Project Smurf

turn the case on its side and fill the res and then once the air is gone and its full turn it back to normal

Cheers mate, I decided that it was simply too big with the hardline tubing as well... Its a shame because I like the larger res but i've now had delivered a replacement inner tube for it so its shrunk down and fits perfectly.

20151217_201831_zps4uvfkhkj.jpg


Notice i've also now got some angled fittings ready to rock, what do you think of that placement?

More bending kit has arrived, this is the Monsoon insert (red) - you can see even in the picture how poorly the Alphacool insert fit the tube. Remeber it was sold as 12mm ID... its not, there is at least a 1mm gap which made it impossible to get perfect bends.

New one is a better fit, not as tight as i'd like but its better:

20151217_202328_zpsg92ypz97.jpg


And finally the white carbon wrap arrived, it looks OK has a slight shine to it so I think it will look good - only concern is that it will look 'too white' in the base so we shall see!

White vs. normal black:

20151217_202704_zpss4qecj1z.jpg


So thats it, i've got tomorrow off work so the plan is to finish up tomorrow with all my tubing etc and then its just customising other non essentials. Wish me luck people!
 
Must say I really like the smaller reservoir positioned next to the RAM, looks very neat & tidy and leaves space for more GPU's :)
Shocking that they're selling inserts that are basically unusable, but glad you've found one that actually fits, want to see the finished Smurf! :D
Not sure on the white carbon being too white, but could you paint match one of the blue components and spray the edges of the drive Smurf blue? Just a (probably crap) idea :p

No all good ideas, maybe someone should tell Crucial to make me nice shiny blue metal labels for my 3 drives :D

I've obviously got limited experience with hardline bending but I'm surprised the inserts aren't sold a few mm over to sand to fit (given tighter is better). Looking forward to getting this over the line so hopefully loads of progress tomorrow.
 
Are you sure you bought the correct silicone insert? Alphacool do 2 sizes because they sell 3/8" and 1/2" ID hardline.

Still, you have the Monsoon kit now so fingers-crossed you'll enjoy the bends a lot more.

Yep, took me a while to track some down and it was defo the right size... Maybe I got a dud or maybe the actual insert was mixed up supplier side but either way much swearing was involved :)

Tomorrow i'm going to organise my mess of kit, make a big pot of coffee and get stuck in. Good times.
 
Wow, some great progress being made dude! The blue / white colour scheme looks really nice, especially the gpu block. Look forward to more pics!

I know right, someone needs to just give me another card already so I can have two :D
 
the angled fittings look nice but i would have gone with white bitspower ones to match the theme just to be critical :D

Actually feel the same I didnt use the black ones (where visible) in the end, the chrome looks pretty tasty.

Almost there, few runs i'm not happy about but soooo close...
 
Are you ready for MAJOR updates? :)

So today has been fiddly, tiring but also fun... Thanks to Monsoon bending was a much better experience, I think the bends went pretty well (there is one I might consider copying tomorrow). So i've got a load of snaps from todays work, apologies they are of the tubes still dirty and dusty from bending/cutting down for the most part but you get the drift.

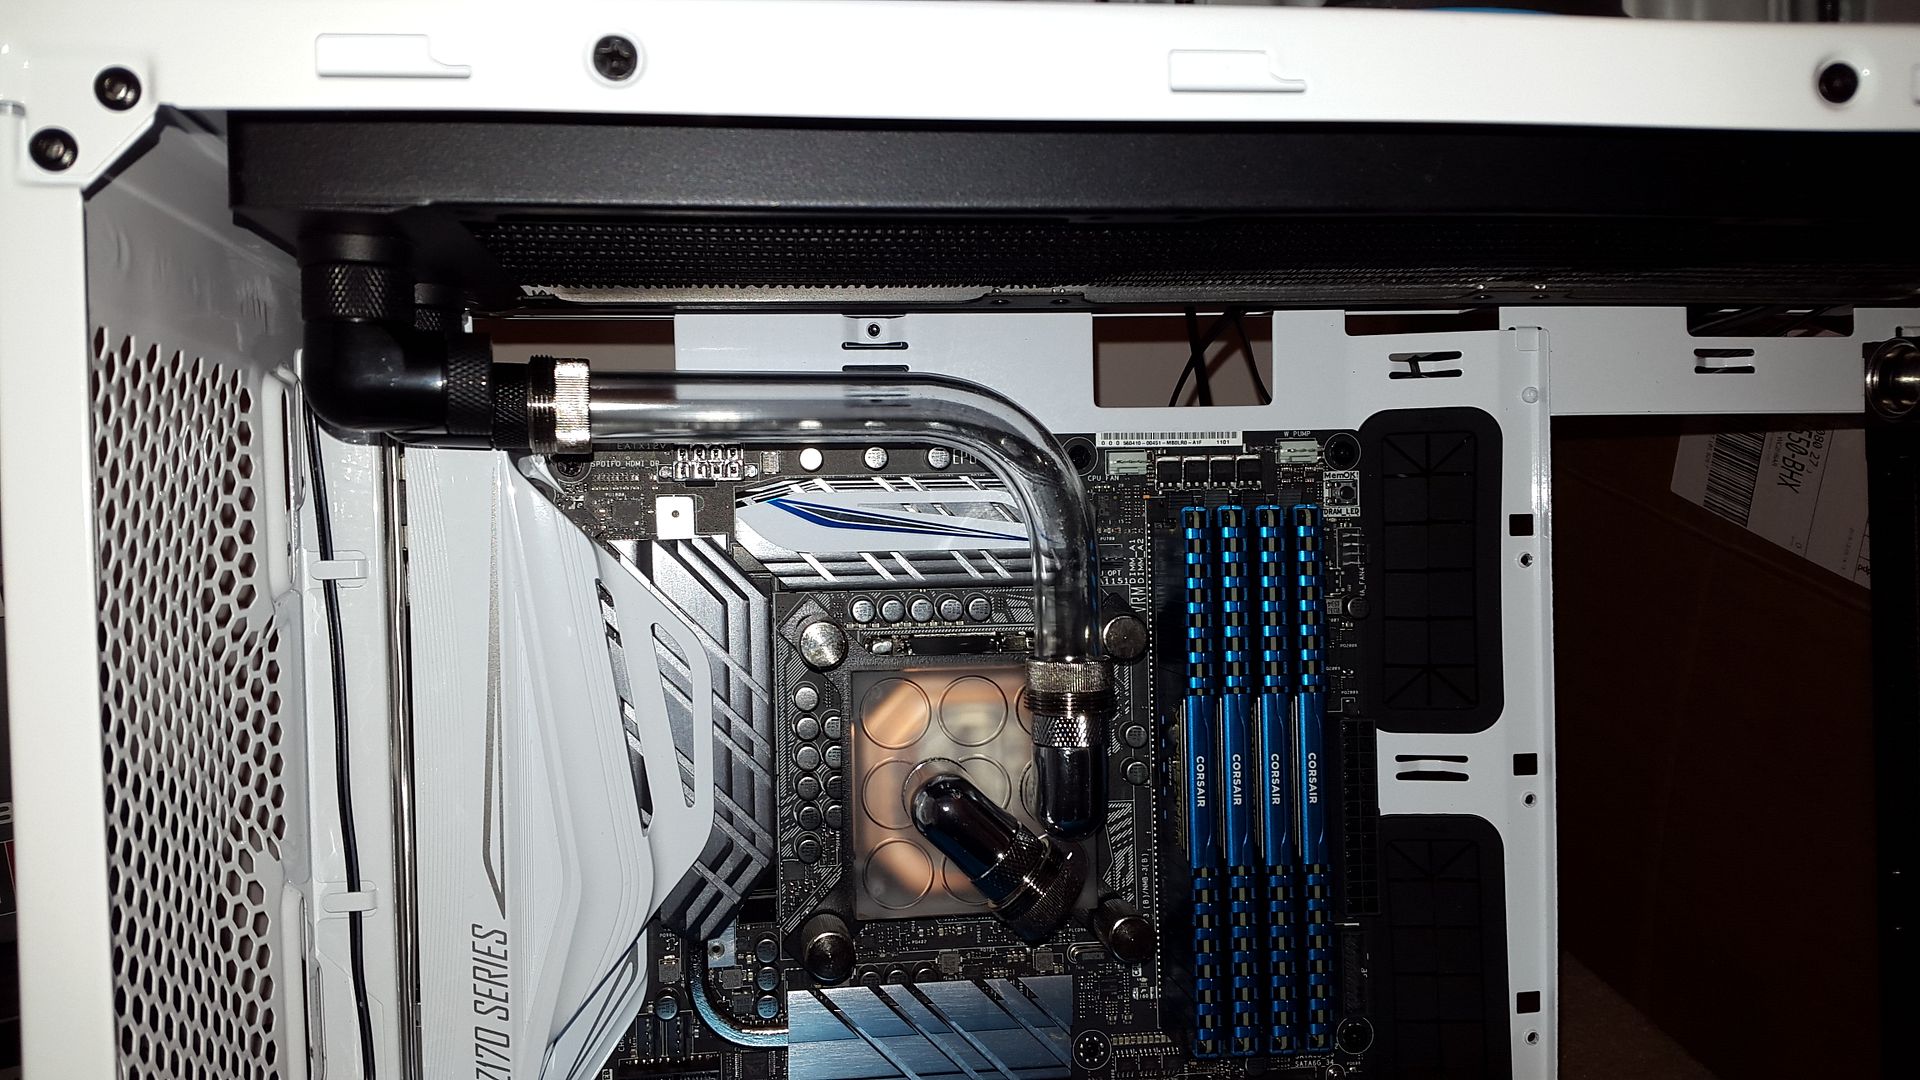
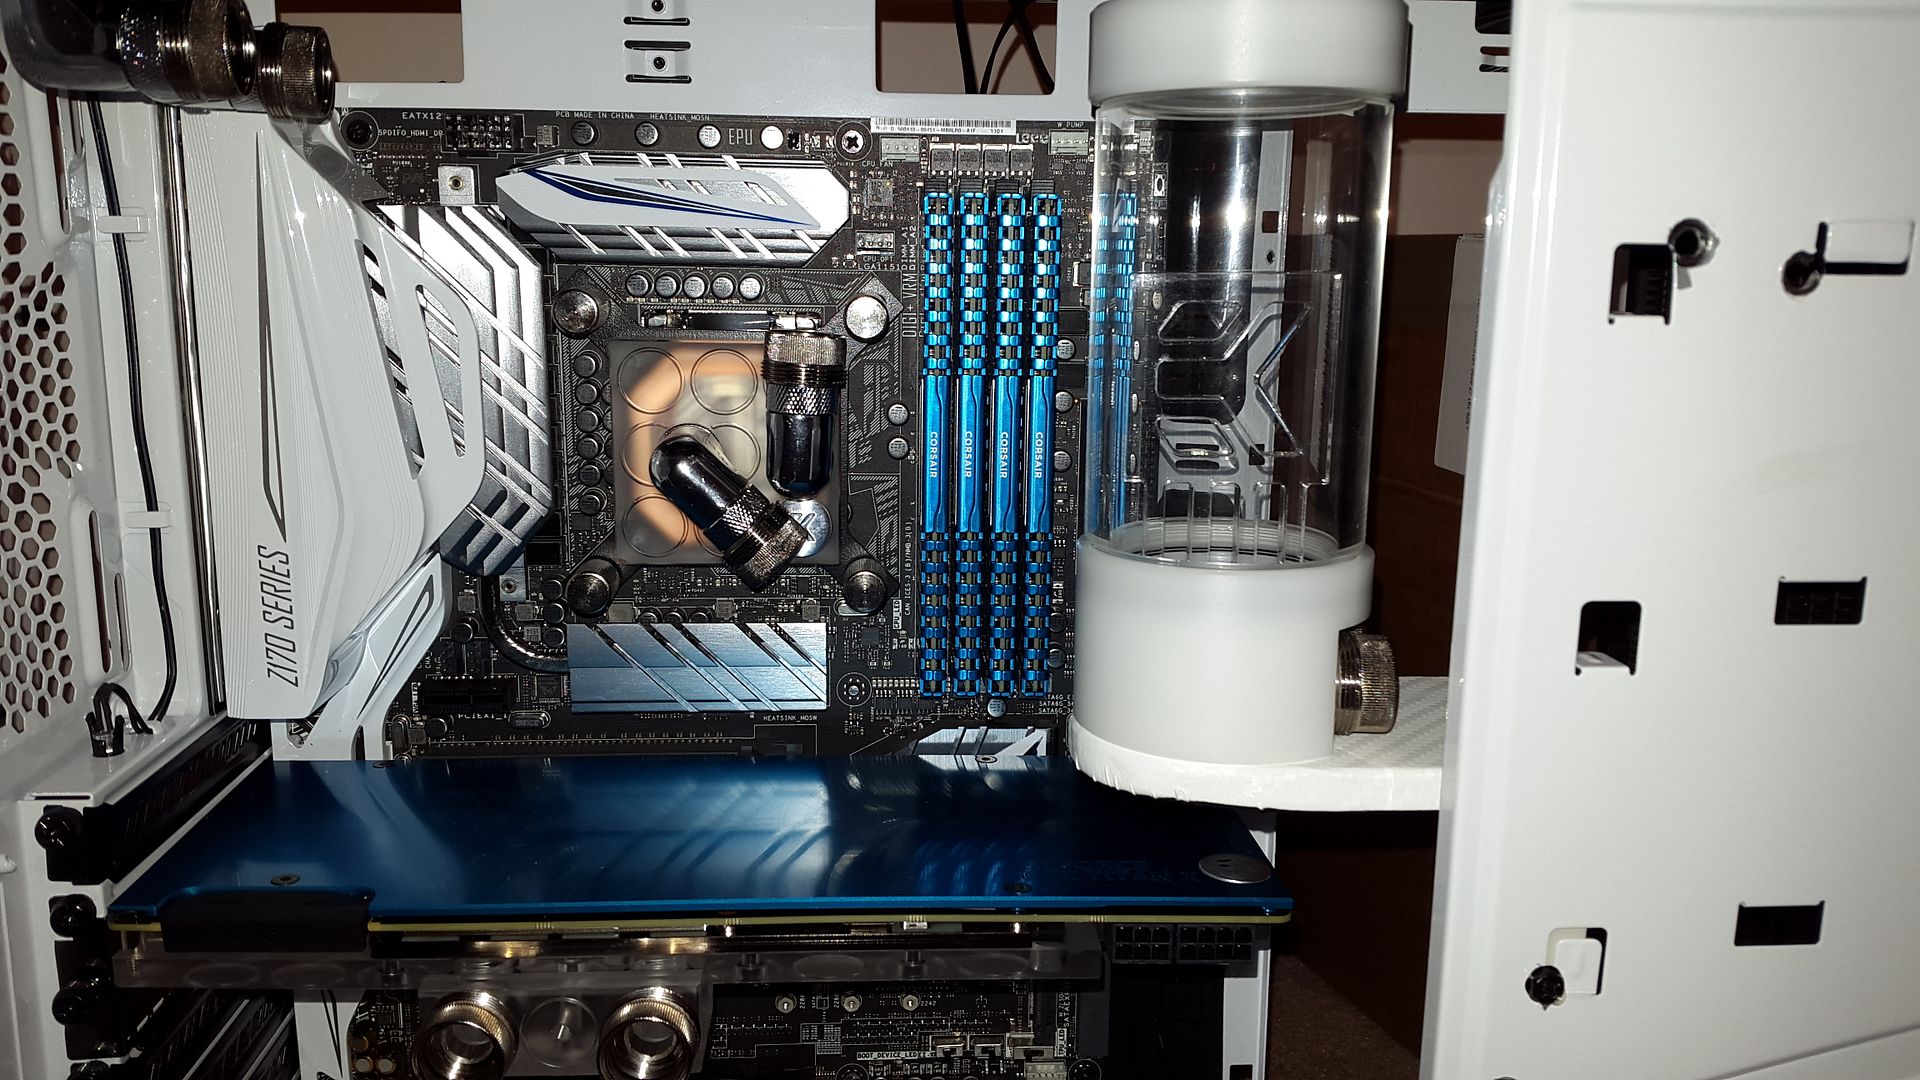
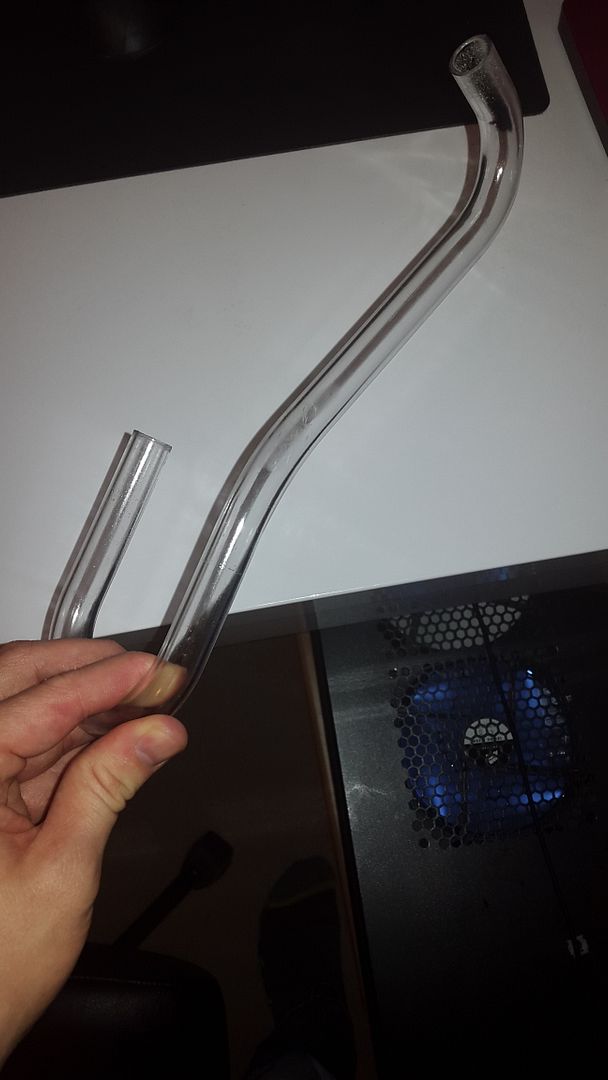
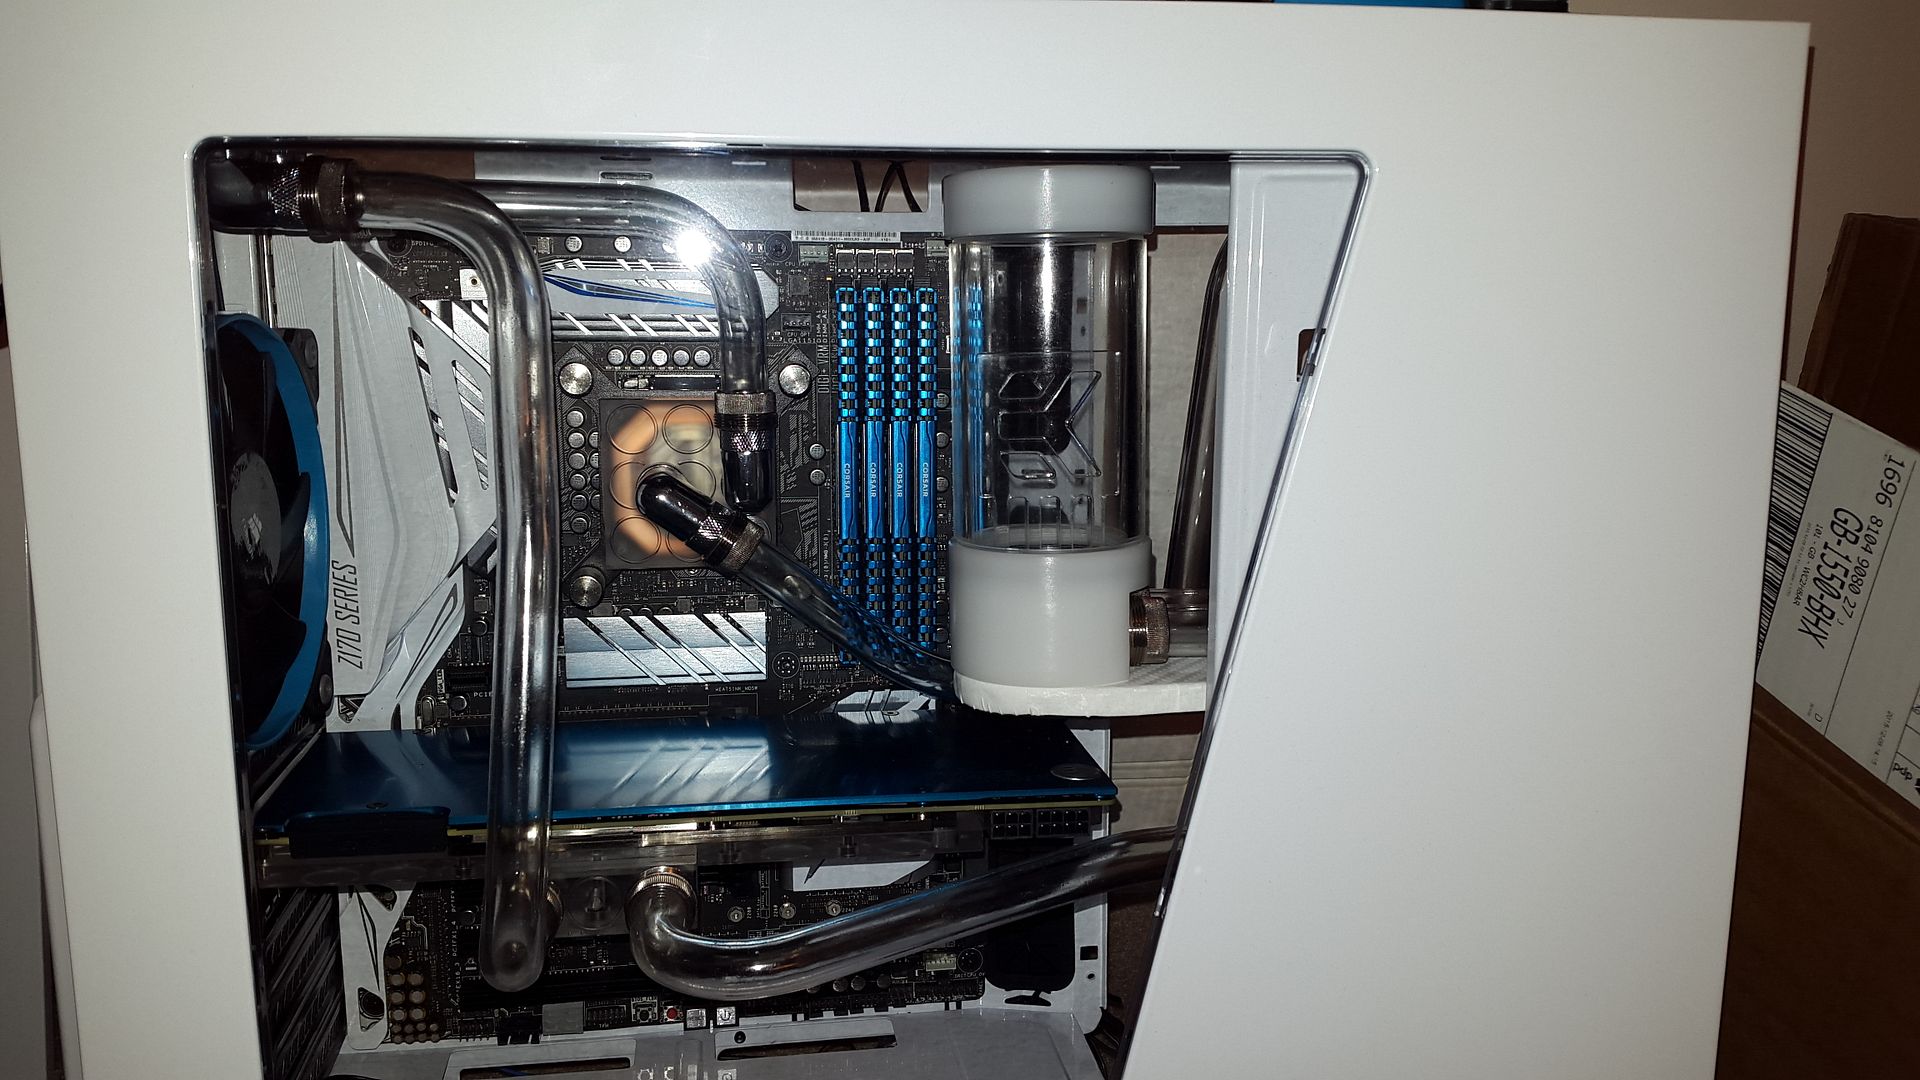
Started with a few simple bends but quickly realised I needed to get the tricky bits in before. This one is pretty close to the RAM (finger gap) so I hope its fine there?

20151218_132701_zpsoglclkta.jpg


20151218_132642_zpskhw12ajj.jpg


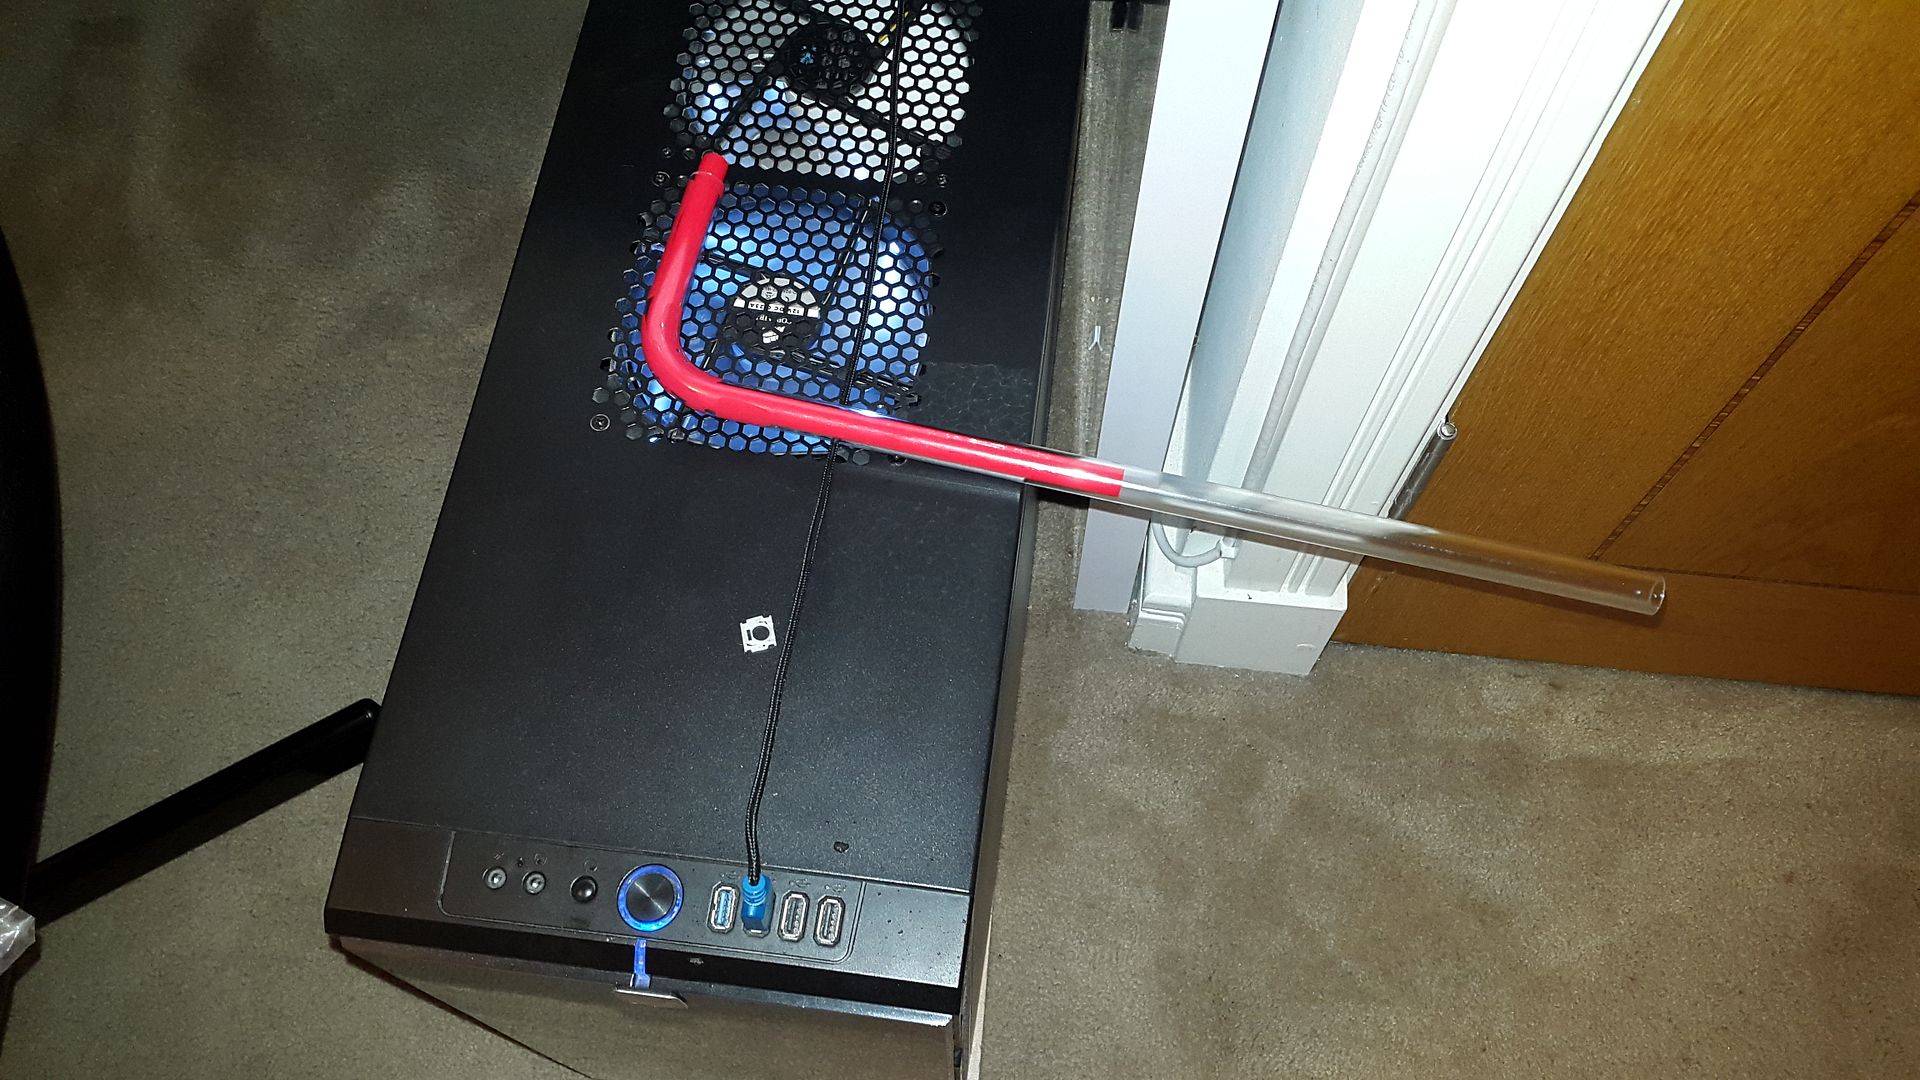
By the way I used my professional cooling station to cool off the bends... Jokes. Actually this is a really good way of doing it, because of my black case and the fans LED you can easily fine tune the shape of the bend while it cools.

20151218_133147_zpsohhoppmq.jpg


Treated myself to a nice easy bend here:

20151218_134518_zpslepywbh5.jpg


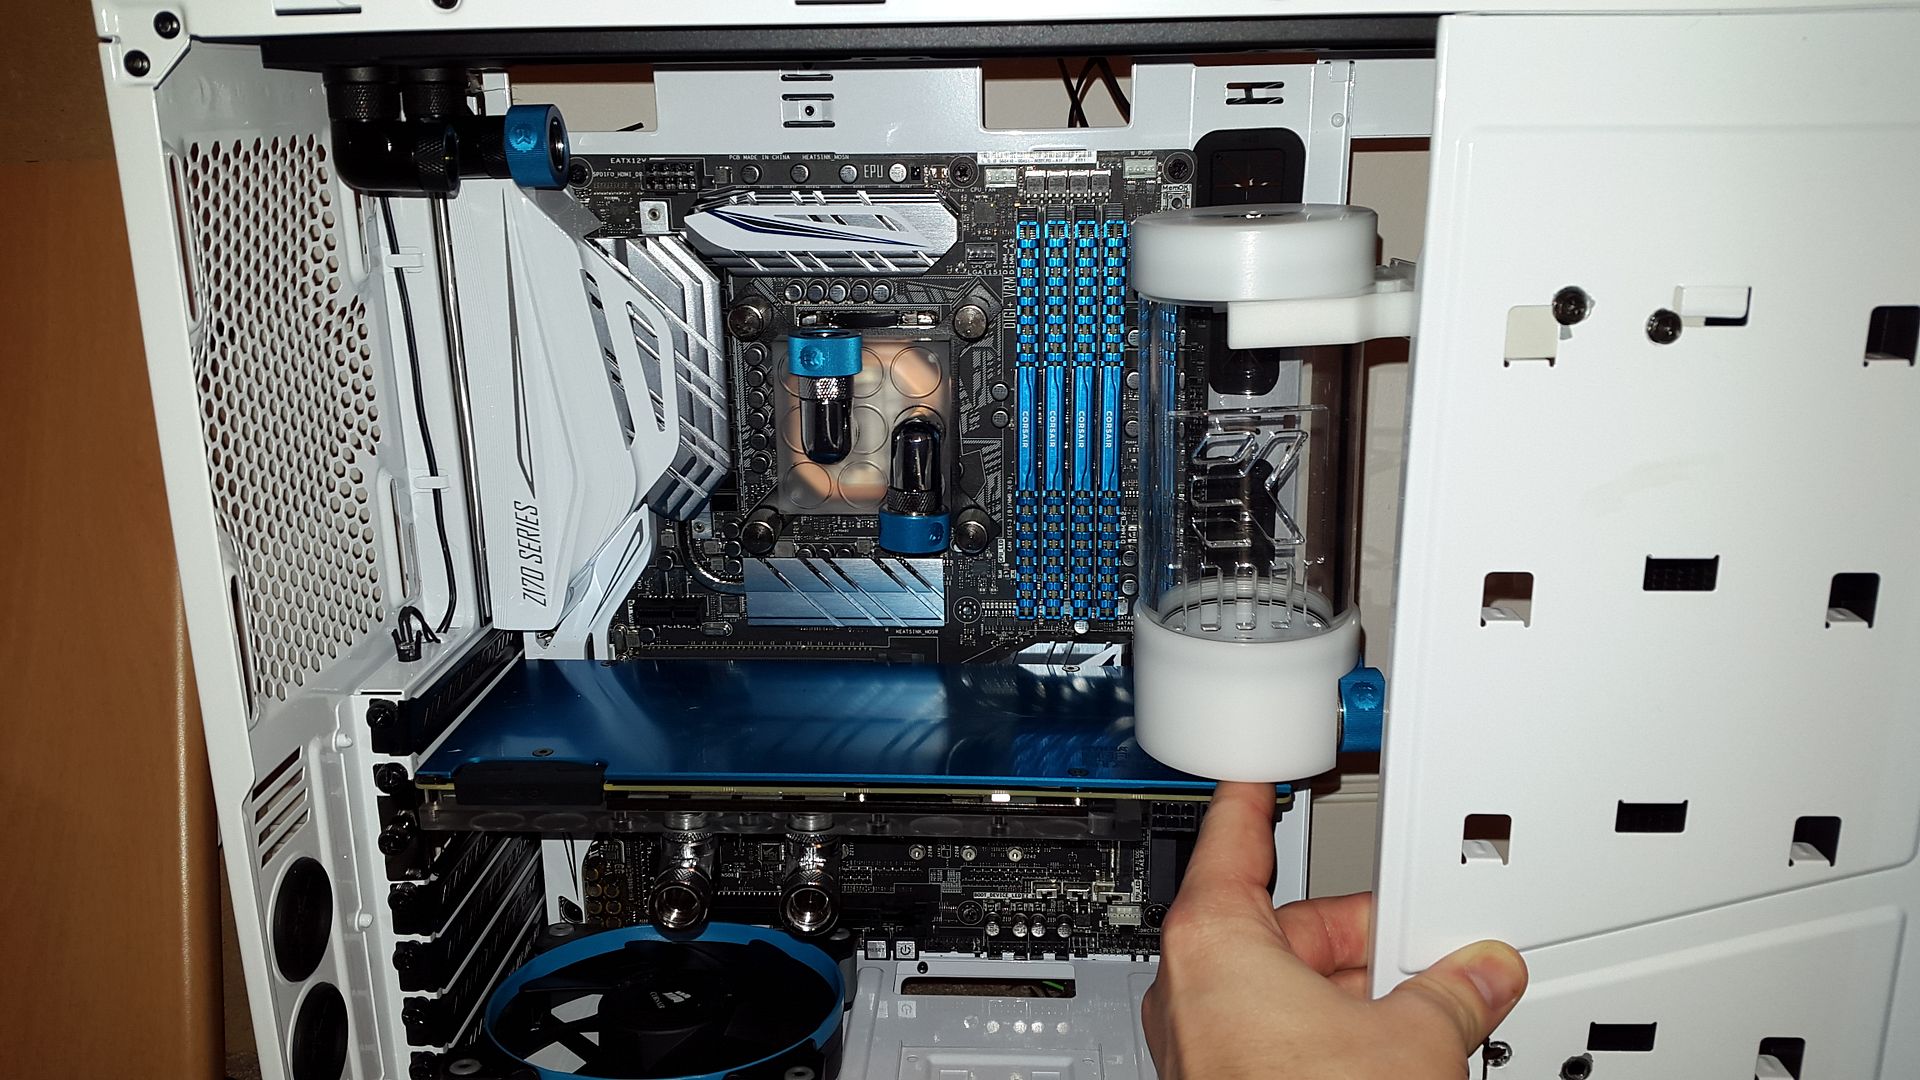
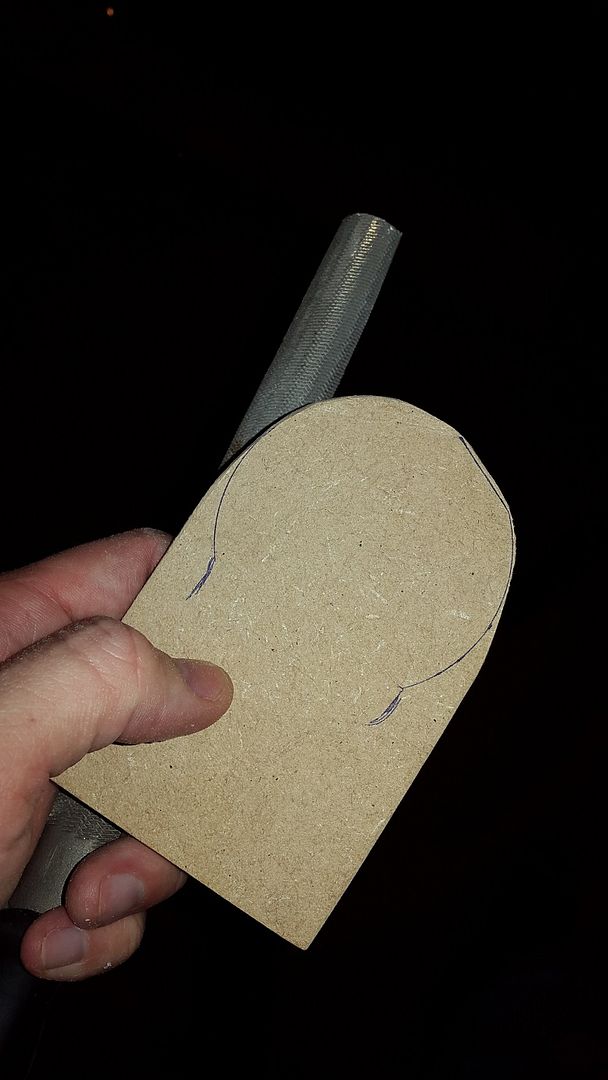
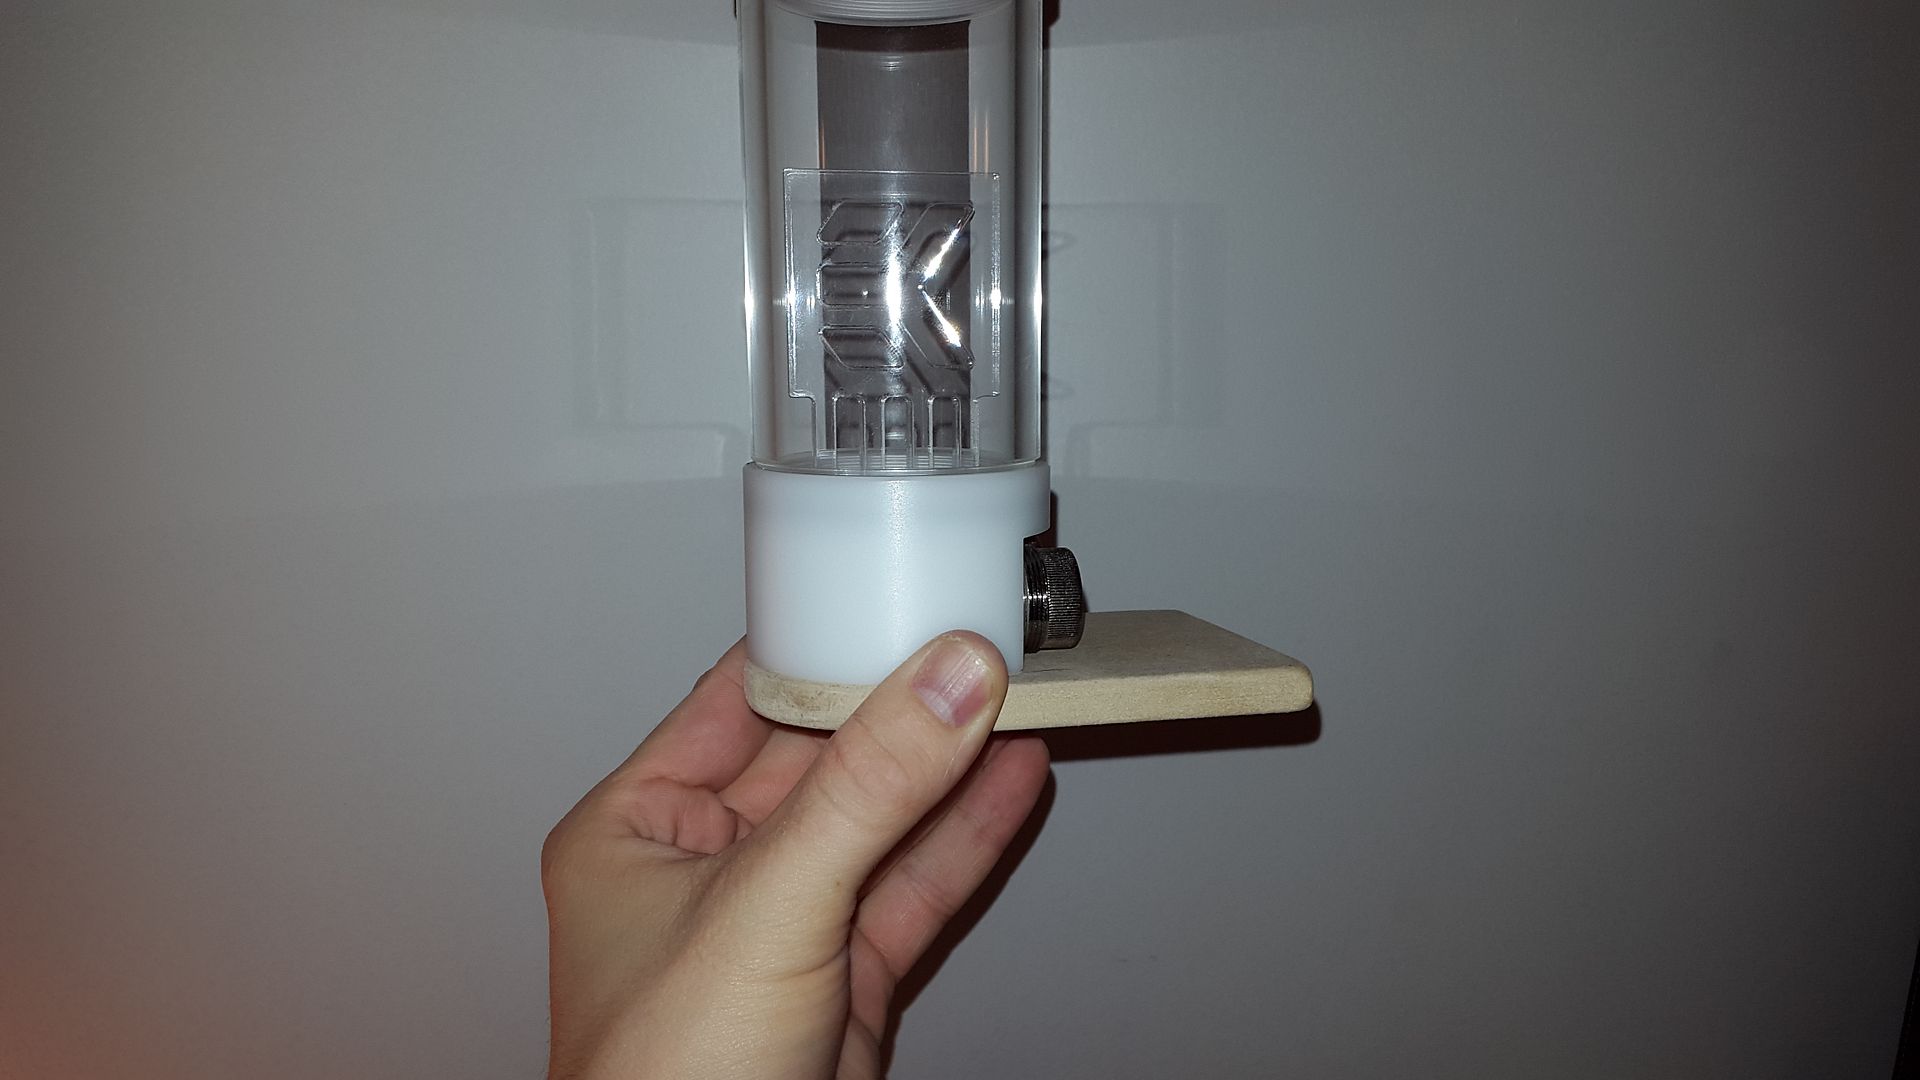
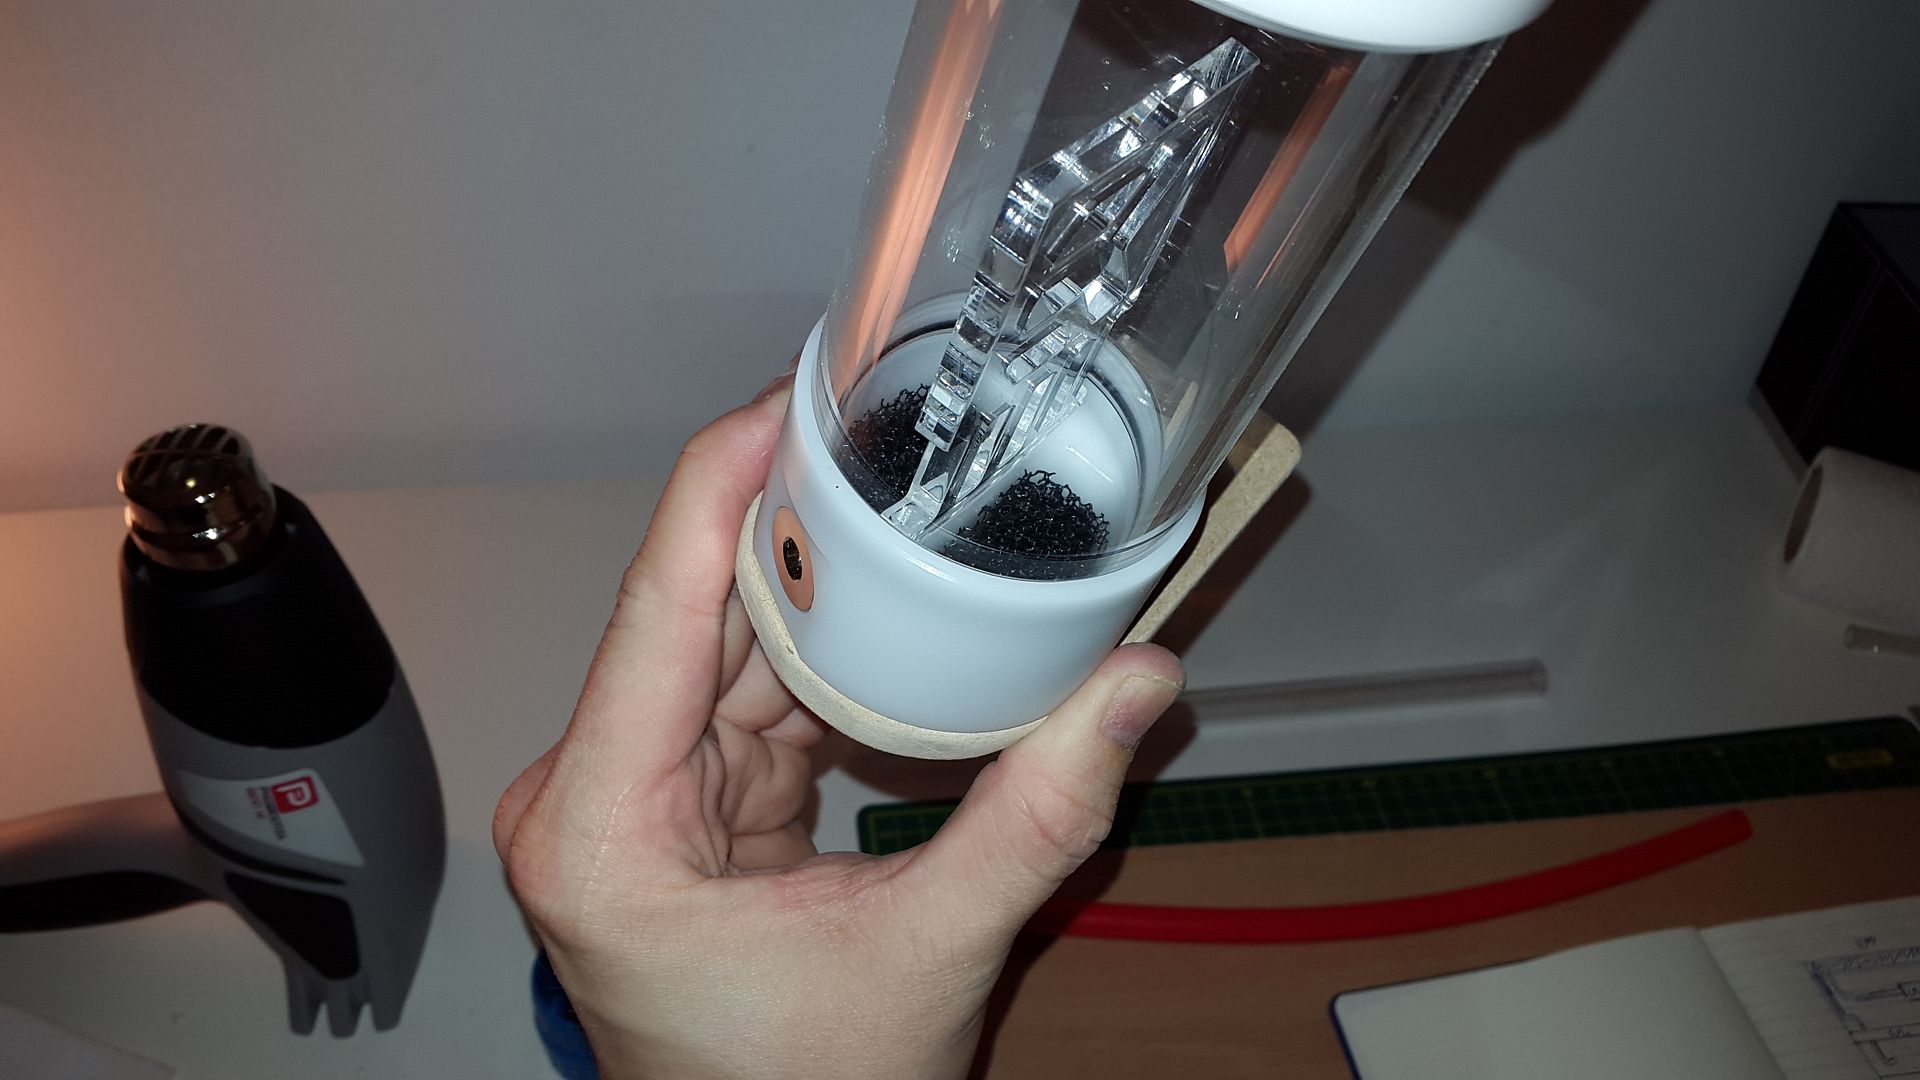
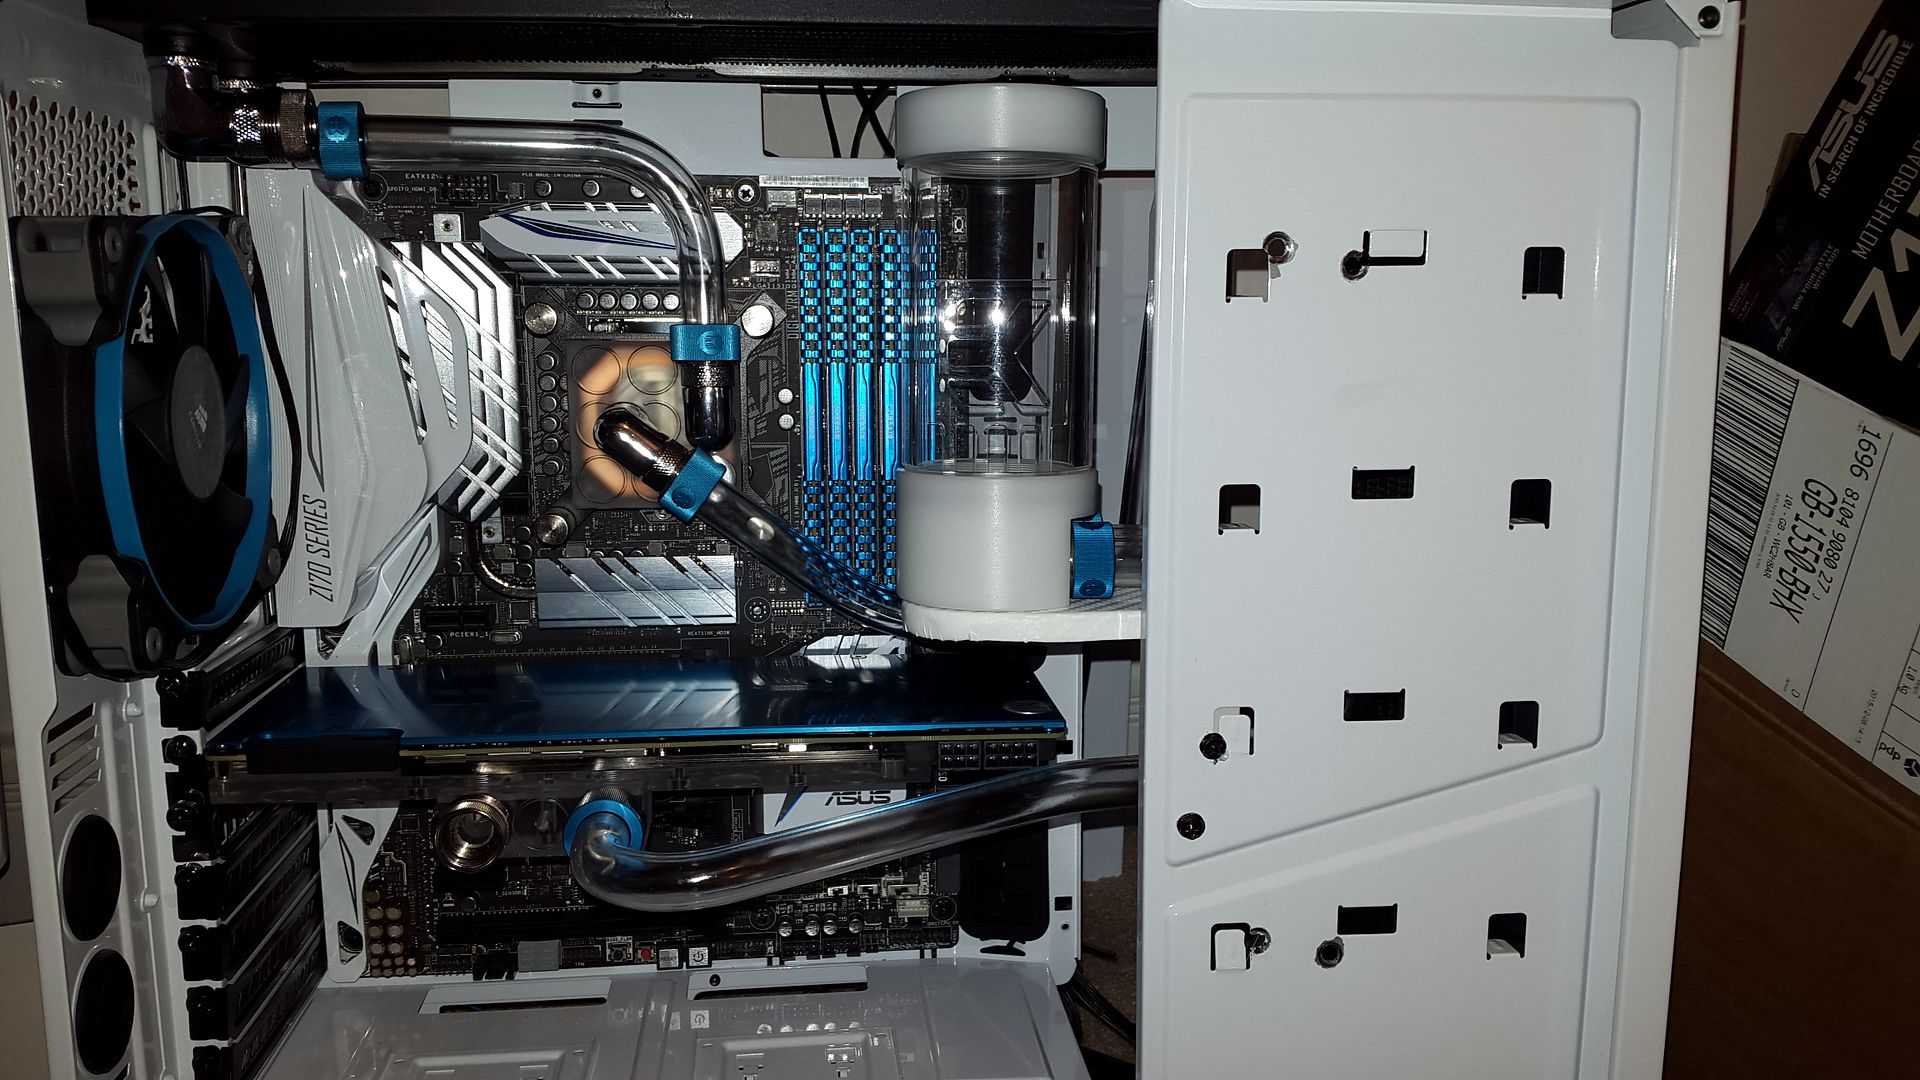
So while I was thinking I need to get the res in and make sure I can route that ok I just could not stand that **** white mount you get with the res. No offence to EK but 1. Its not the same white as the res, 2. In my fussy opinion it looks really cheap. So I decided to crack on a make a small stand for it:

Cut a small piece of MDF:
20151218_153158_zpsnfij0e63.jpg


Refined the shape to fit the res well:

20151218_153815_zpsxzy4txk0.jpg

20151218_153822_zpsq1kdib7f.jpg


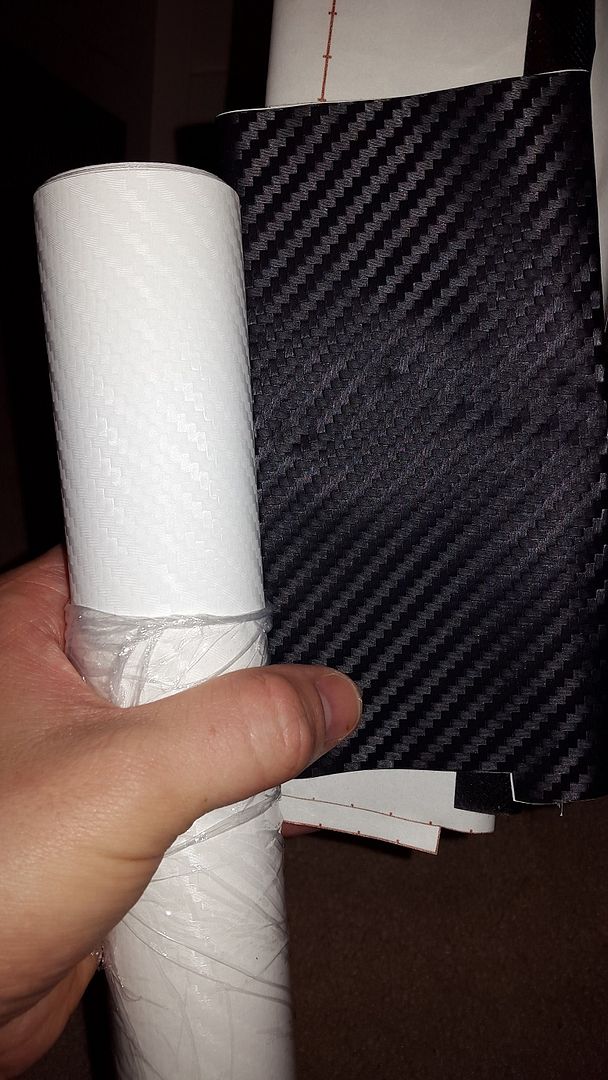
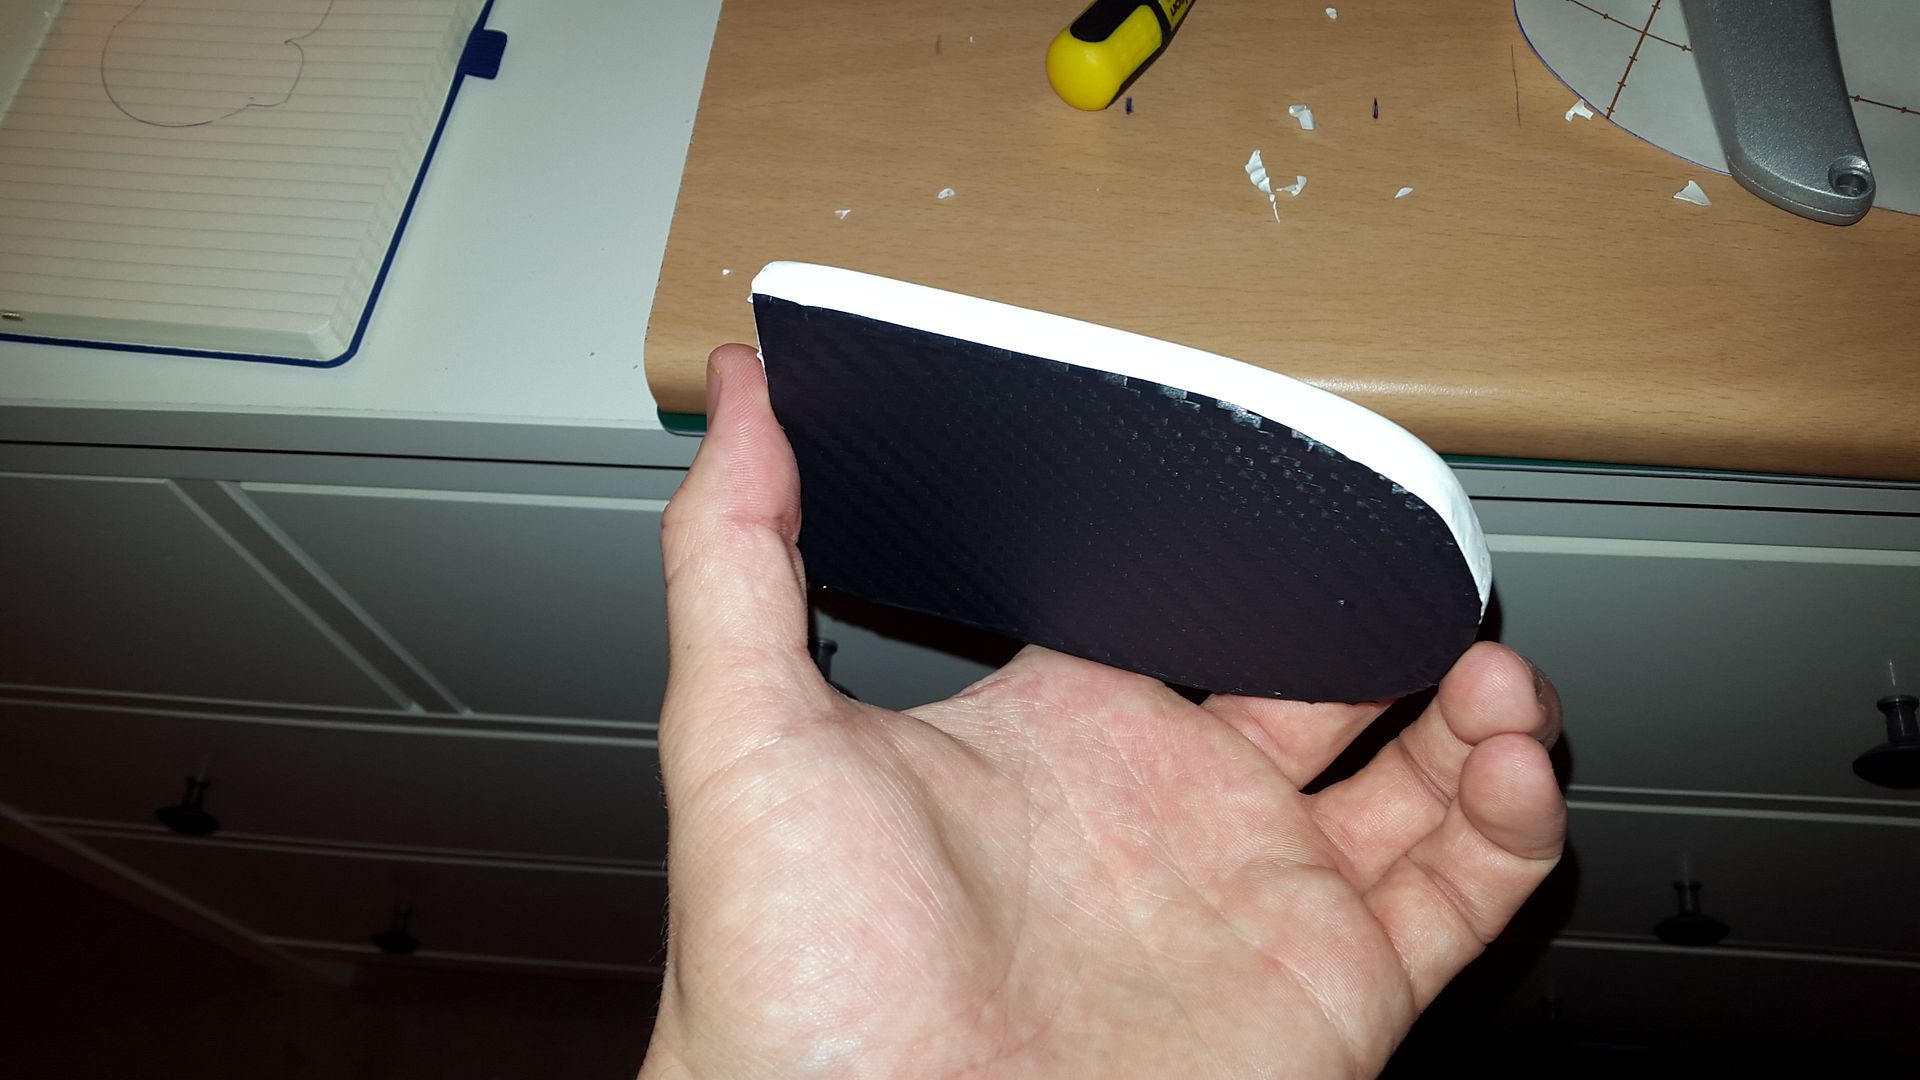
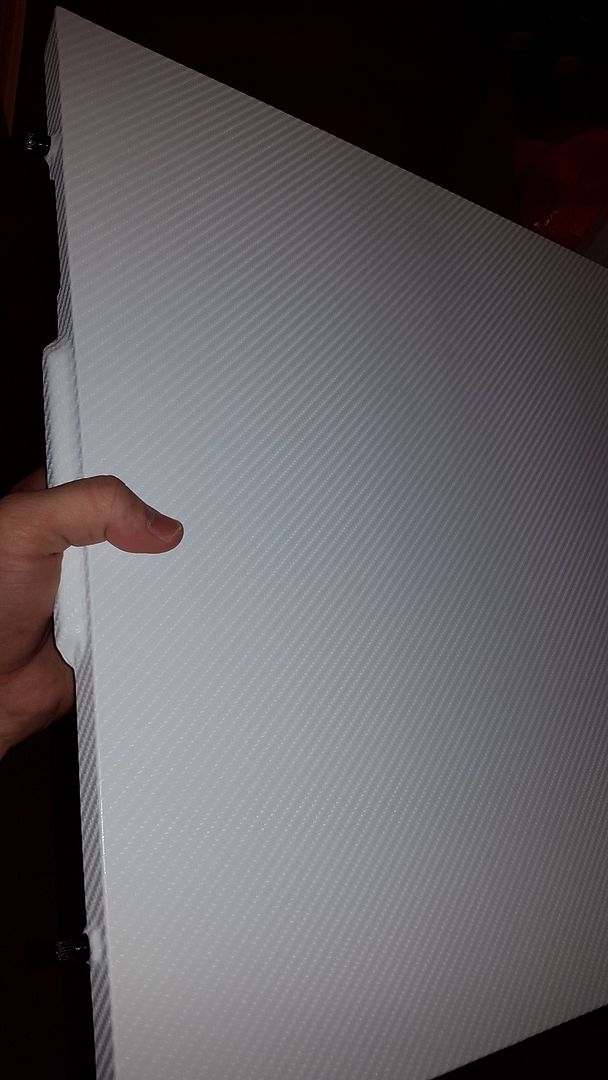
Thought about painting it white. Realised I have no white paint... Remebered I have new white carbon wrap...

20151218_153822_zpsq1kdib7f.jpg


Went with a black underside, not perfect but its much better looking and less intrusive than the side clamp crap you get with it:

20151218_160451_zpsjfiedtsp.jpg


Mounted in the case where the bracket would be for the EK clamps, what do you think - better or worse? Now its tubed in it doesnt move but i'll probably put some strong sticky pads under it just in case.
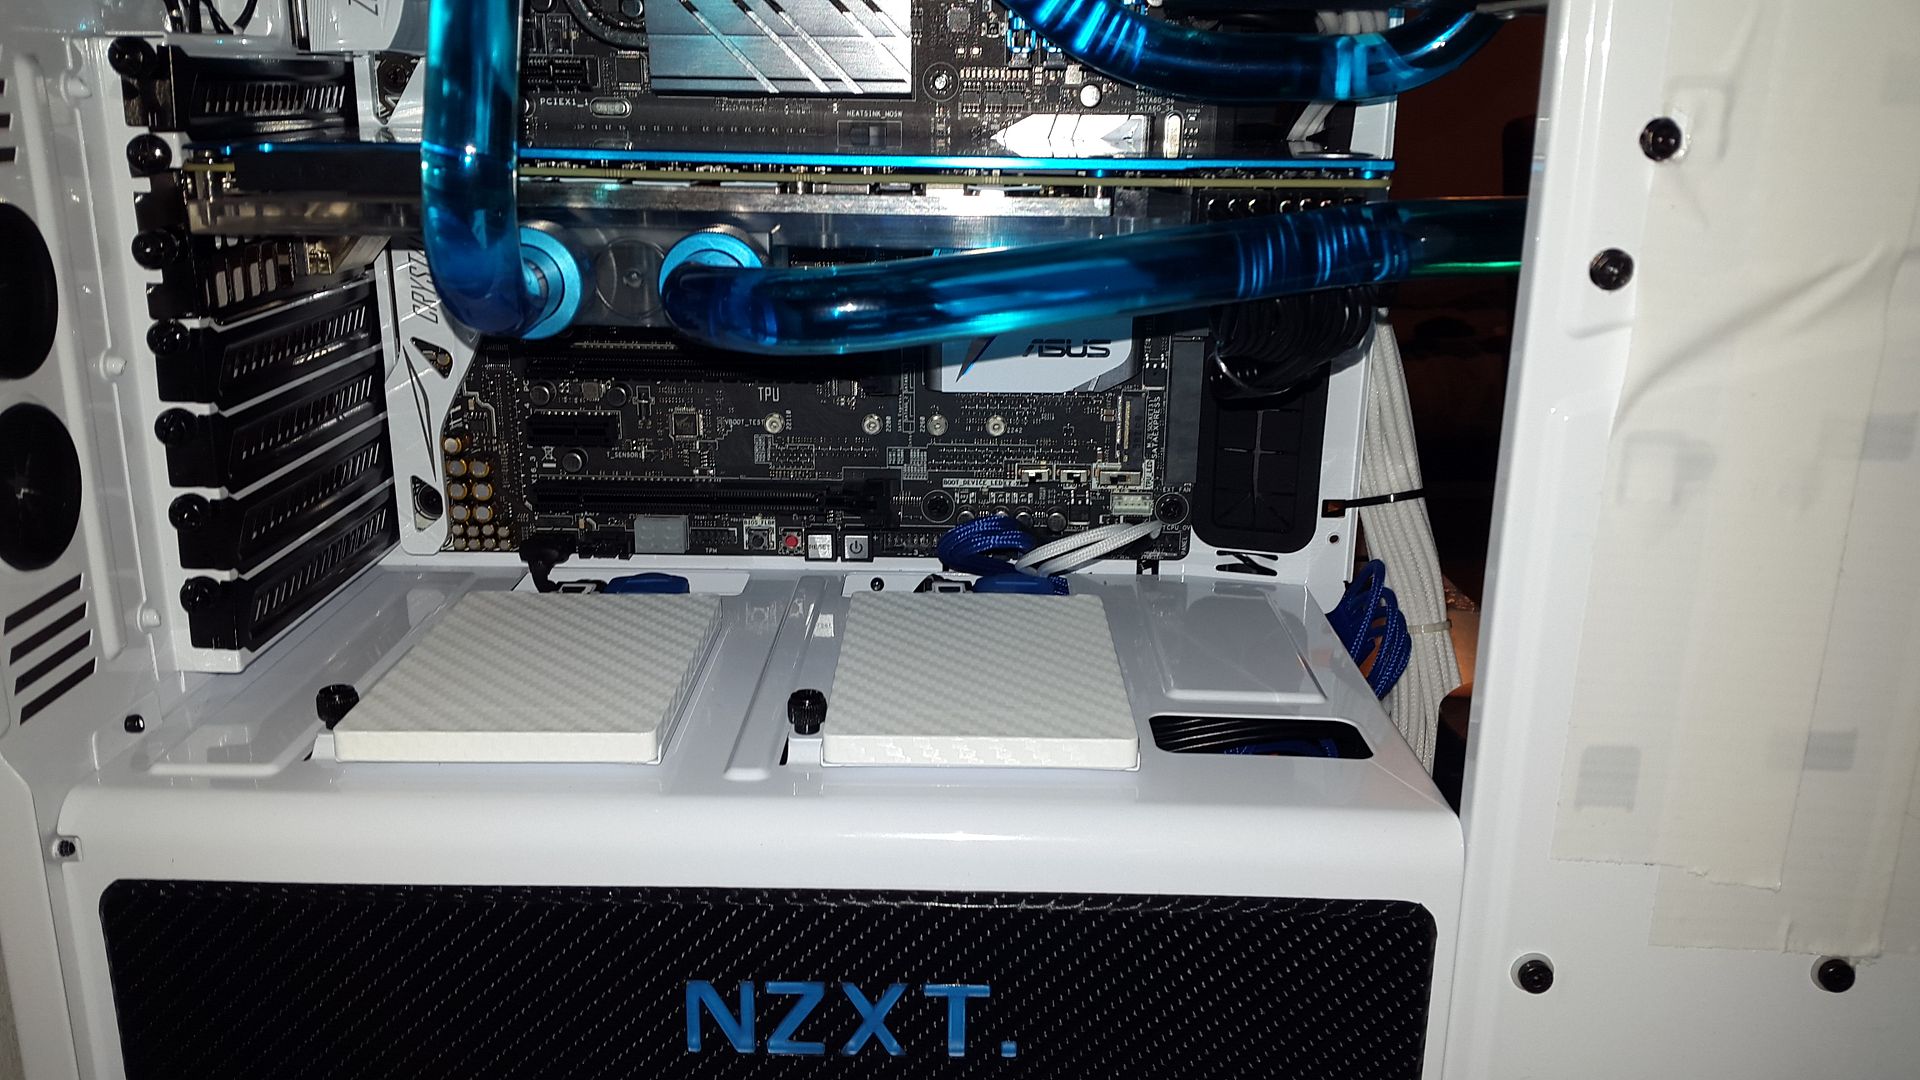
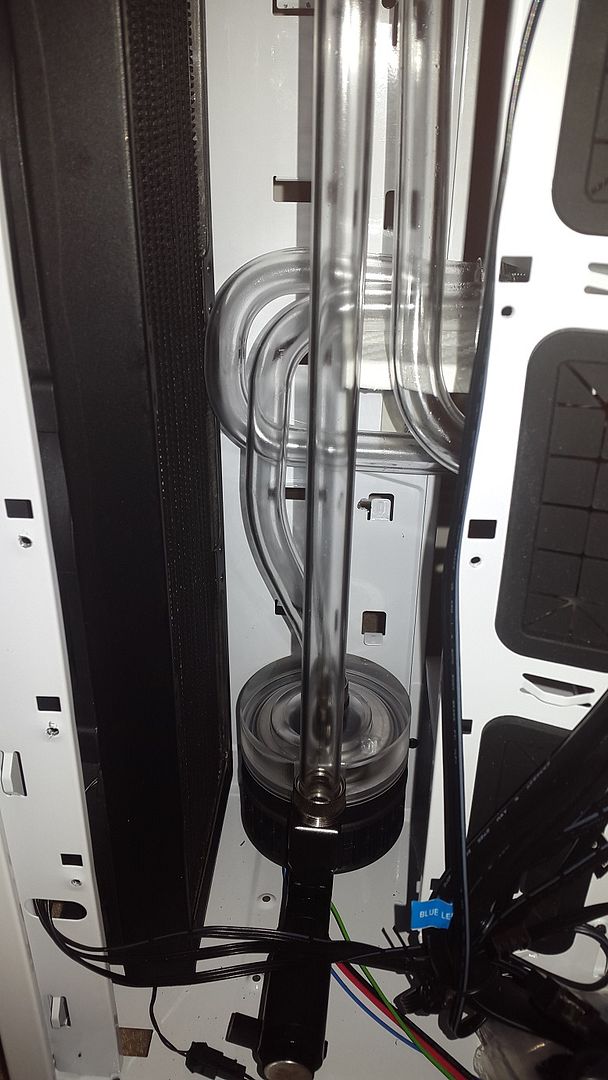
20151218_163618_zpsokmbbxhs.jpg


Plumbing it in:

20151218_165734_zpsam0gyj8m.jpg


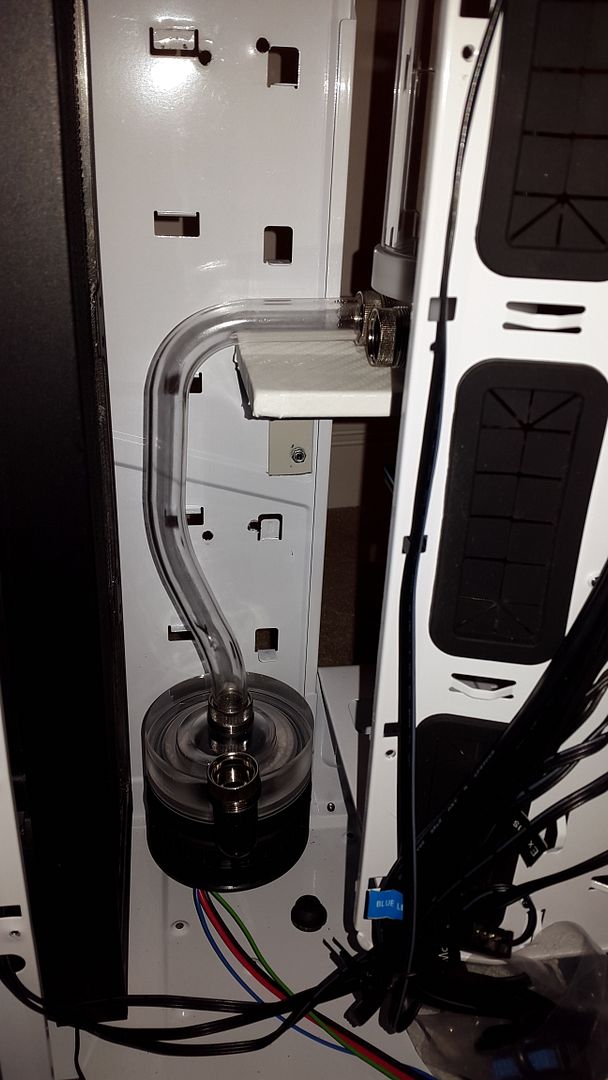
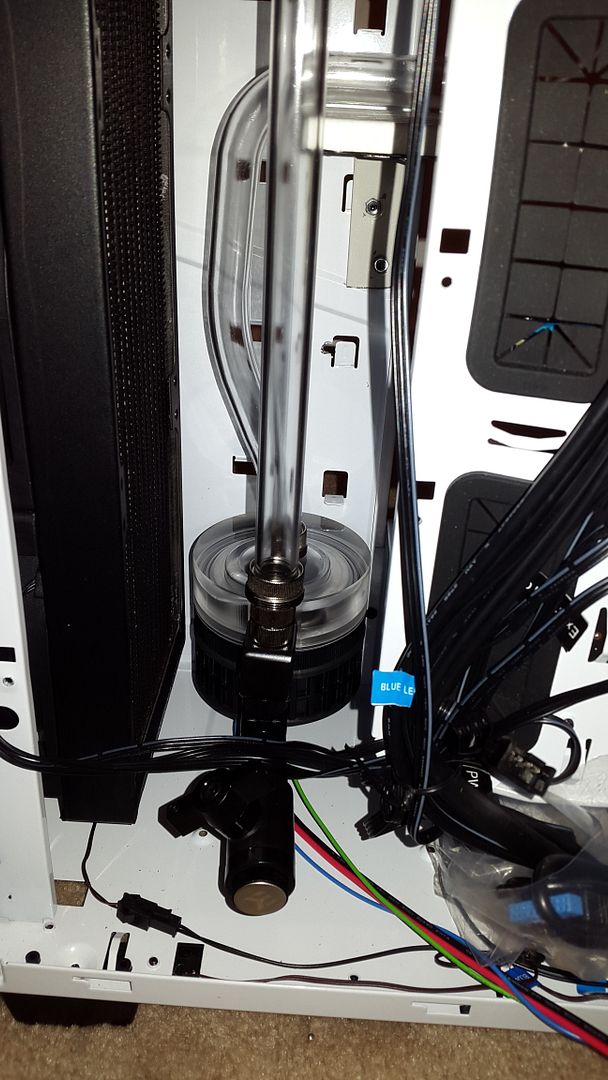
Remembering I didnt put the ***king drain valve in so had to remake a few tubes while I moved things around, ended up good though - it swivels on the 90 degree fitting so should be easy to drain.

20151218_172020_zpsqzolyyyv.jpg


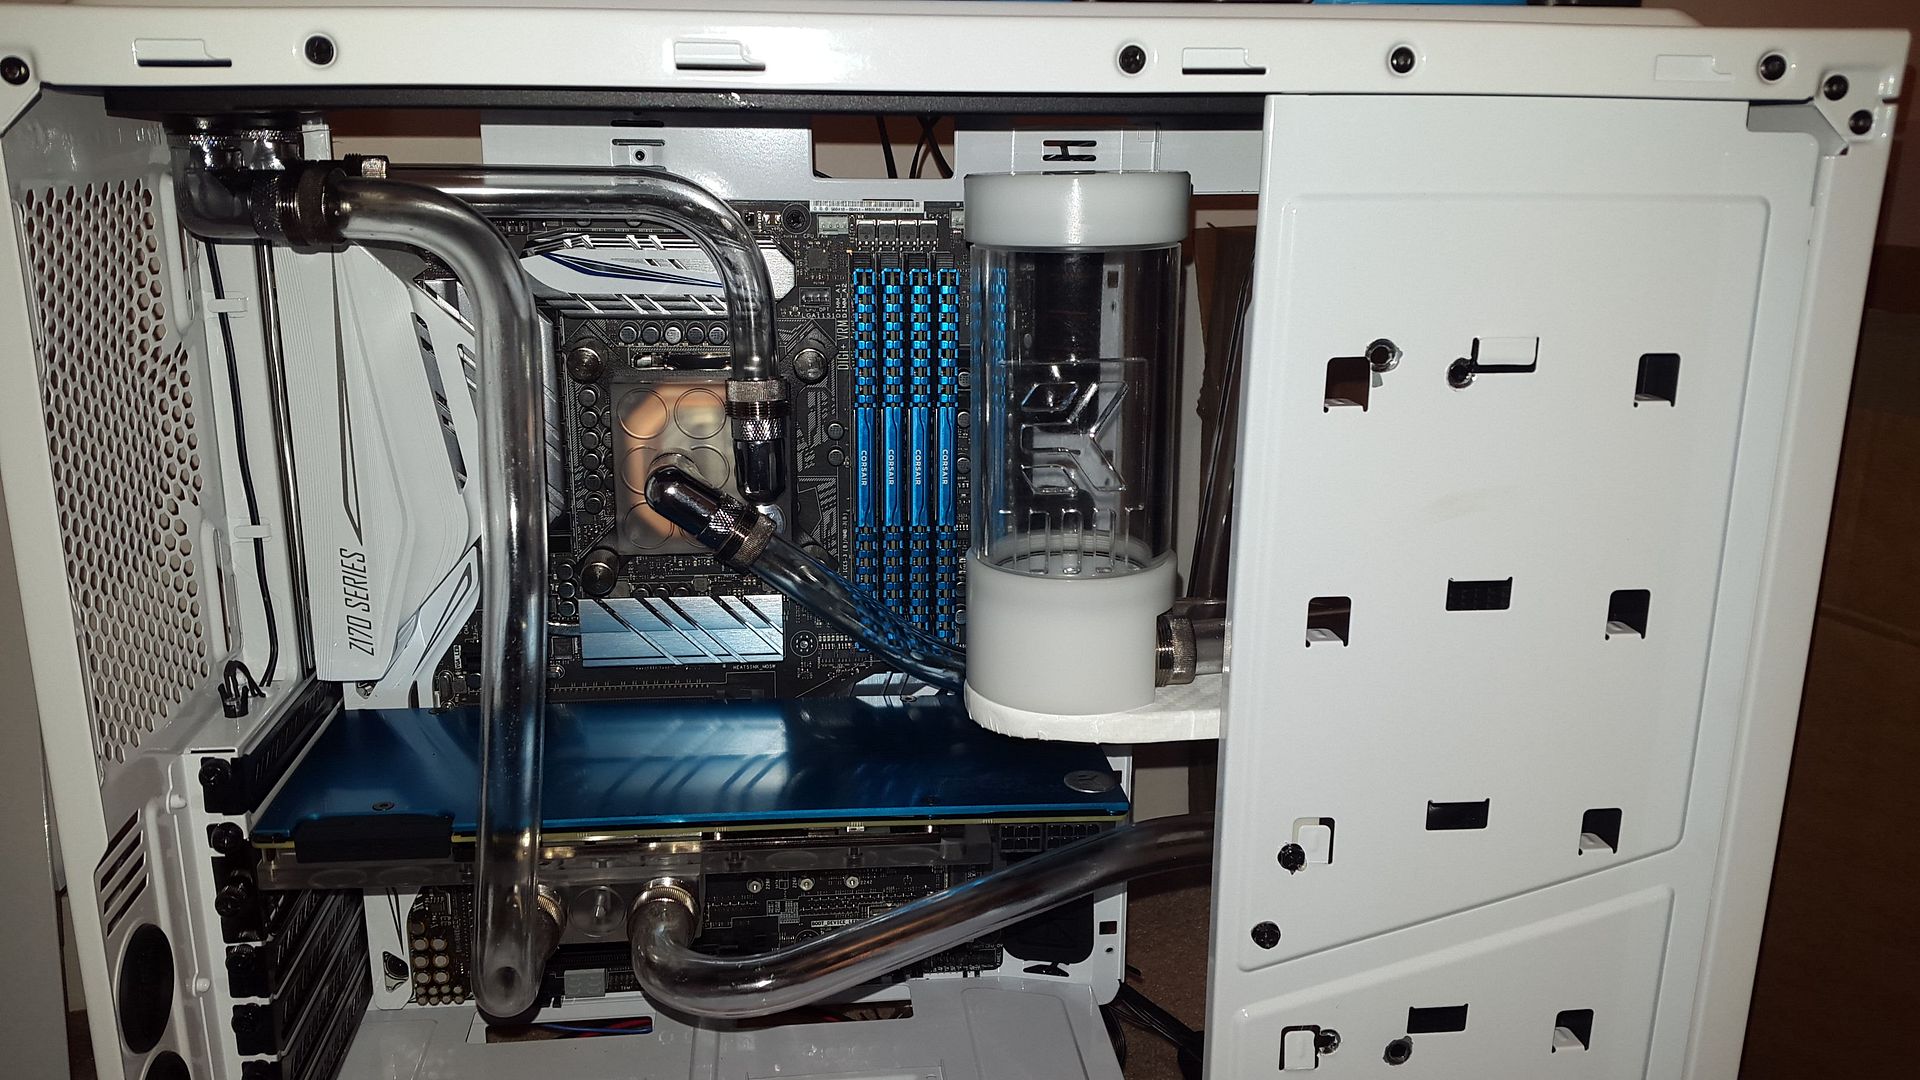
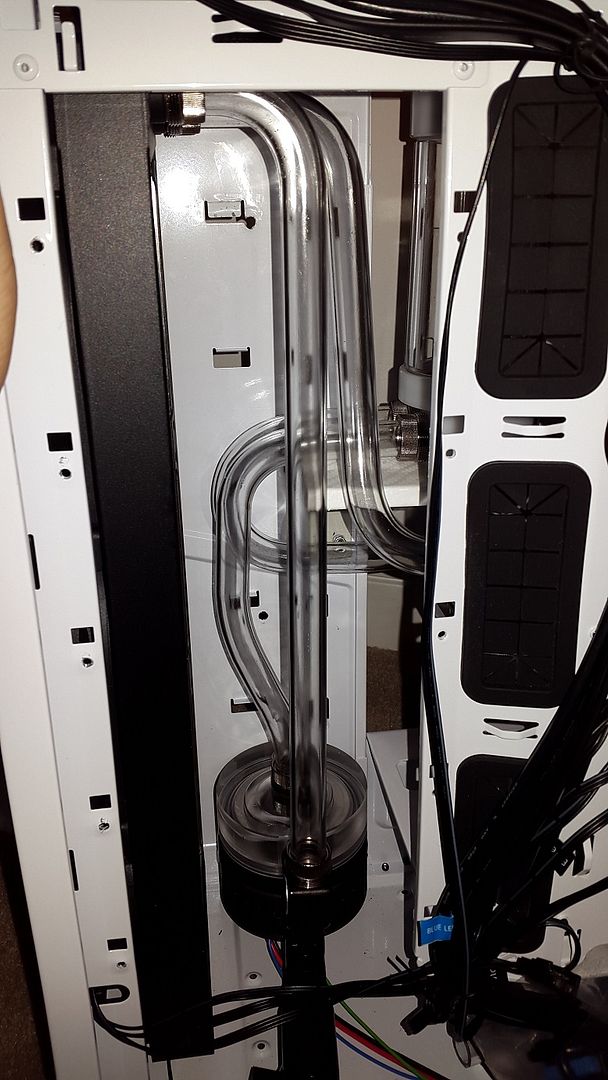
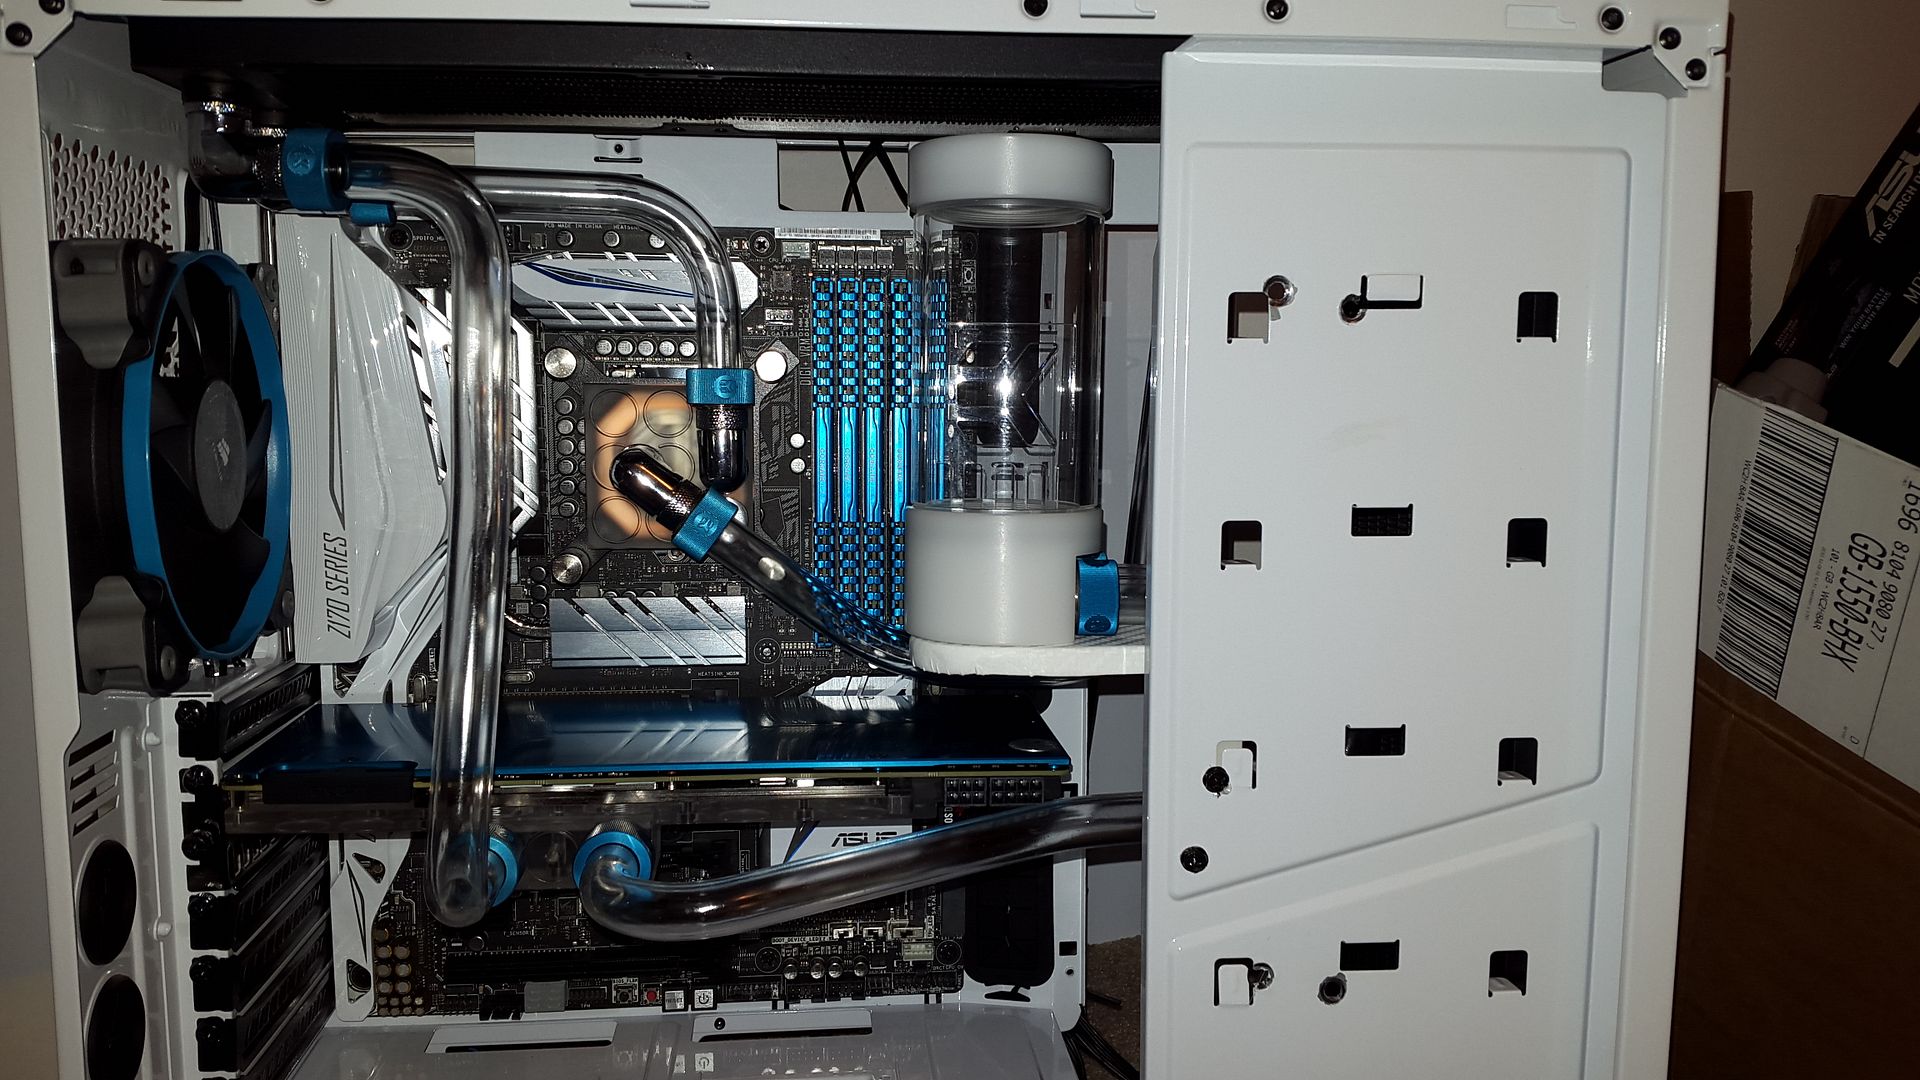
Many awkward bends later some of the really tricky shapes were in and I was finally nearing completion. Trust me these took some effort :)

IMG-20151218-WA0001_zpsjq3otvuu.jpeg


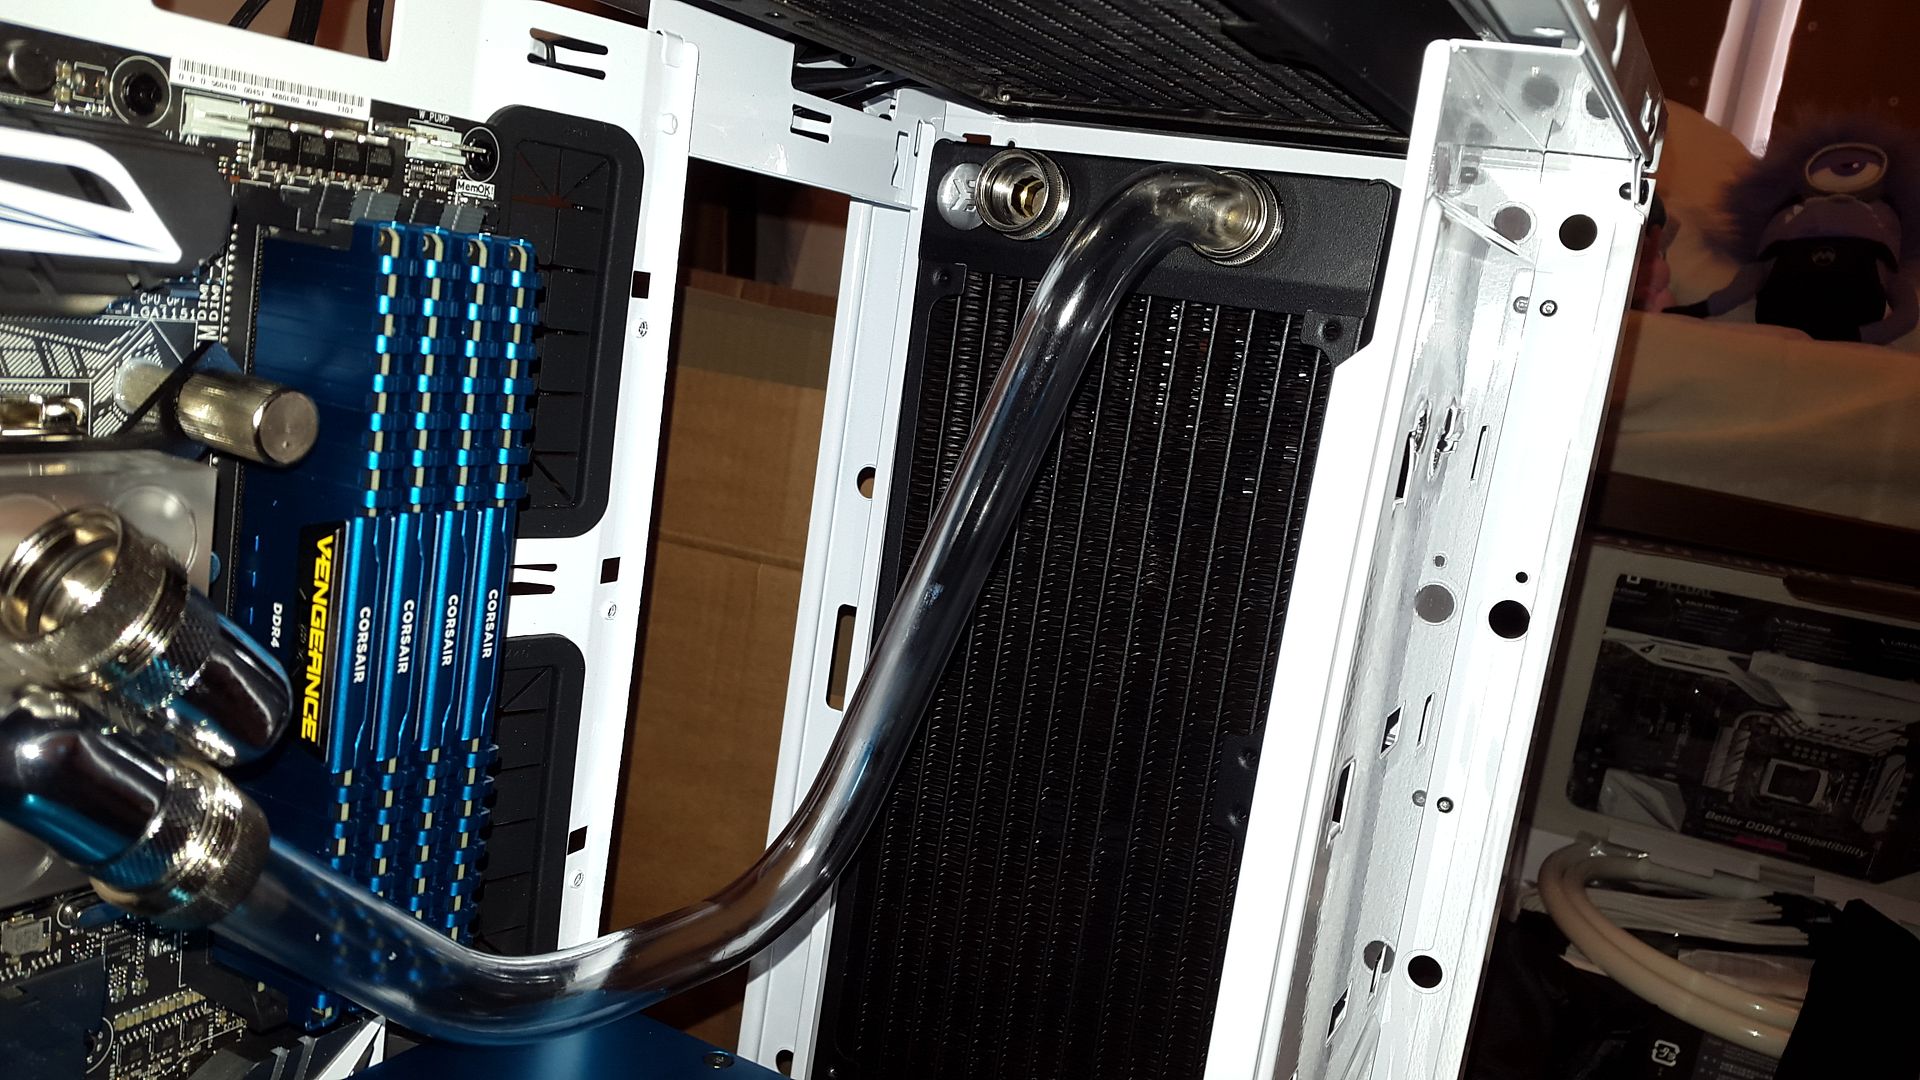
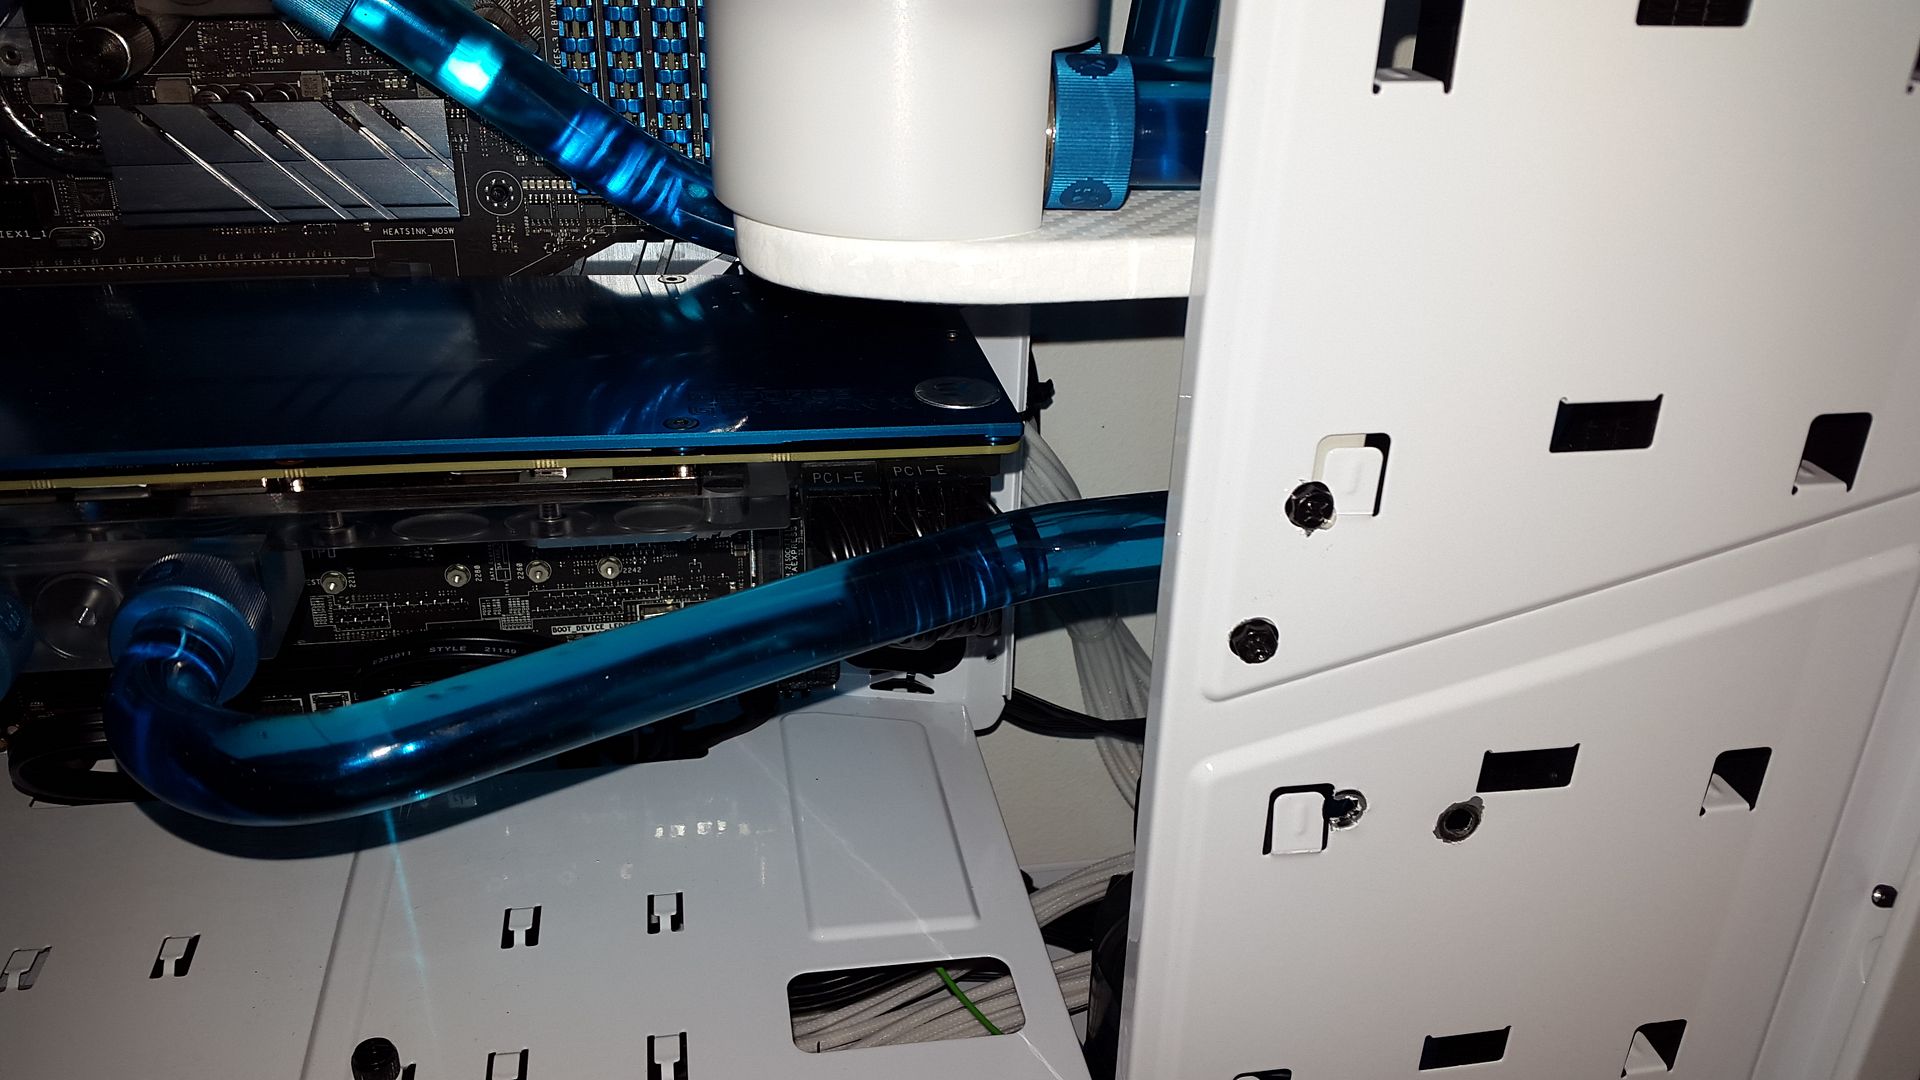
Then I check the back and... Oh, touching the rad. Not happy but not defeated, I also remade the tube to the pump AGAIN to remove the spacers I cheated with earlier.

20151218_190834_zpsvhhkqefu.jpg


Fairly typical that it was one of the most technical bends in the rig, needed so very careful reshaping to bring the bend in.

20151218_190943_zpswuapangz.jpg


Winning... It fits nicely.

20151218_193047_zpsz4610mbw.jpg


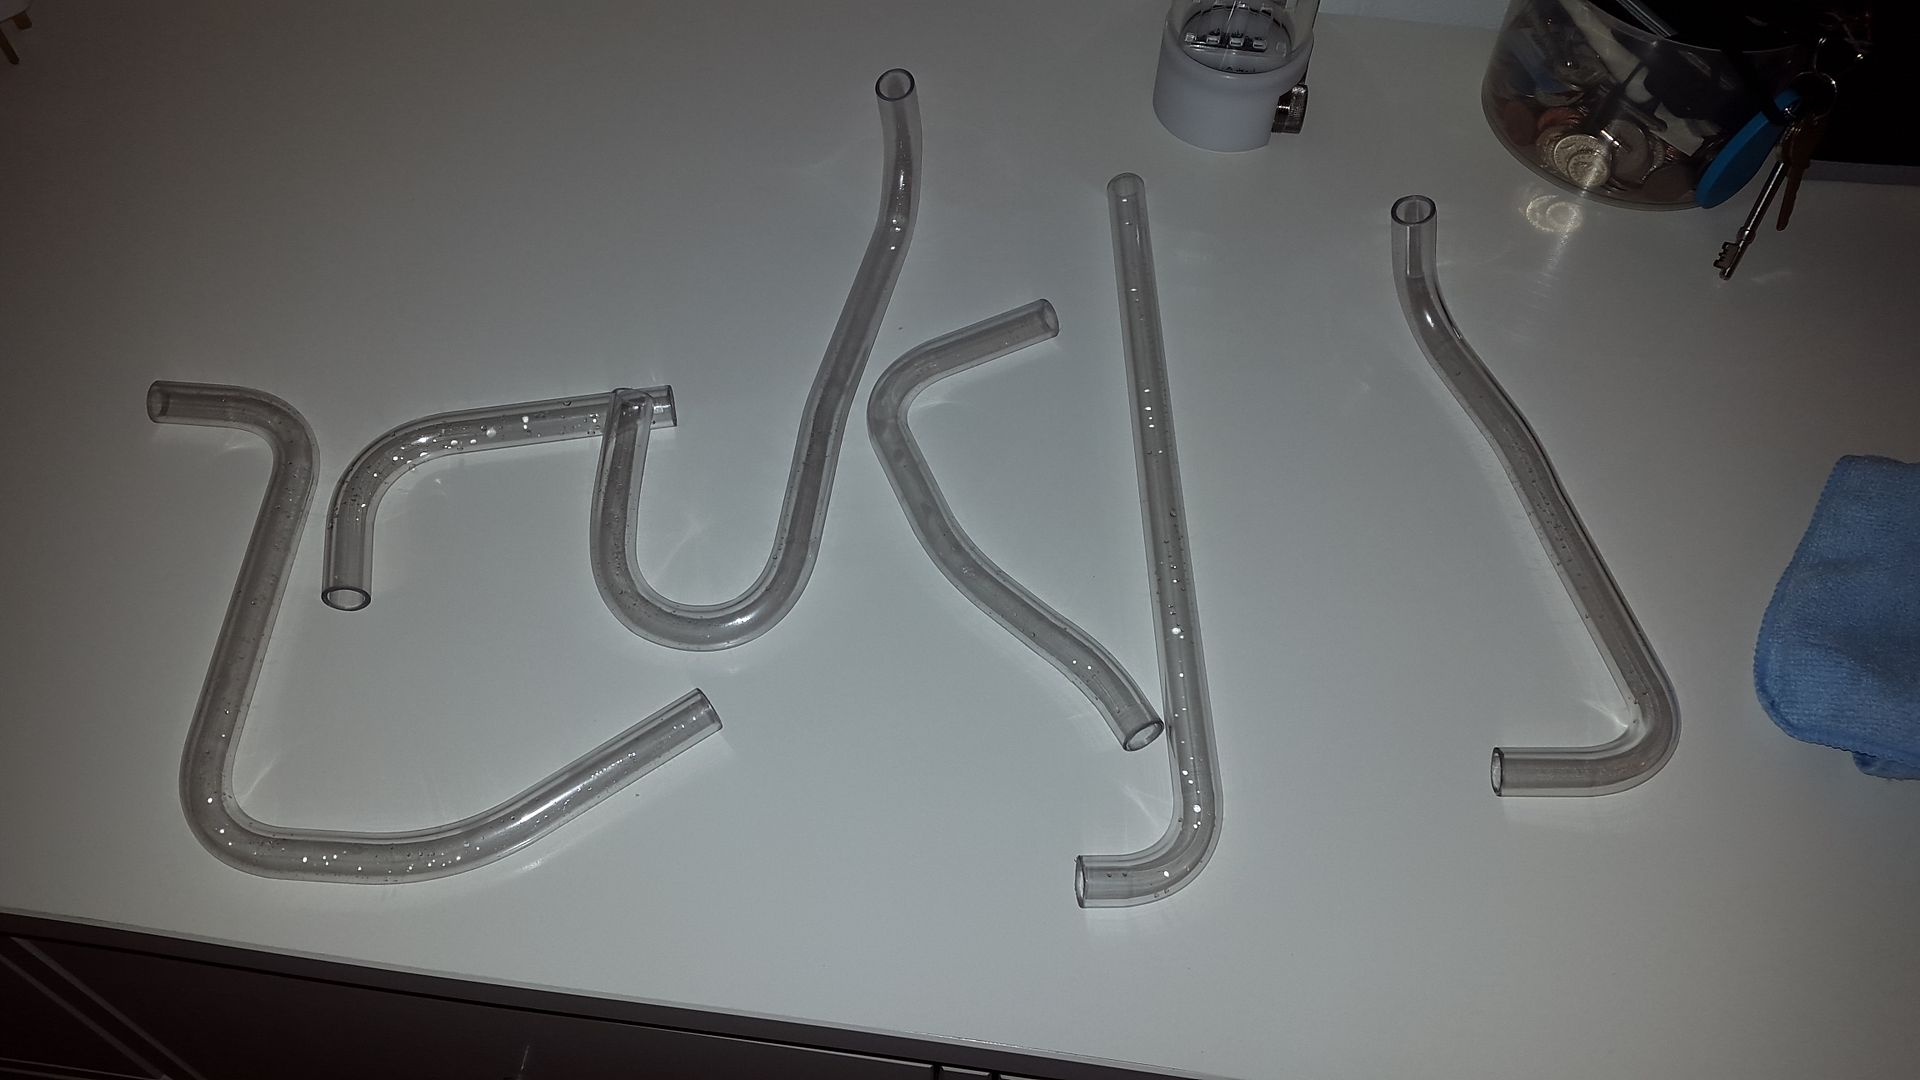
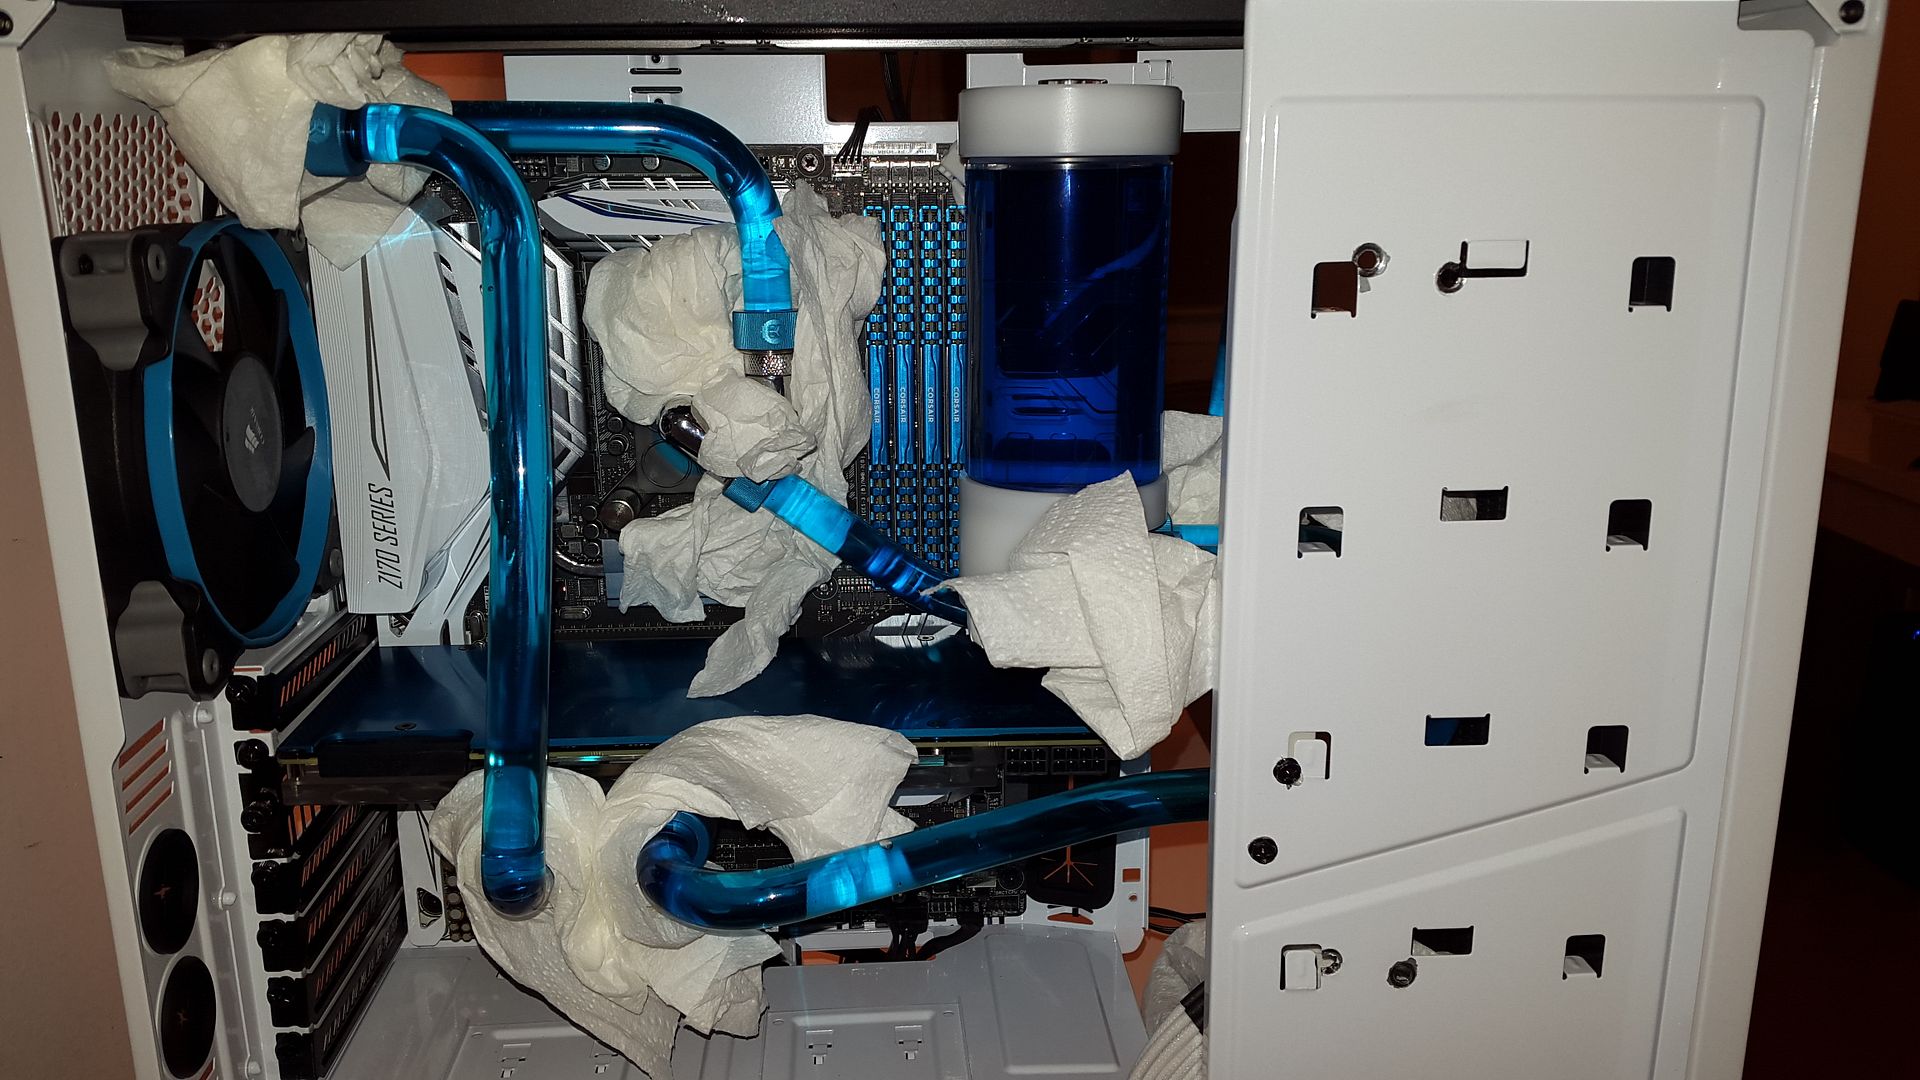
So there we are, pulled them all out and have just given them a nice soapy bath/good rinse to clean out the olive oil (amazing for the bends) and dust. Here is what feels like a lot more work than it looks, drying off post wash :)

20151218_201932_zpsyvzoarbt.jpg


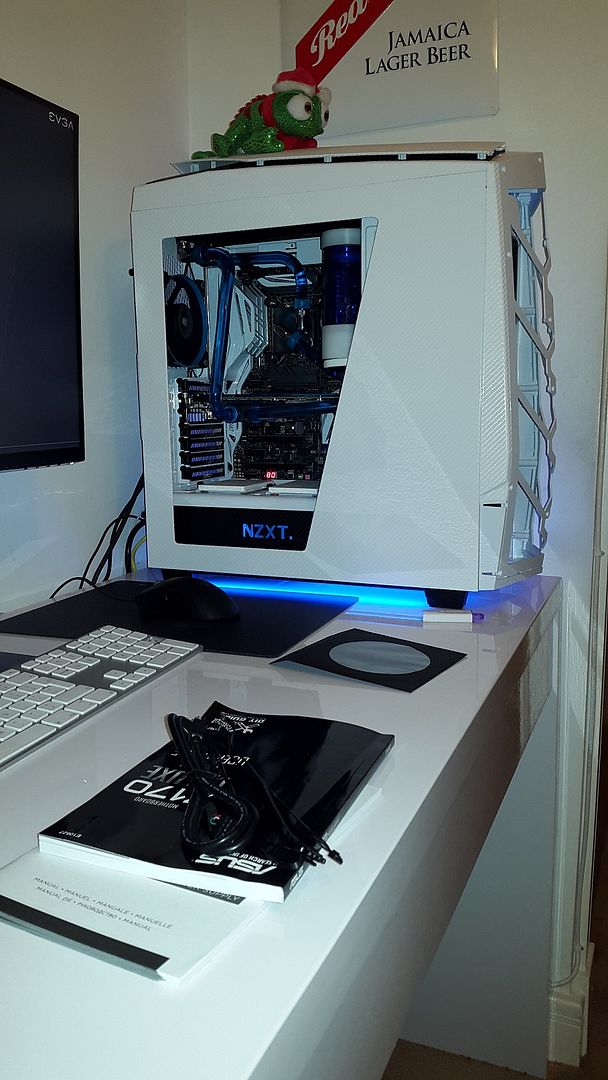
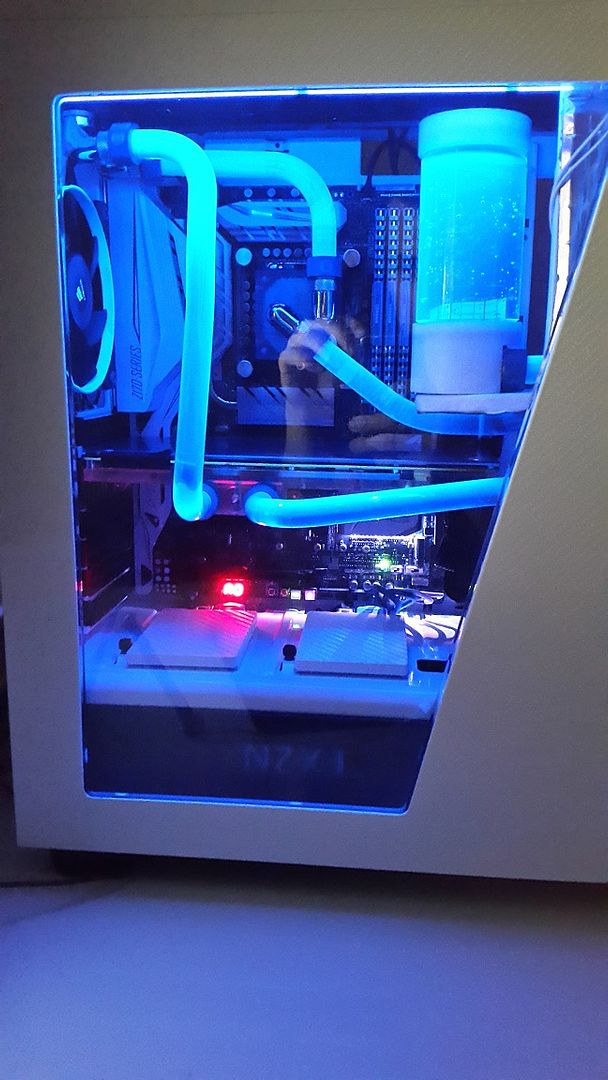
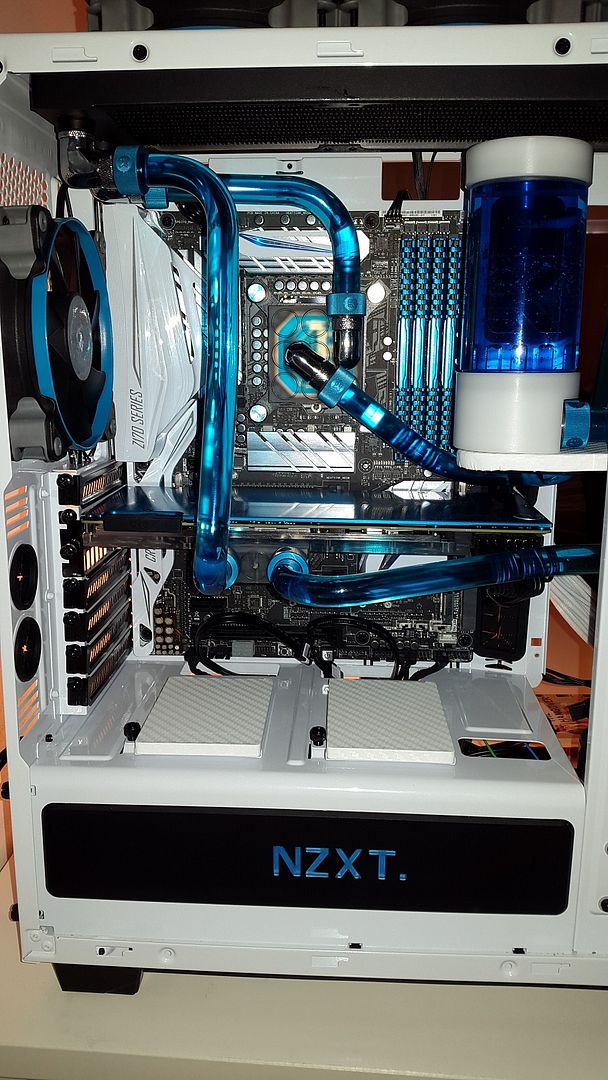
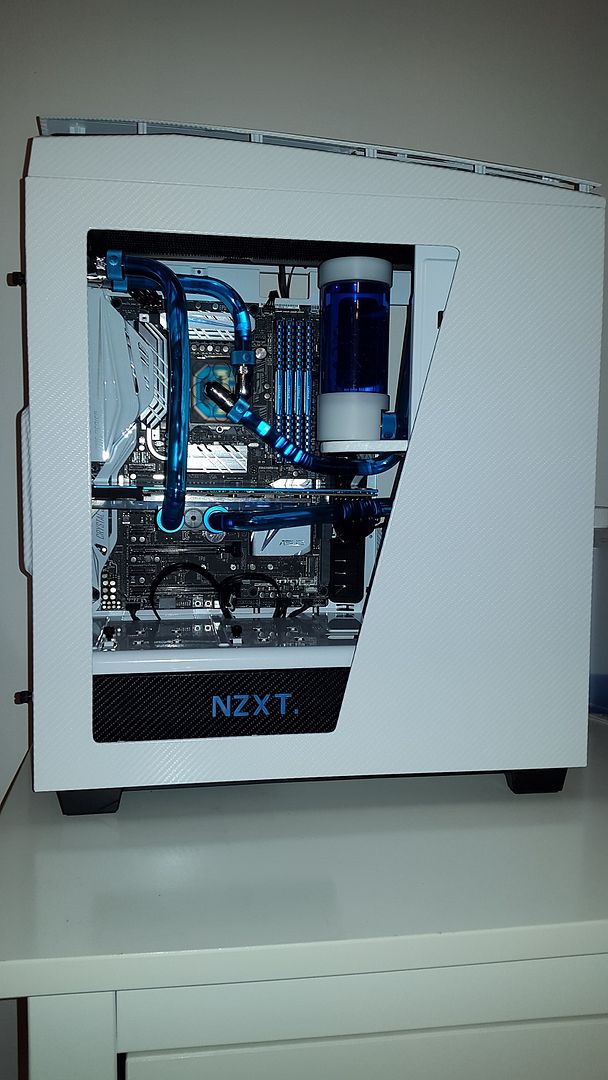
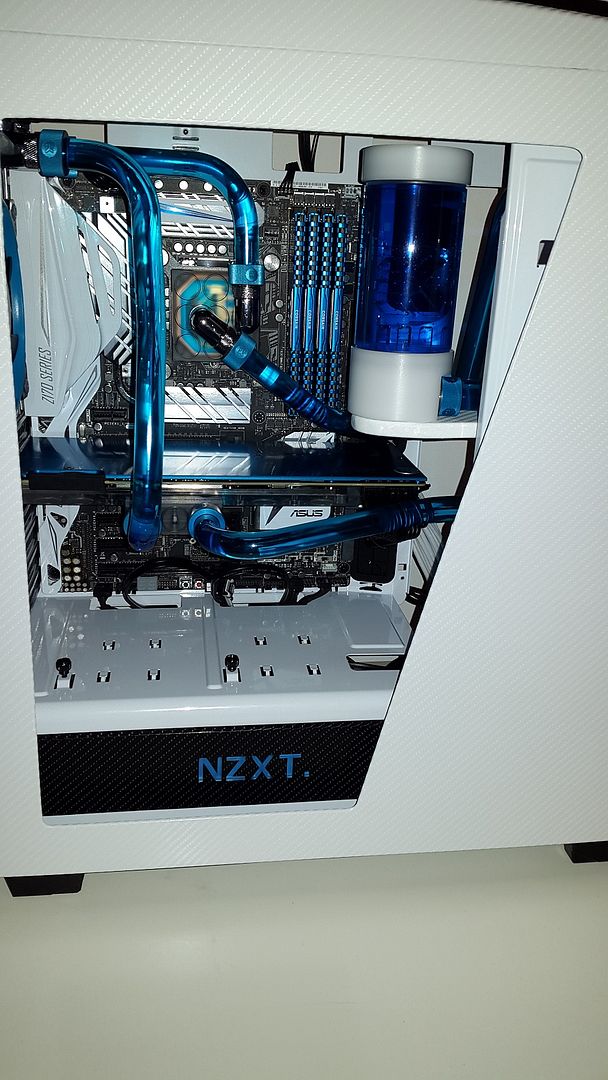
Before I pulled them out took a quick snap, without the nice blue compressions but this is how it looks through the window (swapped out the black fittings for shiny ones):

20151218_193316_zpsxk1yuskf.jpg


And that is today, its getting there and i've got some more mods to do on the case but progress! Tomorrow i'm helping a friend move but hoping to check, tighten and fit it all back in... Right now its time for a few well earned beers and a steak!
 
Last edited:
Smaller update, time to put the jigsaw back together again... This time with the sexy blue fittings to complete the look. I put in all but one tube, there is just something about this one i'm not sure on - I feel like I want to make it again different but I can't see where. Tell me what you think, its the left hander on the GPU which is quite an awkward tight bend.

Without it:
20151219_214054_zps1pnszczh.jpg


The tube that just makes me think I should, nothing wrong with the bends just visually its something:

20151219_214207_zpsi3zkprwj.jpg


And all of it in one:

20151219_215307_zps4ifmysbl.jpg


Tomorrow I should have time to connect up the power to the pump, attempt to make a jumper and then test it out... It better work :D
 
Coming along great. not sure on that reservoir mount you've made though, Can't help but feel like it looks tacky from the pictures (might be the wrinkles in the wrap?) and as for the tubes personally i think it might be because they aren't parallel making it seem as if it doesn't look right?

I agree entirely on the mount, I said it's not perfect and it will be redone - annoying thing is I did the other side perfectly... I was being lazy, agenda was to get the thing in place so I could do the plumbing so once I know it's all working I'll remove it and do a proper job. If you look further up at the pics you will see the other side wrapped, looks better right?

I think you are spot on with the tube, but literally it's impossible to do a straight run with the angle on the card. I think tomorrow I'll flush the system all going well and I might have a go at making a new one while I do that...

Thanks the feedback.

Edit: Drunk me thinks I can get a straight run and do some incredible job on with a mid tube 25 degree bend towards the window... We will see if sober me agree's when the time comes.
 
Last edited:
Yeah i think the other side does look better, i think its a problem with mdf in general as well though. Once its sanded down it just looks too rounded.

keep up the great work either way, i look forward to seeing it finished :P following this one closely ;)

Indeed, I wasnt as offended with the stock EK res mounts on a bigger res but dam they look crap on small ones. I really dont see why you need to have it on the tube but mainly for me the issue was it was a different colour!! White + weird white. The issue is not so much MDF, well in part I shall explain - the shape makes wrapping tough, more so the size given its all so close. I wrapped a massive amount of my car interior with this and its great but needs time and care, the main thing I lacked was effort and the size was fiddly... Also used the heat gun out of laziness because it was out, I really think hairdyer is better on this stuff. Anyway, really when you use this you intend one side not to be on show, obviously not the case here, but the trick is to stretch well and get the finish without ruining the look. On small things it is hard but also it was burning me lol, like I said lazy, if I gave one tip it would be finish the MDF with something - its too dry and doesn't lend itself to reshaping.

It would all have been better with more effort in short (trust me I tried on that side but was not gonna happen) but as I said I just wanted to get the plumbing in and now i'll be fussing over the detail! Just hope nothin is defective when I fire it up ;)

Your build looks smart so far, good job on all those bends! I've finally got around to putting my EK waterblocks and backing plates on my cards and like you say they are pure GPU porn ;) superb bits of kit!

Really nice finish arent they? Just a shame it says titan on it... Also if I was EK and made these plates i'd make matching SSD plates etc, just saying... would be awesome to make it all match and stuff like that is simple. Still nobody has gifted me a 2nd card :( haha! So make me 2 plates already :P
 
Last edited:
Update time!

So i've been filling/flushing the beast today... Few concerns on that i've posted over in the WC section. Mainly around the initial flow being really weak and it being seriously tough to help the air around and get it going. Thread is here if you think you are well placed to comment:

New Build Flow/Air

So, better post up some pics hadnt I?

Flushing it out a fair bit and initial leak testing:

20151221_140423_zpsbsqdcfmw.jpg


No leaks found...

Blue time (FYI I knocked this crap over all over my room haha!):

20151221_161859_zpsxmyxlseu.jpg


Lotta bubbles to clear:

20151221_161844_zpswg54doem.jpg


Any pointers on how to get it all clear would be lovely, will do some more moving about of the case later on. Main thing is there are no leaks found just yet, fingers crossed! I do feel like I want white angled fittings now though but that will have to wait for the future!! I do have an LED cap mounted in the top of the res, hopefully a nice white LED there will stop it looking so dark.
 
I don't know anything about water cooling xD but if that was my PC and it had a windowed case, I would love to watch the bubbles while loading into a game :D maybe I'm just weird though. But I guess that you have to clear all the air for a reason that you could maybe explain to me?

Only the large bubbles would cause a problem but really it will work itself out in time. The temperature increase when the system is on will help no doubt, would be kinda nice to see fizz going round but it would impact the cooling properties when you introduce air in to the mix.
 
More updates! Been wrap-happy again, I ordered a load with some stuff on Amazon to test a slightly cheaper white carbon with a view to doing the exterior... Started with this small piece:

20151221_194131_zpstni5kuvh.jpg


Here it is for comparison next to the original glossy white:

20151221_194200_zpshyp7msx3.jpg


And with a few more pieces done, this one with the mesh replaced to see how it looked:

20151221_200655_zpsacwon8pp.jpg


And with the big ass top piece done,this must be one of the most awkward shaped things to choose to wrap EVER...

20151221_203506_zpscrubw2yw.jpg


What do you think? I need a lot more wrap to finish so it won't be until after Xmas...
 
I like it! Very unique finish. Have to say I think you've done an amazing job given how bloody awkward shaped some of the pieces are! :D

I was literally thinking WHY did I buy this crazy thing, but looks good after its done ;).

Wrapped a few SSDs this morning to match:

20151222_131713_zpsktmdq81o.jpg
 
Looks absolutely class!

Thank you, just been eyeing up some new perspex for a few custom finishes... I think all that is left to do is the case wrap, custom perspex on part of the inside then replace the outer window because some how i've scratch the utter crap out of it :).

Also going to be ordering a few pretty sleeved cables for the GPU, 2 x SSD and CPU. Tomorrow I should be firing it up and seeing that it all works (PLEEEEEASE).
 
I was going to ask you if you were thinking of any wrap on the inside of the case and/or components. From pics that wrap looks like it would reflect light in an interesting way? You got any lighting planned?

+1 for awesome looking build

You know what I was thinking of doing it with black carbon but when you look at it with the two rads and all the tubing in there really isnt anything to wrap. What I am doing is mounting a perspex sheet down the right hand outside of the drive bay, play is to wrap one in the white carbon then overlay a translucent blue on to it... Problem is I don't know where I will be to take delivery so can't order until after xmas :(

Most components would get a bit hot so would be worried about the wrap just shifting, any suggestions looking at the photo? My first though is the power shroud - remove the black plastic, wrap in black carbon and replace.

Final note, does anyone have any recommendations on good lighting?
 
Last edited:
Small update before I head off few a few days of over eating and drinking :). Re-wrapped the stand for the res, as pointed out above it was a **** job the first time, still need to centre it on the res and stick the res down but it looks pretty good now:

20151224_140041_zpsfxpinckn.jpg


The right hand drive bay wall is what i'm going to customise, I also want to cover all those holes to improve the airflow anyway.
 
Last edited:
This has come a long way from when I last had a look.

Looks awesome dude, well done. Looks much better than my loop I had in this case!

Is it hardline? Some tubes suggest it, others like the one on the left, say otherwise.

Cheers mate, its all hardline (PTEG) just a number very technical bends due to the size of the case and mega rads (don't forget I have 2 x 360mm rads stuffed in here ;))

One on the left of the case pic is the one on the right of this picture, its a tricky shape to come out and back over the GPU... Then it has to kink in to meet the rad, difficult to grasp in 2D laying flat:

20151218_201932_zpsyvzoarbt.jpg
 
Some more updates! So I've been busy wrapping the rest of the case today, only one chunk left to do but alas I've not go enough wrap in the right direction (stripe matching)... Will have to order another piece to finish it off. So what have I been up to...

Removed, wrapped and replaced the black insert on the power shroud - looks pretty good I think, a quick note if anyone is looking at this case and wanting to swap out the blue led this one is actually white with a blue insert which can be easily removed. Now looks like this:

20151228_131933_zpsng76jjmg.jpg


Once i'd got that done I go to work finishing and re-wrapping the bit I did as a tester, I did a more thorough job this time on the USB ports and added a black wrap to the power switch as an accent:

20151228_151707_zps2gevlux3.jpg


Decided to treat myself to a relative NORMAL shaped wrap, my god this case is awkward to do this on:

20151228_154756_zps9yjokg6b.jpg


The two bits together:

20151228_155013_zps3ttjds37.jpg


Wrapped the window piece which involved a lot of swearing and two coffees.

20151228_165431_zpspryhsa4d.jpg


Close up with the PSU shroud:

20151228_165536_zpsagr1k3mt.jpg


Diff angle, the wrap isn't really as shiny as it looks in the pics. My room is quit badly lit and the flash makes it sparkle much more than it does in person:

20151228_165700_zpso4cw3ta1.jpg


20151228_165938_zps3jyarjvy.jpg


So almost done at this point then I realise I can't do the last bit....... :mad:
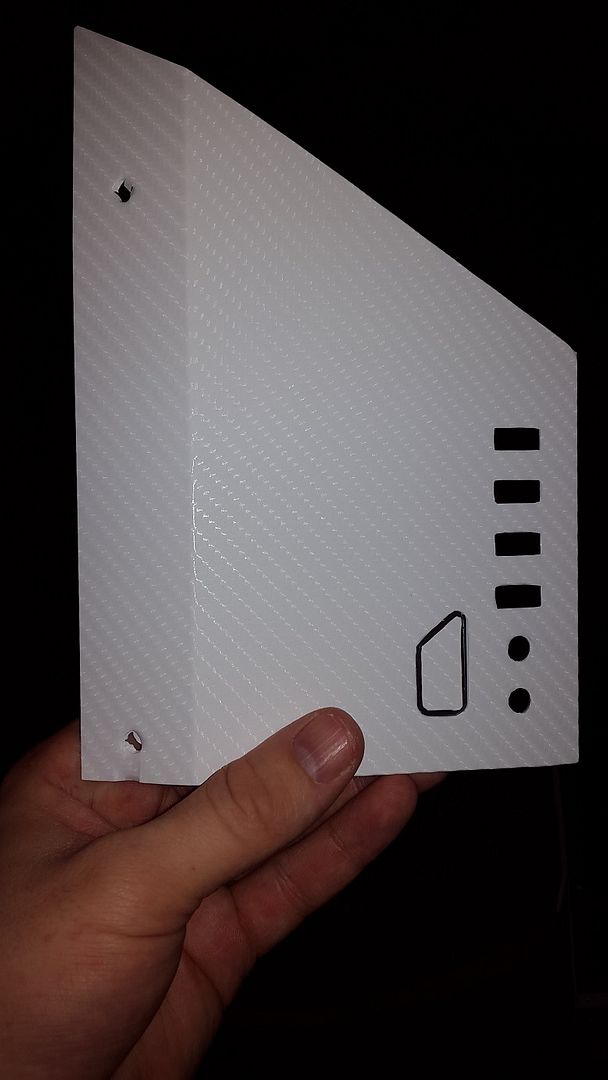
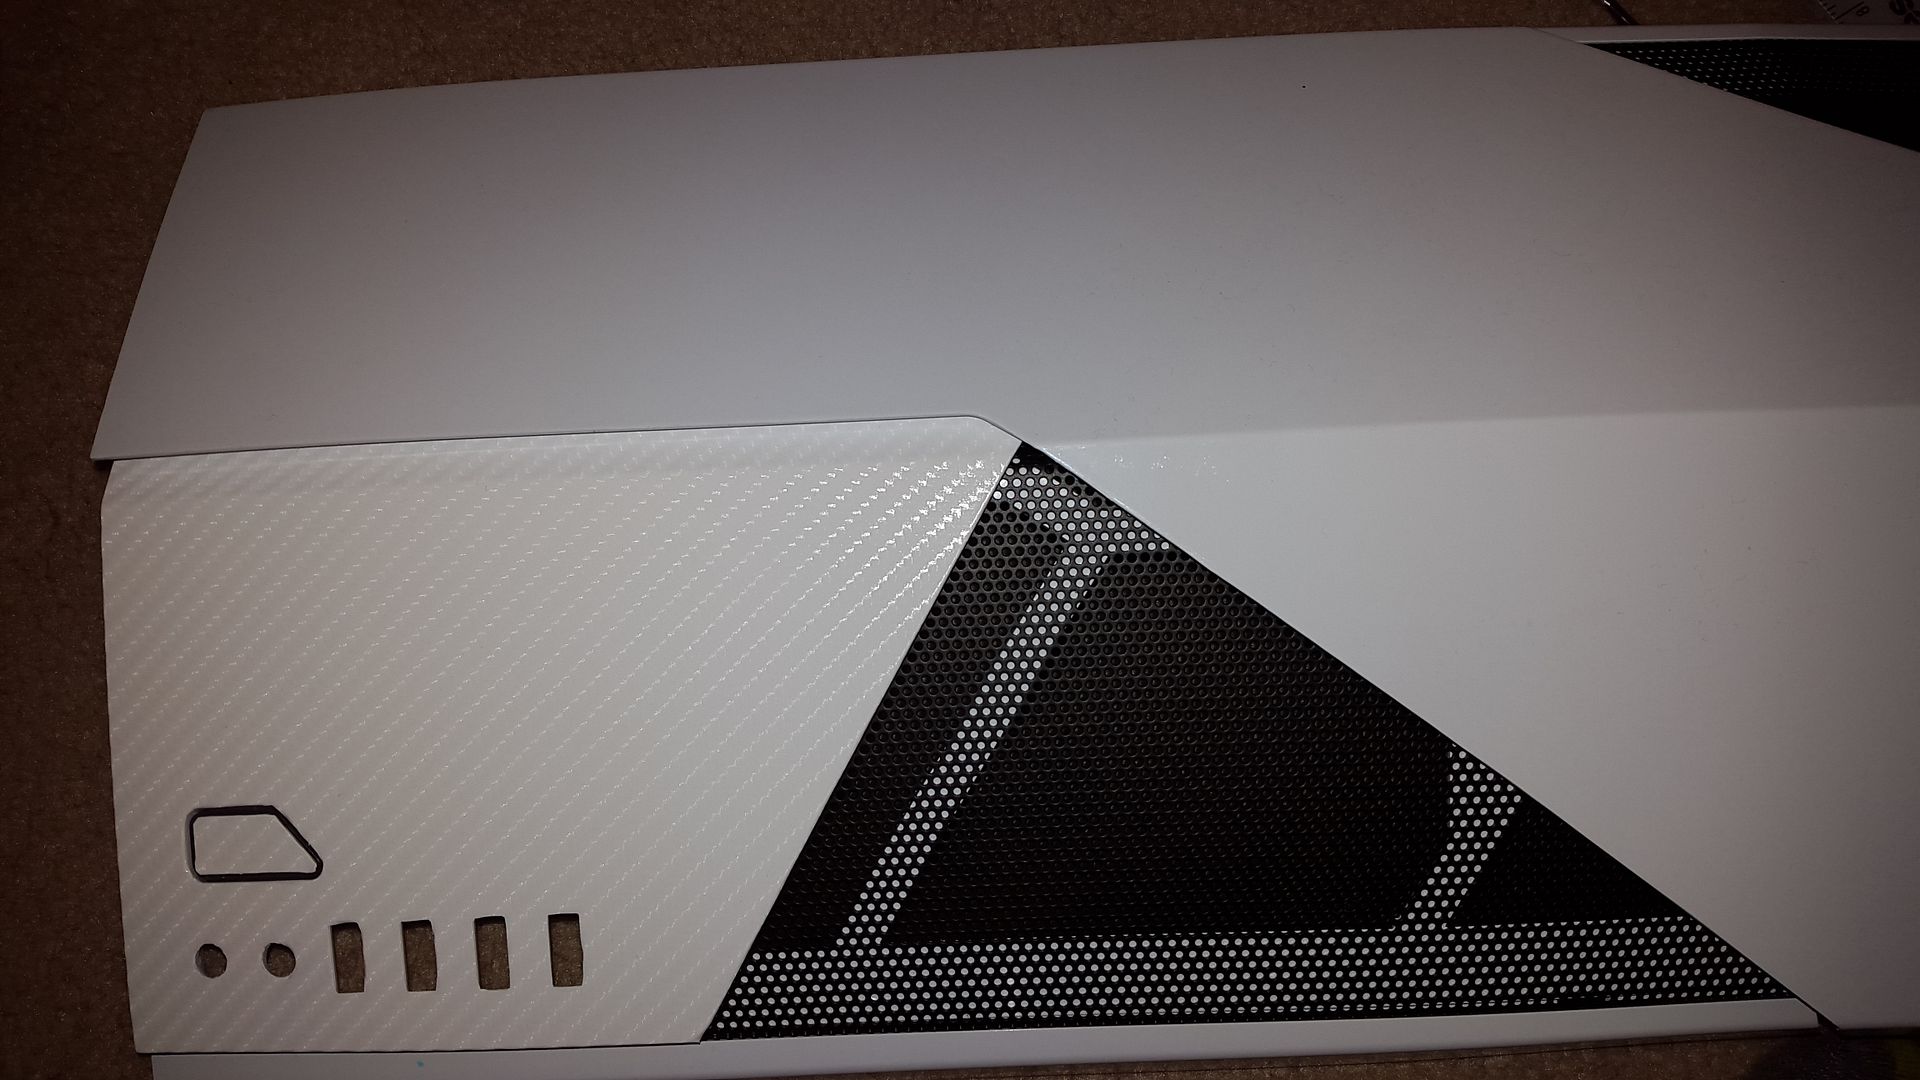
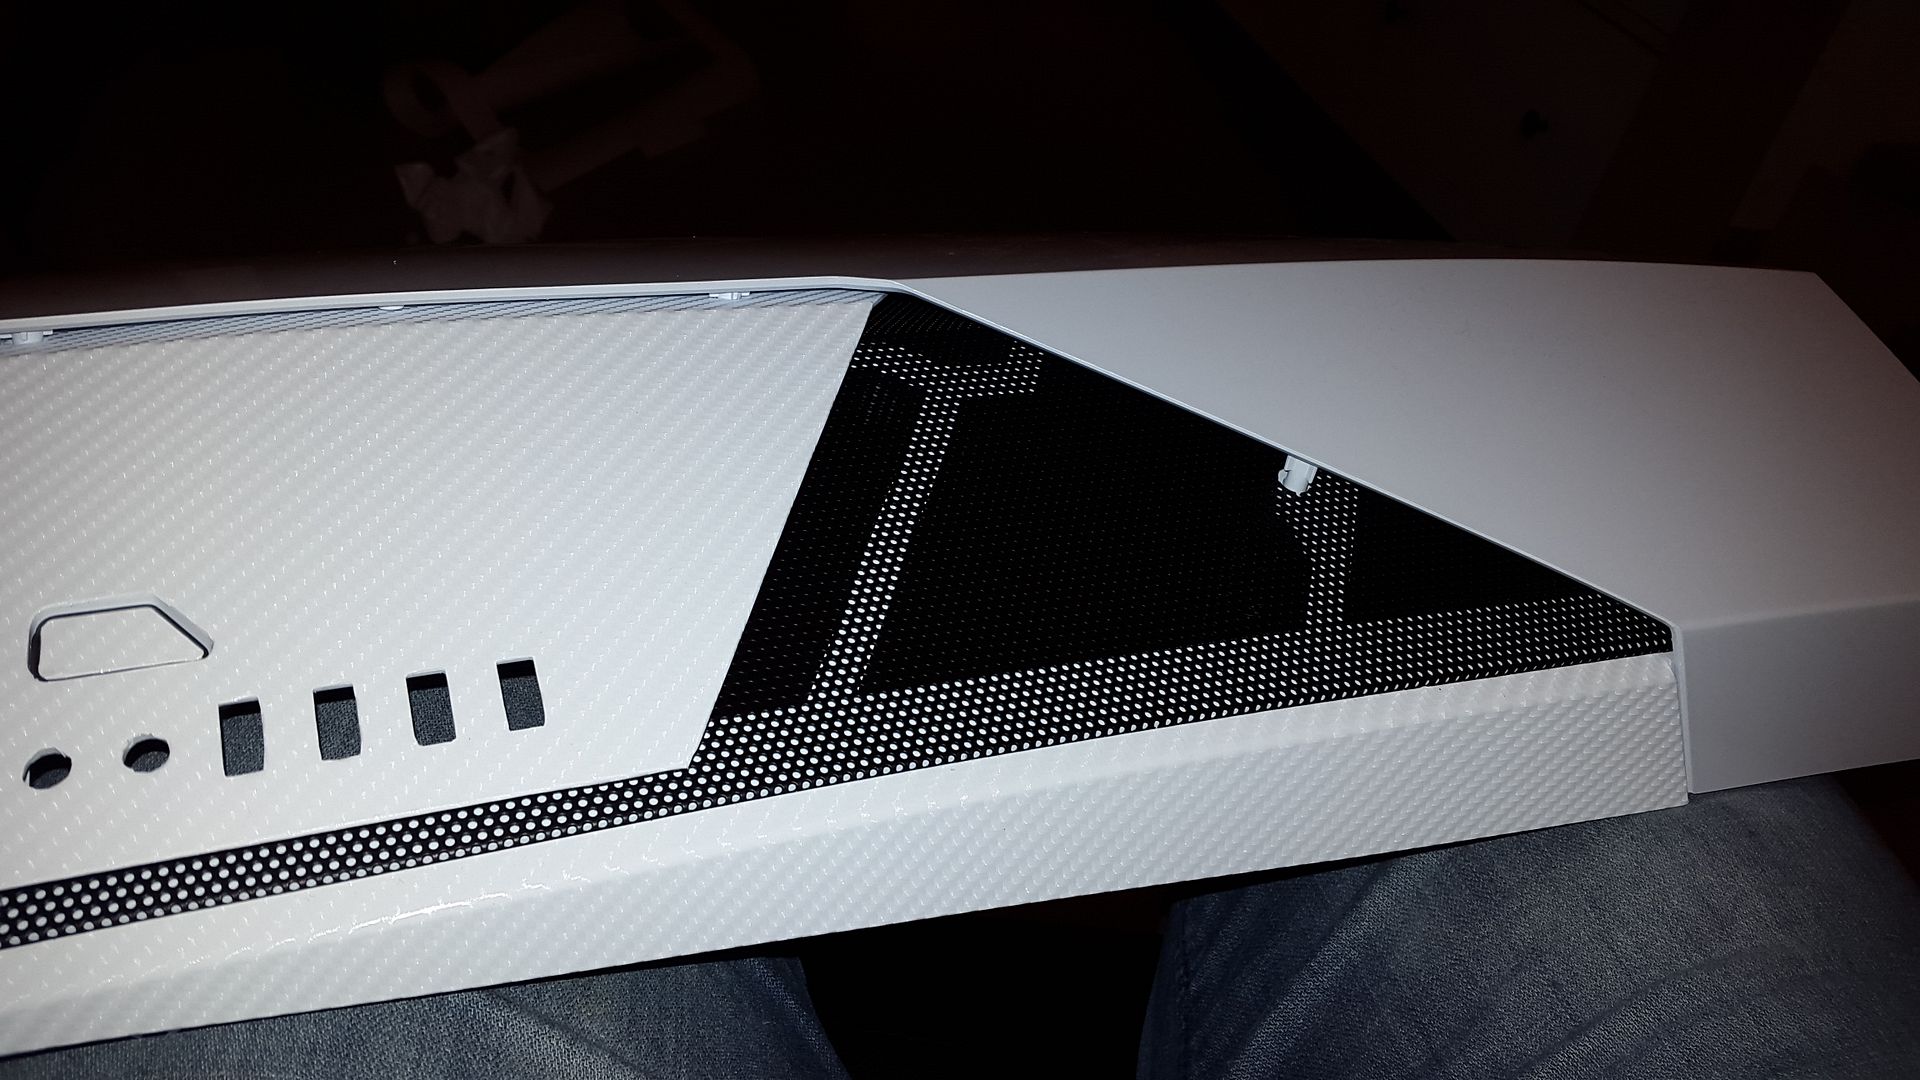
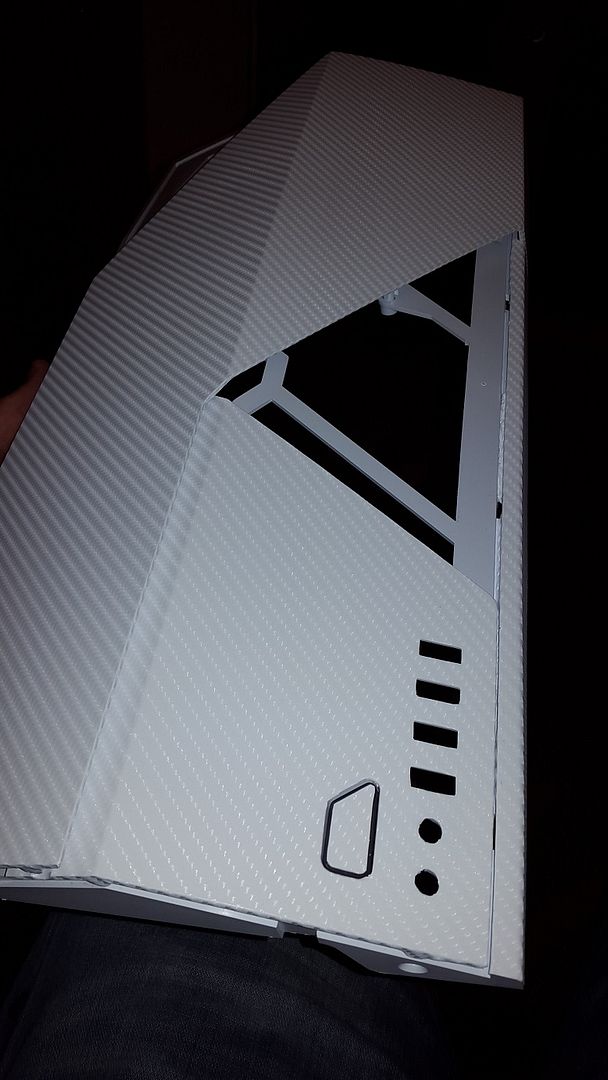
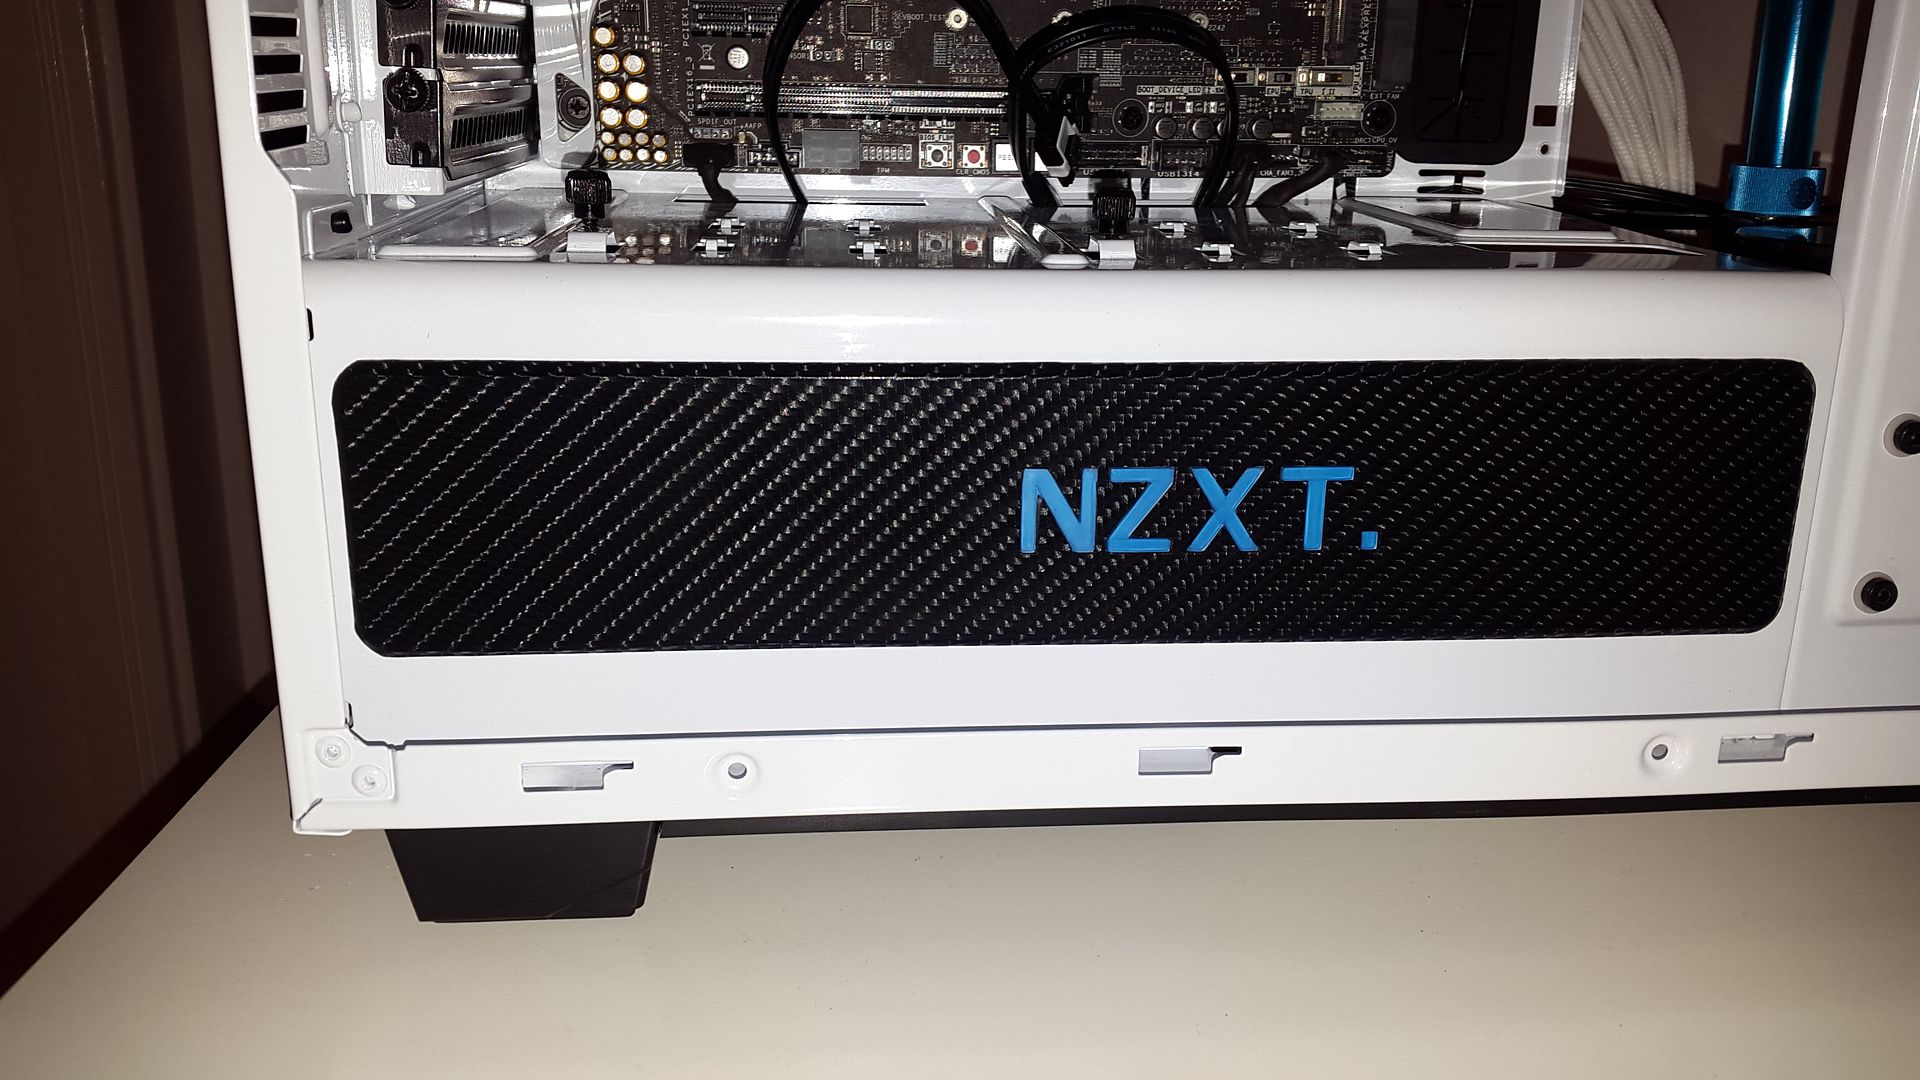
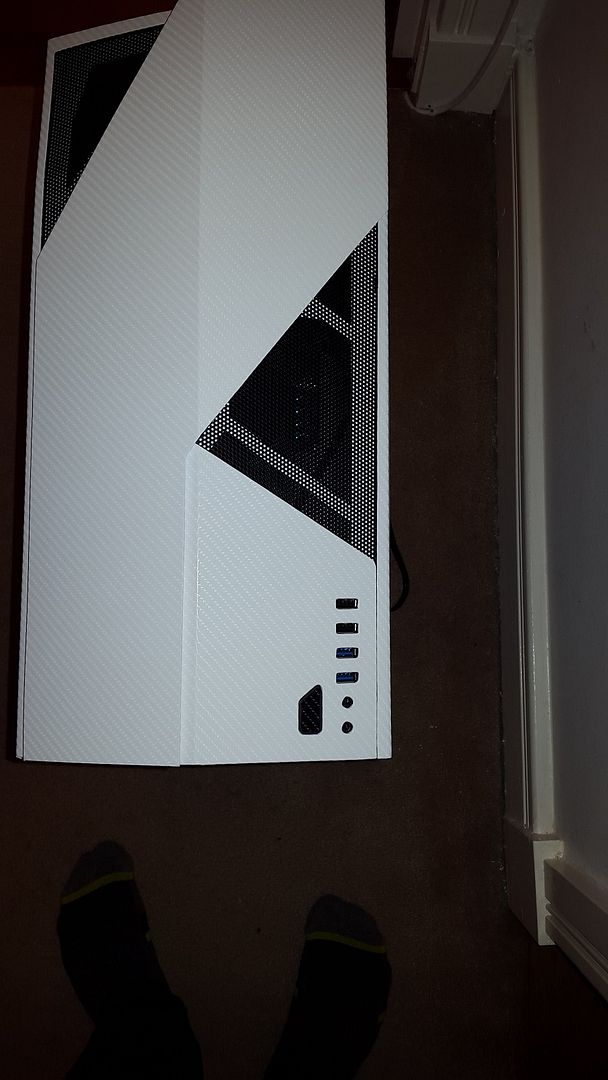
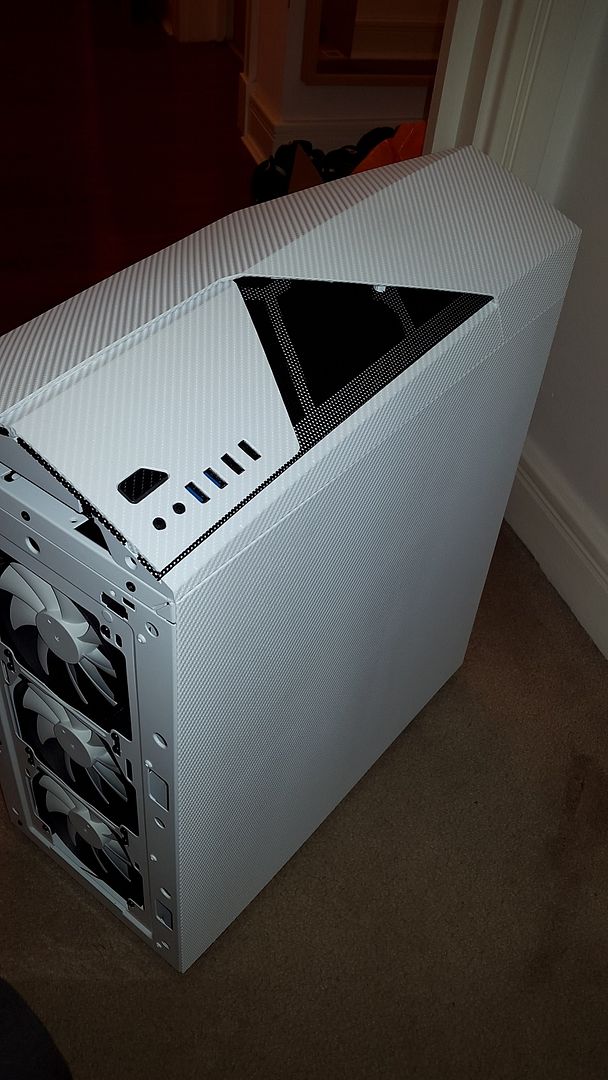
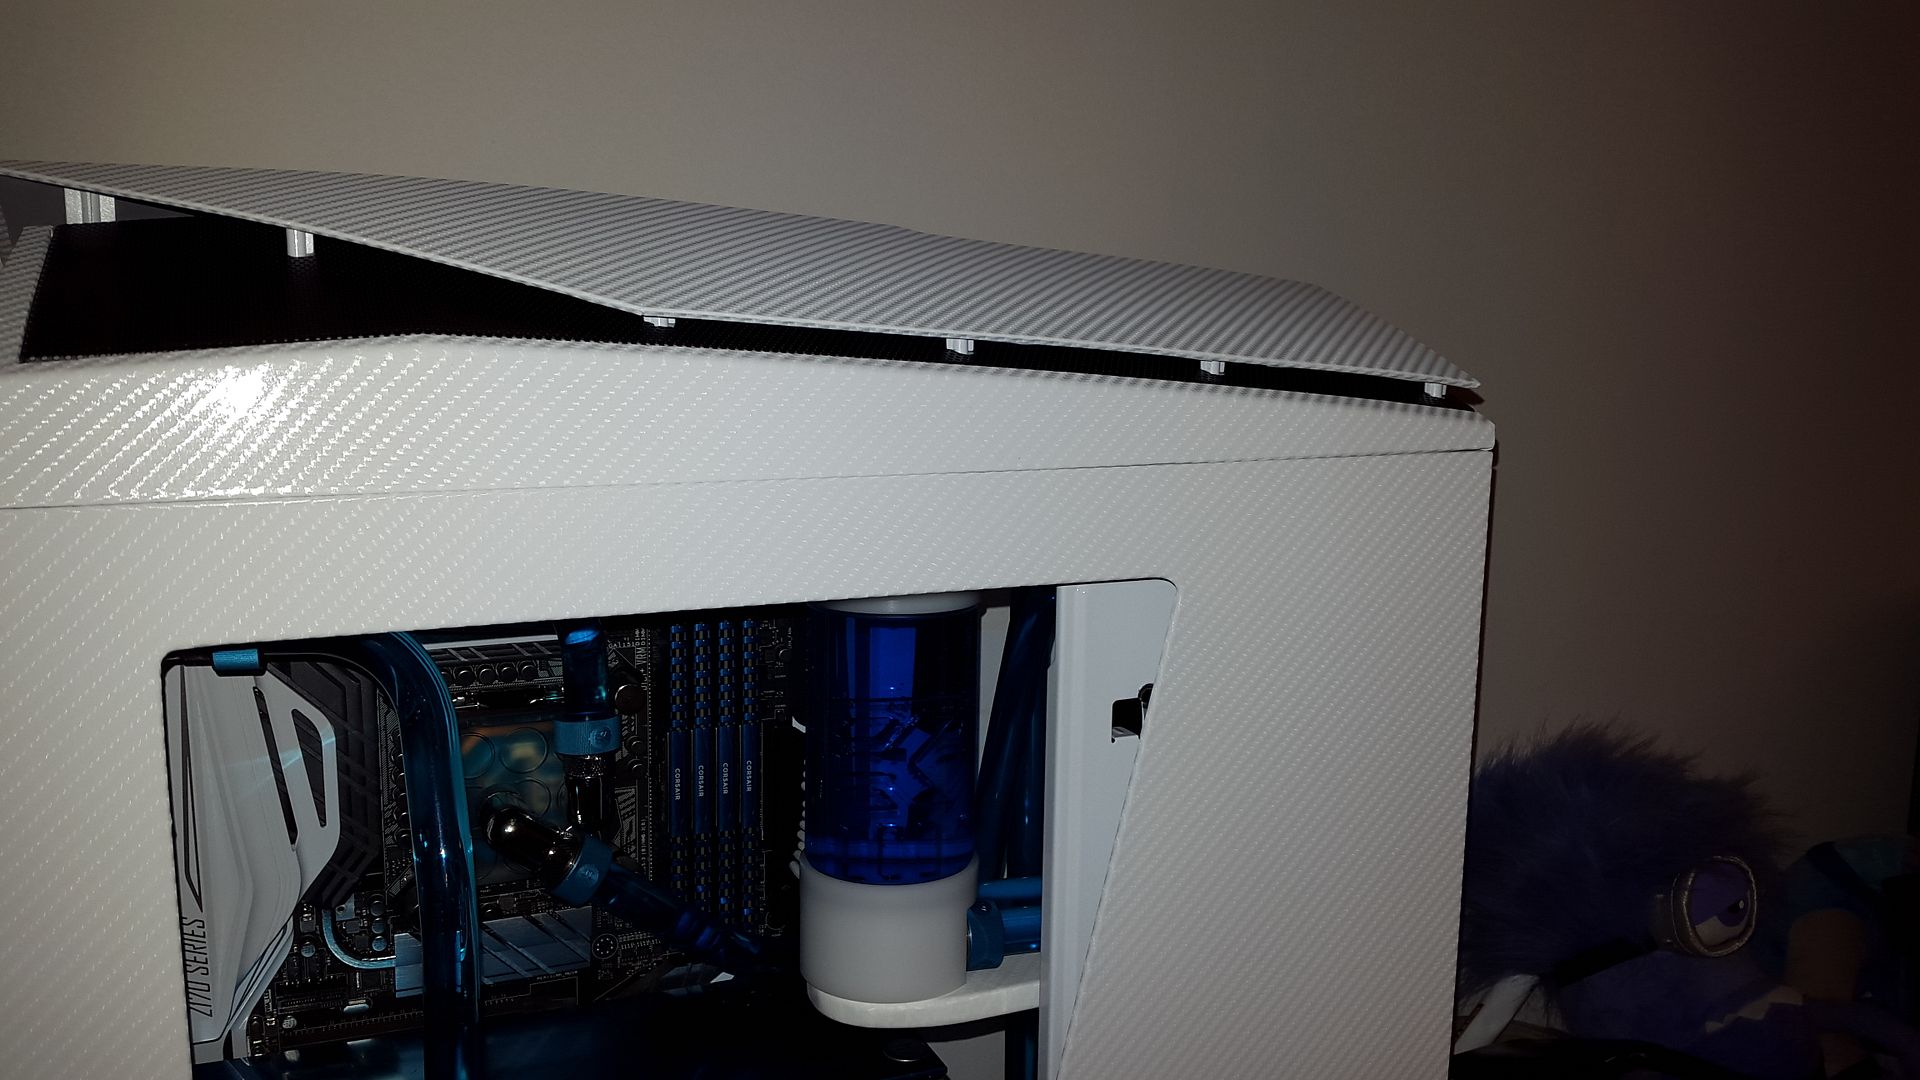
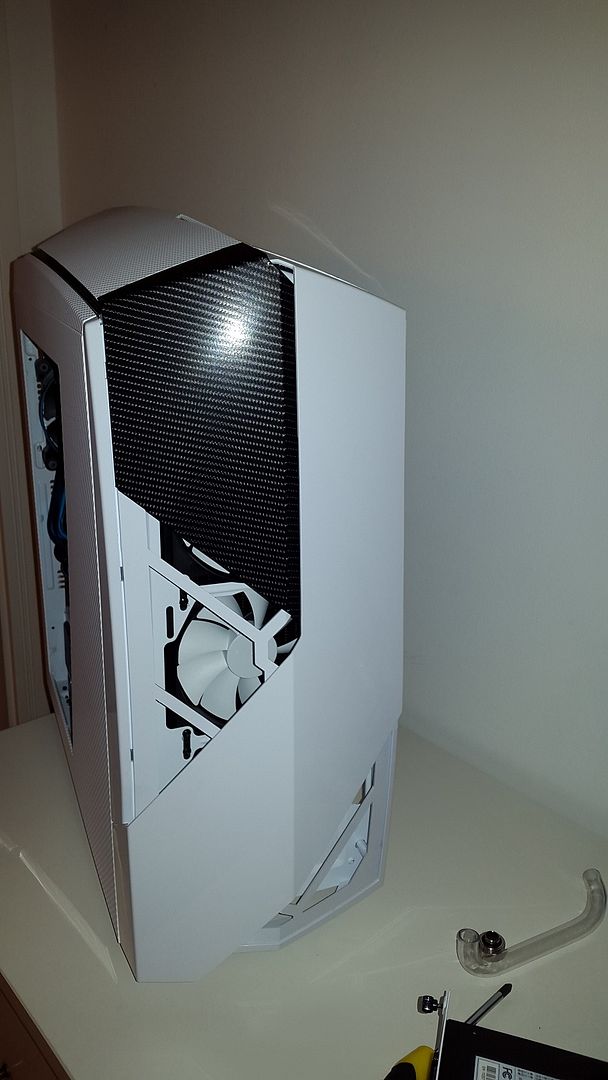
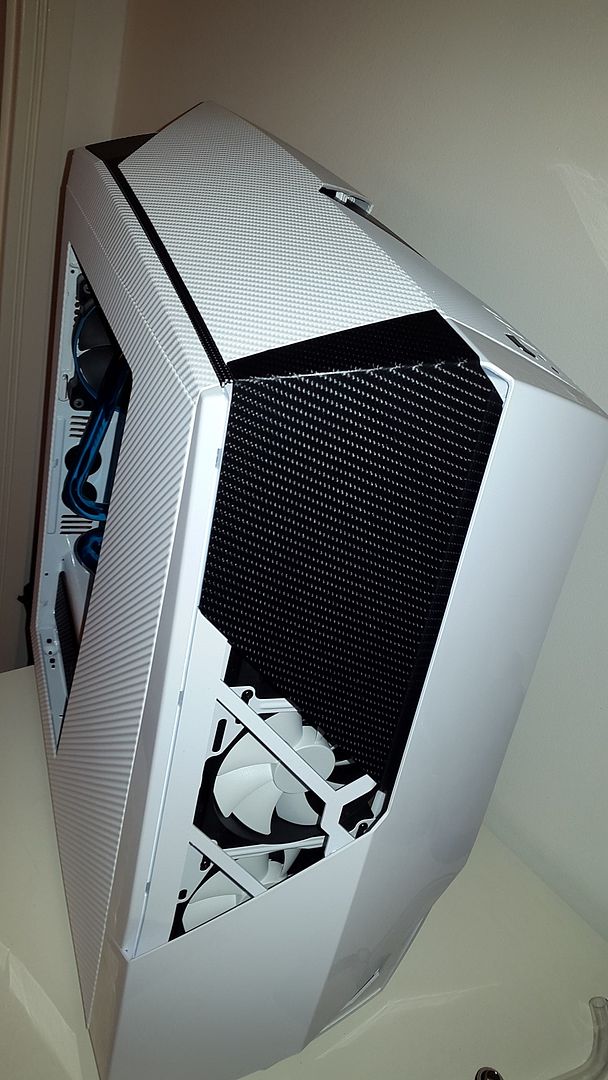
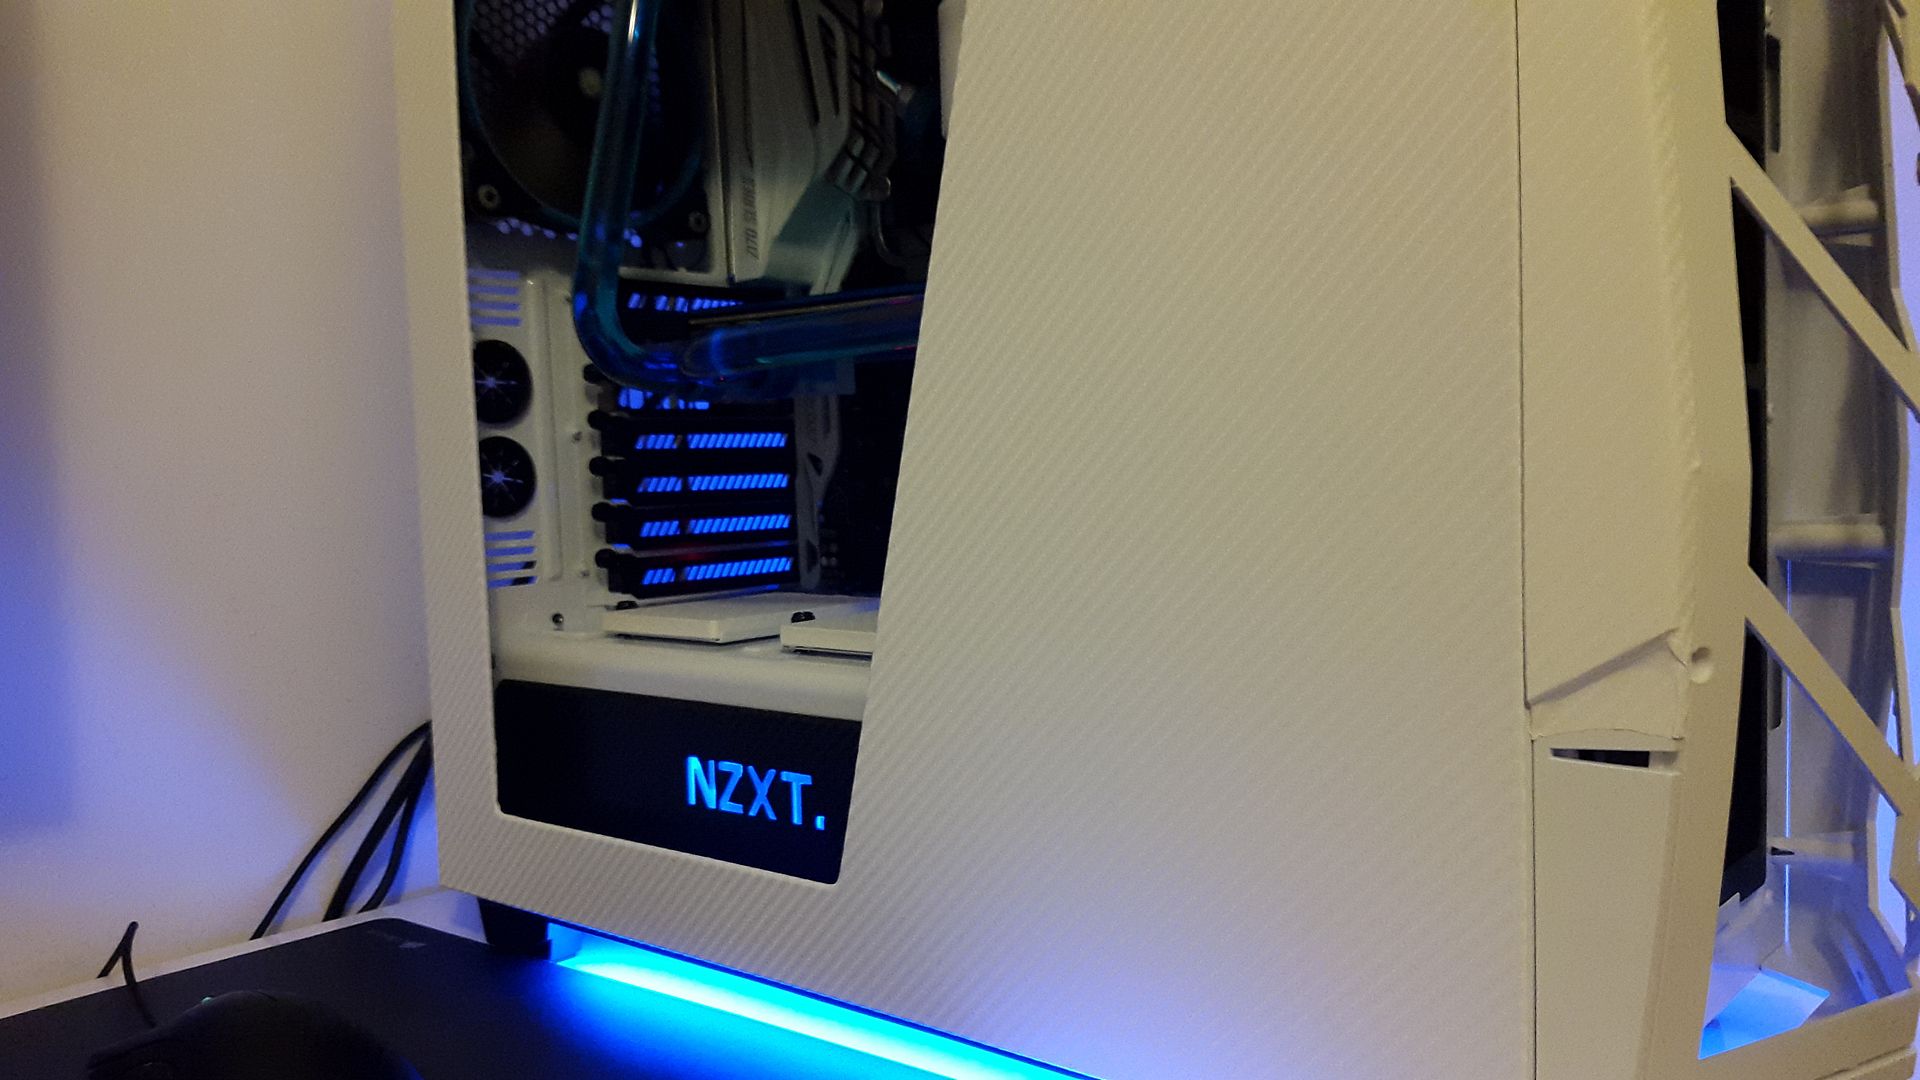
. Decided to add another accent to stop it being just a total white case with this front piece done in contrasting black carbon. What do you think, I think it looks kinda cool.

20151228_173012_zpsucvorhuv.jpg


Diff angle (the black mesh is not present as this is just propped in to place...)

20151228_173023_zpsdnw8akx8.jpg


So thats it, tomorrow some cables arrive so i'll be firing it up and then hopefully this week i'll have to final piece wrapped (last big white bit on the front). Final jobs to do: Order plexiglass for the window and side of drive bay, custom GPU cables and lighting... Almost there!!! :D
 
Happy New Year! Been a bit busy eating and drinking everything in sight but some updates for you... The beast is now in use,typing on it as I speak, it's not completely done yet as i've got a few case mods to complete but its finally working.

Getting it to post was a total nightmare, in the end I had to drain everything and test bits from this and my old machine and narrowed it down to the CPU. For some weird reason when I loosened the spring loaded caps on the block it was fine, bit tighter and nothing at all... Now I did as per the instructions and screwed to the end of the thread by hand, it really wasnt over tight so not sure what was happening here?? Anyway its was a bit of a fussy booter but i've steadily been tightening it over time and seems perfectly happy now. So what does it look like:

20151230_234544_zpskmfpx7dc.jpg


Drives in place, when for some blue braided cables but the white SATA cables were out of stock...

20151230_135100_zpsndaxyzvh.jpg


Unfinished front end:

20151230_234642_zpsd85rsq7k.jpg


And i've been playing with some overclocks on the GPU first, this seems pretty stable thus far:

Capture_zpsuw3zxvof.png


gpu_zpsxdru8nay.gif


Now my new wrap did arrive to complete the front, had a quick look and for some reason the bigger size is not the same as the smaller so i'll have to test it and see if its useable or not... But unfortunately I tripped like a muppet when I was running and have some nice chunks of skin missing from my hands so wrapping is not really an option :(. Things still to do:

1. Lighting, any advice on it - the UV blue fluid in particular
2. Wrap front final piece
3. New perspex for the window and internal drive bay wall
4. Custom braided GPU and CPU cables, to be ordered now i'm back home!
5. NZXT Grid 2, think i'm going to buy one and replace the stock unit so I can properly dial down the fans... System runs pretty cold so really no need for the noise :)

I'll be cranking up the CPU clock once I know the GPU is doing fine, runs most of what I was playing like a dream... I also pulled the trigger on this whilst a bit bored on boxing day:

https://www.overclockers.co.uk/dell...reen-led-monitor-midnight-grey-mo-084-de.html

MO084DE_118907_800x800.jpg


Loving the screen so far!
 
Hello all.

Some more updates, my hands still pretty out of action to finish the wrapping but i've now ordered some pretty cables for my GPU/CPU and purchased some UV cathodes as a bit of a test to see how it looks on the UV Blue fluid. I also ordered a load of sound denting which i've applied inside the side casing to help with any vibrations or noise, it will make a small difference only but why not.

Pics or it didnt happen right?

Sticky sound denting, its the kind you use if you do car audio in the doors around speakers to tidy up vibrations and give better sound (my car is full of this :) ):

20160106_205029_zpsebdzvze3.jpg


And a quick test of the UV lighting, what do you think? I'm thinking about getting some white LEDs instead but i'm torn really...

20160106_204019_zpsawmm1d93.jpg


Also any advice on changing that ****ing red LED readout to blue? I'm thinking i'll just have to stick a bit of black on it and simply remove it if I have issues and need to see the code. In other news i'm enjoying overclocking this... Seems like a 600mhz overclock on the CPU is massively easy and temps don't get far past 60c at 4.6ghz. I've also noticed the GPU overclock seems to exceed what its set as so in games my stock 1100mhz core clock is reaching 1500mhz with no issues and a very small over volt (literally +24mv).

CPU temps at full load for 30 mins, 4.2ghz (over the stock 4):

CPU_zpsncy3sq4k.png


Stable overclock on my GPU:

Capture_zpsuw3zxvof.png


gpu_zpsxdru8nay.gif


As I said in game GPU-Z is record it clocking in excess of 1500mhz and the temps literally stay around 40-45c on the GPU. So in short, I really wish I had two good looking EVGA cards in it but i'll have to be patient...

Cheers!
 
Last edited:
Back
Top Bottom