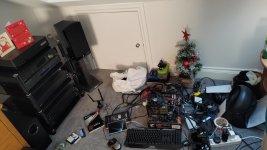
Sr Vr. The ACME server.

Soldato
Joined
23 Apr 2010
Posts
12,042
Location
West Sussex
After the fun (no really it wasn't fun it was an enormous pain the willy) of building my NAS last year I swore I would never do another mod build like that again. I hated it.

That said the NAS itself is kinda sweet, and I love having access to all my crap. However, since the last two upgrades I did I have amassed a literal pile of SSDs. Due to one rig not being able to take them at all and the other almost impossible (and would require really long ugly cables) I have decided to pile them all into an almost silent server.

Right now I have counted 3 250gb, 2 500gb and three 1tb. As well as a little toy someone sent me recently in their bundle 'o' crap take it all kinda deal. It was this I was after really. I was going to add it to my NAS.

G2tWwpD.jpg

Ye olde Revodrive X2. Only this isn't just that. This is the last PCIE one they launched and does 1700/1500. Even better it's 960gb, so lots of very fast storage.

TlzD6zg.jpg

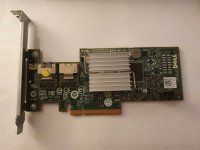
He also sent me, literally, about ten SAS controllers. Most were one port (so 4 drive) or 2 port (so 8 drive). Then I spotted this monstrous looking one.

cZQgoid.jpg

16 SATA ports :D That ought to just about do it !

Board, CPU and cooler.

N5PPM86.jpg

1920x with a H100X on TR mount. With two Eloops. This is all literally stuff left over from upgrades. Still need to buy RAM and SAS breakout cables too.

Now for the case. 4U seemed about right. TBH I don't care about the size, so long as it will take everything I want to cram in there. I also wanted something different, and stupid. So naturally when I saw this ACME 4U beige server case from about 27 years ago I wanted it.

OQ5ol1m.jpg

The whole thing is thick steel and alu. So the port covers on the front etc are all alu.

ALjkkM6.jpg

ZiC1MM5.jpg

Now of course this means some serious chopping. I want a 120mm intake past the power supply and a 240mm hole on the right. I will lose a couple of slots on the MOBO doing this, but with a 16 port SAS card and another 8 ports on the board I don't think that will be an issue. Talking of issues. 8 SSDs or so is a lot. I am not sure if they will all fit in the front area, and tbh? I would rather they were nearer the board any way. So I have had an idea. Due to the amount of these SAS cards I have I noticed that they had vented PCI plates on the back. Not only that, but they have 90' threaded holes that bolt to the card. This means I can remove say, 3 of them and make acrylic plates that hold 3 2.5" SATA SSDs each. So that is 9, in about 5 slots.

Obviously I need some grilles for the intake and AIO once I cut the holes in the case. I reckon these are ancient looking enough :D

5tWaK2L.jpg

Mmm, brown.

The rest (Don't have RAM yet) is all here.

dMJuUfN.jpg

jh2V7q0.jpg

Obviously I need a GPU. Amazingly there was actually a passive one in the pile I got sent.

VmIisoo.jpg

Perfect.
 
Hopefully it won't be :D

Been trying to calculate what can go where. Rabbit hole. Probably best to wait for the case tbh. I have designed and drawn what will be the drive planes, though.
 
God I am such an idiot. DERP.

So I have one of these.

AcH9trZ.jpg

If you don't know what it is that's OK. They weren't around for very long. It's basically a U.2 drive (I know, I doubt you remember that). When Intel decided to start inventing NVME they did it via a 2.5" drive. That has this cable.

QEbjd0D.jpg

It's a SAS end. You can't put it into a SATA SAS controller though I don't think. And besides you don't need to. The way they worked was via this.

GFhPxmk.png

I put mine in this though, as I had my M.2 slots all filled with drives.

QQjFgmu.jpg

So when I thought about fitting it I thought "Well it won't fit where the rad needs to be so I can't use it". Then it just dawned on me about 5 minutes ago that thicky Mc-chit here can actually remove the U.2 to M.2 and put it in a M.2 slot right under the radiator and fans.


Derrrrrrp.
 
Well that's the RAM sorted. I didn't think I was going to have enough cash just yet, but a quick browse brought these up for £44 a set (16gb 3000). So I ordered two.

rKh3uVV.jpg

Not exactly ideal in white, but the black or red is £63.
 
OK. So after four hours of scratching my head and realising certain ideas I had post case were not going to work I have figured it out.

Firstly the rad position. Now I was almost scuppered here, because I do not have a mobo to test fit. I need this for the height of the board and its slots. So I know where to put the rad, or if it will even fit. Thankfully I remembered I had a mining riser left in the drawer and this did the trick. So here is where the holes will be going.

ErPq2PK.jpg

The other problem was how to intake air. My idea of putting a fan opposite were destroyed by the tank of the 5.25 area. Its a huge metal construction, and you can not fit the blanking plates without the whole thing attached. IE, if you remove it you lose the bay covers. I wasn't prepared to accept that, and tbh? I wanted that bit intact because it will hold 16 SSDs easily.

So the big problem to solve was where to put the intakes. Thankfully I did work that out. I fitted the mining riser to the GPU, which in this case is passive (so sticks up well above the slot) and.

PJWXrBB.jpg

I can cut two into the top of the case. This is excellent because it will blow a ton of air down onto the PCIE area (for the GPU, SAS card and ETC) but also it will blow fresh air into the rad directly. Meaning all of the parts of the inside that need cooling will be directly under two fans.

Then came the issue of how to go about cutting it. TBH I am not in the mood for a two hour Dremel session. I need something more powerful and quicker. Jigsaws are good, but getting the holes exact can be hard, especially in thick steel like this. The saw tends to jump around a bit.

So I went for the fastest option.

zMLVv15.jpg
 
OK so wrapping it up for today..

I now have the side mapped for where the rad will go. I've drawn the holes (wasn't needed but did it any way)

LiKRYOv.jpg

That did make me laugh. TANK is written there because that is where the end tank for the rad goes. However, at 17kg it's about right lmao. This is where the fans will go in the top.

hdDMhDY.jpg

Then I figured I would fit the cards I am using in order to make sure the fans clear. They do. However, I made a mistake at first. The GPU is obviously 16 lanes. What I had mixed up was the SAS card (because it uses 8) and the Revodrive which uses 4. Good thing for manuals.

MmDhaKN.jpg

RCmmfjU.jpg

So yeah that all worked out really well. Plenty of room left for the rad and fans, and everything where it should be.

I am not making drive planes now. My Dremel died (RIP) and I have a much better idea.
 
Bloody hell back planes are expensive ! I was going to get my friend to 3D print a rack, but it would have used tons of filament and taken forever. Plus then it dawned on me, what if a drive dies? I will have to disconnect the entire thing, drag it out, open it up and.... Yeah no thanks.

Z1Wkl61.jpg

I got three of those. Cost a packet, but I reckon it will be worth it.

kX2421B.jpg

jTMyjJr.jpg

Right. Quite probably the hardest work day on the case. I cut the holes (was scary, but it did the job very well) and then was worried about getting the fan/rad screw holes right. I've used templates before, but you can't find them now. Plus I have no vinyl to cut, or ink in my printer.

My engineer was having a day off, so I made a really super fantastic tool. I present, the El Crappo Fanholio.

wVW7vLT.jpg

And no, I totally didn't bolt the fans onto my new EK AIO and then tape it all together and tape a metal ruler to it. That's a bloody precision tool that is mate !

Any way it worked very nicely.

xrT6f8S.jpg

161yDob.jpg

Mt0nr4d.jpg

I don't know if that will be an issue. I doubt it, given I will be running the fans as low as I can. However, if it needs to be cleared I can use the jigsaw.
 
OK so the major modding is over. Thank god. It's fun, but not in a freezing attic. Top vent on. I am going to remove them in a bit and run cloth tape around the lip so it seals better and stops any vibration.

iRfOipI.jpg

The side vent attaches like this. Meaning you only have two extra screws to worry about.

bl2qjTv.jpg

The bottom part needs some neoprene, as there is a step down in the case (for the top clamshell). I have that too. This is it assembled.

CpukXgP.jpg

What's great is the vents are directional. Meaning you can aim the intake and exhaust.

All done.

pLSfiy5.jpg

When I fit the gaskets I will put the interior stuff back in.
 
OK, we're there. First thing I did today other than drilling lots of holes and making all the fan bolt holes bigger (I realised I needed the low profile self cutting fan bolts) was cut two slots into the inner chassis to clearance the two top side vent bolts.

SKZWIHP.jpg

After marking it out I put down the 2mm Neoprene gasket.

2TW7Pju.jpg

This will stop any vibration due to the panel thickness. I also want it to be as "bug free" as possible as I have noticed one or two earwigs in the crawl space when in there. These are buggers, as they crawl in there, get zapped and then decompose causing a short. So the back PSU part will need fine mesh too, but that's cool I got loads.

Onto putting a cloth tape gasket onto the upper part of that grille.

DN5slQd.jpg

And then a full cloth gasket for the top one.

YZiIBSt.jpg

You can see here why that neoprene was so important.

D57Vvna.jpg

It stops crap getting in. Put the internal parts all back together, and.

cRst7SS.jpg

Now I need a couple of decals. Because my flat has the best roof access the maintenance guys sometimes come in (after I have allowed it and have someone there). It's been known for them to check the crawl space at times. My rent is very high, but for that I get the best service you could ever expect. They are meticulous. However, I don't want them shifting gear around and possibly covering either vent. Especially if I hook it up online and leave it going whilst I am gone.

I also mentioned that I had braided the IO cables. I did, last night.

nva6bfF.jpg

I did them in pairs, as well as the speaker (important on a build like this).

That should now be all of the mod work done, hurrah.
 
Oh you plonker lol. Yeah I wondered where you were :D

It got me on the foot too. This was one of the sneaky ones that you don't feel though. The thumb one? yeah that bloody hurt lol. This one though? well I was lying in bed after getting done watching TV and squinting at my foot thinking "What's that cack all stuck on my foot?"

J6dEvT2.jpg

It got me again twice yesterday but mere flesh wounds that didn't bleed. I think it'll be gloves come build time tbh.

TBH dude the way you have to "bore" those holes (my drill doesn't even have the torque down that low) it takes ages. Having cut those relief slots yesterday for the side vent bolts I realised just how easy the jigsaw goes through it. I wouldn't have cut the holes with it because they are never round, but yeah if it turns out I do have to clearance that part I will just use the jigger on it. The rad will be on a gasket, so it should be able to waft the heat out. Plus I will be running those fans at 600 RPM with the top ones allowed to ramp up so it should be OK.

Yeah, for sure that was the best place to put the intakes tbh. Right over anything else hot (cards, drives SAS etc). It will also cool the NB, and the PSU can then extract that air from that side.

Still waiting on the SAS cables. However, I think they will be here before the back planes any way.
 
I think the best one I did was pick up one of those old razor cases by the inside edges - obviously without thinking - and as it went up, it tilted slightly and just slid through the flesh. You might want to get yourself a deburring tool. Noga arguably make the best ones but anything would do the trick well enough. You can pick them up for under a tenner. You don't need a bucket load of spare blades....or at least you don't for the decent ones, maybe if you're looking at the £3 ones you might. You want to do it before you get the motherboard in there - you know, for the benefit of future-you - as the metal shavings it scrapes off could short out the board. Even a file would work.

I've got a belt file. That is what I used to smooth off the holes etc. TBH? to get it completely safe you would need to spend hours and hours. Come build time I will wear cotton gloves. It's funny because it's absolutely wonderfully made. You would love it. The handles? cast alu. The front panel? is in about 4 pieces. There are two cast alu pieces (top and botom) that come out with the handles. Then an alu face plate, then under that a steel one. So in theory you could remove that, take out the face plate with the 5.25 holes and 3.5 and completely make your own. No one used rolled edges until about 2001. It just wasn't thought about really. This? is 90s. When I took out the header cables I found two completely petrified and rotten rubber bands lmao. All of the bay covers are alu aswell, the packing in the box is insane and the box is about 1/4" thick. You just don't get anything like it now at any price really. Oh yeah, forgot to say. I unclipped the AT keyboard thing and removed it, and put a vinyl disc over the hole.

Right. Last of the mods. TBH it isn't even really a mod, more of a easy hack.

Bottom right of the pic. You can see those plastic things.

nva6bfF.jpg

Those are for full length cards to go into. I don't have any.... Inside that area goes a 80mm fan. I have removed it, as it's a molex power house (annoying). I will be replacing it with this.

2DpQ8zs.jpg

Couple of problems though. Firstly it's not really all that necessary unless it's doing a job. I have found one for it... Secondly, if you were around in the early 90s to about 2000 you would know that dust filtering was at best rudimentary. AKA - awful.

y3HS9ks.jpg

It was like trying to suck a golf ball through a garden hose. Now whether I use a fan or not I need a better solution than that crap. So I had a dig around and found this.

W7NyTlk.jpg

Which is up to modern standards. Then I needed to find a use for the fan. I did. I am going to remove the plastic parts (they just pop out) and fit a drive carrier there for 2.5. The reason? I go back to this.

VMQJwpv.jpg

These were designed for server use. The reason? well they are blisteringly fast. However, they are also the most reliable stable SSDs ever made. So are still very much in use in the server space. Linus runs his servers with them, only his are much bigger. IIRC he bought them from Amazon when they upgraded. They run warm, but are supposed to be in a cooled drive sled. Obviously I don't have one of those, so I am going to bolt it right in front of that 80mm fan. The bottom is all fins, so I would imagine that is where most of the heat comes from.

Given this will be the OS drive it needs to be very well looked after.
 
Bonus :D

About two months ago I switched mum's broadband. Talktalk ramped the price up and didn't offer her a deal to stay. So screw em.

Switched her to Plusnet. Thought we were going to get a £50 mastercard pre paid thing, turned out to be £100 :D

x5y3vGZ.jpg

Ordered two sets of those. 3200 this time, so I will either try running them all at 3200 or 3000 on the white set.
 
OK so I got home yesterday and had a thousand things to do. Smashed those out, so I started plugging things in. Already pasted the CPU. Turned out EK throw in some Kryonaut with their 1700 kit. I didn't need it, as I hadn't mounted that yet.

AZNDdWo.jpg

I would say cable management is going to be erm, complex.

More good news. The SATA back planes arrived at mum's today. No duty ! So that's four days air from China and no duties. Stoked !

Have had to order a 5m VGA cable. I have no way of outputting video ATM. That's maybe a good thing, as I have so much to do.
 
Smogsy - cheers dude. Yeah, tbh it's not really workable in a server environment tbh. There's no cooling basically.

Semple - if I rack mounted it it would have no cooling at all. If you put the rails back on that's it, sides are totally blocked. Plus I don't have room for a rack.

olJStAE.jpg

I'm currently working out what does/doesn't work. However, look at the back there there's a door. That opens up to a crawl space that goes around 35ft all along my flat. It's going in there. Very well insulated, and always freezing cold in there.

My main room is a kitchen/diner/living room. 6m long by about 4m wide. At one end it tapers because I am in the roof, so the door wall there is 1m. Then I have a 4x4m bedroom, large bathroom etc. For me? it's ideal because it's easy to clean.

Sadly the 16 port SAS card is a no go. Drivers are old, and from 2013. Most report it still works, but all on AMD say it doesn't, which is my finding. You install the driver, it hangs, then kills Windows 10. Literally kills it stone dead beyond repair. 10 hours of messing with it yesterday and I gave up.

Going to need a more modern SAS card, but I have my eye on one. The Revodrive however works beautifully.
 
I'm hopeful the CPU temps won't be that bad. It's literally air in, through the cooler and out. We'll see though. I don't mind down clocking the CPU to Epyc levels if I have to.

After another couple of hours of digging my head was really starting to hurt over the SAS card. I'm waaaay out of my depth. Like, I just don't know what the heck is what in servers any more. Until 2004? that was all I used. After that I moved out of the IT game and yeah, not really had a need for being up on it.

I had a Adaptec 6gb card. Problem is? only one port so 4 drives. That said, I decided to play with it any way as if I ended up getting a larger Adaptec card or two I would need to know what I am doing. Set it to JBOD, booted into Windows. Was seeing the two 1tb SATA SSDs as 2gb drives. Erm. Went back into the RAID bios, set them up as simple volumes. Booted into Windows, same. Fork.

In the end I attempted to format one in the RAID bios. After four hours I gave up. However, when I went into Windows there it was all of a sudden FFS. So I did the same to the second one, let it run for about 5 minutes then rebooted and sure enough Windows saw it properly. Gawd knows. However, this thing takes aaaaaaages to boot. Especially with the Revo in there on its own RAID sorta bios too. Then I remembered.... My NAS !! I had all of this crap before with Adaptec, before realising FreeNAS wouldn't work on it no matter what. Which was a must, as it uses ZFS. However ! what I did learn through all of that is that Dell Perc H200 are the bees knees. Cheap, easy to flash into IT mode, no slow as balls RAID bios and support everything.

So I made an offer of £30 on two of those on the fleabay and they are on the way soon. Orsum !

8YiCTMt.jpg

Nice thing is if I ever decide to go with FreeNAS or the other NAS that uses ZFS? I can. Plus that was by far the cheapest solution too. For a really decent RAID card.
 
OK. Been quietly plugging away when I feel like it. Got to a point where there really isn't anything else I can do.

After doing a lot of research it seems that the cloud software needs Linux. Either through Linux or a VM, no matter what. It does not function under Windows on its own.

I would have gone down the Linux rabbit hole (and will) but sadly it seems the 7300 GT is dead. What I mean is it works in Windows with no driver loaded, but if you go into Linux it installs a driver (which Windows doesn't have) and is garbled really badly. Due to this I can not work on it. Mostly because I am using a 7" screen. Maybe if I had it plugged into a better monitor or my TV I could get around that, but I really don't see the point in struggling for the sake of it.

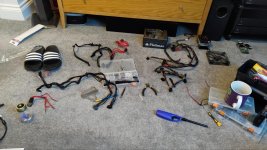
As such I decided to focus my energy on other things. Like sorting out the PSU. I don't need many SATA connectors (maybe four?) but as of right now they were on Molex to SATA runs. Which are a real pain to plug in, and mean you need two lots of cable to do one task. Also, I decided to basically not use any extensions as they are not needed and the case doesn't have a hidey hole for left over wire.

Thankfully this PSU came with a set of connectors and a whole buttload of pins. You could basically get your own wire and remake every thing it uses. As such I removed the Molex ends from the SATA cables, and changed those to PSU connectors. I also found a Molex run (I didn't have any and was using red ones I made) which had a floppy connector on the end. I removed that and added a 5th Molex, which should be enough to power everything (the back planes use molex, so that's three). Any way, like I said I also decided to ditch the silver and red cables. So yesterday I got to that.

CIeMjL0.jpg

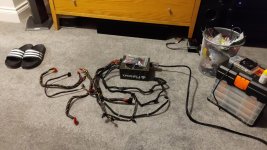
When I was done I was left with this.

ZqLgAVk.jpg

Which is much, much better. The only other black braided cable other than the two SATA runs is the 4 pin (board needs 8+4) which I also had to make because the PSU only comes with 8 pin connectors and they don't split.

Am currently working to obtain a new fan for the PSU. It's cheap, flimsy and noisy and has developed a rattle. Am trying to get a Noctua, but it has to be a 3 pin so I have had to bid on a couple. If that falls through I will go with something else.
 
Back
Top Bottom