

Don
- Joined
- 20 Oct 2002
- Posts
- 17,218
- Location
- In a house
I thought I would document my journey upgrading my home to have a better network using StarLink as the main connection - I have placed the thread in Home and Garden as I am focusing on the setup of the system at home, rather than networking specifically, and also there is a dedicated Starlink thread in the Networking already.
So, background - I work from home, and live in a fairly rural location. I spend a lot of the day working on the internet running meetings/video calls with many devices connected most of the day. I have found that a single Sky Broadband connection with a varying speed of anywhere from 50-75mbps was mostly fine when it was just me in the house, but it is not a great experience. This is made worse when the family get home and use their devices! We also have fairly high contention in the village it seems, which does not help matters.
My Current setup is that I had the Sky BB router in the Lounge downstairs, with a powerline connection to the garage which also is my "workshop" where I have a TV and a PC which I used when working on cars/bikes/etc. I also have a wireless AP providing a specific network for the "Garage Wifi".
Most of the rest of the house is connected to the Sky via Wifi, including mobiles/tablets/smart home/Blink Cameras/Doorbell/etc. This included my office, where I have up to 6 machines all hung off the SKY Wifi
The Sky Router also has a NAS attached to it directly via RJ45, as well as the Hive box and a Large OKI MFD (Printer/etc). This router also runs off a UPS for protection against shorter powercuts.
For redundancy I have a 4G Router in the loft hanging off a small DC UPS, with an aerial bolted to the roof, inside. I have that router attached to a cheap Chinese Wifi router as it has much better coverage than the 4g router's built in Wifi. If there is an outage of SKY, I can connect to this manually, and it will work just about ok (although the 4g is spotty up here, and slow). If the case of a longer power cut, I can connect to the weaker 4g router itself, which has the DC-DC UPS, that lasts a lot longer!
A little diagram to show the setup:

After deciding to look into my options, I have decided to move away from Sky for BB, and get Starlink to give me a faster network connection. This may have some issues, but I was keen to improve the networking in general around the house, and decided to revamp the whole IT setup at home as part of the process. This includes, installing proper network cables for the house where needed, a move to using a Mesh system for Wifi where possible, setting up a some automatic failover process for the new "backup" Vodaphone BB connection/Starlink. I also wanted to be able to use managed switches where needed to force certain machines over the BB line as a preference for lower latency (mainly for my kids when gaming) or just QOS preferences, whilst also making a proper patch/cabling board to handle the infrastructure needed.
It should look something like this:

Now, I tend to try and do most things my self and learn the required skills as I go. This project is not going to be any different. Although I will make some exceptions for certain things!
First thing was get the Starlink, it arrived very quickly, 2 days after order, which was not what I was expecting given the stuff I read online:

Initial setup was VERY easy, the app did most of the work, and got it working sat on the drain in the middle of my lawn (it is supposed to be as close to level as possible, and this was mostly the best spot in the lawn where it would get the least obstructions.
SpaceX says you need to have an un-obstructed dome of 100degrees from the face of the dish and the app has a nice little representation of the sky it sees!:


So, the house and some trees were causing a few issues, and I was seeing some small drops as a result, and speed was mostly ok, but I was hoping for a little better once it was properly mounted:

I had my eyes on this gable end of my roof to sort this problem out. However, this part of the house is VERY high up, and my dual section ladder was simply not enough to get a mount installed properly:

A few calls to local aerial places, some of whom simply refused to install the dish, claiming they did not know enough about it, and could not guarantee it would work, etc. Finally found a nice chap locally who took the time to listen, and actually agreed to come out and do the install for me. He was a little worried, as he had done two before, but they were flat roof type installs, and he was not 100% sure what mounts it would need. Still, a little bit of explaining that I had done most of the work, and got all the parts together to do it, and really just needed him for his long ladders and time, to install the pole in a way that he would have done hundreds of times before.
So, about mounting. The dish slots into the little X base that was shown earlier. This little section was the right size to slide into an aerial pole that I had, but i was not confident it would stand up to the English weather with just a few CM in the pole:

So, I decided to modify a pole joiner type clamp, with the hole for the cable. Sadly SpaceX made the cable end an L shape with quick a bulky fitting which meant it would not be possible to slide the cable down the inside of the pole (this was my initial preference!) so, some mods were needed:

After some cutting, sanding and smoothing, I had the above. I was mostly happy with this, but also wanted to make the clamp more secure, so I 3d printed a sleeve to bulk out the smaller section of the pole to mean more of the surface would be clamped correctly:

You can see it here, its the black material that visible just inside the hole:

I left an overlap in a few places to make sure this protected the cable even more from the (albeit smooth) metal edges, so now we are ready to get this thing onto a pole nicely:

Whilst waiting for installation day to come, I started to work on the panel for the networking in the loft:

3d printed a few mounts, and started to mock up locations for the stuff I needed, then making some holes for cables:

Checking out my layout I ended up turning the ethernet adaptor for the Starlink through 45 degrees to make cables runs easier:

Quite happy with how its turned out, and soon enough it was mounting day!


MY aerial guy did a great job, and I was up and running again in no time:

So, the two cables into the top router are from the starlink in white, and 4g router in purple. These are fail-overed(?), with the Starlink as the main, and 4g as backup. The 4g will be being swapped for the new Voda BB when it arrived later this month, though a cable run that will be patched in from downstairs. The yellow cable is sharing the ethernet to the 8 port and the green to the 5 port for expansion (I may swap the 5 port out if needed to another 8 in future) The yellow cable coming out of port 1 in the 8 port is then going to the mesh main unit. I had yet to run any cat6 around the house at this point, so the patch panel is not in use! I also want some better patch panel cables to make the runs neater/less tight.
The mesh and 4g router are sat on the floor near the latch opening for now, but I may change this in future:

However, we now have un-obstructed sky views, and no network drops!

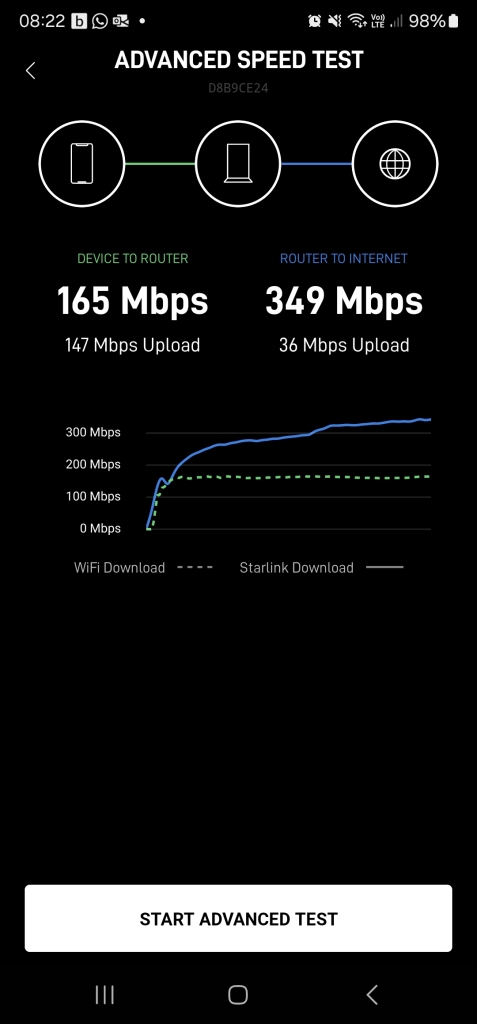
The Mesh is working well, and we have decent speed all around the house. This was in one of the worst spots of the house, when connected to the mesh:
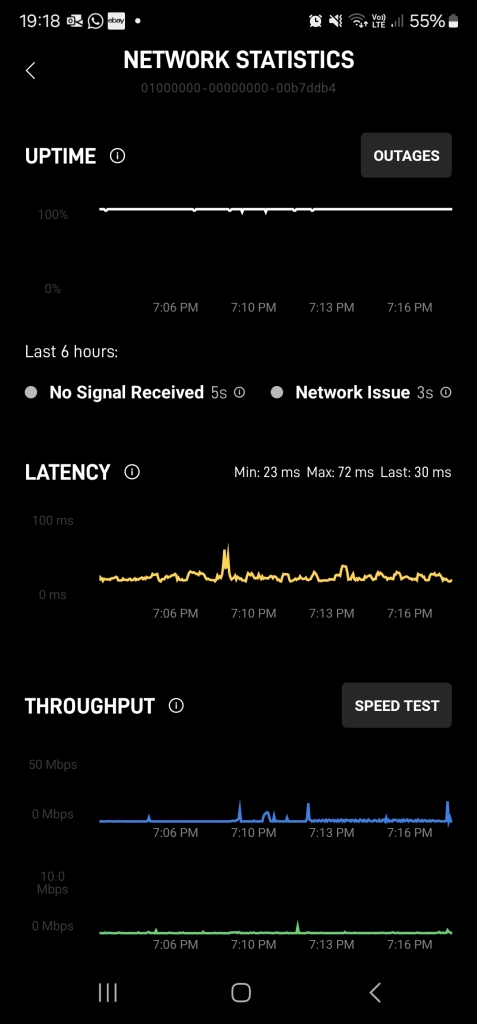
Latency is not as bad as I thought, and drops are down to negligable:
Phase one is completed!
So, background - I work from home, and live in a fairly rural location. I spend a lot of the day working on the internet running meetings/video calls with many devices connected most of the day. I have found that a single Sky Broadband connection with a varying speed of anywhere from 50-75mbps was mostly fine when it was just me in the house, but it is not a great experience. This is made worse when the family get home and use their devices! We also have fairly high contention in the village it seems, which does not help matters.
My Current setup is that I had the Sky BB router in the Lounge downstairs, with a powerline connection to the garage which also is my "workshop" where I have a TV and a PC which I used when working on cars/bikes/etc. I also have a wireless AP providing a specific network for the "Garage Wifi".
Most of the rest of the house is connected to the Sky via Wifi, including mobiles/tablets/smart home/Blink Cameras/Doorbell/etc. This included my office, where I have up to 6 machines all hung off the SKY Wifi
The Sky Router also has a NAS attached to it directly via RJ45, as well as the Hive box and a Large OKI MFD (Printer/etc). This router also runs off a UPS for protection against shorter powercuts.
For redundancy I have a 4G Router in the loft hanging off a small DC UPS, with an aerial bolted to the roof, inside. I have that router attached to a cheap Chinese Wifi router as it has much better coverage than the 4g router's built in Wifi. If there is an outage of SKY, I can connect to this manually, and it will work just about ok (although the 4g is spotty up here, and slow). If the case of a longer power cut, I can connect to the weaker 4g router itself, which has the DC-DC UPS, that lasts a lot longer!
A little diagram to show the setup:
After deciding to look into my options, I have decided to move away from Sky for BB, and get Starlink to give me a faster network connection. This may have some issues, but I was keen to improve the networking in general around the house, and decided to revamp the whole IT setup at home as part of the process. This includes, installing proper network cables for the house where needed, a move to using a Mesh system for Wifi where possible, setting up a some automatic failover process for the new "backup" Vodaphone BB connection/Starlink. I also wanted to be able to use managed switches where needed to force certain machines over the BB line as a preference for lower latency (mainly for my kids when gaming) or just QOS preferences, whilst also making a proper patch/cabling board to handle the infrastructure needed.
It should look something like this:
Now, I tend to try and do most things my self and learn the required skills as I go. This project is not going to be any different. Although I will make some exceptions for certain things!
First thing was get the Starlink, it arrived very quickly, 2 days after order, which was not what I was expecting given the stuff I read online:
Initial setup was VERY easy, the app did most of the work, and got it working sat on the drain in the middle of my lawn (it is supposed to be as close to level as possible, and this was mostly the best spot in the lawn where it would get the least obstructions.
SpaceX says you need to have an un-obstructed dome of 100degrees from the face of the dish and the app has a nice little representation of the sky it sees!:
So, the house and some trees were causing a few issues, and I was seeing some small drops as a result, and speed was mostly ok, but I was hoping for a little better once it was properly mounted:
I had my eyes on this gable end of my roof to sort this problem out. However, this part of the house is VERY high up, and my dual section ladder was simply not enough to get a mount installed properly:
A few calls to local aerial places, some of whom simply refused to install the dish, claiming they did not know enough about it, and could not guarantee it would work, etc. Finally found a nice chap locally who took the time to listen, and actually agreed to come out and do the install for me. He was a little worried, as he had done two before, but they were flat roof type installs, and he was not 100% sure what mounts it would need. Still, a little bit of explaining that I had done most of the work, and got all the parts together to do it, and really just needed him for his long ladders and time, to install the pole in a way that he would have done hundreds of times before.
So, about mounting. The dish slots into the little X base that was shown earlier. This little section was the right size to slide into an aerial pole that I had, but i was not confident it would stand up to the English weather with just a few CM in the pole:
So, I decided to modify a pole joiner type clamp, with the hole for the cable. Sadly SpaceX made the cable end an L shape with quick a bulky fitting which meant it would not be possible to slide the cable down the inside of the pole (this was my initial preference!) so, some mods were needed:
After some cutting, sanding and smoothing, I had the above. I was mostly happy with this, but also wanted to make the clamp more secure, so I 3d printed a sleeve to bulk out the smaller section of the pole to mean more of the surface would be clamped correctly:
You can see it here, its the black material that visible just inside the hole:
I left an overlap in a few places to make sure this protected the cable even more from the (albeit smooth) metal edges, so now we are ready to get this thing onto a pole nicely:
Whilst waiting for installation day to come, I started to work on the panel for the networking in the loft:
3d printed a few mounts, and started to mock up locations for the stuff I needed, then making some holes for cables:
Checking out my layout I ended up turning the ethernet adaptor for the Starlink through 45 degrees to make cables runs easier:
Quite happy with how its turned out, and soon enough it was mounting day!
MY aerial guy did a great job, and I was up and running again in no time:
So, the two cables into the top router are from the starlink in white, and 4g router in purple. These are fail-overed(?), with the Starlink as the main, and 4g as backup. The 4g will be being swapped for the new Voda BB when it arrived later this month, though a cable run that will be patched in from downstairs. The yellow cable is sharing the ethernet to the 8 port and the green to the 5 port for expansion (I may swap the 5 port out if needed to another 8 in future) The yellow cable coming out of port 1 in the 8 port is then going to the mesh main unit. I had yet to run any cat6 around the house at this point, so the patch panel is not in use! I also want some better patch panel cables to make the runs neater/less tight.
The mesh and 4g router are sat on the floor near the latch opening for now, but I may change this in future:
However, we now have un-obstructed sky views, and no network drops!
The Mesh is working well, and we have decent speed all around the house. This was in one of the worst spots of the house, when connected to the mesh:
Latency is not as bad as I thought, and drops are down to negligable:
Phase one is completed!
Last edited:

")


")
 Now we're finally on full fibre using the OR community voucher scheme but the whole Sky matrix setup though just fell apart and all the boxes just kept falling offline because of having solid inner walls.