Total Pc Area overhall!

Associate
Joined
29 Jul 2017
Posts
68
Well.........
First time posting anywhere online a log of a project I am beginning, so hoping it goes well.

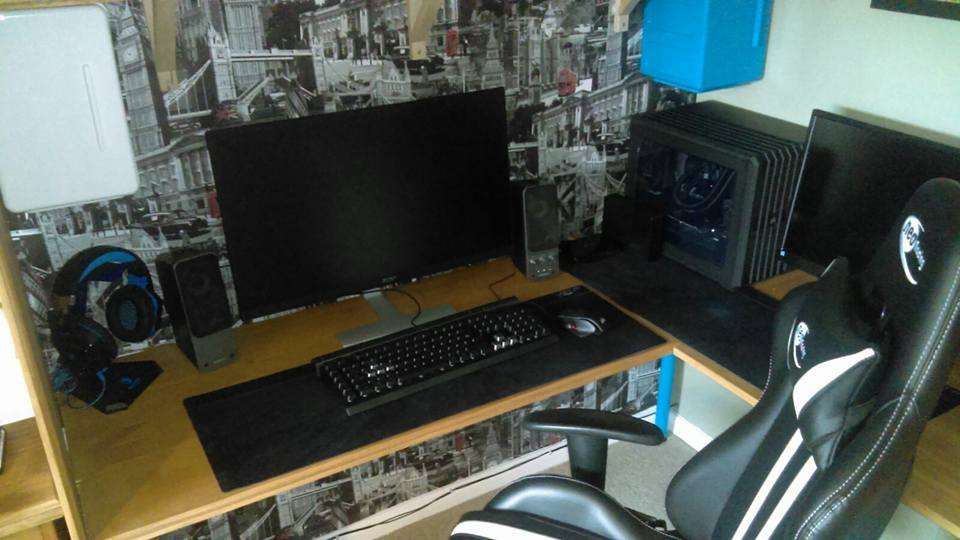
I did have this Computer up for sale as the Mrs never uses it but stupid offers made me decide to keep everything.

My plan is to totally change the area for a brighter cleaner look.

Ill log everything as much as I can.

Plans are as follows.
The area is a bit dark so Im going to be changing colour scheme to black and white.
I have a few things to replace such as speakers etc.
Everything ordered has now arrived so there will be a lot of sticky back plastic and spraying going on but Ill try to picture as I go.

Its not just the comp I will be sorting but the entire area including full Rgb lighting and desktop surfaces etc.

I do however have a spare Aerocool DS cube case laying about. Any ideas out there as to what I can use it for?

Incase anybody askes the specs at present for this PC are now:
I5 7600 CPU
RX 480 8GB GPU
16GB VENGANCE 2400MHZ DDR4
AIR 240 CASE (Number 3 in my house as I love them!)

If anybody sees me doing anything wrong please let me know.
Should be done within a few weeks/months so lets hope it goes well.

TTFN :)

DBmuGc.jpg
 
Associate
OP
Joined
29 Jul 2017
Posts
68
Probably should have stated I had already started lol. Well I had a 4 day weekend and got quite a lot done I think. Im no expert so your abuse should be mild :). Pics incoming!
 
Associate
OP
Joined
29 Jul 2017
Posts
68
Ok so at first I bought everything needed. I decided to start by swapping out bits I wanted to change. I swapped out the creative t20 speakers with some edifier 2.1s. I took down the old comic pics and popped up a rather large pokemon maxi poster I found in ASDA of all places and finally got some storage sorted for the shelves as they were totally full of crap.
sGKuXD.jpg

pmIL7SXoj

pm2mH4yoj
 
Associate
OP
Joined
29 Jul 2017
Posts
68
I started the actual changes at the top. I stripped out the old shelving and sanded them all down and cut some access holes for the lighting I am planning to put around them.
pmwdfkCWj

pmCE2eBxj


After they were down and sanded they were covered in a white woodgrain effect sticky back plastic. After fitting the Led strips (RGB) I heated and smoothed out all the covering and remounted the shelves on original brackets. I then tested the lighting before fixing it all into place.
pmbqlkTJj

pn9mVTubj

pouNHpFoj


I then installed a little custom corner shelf for my new favourite figure to stand over the PC itself. Hes approx 28cm tall. I then called it a day on the top shelves after fixing into place and ensuring all coverings were all smoothed out.
poyaFjxRj
 
Associate
OP
Joined
29 Jul 2017
Posts
68
Yesterday I got started on the actual desk. This was a pain in itself as the ripping out as a big job as over the last few months several cables etc have been added and tied in stupid places so they fit and it took me about an hour just to remove cable ties and get the pc moved and the desks empty.
pnNh74SXj

pnv7klWuj
 
Associate
OP
Joined
29 Jul 2017
Posts
68
Then came the big cover up job. I had a total of 7 blue legs so set about wrapping them white. Then sanding down the desk tops and covering them. The big piece was a total nightmare and I went through 3 rolls of covering before I could get it done with no bubbles etc even with heating it up to smooth on!
poyT4mTAj

pnKcUUo9j

pm7Drtlpj

pmd7rVKij
 
Associate
OP
Joined
29 Jul 2017
Posts
68
Before I tried fitting anymore lights or anything back into place I sorted out the power issues I had. I was originally using 2 4 gang extensions from different parts of the room. Just bog standard ones from wilkos. Obviously this caused a few issues so I "splashed out" and bought some proper kit and installed it into place and got some cable management points installed ready to go.
pmxiMdAJj

po5Stpsqj
 
Associate
OP
Joined
29 Jul 2017
Posts
68
Time to start putting it back. Lights fitted to the back of the desk and all joined together with previous lights so it all syncs and goes off the same remote.
poxnUMSHj

Starting to put the system back into place and get everything exactly where the Wife wants it to make it comfortable to use.
pmgokYG8j

Finally all back into place and clean. Excuse her dressing table chair Other one was being cleaned.
pnwnutzmj
 
Associate
OP
Joined
29 Jul 2017
Posts
68
I must apologise for the photo quality. I am no photographer and my phone camera seems to be totally awful. As I plan on doing more projects etc I will buy an actual camera and learn how to use it :)

Shes pretty happy with the layout so its all good. The next thing is to sort the actual PC. I already have the bits needed (Cables Combs, Paint, Primer, Lights etc) Will probably take longer and I will get some decent pics sorted.

Anybody spots something I have missed let me know. :)
 
Associate
OP
Joined
29 Jul 2017
Posts
68
It looks like you did what you set out to do, much brighter / clean looking. More note worthy the missus is happy, so well done!!
Thanks. Im actually pretty pleased with the outcome. I have however become very annoyed at the quality of the post and pictures so I bought a new camera! Ill be starting to rebuild the system soon so hoping those posts go better.
:)
 
Back
Top Bottom