Urgent help needed regarding gpu waterblocks not fitting.

Soldato
Joined
26 Sep 2013
Posts
10,756
Location
West End, Southampton
Hi guys.

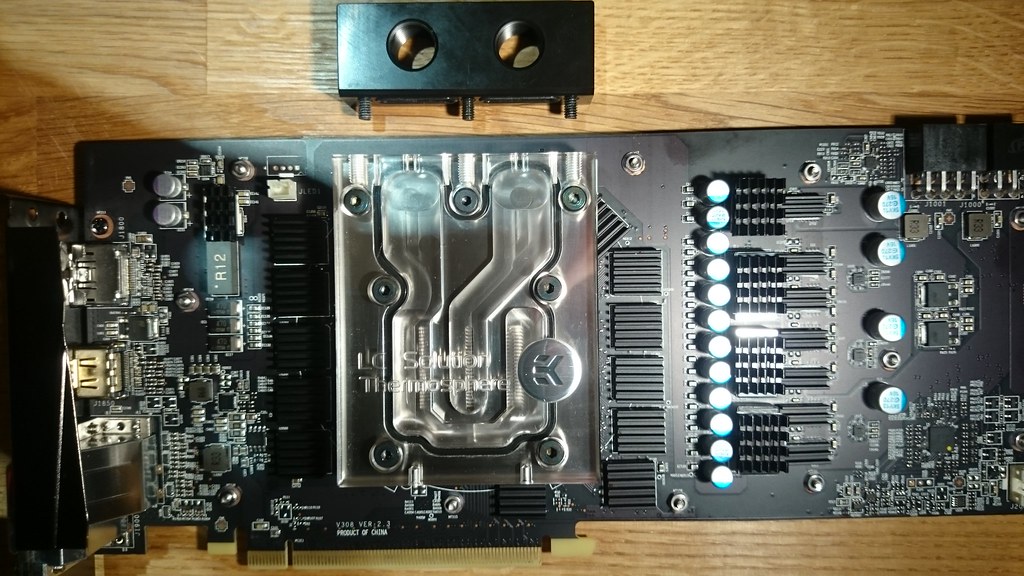
I'm in need of some advice, scratching my head here. I've put my thermosphere water blocks on my gpus, but when I offer up the bridge, the edge of the gpu pcb's fouls on the bridge because the thermosphere blocks are shorter than the end of the pcb. Now the weird thing is, I went on the EK configurator and put in my card models (MSI 390) and these were the blocks that were recommended as there are no full covers available. I bought them from ocuk but did match up the model number and is exactly the same as EK site suggested. Am I being dumb here??? The blocks are simply to short and I can't bolt on the bridge because the blocks are set back about 5mm. Any ideas, here are some pics. This is doing my head in, have i done something silly here?

21550919745_ae3e47cf9d_b.jpg


21559670791_698189d833_b.jpg
 
Last edited:
they are not reference 390's no, they are MSI 390's. The EK configurator and the guys at EK said these thermosphere blocks would fit my cards, they are clearly to short though.

Just bolted on the existing black end bits with the ports to run the tubes without the bridge, can't even do that because the fittings wont fit. I'm not impressed, so many weeks of research, cheking with EK and now I'm in a position where I can't even connect a £700 custom loop together. :mad:

20930541583_60733a5783_b.jpg
 
Last edited:
Looks like part of the blocks is missing. Can you add a photo of the bridge on its own

this is the bridge for my Z77 PCIe spacing

20930921503_3762079f6d_b.jpg


and the back with the plate I've put on to block the lower holes which isnt needed.

21363994040_7c42ab405c_b.jpg


This is the original black end piece that came attached to the waterblocks

21560808641_9fa42a40fd_b.jpg


and connected back to show how the gpu block came

20930919573_88e4100b47_b.jpg


The GPU Thermosphere waterblock simply isn't long enough. The R600 mounting bracket only fits on one way so I know it's not the bracket.
 
yep it's incredibly annoying, was so angry last night, just the fact I've put so much time and effort into planning everything. I've spoken to guys at EK many times regarding the blocks and the bridges needed and they assured me, as did the EK configurator, that everything will bolt together just fine. Clearly something is different with the MSI 390 as the blocks are just way to short, they should not be under flush of the edge of the PCB. With them that short, there is no way any bridge will connect, and there is no way any EK fitting will screw into the top because it fouls on the edge of the PCB. Yes that's fine for running one card as you can come in from underneath, but not when running multiples, but the EK guys knew I was running multi gpu's they suggested to bridge and everything that's the frustrating bit.

I mean, this is the block from above, there's no way of any bridge fitting for the card, yes the block fits but it's not how EK show when running multiple cards.

20930765684_f9356eb4de_b.jpg


as you can see, can't even connect anything to the top holes

21553536535_07ce7f8f99_b.jpg


Only thing I can do now, is fudge around with the loop, and make it functional by doing something unconventional and not how I want it. There's no way I can connect to the tops of the card because everything will foul the on the PCB, so I'll have to plug the top holes and connect underneath, like this I guess

21575592641_b31f553ae0_b.jpg
 
Last edited:
thanks, I'm just going to connect it with the fittings as I've shown above. A little different, but at least it will be original lol
 
thanks harry, wont be a few days now as I'm back to work tomorrow after a nice week off. But keep looking back here and see how it turns out lol.
 
Thanks rich. Just going to work with what I have above regarding those 90 degree fittings I've roughly put in place. It's a little unconventional but I think it will still look quite smart once it's all connected.
 
can I just with you lot, will the flow be fine having my loop plumbed in like this, apologies for the kiddie sketch, doing this at work on my phone whilst re-imaging a PC in a Lloyds branch :D

20975164594_9d7d9984ed_b.jpg
 
because I bought the GPU's way before I decided I wanted to go to a water cooled setup.

Well lets hope I fail in providing you a train wreck. Thanks for your nice encouraging words.
 
You shouldn't do it that way. The Thermosphere has a dedicated in port (RH side) as it has a built in jet plate similar to a cpu block. If you run it that way the top card won't be cooled as well as the bottom card.

ah yeah didnt think about the top card, just saw on the EK installation pdf that the preferable inlet is the right port. Of course I did that for the bottom card, but the top card I overlooked.
 
Last edited:
exactly fx. The top ports of the blocks foul on the edge of the pcb. Even getting those G1/4 spacers that momo posted on the last page would not work because the diameter is to large. All a bit annoying but will make it work and try and make it look as nice as possible.
 
Typically EK don't make full covers for the msi 390....its only the most popular 390 lmao. When I bought them I had no intention of water cooling so at that point didn't check for full covers. if they become available in future, I'll just drain the loop and redo.

Fittings were fine, was fun getting a nice smooth bend that small lol.
 
Last edited:
well here it is, my first attempt at a custom water cooling loop with PETG tubing. Just got to fill her up tomorrow and leak test. Forced into something a little different, but I kinda like it.

21064157114_9e07aaf467_c.jpg
 
already had the AIO cooler, I really like the 105, but I've every intention of later down the line putting the cpu in a loop as well. It's my first custom job so didn't want to take to much on at once if ya get me.
 
What's the best way to get air out of the system guys? I've now filled the res and cycling the psu with the lid of res off to get the air out, but I seem to have a lot of air at the tops of my tubes. how do I get all that out and how long does it roughly take?
 
Thx guys, I'm quite pleased, looks really nice with the fluid in.

Tubes are now filling up nicely, air is gradually moving along. Can't wait to turn it on and use it haha.
 
Last edited:
Back
Top Bottom