I wish I knew about this painting trick before (cutting in straight lines)

Soldato
Joined
13 Nov 2006
Posts
24,016
@sigma

In your case, I assumed you have got a bit of the darker paint on the lighter coloured walls from the bleed? You want to put the masking tape on the lighter walls at the side and end up making your dark straight lines on the light walls (depending on how much bleed you have). That way, you are covering light paint with dark.

If you do it the other way, putting the masking tape on the darker feature wall, you’ll be finishing up trying to cover the darker paint with light....will will take more coats, might not cover perfectly, and the more paint on the masking tape will make it harder to pull off.

Get some pics up

I don't have a hosting site that I use any more (used Photobucket many moons ago) but I will upload some when I finally get around to sorting it.

This may be in another 3 years time :o :o
 
Soldato
Joined
13 Nov 2006
Posts
24,016
Bump.

@TheOracle I'm in need of advice a fair bit sooner than I expected. I'm not correcting the old wall I mentioned previously but I am painting another room. I've done a first pass on the ceiling and walls, and am getting ready to do the final pass on the ceiling next.

I think I understand the process, nicely summarised by dazzerd here:

Other way round I think paint ceiling as normal, mask ceiling then paint over tape. Then paint wall, then you don't have to worry about wall colour going on ceiling as it's taped. Once wall is done remove tape and voila


However what I'm unsure about is exactly how to do this. Once the second ceiling coat is dry I'll tape up the edge so that the newly painted ceiling is protected. As above, I'll then paint the edge white before doing first coat of the wall colour.

What I'm unsure about is when to peel the tape off? Only after the second wall coat, surely? I thought the idea is not to allow the paint to dry before pulling off the tape, does this only apply to the drying of the second coat? It must do?

Any tips on how best to ensure the tape is on in a straight (and 'correct') line would be most welcome as well.
 
Soldato
Joined
27 Aug 2005
Posts
3,615
Let me get this right:

1) You paint with original colour over tape, wait to dry
2) Paint over masking tape with ceiling colour., wait to dry
3) Second coat of celing colour and then remove tape
 
Soldato
Joined
10 Mar 2006
Posts
2,912
Location
Fife
Let me get this right:

1) You paint with original colour over tape, wait to dry
2) Paint over masking tape with ceiling colour., wait to dry
3) Second coat of celing colour and then remove tape

No

1) Paint both sides of joint with the colour you want to put the tape over (white)
2) Apply tape
3) Paint over tape with colour from step one (White)
4) Paint wall with secondary colour for the wall (Green)

the paint in step one will be the final coat for the ceiling. Masking tape doesn't create a perfect seal on the surface which allows paint to get under it, this is called bleeding. If you didn't give it a first coat with the same colour (white) then the green would bleed under it.

But painting it over with the same colour you are bleeding the same colour of paint, thus you don't see it. So when you paint the second colour over the masking tape, all of the edges are sealed and the paint has nowhere to go.
 
Soldato
Joined
27 Aug 2005
Posts
3,615
No

1) Paint both sides of joint with the colour you want to put the tape over (white)
2) Apply tape
3) Paint over tape with colour from step one (White)
4) Paint wall with secondary colour for the wall (Green)

the paint in step one will be the final coat for the ceiling. Masking tape doesn't create a perfect seal on the surface which allows paint to get under it, this is called bleeding. If you didn't give it a first coat with the same colour (white) then the green would bleed under it.

But painting it over with the same colour you are bleeding the same colour of paint, thus you don't see it. So when you paint the second colour over the masking tape, all of the edges are sealed and the paint has nowhere to go.

Think i kinda get it but do you have to wait for paint to dry in Step 3 before doing 4?
 
Soldato
OP
Joined
30 Sep 2005
Posts
16,553
all you are doing is sealing the tape to stop bleed, so yeah you need to wait for it to dry. You only want a single coat before pulling the tape off. You only need to get your straight line, so no need for two coats. The second coat just has to go as close to the line as you feel confident with.

Many people actually use clear silicon as a sealer rather than paint, not tried that yet though.

Just to clarify

1. Paint celing white getting some white paint on the walls
2. Put masking tape on celing close to walls edge
3. Paint edge of masking tape white (wall side) to seal the tape
4. Paint wall colour of choice, which wont bleed onto the ceiling as you've sealed it white

or.....and here's an idea I've been trying in a few of my rooms. Paint the celing and walls the same colour! Worked well in my sons bedroom (all blue), and will be trying my daughters in lilac next year.

We're going to do our bedroom dulux egyptian white I think which will probably look good. The hallway and lounge have green walls so obviously a green ceiling would look a bit daft, but if we'd gone for a real light colour I would have tried it.

Kitchen is all white, as is all the toilets so that's easy.

Also, I got a quote a while back from a painter and decorator. They don't charge a great deal, so for the money I might me tempted to just pay someone to do it. Paintings a messy job!
 
Soldato
Joined
5 Mar 2010
Posts
12,348
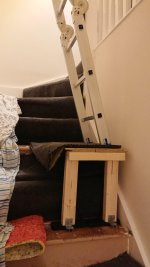
The distance between the highest step and the ceiling is 4m and there's no safe way to get up a ladder to paint properly. Whilst I have gone up the ladder, it's not really very safe, and there's no way I can paint with any accuracy, although I can just about manage to sand/stick some masking tape on.

I ran into the same problem. As we have no garage, i've bought a set of those multi-folding ladders - they close down to 1m tall, but can extend to 4m. The problem i had was there was a part of the landing ceiling nearer the top of the stairs where a 4m ladder can't quite reach it.

I looked around online for ideas, and found you could get these stair platforms that you can place a ladder onto, but these were £100-200, and were way too expensive for what i was happy to pay for for a quick 5 minute paint job. So as i had some spare boards from the loft, i decided to make my own platform. As we're having a new carpet put down, i was able to lift part of the stairs carpet to screw the platform to the step for additional sturdiness.

87IrJmb.jpg
 
Associate
Joined
18 Jun 2020
Posts
276
Location
Warminster
This is a top tip, thanks! So glad I stumbled across this today! SWMBO is gagging to get some painting done now it's time to get indoor jobs done, so I'll be using your technique in the coming weeks for sure :)
 
Soldato
OP
Joined
30 Sep 2005
Posts
16,553
@TheOracle

Do you pull the tape off while the paint is still wet or do you wait for it to dry first?

I did it when it was dry, but probably best when wet. Depends how many coats your doing. If you are glossing woodwork, and stick two coats on you run the risk of actually pulling the paint off the wood if it's dry.

Probably for walls and ceilings leave till dry, woodwork pull off when still wet.
 
Caporegime
Joined
13 Jan 2010
Posts
32,578
Location
Llaneirwg
I wish I knew about this.
Spent so long redoing lines because the Fing tape didn't work. In end gave up with the tape entirely.

I like feature walls so was an absolute nightmare
 
Associate
Joined
10 Sep 2009
Posts
1,469
pink tessa tape won't, green frog tape will

Frog tape rarely pulls off paint in my experience. I have used hundreds and hundreds of metres of it. I've had it pull a couple of small (5mm) patches of emulsion off in one room. I honestly thought everyone knew about taping edges. Life is too short for freehand cutting in!
 
Soldato
Joined
9 Mar 2012
Posts
10,072
Location
West Sussex, England
So basically someone hadn't painted a straight line when doing the curved part of the ceiling originally?

I would have painted the ceiling down on to the wall without masking tape to start with. Using the masking tape to begin with creates a shunt where you have a difference in paint levels where the masking tape is occupying. Not using the masking tape to begin with means you only end up with one shunted edge on the wall. If you allow the ceiling paint long enough to cure you can then take that shunt out with a fine sand paper. Then use the frog tape yellow or similar to create the new line that the wall should finish to. Always remove the masking tape whilst the paint is still wet otherwise the paint may crack other than on the line of the masking tape and give a rough edge.

The painted surface that you apply masking tape to needs to have had several days to cure properly before applying tape to it otherwise you risk pulling the freshly painted surface off.
 
Back
Top Bottom