I wish I knew about this painting trick before (cutting in straight lines)

Soldato
Joined
30 Sep 2005
Posts
16,553
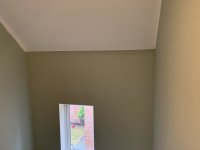
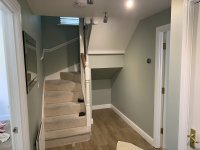
I'm painting the entire house during lockdown and always wondered how I was going to cut the ceiling in above the second landing. The distance between the highest step and the ceiling is 4m and there's no safe way to get up a ladder to paint properly. Whilst I have gone up the ladder, it's not really very safe, and there's no way I can paint with any accuracy, although I can just about manage to sand/stick some masking tape on.

I've always usually gone freehand as even using the best masking tape can bleed at times, although I actually need to draw a straight line from one wall to another as the ceiling curves down in front of the landing banister. There's no way in hell I can get that done without tape and a roller on a long pole.

anyways, I stumbled across a youtube comment which said a trick he used was to put masking tape on, then paint over it with the same colour as what's underneath (in my case, white for the ceiling), then once it's dried to paint over it a second time with your actual wall colour (green). The first coat seals the edge of the tape, any bleed is invisible as it's the same colour as before.

Tried it yesterday and just took the masking tape off now. Wow!

This may be old news to most, but it's new to me :D:D:D

TptpRI5.jpg
K6aZEZl.jpg
fTlyARK.jpg
CmzNVov.jpg
 
Soldato
OP
Joined
30 Sep 2005
Posts
16,553
frog tape doesnt bleed.

Oh it does. Frog tape is crap imho, usually pulls the paint off too (including the green and the yellow, yellows worse than the green).

Tessa tapes what you need, but even that isn’t 100%. Only way is to seal the edge with paint...have heard pros using chalk too although that seems a bit messy to me.

In fact, sado me tried numerous masking tapes to see which one was the best

1. Tessa tape
2. Blue from wilkos
3. Fixman low tac
4. Cheap stuff I bought from Poundland
5. Frogtape


Update: Just redone the hallway ceiling, perfect! Not even 1mm of bleed. Tomorrow, landings, banister, skirtings and door frames.
 
Last edited:
Soldato
OP
Joined
30 Sep 2005
Posts
16,553
Trying to work out what to do here but not quite following. If my wall is yellow and my ceiling blue do I put good quality masking tape on the wall and paint the ceiling and into the tape in yellow and when it’s dry go over it again in the blue?

It's always best to put the masking tape on the lighter coloured wall. That said, it always looks better when cutting into a ceiling, that the paint ever so slightly goes onto the ceiling, rather than the ceiling coming down onto the wall.

Put the masking tape on the ceiling, paint over the edge nearest the wall blue, then stick two yellow coats over it when painting the wall.
 
Soldato
OP
Joined
30 Sep 2005
Posts
16,553
Well my hallway, 2 landings and cloakroom are finished. Just starting on the lounge today.

The masking tape trick worked perfectly on all ceilings, door frames, hand rail and skirting boards.

7x2sWAi.jpg

^ Yes we are getting a new carpet once lockdown ends

Not a 100% professional job (im not a professional), but learnt so many tips and tricks over these last few weeks. I am being really picky though.

Just done the lounge ceiling, and decided to use dulux diamond matt brilliant white. Reading online even the pros struggle to get an A1 finish as it has a 10% sheen to it, but again reading up I did a few things like adding 10% water, using a small roller and working in a certain way. Now it's fully dried it looks fantastic so I'm really chuffed.
 
Last edited:
Soldato
OP
Joined
30 Sep 2005
Posts
16,553
Do you think this method will work on walls that were painted 3 years ago, without having to fully repaint both walls? It’s basically a feature wall that looks OK from a distance but I’ve never really been happy with it when close up.

Tips for doing corners would be most welcome.

What paint was it? And what aren’t you happy with? The uniformity? (Ie, in direct sunlight looking at it off angle does it look patchy)
 
Soldato
OP
Joined
30 Sep 2005
Posts
16,553
Dulux Matt for the feature and Silk for the side walls.

It’s where they join that’s never quite been fully straight and the tape did bleed etc.

Down both sides? Or all three (inc top near ceiling)? Any chance of a photo? I could advise what I’d do to put things right

Also, I assume with it being three years you won’t have the original paint so need to be careful if you bought new paint of the same colour as it will be from a different batch

To make good a bad line, it’s far far easier to go over a lighter coloured wall with a darker colour. I assume your feature wall is the darker one. In any case, it always looks best to ever so slightly go onto the lighter wall with the darker colour anyway. It’s the same with ceilings. You want maybe 1mm of wall paint just going onto the ceiling.

I guess you did the feature wall last and got some on the side walls. Depending on how much you got on, I’d tape the sides ensuring you are not masking the darker paint. Then go over it with the silk to seal, then go over it again with the Matt. If you have to buy a small pot of Matt again, don’t worry, you can use an artist brush just to go down the sides. You’ll not see a difference I guarantee, and when you take the tape off you’ll have perfect lines.
 
Soldato
OP
Joined
30 Sep 2005
Posts
16,553
At least from the photo I wouldn't be able to tell that wasn't a professional job - looks very nice.

Thanks mate. If I knew then what I know now, it would be absolutely perfect. Still, you live and learn.

To be honest, if I’d paid someone to do that I wouldn’t know so I’d be happy. It’s only because I’ve done it myself, I know all the little bits which aren’t absolutely spot on. It’s things like with all the blinds open and bright sunlight coming in, looking at certain walls you can notice a slight sheen to the paint. Basically the colour uniformity isn’t 100%. I now know how to fix it, but it’s painted now, so it will just have to do. It’s something to do with how the light bounces off the paint. I’m a bit OCD really :D

I’m painting the lounge this week, so I should get that looking spot on.
 
Soldato
OP
Joined
30 Sep 2005
Posts
16,553
Just thinking I might as well jot down a few bits I’ve learnt over the past few weeks in case anyone is interested.

Obviously the masking tape stuff in post 1 sorts out the cutting in

1. Sanding....awful job, and covers you and everything else in dust. There’s a trick for that! It’s bloody brilliant.

Buy a Henry hoover (I bought a Henry wet&dry from Argos which is the same as a Charles. Just has a bit more powerful motor) and one of these,

https://www.toolstation.com/mirka-dust-extraction-handy-sander-kit/p86220

I sanded pretty much half my house, walls and ceilings and didn’t even need a shower afterwards. I was that clean.

2. Painting

I think most people already know this, but it’s vitally important when rollering to really load the roller full of paint and never let it go dry (ie rollering all the paint off it before loading it up again). Keep going in the same direction all the time. If you go up and down, don’t then start going side to side. Never paint back over paint which is starting to go dry. It’s called keeping the wet edge. Quite hard to do actually for amateurs as we are much slower at painting than the pros. The paint should always look wet. Most of the paint in the UK dries really quickly, especially this time of year. It gives a crap finish. Paint should not be really thick either, and can be slightly watered down to help it go on easier and keep wetter for longer. I painted my ceiling the first time without knowing this and by the time I’d stepped off my ladder, loaded my roller up and got back up the ladder the paint had dried so I couldn’t even see what I’d painted and what I hadn’t. Just by adding 10% water, it kept the paint wet, and it was still looking wet when I’d got half way through doing it. The second coat looked fantastic.

When painting anything, never over paint. Get the paint on, 3 or 4 passes and leave it. Don’t keep rollering it to death, and don’t be heavy handed. Let the roller just glide over. Get the paint on well, and don’t spread it too thin. Keep it quite thick. You should have a nice texture after 3 or 4 passes then leave it. It’s easy to keep going at it, but you have to be strict with yourself and just move on.

I had great success with a small roller, and used that for nearly everything, even the cutting in. It also avoids picture framing, where sometimes you can end up seeing a border around the wall where you’ve used a brush for cutting in, and a roller for the middle bit.

3. Glossing woodwork

Don’t buy quick dry gloss. It’s crap. Especially Dulux trade quick dry. It’s like water, dries in seconds, doesn’t cover very well, and runs like crazy. If you see a run, you can’t brush it out as the paint as already gone off, so it drags. Dulux one coat gloss on the other hand is really good.

Personally I do the woodwork first, then the ceiling and walls. The reason is that it doesn’t matter if you get white paint on the walls from doing the skirtings and door frames as you’ll be covering it with the wall paint. Plus, and probably the main reason is that you can wash the wall paint off gloss much easier than you can wash gloss paint off the walls! In fact, most of the time you can lightly scratch it off with your fingernail. Getting gloss off walls is a pain.

4. Window Sills

Use a small foam roller. You’ll end up with a mirror like finish. I actually used a foam roller where I could on the skirtings too. Try and do many thin coats if you can. If you get the paint on too thick, you’ll get an orange peel effect. The downside, is the more coats you put on, the higher the chance you’ll trap dust and little hairs in. Light wet sanding is ideal to get them out. Think 180+ grade paper.


Dulux has a paint satisfaction guarantee on some of their more premium range. If you are not happy with it for any reason, they’ll nearly always refund you in vouchers.

I got tons of vouchers from them for complaining about the gloss....in fact, they sent me three times as much as what I’d paid. Think they also try to compensate for lost time too, which is good service.
 
Last edited:
Soldato
OP
Joined
30 Sep 2005
Posts
16,553
@sigma

In your case, I assumed you have got a bit of the darker paint on the lighter coloured walls from the bleed? You want to put the masking tape on the lighter walls at the side and end up making your dark straight lines on the light walls (depending on how much bleed you have). That way, you are covering light paint with dark.

If you do it the other way, putting the masking tape on the darker feature wall, you’ll be finishing up trying to cover the darker paint bleed with light....which will take more coats, might not cover perfectly, and the more paint on the masking tape will make it harder to pull off.

Get some pics up
 
Last edited:
Soldato
OP
Joined
30 Sep 2005
Posts
16,553
Gloss is a pain especially as they've banned some chemicals in it or something so it tends to dry slightly off coloured. The skirting in my room has gone slightly yellow (done by previous owner) and looks like it is 20+ years old despite having been done in late 2017.

If it’s yellow, sounds like it might be oil based? Water based gloss shouldn’t yellow.
 
Soldato
OP
Joined
30 Sep 2005
Posts
16,553
all you are doing is sealing the tape to stop bleed, so yeah you need to wait for it to dry. You only want a single coat before pulling the tape off. You only need to get your straight line, so no need for two coats. The second coat just has to go as close to the line as you feel confident with.

Many people actually use clear silicon as a sealer rather than paint, not tried that yet though.

Just to clarify

1. Paint celing white getting some white paint on the walls
2. Put masking tape on celing close to walls edge
3. Paint edge of masking tape white (wall side) to seal the tape
4. Paint wall colour of choice, which wont bleed onto the ceiling as you've sealed it white

or.....and here's an idea I've been trying in a few of my rooms. Paint the celing and walls the same colour! Worked well in my sons bedroom (all blue), and will be trying my daughters in lilac next year.

We're going to do our bedroom dulux egyptian white I think which will probably look good. The hallway and lounge have green walls so obviously a green ceiling would look a bit daft, but if we'd gone for a real light colour I would have tried it.

Kitchen is all white, as is all the toilets so that's easy.

Also, I got a quote a while back from a painter and decorator. They don't charge a great deal, so for the money I might me tempted to just pay someone to do it. Paintings a messy job!
 
Soldato
OP
Joined
30 Sep 2005
Posts
16,553
@TheOracle

Do you pull the tape off while the paint is still wet or do you wait for it to dry first?

I did it when it was dry, but probably best when wet. Depends how many coats your doing. If you are glossing woodwork, and stick two coats on you run the risk of actually pulling the paint off the wood if it's dry.

Probably for walls and ceilings leave till dry, woodwork pull off when still wet.
 
Back
Top Bottom