You are using an out of date browser. It may not display this or other websites correctly.
You should upgrade or use an alternative browser.
You should upgrade or use an alternative browser.
What "man jobs" have you done today?
- Thread starter jaybee
- Start date
More options
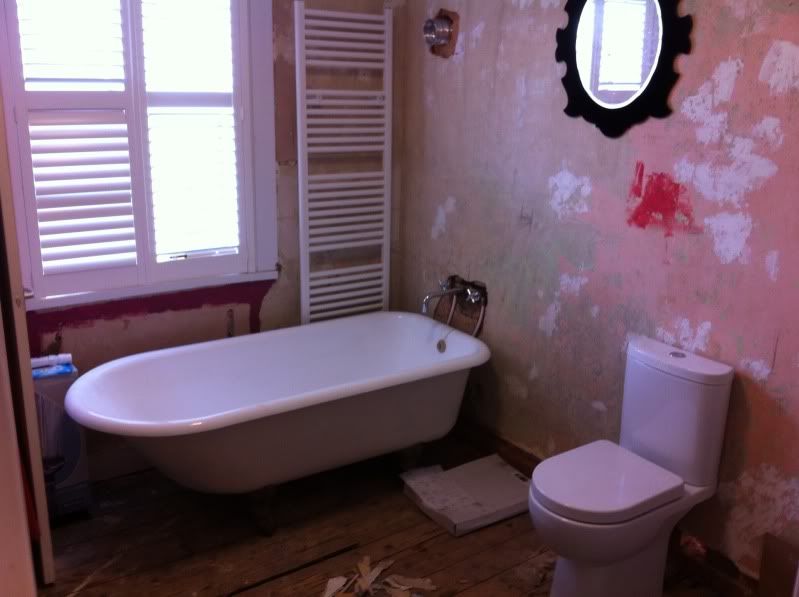
Thread starter's postsHow it looked after i replumbed it with everything where i want (no bath in middle of room - +30 yr old cast iron)
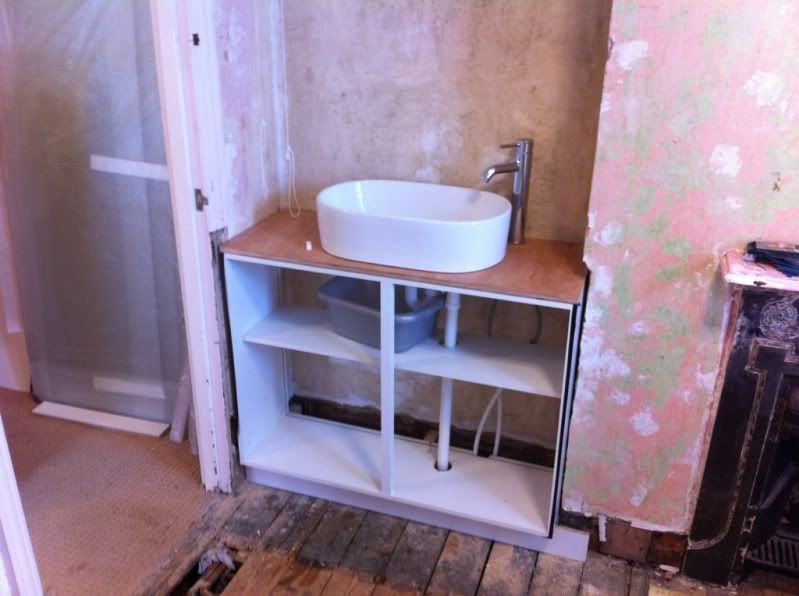
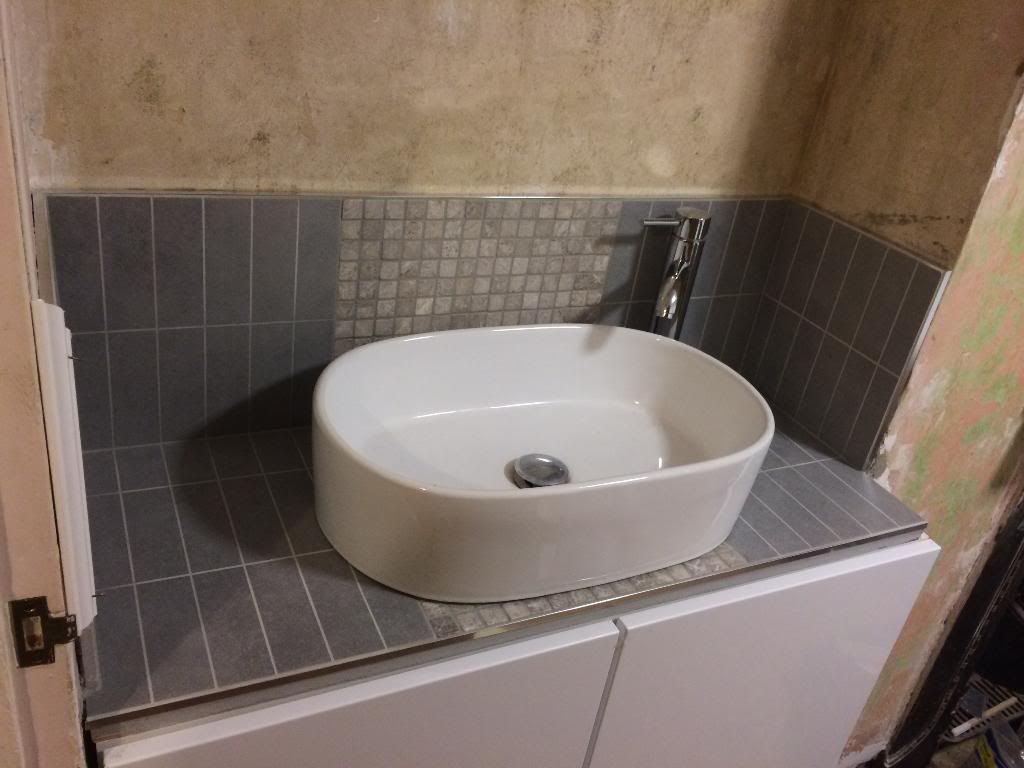
Showed is on right, sink on left of door
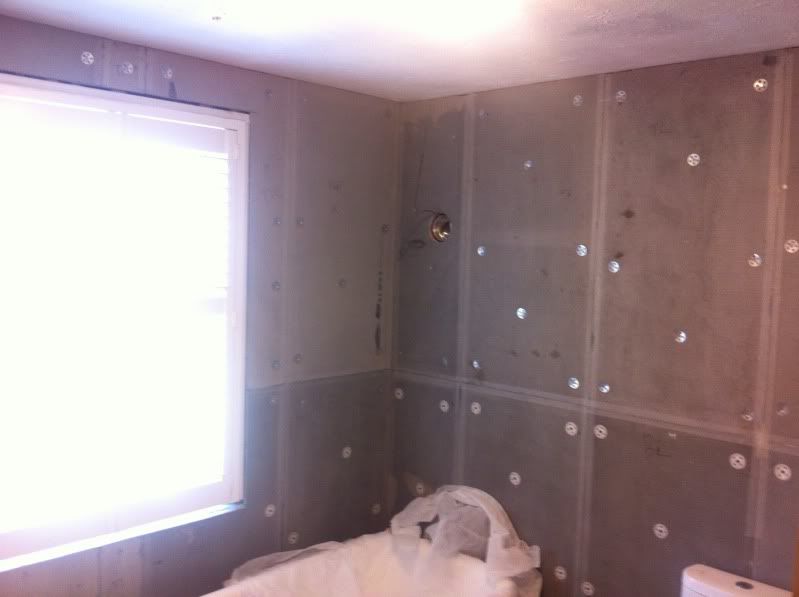
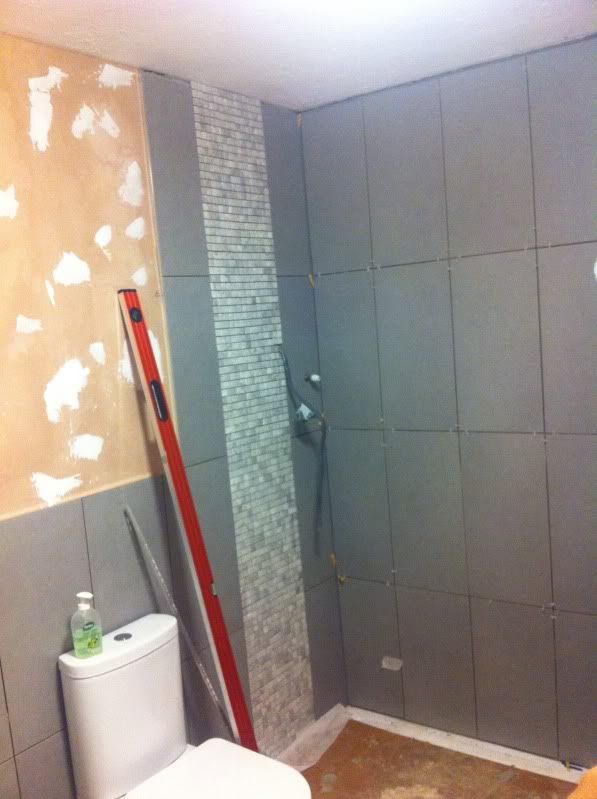
Marmox 20mm boards after i pulled all the old plaster off
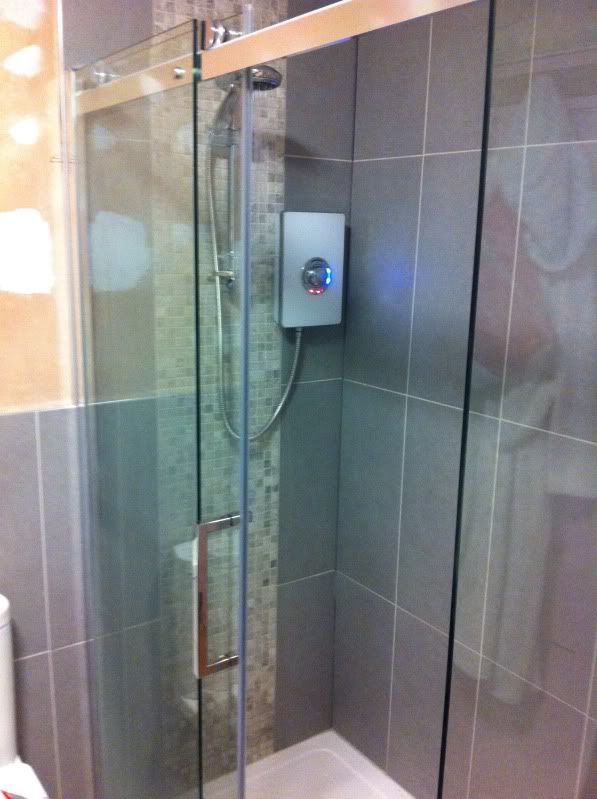
Shower and frame in (10kw Mira is pretty good for elect)
http://s57.photobucket.com/user/sig...t=3&o=40&_suid=140715540773601236806974457258
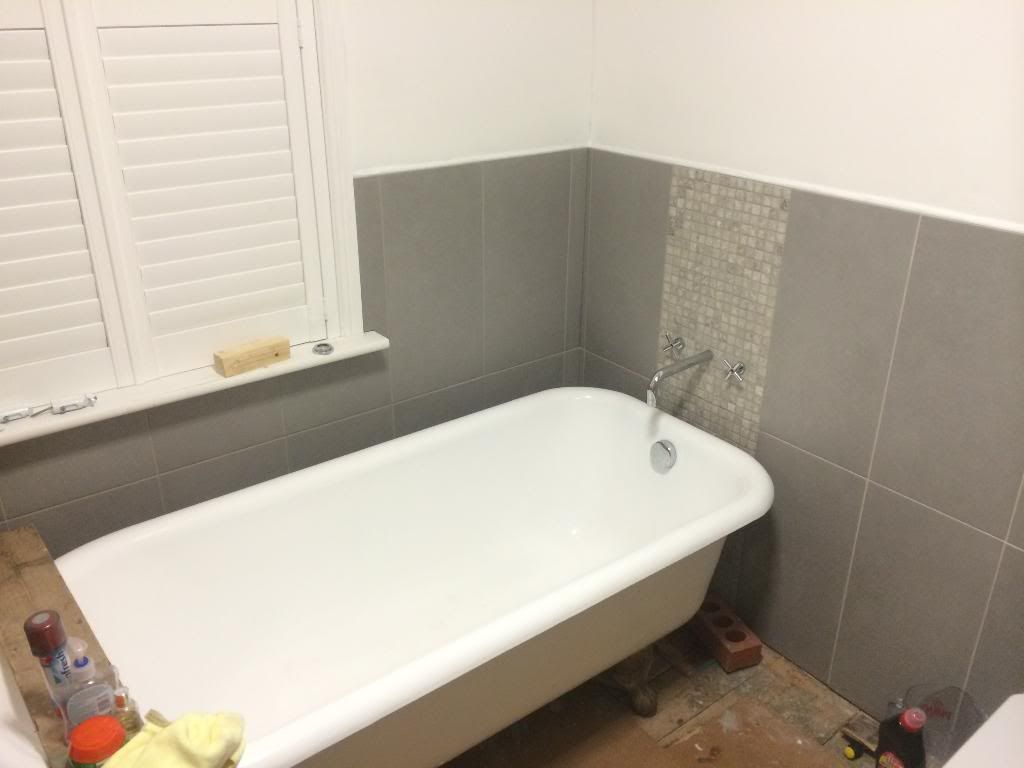
Showed is on right, sink on left of door

Marmox 20mm boards after i pulled all the old plaster off


Shower and frame in (10kw Mira is pretty good for elect)


http://s57.photobucket.com/user/sig...t=3&o=40&_suid=140715540773601236806974457258


Last edited:
Marmox is very good, i wanted the 20mm for better insulation as the two walls are external, my walls are cavity too and so I used some website (i forgot the name) that let you do calcs to work out where the dew points are etc. Id go for 20mm over 12.5. Stiffer and better insulating without costing much more.
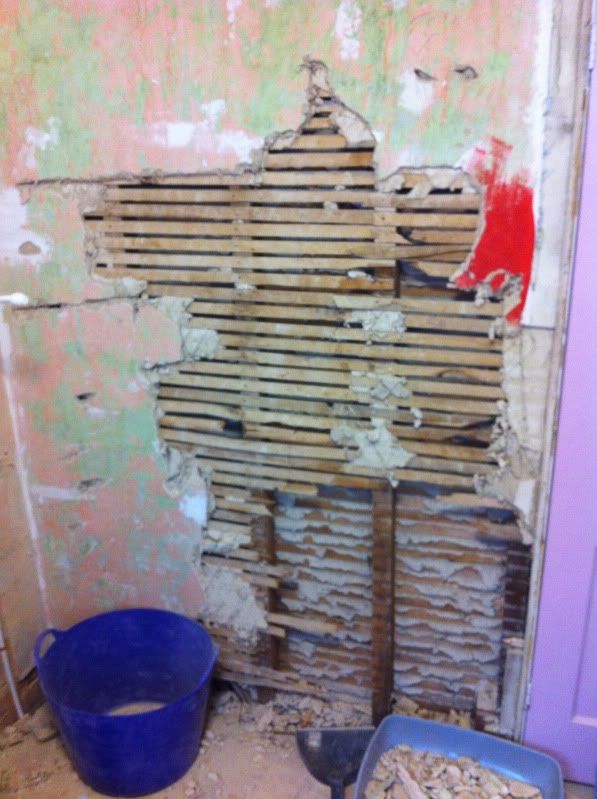
The worst job is getting the old plaster off:
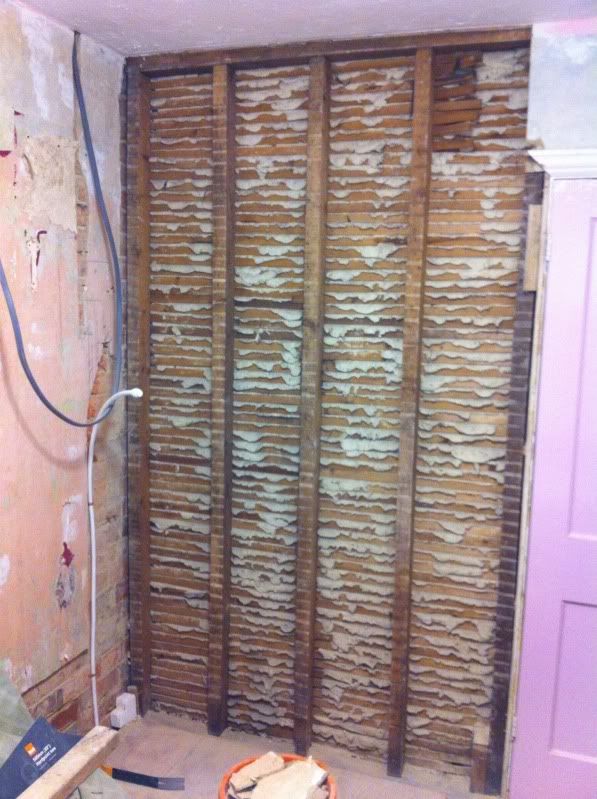
As for fitting, Studs are easy Screwed into stud work. But i did have to add more stud and noggins as the house is old and on ~400mm cantres rather than 300, The extra noggins are for the shower fittings - so i can only stress the point to plan ahead, once the boards and tiles are up you will be stuck if you want to add some wood after
Rockwool was just for noise as its an internal wall and i had spare in loft
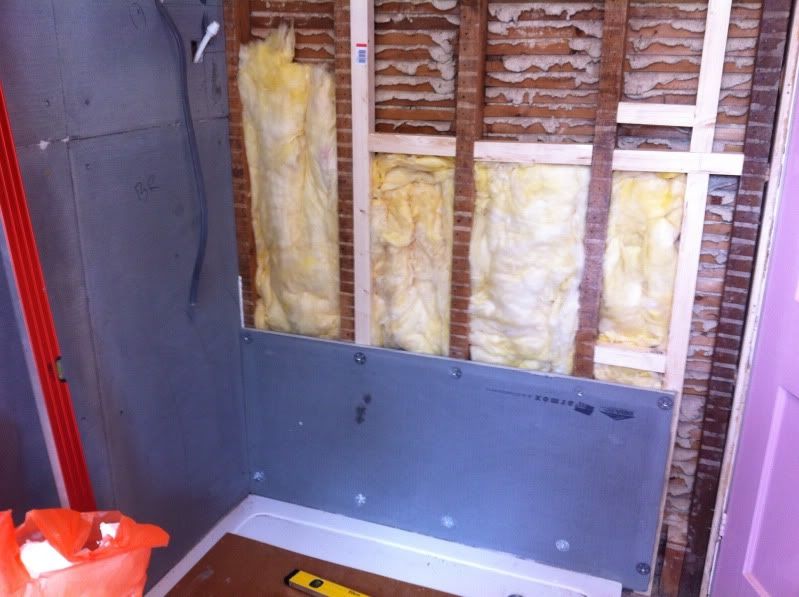
Very satisfying onces complete:
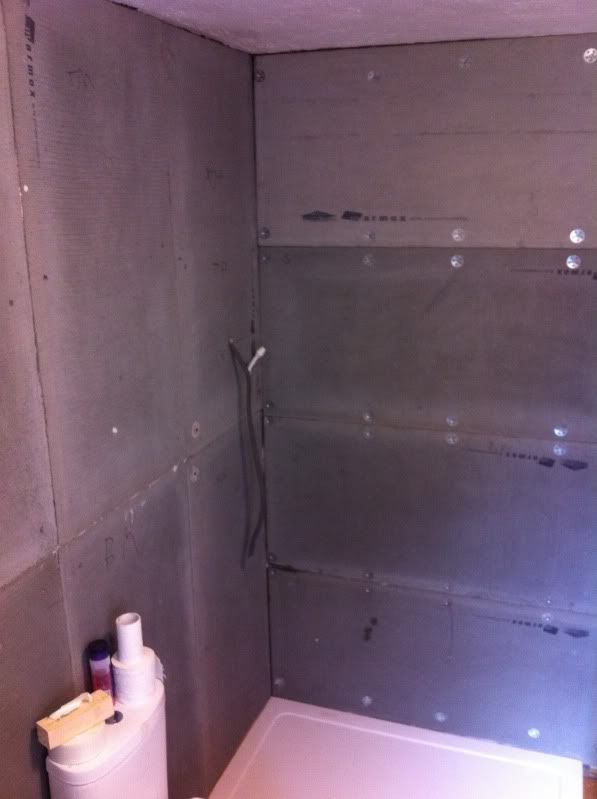
For walls. Drilled either 6 or 10mm holes then tile adhesive to dot and dab the panels in place. You can use the adhesive to get them perfectly level. Each edge needs gluing to each other and take the time to make sure it's square and all edges are flush. Also put additional adhesive where extra fittings go. Eg the shower frame fixings and around the extractor fan. Makes it much easier.
Buy a cheap handsaw to cut them. The cement faces ruins drill bits and saws.
6 or 10 mm holes depend on which fittings to use. I used the plastics ones on the bits I tiled and the, flusher, metal fittings on the bits I plastered
You then drill the holes again but going throught the adhesive and into the brick. This allows you to fit the relevant fitting. Either plastic spankers (White on lower half) or screws for the silver washers on top half.
Marmox is watertigh but i still tanked the shower and used waterproof adhesives with waterproof mapei grout.
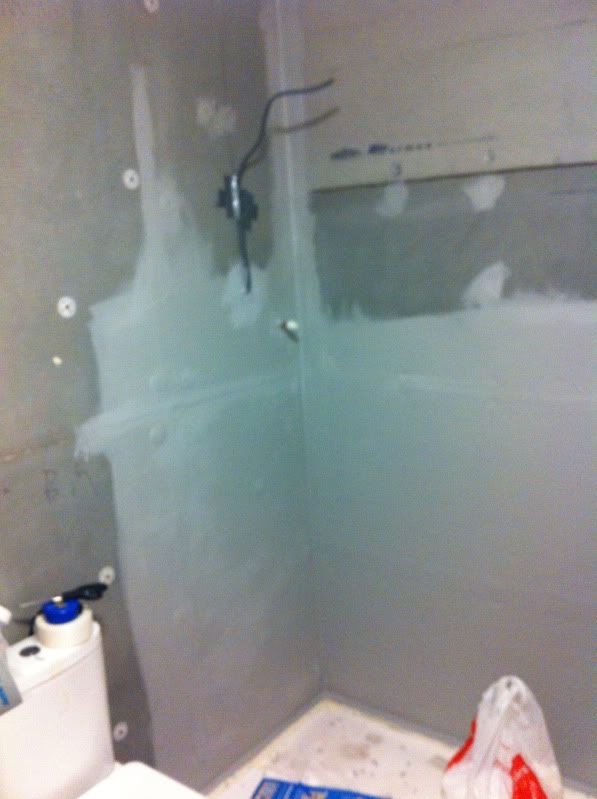
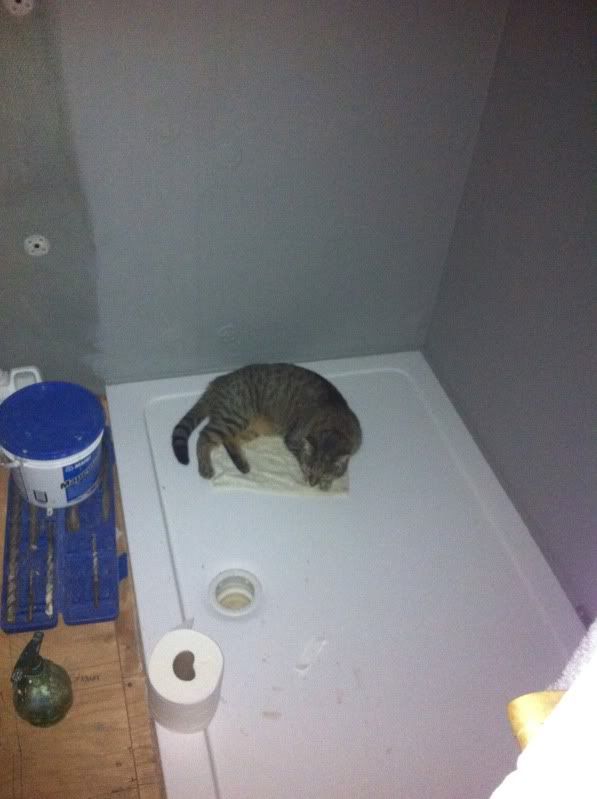
The worst job is getting the old plaster off:


As for fitting, Studs are easy Screwed into stud work. But i did have to add more stud and noggins as the house is old and on ~400mm cantres rather than 300, The extra noggins are for the shower fittings - so i can only stress the point to plan ahead, once the boards and tiles are up you will be stuck if you want to add some wood after

Rockwool was just for noise as its an internal wall and i had spare in loft

Very satisfying onces complete:

For walls. Drilled either 6 or 10mm holes then tile adhesive to dot and dab the panels in place. You can use the adhesive to get them perfectly level. Each edge needs gluing to each other and take the time to make sure it's square and all edges are flush. Also put additional adhesive where extra fittings go. Eg the shower frame fixings and around the extractor fan. Makes it much easier.
Buy a cheap handsaw to cut them. The cement faces ruins drill bits and saws.
6 or 10 mm holes depend on which fittings to use. I used the plastics ones on the bits I tiled and the, flusher, metal fittings on the bits I plastered
You then drill the holes again but going throught the adhesive and into the brick. This allows you to fit the relevant fitting. Either plastic spankers (White on lower half) or screws for the silver washers on top half.
Marmox is watertigh but i still tanked the shower and used waterproof adhesives with waterproof mapei grout.


Last edited:
Hope you don't have plumbing issues and need to get under your floor
Why? Its more of a problem if you tile! Just pull up vinyl, remove boards > Fix > Replace board with some new stuff and refit vinyl
I have screws in the panels that are needed for access (eg shower drain)
This took a lot of my time up:

Bit more of a update on my room if you guys saw my last post here:
Hey guys
I recently moved my system into a 750d if you remember, or if you haven't seen here are the pictures of the system move to my new case, Click spoiler:
Out with the old white and silver version of the akasa eclipse 64, and in with the new 750D(very happy with this case).
I still need some new cables though to match the blue/black theme aswell as some new fans to match my cpu fan so this isn't the final finished build, but I just transferred my parts over today.
Also, my new black fan controller hasn't arrived yet, so if you are wondering what the silver box is next to my hard drive cage, its two akasa jr fan controllers just as temporary. its not as clean cable wise as you pro's but im happy with what I have so far, it this case puts my old one to shame!! I used to run the side panel off my old eclipse 64 as the air cooling was shocking, so
it was a absolute dust magnet. and now in this 750d, the temperatures are lower than they was before, even with a side panel on. very impressed.
Also, this case makes my new 24" Asus monitor look tiny!!!
(Re-uploaded images, last one didn't work for some reason)


750D time!


** Image removed due to swearing **I just got my new fan controller installedturns out it was delivered to my neighbour, so here she is! looking neater now, I can't wait to get some new cables, one of them corsair generation cable kits, and some new black sata cables, and mainly new af140 quite edition fans, and two fans for on the roof of the case. then when funds are climbing again, going to grab a corsair H110 water cooler for the cpu equipped with the two 140's im getting for the roof of the case. Cant actually remember the last time I was this excited about my computer, went through the phase of put as many neons and led fans that's possible in a case in 2003, then in 2007 went for the not bothered what it looks like as long as it has power. now iv taken up this trend of make it look stylish and neat! though it costs a lot of money to do so haha.


Also if you wonder why only one graphics card is lit up, I have ulps enabled, I think its a great feature for desktop use
 Right.. Thanks to my own stupidity of bricking my motherboard bios, I had nothing to do for a few days, no computer. and I sat and looked at this room I spend most of my time in when im home and indoors, after going through all my teenage life starting to paint it, then giving up after one wall, it ended up, 7 different colours, brown, white, blue, cream, alsorts. you name it, it was probably in here!
So I decided, (the missis decided) Its time to sort this room out once and for all, So now, I am going to show you two pictures of how TERRIBLE my room had gotten, Hence its covered with posters iv picked up over the years from world motocross events just to hide everything. (yeah im a biker btw)
Here is my old room with my new 750d

And a panoramic of my old room

Soo... You can see how terrible it all is, step 1. take them posters down, and see just how worse it can get.

Yeah it does get worse haha. Unfortunately, I didn't take any pictures of 2 days, 9 hours per day absolute grafting, knocking out built in wardrobes that was installed in the 60s, and stripping wallpaper off, and off the roof that I think had been glued on by the hulk, it took 9 hours just stripping it off even with a steamer....
Okay, so, as mentioned I bricked my old motherboard, so now that my room is almost done (pictures soon to follow in a moment keep reading). lets get that old motherboard out:

old and new

in with the new

And in with the new 16gb ram, fed up of running out of memory when I was using 4gb for the past 4 years

right now my system is up and running, computer and desk is installed, im now sat a few feet more to the right of where I was before, infact my computer is now inside where there was a built in wardrobe, which had a Christmas tree inside from the 80s lol up where the printer is in this picture, I left the bottom of that part of the cupboard in as a nice shelf:

Now to finish off a few bits and bobs. !
Baileys bottles Installed:


Now to paint them shelves !

Now all is looking good, lets get some panoramic pictures of my room, or well, just photos, btw I never apologised for my bad indoor photography! haha. also its dark outside now so just did the best I could with the lighting with my iphone.... here goes! all painted and done....... 18-20hrs.. (2 days work)...... (with help from the missis)


No idea what the.. is on tv, but yeah bad panoramic moment.

Also, bad panoramic picture as you can tell with the lighting on this one.


Looks so much better, my photography skills don't help in the slightest, but the room looks ten times bigger in person, I cant get over how good it looks.
btw the tv I just angle towards me when im on my pc, (42" Panasonic plasma)
Whats left to do, is new black curtains, and some blackout blinds instead of using two pair of curtains (cream curtains on one side then black on the other side). need to move that chest of tall draws) and need to move my clothes back in here, haven't dared yet incase theres even one drop of paint not dry. and as for my pc, need to install my new black sata cables that have arrived instead of the old ugly yellow and red ones that's in there now. and all is good.
also moving my desk to the right 3 foot, my pc is closer to the wall, and this corner of the house NEVER gets sun light at any time of the day, coldest part of the house, temperatures have dropped by 5c load!
Now, time for a new cig with my updated specs:

And now, will leave you with some shots of my computerhope you enjoyed reading!


(and yes that's a 2005 razer diamond black plasma blue Limited edition, still going strong!)

Btw the cost of this room transformation £30 and two spare days. (price not including new motherboard.. but that was my own fail!)
but here is the update:
A little update, over the weekend, I emptied everything out of the remaining cupboard, and then painted inside and let it dry for a few days, threw half the junk away and i also hang my clothes in there now out of the way
Here is the cupboard in question, i forgot to take pictures of the before but heres in progress of painting:

And finished painted

Now this junk has to somehow fit in there


also found some old pokemon cards!

Almost got all the stuff back in there.
** Image removed due to swearing **
Now time to get my clothes in

All done!

No snazzy pics but I put down carpet for a whole house today. Stupidly trusted a carpet layer I employed and got bitten in the bum when he sent me a text asking to match the money another place were offering. I told him where to go. Contractors huh.
Agreed to a contract to do carpet 15-20 houses a month. And it's just me and my business partner. This is going to be fun
Luckily we don't have to do much smooth edge (gripper bars) and underlay as we're allowed to use existing if in decent condition. Otherwise I'd still be there.
Quite enjoying 'working' again. Getting lazy punching an iPad and driving around whole day
Agreed to a contract to do carpet 15-20 houses a month. And it's just me and my business partner. This is going to be fun

Luckily we don't have to do much smooth edge (gripper bars) and underlay as we're allowed to use existing if in decent condition. Otherwise I'd still be there.
Quite enjoying 'working' again. Getting lazy punching an iPad and driving around whole day
Bit more of a update on my room if you guys saw my last post here:
Btw the cost of this room transformation £30 and two spare days. (price not including new motherboard.. but that was my own fail!)
but here is the update:
Vast improvement all round

Soldato
- Joined
- 22 Feb 2014
- Posts
- 3,022
have been installing raised joists on top of existing loft joists to board my loft out due to the fact there are LOADS of pipes and electrical wires running over the existing joists so I cannot board directly to them.
CLimbing up and down into the loft using a stepladder has not been fund so i decided to install a loft ladder, and this made me quicly realise our lfot hatch is not big enough so I have extended that as well, missus nearly had a heart attack when she came home and saw the new massive hole in the celing
I have unforntunately put a foot through the bedroom celing though
Was up there late last week and was tired, I put my foot on a board that was just resting on 2 joists but the board was wider than the joists and my foot just made the board spring up like a see-saw and my foot slid straight off and through the celing below
CLimbing up and down into the loft using a stepladder has not been fund so i decided to install a loft ladder, and this made me quicly realise our lfot hatch is not big enough so I have extended that as well, missus nearly had a heart attack when she came home and saw the new massive hole in the celing

I have unforntunately put a foot through the bedroom celing though

Was up there late last week and was tired, I put my foot on a board that was just resting on 2 joists but the board was wider than the joists and my foot just made the board spring up like a see-saw and my foot slid straight off and through the celing below

Bit more of a update on my room if you guys saw my last post here:
Btw the cost of this room transformation £30 and two spare days. (price not including new motherboard.. but that was my own fail!)
but here is the update:
Tiny computers eh... I remember them

Soldato
- Joined
- 6 Nov 2002
- Posts
- 9,982
- Location
- London UK
Todays activities, doesn't look like much as yet but that's already 50+ bits of woods and 500+ fixings used already.


Been out in the garden again. You can see from this picture the old leantoo conservatory on the back of the house

that has now been removed with the help of the father-in-law and it now looks like this.

I also did a couple of other odd jobs around the garden, painted the shed and a couple of fence panels, fixed the outside tap back to the wall. And then it rained, and its still raining now!

that has now been removed with the help of the father-in-law and it now looks like this.

I also did a couple of other odd jobs around the garden, painted the shed and a couple of fence panels, fixed the outside tap back to the wall. And then it rained, and its still raining now!
Soldato
- Joined
- 6 Nov 2002
- Posts
- 9,982
- Location
- London UK
Small bit of progress today, can't hook up the swings as wrong under sheeting/membrane has been delivered so won't be finishing this weekend.


I made a shoe box/bench thing for the rear porch. Used linseed oil on it last night so it's a bit darker than the pictures.
The lid isn't sitting right but I'm going to give it a week or two to settle down and then fit it properly. Also, excuse the mess! The strap will probably change at some point as that it an old belt of mine!
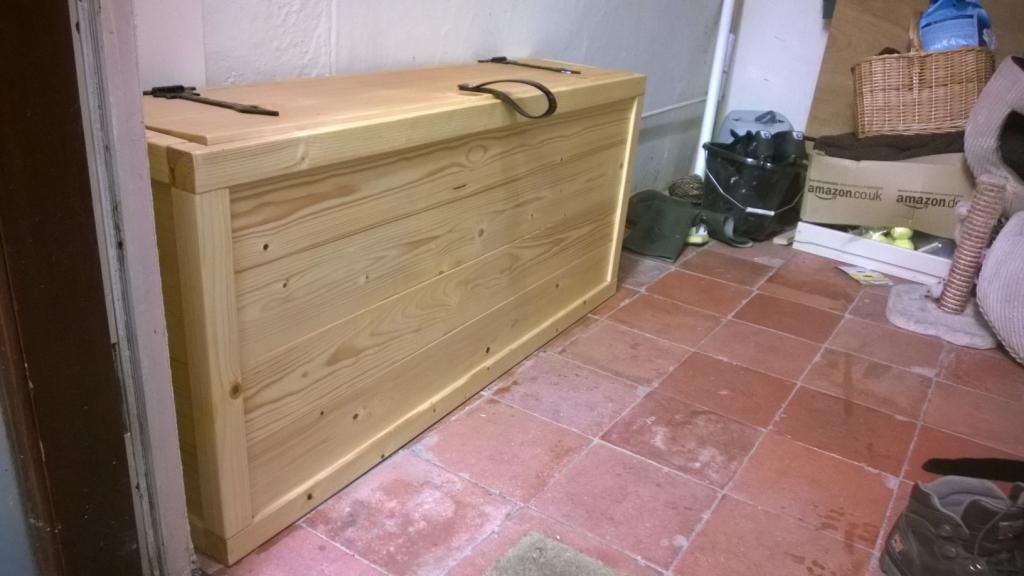
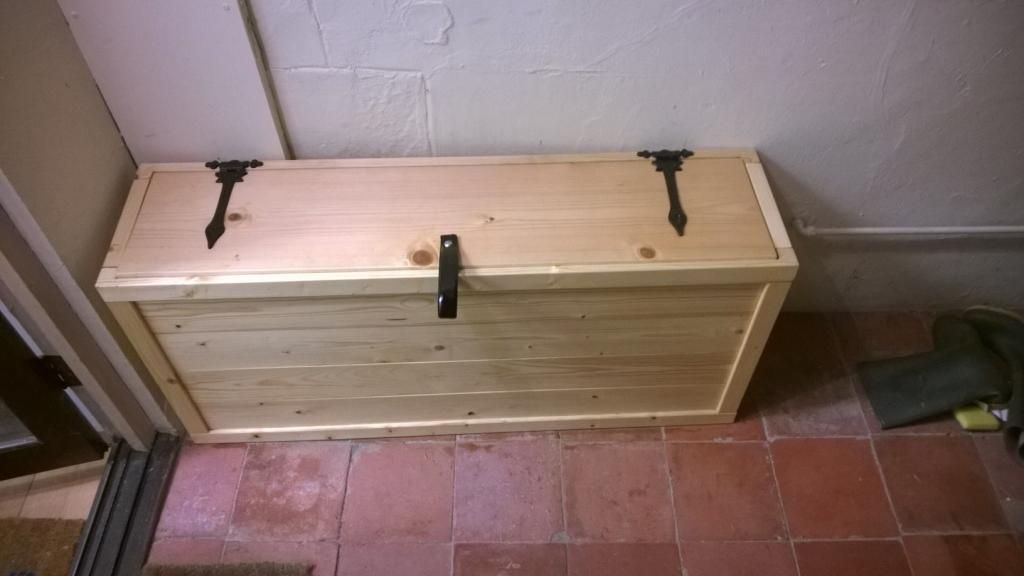
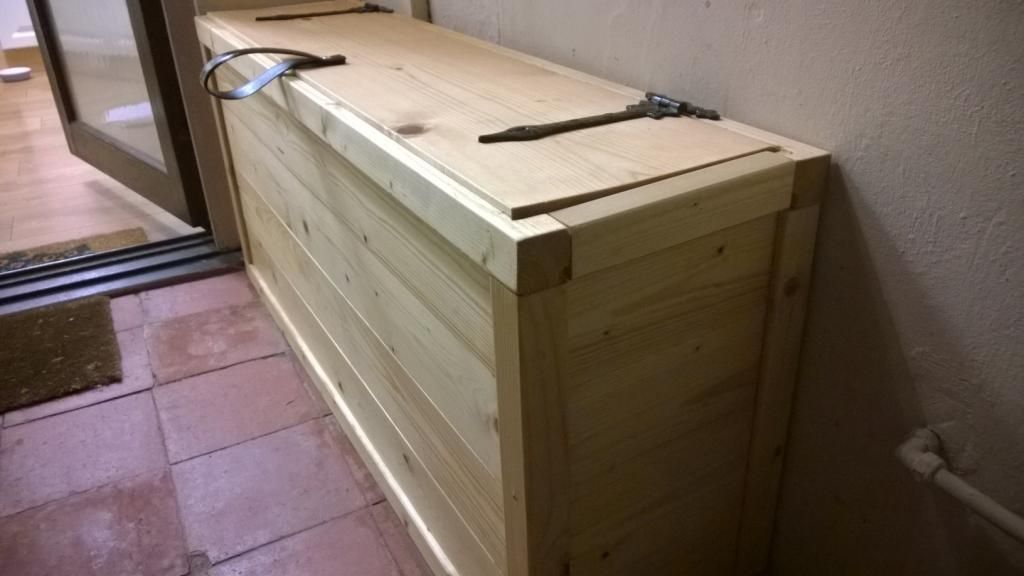
It was the first proper use of my router and the new table I made for it, pretty easy to put together as I had a cutter the same size as the side planks so just cut grooves into the frame for it and use gator glue to put it all together, much easier!
It's all pretty damn solid and heavy, the sides and base are 18mm PAR pine and the lid's 21mm.
The lid isn't sitting right but I'm going to give it a week or two to settle down and then fit it properly. Also, excuse the mess! The strap will probably change at some point as that it an old belt of mine!


It was the first proper use of my router and the new table I made for it, pretty easy to put together as I had a cutter the same size as the side planks so just cut grooves into the frame for it and use gator glue to put it all together, much easier!
It's all pretty damn solid and heavy, the sides and base are 18mm PAR pine and the lid's 21mm.


![url]](http://[url]https://scontent-b-lhr.xx.fbcdn.net/hphotos-xap1/t1.0-9/10533086_10154403323475363_7561434522984883008_n.jpg[/url])
