

Soooo after many hours messing about with EVGA Precision X, I thought I would write up a basic guide for those who are not familiar with this peach of an overclocking program. Precision X can be used with any card from any manafacturer and not limited to just Titans (this guide is for Titans though).
Download the latest EVGA Precision X from here:
http://www.guru3d.com/files_details/precisionx_dowload_evga.html
Ok, let's get started and if anyone wishes to add anything, please feel free")
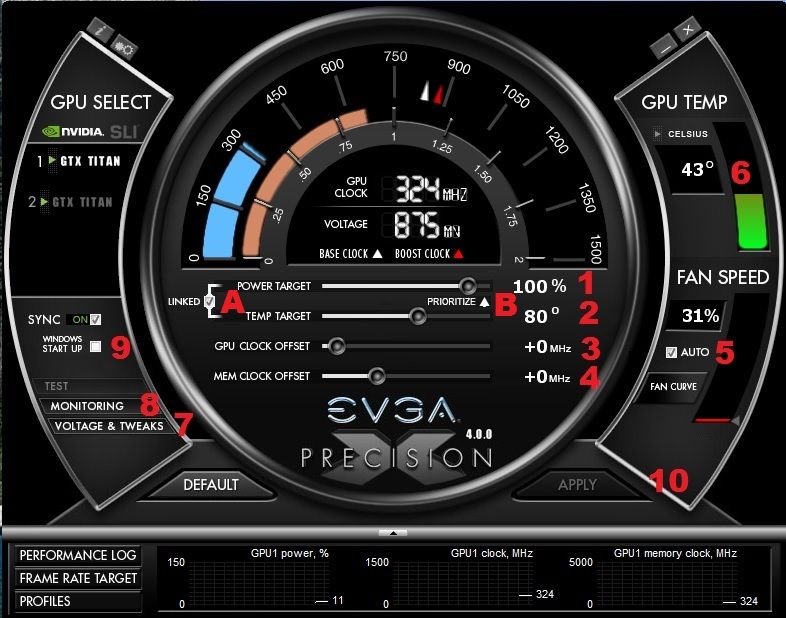
This is the basic layout of the GUI. Very simple to understand.
1. Power target - Use the power target to set your desired TDP. For my highest possible overclocks, I set it to the max (106% for me).
2. Temp target - For benching, I put this to the max (95) but for normal gaming overclocks, I leave this at 80c The GPU will start to throttle back when the set temp is reached and this will help keep the card cooler and possibly quieter.
3. GPU clock offset - Use this slider to find your stable overclocks. For me, I use +140 for everyday gaming but when benching, I push it as far as possible (which again for me is +161)
4. Mem clock offset - Again, this is a case of finding your maximum memory clock. Most of the time, I have mine set at +200 and I find this works well with my GPU clock offset of +140. If you are benching, this can go much higher but for everyday clocks, I like this small memory boost.
5. Fan speed - Uncheck the box if you are benching and put the fan to max (85% for me). This will keep the card nice and cool whilst you are pushing your GPU and memory to the max possible. You can set a fan profile for everyday overclocks but I will explain that further on.
6. GPU Temp - Does exactly what you see. Keep an eye on this whilst benching, a general rule of thumb is to keep it as cool as possible.
7. Voltage & Tweaks - This is where you can add more voltage (upto 1.2V for me) and I will explain more in the next picture.
8. Monitoring - This is where you set how you want info to be displayed and where you can adjust certain elements of what the GPU should do. More on this later.
9. Windows start up & Sync - once you have found a very stable overclock, it could pay to tick the box which will load Precision X when Windows starts up. That will save the time and you can set and forget.
Sync is an option for users who use more than one GPU. If you find that SLI cards perform roughly the same, tick the box and it will apply any overclocked settings used to the amount of cards you have in your system. For example, if you add +140 to the GPU clock offset, it will add that to both GPU's once you click apply. If you have cards that perform differently and you want to squeeze every last ounce of overclocking from your cards, leave this unticked and set each card manually.
10. Apply - after you have set your sliders, as soon as you click apply, all the settings you have made on the front page will take effect.
A. Linked - This is how you decide if you want the power target linked to the temp target. For benching, I leave this unchecked but for my 24/7 overclocks, I leave it ticked.
B. Prioritize - Again, for benching I set this to temp target (I do everything I can to keep the GPU's cool), this way it won't down throttle when doing a quick bench run, so long as you can keep the temp under the designated amount. I have found no difference whilst switching it either but this is not to say at some stage this will be the case.
That concludes the fist part
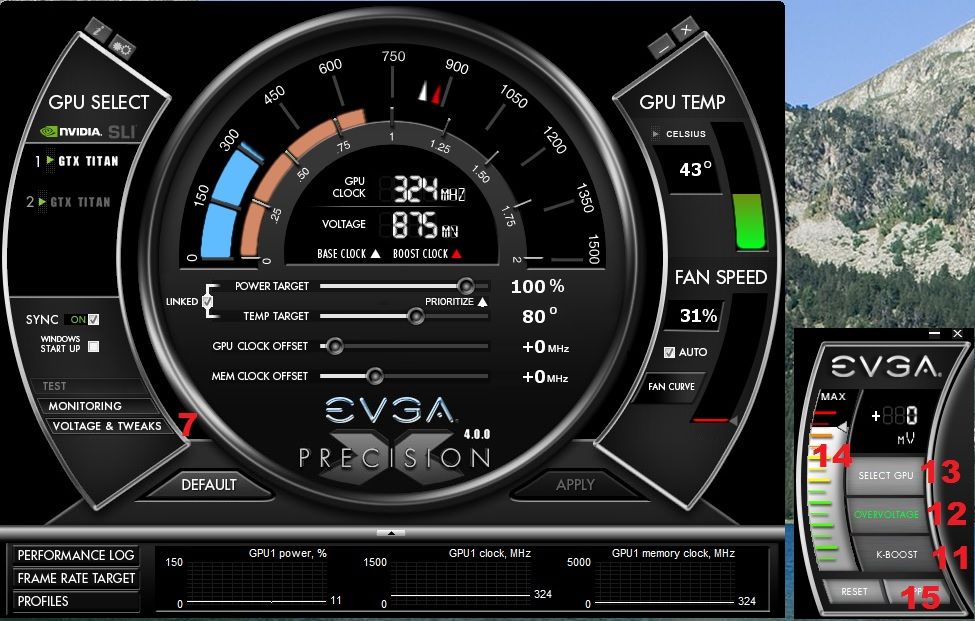
7. Voltage & tweaks - when you click this button, it opens up new options which show the voltage options.
11. K-Boost - This option is for single cards only and clicking this will set your overclocks to run even on desktop. It is a great option for benching and will keep volts at the amount set. For benching, it will keep a constant voltage which will help stability and should allow you to squeeze that little bit more on gaining a few extra points. Once you click K-Boost, it will require you to turn off SLI and restart the computer. It will revert back to normal desktop volts/speeds after another restart.
12. Overvoltage - Clicking this will allow you to overvolt your card and comes with a disclaimer. Standard stuff but if you are not comfortable with this, don't accept.
13. Select GPU - If you are running more than one card, you will need to set the volts required for each card. Set the volts for the first card and clcik apply and then click select GPU to set the volts for the next card and again clcik apply. Repeat for further cards. (looking at you Kaapstad and Andybird)
14. Volts - This is where you set the desired volts. For the reference cards, you have the choice of +13 or +25 and finaly +38. Set these to what you want and click apply. Do the same for the second card if you have one.
This concludes the voltages.
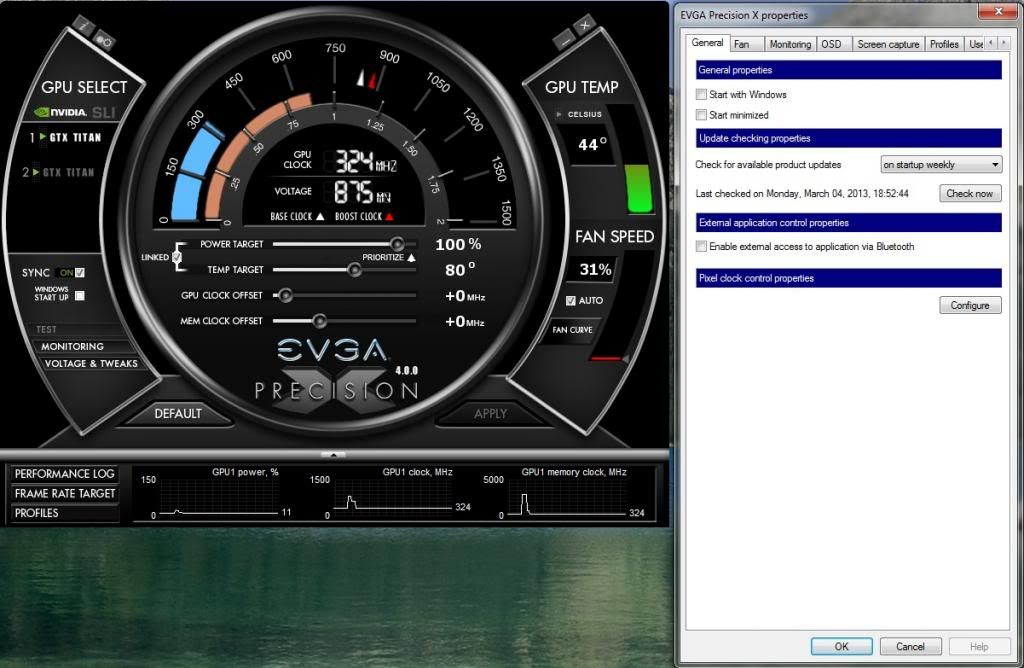
When you click "Monitoring", this opens up a new window where you can set different options for the GPU. The first screen is the General Tab and this is where you can check for new updates/start with windows/start minimized or enable Precision X to connect to a bluetooth device to watch everything that is going on and adjust clocks in real time.
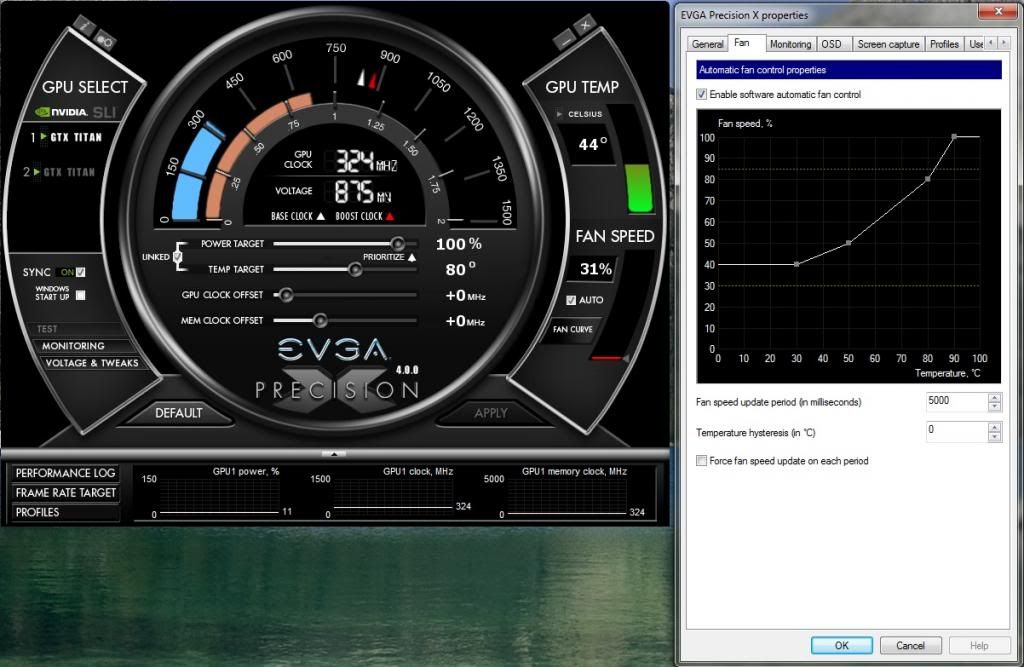
On the next tab, you see we have fan control. Tick the enable fan control to set fan profiles. Each of the little grey squares can be moved, and this is where you can set an aggressive fan (the fan will ramp up quicker) profile for keeping the cards cooler. Set this till you get a happy medium between temps and noise.
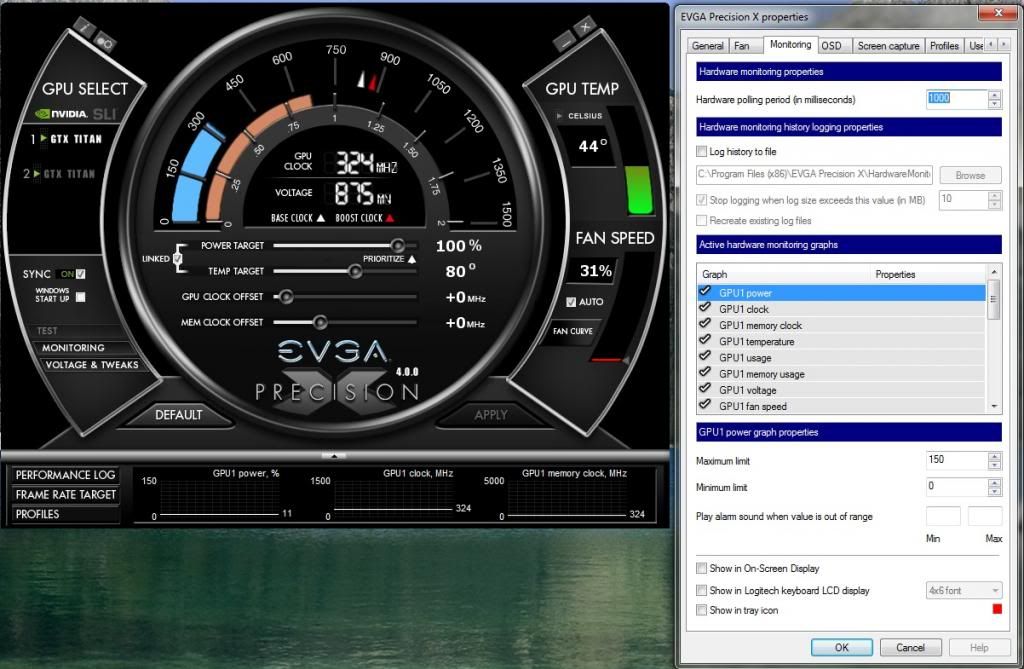
Monitoring is the next tab and a very useful tab to see what is happening with your overclocks. You can log the history to file to use as reference as well but for me the next options are very handy.
When you highlight each of the GPU Power/ GPU 1 Clock/ GPU 1 Memory clock etc, you can decide what you want to be shown on screen. This lets you see what your GPU is doing and if temps are getting high or the GPU core is downclocking. If you have an external keyboard screen like a G510 or G19, you can get all this info displayed on the keyboard screen. I prefer to set mine this way and I get to see what is going on.
When you click on any of the choices under "Active hardware monitoring graphs, further down you will see "Show in on-screen display/show in logitech keyboard (where applicable)/show in tray icon. Click how you want the info for each setting display.
For Example. Click GPU 1 usage and tick the box "Show in on-screen display" and then click GPU 1 fan speed and again tick the box "Show in on-screen display"
Very handy.
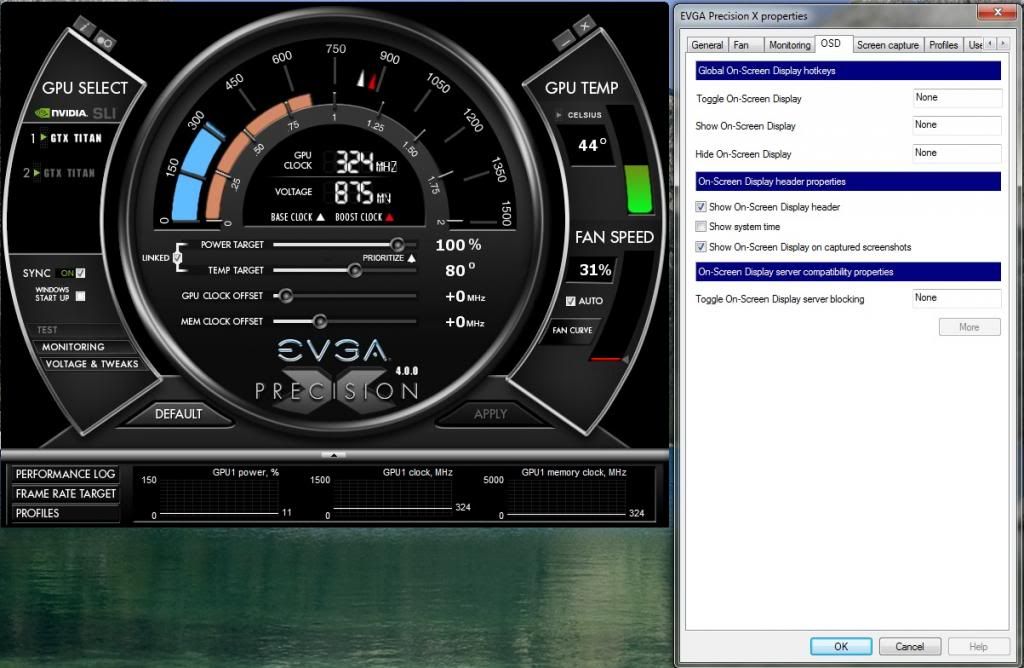
Here we can set the OSD with 'hotkeys' You can easily turn the OSD on and off with a hotkey. Click on any of the three options under the "Global on-screen display hotkeys" and hit what hotkey you would like to use.
Also handy to show proof of your info by ticking or unticking the "Show on-screen disply on captured screenshots.
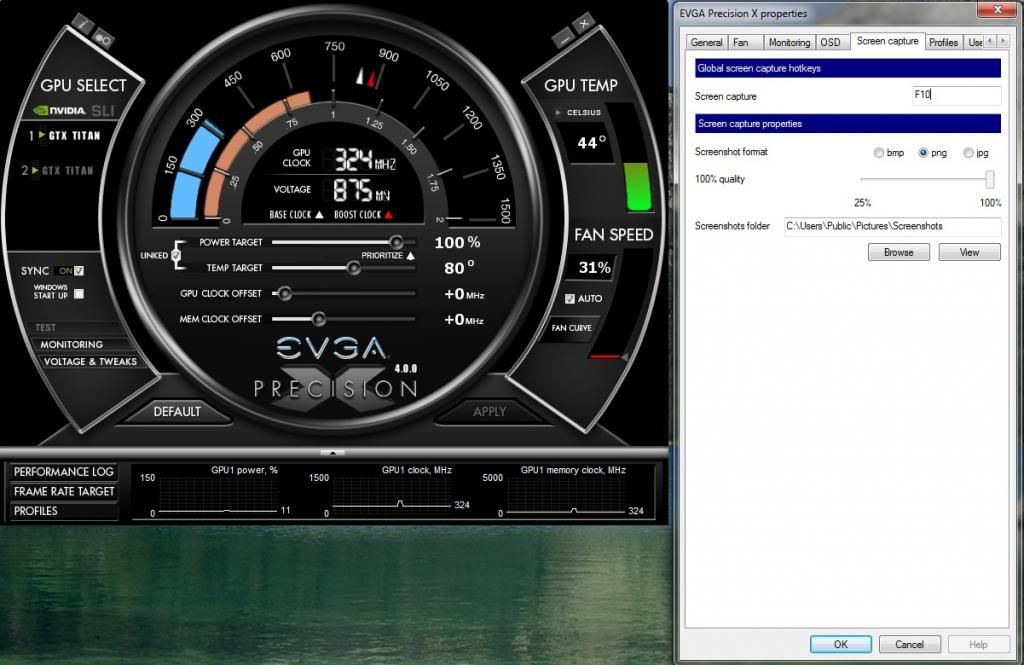
Assign a hotkep for screen shots here under the screen capture tab. You can see where the screen shots will be placed - usualy "C:\Users\Public\Pictures\Screenshots" and you can decide what format to save the picture as (bmp/png/jpg) and set the quality to save disk space.
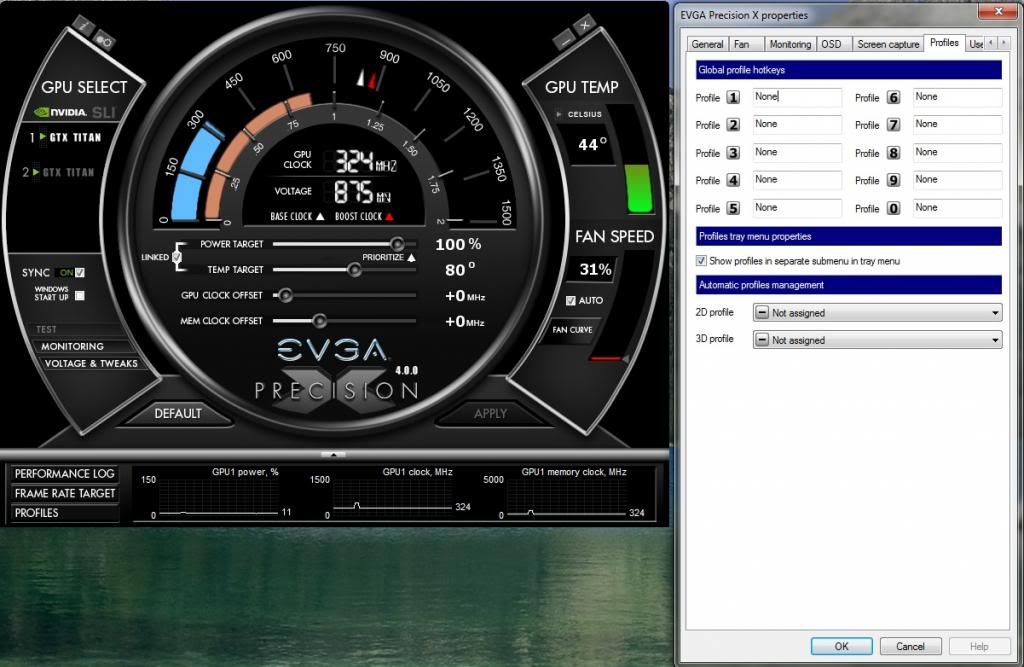
Here we can easily set profiles for our overclocks. Any profile we have saved can easily be accessed with a hotkey. One game might allow higher overclocks than another and you can easily switch between profiles with assigned hotkeys.
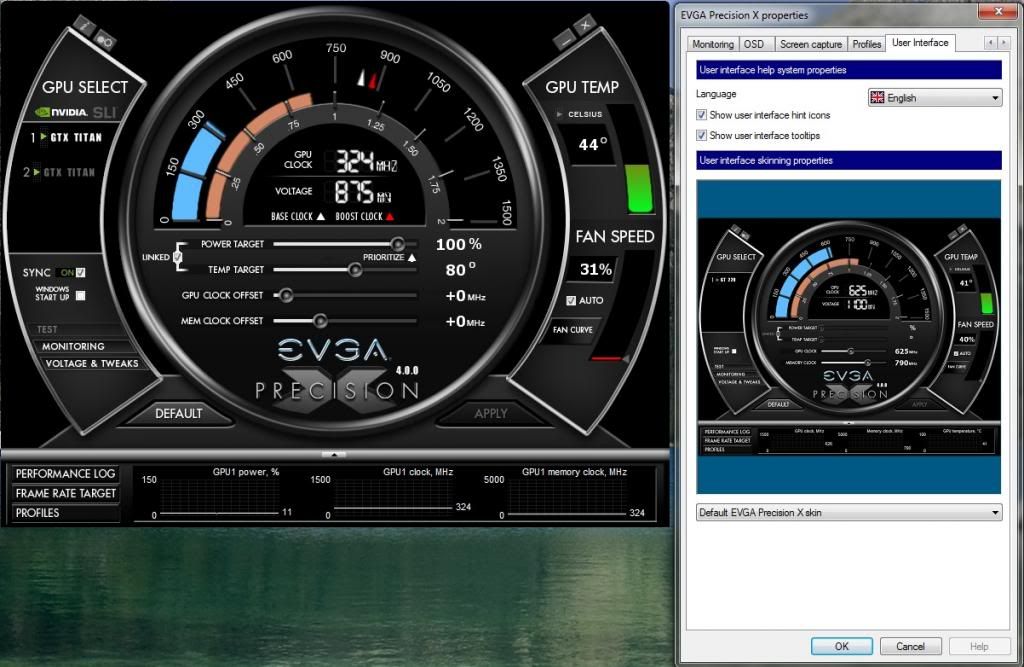
The last tab is the user interface tab. This is where you can customise your front page or change the language. Handy for showing hints and tips when placing the mouse pointer over each option as well.
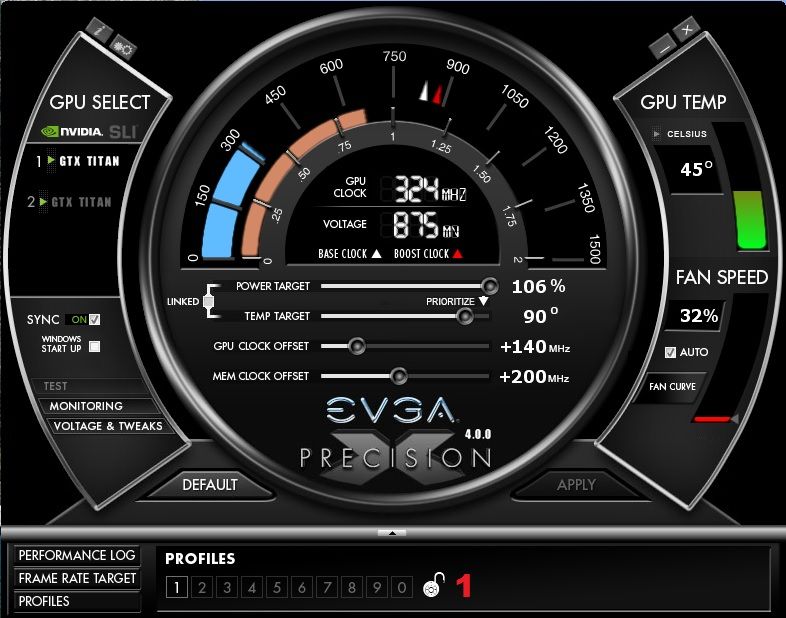
Back to the front page we go and we will talk about the profiles. I have my 24/7 stable overclock and this is what I have assigned to profile 1.
To assign any overclock you wish to use, right click the number and then left click the same number. Make sure you have clicked apply to your overclocks first and make sure the lock is open. When you are happy with assigning the overclocked profiles, click the lock to make sure you don't accidentaly overwrite them.
One thing I forgot to mention was clicking the performance log button and then double clicking on the graphs will detatch the monitoring graphs from the bottom and you can expand this for longer and more detailed monitoring.
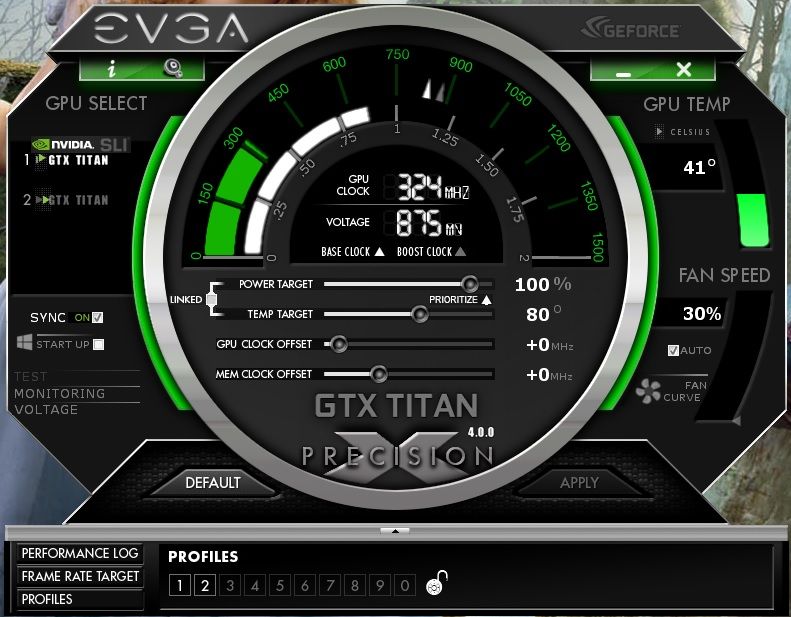
Here you can download custom skins and they should be extracted to - C:\Program Files (x86)\EVGA Precision X\Skins or where you have your Precision X folder.
Download skins from here
Here is a very nice skin I use
This concludes a basic tutorial on overclocking a Geforce GTX Titan and you can also use this guide for overclocking any GPU. Slight differences but the same effect. Good luck and remember to give it some
Edit:
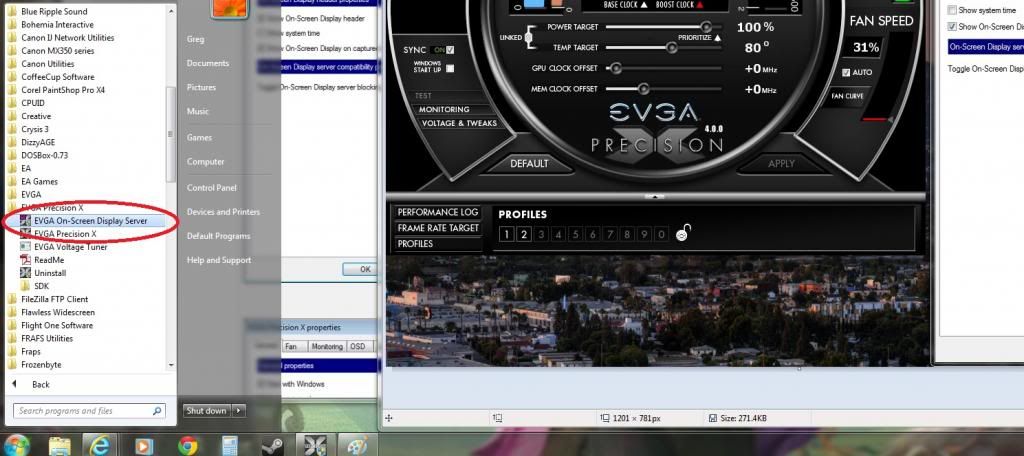
As per request, I will give a basic tutorial for the turning on and off of the "on screen display server blocking" (Handy for some online multiplayer games)
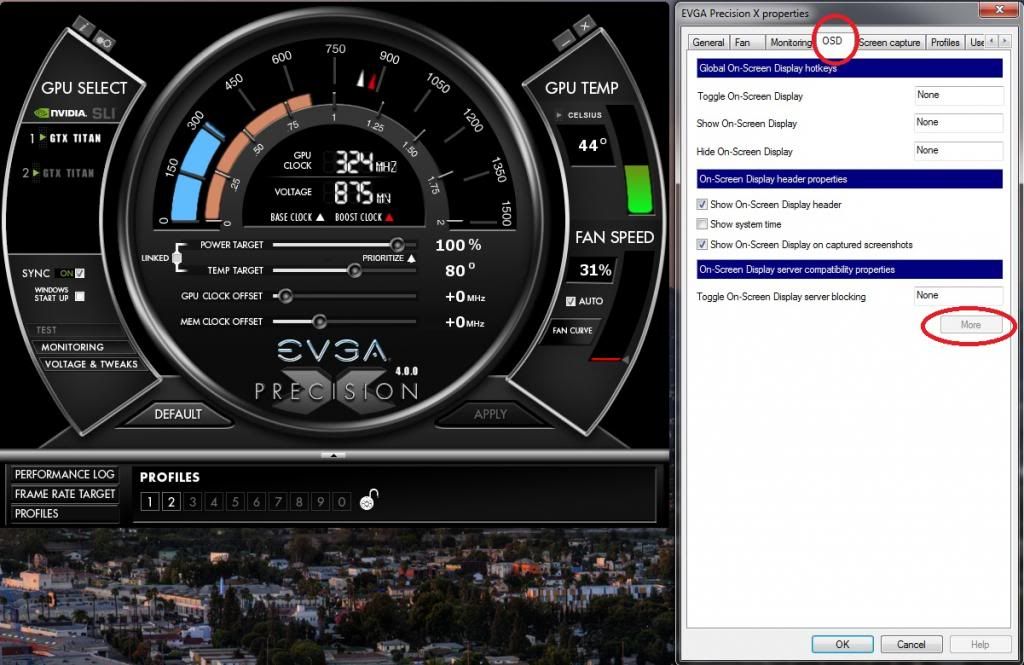
Clicking on monitoring and then selecting the OSD tab, you will see further down that "Toggle on-screen display server blocking" and the "More" button lower down isn't highlighted. To get to these extra options, you will need to click Start/All programs/EVGA Precision X/EVGA On-screen display server This will now make the "More" button clickable.
This will then bring up the Riva Tuner engine and options for how the OSD works and how to add profiles and make online gaming accept you are not cheating.
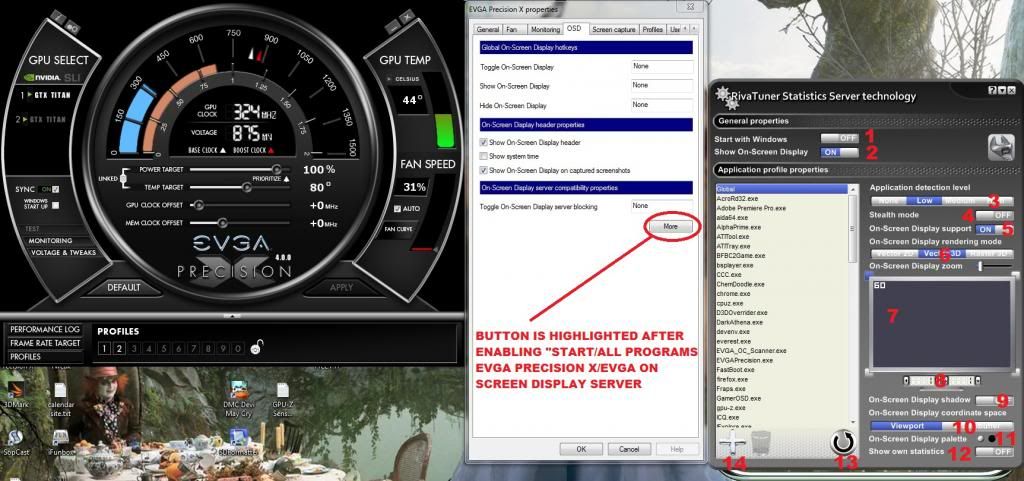
As you can see from the pic it has now brought up the Riva Tuner GUI where we will get started.
1. decide if you want this particular program to strat with Windows
2. Show on screen display - Pretty obvious what that does.
3. Application detection level - This setting will force the on screen display to be shown. Some applications block the on screen display and this will allow you to override the application that is blocking it. You can add your own games/App profiles but more on that soon. For now, you can set it to low, medium or high. Depending on the app, I suggest using the low setting.
4. Stealth Mode - This setting can be used for when an online game thinks you are using a hack tool. Some games will see the On screen display as a cheat hack and Stealth mode will allow you to see frame times etc whilst in Stealth mode.
5. On screen display support - Again, the Anti Cheat programs of some online games can see the On screen display as a cheat and adding profiles for each game will bypass the cheat detection system. I have this set to on.
6. On screen display rendering mode - This option allows the display to be in 2D or 3D raster 2D/3D. I always have it set to 2D for better compatabilty in games. Newer games don't like Raster 3D for some reason.
7. Click on each corner of the screen to decide where you would like the OSD to be displayed. You can use the on screen display zoom to make it bigger or smaller. Nobody wants it hogging the screen while you are getting shot at, so readable is my suggestion but not too readable.
8. You can adjust where and how far in the corners you want the display.
9. On screen display shadow - This helps if certain games are light and you can't see what the OSD is showing.
10. On screen display coordinate space - The OSD reads frame times from where it is. some games will only be rendering away from where the counter is and changing to frame buffer will allow an accurate reading of the frames.
11. On screen display palette - Change the clours of the OSD to anything you like. I like a subtle pink.
12. Show own statistics - Some applications use their own frame time monitoring software and this will allow you to switch between that and Precision X
13. Refresh your profiles with this button.
14. Add your own profiles with this button. In most cases, it is a good idea to add your own profile for any game/application that doesn't show the OSD. You can change any of the settings we have just discussed.
I am not so hot with the Riva Tuner engine, so if anybody thinks I have made a mistake or would like to add anything, please let me know.
Happy frame counting
Download the latest EVGA Precision X from here:
http://www.guru3d.com/files_details/precisionx_dowload_evga.html
Ok, let's get started and if anyone wishes to add anything, please feel free
This is the basic layout of the GUI. Very simple to understand.
1. Power target - Use the power target to set your desired TDP. For my highest possible overclocks, I set it to the max (106% for me).
2. Temp target - For benching, I put this to the max (95) but for normal gaming overclocks, I leave this at 80c The GPU will start to throttle back when the set temp is reached and this will help keep the card cooler and possibly quieter.
3. GPU clock offset - Use this slider to find your stable overclocks. For me, I use +140 for everyday gaming but when benching, I push it as far as possible (which again for me is +161)
4. Mem clock offset - Again, this is a case of finding your maximum memory clock. Most of the time, I have mine set at +200 and I find this works well with my GPU clock offset of +140. If you are benching, this can go much higher but for everyday clocks, I like this small memory boost.
5. Fan speed - Uncheck the box if you are benching and put the fan to max (85% for me). This will keep the card nice and cool whilst you are pushing your GPU and memory to the max possible. You can set a fan profile for everyday overclocks but I will explain that further on.
6. GPU Temp - Does exactly what you see. Keep an eye on this whilst benching, a general rule of thumb is to keep it as cool as possible.
7. Voltage & Tweaks - This is where you can add more voltage (upto 1.2V for me) and I will explain more in the next picture.
8. Monitoring - This is where you set how you want info to be displayed and where you can adjust certain elements of what the GPU should do. More on this later.
9. Windows start up & Sync - once you have found a very stable overclock, it could pay to tick the box which will load Precision X when Windows starts up. That will save the time and you can set and forget.
Sync is an option for users who use more than one GPU. If you find that SLI cards perform roughly the same, tick the box and it will apply any overclocked settings used to the amount of cards you have in your system. For example, if you add +140 to the GPU clock offset, it will add that to both GPU's once you click apply. If you have cards that perform differently and you want to squeeze every last ounce of overclocking from your cards, leave this unticked and set each card manually.
10. Apply - after you have set your sliders, as soon as you click apply, all the settings you have made on the front page will take effect.
A. Linked - This is how you decide if you want the power target linked to the temp target. For benching, I leave this unchecked but for my 24/7 overclocks, I leave it ticked.
B. Prioritize - Again, for benching I set this to temp target (I do everything I can to keep the GPU's cool), this way it won't down throttle when doing a quick bench run, so long as you can keep the temp under the designated amount. I have found no difference whilst switching it either but this is not to say at some stage this will be the case.
That concludes the fist part
7. Voltage & tweaks - when you click this button, it opens up new options which show the voltage options.
11. K-Boost - This option is for single cards only and clicking this will set your overclocks to run even on desktop. It is a great option for benching and will keep volts at the amount set. For benching, it will keep a constant voltage which will help stability and should allow you to squeeze that little bit more on gaining a few extra points. Once you click K-Boost, it will require you to turn off SLI and restart the computer. It will revert back to normal desktop volts/speeds after another restart.
12. Overvoltage - Clicking this will allow you to overvolt your card and comes with a disclaimer. Standard stuff but if you are not comfortable with this, don't accept.
13. Select GPU - If you are running more than one card, you will need to set the volts required for each card. Set the volts for the first card and clcik apply and then click select GPU to set the volts for the next card and again clcik apply. Repeat for further cards. (looking at you Kaapstad and Andybird)
14. Volts - This is where you set the desired volts. For the reference cards, you have the choice of +13 or +25 and finaly +38. Set these to what you want and click apply. Do the same for the second card if you have one.
This concludes the voltages.
When you click "Monitoring", this opens up a new window where you can set different options for the GPU. The first screen is the General Tab and this is where you can check for new updates/start with windows/start minimized or enable Precision X to connect to a bluetooth device to watch everything that is going on and adjust clocks in real time.
On the next tab, you see we have fan control. Tick the enable fan control to set fan profiles. Each of the little grey squares can be moved, and this is where you can set an aggressive fan (the fan will ramp up quicker) profile for keeping the cards cooler. Set this till you get a happy medium between temps and noise.
Monitoring is the next tab and a very useful tab to see what is happening with your overclocks. You can log the history to file to use as reference as well but for me the next options are very handy.
When you highlight each of the GPU Power/ GPU 1 Clock/ GPU 1 Memory clock etc, you can decide what you want to be shown on screen. This lets you see what your GPU is doing and if temps are getting high or the GPU core is downclocking. If you have an external keyboard screen like a G510 or G19, you can get all this info displayed on the keyboard screen. I prefer to set mine this way and I get to see what is going on.
When you click on any of the choices under "Active hardware monitoring graphs, further down you will see "Show in on-screen display/show in logitech keyboard (where applicable)/show in tray icon. Click how you want the info for each setting display.
For Example. Click GPU 1 usage and tick the box "Show in on-screen display" and then click GPU 1 fan speed and again tick the box "Show in on-screen display"
Very handy.
Here we can set the OSD with 'hotkeys' You can easily turn the OSD on and off with a hotkey. Click on any of the three options under the "Global on-screen display hotkeys" and hit what hotkey you would like to use.
Also handy to show proof of your info by ticking or unticking the "Show on-screen disply on captured screenshots.
Assign a hotkep for screen shots here under the screen capture tab. You can see where the screen shots will be placed - usualy "C:\Users\Public\Pictures\Screenshots" and you can decide what format to save the picture as (bmp/png/jpg) and set the quality to save disk space.
Here we can easily set profiles for our overclocks. Any profile we have saved can easily be accessed with a hotkey. One game might allow higher overclocks than another and you can easily switch between profiles with assigned hotkeys.
The last tab is the user interface tab. This is where you can customise your front page or change the language. Handy for showing hints and tips when placing the mouse pointer over each option as well.
Back to the front page we go and we will talk about the profiles. I have my 24/7 stable overclock and this is what I have assigned to profile 1.
To assign any overclock you wish to use, right click the number and then left click the same number. Make sure you have clicked apply to your overclocks first and make sure the lock is open. When you are happy with assigning the overclocked profiles, click the lock to make sure you don't accidentaly overwrite them.
One thing I forgot to mention was clicking the performance log button and then double clicking on the graphs will detatch the monitoring graphs from the bottom and you can expand this for longer and more detailed monitoring.
Here you can download custom skins and they should be extracted to - C:\Program Files (x86)\EVGA Precision X\Skins or where you have your Precision X folder.
Download skins from here
Here is a very nice skin I use
This concludes a basic tutorial on overclocking a Geforce GTX Titan and you can also use this guide for overclocking any GPU. Slight differences but the same effect. Good luck and remember to give it some
Edit:
As per request, I will give a basic tutorial for the turning on and off of the "on screen display server blocking" (Handy for some online multiplayer games)
Clicking on monitoring and then selecting the OSD tab, you will see further down that "Toggle on-screen display server blocking" and the "More" button lower down isn't highlighted. To get to these extra options, you will need to click Start/All programs/EVGA Precision X/EVGA On-screen display server This will now make the "More" button clickable.
This will then bring up the Riva Tuner engine and options for how the OSD works and how to add profiles and make online gaming accept you are not cheating.
As you can see from the pic it has now brought up the Riva Tuner GUI where we will get started.
1. decide if you want this particular program to strat with Windows
2. Show on screen display - Pretty obvious what that does.
3. Application detection level - This setting will force the on screen display to be shown. Some applications block the on screen display and this will allow you to override the application that is blocking it. You can add your own games/App profiles but more on that soon. For now, you can set it to low, medium or high. Depending on the app, I suggest using the low setting.
4. Stealth Mode - This setting can be used for when an online game thinks you are using a hack tool. Some games will see the On screen display as a cheat hack and Stealth mode will allow you to see frame times etc whilst in Stealth mode.
5. On screen display support - Again, the Anti Cheat programs of some online games can see the On screen display as a cheat and adding profiles for each game will bypass the cheat detection system. I have this set to on.
6. On screen display rendering mode - This option allows the display to be in 2D or 3D raster 2D/3D. I always have it set to 2D for better compatabilty in games. Newer games don't like Raster 3D for some reason.
7. Click on each corner of the screen to decide where you would like the OSD to be displayed. You can use the on screen display zoom to make it bigger or smaller. Nobody wants it hogging the screen while you are getting shot at, so readable is my suggestion but not too readable.
8. You can adjust where and how far in the corners you want the display.
9. On screen display shadow - This helps if certain games are light and you can't see what the OSD is showing.
10. On screen display coordinate space - The OSD reads frame times from where it is. some games will only be rendering away from where the counter is and changing to frame buffer will allow an accurate reading of the frames.
11. On screen display palette - Change the clours of the OSD to anything you like. I like a subtle pink.
12. Show own statistics - Some applications use their own frame time monitoring software and this will allow you to switch between that and Precision X
13. Refresh your profiles with this button.
14. Add your own profiles with this button. In most cases, it is a good idea to add your own profile for any game/application that doesn't show the OSD. You can change any of the settings we have just discussed.
I am not so hot with the Riva Tuner engine, so if anybody thinks I have made a mistake or would like to add anything, please let me know.
Happy frame counting
Last edited:
")
