project water-noob

Associate
Joined
23 May 2004
Posts
626
Location
staffordshire
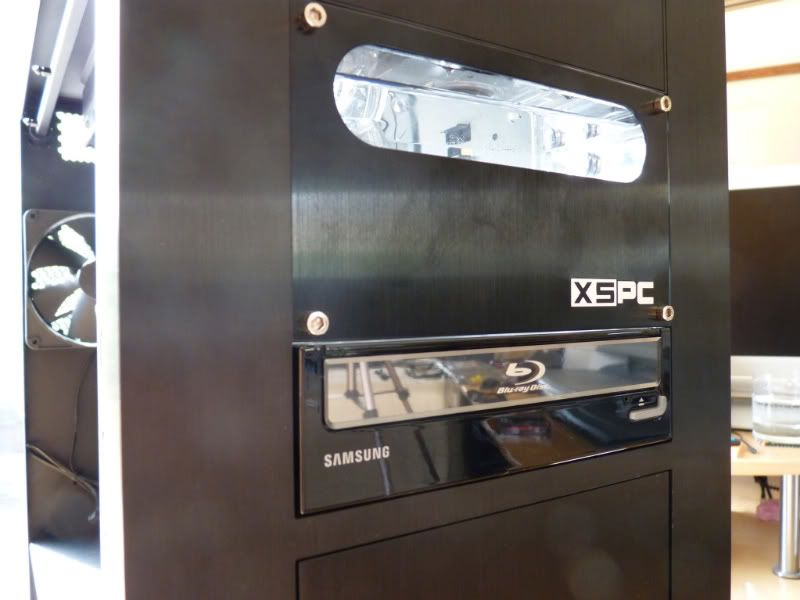
ok , the time for talking has finished, project water-noob is underway.

decided to start this thread for the actual build as my other thread was full of me asking questions and getting rather large (the thread, not me) :o

as promised, heres a few pics of the testing phase:

99kx2c.jpg


as ive got some help from the family, we all have computers, they are all happy to help.
i know what you are thinking, but the gpu block will be built up after the test and we reckon between us that we can get everything fitted in already connected.


2b2tkp.jpg


sorry if the pics are a little blurry, but hey, im nervous :o


21cz8dt.jpg


2ntea9y.jpg


2rgyt89.jpg


anyway, its been on test now for around 3 hours.
no leaks as yet so hopefully its looking good, everything seems to be pretty tightly fitted too.
dunno how long to leave it to test but i cant wait to get it up and running.

more to follow soon .. any suggestions welcomed ;)
 
looks good,
I could only bear to wait five minutes of testing before I fitted my loop, it slide in easy made up with the same res, but no GPU

I also used 6 different suppliers and wasted lots on postage to get everything here quick !
 
Last edited:
I don't want to dampen your spirits as everything looks good and I appreciate that you are new to watercooling. However, leak testing outside a pc then installing defeats the object of the exercise.

The reason being that while it may not leak outside, once fitted it could spring a leak. All of the bending, twisting involved in fitting the watercooling loop could inadvertantly loosen some tubing, or worse, loosen a barb. Therefore you should ALWAYS leak test inside the PC once it has been installed.

LEak testing inside a PC sounds dangerous but aslong as you take your time, don't rush and use common sense, you will be ok. By common sense I mean don't leak test with the pc turned on, just hook the pump up to the PSU and use the 'green/earth wire trick to jumpstart the psu, thereby only powering the pump - google).

Place plenty of kitchen roll around all of the barbs and any small leaks will be mopped up before dripping. Leave it running for an hours or so (24hrs is total overkill). Check the kitchen roll for damp spots. If you do happen to get a little water on any component, just allow it to dry and it will be fine.

Once leak tested correctly, rewire your PSU and PC and enjoy your fully leak tested, watercooled PC :).
 
As above with what webbo said, as well as the fact you would need to remove the tubing from your bay res/pump as it needs to be inserted from the front of the case
 
Echoing what webbo said I'd also like to add that in all likelihood you're going to have to dismantle the loop anyway.

Unless they've changed recently those res/pump combos have to be inserted into the front of the case. If this still holds true then you're going to have a devil of a job sliding a full loop through an optical drive bay.

Edit: Beaten to the punch.
 
I managed to slide the same res and my rad and CPU block in with the loop filled, an extra pair of hands would have helped but it fits :)
I just felt the need to test it outside and then inside cos it was my first time
P1010883-1.jpg

but the way has anyone warned you the res wont fit in the top bay cos of the rad barbs ?
I put my BR drive below to give me space for the tubing above
 
thanks for the info guys..please keep it coming ;)

i should mention that what i had originaly intended to do was (with the help of my lads hands as well as mine), to transplant the whole lot into the corsair 800D.
with the drives out and front panel off, once the case is laid on its side, the res/pump would go in through the back sideways..once through, return the case upright and slide the res back into the bay.
(at least in theory).
we was then going to connect the cpu and gpu.. and then run a monitored leak-test using tissues around the critical areas.
(will still use the standalone psu until im happy its staying leak free )

once thats passed, re-hook the pump/res to the main psu.

over to you guys, what do you think ?
 
Good Plan

just make sure that the barbs and the fittings on the pipes stay tight after you move every thing around.

For me .. after I did outside leak test to see how it all fit together

I cut the tubing off .. tightened averything a bit and fit the stuff in the case then used new tube and clamps on the rig in situ

I wasted a metre or so of tube .. but hey ! .. Tubes cheaper than my CPU !:D
 
Basically as w3bbo said really.

I kinda did mine slightly different but don't we all lol, how i did mine as it was cpu only loop was, installed rad, bay res/pump, cpu block.
Then measured up and fitted tubing whilst everything was in situ.

At that point i removed the mobo, psu, so only the water stuff was in my case, put the waterblock resting on a cardboard box, roughly where it would be in the case (when fitted), then filled the loop and bled it.
Still did the kitchen towel stuff as well, not for protection of stuff, just to spot any leaks easier, left it for a few hours, no leaks, so at that point, i carefully put back the mobo and other components.

Probably not the best or fastest way of doing it, but its how i was comfy doing it, for the first time, next time will be a lot easier and faster.

But looking good perry, basicly biggest tip we can give you is take your time as its your first go at water.
 
although i do echo w3bbo

i must say, if it is your first time it is advisable to get to know the hardware. take some time to find out how it works, how to bleed it etc.
if that means setting it up away from your hardware until you get used to the way it works, then do that. it will give you more confidence if you do a test run like this anyway.
but make sure you then go on to leak test with the WC in situe afterwards ;)

i must say you have chosen a great starter setup that should look sweet inside your system when it is all put together.

looking forward to seeing the final pics of this project :)
 
its been a long night......

...... however


......... i think ive created a monster :D

and ruined 3 pairs of underpants :p


stay tuned, pics soon ;)
 
Last edited:
gonna have to wait a little longer for some pics, camera is charging but will get some up soon i promise.

just to recall the setup:

i7 920 D0 o/c 3.8mhz
asus 5870 std clocks

cpu and gpu watercooled as in thread, and rad has now got 3 apache blacks blowing air out of the case via the roof of the corsair 800D

1 apache black conected to rear of case blowing out
2 noctua (dont remember the models) drawing air in from the bottom of the case, and a couple of no name fans cooling the SSD and 1tb HDD

these are all backed off to almost silent using the fan controller.

my idle temp for the cpu is 39 , havent ran prime yet .. dunno how long to let the cooling "bed in" ?
after playing ten mins of bad company 2 , temps increased to 49/51.

gpu idles at 31, rises to around 48 max after 10 mins of bad company.

do these temps sound about right? not sure if ive tightened the cpu enough ?
 
Looking good perry, cant wait to see some more pics. Those temps sound ok to me, I'd be happy with them, although someone with more watercooling expertise might be able to comment.

I have gone for a similar water setup as you for my first build, hopefully most of the stuff should arrive early this week. Gone for the xspc drive bay res/pump, triple rad, cpu block and gpu block.

Keep us all posted with some updates and finished pics :)
 
looks excellent, good work

you got any snaps of the system from the side so we can see the full layout?
 
looks excellent, good work

you got any snaps of the system from the side so we can see the full layout?

yea , well i didnt have, but how could i refuse :p

again, bad focus .. will take some more with a better cam soon.

15zqp0w.jpg


i hope i am now considered worthy of " trainee " water-cooler , oh great one :D
 
yea , well i didnt have, but how could i refuse :p

again, bad focus .. will take some more with a better cam soon.

15zqp0w.jpg


i hope i am now considered worthy of " trainee " water-cooler , oh great one :D

I have to admit, I've never really been a fan of that case.... until now. It takes your watercooling setup beautifully. Overall it looks very neat and smart :D
 
I have to admit, I've never really been a fan of that case.... until now. It takes your watercooling setup beautifully. Overall it looks very neat and smart :D

thank you, im pleased its getting good comments, its been a really good case to work with, and theres loads more potential for those who really know what they are doing.

of course, if theres anything i could do to improve it, please shout up everyone ;)
 
Back
Top Bottom