011D Mini, ATX build with cobbled in ATX PSU, DIY vertical GPU, and configurable loop.

D4N

D4N

Associate
Joined
7 Jun 2020
Posts
191
Thought I’d show my upcoming build using a Lian Li 011D mini.

I wanted to use this case when I upgraded my system back around April, but had to buy something different at the time seeing as the 011D mini hadn’t released back then. I had come from using a meshify mini, but when I upgraded, I changed from using a micro atx motherboard, to full size atx as there didn’t seem to be many Z490 m-atx boards about when it released. Even earlier in the year, I planned to upgrade my psu when I upgraded my system, as I was using a sfx-l be quiet 600w unit that I had in a case before the meshify, with my old 6700k and 2080 combo, and I wanted to get something with a bit more in reserve, so got a be quiet straight power 11 850w platinum supply when it released.

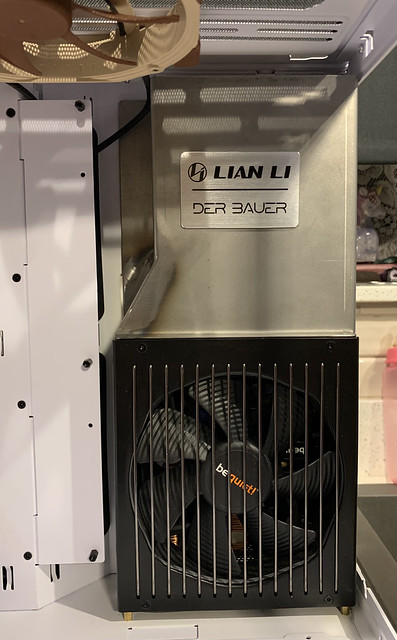
All of that leaves me with a full sized ATX motherboard and PSU to somehow try and shoehorn into a case it shouldn’t fit into.
 

D4N

D4N

Associate
OP
Joined
7 Jun 2020
Posts
191
My initial thoughts about the psu after seeing videos and pictures of the case was to either:
1 - fit it underneath the gpu, in the more traditional position and make a shroud
2 - cut the back panel to make clearance
3 - make it fit in place of the side radiator position

After buying the case and looking at it, the psu was too tall to fit underneath the gpu, as I want to get the vertical mount when it releases, and it was going to be a bit janky hanging out of the side, so I have set about modifying the radiator mounting area to accept a full size tax psu.

I could use the 600w sfx-l psu I’ve got, but where would the fun in that be!

I’m either going to end up with a unique case, or a pile of scrap. It’s not going to be a quick build, as I’m waiting on bits to arrive from all over, and getting time to chop it about

First step was to strip the case and remove the motherboard tray, which left me with this


Now I’ve got to take the psu out of my system to see where it needs cutting.
 

D4N

D4N

Associate
OP
Joined
7 Jun 2020
Posts
191
I’ve managed to cut the radiator mounting area out, and folded the edge back so it’s still rigid, and drilled some holes in the bottom to fix in the psu, and this is what I’ve got now. It’s just placed together at the moment. Got the power supply on some stand offs at the minute. I’m waiting on an angled IEC extension lead to arrive from China before I know how long they need to be. Or it’s cut a hole in the bottom and flush mount it and have the wire running under the case. I’m not sure which way I’ll go yet. Then I’ll have to make some shrouding to cover the cables while leaving enough room to fit the 24 pin and pice cables through.


D4N

D4N

Associate
OP
Joined
7 Jun 2020
Posts
191
That looks good. Out of curiosity, if it were to lie flat in that same corner, how much would it eat into the case along the bottom?
I’ll have a look when I do a bit more to it tomorrow.
Cut out some more today, and painted the raw edges, and it’s still a bit tacky at the minute. I should be riveting the motherboard tray back next.
 

D4N

D4N

Associate
OP
Joined
7 Jun 2020
Posts
191
Ha
That looks good. Out of curiosity, if it were to lie flat in that same corner, how much would it eat into the case along the bottom?

I’ve riveted the tray back in this morning and had a quick measure for you. With the psu as in the picture, but lay down flat on the bottom it gives you approx 250mm to the back of the case, and if you measure to where the fan/radiator mount would have been is 220mm, so clearance there will depend on the length of your psu.
 

D4N

D4N

Associate
OP
Joined
7 Jun 2020
Posts
191
This is where I’m up to now. I’ve cut a hole in the bottom so I can easily get to the power switch on the psu, and it lets it exhaust air out of the case. I’m using some motherboard standoffs in the psu to raise it enough so the power extension lead can run inside the case, and I’ll eventually make a plate to mount it where the psu was supposed to go.
Now I know where the psu is going to be, I mocked up a shroud to hide the wires out of cardboard that I will make out of steel and paint.


D4N

D4N

Associate
OP
Joined
7 Jun 2020
Posts
191
Yeah, got a press at work. I did consider aluminium and brushing it to match the front panel, but I’ll probably use 1.5 or 1.2 mild steel and paint it. The weight will be hardly anything for something that big. The angled bit will need welding in and grinding to match the bends on the rest of the shroud, and it’s easier in mild steel to get a tidy little weld. And I can weld some studs on the back to attach it in steel, I haven’t got access to any ally weld studs.
 

D4N

D4N

Associate
OP
Joined
7 Jun 2020
Posts
191
I used a can of plastikote white to touch up where I have cut it, but it’s got a bit of a yellow tinge to it, so I’m going to try and get something that’s a better match. I have got a mixed pot of white that I used on another project I might try, but I’ll have to get a spray gun out to use that.
 

D4N

D4N

Associate
OP
Joined
7 Jun 2020
Posts
191
Done a bit more to it. I had to trim the one foot a bit to clear the power lead and give a bit more access to the switch, so I used some Sugru to fill it back in where I had cut it back.


I have got the shroud roughly done and test fitted so I can mark where it needs fixings putting.


I’m probably going to leave the Lian Li badge in the front part of the case rather than hidden away in the back on the 2.5” mount.


There should be enough room behind it to fit the cables in I hope!


It should soon be ready to get painted.
 

D4N

D4N

Associate
OP
Joined
7 Jun 2020
Posts
191
Managed to buy what must have been the last Noctua NF-A12x25 on Earth from Germany and actually have it delivered, unlike the other bits that have been stuck there for the last 2 weeks “due to a Brexit related disruption” according to UPS.
 

D4N

D4N

Associate
OP
Joined
7 Jun 2020
Posts
191
d265w9ertk561.jpg

That does look smart. I’ve got a 360mm stuck in the post I’m planning on putting in the bottom at the minute. When it eventually arrives I’ll have a play and see what possibilities there are.
 

D4N

D4N

Associate
OP
Joined
7 Jun 2020
Posts
191
Got the shroud painted now, and cut out a blanking plate for where the original PSU
would have fitted, the proceeded to break the mandrel in my nut riveter on the first one.


My parcel of bits from Germany was delivered, so I’ve got a bit I can do over the weekend. The next hold up will be waiting for the vertical mount kit to release. Hopefully OCUK will get it listed soon!
 

D4N

D4N

Associate
OP
Joined
7 Jun 2020
Posts
191
Bit more progress now that some of the bits have arrived. Tried the reservoir on the shroud to see how it fits, and tried the radiator in. It’s an EK SE 360. Fitted the Noctua NF-12x25 PWM that seems to be rarer than hens teeth, on to the end of the rad so I can see where the pump needs to sit (got another 2 in the front of my current case I’ll use on the other spaces), and then I’ll have to make up some sort of mount.
I went for a D5 Next so that it can control the fans on the radiator from its built in water temperature sensor, and a Heatkiller top.


I made a backing plate to go behind the FLT reservoir out of mirrored stainless steel and cut it out to house the Lian Li badge that I moved from the back. Hopefully this will look good when the RGB is on. I can always take this out if I don’t like it, or make one out of a different material.


I’ll have to get the heat gun out and bend up some tubes to link here. The paint isn’t quite the same shade as the case either, but it will have to do.
 

D4N

D4N

Associate
OP
Joined
7 Jun 2020
Posts
191
This week, I have been mostly making brackets.

Finished off this one to blank off the original PSU hole, which also houses the power extension lead, a molex mini fit panel mount connector and a bulkhead fitting. Also cut a hole for the radiator outlet in one of the original blanking plates.


I made a brushed stainless pump mount to go on a fan too. It started like this


then hacked it about to make this


then fitted out with the pump and fan


D4N

D4N

Associate
OP
Joined
7 Jun 2020
Posts
191
Done a bit of pipe work this afternoon. I’ve used a spare psu just as a fill in until I finally transplant my system from it’s current case.


D4N

D4N

Associate
OP
Joined
7 Jun 2020
Posts
191
I’m thinking of maybe making my own vertical gpu mount seeing as the official one doesn’t seem to be available anywhere.
I’ll have a measure up and see if I can cobble something up.
 

D4N

D4N

Associate
OP
Joined
7 Jun 2020
Posts
191
this mount is what's holding my build up in the mini, doesn't seen to be anywhere :(
Same boat I’m in. The Phanteks one I’ve got in my other case needs the bars cutting out between the slots, and I think that’s how most of them are. I don’t think that type will work very well in this case because of how the modular brackets are. I think it wouldn’t be particularly secure compared to other cases. What I plan to make is a piece that replaces the cover to the right of the first 3 expansion slots, and the first modular slot underneath. It should be pretty solid as it’s got 3 bolt on the side of the expansion slots and the ones down the right side of the case I can use to attach it. It will place the gpu closer to the side panel than the official one, but I’m going to use a water cooled card, so it’s not a problem. It will be better for how I want to plumb it actually, as I will use the ports on the backside of the card, so being a little closer to the side will give me more room behind it for pipes.
 
Last edited:

D4N

D4N

Associate
OP
Joined
7 Jun 2020
Posts
191
I finished off making this today


to mount my Phanteks LED neon strip to the side of the radiator.


D4N

D4N

Associate
OP
Joined
7 Jun 2020
Posts
191
Got the first stage of the DIY vertical mount made and test fitted. Tried my trusty old 970 in there.


I had to trim back a bit underneath the rear fan mount to make a bit of room, but if you look at images of the official one, it is closer to the fan like mine. I did measure the one dimension a few mm too small, hence the gap between my mount and the top 3 pice covers. Never mind. I also swapped the thumbscrews holding the modular plates for some smaller stainless cap head bolts that are a lot less bulky than the thumb screws. Once it’s all together, the modular plates shouldn’t need to come off very often, so I’m not bothered about it needing an Allen key to remove them. I’ll keep the thumbscrews on the top and side panels though.

Next problem to overcome is I bought a 120 radiator to go on the rear exhaust, as I though you can’t have too many radiators. Trouble is that it sits too far down to clear the top of the GPU. It fitted in lovely until I went to try the old 970 in :o
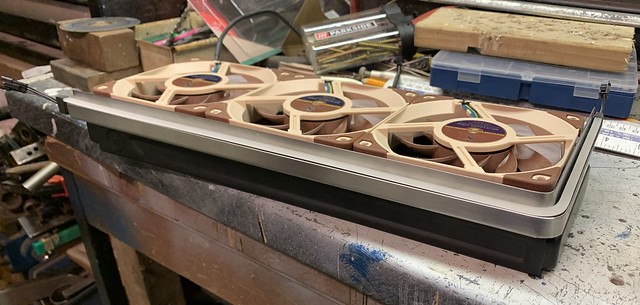
. I extended the slots on the fan mount to try and lift it up as high as it would go, but it’s not quite enough, so I’m probably going to try and get it on the outside somehow, which brings its own problem. Being on the outside means it’s in the way of the screws to mount the GPU. I’ve got a bit of an idea, and will try to bodge something up.
 
Back
Top Bottom