011D Mini, ATX build with cobbled in ATX PSU, DIY vertical GPU, and configurable loop.

D4N

D4N

Associate
OP
Joined
7 Jun 2020
Posts
191
Radiator should be sorted now. I made a hinge to mount it on the outside so that I can swing it out of the way to access the screws on the GPU. Like so:
Open


Closed


It’s mounted so that it clears the top panel when you need to remove it, and it just about clears the GPU mounting screws. I have got a spare hole though, as I drilled one in the bracket for holding it closed, then when I checked the inside of the case, there were already 2 holes there for dropping the modular back plate, so I drilled these through the panel and used them instead.

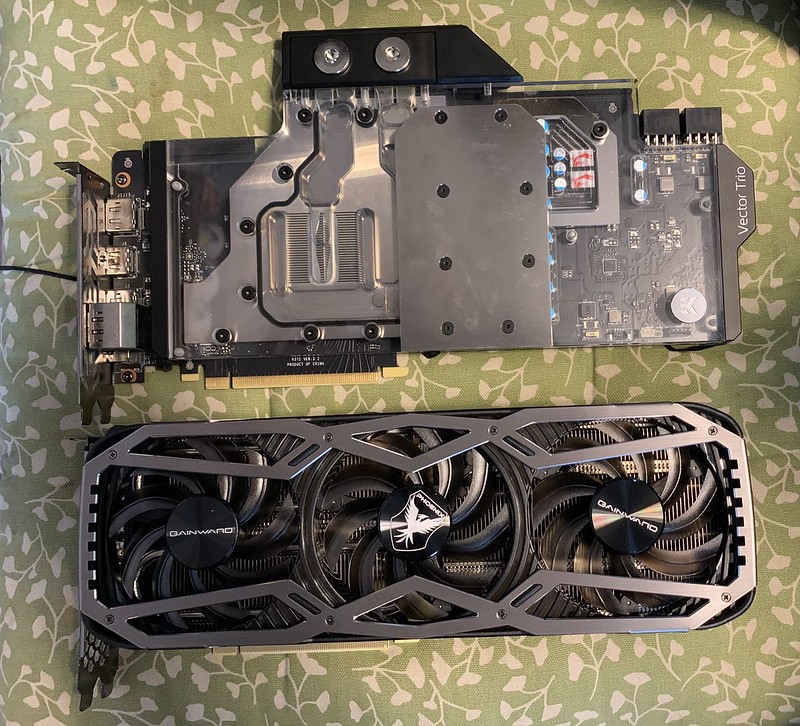
I also tried in the card I’ll actually be using in it just to check clearances. It wouldn’t want to be much longer, or it would be on the pump! I have got a 3080 that’s a bit shorter in length on order, but I don’t know when that’s likely to arrive, and when it does, I don’t know if Watercool will be shipping to the UK or not for the waterblock I want. Still, my 2080 isn’t a bad card for the time being.


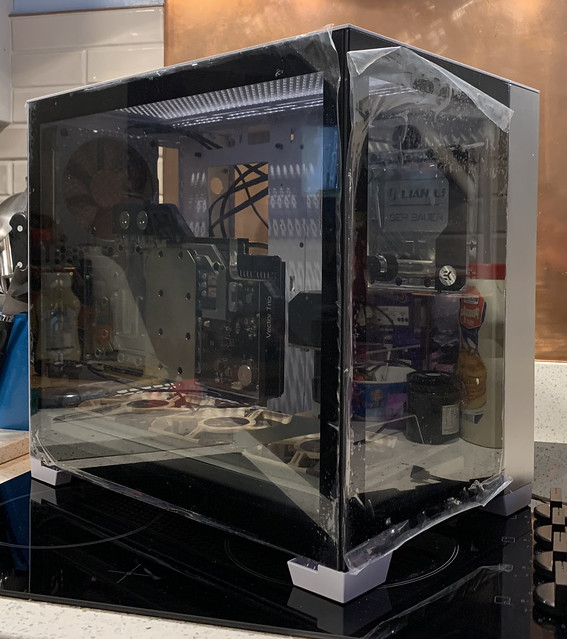
It’s starting to take shape now. Hopefully I’ll get the vertical mount finished this week. I’m undecided whether to paint the back radiator white to match the case, or leave it black to match the border on the glass.
 

D4N

D4N

Associate
OP
Joined
7 Jun 2020
Posts
191
I got the lower part of the vertical mount done today, just got to make a couple of spacers to go underneath the riser cable to support it. I should hopefully get some final components in at the weekend all going well.
 

D4N

D4N

Associate
OP
Joined
7 Jun 2020
Posts
191
A bit more progress has been made. I had a tin of paint mixed to match the case, so I have repainted the shroud to match rather than leave it with the warmer shade of white I used before. I gave the thumbscrews and radiator a coat of white too.


Finished the last few bits on my DIY vertical mount


I started to put in some of the bits for the system.


I’m quite pleased with how the power supply fits. The front of it is fairly level with the motherboard, and 90° sata connectors are a spot on fit in the space on the side. The PCIE power cables I had used before are too short though, so I’m going to have to make up a longer pair, and I also need a braided sata power cable for the D5 Next. I’m waiting on some 15mm Noctua fans to come back into stock, as 25mm ones cover the Phanteks neon strip along the top of the motherboard.
 

D4N

D4N

Associate
OP
Joined
7 Jun 2020
Posts
191
The pump protrudes out of the back of the flt pump/res combo, so would stick in over where the psu cables are. I’d have had to have made the shroud a lot deeper if I’d have gone that route. I like the Aqua Computer D5 Next as it’s got monitoring software with it, and you can controls the fans and pump by water temperature.
 

D4N

D4N

Associate
OP
Joined
7 Jun 2020
Posts
191
Nearly in a functioning condition now. I gave my waterblocks and rads a clean out while the system is apart


and made up some longer braided PCIE cables, so they would actually reach


Should just need a bit of plumbing now to get it up and running.
 

D4N

D4N

Associate
OP
Joined
7 Jun 2020
Posts
191
Some real nice work here. You could probably sell those pump mounts.
Shame you had to put the 120 rad external.

I’ve got a whole external loop to go with it, so I don’t mind a 120 on the back. More rads can’t be bad!

I’ve done the plumbing today. It’s a bit different to the norm. I’ve made it configurable so it can be used with just the rads on the case, or with the external loop plugged in, or as separate dual cpu/gpu loops. The pictures will show how.

This was the first bit of the plumbing puzzle. The gpu pipes.


And how it sits in the case. I think it fits quite well with the 2 pipes for the gpu offset, and the cpu to radiator pipe to the left.


This is it configured to run everything from the internal loop, consisting of a 360 and a 120 rad. I used 2 45° fittings from the 120 rad to the GPU input, so there is enough movement in it to open the hinge on the radiator enough to get to the screws on the GPU. If I do want to remove the GPU for anything, I’ll probably just unbolt the back modular section with my vertical mount and pull the whole lot off with the rad and pipes attached.


With the quick disconnects I can swap the pipes about to add in my custom external loop consisting of a D5 next, a Watercool Heatkiller tube 200 and 2 Alphacool XT45 280mm radiators paired with 4 Corsair ML140 fans in a custom enclosure. This is it configured as one big loop, with both CPU and GPU, cooled by a combination of 360, 120, and 2x280 rads.


The other possible configuration is like this, where the GPU is cooled by the external 280’s, and the CPU is cooled by the internal 360 and 120.


Currently I’m letting it run from the external pump to leak test it for a while.


I didn’t think I’d be able to get it done today as I couldn’t find one set of the disconnects so ordered a new one, only to find it about half hour later. Suppose I’ll have a spare one if I need it.
 

D4N

D4N

Associate
OP
Joined
7 Jun 2020
Posts
191
Now I’m happy it’s got no leaks, I’ve powered it up. I’m really pleased with how it’s turned out. The LED ring on the Heatkiller tube is an Aquacomputer rgbpx one for their Ultitube reservoir, and is controlled by the D5 next. I modified the struts on the Heatkiller res by milling a slot so that it would accept the Aquacompter ring. The Watercool made strip to fit the Heatkiller is just a strip down one leg with a few LED’s on. I think the ring is a lot more even than that would be, and the fact that it only needs a short wire to link to the pump, rather than a long one right back to the motherboard makes it even better.

A brief spec off the top of my head if anybody is interested is:
MSI MEG Unify Z490 ATX
i7 10700K overclocked to 5.2 all core (although I have benchmarked at 5.3)
MSI Gaming X Trio RTX 2080
32gb G Skill Trident Z 3400mhz
2tb Adata XPG M.2
256gb Samsung 960 M.2
2x 2tb firecuda sshd
Be Quiet straight power 11 850w PSU (ATX sized!)
Custom braided cables
2x Aquacompter D5 Next
EK FLT 120
Watercool Heatkiller tube 200 D5 mount
Watercool Heatkiller D5 pump top
Watercool Heatkiller IV CPU block
EK Vector Trio GPU block
2x Alphacool XT45 280mm radiators
EK Coolstream classic 360
EK Coolstream classic 120
a mixture of Alphacool and Barrow fittings
3x Noctua NF-A12x25
1x Noctua NF-F12
4x Corsair ML 140
2x Aquacomputer Splitty 4
2x Phanteks neon strip 400mm, 1x 550mm
1x Phanteks halos lux
Various custom made panels, brackets, mounts and enclosures
A modified Lian Li 011D Mini


Now for a few more pics

Its not too bad in the back for space actually


The splitty 4 mounted in the back of the case linked to the D5 Next to control the case fans


And the rear of the external enclosure if anybody wanted to see it. Got another splitty 4 on here again

 
Last edited:

D4N

D4N

Associate
OP
Joined
7 Jun 2020
Posts
191
And some pictures of it powered on


It’s pretty much as I want it now. I am waiting for some 15mm noctua’s to use as exhausts in the top, but stock is overdue, and not going to arrive until the end of the month. Other bits I’d like are a bit more difficult. 3080’s are near impossible to get, and although I have got one on order, when it comes the Watercool Heatkiller V block I want, Watercool aren’t shipping to the UK at the minute. It’s the same story for the Aquacompter High Flow Next I want to add in between the FLT 120 and the pump. They are out of stock, and when they do get them, they won’t ship to the UK. If the shipping situation doesn’t change, I’ll probably either try to get them in person in Europe, if and when we’re allowed to travel again, or get them posted to somebody in Europe to forward them to me.

If anybody wants to know anything about the build or see a picture of something specific, speak up and I’ll see what I can do.
 
Last edited:

D4N

D4N

Associate
OP
Joined
7 Jun 2020
Posts
191
Had a bit of luck and managed to find a High Flow Next in stock at a place that actually delivers to the UK! Just had my shipping notification so should have it soon, providing it doesn’t get held up again like my last parcel from Europe did.
 

D4N

D4N

Associate
OP
Joined
7 Jun 2020
Posts
191
Had it apart today to add in the High Flow Next, the slim Noctua’s in the top, and extended the pipes/cables to the external rads. I did have to extend the slots on the pump mount a bit and shift it over to the side a bit to make room to fit it in. One thing I have noticed is the pumps run quieter now I have got some EK cryofuel in there, rather than the plain deionised water I had got in. It was on cryofuel before I swapped cases, and i did have suspicions about why it was a bit noisier with just water.
Another thing I noticed was how much noisier the fans are with the top panel on. When I first saw how small the holes were in it, I didn’t think it would be that great for airflow, so I’ve got it sat on the top on the location mount so it’s got a 5mm or so gap around it to let the air out better and quieten it down a bit. Even just putting the dust filter on makes an audible difference in volume. I am toying with the idea of modding the top panel for better airflow, or maybe even making a new one to replace it. I should have enough paint left in the can I had colour matched to give it a lick of paint to make it look good again.

Here’s a pic of the High Flow in it’s new home


D4N

D4N

Associate
OP
Joined
7 Jun 2020
Posts
191
Good news. I’ve managed to secure a Gainward 3080 ti :D

I have got a pre order for a EVGA 3080 XC3 elsewhere that’s been going nowhere all year, so since the 3080 ti launched I have been trying for a FE card, but anytime there is a notification it’s always while I’m working and my phone is in a locker, so always miss the chance.
The Gainward was a bit more than I’d liked to have paid and will probably be cheaper in the future, but it still came in less than non ti 3080’s are going for on eBay at the minute, and it was from a retailer, not a scalper, so that’s something at least. It’s a pain as I’ve already got a water cooled backplate for an XC3 because I jumped the gun and pre ordered from EK before release, as I thought that would hold me up on the build rather than the gpu itself! Hindsight is a wonderful thing.

I reckon I’ll run it air cooled for a while before I buy more water blocks, just to be sure it’s all working okay first.
 

D4N

D4N

Associate
OP
Joined
7 Jun 2020
Posts
191
I've put the new card in today. It's worked out okay, as the new card is a touch shorter than the old one, so it went in without having to remove the pump at the front. I've just looped the pipes together that went to the GPU, so I've got a load of radiator space just cooling the CPU at the minute. Once I'm happy the card is okay, I'll get it under water. Being a reference design card, there is plenty of choice for blocks.

Side by side, old and new


With it fitted in the case


Ready to go


Although the glass side panel will go back on, I'll leave it off for the time being as there is only about 5-6mm of breathing space for it with it fitted.
I also ran a couple of benchmarks in 3Dmark with the old 2080 overclocked before I removed it, and with the new 3080 ti as it comes out of the box. Timespy has gone from 12250, up to 17763, and Port Royal has gone from 7244 up to 12692. I'm interested to see what it's capable of on the stock cooler, then again when its water cooled.

Result (3dmark.com)
Result (3dmark.com)

Next job will be to put the 2080 into the PC my nieces use to play on. Should be a nice upgrade from the 1070 that's in there at the minute.
 

D4N

D4N

Associate
OP
Joined
7 Jun 2020
Posts
191
Had some parcels arrive today. Got me some waterblocks now :D. I was going to wait a bit before I got them, but then when I was browsing the Overclockers water cooling section and happened to notice the block for my card had a discount on it, so in the basket it went, along with the accompanying backplate and some cryofuel to complement it.


I’ll probably still give it a few weeks before I fit them, just to make sure the card is working properly before I take the cooler off.
 

D4N

D4N

Associate
OP
Joined
7 Jun 2020
Posts
191
I decided that the card wasn’t going to die and need a RMA after doing a few stress tests and a bit of use, so I’ve fitted the water blocks today. It looks pretty small in there compared to the MSI 2080 it’s replaced. You get a better view of the cpu block from the side now. I did contemplate going for the bare copper version rather than the nickel plated one to match the copper cpu water block, but I wasn’t sure how clean looking the copper would keep inside the block over time, so played it safe with the nickel one.

I do need a couple more fittings to finish it off and a rgb splitter cable now it’s got extra lighting to run on the backplate, but I’ve got the best part of it done.

51302037217_f473b03899_z.jpg
[/url]

I do quite like some of the touches on this EK water block. I like that the clearance for the power plugs is just cut enough into the plexi to clear the connectors and let’s the top line go straight to the end without dipping down. The block also meets the backplate and covers the end of the pcb now, making it look more of a complete unit. The one on my 2080 isn’t like that, so it’s nice to see EK are improving the design.
And black at the end of the card mirrors the design of the FLT reservoir, so once I get the lighting hooked up, that should look good.

51303799545_40554d571e_z.jpg


51302037047_24a473ce25_z.jpg
[/url]

51302037192_cddf675278_z.jpg
[/url]

It probably doesn’t really need the active backplate, but I like the look of it, and I’ve got enough radiators in the loop, so I might as well make use of them and keep the GPU a couple of degrees cooler. Even though there’s not any memory on the back of the card like a 3090, the original backplate did get pretty hot to the touch when the GPU was loaded, so hopefully the active one will help to some degree.
 
Last edited:

D4N

D4N

Associate
OP
Joined
7 Jun 2020
Posts
191
I’ve finally got around to putting this in properly. I swapped my DIY vertical mount for the Lian Li version, mainly as I stole the riser to use in my other build, and it makes it easier to remove as I can pull the back panel off all in one piece now, complete with the radiator and graphics card attached to it. I had to get a single slot pci bracket to go on the card as I wanted it on the outermost slot to give me a bit of room behind to fit in the pass through ports to put the quick disconnects on.

I’m still leak testing it at the minute, but it should be good to go soon, so I’ll be able to see what improvement the waterblock has made to the GPU.
 

D4N

D4N

Associate
OP
Joined
7 Jun 2020
Posts
191
I've had a quick play on 3D mark to see how the scores have changed.
For comparison, Timespy (graphics only score only) has gone from 11221 with a overclocked 2080 on water, to 19111 with a standard air cooled 3080 ti, and then to 19497 with the same 3080 ti as standard, but under water.
The Port Royal has gone in the same order 7244, 12692, and 13032. In Timespy, the average clock has gone from 1734 up to 1800 without any manual overclocking, just from swapping air to water cooling! I just had a quick look at what the claimed boost speed is for this card, and its only 1665.

Timespy Result (3dmark.com)
Port Royal Result (3dmark.com)

Next thing will be to see how much of an overclock I can get out of it :D
 
Back
Top Bottom