OcUK Staff
Recently Bios engineers at Supermicron figured out how to unlock BCLK overclocking in non K SKU Skylake CPU. This was followed by equivalent Bios for certain boards form ASUS and ASrock.
On Skylake the BLK clock is not linked at all to PCI X Frequency, SATA Devices and USB for example so what ever BLK you use these reamin at a Constant 100 so no information corruption or drive degradation can occur.
I knew that 99% of game titles available today rely on high single core performance and that a HT enabled i3 Skylake CPU with 2 cores and 4 threads would be all thats needed at high frequency to smash through even the most demanding titles with headroom to spare.
This in mind I started testing i3 6100 CPU to find what overclocking could be achieved and the performance of that OC so I could bring out a soft bundle which I support through the forums offering amazing bang for buck.
On all CPU I tried on both the air cooler supplied with this bundle and with AIO 120mm rad water cooler upgrade I could do 4.5ghz Core and 4.5ghz Cache with 2600+mhz DDR4 memory speed on an i3 6100 CPU without any issues at all.
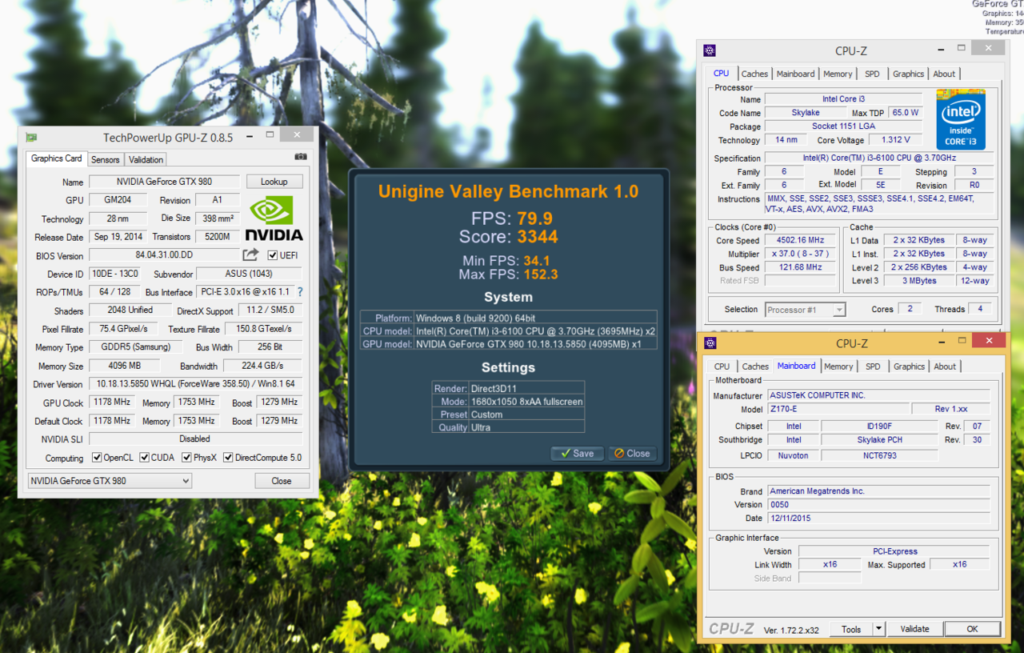
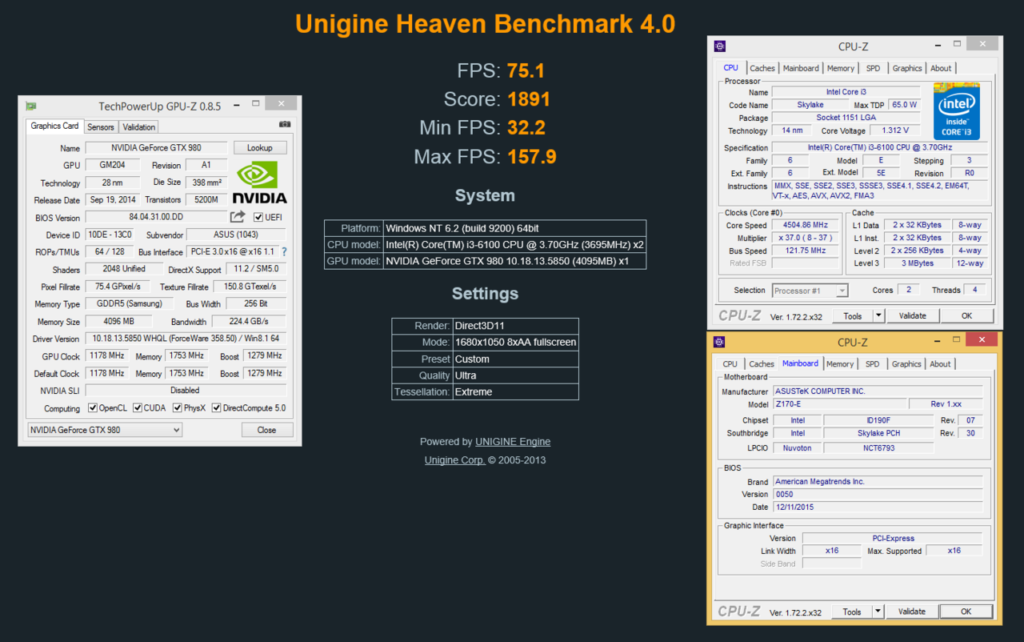
At this 4.5ghz I used Heaven 4.0 and Heaven Valley to simulate single core game performance and a 980 Strix GPU at stock. I can report that the i3 at 4.5ghz was equivalent in performance to a 6600K at 4.4ghz. But of course is much more affordable than the i5. This in the main is due to the cache difference between the two CPU's. Even better was that my CPU samples could all overclock stable upto 4.625ghz with 2666mhz DDR4 without issue at safe voltages and temperatures. This 4.625 is not guarenteed as the 4.5 is but I will provide instructions to overclock your bundle further and you can test your individual CPU.
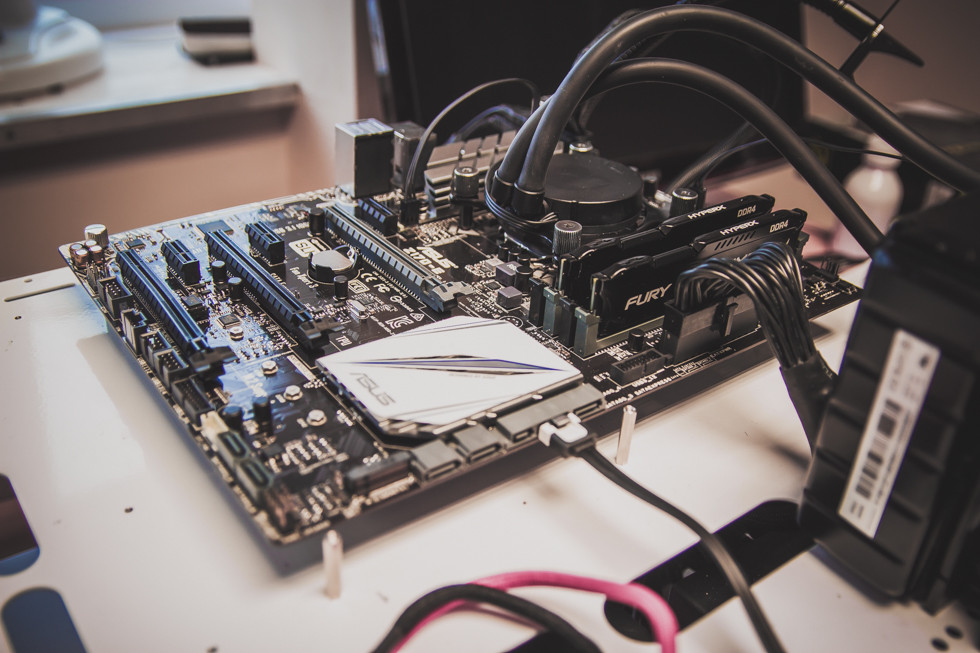
Pics of the Rag
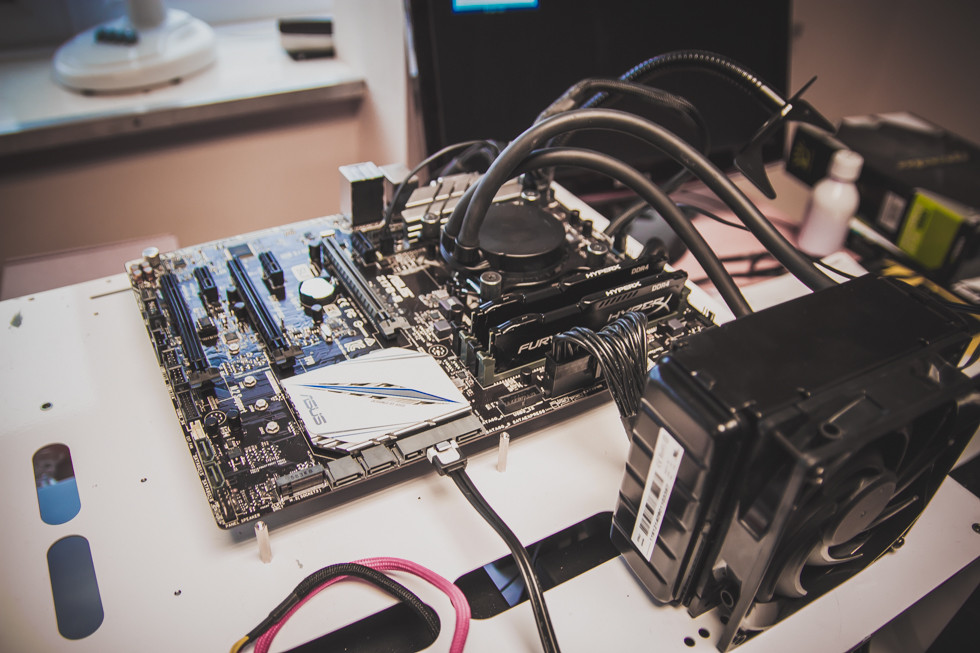
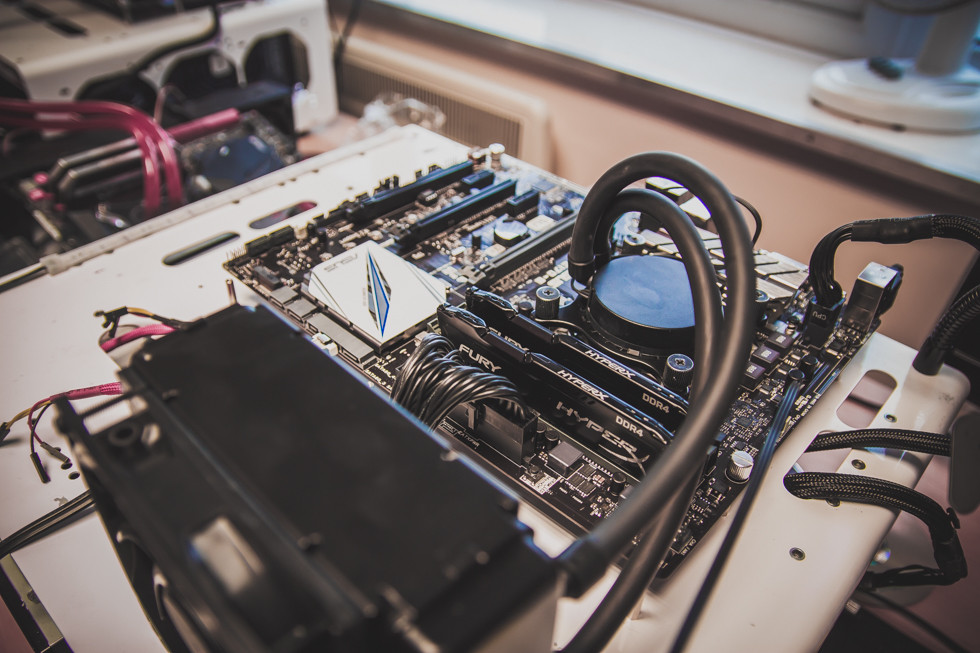
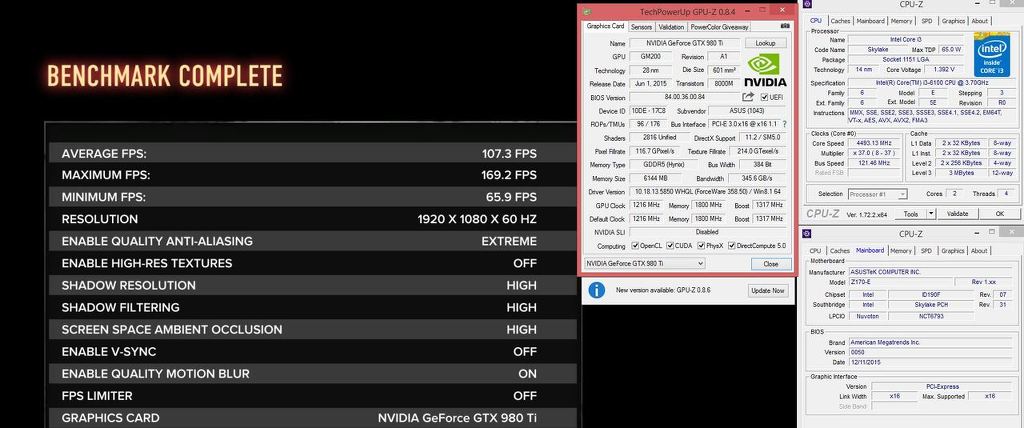
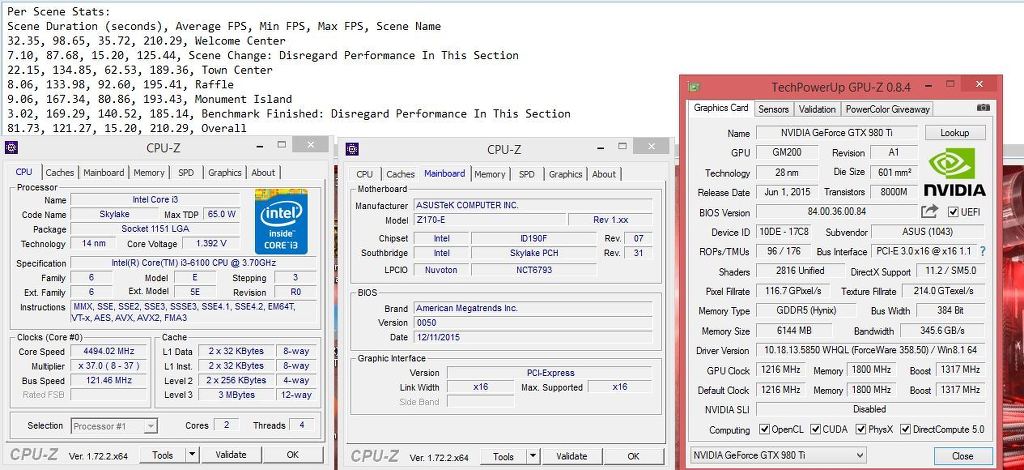
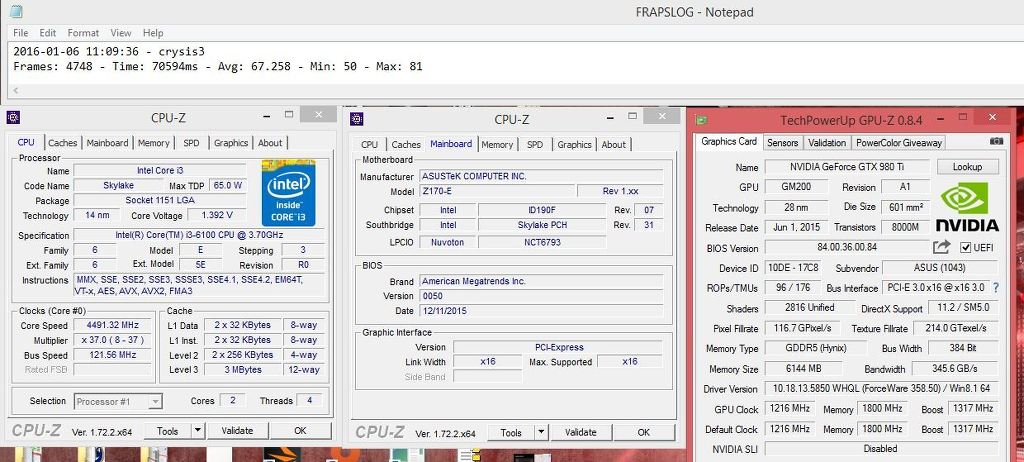
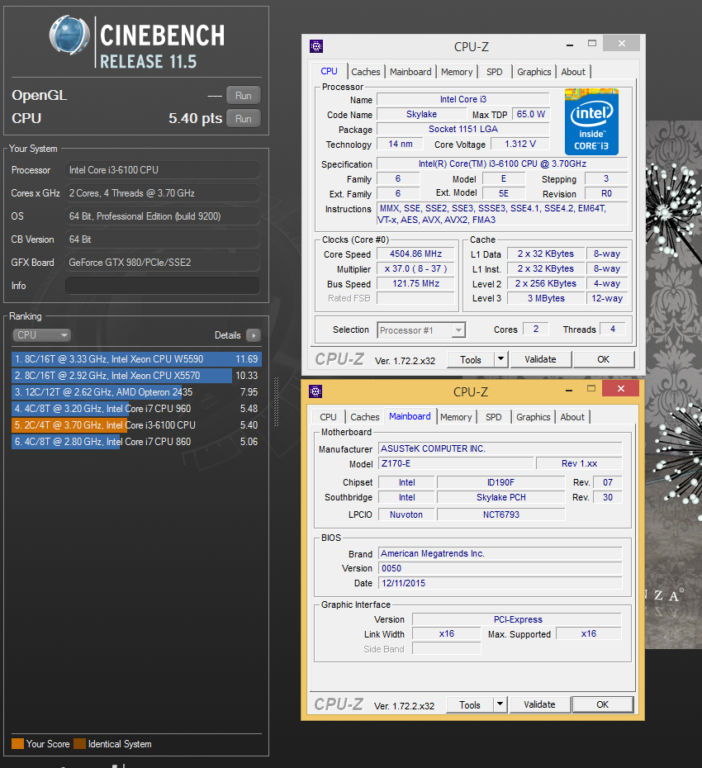
SO here are the benching Results of the bundle at 4.5ghz
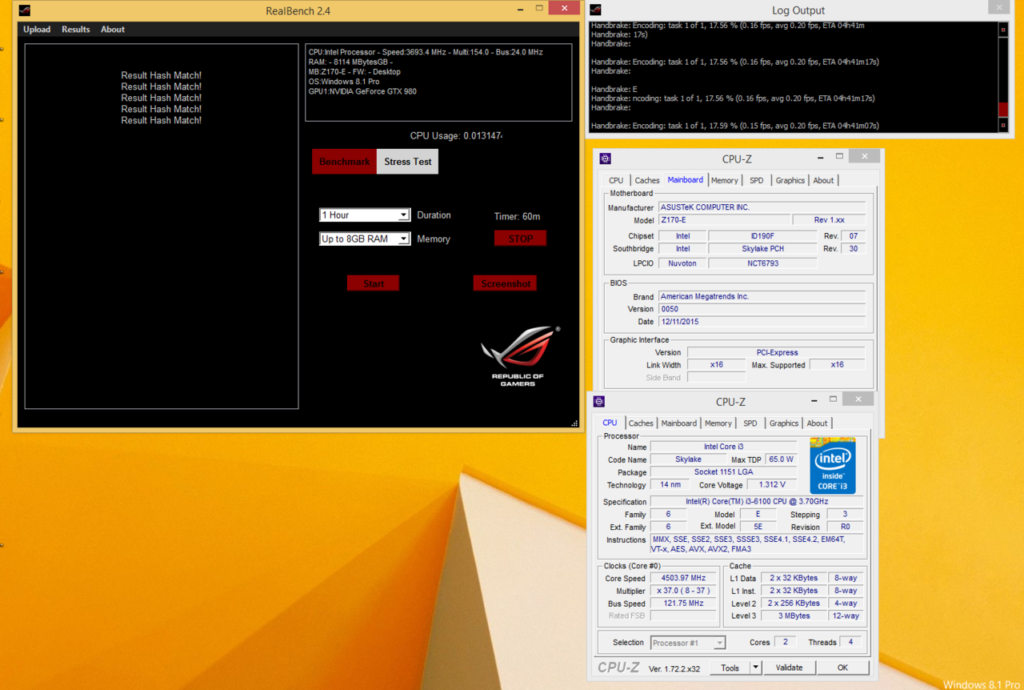
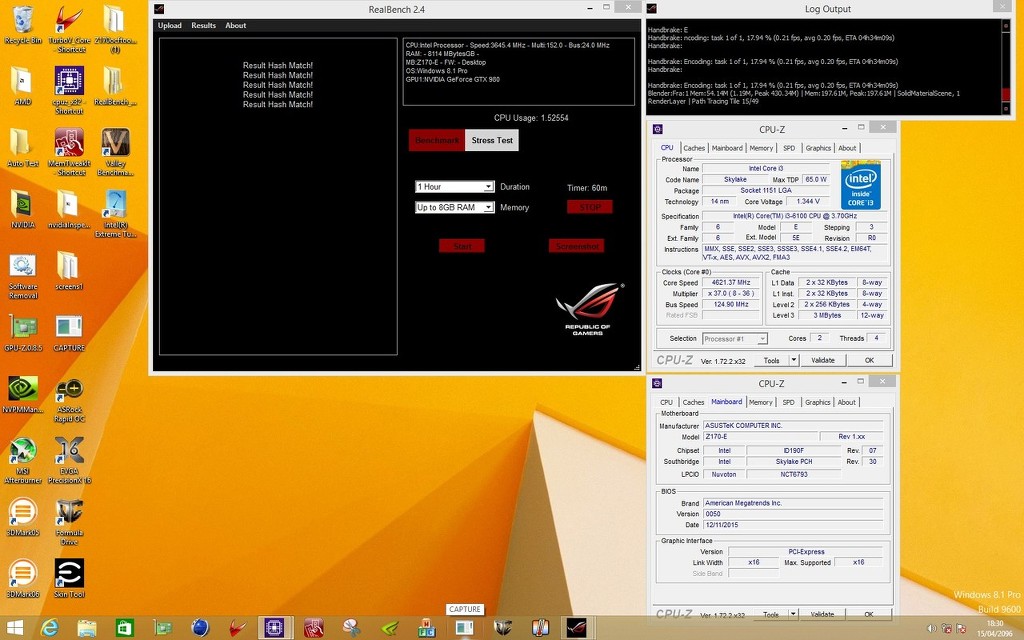
Some stability testing with 1hr Real Bench
Cinebench results
And now instructions on how to overclock your buncle..........
First download the necessary Bios from here:
https://www.copy.com/s/t:IrITZqcj7gT3KgDo;p:%2FZ170-E-ASUS-0050.zip;oid:15795
Extract and put the file on USB pen drive.
Reboot and hit delete to enter Bios.
Press F7 to go into Advanced mode
Scroll Right to Tools Tab and Down to EZ flash 3 Utility, Hit enter.
Select update via storage.
Then select your USB drive from the list and the bios File you copied to the Drive.
Hit enter to select, Enter to read the file and then enter to flash the Bios.
This process will take a couple of minutes and your system will reboot several times as the MEI is also updated. Dont power down during any part of this update.
Once complete go into Bios again press F7 and set up as the following screens.
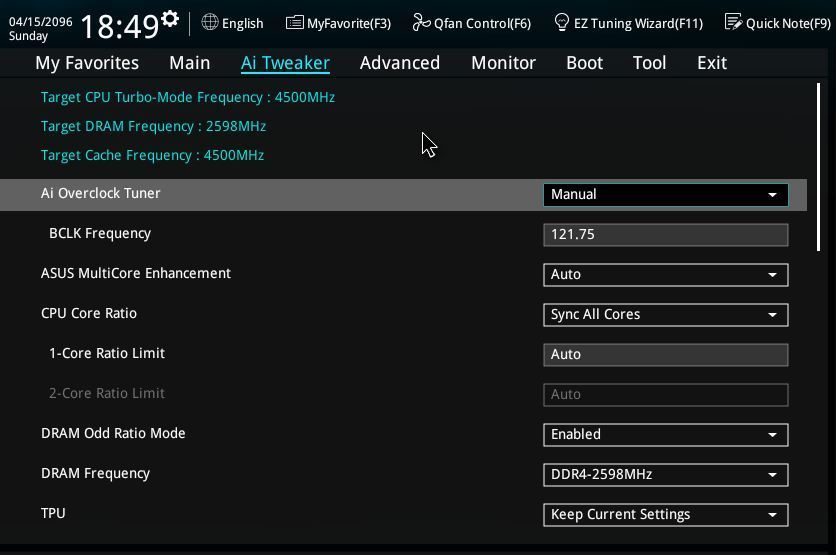
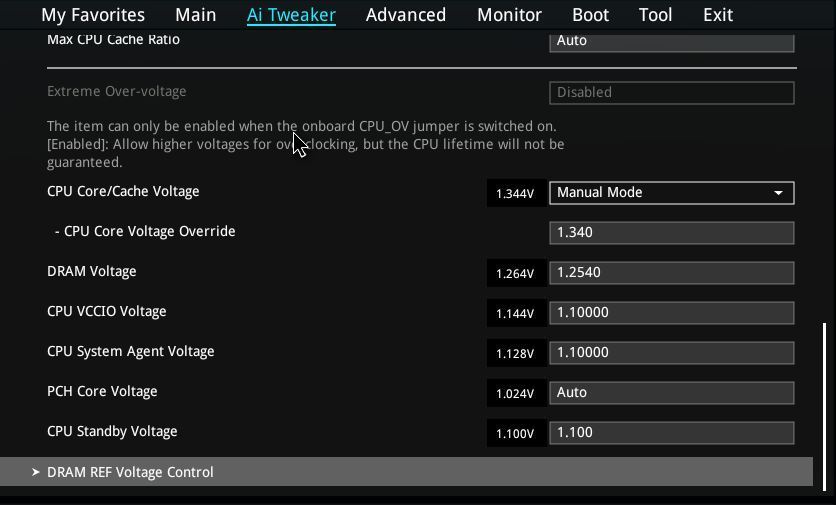
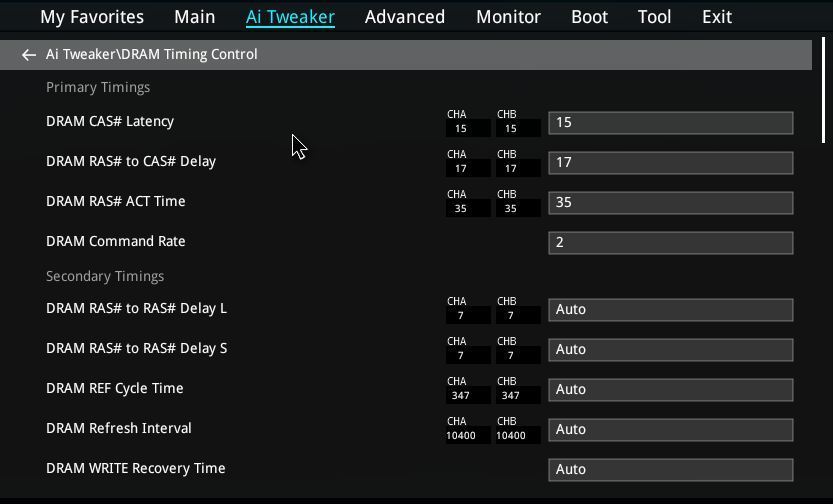
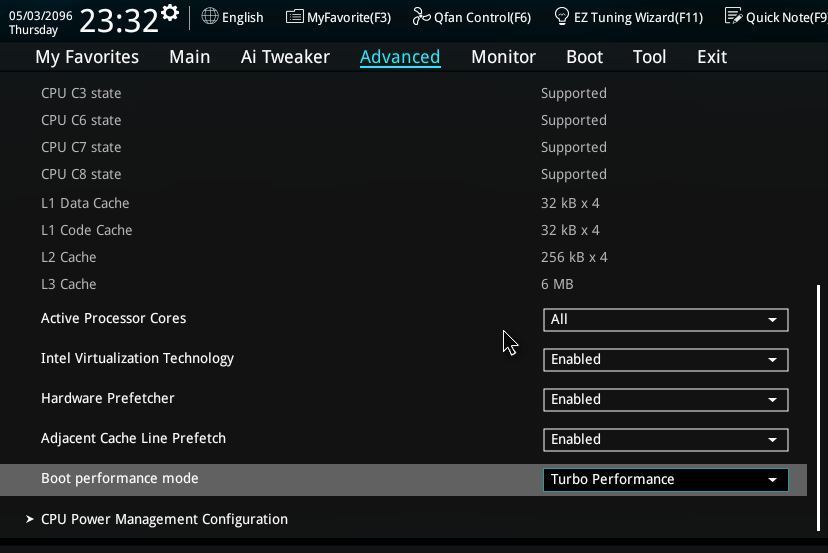
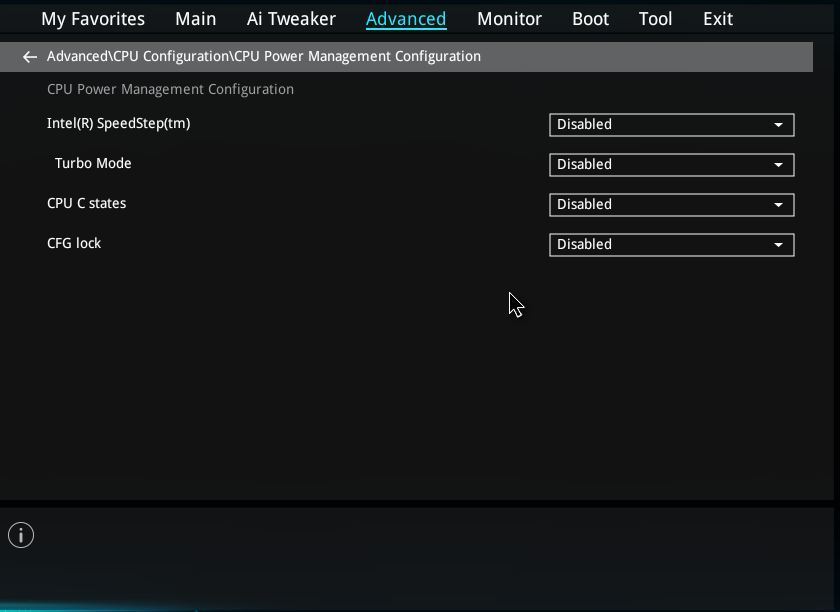
Once set hit F10 and enter to save the settings and exit.
Check in the bios that temps are fine. With experience I found upto 1.4v Core is totally fine on this CPU with the coolers in this bundle. Now test for stability with Real bench or simialr and your games. If your stable leave. If not bump Vcore slightly and retest each CPU is different needing 1.28-1.38 for 4.5ghz.
For those wanting to push further try these settings below for 4625mhz. This CPU was ok at 1.35v for 4625 and remained stable.
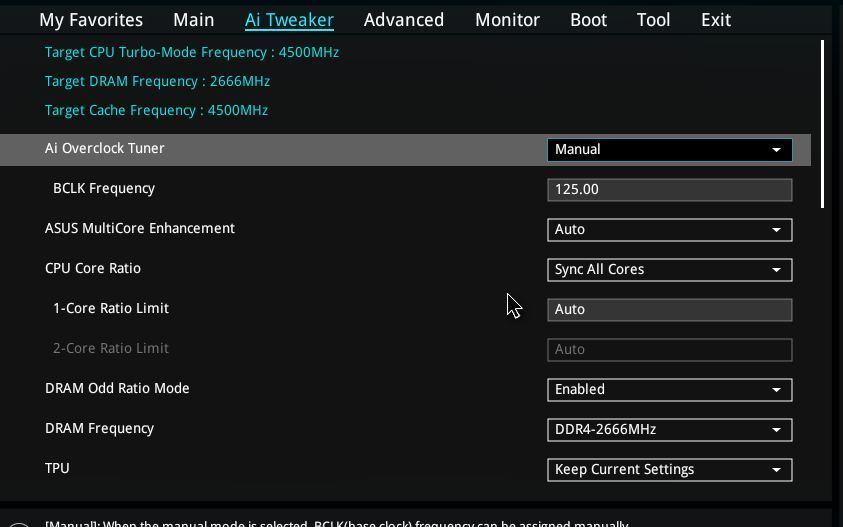
Stability 4625mhz Core Cache and 2666mhz mems.
Ok so whats the downside of this crazy performance. Not much really but I must mention.
1) You have no power saving so the CPU runs full speed all time. BCLK overclocking like this means no speed step. An i3 Skylake is burning almost zero power anyway but I should mention.
2) Temperature monitoring with progs like Core temp is disabled so you need to use HWmonitor or the software provided in the motherboard bunble if you wish to check temps. This is ofcourse not the most accurate but does give an idea and like I said previously this i3 is putting out very little heat even with 1.4v and Prime its well under TJmax on Air cooler. Ofcourse the CPU will still throttle and shut down the system should cooling ever become an issue. But in my teating the headroom in terms of cooling was large.
3) IGPU is disabled.
4) updating the CPU microcode via BIOS update or software may effect the ovreclocking of this bundle. So once installed CPU microcode on provided BIOS should remain the same.
Finally why did I pick the other components besides the i3 CPU.
1) The ASUS Z170 -E motherboard was picked as its a low priced Z170 solution which is still feature rich and very solid when overclocking.
2) The Kingston mems as quite frankly Kingston are the don of DDR4 and allow for real OC headroom and stability.
3) The Brocken cooler I picked as it offers truly great cooling on a budget, is very easy to install and the fan is quiet and does not obscure any dimm slots.
4) Finally I included the AIO as an option in 120mm as this offers a silent and solid upgrade to the standard Brocken cooler should the customer require better temps and even higher OC headroom. At 120mm it also fits in almost all cases without issue.
5) Thermal Grizzley TIM simply the best and 1g sizing as perfect for a couple of applications on a CPU mount.
This Bundle is available now at the following link:
https://www.overclockers.co.uk/detail/index/sArticle/59137
For a limited time its also discounted and we are offering with free shipping.
If your a gamer and want super fast performance this is bundle for you!!! SKYLAKE game RAGGING for The MASSES!!!!!!!!!!!!!! Not RAG TAg at all!!!
Here are the instructions for mounting the cooler:
Parts laid out!! (PICS = slight RAG TAG... due to my camera phone and marketing team being at Iseries)
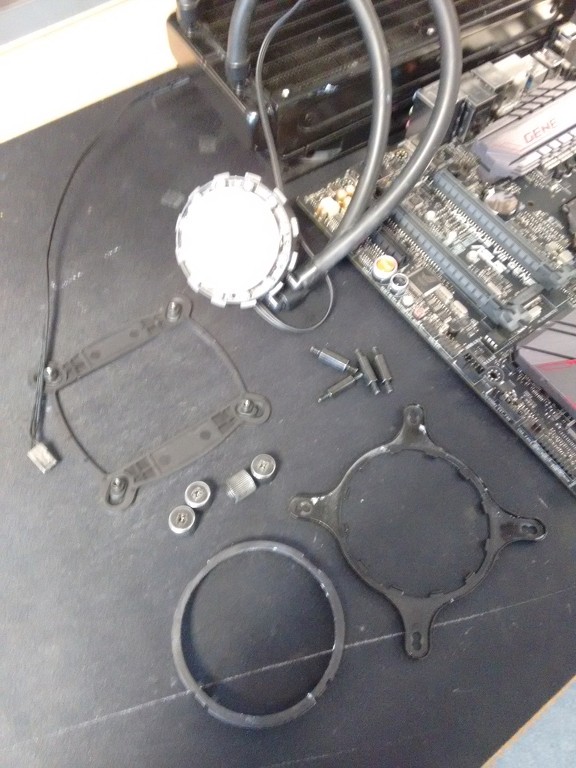
Retention ring hooked in.
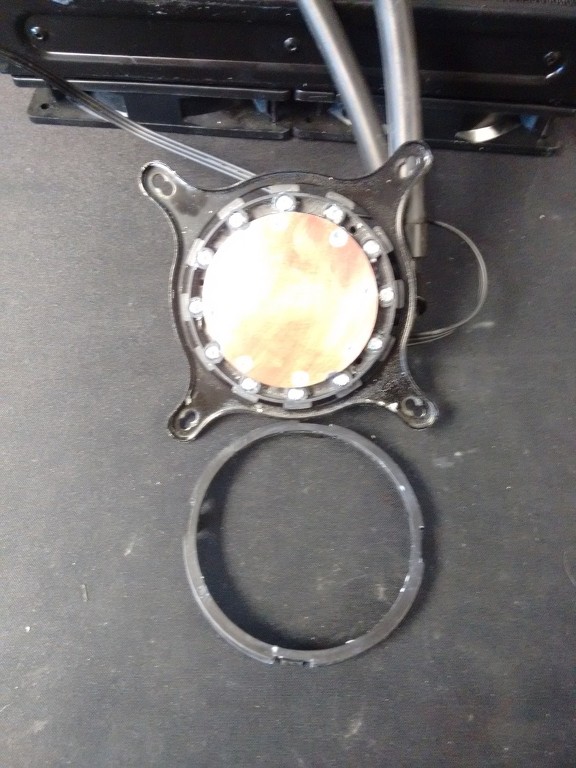
and secured with clip.
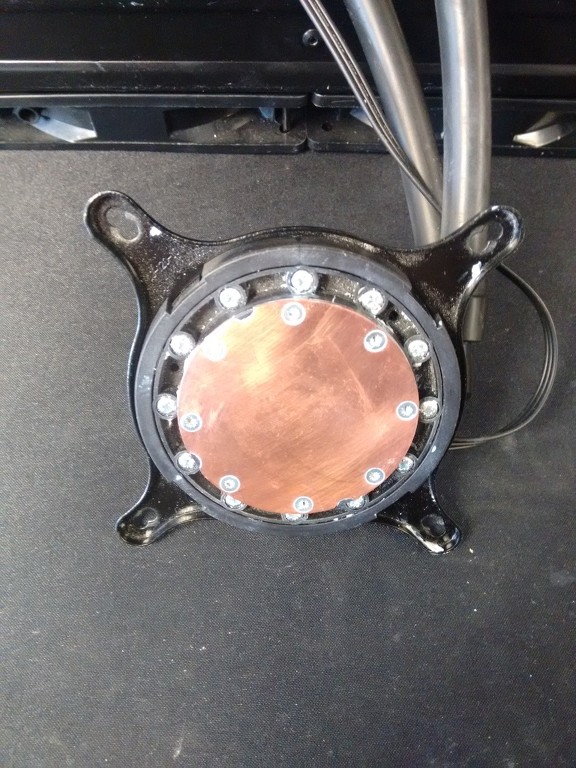
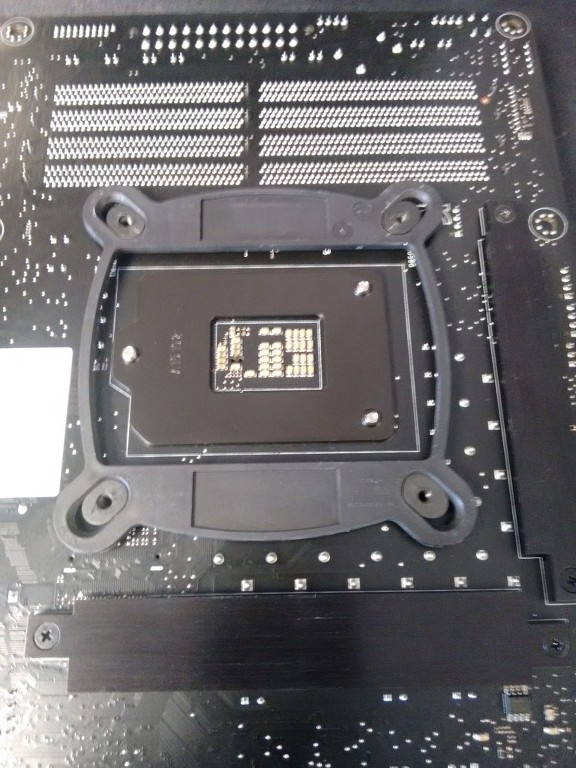
Place the backplate on the back of the motherboard with the holes through the mounting holes on the board.
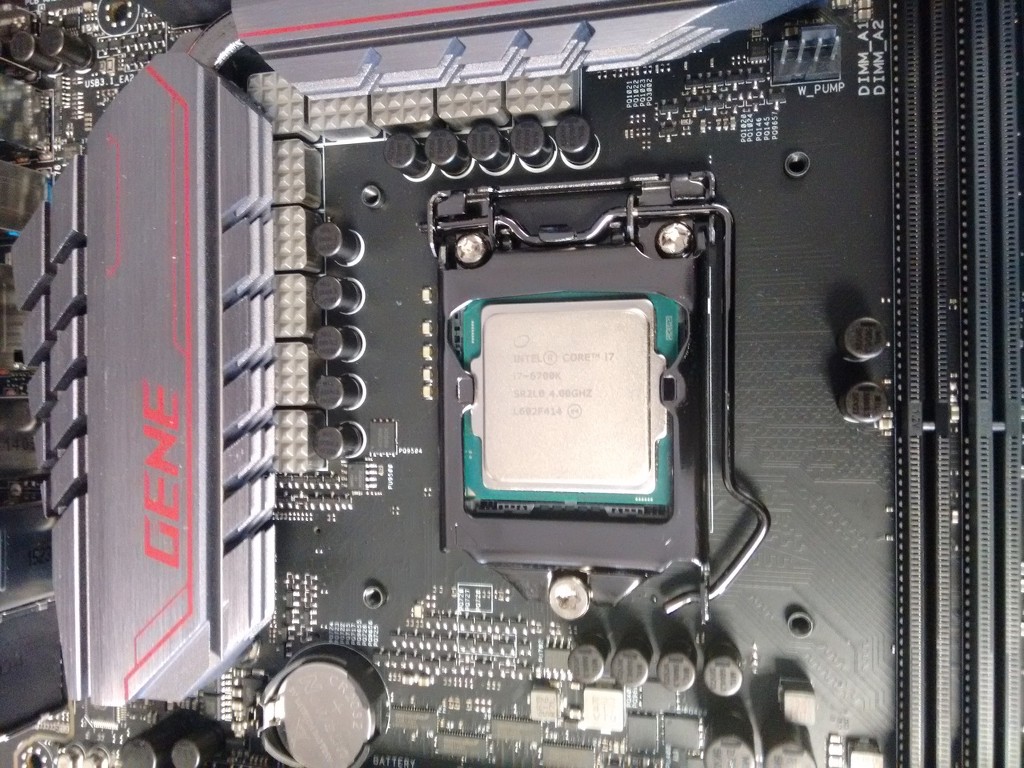
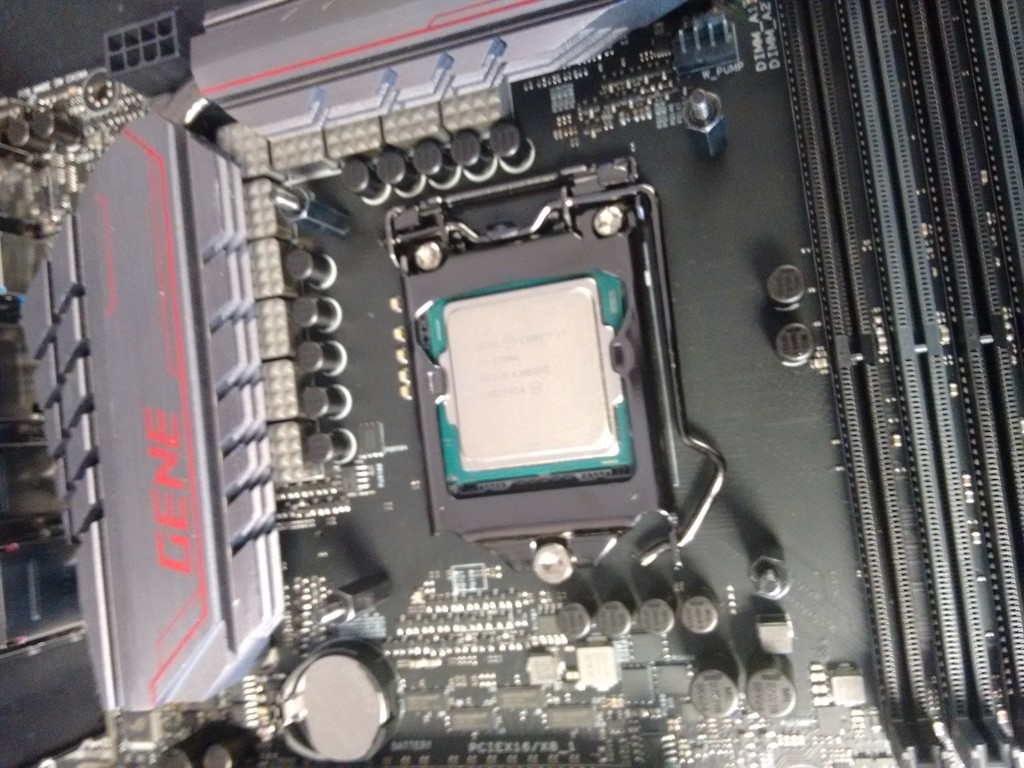
Screw the mounting post into the backplate.
Place the CPU block head over the mounting holes on the bracket. The inner holes are for this socket.
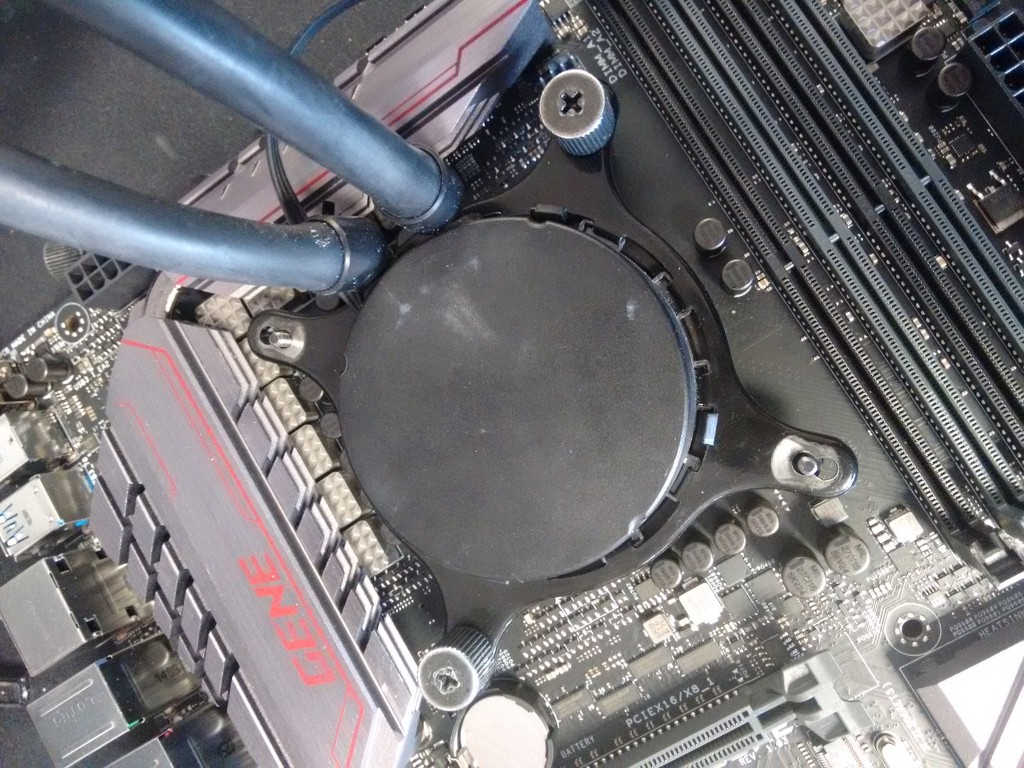
Screw down all 4 thumb screws one twist on each screw at a time until finger tight. Attach the pump!!
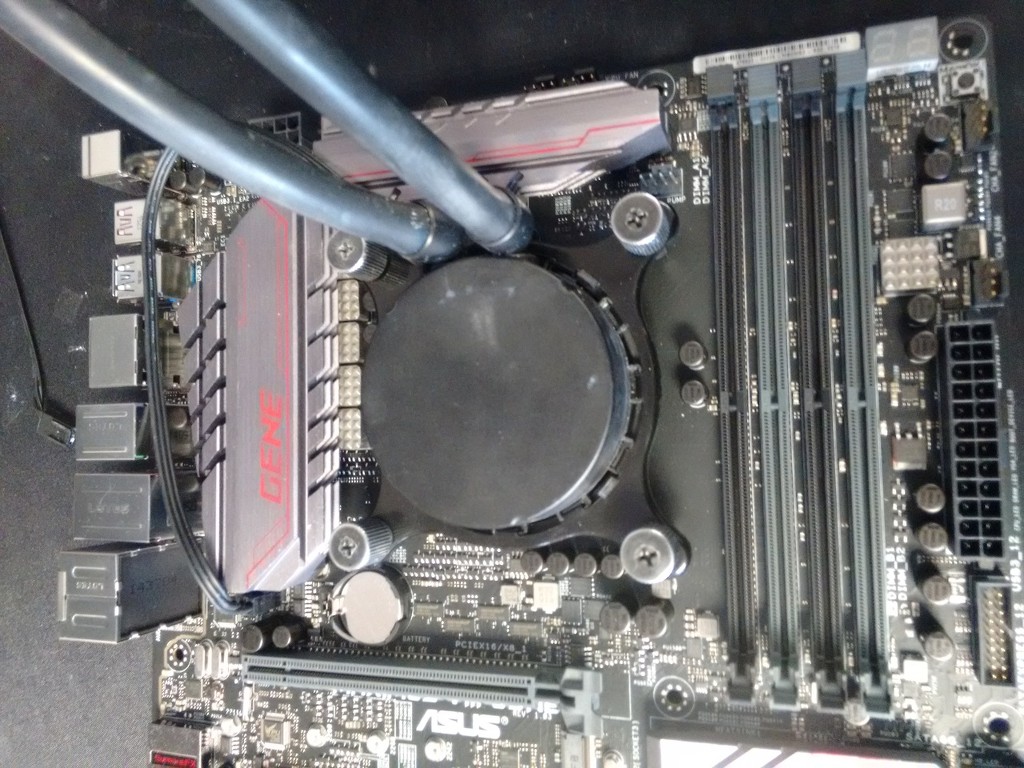
DONE!!!!!!!!!!!!!!!! Any one have any questions about this guide please contact no one..... or moan for no reason!!
On Skylake the BLK clock is not linked at all to PCI X Frequency, SATA Devices and USB for example so what ever BLK you use these reamin at a Constant 100 so no information corruption or drive degradation can occur.
I knew that 99% of game titles available today rely on high single core performance and that a HT enabled i3 Skylake CPU with 2 cores and 4 threads would be all thats needed at high frequency to smash through even the most demanding titles with headroom to spare.
This in mind I started testing i3 6100 CPU to find what overclocking could be achieved and the performance of that OC so I could bring out a soft bundle which I support through the forums offering amazing bang for buck.
On all CPU I tried on both the air cooler supplied with this bundle and with AIO 120mm rad water cooler upgrade I could do 4.5ghz Core and 4.5ghz Cache with 2600+mhz DDR4 memory speed on an i3 6100 CPU without any issues at all.
At this 4.5ghz I used Heaven 4.0 and Heaven Valley to simulate single core game performance and a 980 Strix GPU at stock. I can report that the i3 at 4.5ghz was equivalent in performance to a 6600K at 4.4ghz. But of course is much more affordable than the i5. This in the main is due to the cache difference between the two CPU's. Even better was that my CPU samples could all overclock stable upto 4.625ghz with 2666mhz DDR4 without issue at safe voltages and temperatures. This 4.625 is not guarenteed as the 4.5 is but I will provide instructions to overclock your bundle further and you can test your individual CPU.
Pics of the Rag


SO here are the benching Results of the bundle at 4.5ghz


Some stability testing with 1hr Real Bench

Cinebench results

And now instructions on how to overclock your buncle..........
First download the necessary Bios from here:
https://www.copy.com/s/t:IrITZqcj7gT3KgDo;p:%2FZ170-E-ASUS-0050.zip;oid:15795
Extract and put the file on USB pen drive.
Reboot and hit delete to enter Bios.
Press F7 to go into Advanced mode
Scroll Right to Tools Tab and Down to EZ flash 3 Utility, Hit enter.
Select update via storage.
Then select your USB drive from the list and the bios File you copied to the Drive.
Hit enter to select, Enter to read the file and then enter to flash the Bios.
This process will take a couple of minutes and your system will reboot several times as the MEI is also updated. Dont power down during any part of this update.
Once complete go into Bios again press F7 and set up as the following screens.


Once set hit F10 and enter to save the settings and exit.
Check in the bios that temps are fine. With experience I found upto 1.4v Core is totally fine on this CPU with the coolers in this bundle. Now test for stability with Real bench or simialr and your games. If your stable leave. If not bump Vcore slightly and retest each CPU is different needing 1.28-1.38 for 4.5ghz.
For those wanting to push further try these settings below for 4625mhz. This CPU was ok at 1.35v for 4625 and remained stable.

Stability 4625mhz Core Cache and 2666mhz mems.

Ok so whats the downside of this crazy performance. Not much really but I must mention.
1) You have no power saving so the CPU runs full speed all time. BCLK overclocking like this means no speed step. An i3 Skylake is burning almost zero power anyway but I should mention.
2) Temperature monitoring with progs like Core temp is disabled so you need to use HWmonitor or the software provided in the motherboard bunble if you wish to check temps. This is ofcourse not the most accurate but does give an idea and like I said previously this i3 is putting out very little heat even with 1.4v and Prime its well under TJmax on Air cooler. Ofcourse the CPU will still throttle and shut down the system should cooling ever become an issue. But in my teating the headroom in terms of cooling was large.
3) IGPU is disabled.
4) updating the CPU microcode via BIOS update or software may effect the ovreclocking of this bundle. So once installed CPU microcode on provided BIOS should remain the same.
Finally why did I pick the other components besides the i3 CPU.
1) The ASUS Z170 -E motherboard was picked as its a low priced Z170 solution which is still feature rich and very solid when overclocking.
2) The Kingston mems as quite frankly Kingston are the don of DDR4 and allow for real OC headroom and stability.
3) The Brocken cooler I picked as it offers truly great cooling on a budget, is very easy to install and the fan is quiet and does not obscure any dimm slots.
4) Finally I included the AIO as an option in 120mm as this offers a silent and solid upgrade to the standard Brocken cooler should the customer require better temps and even higher OC headroom. At 120mm it also fits in almost all cases without issue.
5) Thermal Grizzley TIM simply the best and 1g sizing as perfect for a couple of applications on a CPU mount.
This Bundle is available now at the following link:
https://www.overclockers.co.uk/detail/index/sArticle/59137
For a limited time its also discounted and we are offering with free shipping.
If your a gamer and want super fast performance this is bundle for you!!! SKYLAKE game RAGGING for The MASSES!!!!!!!!!!!!!! Not RAG TAg at all!!!
Here are the instructions for mounting the cooler:
Parts laid out!! (PICS = slight RAG TAG... due to my camera phone and marketing team being at Iseries)

Retention ring hooked in.

and secured with clip.

Place the backplate on the back of the motherboard with the holes through the mounting holes on the board.


Screw the mounting post into the backplate.

Place the CPU block head over the mounting holes on the bracket. The inner holes are for this socket.

Screw down all 4 thumb screws one twist on each screw at a time until finger tight. Attach the pump!!

DONE!!!!!!!!!!!!!!!! Any one have any questions about this guide please contact no one..... or moan for no reason!!

Last edited:


