advice on tidying up loop

Associate
Joined
26 Jul 2011
Posts
191
Location
West Yorkshire
Hello there! About a year ago already I bought a Fractal Design Core 1300 mATX case and an ASRock 970mATX motherboard and the Corsair SF600 PSU, also recently added an MSi 1050 Ti GPU.

I transferred the watercooling loop that I built about 10 years ago but I'd like a more professional(?) looking loop.

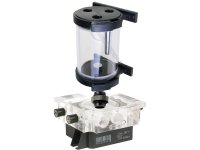
I'd like hard tubing and maybe a cheap pump/reservoir combo in-front of the radiator so can I have some recommendations for those 2 parts and would I need new compression fittings for the hard tubing?

Also, does anyone know of 1050 Ti full cover blocks? or can I do that gpu waterblock (not full cover) thing with some fins that you stick to the VRMs is it?

parts are : Laing ddc-1 plus T 18W w/ xspc pump top. Bitspower reservoir. xspc 240mm x 60mm rad. EK supreme HF cpu block.


Last edited:
Soldato
Joined
26 May 2009
Posts
22,101
I was about to say you couldn't have built that 10 years ago as the components are waaaaaay too new and Bitspower/XSPC weren't even in the WC game back then, then I realised 10 years ago was only 2008. Time flies lol.
 
Associate
OP
Joined
26 Jul 2011
Posts
191
Location
West Yorkshire
lol yep I can't believe it was 10 years ago!

I stand corrected : it was 8 years ago I did my first ever watercooling build, 5 years ago when I renewed the loop with a 240mm rad and went from a bay reservoir to separate pump and res.
 
Last edited:
Associate
Joined
7 May 2004
Posts
1,951
first off a pump/res combo will help cut down on some of the mess if its attached to the front rad.

For a water block look at alphacool. They have blocks for pretty much anything and if they dont have one for your card you can send it in and get one made. They dont look the best (imo) but they do the job.
 
Associate
OP
Joined
26 Jul 2011
Posts
191
Location
West Yorkshire
My radiator is by Alphacool, I'll have a look at their other stuff thanks.

Trying to avoid mounting anything that will hinder airflow so don't want to mount on radiator, I don't like that look.

I'm considering going back to a bay reservoir, it will have to be a single but it is the perfect place for a reservoir as it's unused space. I believe there's some that allow a Laing DDC pump to be mounted inside or at the back of it or something too?
 
Associate
Joined
7 May 2004
Posts
1,951
My radiator is by Alphacool, I'll have a look at their other stuff thanks.

Trying to avoid mounting anything that will hinder airflow so don't want to mount on radiator, I don't like that look.

I'm considering going back to a bay reservoir, it will have to be a single but it is the perfect place for a reservoir as it's unused space. I believe there's some that allow a Laing DDC pump to be mounted inside or at the back of it or something too?


It shouldnt block airflow that much. What are your temps like under load at the moment?
 
Associate
OP
Joined
26 Jul 2011
Posts
191
Location
West Yorkshire
CPU averages about 35*C, 40 maybe 45 if i stress test it. GPU I'm sure was only getting to about 60*C after benchmarking in Unigine Heaven yesterday while testing my overclock.

I'll search for some images of pc's with bay reservoirs and see what I think.
 
Associate
OP
Joined
26 Jul 2011
Posts
191
Location
West Yorkshire
I hope links to other sites are allowed but I can't find "the rules" anywhere and Overclockers don't have any Bitspower pump tops for the Laing DDC pump.

Will the pump top in the below link allow me to fix my existing bitspower reservoir to the top of my Laing DDC-1 plus T pump?
 
Last edited:
Soldato
Joined
18 Oct 2002
Posts
7,831
Location
Scun'orp
You could improve what you currently got there by going pump->cpu->rad outermost port->res->pump. You would get rid of a fair length of tube and also that absolutely massive kink you currently have between the cpu and res. Maybe square up the pump a bit to improve the look, should be doable. Might be able to put it nearer the back of the case between the rad and mobo cable holes, if you also put a 45° fitting on the cpu inlet.

Edit: BTW that link will get you suspended. Also the pump top in that link looks no different to the one you have on the pump already. You could mount the res above the pump but it wouldn't directly connect to it, you would have to use a short length of tube with normal straight compression fittings, with either of those pump tops. That res doesn't look like it is designed to directly fit to any pump top I can think of by the look of it.

Edit: Option 2 would be to relocate the pump directly above the rad, you would probably have to make a platforn for it of some sort. Once there fit a 90° fitting on the pump inlet so you can go res->pump->cpu in->rad backmost port->res. This would be an extremely compact and tidy looking loop.
 
Last edited:
Man of Honour
Joined
16 Mar 2005
Posts
8,057
Location
Clevedon , Bristol
You could make a pump / res combo out of what you have already, seems a shame to get rid of the perfectly good pump and res you already have.

Keep the pump + XSPC top

Add 1 of these to the top/inlet of the pump :

https://www.overclockers.co.uk/xspc-g1-4-5mm-male-to-male-fitting-black-chrome-wc-105-xs.html

Screw the bitspower res onto it upside down :

DKkRE4P.jpg

Total cost £1.99 !!

----------------------------------------------------


An all-in one solution for small form loops ;

https://www.overclockers.co.uk/xspc-ion-all-in-one-pump-reservoir-white-wc-404-xs.html


Something more ' bling' that will use your existing pump ;

https://www.overclockers.co.uk/phanteks-glacier-r160-rgb-reservoir-120ml-wc-025-pt.html


If you want a bay reservoir, OcUK don't stock them - but they do exist :

Google ' DDC bayres ' ( Alphacool and XSPC make one )
 
Soldato
Joined
18 Oct 2002
Posts
7,831
Location
Scun'orp
One downside to the union fitting as above is that if you then clamp the res to the case you will find the pump vibration will be very annoying. I did this myself once with the same pump and an EK tube res, with a union fitting like that, and had to go back to a short length of flexible tube between the two because the increase in noise was unbearable with the res mounted to the case. You would probably have to prop the res up against something to avoid having to clamp it to the case. In my case the pump simply dangles off the bottom of the res by the short tube and it is completely silent.
 
Associate
Joined
7 May 2004
Posts
1,951
One downside to the union fitting as above is that if you then clamp the res to the case you will find the pump vibration will be very annoying. I did this myself once with the same pump and an EK tube res, with a union fitting like that, and had to go back to a short length of flexible tube between the two because the increase in noise was unbearable with the res mounted to the case. You would probably have to prop the res up against something to avoid having to clamp it to the case. In my case the pump simply dangles off the bottom of the res by the short tube and it is completely silent.


Originally with my EK pump res combo I had it attached to the case with the standard pump bracket. The noise was unbearable. Since then however I have attached the pump to my front rad using those types of clips and I can barely hear it........ However disclaimer at the moment my ears are serverly blocked so I cant hear much of anything anyway so not sure weather it has actually made a difference or because I just cant hear anything properly anyway
 
Soldato
Joined
18 Oct 2002
Posts
7,831
Location
Scun'orp
Makes sense as the mass of the rad + water would tend to significantly reduce the tendency for it to resonate and amplify the sound. Whereas the thin case plate is effectively acting as a speaker.
 
Soldato
Joined
1 Dec 2015
Posts
18,514
just remove the res and go from the Rad to the pump to the block to the rad. Has top fill points to use that to fill the system. Almost at the height point... when filling just put some boxes underneath to raise the height- fill up. when loop is filled and port holes close, mount back into fan location again - no costs!

if you want it neater- buy EK DDC pump bracket and mount to the bottom 120 of the 240 rad :) simples
 
Associate
OP
Joined
26 Jul 2011
Posts
191
Location
West Yorkshire
Brizzles : exactly what you thought of....I bought a male to male connector and 3 90* rotatable compression fittings (although I only used 2 of them in the end).

Thanks for all ideas, this is what I've been working on the last few days (between work etc.)

I left flash on my phone camera as it highlights things better although it makes for a lesser photo.


^computer on


^computer off, complete with lots of air :/ I've spent ages rotating case to get bubbles out, connected a tube to top of radiator and had one on spare port of reservoir but just can't get rid of it, not sure how much of it I should expect to get rid of?
 
Associate
OP
Joined
26 Jul 2011
Posts
191
Location
West Yorkshire
Just thought, I could just take the radiator and cpu block off and get the air out that way.... derrrr.

Also I forgot to mention, my cpu block is knackered, I should have got a photo but didn't. The center of the clear acrylic top that almost touches the copper has all melted, it just crumbled off as I touched it, so the rubber seal isn't seated properly. That block is 8 years old though as I mentioned in the beginning of this post, so it's done well but it's time for a new one when I have some money.
 
Soldato
Joined
1 Dec 2015
Posts
18,514
Just thought, I could just take the radiator and cpu block off and get the air out that way.... derrrr.

Also I forgot to mention, my cpu block is knackered, I should have got a photo but didn't. The center of the clear acrylic top that almost touches the copper has all melted, it just crumbled off as I touched it, so the rubber seal isn't seated properly. That block is 8 years old though as I mentioned in the beginning of this post, so it's done well but it's time for a new one when I have some money.

least you can hold the block at the top so all the air reaches it, loosen the compression fittings, pop each tube off and then remove fittings and place on new block. Before popping each tube onto the new block. pouring liquid into each one to top up and air gaps then onto the new block and tighten, then refix onto board :)
 
Associate
Joined
7 May 2004
Posts
1,951
the way I bled my system was to leave the top of the res and leave it running for a couple of days.
I have quite a restrictive loop and only took 2 days to get all the air out (could have been less time as I was away)
 
Associate
OP
Joined
26 Jul 2011
Posts
191
Location
West Yorkshire
I tried this first; put a fitting on spare port of res with a load of tube that I held up in the air just in case and sure enough for some reason the fluid ended up trying to climb the tube after a few minutes.
 
Associate
OP
Joined
26 Jul 2011
Posts
191
Location
West Yorkshire
least you can hold the block at the top so all the air reaches it, loosen the compression fittings, pop each tube off and then remove fittings and place on new block. Before popping each tube onto the new block. pouring liquid into each one to top up and air gaps then onto the new block and tighten, then refix onto board :)

Yep I'll certainly try that thank you
 
Back
Top Bottom