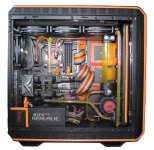
With apologies for a lack of photo's this is a short note on some of the challenges/progress over the weekend, with the aim of sharing some of the noob mistakes and things that I've learnt in the hope that it might inform/help others.
1/ At high revs the pump(s) had a very audible whine to them. Because I'd wired them up to be powered from a single molex rather than have each one powered separately I wasn't able to figure out if it was one or both, and with concerns that I had maybe let one run dry for a few seconds during filling I took both out of the loop and dissembled both looking for damage - nothing obvious. Still to do: test each in isolation to see (hear?) if I can figure out what the issue might be.
2/ Proprietary RGB gotcha. The blocks from Phantek have proprietary connectors - on the end of some (excessively) long cables. They come with additional (excessively) long cables that adapt to standard RGB headers. With the CPU block I was able to discretely route the cables to the back where I could then hook it up easily enough using the adapter cable. However for the GPU blocks I decided that the neatest solution was to cut down the cables and hardwire (solder) directly to the RGB header on the cards (on the basis that once attached I couldn't foresee needing to disconnect, and if I do need to split the card from the block I could still do that by disconnecting the other end of the cable). My mistake was to assume (in lieu of the connector labeling each colour) that it was only the connector that was proprietary and to solder the wires in the order of the ribbon cable. However once powered up it was obvious that the colour of the GPU blocks was not following the rest of the components. So, I dug out the adapter cable and pretty much immediately spotted that the ribbon cable had one of its strands crossed over, out of sequence to the standard RGB connector. Doh! So I also had to strip out both GPU's and resolder the RGB cables in the correct order (at the same time I did a better job at sleaving them). Still to do: confirm that they're now in synch with the rest of the RGB components (which I can only do once the pumps are back in and the loop is complete again).
3/ I've started the custom cabling which is going to be a mix of sleaving existing cables and making up some from scratch. The main take-aways at this stage:
a. It's not as daunting or as time consuming as I'd imagined it to be (this being my first foray into custom cables).
b. Getting the crimps right is something to practice (fortunately I'd over ordered pins) and is a test of eyesight as much as anything - I need to book an eyesight test because I really struggled to see things clearly enough with my current glasses!
c. Although I'd over ordered the sacrificial MDPC-X heat shrink, I hadn't anticipated quite how many attempts at getting the ends right would require more than one piece. On some attempts I used three individual pieces. On the basis that I've already used half of the quantity that I originally ordered and have only completed somewhere between one quarter and one third of the work I've already restocked.
d. For the first few pieces of sleaving I was taking care to melt the sleaving at both ends when I cut a piece. However using the MDPC-X sleaving the effect of that was for the sleaving to "blossom out" where it melted back. After a while I started to think that that might be contributing to why some pieces of heat shrink were tearing under heat (stretching against shape, extended edges before the sleaving itself melted back?). I then experimented with not melting the cut ends and I felt that it improved the success rate.
e. Be wary of "cheap" cable combs. It didn't take too many individual sleaved wires to be threading through the combs that I had before they disintegrated. I've now got some aluminium combs on order instead.
And in other, possibly less interesting, news (which really does need pictures to make sense of):
- I've added a bit more Lego to the case by way of trimming (hopefully finding the right balance this time - the attempt at a Lego shroud was waaaaaayyyy too much!)
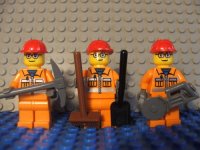
- Going along with the growing Lego theme I've ordered some Lego minifigs "workmen" to add some additional "interest" to the build.


