Project: Irrational Exuberance

Associate
OP
Joined
29 Mar 2016
Posts
183
Location
Salisbury
Yeah haha thank you very much, I'm sure we could sort out haribo for you

Spoke with CS today, it's going to be picked up on Monday morning so should be back shortly. Hadn't realised the price had gone up post Brexit, really is a couple of thousands worth of excess RAM at today's prices.

Anyhow, back to rinsing out some radiators and testing fans. Will post some more progress on the build shortly.
 
Associate
OP
Joined
29 Mar 2016
Posts
183
Location
Salisbury
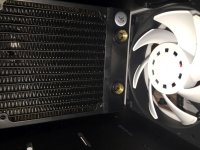
Made some progress over the weekend first cleaning out the radiators then starting to mount them to the case along with the fans. With the Parvum L1 you need to mount them as you build it as the next layer of the case covers the mounting holes.

The fans and front 480mm rad mounted:

dYfxJwv.jpg

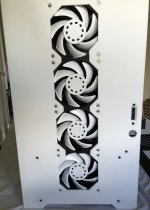
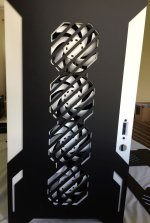
And with the outside layer added:

4qssNPK.jpg

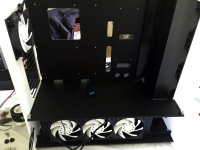
One of the lower 360mm radiators in position:

SqTwMg2.jpg

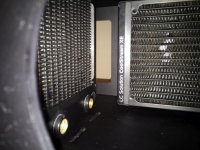
Inside the lower compartment, there is not much room to connect everything once at the EK Coolstream XE are mounted. Even with the fans on the outside. Still it will easily be possible, just a bit fiddly. Going to be fun getting the pump in down there as well, considering moving it up top, not sure currently.

UerQ90D.jpg

3N875lC.jpg

Still trying to figure out where to mount the Aquero 6 controller, tempted to try removing the screen and remotely mounting it elsewhere.
 
Associate
OP
Joined
29 Mar 2016
Posts
183
Location
Salisbury
If you need to remove the screen it works fine, I checked :D I plane to mount mine face down so the fan connectors are facing upwards in a nice accessible fashion. Just once in a while I like to make life easier for myself! ;)

That's good to know, have you tried jury rigging some wiring to remotely mount the screen elsewhere in the case? Tempted to give it a go so I can have the unit somewhere easy to get to round the back and the screen where it can be seen through the window.
 
Associate
OP
Joined
29 Mar 2016
Posts
183
Location
Salisbury
Hey there Neutrino101,

Dont suppose you have the order number for the memory you received?

I need to do a little investigation on this side.

Thanks

Bailey

The order number was: OC3119644

If it helps with the investigation it was part of a large order of parts and as I was still waiting for the case I didn't fully check everything in the box when it arrived and even pilled other stuff on top for the past few weeks. It is only when the case arrived this week that I found another 8 boxes of RAM on top of the 2 I had ordered at the bottom of the box. They were still inside the Corsair shipping boxes that contain 5 boxes of RAM each so looks like someone just gave me 2 boxes of 5 instead of 2 individual boxes.

I had already got 2 boxes out to put in the MB a few weeks back and had thought these were loose in the box but turns out a mate who was round trying out the Vive at the time and had helped me unpack had taken them out of one of the 2 big boxes without realising what he was looking at. So they were all shipped from you as 2 boxes of 5 sets of RAM each. Not 2 loose and 2 boxes of 4 as I had first thought.

Both boxes (8 sets) were picked up by the courier today so should be on their way back to you.
 
Last edited:
Associate
OP
Joined
29 Mar 2016
Posts
183
Location
Salisbury
Sorry for the lack of posts the last few weeks, been away for most of it and run in to a few problems during the time I have had to work on the build.

First up I realised that the mounting screws provided with the reservoir were not long enough to mount it to the Parvum case. A minor annoyance but delayed things for a few days whilst I ordered some new screws which obviously when they arrived were the wrong ones. I gave up in the end and drilled the holes out to m4 size to match the incorrect screws I was sent. It was relatively easy to drill holes in the case using a slow speed setting on the drill.

Next up I realised that as I was using very wide radiators in the lower compartment that I needed some 90 degree fittings as the radiators were too close to each other to allow straight connections to fit without kinking the soft tubing, so this added another few days wait for parts. The lower compartment is now finished and all the tubing and pump are connected.

Finally I wasn't happy with the bends on my Acrylic tubing as no matter what I did they were all going slightly flat. Turns out that not all 10mm silicon inserts are equal, the monsoon one I was using is only 9mm when I measured it! Have now ordered the Primochill 10mm insert which should arrive tomorrow so will start the acrylic tubing from scratch this weekend. A word of warning that not all 13/10mm tubing is actually the same size, a trap I fell straight in to on my first Hard tube build. Using 13/10mm parts from different manufacturers is not a good idea it turns out.

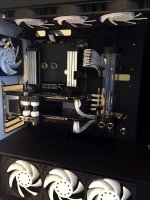
A quick picture below to show the build as it is currently, just the new tubing to do and then its time to fill the loop. Also need to tidy up the cables a bit.

cCNx3Ef.jpg
 
Associate
OP
Joined
29 Mar 2016
Posts
183
Location
Salisbury
The Primochill silicon insert arrived today and this time it is too big to fit in the tubing! Despite being made by Primochill it won't fit their own tubing. Can't get it more than an inch in to the tube before it is stuck solid... Does anyone here have an insert that they recommend to use with Primichill 13/10mm acrylic?

I have a short term work around, popped in to Tescos and picked up some KY jelly which when applied liberally allows the insert to slip inside the tube with relative ease, surely this can't be what everyone has to do to get them to fit? :p
 
Associate
OP
Joined
29 Mar 2016
Posts
183
Location
Salisbury
Aw mate, you gotta laugh! (I know I did!)
I have of people sanding it slightly smaller before if that helps. I also vaguely remember it being said that one insert was often sold as 1mm larger because of imperial to metric conversion but I forget if it was 11mm for 10mm or 12mm for 11mm.
The black Barrow insert I got (off the bay) measures 9.5mm...which I got because the blue Monsoon insert was only 8.8mm.

I have been experimenting this weekend and have found that Olive oil appears to be the perfect lubricant for the silicone insert. I sanded down the Primochill insert very slightly and when lubed up with Olive oil it slips in nicely and holds the shape of the tube well when bending. Unfortunately it looks like KY jelly does weird things when it gets too hot and was leaving a slight whitish discolouration in the tube, so olive oil it is. Hopefully will have some progress to show shortly.
 
Associate
OP
Joined
29 Mar 2016
Posts
183
Location
Salisbury
A bit of spare time at last this week so finally got all my hard tubes bent and ready to fit, having trouble getting the last of the acrylic dust out from the middle of some of the longer tubes, have tried soaking, running fast water from the tap but still have little bits hanging on, likely stuck with some olive oil. Anyone got any tips for getting the rubbish out of the middle of the long bendy tubes?

Once they are clean then it's time to fill the loop....
 
Associate
OP
Joined
29 Mar 2016
Posts
183
Location
Salisbury
tU7MKNz.jpg.png

It's finally almost finished and is now running. I have taken a quick shot above to let people see how it looks, will take some more detailed photos in the next few days under better lighting.

The only bit that remains is to choose some suitable LEDs to place in the case. Currently thinking of a single strip of white LEDs along the top but open to suggestions, The MB has a RGB LED header so could hook one up pretty easily.

I had a single leak when filling, one of the mounting sockets on the big 480mm radiator had not been fitted properly at the factory, I had tightened them all up before screwing in the fittings but it turns out this one had the rubber O-ring seated badly so it leaked pretty rapidly when filling the loop. Lesson for the future, undo all the factory fittings and make sure they are seated properly before screwing in the fittings for the tubing. Fortunately thanks to the drain valve I added in the lower compartment it was relatively easy to drain the loop and fix the problem.

I am sure that my acrylic bending could be neater but I am happy with the results for my first attempt. I may go back and improve the tubing when I upgrade the graphics cards mid life. I would recommend anyone looking at hard tubing for the first time to spend a few weeks practicing getting the heating just right before attempting your actual build. Budget for a lot more tubing that you will need simply to use for practice.
 
Associate
OP
Joined
29 Mar 2016
Posts
183
Location
Salisbury
Well they look good from here. Maybe some slight thinning of the far left tube (GPU to rad) but that's being overly picky and could just be the angle of the pic.

If you've got an RGB header I'd go with that. Give you the opportunity to try different colours and pick what you like best - or change your mind. You can probably balance the colours by hand to give the whitest white if that's what you want....or swap it out if you decide white is the way but it isn't bright enough.

I'm becoming a big fan of Aqua Computer's Dr Drop - despite mine leaking :rolleyes: It gives you a good way of checking it's not going to leak before you get stuff wet. For my overkill res, this was really helpful as it needed to be tightened up much tighter than I was expecting before it held the 0.5 bar (8 psi) of test pressure.

I had a look at the Aqua Computer's Dr Drop, with hindsight it would have been worth getting. Will likely pick one up before my next build, got the bug now and my VR PC could do with some hard tubing....

Just a few bits to sort out on this one before it is fully finished. Will get some LEDs to experiment with this week and also having an issue with the EK WB D5 pump not being recognised by the Aquero 6. Whilst not a show stopper it does mean my pump is currently stuck running at full power. Its controlling the fans brilliantly, very easy and all sat at about 750 rpm so barely audible. The noisiest fan in the case is the Seasonic PSU which sounds like a rocket in comparison.
 
Back
Top Bottom