[Project Log] Cooltek W2 Workstation

Associate
Joined
24 Oct 2008
Posts
424
Location
W-s-M
[Project Log] Cooltek W2 Workstation (completed)

Why I have decided to build a new rig
While already having a 4K and a 1920x1200 monitor I felt that it was time to also update this machine of mine that is encroaching on 3 years. While it still packs a gaming punch, for the work I have been doing in the last year this machine cries instead, so in comes the order I have just placed at OcUK! Hopefully on Friday I will receive all of my parts as well as the case from another store.

The Components
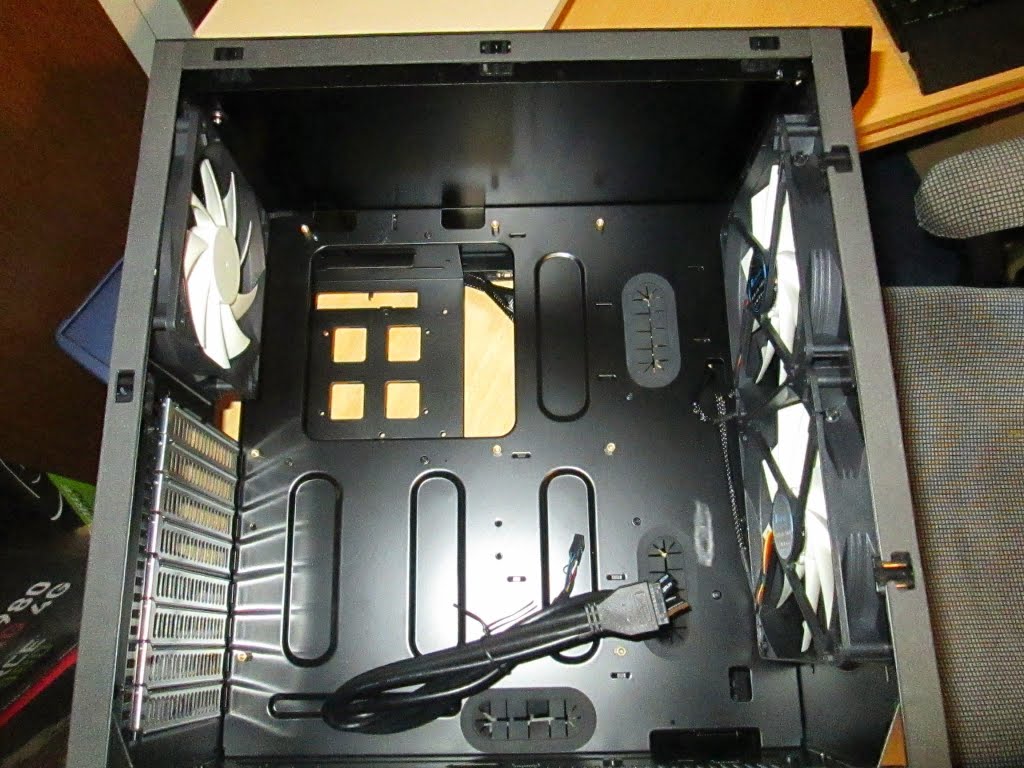
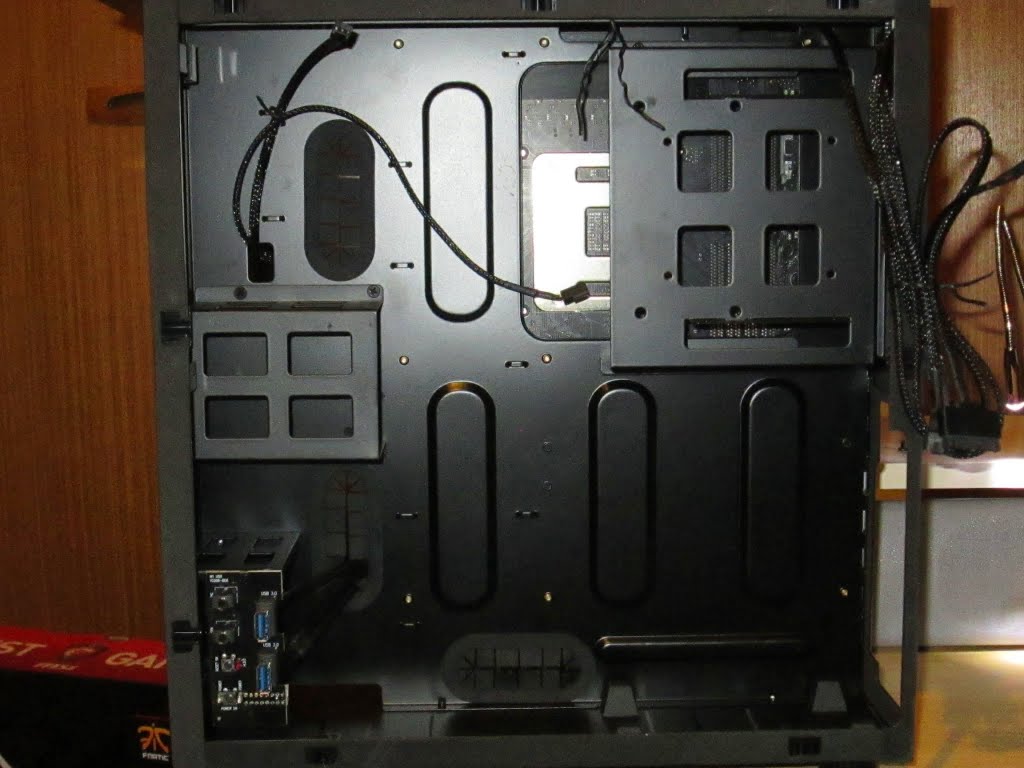
Case: Cooltek Jonsbo W2
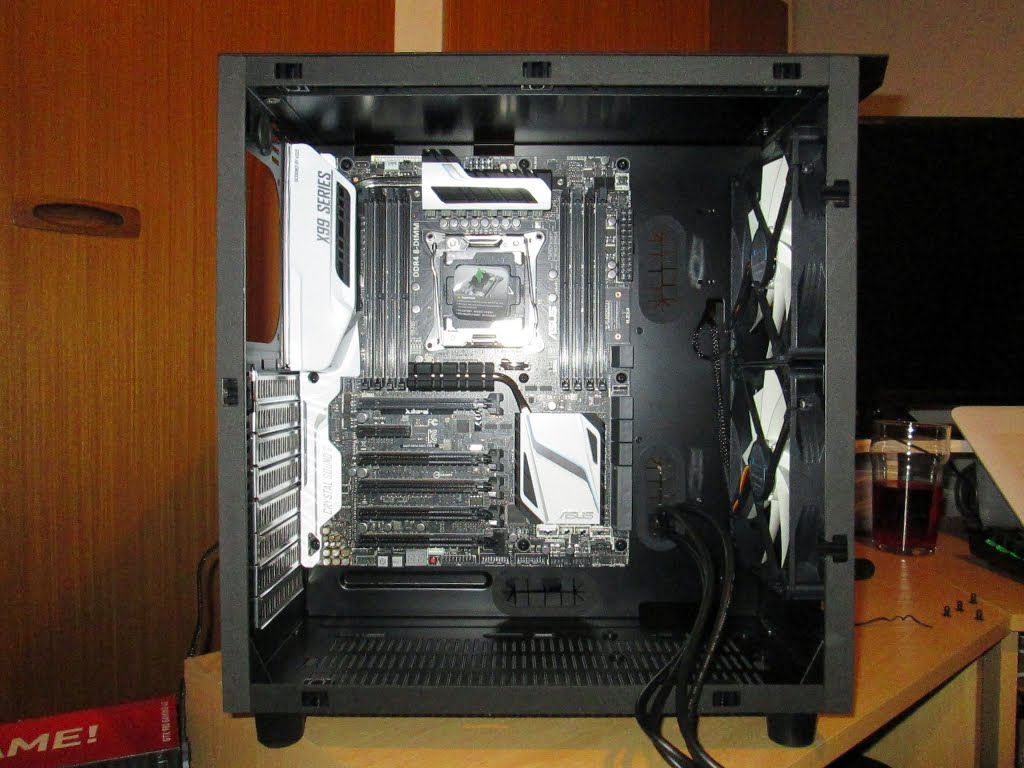
Motherboard: Asus X99-S
Processor: Intel 5820K
Graphics Cards: 2x MSI GTX 980 Gaming Edition 4GB
RAM: 2x Crucial 16GB (4x4GB) DDR4 PC4-17000C16 2133MHz Quad Channel Kit
SSD: Crucial MX100 512GB
HHD: Western Digital Caviar Green 3TB
HSF: Phanteks PH-TC14CS - Black
Power Supply: EVGA SuperNova G2 750W
Optical: External Samsung SE-506CB/RSBD
OS: Windows 8.1 64b

What I was looking for in a new PC
The idea of this build was to have it as silent as possible while being able to use CUDA performance for renders without the PC sounding like a jet engine. The other reason for choosing this case over the Corsair Air 540 was that it is much smaller but also looks much more sleeker while it still has plenty of airflow and can still hold even up to an XL-ATX motherboard! Not that I went for one of course. The Asus X99-S and 5820K bundle that was out this week helped me sway towards that too.

Choosing the graphics cards was a bit of a no brainer really, it had to be a card where it can run without the fans running, which pretty much narrowed everything down to the Asus Strix or the MSI. I was about to go for the Strix but the price went up and the MSI went down thanks to the week deal, so I picked up two of them to help split the load between the GPUs.

The HSF is a bit of a weird one I know, it is mid-height but I didn't want to risk having an HSF that was a few millimetres away from the side.

Also to keep things aesthetically nice I wanted to have a black and white theme. Unfortunately the case SKU with the window has been sold out everywhere however at some stage I will most likely purchase the window as well as some white heatsinks to put over the RAM. The red on the MSI will add a little colour though if it doesn't look nice with the Black and White theme then I might spray paint over the red.
 
Last edited:
When the computer case's box is smaller than the components case makes you wonder if it'll all ever fit inside!

IMG_0343.JPG


All of the components for the build out of the box.

IMG_0365.JPG


As the lighting isn't great it doesn't show its true finish but goodness this case has a stunning brushed aluminium finish.

IMG_0368.JPG


This is the rear of the case, the opening at the bottom left is the power supply area with the optical bay just above it... weird to have an optical bay at the back of the case but what the hell it's there.

IMG_0369.JPG


Inside of the left side of the case. Looks unbelievably tiny! I think this is actually the smallest case I have ever owned.

IMG_0370.JPG


The motherboard installed... only I had to remove it again because I had to install the heatsink first, d'oh!

IMG_0371.JPG


And this is the heatsink, rather unconventional that it's sideways rather than the tower like heatsinks, but it is what I knew would fit in the case.

IMG_0372.JPG


And here is the heatsink installed... now the snag here is that when the fans are installed then the graphics card doesn't fit in the first slot! This means that I will need to turn the heatsink around a full 180.

IMG_0378.JPG
 
Last edited:
I managed to pick it up for £118 including delivery. There are currently only 2 known places to get it from in the UK at the moment which is a shame.
 
I LOVE the look of this case, but unfortunately I hear the cooling isn't too great. Are you sticking with air or going water cooled?
 
I will be sticking with air cooling. There are a couple fans at the front which comes with the case as well as a rear fan too so I will have a front to back airflow. There are a couple fan positions at the bottom of the case too which could be used to draw in more air to give a high positive air pressure.

I have been toying with the idea of watercooling for many a year now and if temps do become rather high then I will do something similar like what is shown in the Cooltek pictures at the bottom. The cable management on this case looks fantastic so can't wait to get my hands stuck in.

Overclockers have already shipped my parts and the other store has my case already ready for picking up by the courier today.
 
Last edited:
Added some pictures to the second post for you all. A few annoying things so far is that when putting the heatsink on I didn't realise how close it would be to overlapping the first slot (I thought it would be fine) so I'm in the process of turning that around now. Also another weird thing is that the Phantek fan at the bottom of the heatsink doesn't fit in place square on but it's instead slightly offset compared to the top fan which I thought was rather odd.
 
Hooray it's working! My goodness this case is quiet but this case I swear weighs more now than this one I'm typing on. I'll do a side by side comparison of the case sizes too so you can see the difference between them, I think you will all be staggered. I'll add the remaining pics once I've got this machine fully up and running. Now I need to get the blu-ray drive hooked up to it.
 
Here are the final images:

The RAM, heatsink and fans are in place.

IMG_0379.JPG


The bottom fan is offset slightly due to the heatsink's pipes on the other side. You can see that the CPU power cord hidden to the right is required to be connected before the bottom fan is installed, it made the build rather awkward because of it. Also the RAM slots are full covered meaning that the bottom fan will also need to be removed when I need to install more RAM.

IMG_0380.JPG


The left side of the case with everything installed before wiring.

IMG_0385.JPG


The finished wiring in the main area. It's not brilliant though for my first attempt I think it's OK. having separate braided wires instead of being clumped together would've looked much nicer and easier to work with.

IMG_0389.JPG


The right side of the case before anything goes in there.

IMG_0384.JPG


The SSD, HDD, and the PSU is installed with the CPU cable installed.

IMG_0387.JPG


The finished wiring in the hidden area.

IMG_0388.JPG


It's finally up and running! And yes it does say 16GB though I'll be receiving the other 16GB soon... with the small form factor of this case I am not looking forward to it as it will require removing the Heatsink fans which in turn means removing the motherboard from the case. :(

IMG_0390.JPG


Size comparison of my old PC (top) and this new PC (bottom). It is so short.

IMG_0392.JPG


A height comparison of the two, This case makes the Antec P280 look absolutely massive! While it is big it's certainly no where close to a full sized case as it's only a mid-tower.

IMG_0394.JPG


And a width comparison, the only part of the case that is actually wider, but not by much.

IMG_0396.JPG


I decided to compare the size to my old Chenbro Gaming Bomb that I picked up back in 1998, that case at the time was an amazing case but it was so small and certainly high end, but for what's in it (of lack there of) it weighs more than everything that's in the new case! The Chenbro was a steel case mind and it had lots of sharp edges. :D

IMG_0397.JPG


And a height/width comparison. This Cooltek case makes this already small Chenbro look huge too.

IMG_0398.JPG


Impressions:
I have to admit that while building the computer was a lot of fun, wiring the case was a bit or a problem, mainly because the PSU cables were just far too long. If anyone knows where to get some shorter PSU cables from then that would be great.

Having a flat HSF also cause a fair few issues, in the possible positions to have it at it would either block the CPU power connector, block the top PCIe slot, and it will always block 4 RAM slots, or all 8 if the HSF was orientated 90 degrees in either direction. As I only need to install RAM one more time I will only need to remove the motherboard once so get to the RAM slots, but if I had to be fiddling inside the case more then I think I would pick up something like an H100, perhaps I should have gone that route by spending an extra £30.

The PC altogether is slightly quieter that my Antec which I find quite remarkable, also had a few gaming sessions with Civ 5, FF14, and Project Cars and all I can say is that the performance on this thing is amazing! Project Cars on full settings at 4K is drool worthy, FF14 I get a solid 84FPS, and Civ 5 ran like a beauty and each turn on an Marathon late in the game ended pretty fast too. Another amazing thing is that the case as well as the GPU fans stayed quiet throughout. The temps aren't going higher than ~68C so that's pretty good and it means that the fans on the GPUs aren't switching to their highest, same with the CPU fans as at ~60C they're set to work like a hurricane, and thankfully I have yet to hear them.

Overall, despite the difficulty of installing into a small form case, I'm really please with how it turned out though the only change I would make in the whole build would be to have an AIO for the CPU, that's about it really.
 
Last edited:
Can you please re-size your pictures so that they're below 1280px? I've temporarily placed them inside spoiler tags.
 
Sorry about that, resized to 1024 as Picasa doesn't have the option for 1280 *facepalms*.

I've now got the remaining RAM to add so I'll be seeing if my theory works tomorrow. Remove the GPU connectors, the Mobo connector, and the graphics cards, then unscrew the motherboard and sloooowly lift it out, remove the bottom fan and then install the RAM, then put everything back while the CPU power cable is still attached... this really is a caveat with small cases but it's fun nevertheless.
 
Back
Top Bottom