Project: Silent Overkill

Make yourself up some distilled vinegar solution and fill the rad up and let it sit for a bit, then wash it through like before. Should rip some of the nastiness out of the rad.

I have all the joy coming soon when I flush out my 2 2nd hand rads.
 
Thanks, might have to try that. Water has always been sufficient for previous rads. No flakes in this one, just cloudiness.
As all the shops are shut, will Malt vinegar (brown) be ok?
 
That I couldn't say. Advice seems to say distilled vinegar which is white, but pretty much all distilled vinegar you can get in the UK is distilled malt, so it's still malt.

As you'll need to properly flush with distilled water anyway I don't see any reason why not. Apparently hot(ish) lemonade is a good one too.
 
That'd be a touch of citric acid (lemons) and a touch of carbonic acid (fizziness). Sounds like some espresso machine descaler would do the trick....were I that brave/stupid. There's that fine line again!
Thanks LePhurron. Will give it a go with the vinegar and then flush it.
 
Chickened out on the industrial stuff and going for a 50% solution of Sarson's best. Limited variety available on Easter Sunday! My wife's going to be sooo happy with the way her kitchen smells when I've finished! :D
 
Finally! Gave it over half a litre of 50% vinegar for 20 minutes, turned it over, left it another 20, gave it a bit of a shake and drained it. This is what I got:


This was see-through before it went in....and a nicer colour!
Set it up on the Dual DDC powerflush for an hour and half, then reversed it for a while. Expected it to be nice and clear. Nope. Actually worse than when I started. Took the best part of ten fills with half a litre of water, shake and drain before it came out clear. Couple of rinses with DI and I'm sitting down with a beer at last! :D Remind me not to buy another rad for at least ten years....my wife will divorce me! ;)
 
So what's worse than flushing a rad? Flushing a MONSTER rad! I foolishly assumed the design was like most with atria at each end. Found out the hard way when I poured water in one top port with another top port open to let the air out. Turns out they're directly connected :rolleyes: Actual design seems to be 3 or 4 tubes going from top ports to the right, then 3 or 4 tubes back and zig-zagging all the way down. It makes it a real pain to fill with a funnel in order to flush it out and I was fearful that flow would be naff.

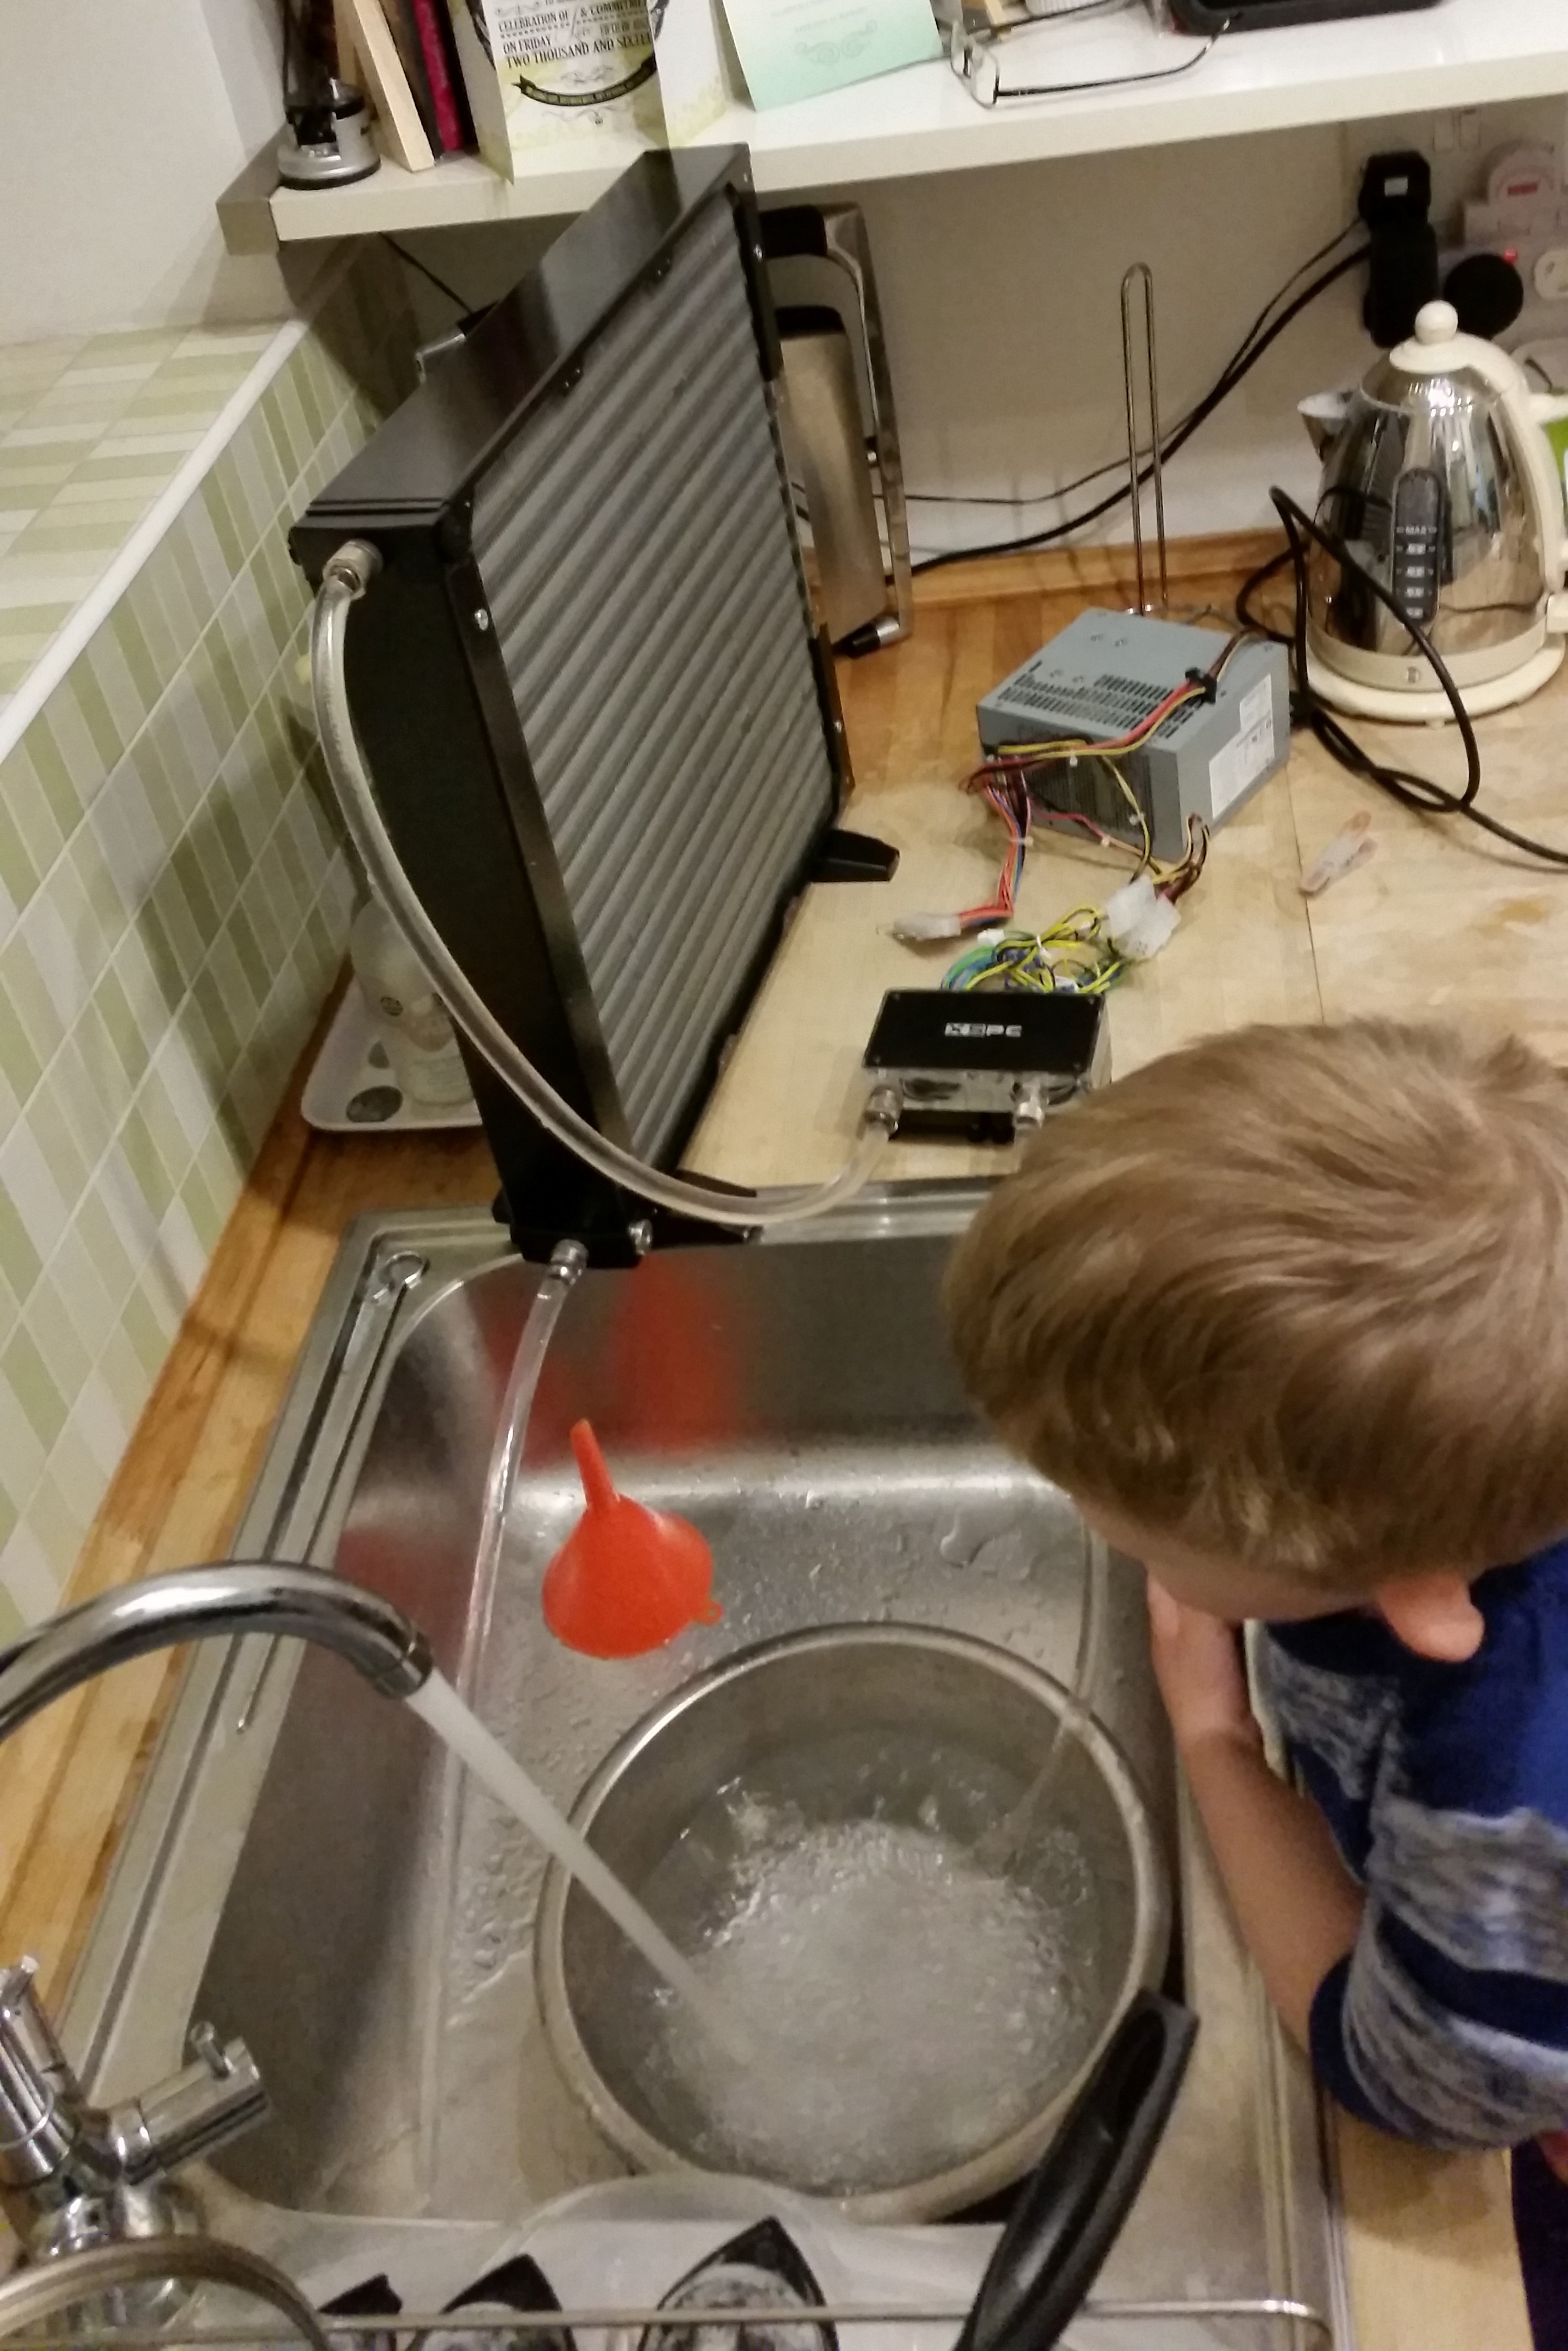
A while ago someone posted the genius idea of siphoning water through the rad to flush it. I gave this a go for the last rad and was dead smug with myself but the results were disappointing when I gave it a final shake with some DI and flakes came out. In the spirit of Overkill, I took it to the next level. I present to you the Dual DDC PowerFlush! Fun for all the family...clearly.


I was careful to keep water and mains (and son!) separated :cool:
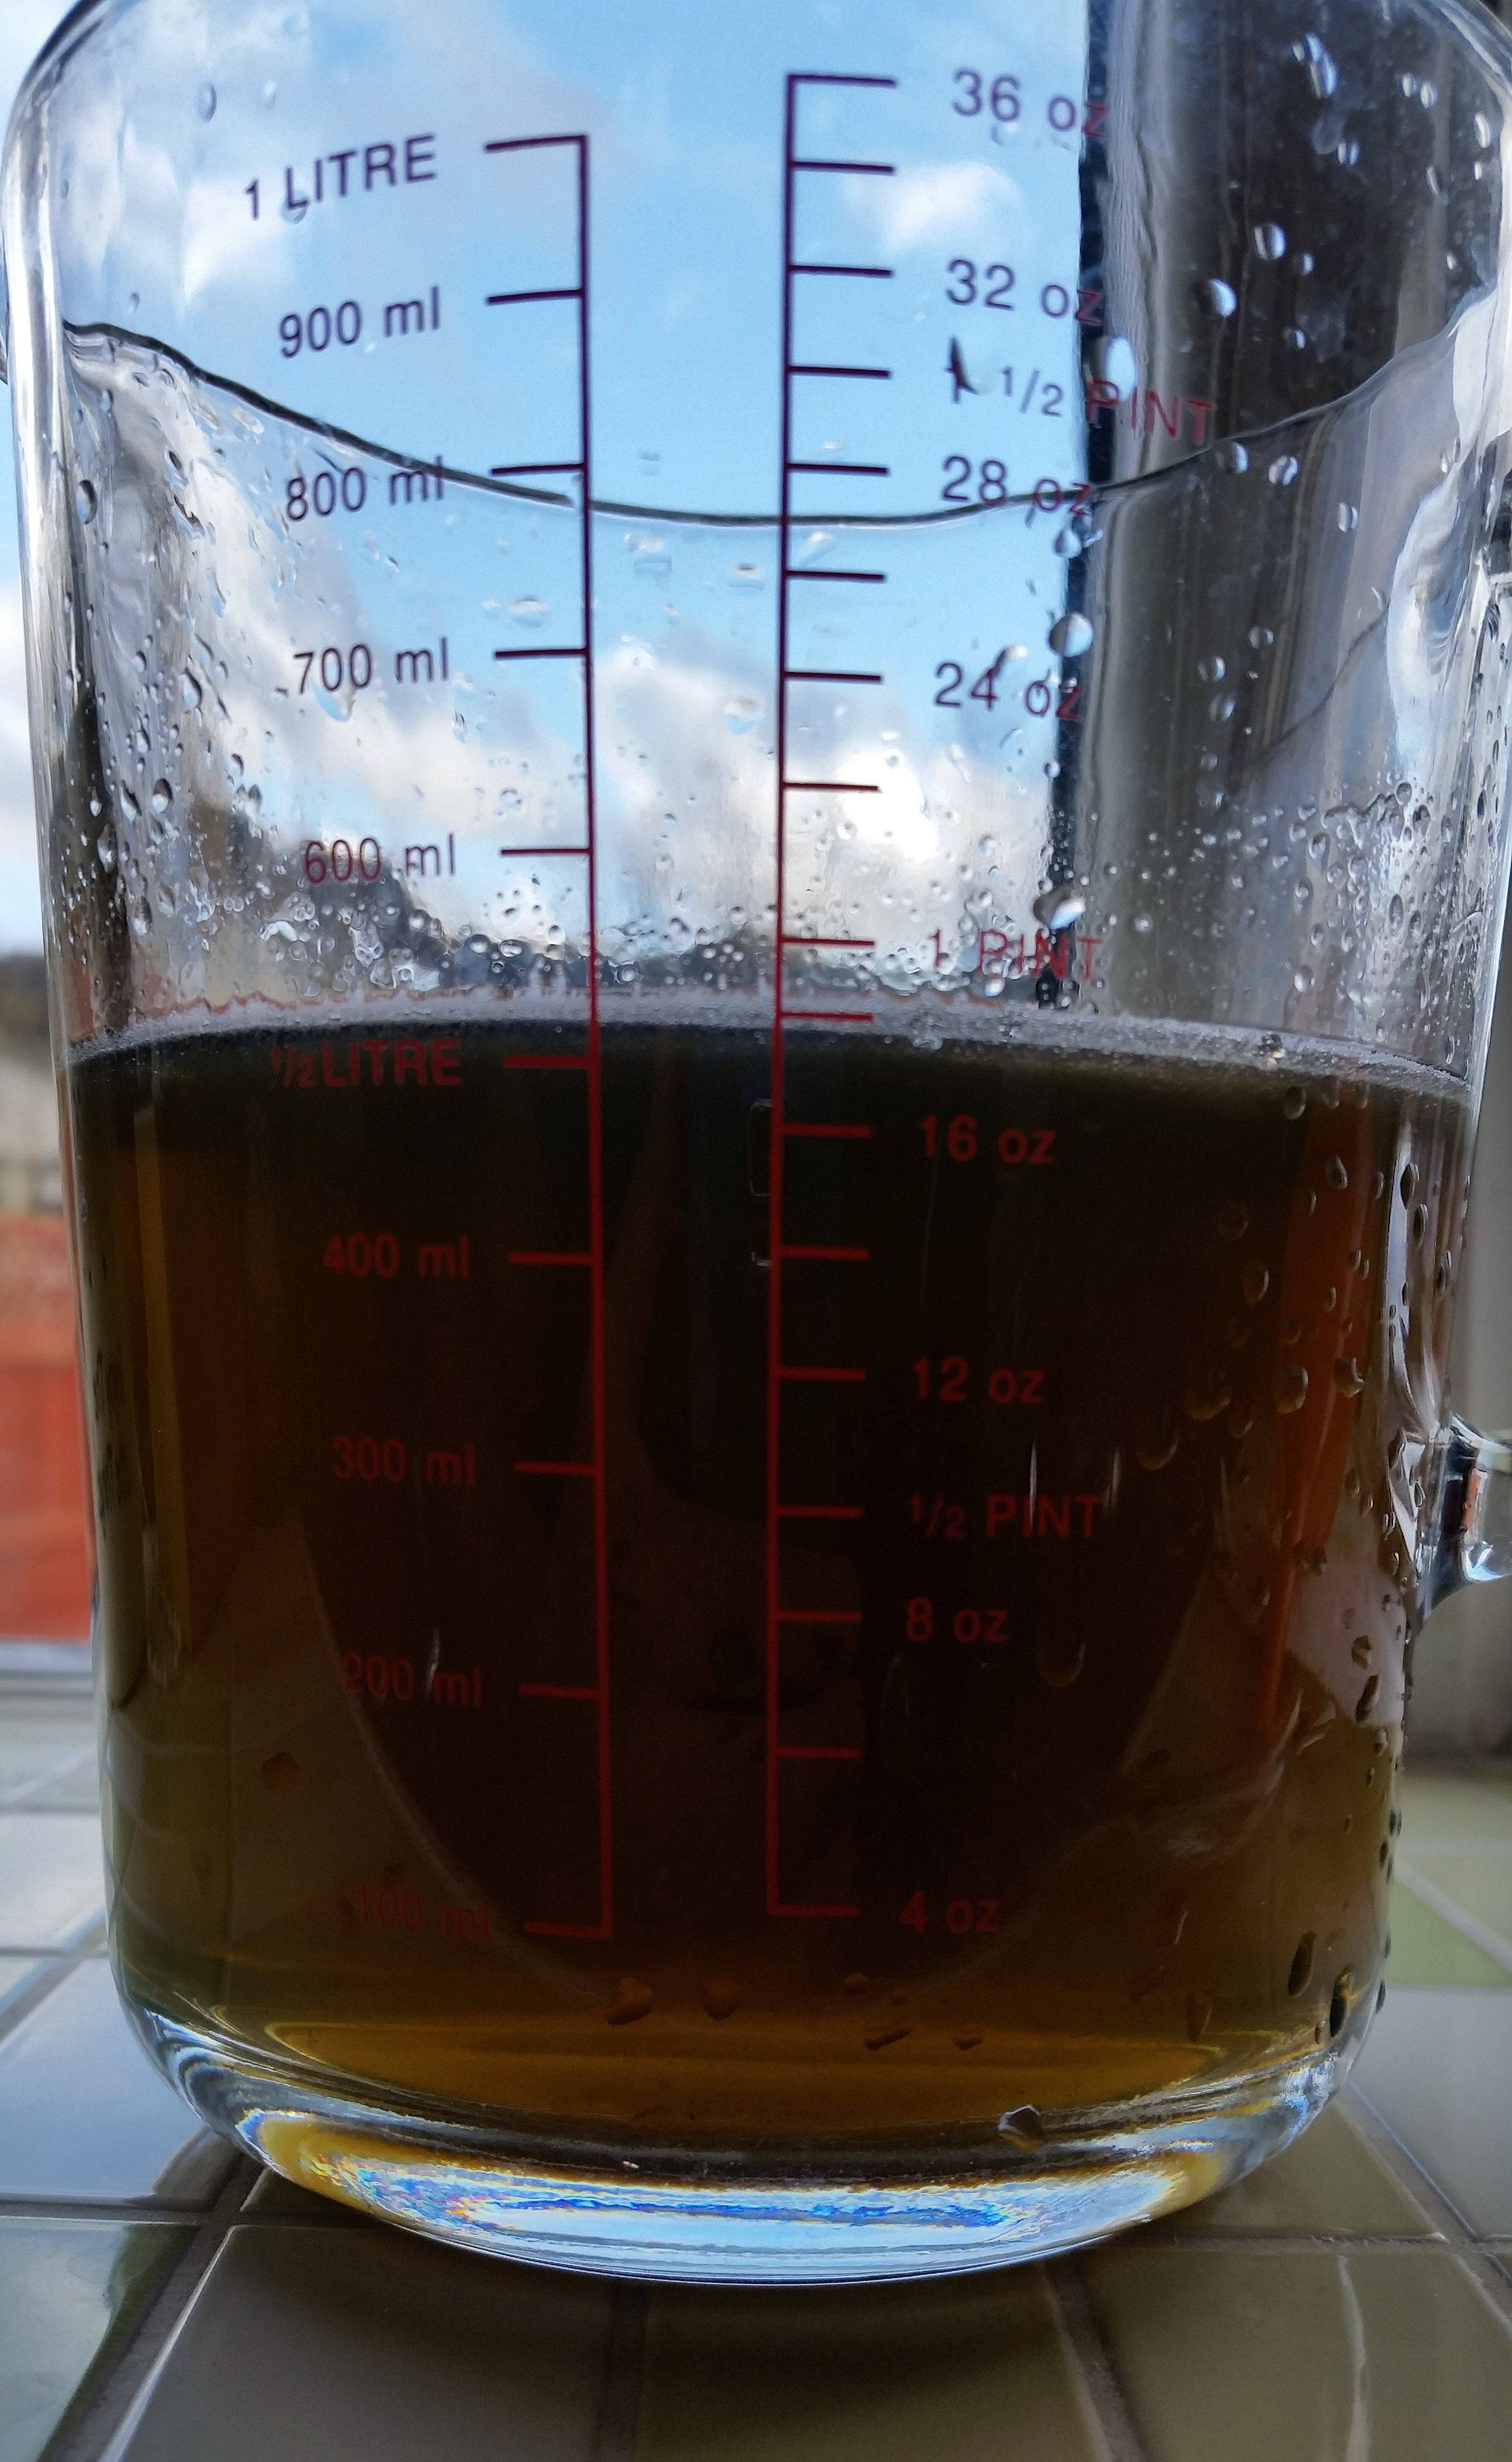
Looks like I need not have worried about flow rate! It does seem to increase with the 2nd pump running - at least the jet goes further - but I won't have figures until I get everything finished and have the Aquaero and flow meter in the loop. So with massive flow gushing through the rad, it's all clean now and my laziness has been rewarded, right? Nope. A shake with tap water still has it coming out cloudy - like difficult to see through white cloudiness. Seems like there isn't really a good shortcut to this. Very disappointed.

Thats not you in the pic surley or are you using child labour ?

Damm just seen u said Son, lol but still classed as child labour.
 
Well, he's got to do something to earn his keep ;) Kept him amused for a while. Had it set up again today so checked a blue LED in the pump block. You'd think some kind of magic had been performed. :cool:
 
Jesus, that's a crazy amount of crud to come out of one radiator! I know it's a massive radiator but still... :eek:

I'll never moan about rinsing out a filthy Coolgate one again :D
 
To be fair OJ it was brown vinegar to start with but it was at least transparent and brighter before I started. Also started to get white almost fluffy crud out of it afterwards.

TLC has been done and DI came out (eventually) crystal.
Just got to work out how to fan it next. Had assumed that 200mm fans would be better and quieter - It's certainly cheaper to buy 4 than 9! The Bitfenix seem to be a bust though so have to work out whether to try Aerocool Dark Force or go 30mm thick which is too thick for the fan grill or wait for Noctua 200mm fans which may be released at the same time as Half Life 3!
Other option is to go for 9 Noctua Redux's at 140mm.
What do you guys think?
 
Afternoon all. I'd just like to say AAAAAaaaaarrggh! :mad:

Finally got hold of the 1mm pitch ribbon cable to do the Aquaero split. Managed to break one of the connector (at £5 a pop) through ineptitude but still managed to get the cable made up. Tested good with a multimeter too :D
Was just in process of fitting it to the two Aquaero halves when it suddenly dawned on me to check that the pins were definitely being connected 1-1. They're not. Because the two connectors mate directly and my cable is side to side, it swaps the rows over so pin 1 connects to pin 2, 3 to 4 and so on.

Now trying to order some Dupont housings and pins (think motherboard front panel connections but finer pitch 2mm instead of 2.54mm) from Taiwan to make up my own cable pin by pin. On the plus side, I did notice before I (potentially) fried the Aquaero and I think the ratchet crimper I bought may well do Dupont pins rather than ATX pins (maybe both) so that's a bonus :D

Started having delusions of Acrylic porn yesterday on the train. No idea whether it's possible or affordable but I might see if a local Acrylic company are tooled up to do it. If not will chat to Parvum (to find out that it's both impossible and unaffordable) but they're not just round the corner :D
 
Glad the vinegar worked out for you and got the rad clean, although looking at the picture I sincerely hope you didn't confuse that crud with the beer. That would be hilarious disgusting.

I have lots of parts of my own arriving and after doing some card mock-ups soon I should be ready to commit to laser cutting, so my own rad cleaning adventures are getting scarily closer!

The 360 rad I got second hand had a bit of water left in it and it stank of rotten eggs when I opened it up, so I dread to think what's inside it :eek:
 
The vinegar seemed to make it worse but I think it just removed most of the layer of crud in the rad allowing the rest to come off when shaken with water. By the sound of it, your rad needs nuking from orbit......it's the only way to be sure! :p

On a positive note....I do have them occasionally :D This:


Rad is plumbed through the side panel at last! Hinge prototype works very well. The length on it is just so the metal fittings don't short out the back of the motherboard :eek: I may refine it when I eventually get acrylic'ing as there's way more than enough flex.
The bottom of the rad is also connected in the same way but I've not started on any hinge there yet - still undecided on too many things.

This is the clearance between the non-rotatable 90° fitting inside the side panel and the back of the motherboard tray. You can see why this has been giving me grief?! I had in reserve at most 1mm which I could get by sanding the acrylic piece down and hoping it still sealed on the o-ring. This is the tiny green ring you can see on the left of the top pic - it's the Barrow-green o-ring showing through the acrylic.


I've also slotted the end of the screws that mount the rad so that I can tighten them once the rad is slotted onto the head end of them. The back ones I've then locked with nuts and the front ones I'm going to have to Loctite as there isn't enough space for a nut without destroying the front filter.

So this bits going well :D See, I'm not all doom and gloom....all I need is to get my own way ;)
 
Damn that's tight, no wonder it was giving you brain ache! Looking good though, now hurry up and finish it so we can see just how cool that beast of a rad keeps things :D
 
Well I might have just slowed progress to a crawl actually. I might have just dropped Parvum an email enquiring about acrylic porn. I blame JR23 ;) It depends how much of my idea is possible and, to be blunt, what it would cost. If it's a goer, I'll have to learn some form of CAD to do the design. On the other hand if it's either impossible or out of my price range things will speed up....but I'll be sad about it!
The delay would give Noctua time to release their 200mm fans which I'm hoping will put an end to fan dilemma.
 
Just a small update....well, more of a noop if I'm honest. Have been talking to Parvum and I'm now learning SketchUp to model my case so that I can give them a good idea of what I want cut and have some chance of it being workable.

The plan is to replace the PSU shroud - yes, the one I spent so much time cutting and filing - with three layers of acrylic.
This will then run from front to back of case and contain
  • a dual DDC pump top - modelled on the XSPC one I purchased (THIS is why you plan things in advance :rolleyes:) but with the input and output where I want them for the loop
  • Some sort of mounting and interface to an Aqualis reservoir - possibly just the electronics part mounted underneath with the actual reservoir part replaced - not really sure yet.
  • Mounting for the Aqua Computer filter - I did look into the possibility of cutting this into the acrylic but I don't think it's going to be practical. Lots of very tight tolerance stuff and drilling from all sorts of angles.
  • channel to directly below the graphics card inlet for a straight pipe between the two.
  • underlighting
A thin black layer over the top of the block will hide the block that isn't active just showing the channel and parts of the pump top. The layer will have to be bent 90 degrees and the Aquaero will be mounted on the side as it is now.

This all may take a while though. Hopefully have some updates when I get the right parts in for the Aquaero split. Would help if I didn't keep ordering the wrong thing!
 
It works! :eek: :D
40x 2mm pinned wires turned up yesterday - followed by another 400 today for some reason. Didn't order them, didn't pay for them, don't need them but the seller doesn't do communication....so *shrug*.

I've crimped pins on the other end - it's hard enough to get 2mm pitch pins at all, let alone ready made jumper wires like you can get for the 2.54mm pins that you get on Pi's and Arduinos. The crimp isn't good as my tool is (I believe) for 2.54mm pins, but again, impossible to find a 2mm pitch crimp. It should be fine as long as I don't yank it about much.

Still some sleeving to do yet but still, proof of concept! Also tested the touchscreen while I was at it. That worked too but I didn't take any pictures as it's rather dirty at the moment.


Now to go rummaging through my cheap and nasty braid selection pack. I think there may be some Teleios coming at some point but I'm not going to worry about that until I get to electrics proper.
 
Request For Comments :D

I've been getting to grips with SketchUp - well, I hope that's what I've achieved! The plan is to model what I've got and then design a headache for Parvum from there (sorry lads!).

What do you think? (click for downloadable SketchUp file)


Problems I'm aware of:

  • Accuracy is certainly to the mm (unless I've screwed up of course :D) and mostly to the half mm.
  • There's something a little odd going on with the rear panel that means I cannot delete a couple of lines that ought to be removable without breaking the surfaces.
  • The top rad mount tray is missing - I removed it before I started as I'm not going to be using it....so I haven't modelled it. You want to add it in, feel free.
  • most of the important features are modelled but some of the random holes and cable clips aren't....for sanity's sake!
  • The plastic bits that go between the bottom panel and the feet are missing - see previous two points :D
  • most of the features of the bottom panel are missing - I may add some of these in but I'm really only interested in the PSU shroud mounting holes rather than the fan grills.
  • The modelling of the Mo-Ra is probably overkill....but, well, see project title :D Yes, those fins are modelled individually :cool: Did try with the pipes being made up from deformations of the fins instead of continuous pipes....but SketchUp had to have a little lie down :D


Can you use this model?
Yes, if it's of any use to you please feel free with the following caveats:
  • I disclaim all responsibility for everything. Whilst I've tried to make it accurate, I'm not going to take any responsibility for any mistakes or inadequacies. If you order stuff based on this model and it doesn't fit, that's on you.
  • You may not sell this model or derivatives of it.
 
Last edited:
Back
Top Bottom