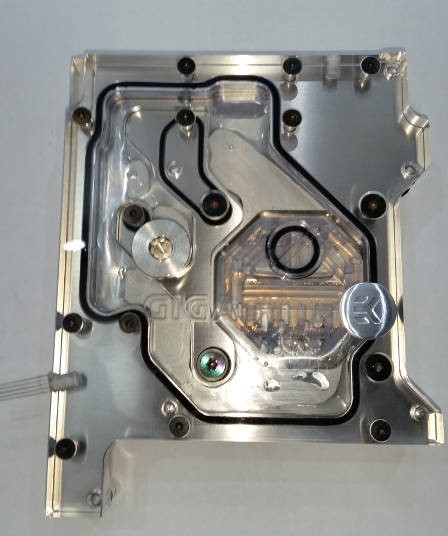
Project: Silent Overkill

I haven't 'broken' my current machine as yet. That's going to be the donor for motherboard, RAM, GFX etc. This is essentially a 'new home' for it. Use it daily for work so I want to keep downtime to a minimum. I'll almost certainly have to take the motherboard out when doing final measurements and checking for the acrylic work as I intend for the topmost layer to slide up to the motherboard covering the wiring along the bottom - I seem to like making life difficult for myself!

It is frustrating having lots of stuff sitting around waiting but I've got to wait for the acrylic first and I've not finished working everything into it yet. Have to take my 4yo son to Disney land Paris next week and then I'm back to the drawing board.
 
Ok, back from holiday and deliveries have arrived.

Ordered some clear O-rings having confirmed that they would be 12mm ID....they were 12 OD :( Back to the drawing board there. If you know of a source of clear (sort of milky white clear silicon) O-rings that fit G1/4 fittings, please let me know. I found one but they want £2 each :eek:

R1/4 die turned up. Customs declaration says "Daily essentials". It's well under the price limits for any duty so I'm not sure why they bothered. Had a quick go at cutting an R1/4 thread (tapered rather than G1/4's parallel) and it does seem to tighten up (before bottoming out) as you screw it into a fitting so it might just work. Will have to set up a loop to see if it drips.

Started having a look at EL tape for backlighting the block once it's done. Thanks (I think) OJ46. Might make for nice even light for the channels and be easier to fit in between the block and the PSU.
 
Did a quick leak test by filling the tube with water while having a stop connection on the other end. Does R1/4 thread work? Our survey says.....uh-uh. Might work with PTFE but I've run out and to be honest, call me picky but I'm only really interested in a seal I can trust to stay sealed!
 
Well, there's been a fair amount of swearing today. Nothing bad, just irritating. Those of you that have sleeved, will understand :D As well as those of you that also haven't burned their thumb while heat-shrinking - no sir, I did not do that :rolleyes:

Anyway, it's not as neat as I'd wanted but it's done and it's not even visible. I had intended to sleeve the middle bits but after some colourful language, it became apparent that it just wasn't going to happen - mainly due to needing to sleeve every part of it before every other part.

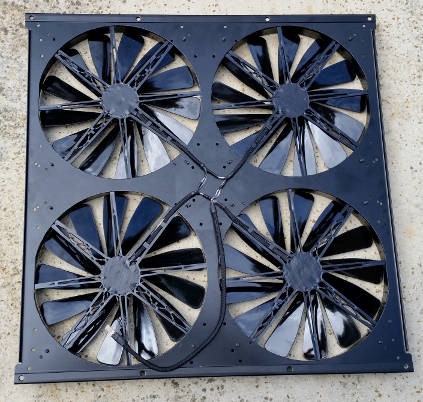
Fans have had the rear sticker replaced with a nice circle of duct tape for two reasons:
1. I singed and shrivelled the Aerocool stickers when I was heat-shrinking the paracord on.
2. Aerocool have some stupid bearing that is full of grease/oil and just has a circle of rubber over it held in place by the sticker. The sticker was coming off on two because it didn't stick to the oiled plastic where the bearing had been over-lubed. *ooh er Matron* :eek:


I had to join them all together and use a non-shrouded fan header as the shrouded male plugs, were just a bit too thick to fit between the rad and the plate. The fans have the opposite gender plug on them because if it were to come apart, I'd want the unpowered end exposed! I secured the 'tail' to the plate with some [cheap imitation] Kapton tape so it doesn't foul the fans.

Next I made up a female to female fan extension, sleeved it, drilled a hole in the case side to pass it through and swore at the fins of the rad until they let me get the cable underneath them - this involved unmounting the rad from the panel and taking half the case apart to get enough clearance....hence the swearing!

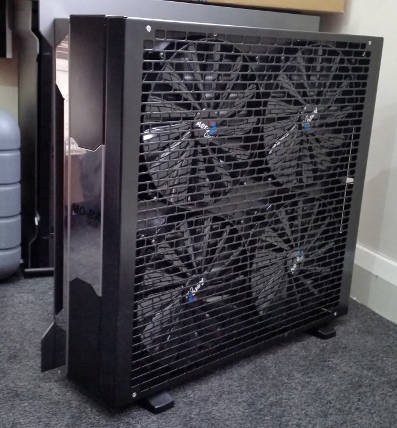
So, fans a mounted and fan-grill in place:


It's a small step but it feels like some progress. Might order some black screws to screw the fan grill on though. Picky but *shrug*
 
Not exactly a progress update but I thought it might amuse people. My PSU (Nesteq Xzero) that I currently plan to use in the new case helpfully uses non-standard 6-pin molex connectors for the modular power leads (molex and SATA). Can't find them available as they're a different pattern to the 6-pin PCI-E shells so I need to get them off to make new sleeved cables when the time comes. Wouldn't budge with the pin extractors rammed in as hard as I could so I ended up giving the cable a good yank with a "what's the worst that could happen?!" attitude.

Turns out that the worst that can happen is the glue suddenly gives (explains why it was difficult) and the pin is fired out of the hole with the sharp wings (that stop it going to far into the hole) ploughing two furrows diagonally across my thumb. The yellow wire is now red :eek:

Plasters are hopeless - don't stick to fingerprints and don't flex. Gorilla Glue (form of superglue with knobs on), however, works wonders. Have a useable thumb again :D
 
Aqua Computer Farbwerk has arrived. Got a 1m strip of RGB LEDs to go with it. Might be able to use them to light the coolant channels in varying colours.

Also ordered fifty RGB LEDs (5mm, 4-pin, common anode) from China. RS only had the common cathode type that isn't compatible with this. They do, however, have the metric f-load of resistors I'll need to wire up a string in possible combingations of 1,2,4 and 8. Plan is to put a load in the bottom of the res - probably a string of 8 of them round the edge and an independent one up the middle core if it works in testing.

If you can smell the scent of solder and hear the sound of swearing, you know it's all arrived :D
 
I think one of the top images is the secound most extrem external watercooling solutions if have seen with linus tech tips water cooled room being the first ;)
 
Cheers. Must try to get the block design completed but work is busy and getting in the way :D Need to ask Parvum if my provisional design is plausible but also need to make sure it's mm perfect too, or it won't fit.
 
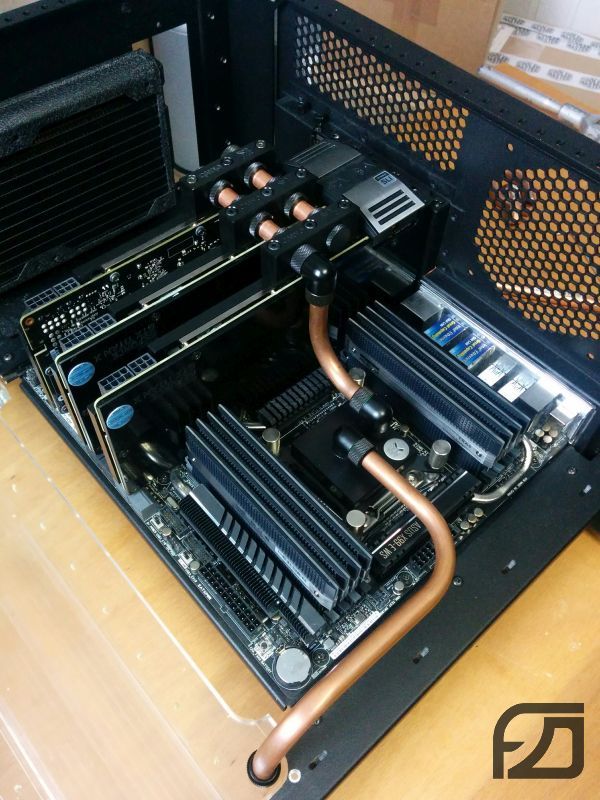
Planned to do a premature move to the new case today - need to confirm some measurements with the board in before finalising the block design - but found I needed to order some 90° fittings as people like Flix29 have changed my mind on how the tubing should be routed from GPU to CPU:

SMA8_WiPl082.jpg

Also looking for a short, black male to male rotary extension. EK do one but it's got straight knurling instead of diamond and will clash with others. Trying to source a Barrow one in black.

Should get some pics up and some idea of temps once the fittings arrive and I can do a functional but far-from-finished build.
 
Ok, some fittings arrived and I've got a few hours free to make some progress. Plan is to transplant everything from the old case and loop to the new.

While I'm at it I'm going to try to drill out the 3mm LED holes in my GPU and GFX blocks to 5mm if there's space. Why? Well, I wanted to use RGB LEDs (the single type rather than strips) so that I can either change my mind or have them change based on temperatures. This will be done with an Aquaero 6 (has a port for one RGB LED) and a Farbwerk attached for an additional four channels. The channels on the Farbwerk are dead easy to attach RGB strips to....but that's mostly not what I want. You can attach singles or strings of singles (like the eight I plan to have in the res) but you have to find your own common anode RGB LEDs (the normal ones available anywhere seem to be all common cathode) and solder in your own resistors depending on the power requirements of each colour. I'll post more details when I get that far.....assuming my sanity is still intact by then!

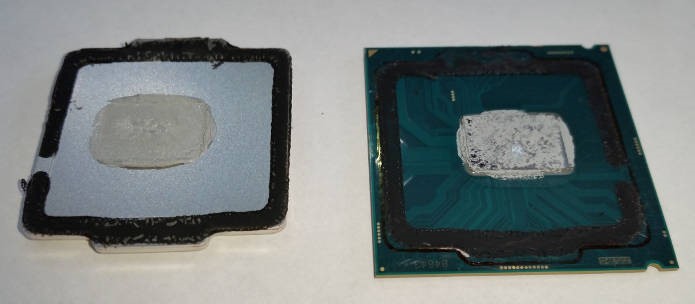
I'm also planning to de-lid the CPU, fill it with liquid metal, put the IHS back on and then use Kryonaut between the IHS and the block.....so if there are no more posts for a while, you know what happened! :eek:

So, before I tear everything apart, pictures of the fittings that turned up:


From left to right: A Barrow 90° fitting, same with a 12/10 EK-HDC hardline compression fitting and the hinge bridge that will have soft tubing on each end and should allow me to open the rear door without having to drain and disassemble.
 
Progress so far. Popped down the barbers to cadge a razor blade. Cheers guys. Sliced through the IHS glue very nicely but one 'ear' was a pain to get loose. Perseverance paid off though.


Tomorrow will be liquid metal time and I'll find out whether it survived! I'm not going to get a fair temperature comparison because the loop is going to be massively different - slightly larger rad :D

Also drilled out my 3mm holes to 5mm in the monoblock. 4.8mm drill seems to give a nice grip on the LED as it's slightly tapered.

 
Damn, you must have nerves of steel taking a razor blade to a 6700k :D

Glad to see it worked out though, be interesting to see just how cool they run with 'proper' paste inside them... Might even be tempted to give it a try if it improves massively! Always makes me wonder why they don't use better quality stuff to start with though, especially as it would add about 2p to the cost of each CPU in the bulk they'd buy it.

Good to see some decent progress anyway mate, can't wait to see the beast running! *crosses fingers CPU still works* :p
 
I agree with you. I'm surprised Intel hasn't seen the demand for decent paste or solder from previous generations.
It's a fine line between brave and stupid...and it's not yet clear which side I've landed! ;) Without wishing to be prematurely blazé it wasn't as difficult as I thought it was going to be. The really thin (and sharp) razor seems to be the key. Most of it it just sliced through, it was just the one 'ear' that I had to keep working on. Found the best thing to clean off the black mastic was a fingernail. IPA and methanol didn't touch it.
Hoping to get a working system today - no pretty cabling yet though. Have to drop my son off to my mum's for the day first and glue all the things she's broken - it's usually angel statuettes *sigh* ;)
 
...especially as it would add about 2p to the cost of each CPU in the bulk they'd buy it.

The decent paste may only cost 2p per unit (if that) but it would cost Intel £200+ per unit in lost sales of the next generation because there'd be no need to upgrade. Hell, there are plenty of legendary 2500K, 2600K and 2700K overclocked to the hilt still keeping up with Devil's Canyon and Skylake and not being upgraded.

So, overclocking potential goes down as the process node shrinks, nerf the increased heat output with rubbish TIM and dodgy glue, force upgrades.
 
Thought most people usually force them apart using a vice, but that definitely sounds the safer option... One to keep in the ol' memory bank for future upgrades!
Can't wait to see what temps a 6700k runs at with a monster rad and decent quality thermal paste, even if it will no doubt lead to more work when mine arrives... :p

You have a very good point there LePhuronn, just a pity they have no real competition at the top end to force the issue.
 
Delid is the best thing I have done, dropped temps by ~10 degrees. Did not fancy using a blade or vice method, so I bought the rockit88 of Dan for pretty cheap including his left over liquid metal. Result!
 
Back
Top Bottom