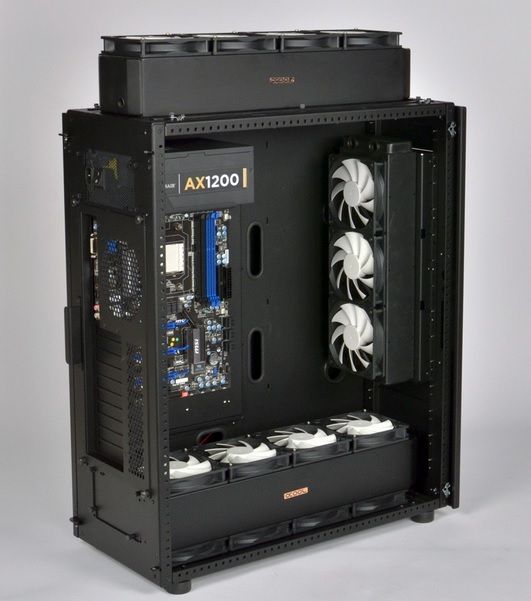
Project: TITAN 4 !!!!

Man of Honour
Joined
21 May 2012
Posts
31,922
Location
Dalek flagship
It is all in the title, this is a project to build a home for my graphics cards.

The first part of this project is to get the system up and running and then go for fine tuning and refinement later.

Here is a few photos of the case to get this thread started.

002vzr.jpg

The parcel felt very light, even the delivery guy mentioned it.

003uss.jpg

You do not get many accessories with this case.

007ym.jpg

Back view, notice the PCI-E slots at the top.

008ob.jpg

Front view.

009pxs.jpg

010bmx.jpg

Have had to dismantle the hard drive cage to get to the fan mounting point, I was tempted to leave it out as I don't use hard drives but I don't think that would work as the cage forms part of the rigidity of the case.

014dej.jpg

Here is the bare bones

015tvw.jpg

Some fans

017stl.jpg

016xzf.jpg

480mm AX rad and more fans, plenty of room for another 480mm down there.

002rkb.jpg

Another rad and more fans

003ctea.jpg

I bet no ones going to look here for the SSDs

006hw.jpg

Yes that is a RIVE in there looking a bit lost

001pdt.jpg

That's the PSU installed

006hih.jpg

Some plumbing

007tfk.jpg

More plumbing

009zcn.jpg

I am not looking forward to the next step, filling it up.

003msp.jpg

004cna.jpg

In with the memory, I hope my 3930k can keep up with it.

005hj.jpg

Time to put one of these in

007tha.jpg

In the end I put all of them in, I don't like having the rig on its side too long now its full of water.

006czf.jpg

This will give you an idea of the size of the case, the side panel in front is off of my Corsair 800D

008ndf.jpg

It's alive, just started it up and got into the bios, set the CPU to 4.0ghz and memory to 2400mhz

002zyw.jpg

With the back panel on.

003fbu.jpg

Top of the cards, no back plates needed here.

004lnr.jpg


005baa.jpg

Lower front panel on.

006vt.jpg

Top panel on.

007lld.jpg

Looking through the window.

001vdvp.jpg

Third rad fitted.

003mooh.jpg

All waterblocks fitted.

002qjk.jpg


003gmf.jpg


004db.jpg


006gro.jpg


008dnm.jpg

It is a very tight fit in there if using backplates.

009aok.jpg

This job I hate doing.:D

010ybb.jpg

In case of emergency, at the first hint of trouble, connect tube to quick disconnect and drain loop.:D

003sro.jpg


bplq.jpg

Moved the red PCI-E leads
 
Last edited:
Posting for the sub. Looks like it's going to be epic. How well do 4 cards scale, will it be used for gaming?

I have been using quad sli for a long time 2 x GTX 690s and in a lot of things they scale quite good so hopefully the Titans should work the same. As to gaming I am a big Civ5 fan and on 3 Titans it flies on a huge map so hopefully 4 will be even better.
 
Now this is gonna be epic, well jealous, wish i had your money Kaap :) the case is fantastic.

I wish I had my money, its all gone now, this is the last build I am going to do for a very long time.

I have just ordered another 2 AX480 rads, I found a problem trying to attach fans to the top of the case, the holes are only big enough to take rad screws so I need to attach a rad to attach the fans lol.
 
Not a bad shout on the blocks bud and so far the gains are very minimal under water. Under a chiller though, quite big gains ;)

When will you be putting it all together?

It should be up and running in the next couple of days, I am waiting for 2 more 480mm rads to turn up in the morning, I need to fit one of them to the top of the case so I can attach some fans. The screw holes in the top of the case are only big enough for the type of screws used by rads.

If I don't end up w/cooling the GPUs the CPU is going to have some serious cooling all to its self lol.

One of the reasons I have gone for a reverse type case is it means the GPUs are up the top out of the way and hopefully running cooler. On my corsair case where 3 of the Titans are now, the top one is very close to the rear rad causing them both to get a bit warm.
 
Good luck with the build and I'll be watching closely what you come up with spec wise.

A note of caution though and I post from experience, I'd turn the fans/stickers around so all of the Corsair logos are orientated the same way or you'll have Rossi~ to deal with ;):D:D

I had thought about the stickers but it makes keeping the cables neater the way they are.

If I peel off the stickers is there anything underneath.

Just fitted another ran and more fans.

002rkb.jpg
 
Last edited:
What's the clearance like from the bottom of the PSU to the top of the 480, can't really see from the angle of the pics.

I have not tried it yet, but when I was looking at it earlier it is very tight about 1mm.

At the moment I have got a little problem with the PSU, I posted this earlier in 8 Packs section

http://forums.overclockers.co.uk/showthread.php?t=18498491

If anyone has any ideas I would be very grateful.
 
Last edited:
Hope you're not going to keep the blue fan rims on and plan to change to the red one :P

I have still got the red rims so I will see what works best. With the cards and memory I will be using there is a lot of blue and green.

The good news is I have got rid of the misaligned corsair labels on the fans.:)
 
You should have no problems at all using a standard Molex -> 6-Pin PCI-E adapter. Like this: http://www.overclockers.co.uk/showproduct.php?prodid=CB-018-AK&groupid=1929&catid=153

The shape of the socket on the mobo is slightly different to a 6 pin PCI-e connector. I have just tried putting a 6 pin PCI-e plug into it and it seems to fit ok. I will give the Molex to 6 Pin adaptor a go.

Do I have to connect one molex connector or two to it.

Thanks.

I have just found a different way to do this.

The 8 pin CPU cables that get pluged into mobo when I looked closed at them more closely come with 6 pin PCI-E connectors as well. The main one has an 8 pin CPU + one 6 pin PCI-E connector, CPU2 has an 8 pin CPU + two 6 pin PCI-E connectors. This came as a surprise to me as in the past I have only used Corsair PSUs which don't have this.

The downside is the 8 pin CPU connector does not split, this means I can not use the 4 pin CPU connection on the RIVE.
 
Just put this together
007tfk.jpg


If anyone buys one of these, they can turn up in different forms.

The first one I bought for a build turned up in kit form with one pump and one o ring missing.

The second one I bought turned up pre assembled, but the screws holding the pumps on were lose.

This one turned up as D5s in 2 individual pumps which I had to take apart and then attach the D5s to the res.

The above is a little confusing if you are expecting a fully assembled Pump/res combo.

Having said that, they are good units.
 
What Titan blocks are you going with Kaap?

What was the delivery costs and duration like on the case too? You have no idea how many times I've nearly purchased this case only to be a little girl about it :(

I am not sure about blocks yet, I am waiting to see how everyone else gets on.

I think it took just over a week to get here.
 
Last edited:
Back
Top Bottom