Project: TJ07 Revived

Put on the waterblock on one of the GTX 980ti's last night as well as the backplate.

By the way I didn't use the TIM or the Thermal Pad's EK supply as I used Kryonaut Thermal Grizzly and Fijipoly Sarcon XR-m Thermal Pads! They are rebranded by Alphacool (Alphacool Eisschicht thermal pad - 17W/mK 100x100x0,5mm Sarcon XR-m). These thermal Pads are very expensive, but I've spent enough on this build as it is so I thought why the hell not lol. They're also the 17w/mk which are very hard to come by in the UK and expensive but lets hope it's well worth it. I can see why OCUK wouldn't stock them though due to their crazy price!

I used the stock pads on the Backplate as I used up all the pads for my motherboard waterblocks as well as on the memory and VRM's on my full cover block on my 980Ti GTX and I'm going to buy more for the 2nd block :D. It's not cheap.
 
I looked at those - I was attracted by one set of numbers and put off by the other! Be interesting to know if there's much difference but I'm not sure you can read the memory or VRM temps off the card can you?

There's quite a few people elsewhere that swear by it. The EK stuff generally only has 3 or 5w/mk, so this is a big difference, so do the Akasa thermal pads which are actually really poor from experience. The pads are also a different material, they crumble if you rub them and if they get too compressed when tightening waterblocks they leak a little silicone oil which isn't conductive however. Not sure if I can read those temps individually but I definitely can measure my Motherboard's chipset temp which is blocked with that thermal pad and having pushed this motherboard hard and knowing how well it used to perform, I should be able to deduce easily any noticeable difference (it's a great overclocking board!)

Hopefully I can push the GPU's and BCLK higher with better heat transfer these pads provide and stay within reasonable temps, I guess that depends on Asic Quality but not sure how much of a real world difference Asic Quality makes.
One of the GPU's has a 70% ASIC Quality and I don't know about the one I just waterblocked. After doing some digging it seems lower Asic Quality GPU's would benefit from being watercooled than on air and higher Asic Quality ones are better on air due to generally less heat and power, however their overclockability tapers off quicker than a lower asic on water...I dunno, there's mixed information out there....


Also....going back to my last couple posts about the GPU's hitting the reservoir, I have to shift the Res at least 40mm to the right to avoid the cards. I don't think I have that much room in the case to shift it before it hits the 5.25" bays which I have removed temporarily. I can cut out just enough for the res and stick in my Bluray drive and the Aquaero controller but I might have to leave the Alphacool dual res I got earlier for another PC if that is the case (which tbh is probably what I should've done in the first place as its not necessary, but I like the look of those bay mounted res's).
I think if I get a big square piece of sheet steel (maybe 2mm) and line it up with the 5.25" bays, I can push the res 40mm to the right and get reinforcement from the 5.25" bay (which I will need to drill into to screw the steel plate to as well as cut down to fit the res). It would mean my motherboard tray won't be moveble anymore which isn't a big deal once it's all tubed up. I guess that would work....
 
Last edited:
Another update...

I ordered an EVGA Short dual SLI Bridge V2. It has filters to change the white EVGA light to RGB colours. I will use the blue filter to match the rest of my theme. It is a great looking bridge and supposedly improves SLI performance and supports high refresh rates (although I don't know how much of that is just marketing and whether the standard dull SLI ribbon cables do the same thing...

I also received my 2nd EK Nickel Plexi waterblock (These blocks are huge, heavy and look so great). I also got the EK 2way SLI Parallel Terminal which will also look great when this thing is completed.

I will have to start deciding the direction the loop will go in soon, I already have some idea's but will see how it goes...

I have ordered a 2mm thick sheet of 250x150mm Mild Steel which I will wrap in my matt black vinyl and used to hold the Res that needs to be shifted right by at least 40mm, closer to the 5.25" bays, it may even require cutting part of the bays, I haven't yet decided! I have also ordered longer m3x12mm cap head (allen) screws, washers and nuts to use with the steel plate which will be bolted into the motherboard backplate and the 5.25" drive bay plate to provide reinforcement as that Res is heavy and will get heavier with more water. I will use what is left of my sound dampening to absorb the pump noise from causing the steel bracket that I am makeshifting from vibrating and causing noise.

The steel and bolts will arrive next week, hopefully I can start getting more done within the next week or so, so that I can post better pics of this build's progression.
 
Sounding good. Good to hear they've made the bridge colour changeable now. Could be marketing hype but they're probably just highlighting the differences between sli1 and 2. If you could find a cheap sli2 bridge it'd be the same.

They're just tacky stickers you stick on top, doesn't look right. You can open the bridge with a torx screwdriver and stick in a photography filter, like the coloured ones for flash as the LED is white. Also the bridge can be painted, it's 2 pieces, one is aluminium and the other is plastic. Easy to mod online
 
Cutting mounting holes for Aquacomputer Steel Mesh Filter

20160605_191344.jpg


Lots of scratches from the old XSPC Dual Bay Twin D5 Bay Res, it has these Brass standoffs which get dislogged fromt he rubber grommet it is embedded in and scratched the bays up. It won't be visible from the outside so will leave it rather than attempt to polish it.

20160605_191351.jpg


20160605_195237.jpg


20160605_195300.jpg


20160605_210228.jpg


20160605_210239.jpg


4mm holes using a Step Drill bit. I marked the holes after I cut out the main square. The instructions weren't very helpful (there weren't any or were in German!) I just drew around the filter and cut it out. The 5.25" bays are 2-3mm thick and when I tried to screw it down, the nuts got caught under the filter so it's slightly at an angle but is screwed on tight. Will post a picture of the filter mounted and screwed down later.
 
Last edited:
More updates coming soon


1) Steel bracket to move the tube reservoir to allow the gpu's to fit completed - had some challenges such as getting it to fit with both gpu's installed and making sure the fittings from the Bay res don't hit it (was a bit difficult, had to use a 45 degree angled fitting that was low enough to miss the tube res by a few mm!

2) GPU SLI Terminal Block - I initially had a panic when I first installed the GPU to align the tube res when I noticed the terminal sticks out beyond the case width so I thought i wouldn't be able to close the side panel. Turns out since the acylic on the side window is on the outside, it barely gives enough clearance that the terminal block has a few mm of space so no issues there....phew

3) Radiators in the basement - needs careful planning as that extra long PSU and the drain valves im using need to be aligned so that I can get it all to fit and aligned so I can run the tubing to the main part of the case without having to make further cuts/drilling!

4) Still need to sleeve case fans and front panel connectors - this will be last when I'm happy with the build.

5) Pics coming....
 
Pics!

So this is 3 mm mild sheet steel, I used a pencil to mark out the position of the holes corresponding with the holes in the motherboard backplate and a scribe to help align the drill bit. I decided to use 8mm hex screws (same size head but longer as the screws provided for the Aqualis Reservoir mounting plate) to hold the plate in place between the motherboard backplate and the 5.25" cage.
20160619_213438.jpg


Here, you can see the motherboard backplate and the 5.25" cage aren't completely flush so the sheet steel bends slightly, but it's quite strong and sturdy enough that I shouldn't experience any long term issues and should be more than strong enough to hold the reservoir in place including factoring in the weight of the coolant.
20160619_220330.jpg

20160619_220507.jpg


Side view of the case showing what the steel plate with the reservoir will look one once everything is bolted down. I will be coating the steel plate with Black Vinyl, as well as the 5.25" case. Also, I will be using the remaining sound dampening foam I have left, behind the steel plate and on the 5.25" cage to dampen any pump vibration as I will now have two pumps in the loop and the steel plate is just against the aluminium motherboard backplate and 5.25" cage via steel screws so I expect it will cause quite a bit of vibration.
20160620_013358.jpg


Hopefully, here you can see just how close that terminal block is to the side window, I was worried this might protrude too far and prevent the side window from being installed on the case, but it looks like it's just okay. Note, this isn't the SLI Terminal which I haven't fitted yet until I install the waterblock on my 2nd 980Ti. However, it is the exact same thickness so should be fine.
20160620_013549.jpg


Here you can see just how tight getting the Aqualis Reservoir between the GPU and the Bay Reservoir was. I had to allow for the fact that I may move the GPU's out for maintenence or replace in future so I wanted a couple mm of room to allow for that, but it is a very tight fit, so I will have to see the best I can do. By the way, the reservoir isn't mounted with screws here and is lying against the motherboard plate so looks like it's quit bent (but it isn't!)
20160620_013615.jpg

20160620_013742.jpg
 
Last edited:
Nah all soft tubing, those chaingun fittings are for soft tubing :). Each one comes with two O rings, I presume 1 goes on the compression end and one obviously at the G1/4 end, although the compression of the tube should be enough without needing an O ring, ah well, using them anyway.
 
Are they different colours? Got a feeling I read somewhere that they could just be a colour choice for the G1/4 end. Don't quote me on it, just something I've dug out from the depths of my dodgy memory that could be completely wrong.

Yep they are different colours, one matches the colour of the chaingun fittings (I got different colours, blue, white, chrome, black chrome) and the other is just a plain black one. I don't know why they would supply both, its not like you can see them when the fittings are screwed in, I certainly can't!
 
So I've been looking at reviews of my Alphacool bay reservoir and the aquacomputer aqualis base/tube reservoir and the reviews show they have poor performance due to the design of the res/top intself causing restriction and hurting the D5 Pump's performance and the flow in the loop in general.

These are the reviews:
http://www.xtremerigs.net/2013/08/09/aquacomputer-d5-top/

http://www.xtremerigs.net/2015/02/05/alphacool-dual-d5-repack-review/


I want to keep the Aquacomputer kit now since I've already invested in it and it looks good lol. I want to change the Alphacool Bay Reservoir as it's pretty poor, I will stick that in a cheap rig that only cools the CPU.

I've been looking at other Bay Reservoir's. Out of all of them I'm really liking the Koolance RP-452X2 Dual 5.25" Reservoir Rev 2.0 and it blows most of the reservoirs out there in terms of performance (and it's a dual pump).

I have had a look at the Monsoon dual bay reservoirs with a single pump but again, they're good to look at but reviews on their performance don't seem to be too great.

What do you all think?
 
One now the things that's worth checking is how much it hurts performance. It's all to common for reviews to slate things as terrible when the difference is less than a degree. Frankly even if it's 4 degrees worse, are you going to notice? If you're really pushing an overclock, yes, or if you're already close to the edge...but if not, is the additional cost worth it? Not saying it isn't, just something to consider.

It's not just that, the Alphacool bay res is completely acrylic and uses a lot of glue, which can leak over time and with heat the glue can melt so I'd want to keep my temps low, but remember I will have 6 components to cool (2xGPU's, 1xCPU, 2xMosfets, 1xChipset), add to that the filter, 2 flow sensors, all the rads, etc. Also from the looks of it I will have to make use of a lot of angled fittings, so I will need strong pump that isn't too heavily restricted in the first place. So to be safe I'd rather try and reduce the restriction where I can. Looking for more reviews with proper flow testing before I do it, and one that isn't glued like this one.


I could Just pick up another XSPC Twin D5 Dual Bay Res that I had before!
 
Last edited:
Ok, so I tried to contact Alphacool to get the Single D5 plexi kit as the Alphacool Dual D5 is actually very poor and the Single Top with a single D5 has a much much much better design than having the Single D5 in the Dual top. I'm going to have lots of 90 degree bends (=High restrictions = low flow = higher temps) in my loop. These Alphacool Repacks are marketed as Modular, meaning you are supposed to be able to change anything you want on the Reservoir itself, such as dual pump to single pump tops by just buying and swapping the components.

They just keep linking just the back plexi cover, however as I have tried to explain to 3 different people, there is a middle part that contains the pump's volute and a large pump intake fitting (large threaded pump intake with holes to allow air to escape the pump and into the top of the reservoir).

They keep linking this which as you can see is just a back cover and hasn't got a pump intake/volute and doesn't direct the pump to an outlet:
94266_0.jpg


With just the rear plexi replacement they keep linking me to means:

1) The pump can be mounted to the plexi but without the volute and middle section it will just spin and run dry until it overheats and dies.

2) There's no watertight seal between the Res and the plexi back cover without the middle part that bridges between the res and the rear plexi cover (it's just a bloody cover!) which provides the watertight seal meaning all my expensive work will have been a waste of time and money

3) There's apparently no way to get the middle part of the res from Alphacool or any supplier to allow me to convert the Res to the ful Single D5 product. The plexi is just £15, the full Single D5 product with all the components costs the same as my Res. This contradicts the whole point of this Modular Res if you can't actually make it modular with all the correct parts.

This is what the Single D5 repack looks like, you can see there is an extra middle part here that is sealed with O ring's on both sides:
alphacool-repack-single-laing-d5-dual-525-bay-station-incl-1x-al-1012161-56218-3.jpg


This is my Dual pump repack, you can see it's just a solid accetal without the middle section:
45306-3-neu_600x600.jpg


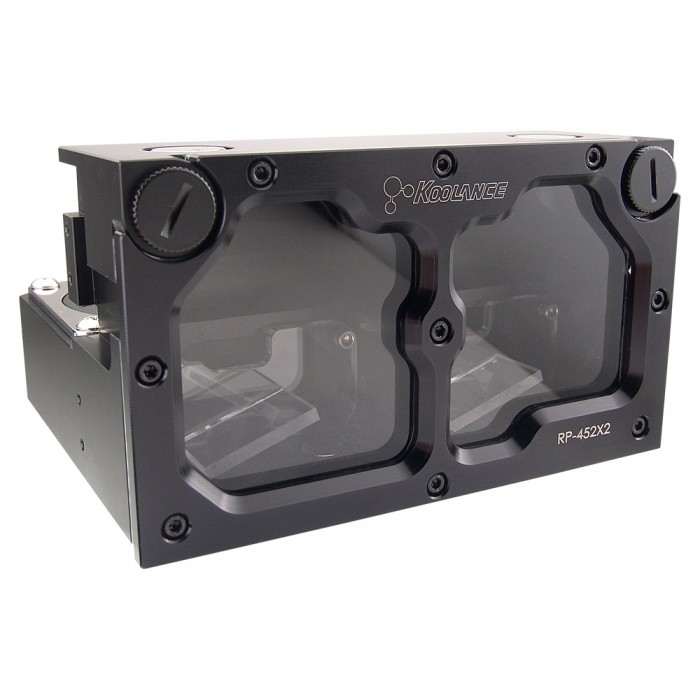
So I've had enough with this stupid res and Alphacool's poor support for it. I'm going straight to Koolance. I have bought the Koolance RP-452X2 Dual 5.25in Reservoir. It's the best performing dual pump reservoir that works properly in series without all the alphacools problems (tons of flow and pump pressure!). The single pump is also as good as the other single pump bay reservoirs, it's also a fairly silent reservoir and the Rev 2.0 has a lot of improvements, especially the bleeding. It's also made out of solid acetal so it won't fall apart like the Alphacool can which is just glued all over the place. AND the whole thing can be taken apart for cleaning properly which my XSPC Twin D5 Dual Reservoir can't (I could have saved that res if I could clean the crap stuck in it but because it's glued plexi and cheap and full of nasty stuff built up in it that I couldn't get rid of, I had to abandon it).

Finally, the Koolance solves all the problems with space (It's more compact than the Alphacool Repack so it wont touch my Aqualis Tube Res which was a massive PITA to fit.

Also as you can see in this project log I'm not one to shy away from overkill :D. This is a very very nice and high quality dual bay reservoir:

rp-452x2_p1-700x700.jpg


My plan is to have the AquaComputer Aqualis D5 top feed the Koolance (The more powerful one should be in front). Then play with the pump speed settings until its nice and quiet. Having 3 redundant pumps I can run them all quite low :cool:


The only problem I now have is the drain ports on my bottom basement rad's. The large 480 will have to have it's drain valve stick out in the rear of the case (Drill into the 2nd PSU blanking grate of the rear of the case. However, my 240 Rad is in front of my PSU so I can't feed the drain valve from it to the rear, and the port for it is at the front where the TJ07 curves at the bottom so I can't just drill a hole and stick in a bulkhead there!

I will post pics to show what I mean but I have been scratching my head for 2 weeks trying to decide how to do it...
 
Last edited:
Well it sounds like you've had a lovely time with Alphacool. New res looks good though. Three pumps in series? You trying to make mine Poject Underkill? ;) :p

LOL! :D :p

I assembled the Res with the two pumps in Series and took out the stop fitting in the bottom to turn it into a shared reservoir late last night after having had a few pints lol. Oh man the build quality is top notch, such a well made Res.

I should change my project name shouldn't I lol...

Project: TJ07 Steroids
 
So as you can see in the pics below I'm trying to plan how to fit the loop with the bottom rads, however I also want a drain port on each Rad so I can drain the loop easily. I previously used Koolance QDC's (I'll still use a few of these somewhere in my loop). So the Bitspower Q plus fittings will be used to allow me to connect a drain valve. Now as you can see it's pretty tight. I have tried orienting the rad with the G1/4 ports in all directions and what you see in the pics is the best I can do as a compromise to allow me to have the loop go straight up out of the basement rather than as I previously did with the outlet of one rad connected to the inlet of the other.

I now plan to add two spare GT's to the 240mm rad so I can have Push/Pull. I can't fit more fans on the 480 rad for push/pull as it's too tight down there (that's what she said :p). So the push on the 240 Rad will act as a pull for (half) the 480 Rad, part of it is blocked by that massive AX1500i PSU anyway.

Now, as the compromise I will have to either drill the bottom of the front panel or the floor of the case to add a couple of G1/4 bulkheads to add the drain valves so I will have the bitspower drain valves screwed into the front, otherwise stop fittings that I will have to unscrew to let the liquid drain.

Please let me know what you think and what you recommend?


20160702_010021.jpg


20160702_010112.jpg


20160702_010138.jpg


20160702_010152.jpg


20160702_010600.jpg


20160702_010622.jpg


20160702_010859.jpg


20160702_010927.jpg


20160702_010940.jpg


20160702_010955.jpg
 
Last edited:
Difficult to work out what's going on from the pics if I'm honest. If you're using soft tubing you could always just pull off a hose if you can get to any low down.
Drains in the bottom are ok as long as the case has (or could have) feet to lift it clear of the protruding stop plugs. You also have to be able to lift it.
I've seen people put drains on the top/back/front and just tip/invert the PC to drain. Depends on your res but sometimes off-the-wall ideas work well.

How hard is the front panel to remove? Could you easily remove that and connect in to drain rather than passing through the front?

Front panel of what? It's a TJ07 lol. It doesn't have a panel. The entire case is a huge sheet of aluminium that has been curved to make a rigid case...

The top front and bottom are one thick sheet of aluminium.....there is no panel!

I guess it makes sense that you can't work out whats going on if you haven't seen a TJ07.

I can just slide the case forward to the edge of the table to access the ports. It's going to be on an ikea solid wood side table.

I really prefer to make use of the bitspower drain ball valves so i was thinking of front mountjng bulkheads and screwing them in. Then attaching a hose and open the tap when i needed. It's not idea but it works otherwise ill have to use stop bits on the bottom and hope not to be fluid everywhere (especially if the stop bit leaks!!!)

I wouldn't need to tilt it much, i have so many fill ports at the top on the Koolance res and the port on the Aqualis res that I could just let air do all the work for me. I also have a Alphacool pumpin gum ball to allow me to push air through and push liquid out of the loop.

I'll take more pics if it makes it easier
 
Last edited:
OK, so I have got hold of a set of 4 MNPCTech Diamond Knurl Case Feet in Silver which are very popular with the TJ07 and match the silver TJ07 colour very nicely :D. They seem hard to find in the UK but I always find a way to get something I set my eyes on.

So the idea is to drill/tap new holes for the case feet and drill out a G1/4" hole for each bottom Rad drain valve I can now mark out where I want the drain valves and then mark holes for the case feet so that they don't overlap. With the stock feet the feet are currently placed where I would need to drill for the G1/4 bulkhead for the drain valve.

These feet raise the height of the case a couple cm's (also have great sound dampening), which allows me enough clearance to hopefully screw in a 90 degree fitting and then screw in the bitspower stop valve so I can drain from the bottom. Due to the tight space in the bottom this is the best I can do as a compromise!

More pics, etc to follow when I actually manage to get this **** together, it's quite frustrating as it's holding me back from getting this up and running..

user735591_pic41768_1424894874.jpg


One more thing....I got a response from Alphacool, they said the modular parts for the Res are only available for the Rev 1 res, not the Rev 2.0, even though I can't tell any difference between the two! They then said they will be amending their website! I wonder how many people bought this Res over the years having been seriously mislead.

I should have guessed when OCUK stopped selling it!

But anyway I clearly made a good choice to switch to the koolance Res. Koolance have a great reputation and are one of the best in watercooling. Their fittings are top notch and I've always used them when I can't find an EK or Bitspower fitting to do the job (because they're normally more expensive, but you definitely get what you pay for!) and this Res is very high quality (Solid piece of Acetal, premium stuff!) in case there was any doubt this project was anything less than OTT and on serious roid rage, I think those doubts are gone now :D

i'll probably use the Alphacool in my test bench just to cool a CPU with a 1x240mm rad.
 
Last edited:
Sleeving time!!

So I'd like to think I've gotten better at this...

20160710_154520.jpg


20160710_154545.jpg


20160710_154612.jpg


20160710_154742.jpg


20160710_154807.jpg


20160710_154841.jpg


Ran out of a full length of sleeving, so I had to improvise with the leftover shrink tubing and two small lengths of sleeving:

20160710_202528.jpg


All that's really left now is the bottom two rads, and the new case feet. Unfortunately I'm still struggling to get those two rads to fit with the tubing going straight up as well as planning a drain port for each rad through the bottom of the case (the extra height due to the new case feet will allow me to stick in a 90 degree fitting on both drain ports and screw in the bitspower drain ball valves).

If i have drain ports in the floor of my case, I will need to keep the fittings on bottom rad ports completely straight to screw into the drain line's bulkhead in the case floor...that causes issues with bending the tubing with the top rad ports getting in the way no matter how I rotate it...so I will need to add some 90 degree bends on the bottom rad ports to get the tubing around the rads, however I have very limited space to work with so that might not work. This is driving me crazy! :eek::confused::(:rolleyes::mad:

The other option is drain ports in the front of the case, which will hurt the aesthetics somewhat so I ruled that out. I thought about drain lines going to the back of the case instead but I was worried about any leaks frying the PSU as well as the 240 rad's drain port being more difficult as the PSU is in the way of it...anyway I'll keep trying.

I'll try to post pics of what I'm trying to do...
 
Last edited:
Instead of a pass-through in the floor, could you have a hole slightly larger than some soft tubing and stick a grommet in the hole to stop it a abrading? That way you've got some flex and it doesn't have to be exactly in line.

I'll need to bend it 90 degrees if it goes in the bottom. Let me take some pics and illustrate to make it clearer.


Btw I saw someone with a Project Overkill V3 in the project log, noticed that isn't you :eek:
 
Updates!

Top Rad & Fans connected!

This required using a dremel to carefully cut off a few mms of thread from 8x 30mm UNC 6-32 screws as 27mm length screws (7mm phobya shroud + 15mm fan + a couple mms for the Radiator to grab onto) aren't exactly available!

Also cracked open the box of Bitfenix Alchemy 2.0 Cables. Oh man are they nice! I fed the CPU 8 pin and 24pin ATX cables through the rear of the mobo tray and the 4 6+2 PCIE cables for the 2x980Ti's and then used the supplied cable combs to give it a nice clean look!

Plugging the cables into the monster Corsair AX1500i was slightly difficult as it was a bit of a tight fit with the 280 Rad next to the PSU and there wasn't much space for the connectors however I fits, although a bit snug!

Fitted the OCZ Revodrive 350 to the bottom x8 PCIe slot (Physically x16 but only has x8 pins soldered on the back due to chipset PCIE lane limitations).


Almost done!

The 480 Rad in the bottom is now going to be oriented so the ports face the rear of the case, so the drain port will be screwed into the rear by using a Bitspower Q Sparkle fitting.

The tubing will no longer go straight up out of the basement as it was difficult to align it all with the limited space under there. Instead, I will do what I did previously, 1 tube going down to the 280 rad from the case (from the pumps probably), from there it will feed the 480 rad's inlet, from the 480's outlet it will go up through the mid plate.


I'm not sure yet the best loop layout beyond that though, but the way it looks like it's going to work is this:

AC Pump/Res > Koolance dual Pump/Res > GPU > GPU > NB > Mosfet1> CPU > Mosfet2 > Top 240 Rad > Bottom 480 Rad > Bottom 240 Rad > AquaComputer Mesh Filter > Primochill Vortex Flow Indicator > AC Pump/Res

However the Aqucomputer MPS flow sensor needs to go somewhere. I might swap the flow indicator to before the EK Parallel SLI block thingy GPU Inlet and the MPS flow sensor after the Mesh filter but before the AC Pump/Res.

I dunno, maybe a pic with the layout drawn out will help!

Will upload some pics soon...
 
Last edited:
Back
Top Bottom