

You are using an out of date browser. It may not display this or other websites correctly.
You should upgrade or use an alternative browser.
You should upgrade or use an alternative browser.
Project "well, I don't know what to do with it yet"
- Thread starter Lashout_UK
- Start date
More options
Thread starter's posts- Joined
- 2 Mar 2004
- Posts
- 11,919
- Location
- SE England
loving this, what sort of money do they go for?
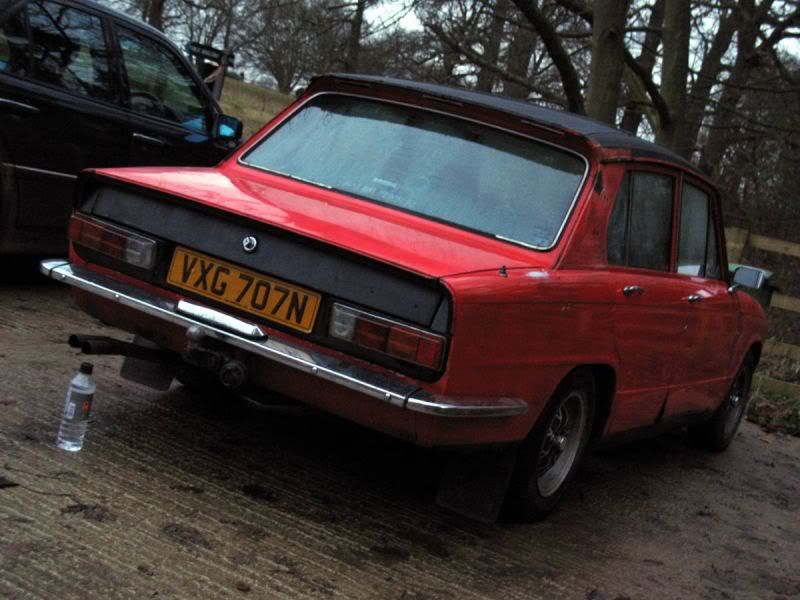
Anything from 3-500 quid for a good potential project, to around 700-900 for something tax'd, tested and useable and up to 1500-2.5k for something in really nice shape depending on option and spec.
Of course, exceptional examples aren't unknown for fetching between 4-8k - and there are always bargains to be had if you sniff around
The smaller engined cars such as the 1850HL can be had for less, for better examples - but are no less usable or tweakable
")
Soldato
- Joined
- 24 Sep 2005
- Posts
- 20,189
- Location
- Middlesbrough
Lashout...
You seem as though your about 45 years old, what with your Dolomite and Corvette.
Where do you get your taste from?
You seem as though your about 45 years old, what with your Dolomite and Corvette.
Where do you get your taste from?
- Joined
- 2 Mar 2004
- Posts
- 11,919
- Location
- SE England
Lashout...
You seem as though your about 45 years old, what with your Dolomite and Corvette.
Where do you get your taste from?
I don't have any specific tastes per se, I just like to try different things - and Corvettes were a low cost way into period supercars and enabled me to see what it was like owning a muscle car with none of the 60s and 70s hangups.
I can't really say what it is about Dolomites - they are a bit of a recurring theme as there's always one on the side, at least - but they just get under your skin. They're full of charm, character, have excellent usability, great tuning options, easy parts availiability and wipe the floor with the competition from the same era at much lesser cost.
I've been out driving it today at last, it's an absolute hoot. Feels very solid, planted and really pulls in the lower gears. Makes a great induction roar when you get on it as well. Makes you grin - it's impossible not to drive it like an utter hooligan

Only two things I've noticed I need to today do is change the coolant, replace the thermostat (as it's siezed open) and replace the oil sender wire, as it's a bit wiggly at one end
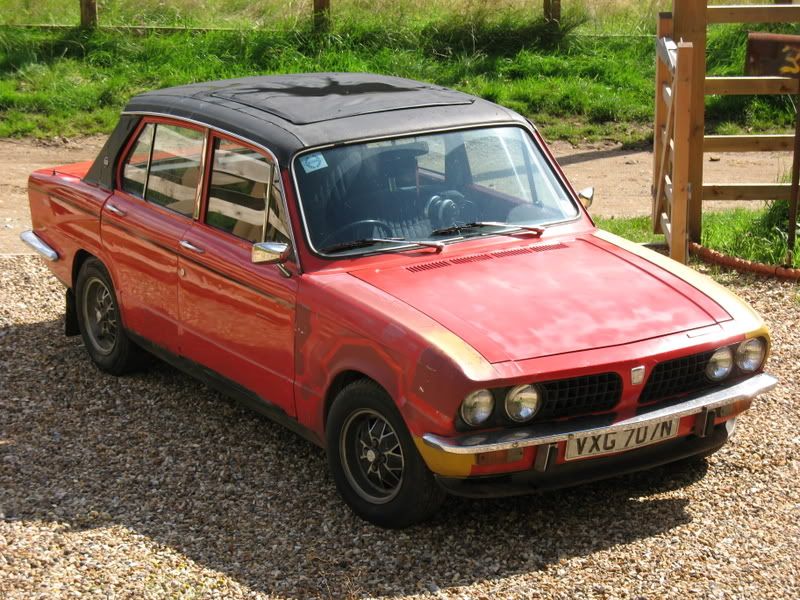
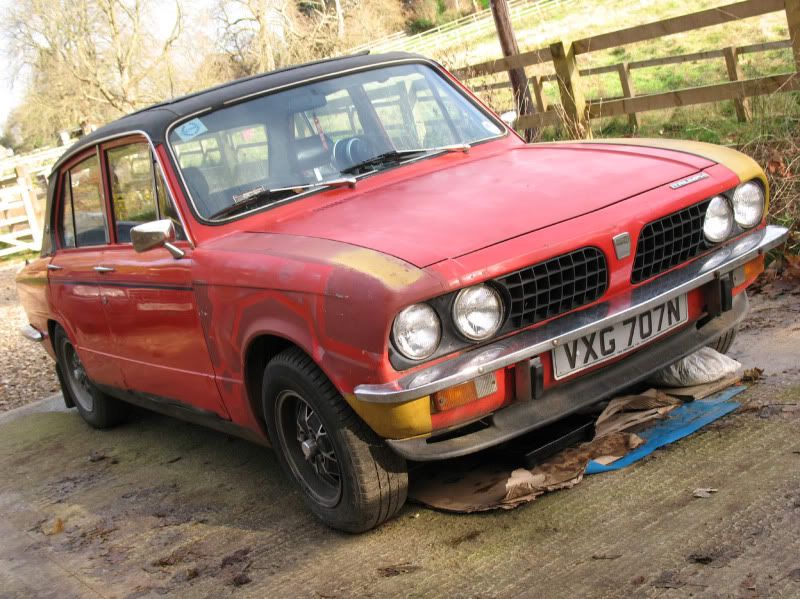
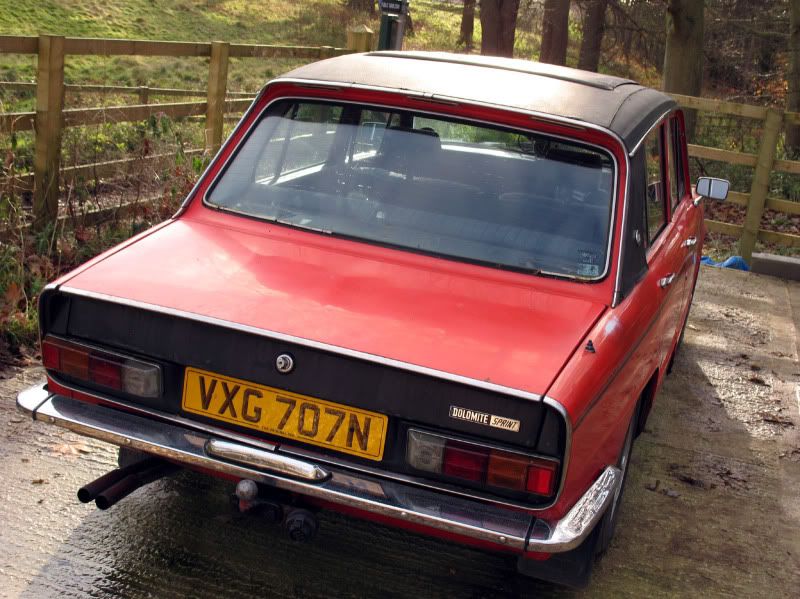
This one cost me 600 quid - so the real lower end but then it is cosmetically.....challenged! All the spangly tuning bits though are worth more than the purchase price
Which is great, because you can drive it into and over things and it doesn't reaaallly matter
Like this?

OH MY ******* GOD, that is the biggest pile of WIN I have seen in a long time.
It looks horribly mad, and those wheels. jesus, new desktop background !!!!!!!!!
OH MY ******* GOD, that is the biggest pile of WIN I have seen in a long time.
It looks horribly mad, and those wheels. jesus, new desktop background !!!!!!!!!
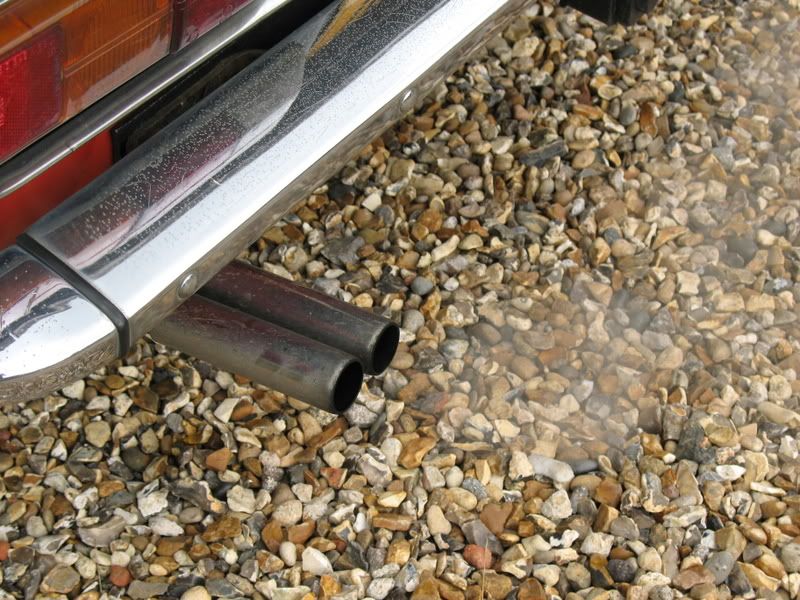
WIN apart from the ridiculous tailpipe, you mean.
WIN apart from the ridiculous tailpipe, you mean.
Surely that's the petrol funnel
")
yes ridiculous but the rest of the car really doe smake up for it.
SOrry for going off topic, love the dolly
- Joined
- 2 Mar 2004
- Posts
- 11,919
- Location
- SE England
Hey no worries, off topic's always fun provided it's vaguely relevant! Good inspiration comes from it sometimes!
I think I'm going to take a few videos tomorrow
I think I'm going to take a few videos tomorrow
- Joined
- 2 Mar 2004
- Posts
- 11,919
- Location
- SE England
Well, we had a terribly fateful thread, on the owners forum - "Have you had a blown Head Gasket?" (to which the general consensus was, as expected, "No").
Of course, I had to utter the immortal:
Any guesses as to what happened about a week later?
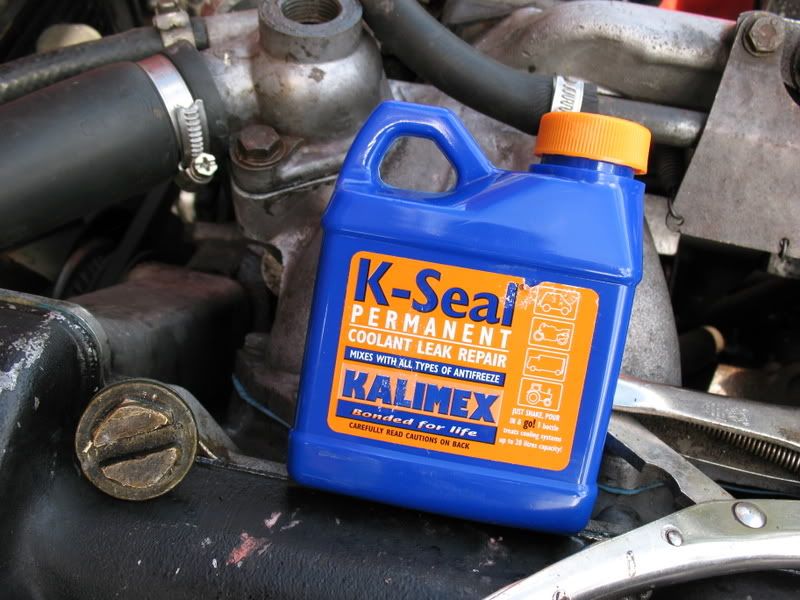
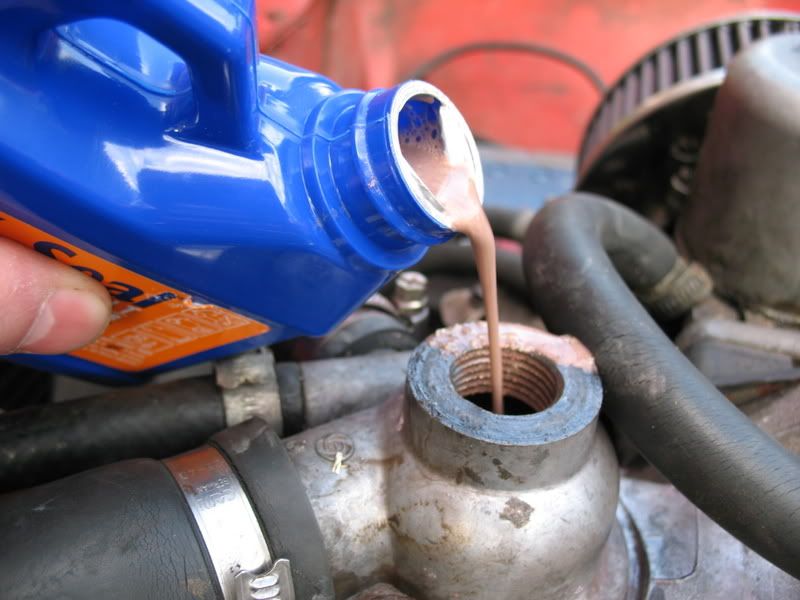
After my failed experiment in products that didn't quite deliver (well aware of the pros and cons before people jump in, by the way - I was just intrigued by the idea and wanted to do my own test - thoroughly flushed out now):
I had to succumb and do the 'right' thing - change the headgasket! No amount of re-torquing the cylinder head, flushing the cooling system, bleeding, kicking and swearing would stop it dumping coolant everywhere and generally acting like a rather fine kettle.
So.....a gasket set was procured and I firstly prepared the car by letting it sit for a week whilst I waited for the rain to ease. Welcome to England!
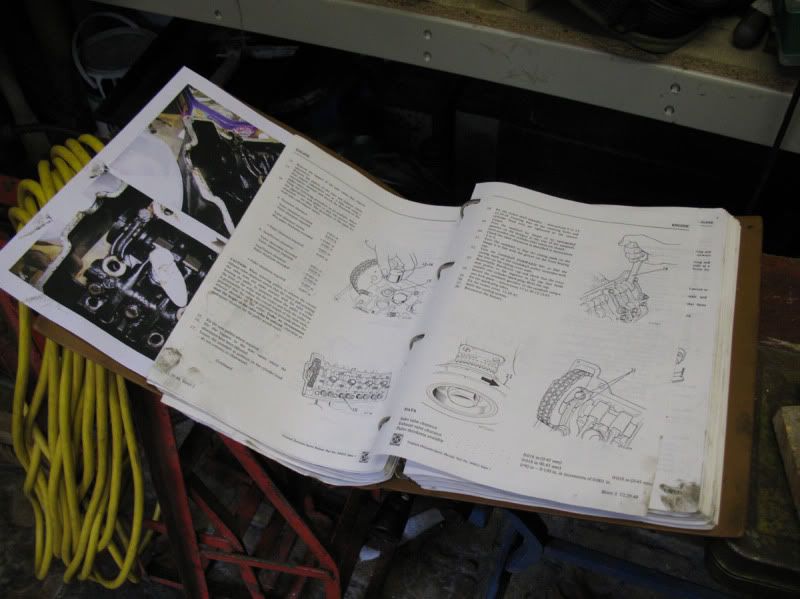
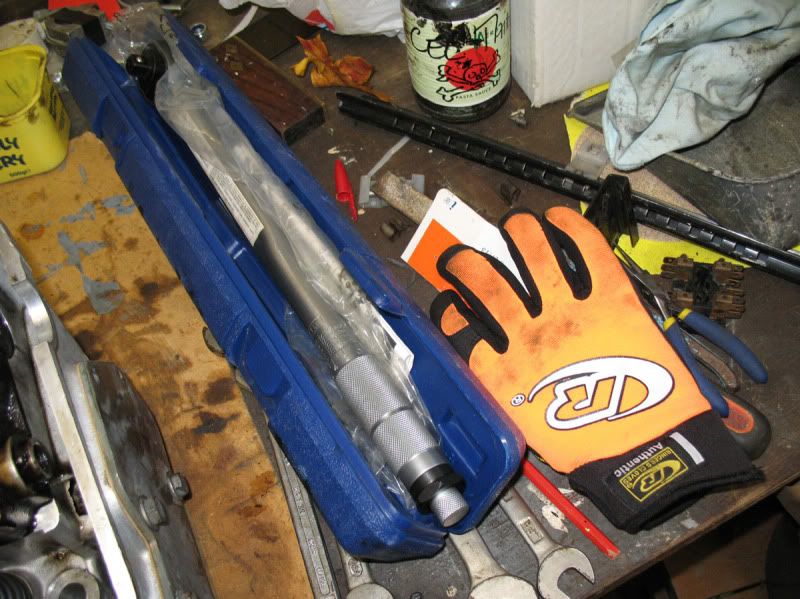
Anyway, it eventually held out a little so stage one - Deploy the tools:
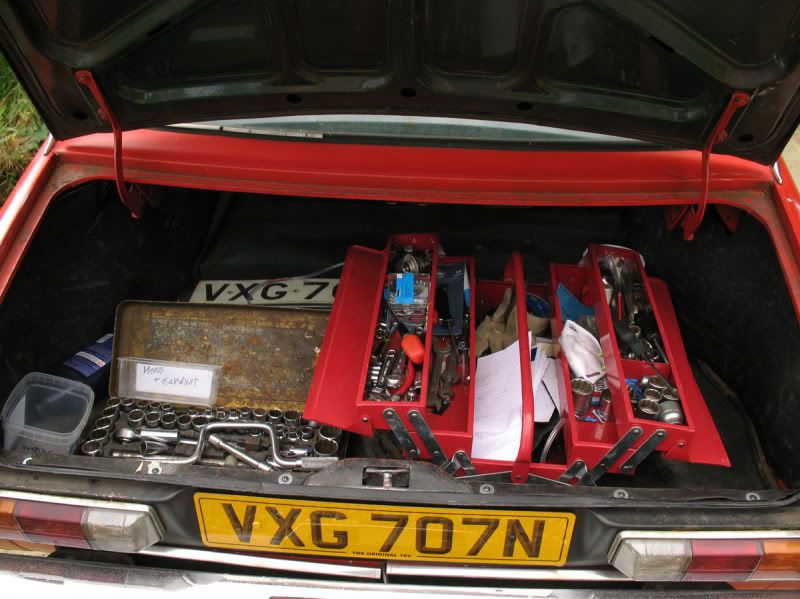
Observe the target:
Study for weaknesses:
......and GO!
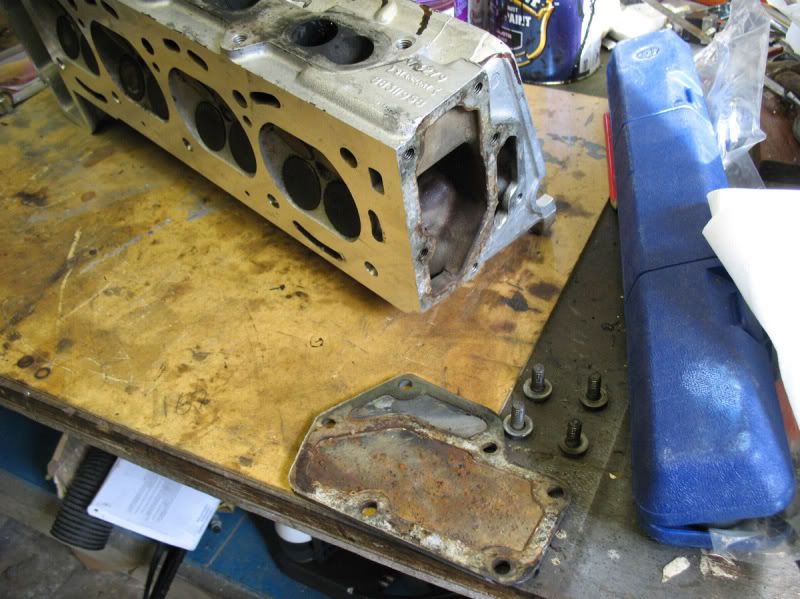
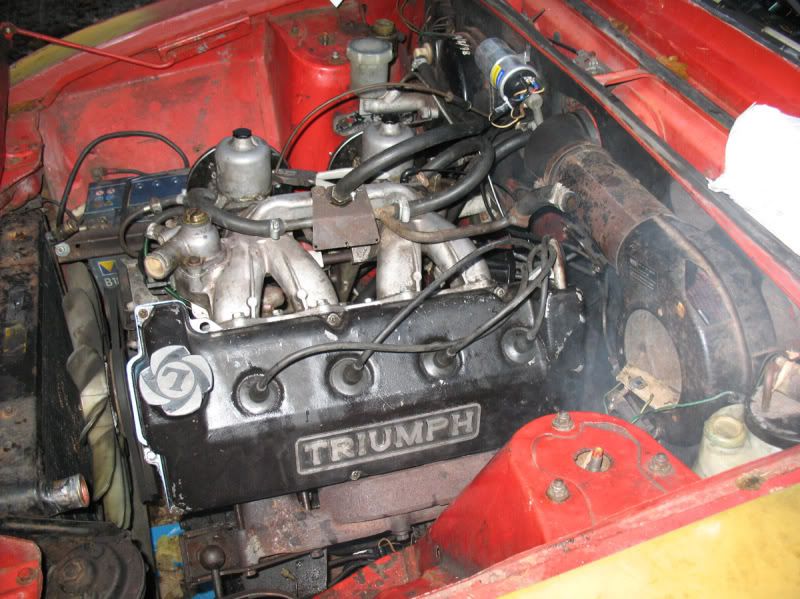
Started with easy bits like pulling all the plugs, leads, hoses and accessible parts to just make everything easier to get at and work on.
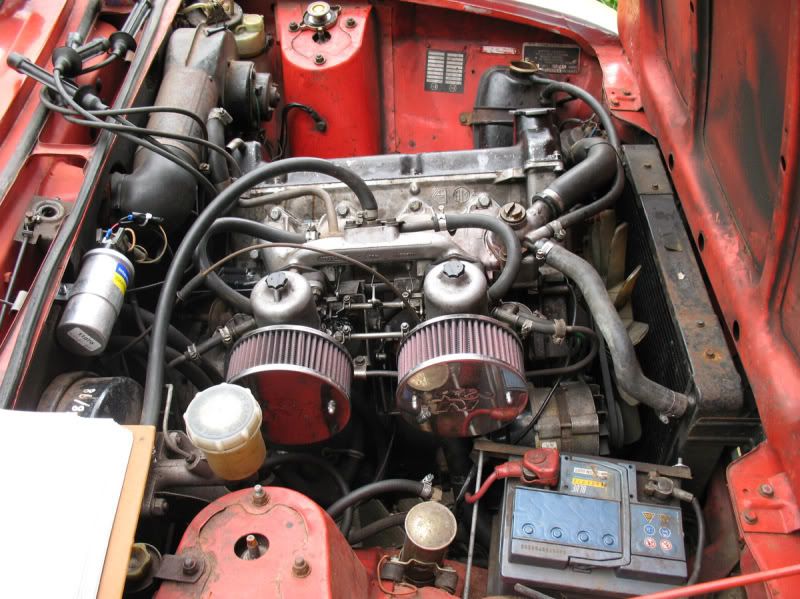
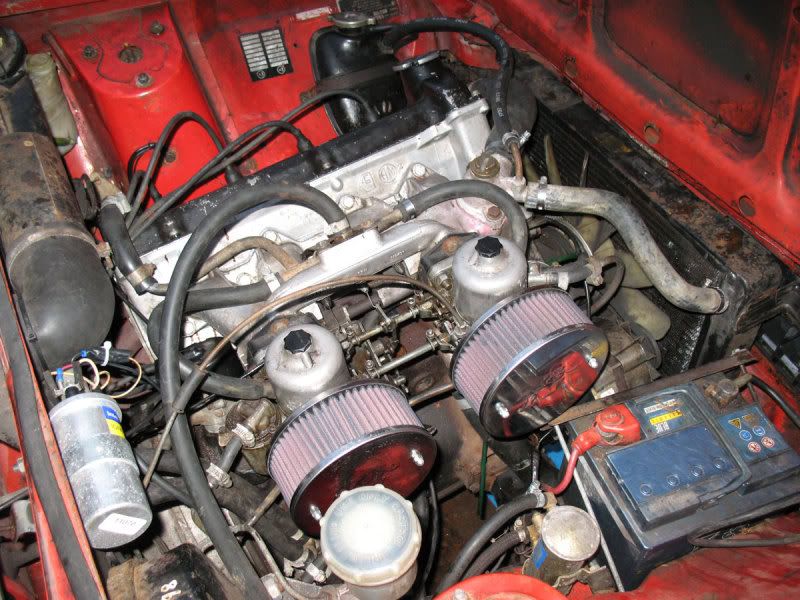
Off come the K&Ns:
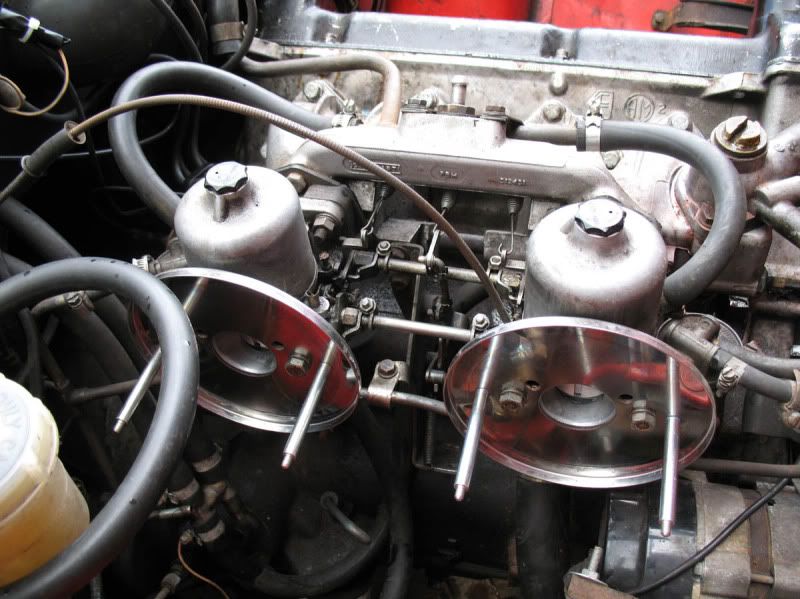
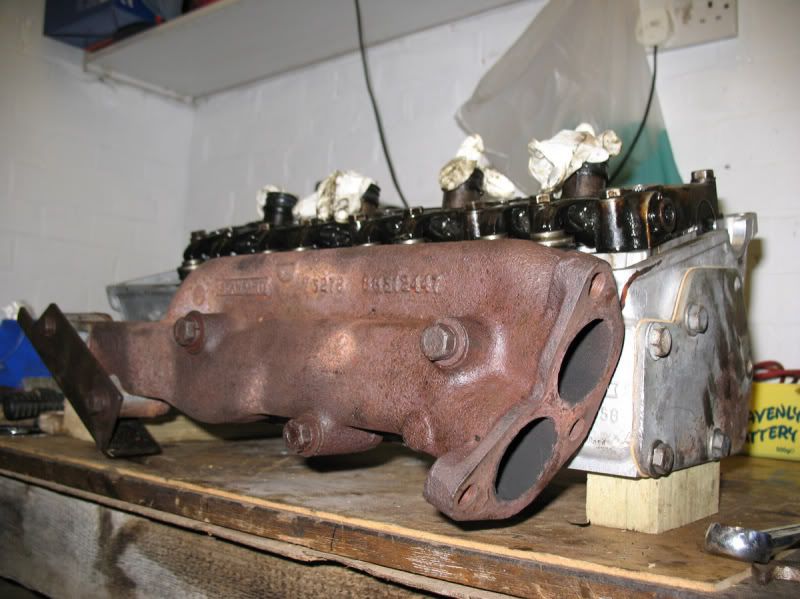
...and the intake manifold:
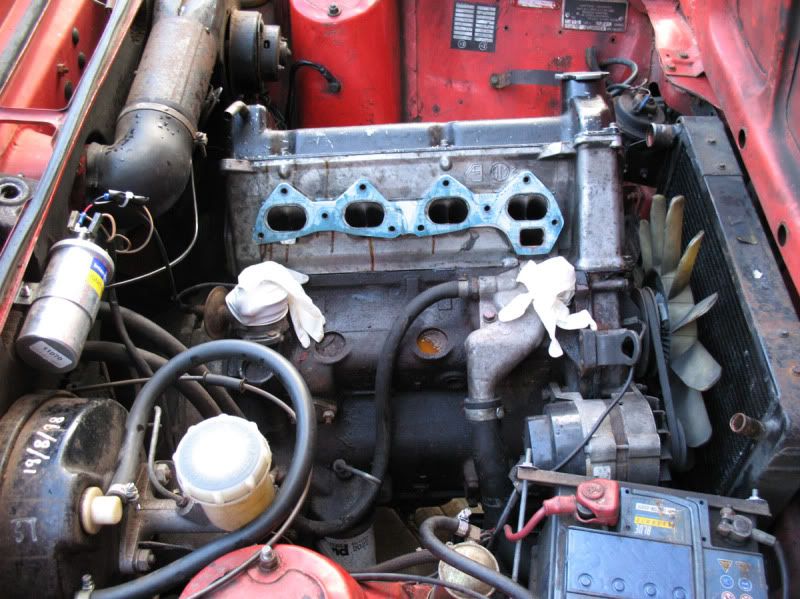
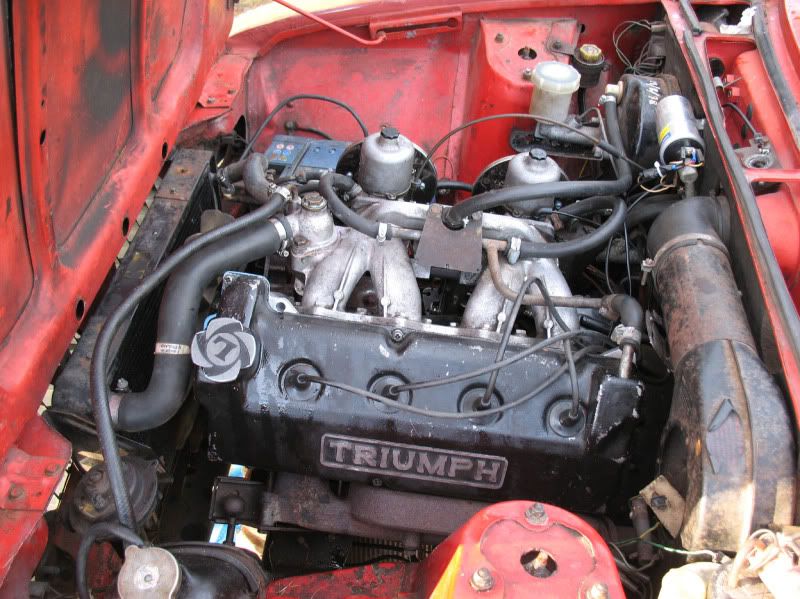
Quality finish to the ports, eh? Nicely matched No wonder the factory blueprint engines made 135-150BHP and the final 'stock' figure was 127BHP.

With all the ancilleries stripped, fuelling system out of the way and miscellanous hoses cleared up, that was the end of day one.
At this point, everything is rather simple. It's just a case of taking your time, working on anything that's suffered the tests of time to ease it out gently rather than shearing it off and storing/labelling the odds and sods so it doesn't turn into a guessing game come reassembly.
Next day, time to hit the three wheeled motion:
This allowed me to drain the coolant properly from the block to facilitate the fitting of the new gasket - too much risk of any contaminating the mating surfaces if left untended and also I didn't want any coolant in it come first fireup.
I also immediately found out what was causing the odd rattling that had been bugging me a few days before taking it off the road:
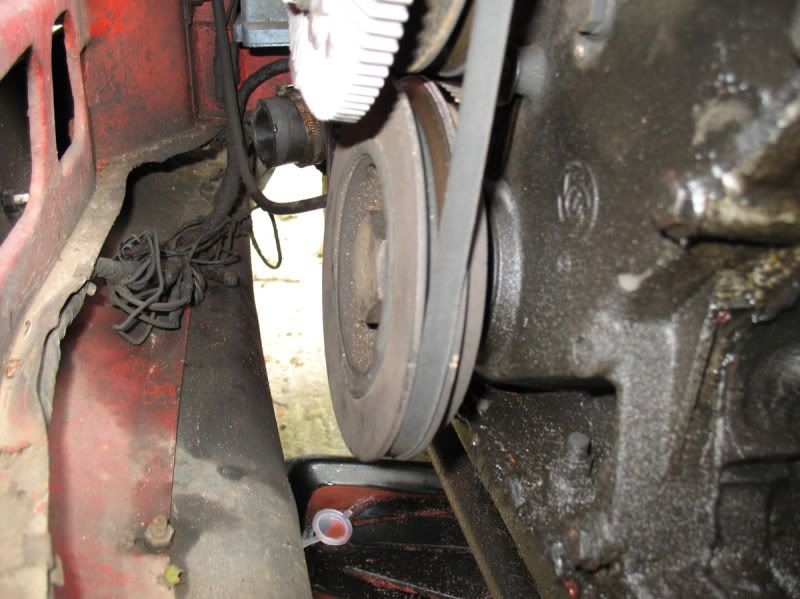
The crank pulley nut was finger loose when it should be up to 120ft.lb........Someone's been here before methinks...
Time to ditch the studs and nuts:

By using two spanners and a nut you can wind the studs out of the head without messing around and minimal fuss.
This is a neat touch in the Sprint engine - you can hang up the timing chain pulley (which unbolts from the cam) to a purpose-made fitting point, to allow you to remove the head without messing the chain or timing about, also removing the need to readjust or refit a tensioner.

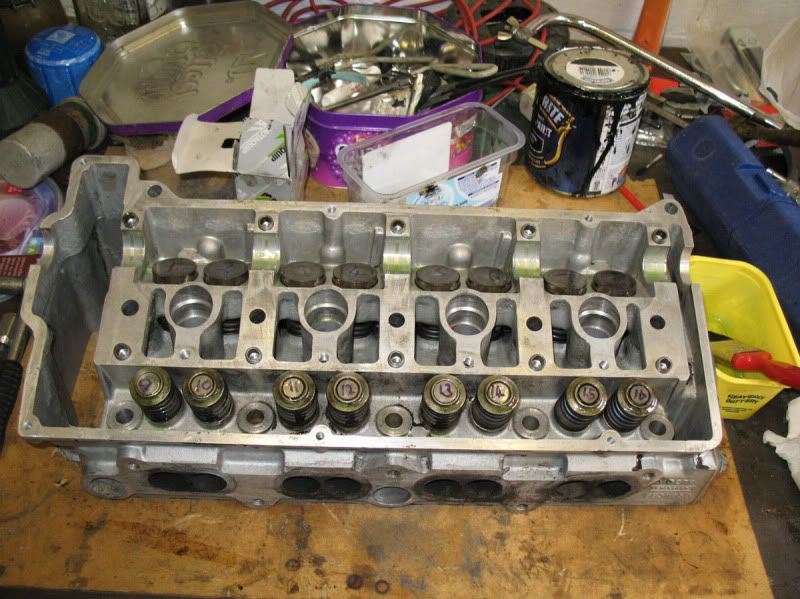
So the head comes off.
Underneath I found the issue straight away and to boot there was a recent gasket fitted, raising my suspicions as to what might have happened.
The surface of the head looked to have seen much better days, although I couldn't see any obvious blows, with the 3rd & 4th cylinder chamber having blasted white plugs, it was clear there was a problem.
Of course, I had to utter the immortal:
Lewis said:No, never, on 7 of them!
In fact, I'll just fire up the Sprint now...<poof>
DAMMIT.
<touch wood>
Any guesses as to what happened about a week later?
After my failed experiment in products that didn't quite deliver (well aware of the pros and cons before people jump in, by the way - I was just intrigued by the idea and wanted to do my own test - thoroughly flushed out now):
I had to succumb and do the 'right' thing - change the headgasket! No amount of re-torquing the cylinder head, flushing the cooling system, bleeding, kicking and swearing would stop it dumping coolant everywhere and generally acting like a rather fine kettle.
So.....a gasket set was procured and I firstly prepared the car by letting it sit for a week whilst I waited for the rain to ease. Welcome to England!
Anyway, it eventually held out a little so stage one - Deploy the tools:
Observe the target:
Study for weaknesses:
......and GO!
Started with easy bits like pulling all the plugs, leads, hoses and accessible parts to just make everything easier to get at and work on.
Off come the K&Ns:
...and the intake manifold:
Quality finish to the ports, eh? Nicely matched
No wonder the factory blueprint engines made 135-150BHP and the final 'stock' figure was 127BHP.
With all the ancilleries stripped, fuelling system out of the way and miscellanous hoses cleared up, that was the end of day one.
At this point, everything is rather simple. It's just a case of taking your time, working on anything that's suffered the tests of time to ease it out gently rather than shearing it off and storing/labelling the odds and sods so it doesn't turn into a guessing game come reassembly.
Next day, time to hit the three wheeled motion:
This allowed me to drain the coolant properly from the block to facilitate the fitting of the new gasket - too much risk of any contaminating the mating surfaces if left untended and also I didn't want any coolant in it come first fireup.
I also immediately found out what was causing the odd rattling that had been bugging me a few days before taking it off the road:
The crank pulley nut was finger loose when it should be up to 120ft.lb........Someone's been here before methinks...
Time to ditch the studs and nuts:
By using two spanners and a nut you can wind the studs out of the head without messing around and minimal fuss.
This is a neat touch in the Sprint engine - you can hang up the timing chain pulley (which unbolts from the cam) to a purpose-made fitting point, to allow you to remove the head without messing the chain or timing about, also removing the need to readjust or refit a tensioner.
So the head comes off.
Underneath I found the issue straight away and to boot there was a recent gasket fitted, raising my suspicions as to what might have happened.
The surface of the head looked to have seen much better days, although I couldn't see any obvious blows, with the 3rd & 4th cylinder chamber having blasted white plugs, it was clear there was a problem.
- Joined
- 2 Mar 2004
- Posts
- 11,919
- Location
- SE England
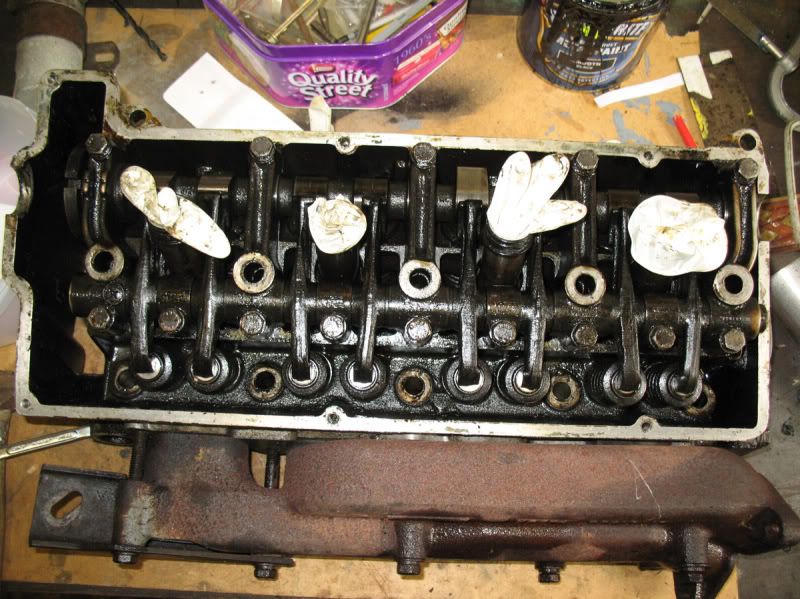
I started to pull apart the valvetrain, labelled it all and stored it.
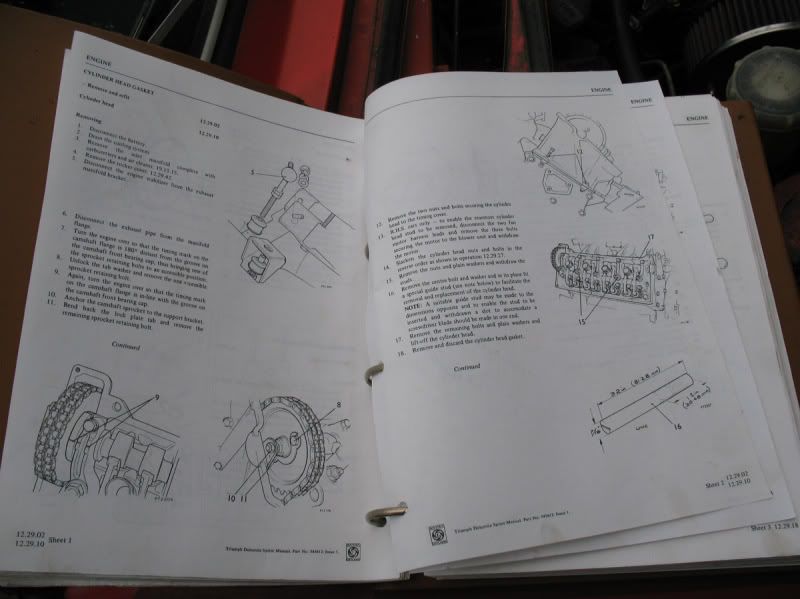
At this point, to restore the Himalaya-like landscape of the cylinder head, I took it to Headline in Milton Keynes, for a skim and pressure test. This would make sure that the head was not only flat and level but also leak and crack free.
They're a great bunch there and very friendly - he showed me the level check of the head, demonstrated how to observe the high and low points and where the blows were occuring. Loads of great tips!
After this, I concluded what I initially thought - someone has, at some point, let it boil over but kept at it and got it really, really hot but not attended to the problem. Once it got to the point where it could no longer maintain temperature at all, or run, they stuck a new gasket on it assuming that'd fix the problem.
Unfortunately, the gasket couldn't handle the level of damage to the surface of the head and failed within a very small timeframe. The fire rings were undamaged, to give an idea of how bad it was! Just blowing clean past (water into the combustion chamber, no oil contamination).
A few days later and I had it back:
Much improved.
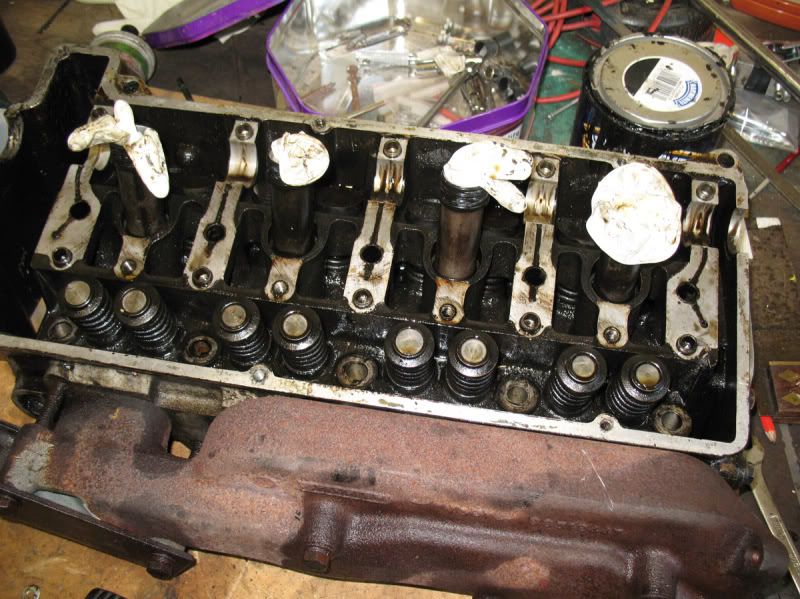
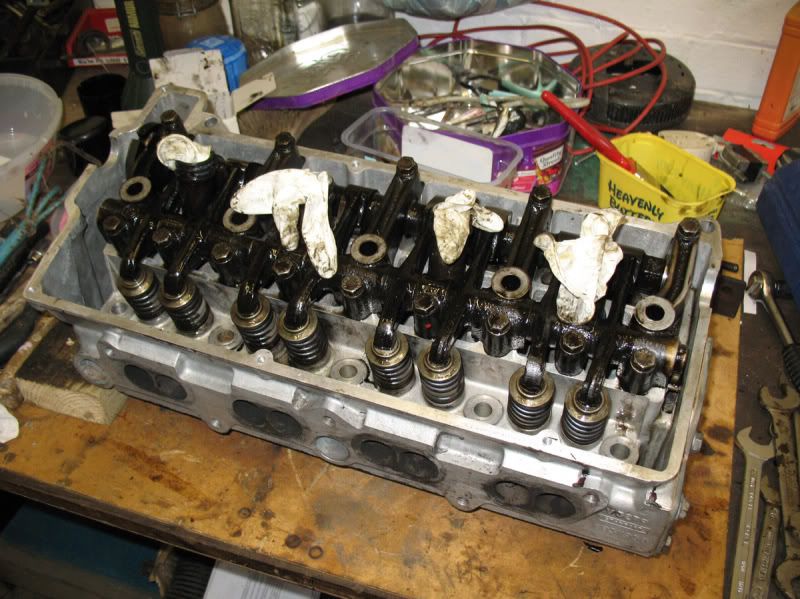
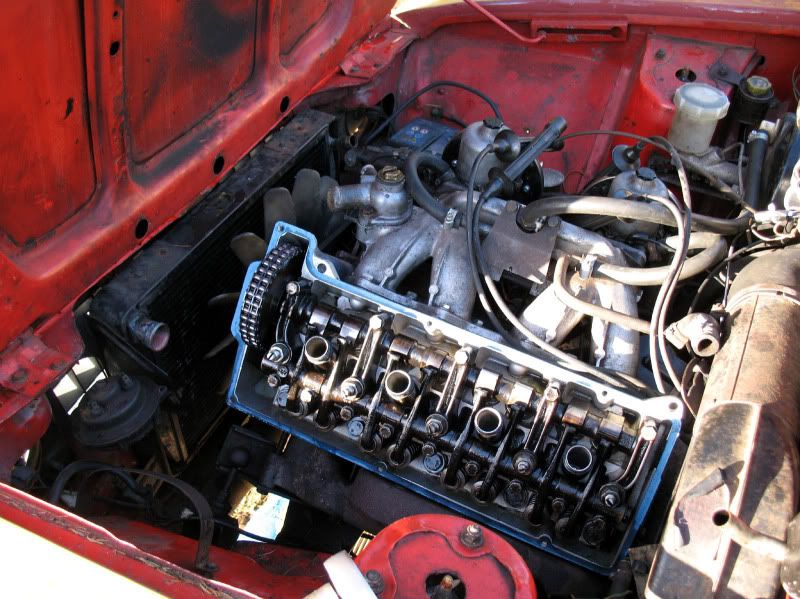
Then it was just a case of flatting back all the surfaces, reassembling the valvetrain, torquing everything up and making sure the cam rotated freely.

Shims and buckets back on:
Rocker gear, cam and plug tubes reinserted:
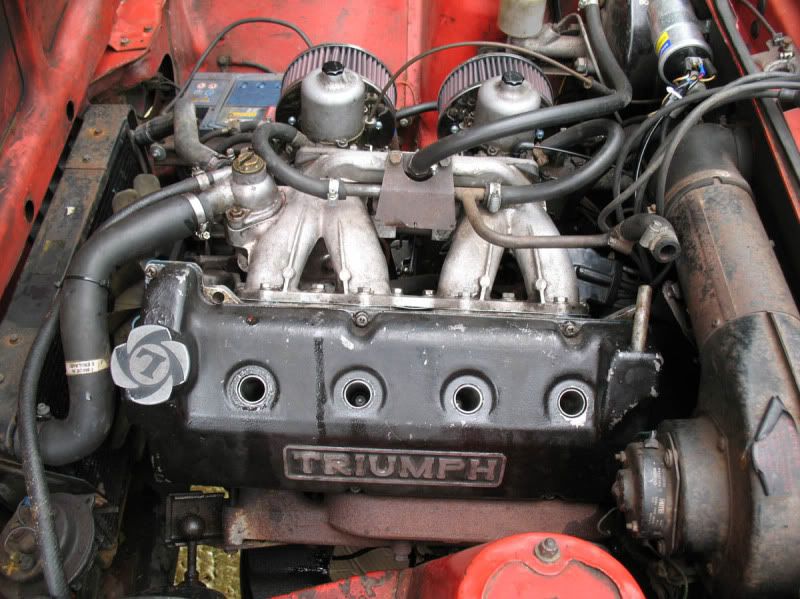
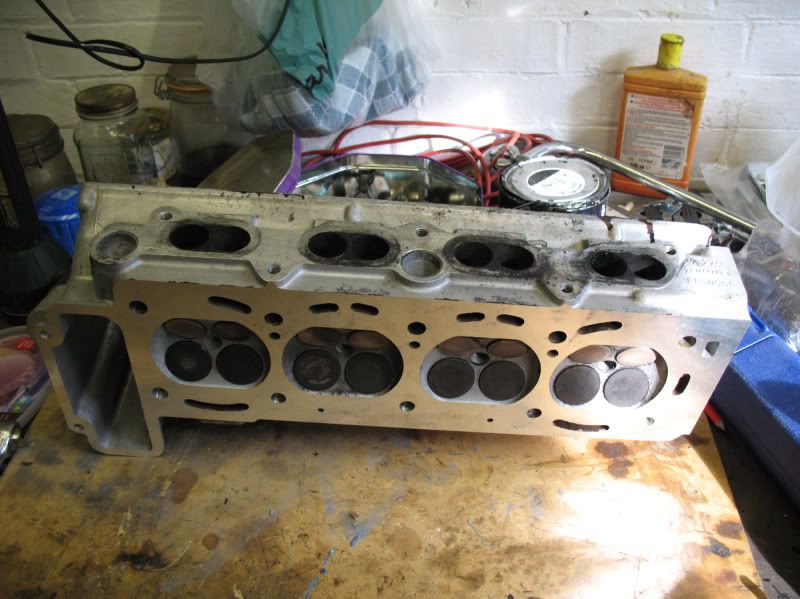
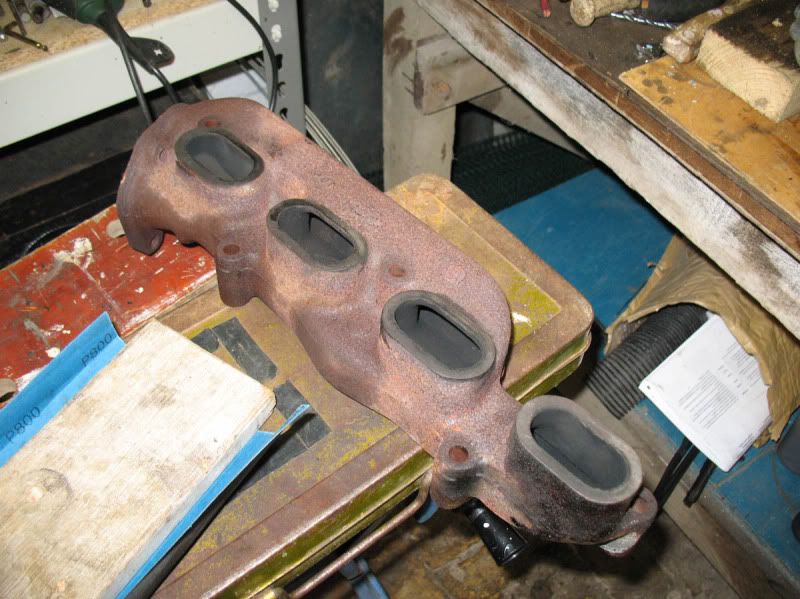
Exhaust manifold mating surfaces cleaned up and flatted back - no gasket on the Sprint.
More conferring:
....and with a bit of help from my friend Mr. Torque:
Voila!

Would look great as a V8...
After all that, reassembly really was just a case of bolting it all back up, ensuring all mating surfaces were clean and everything was assembled to the correct torque.
Getting there:

I recovered my battery from the Toledostag as that's been it's source of power whilst this has been off the road. Unfortunately, it was flat as a doornail - it's been abused a bit and despite being charged frequently, doesn't seem to like being off the car.
It had barely any power to crank the motor over, even with the plugs out. After spinning it over a few times until a good 50PSI was showing, it could barely maintain 50RPMs. I politely told it that I make the rules and on the final crank it caught on full choke and thundered into an erratic, yet running, idle.
After a few seconds and burning off all the oil in the chambers, it settled into a smooth 1000RPM burble.
Very smokey, due to oil on the manifold and a missing exhaust downpipe bolt (past its best, the bolt) - but running!
I let it run up till it was warm to the touch then shut it off - this is still sans coolant - and allows the gasket to 'cook off', seating properly and allowing the adhesives to work. It also gets a bit of heat into the cylinder head studs and bolts, so they expand and everything settles.
I was then away for a few days, doing something involving silly hats and bits of paper, so, after an early rise, I set about finalising the work. It's a little cold out today - 3 degrees if that and a bit of windchill but no matter, I have my Santa Pod cap to protect me!
First port of call was to retorque the head studs, nuts and bolts:
I was really suprised by how much they'd slackened off by - I guess the combination of the gasket compressing, heat expansion, the studs, bolts and nuts all settling adds up a fair bit. They all needed a good half a turn if not more to clamp them up.
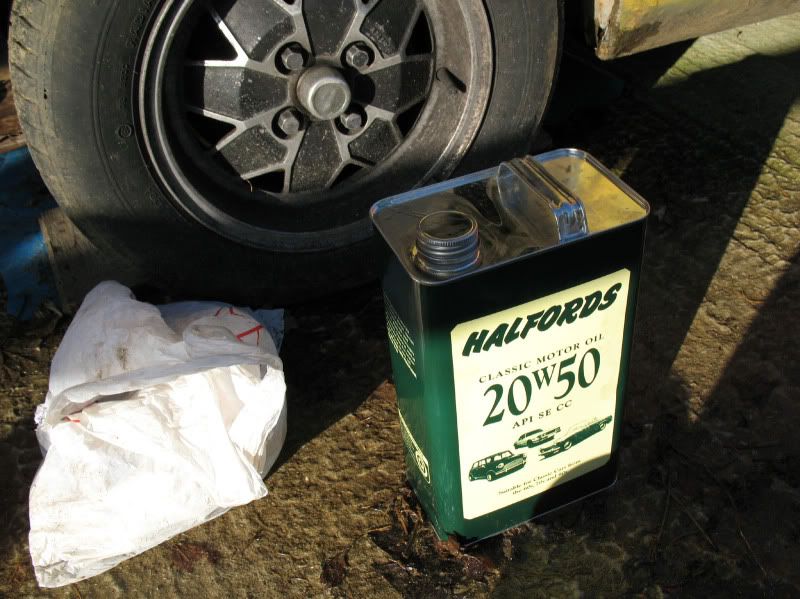
With that done, I could renew the oil filter (having previously drained the old sludge) and refill. My Sprint has the spin-on conversion that uses Fiesta filters so none of this faffing about with spring-loaded paper cartridges:
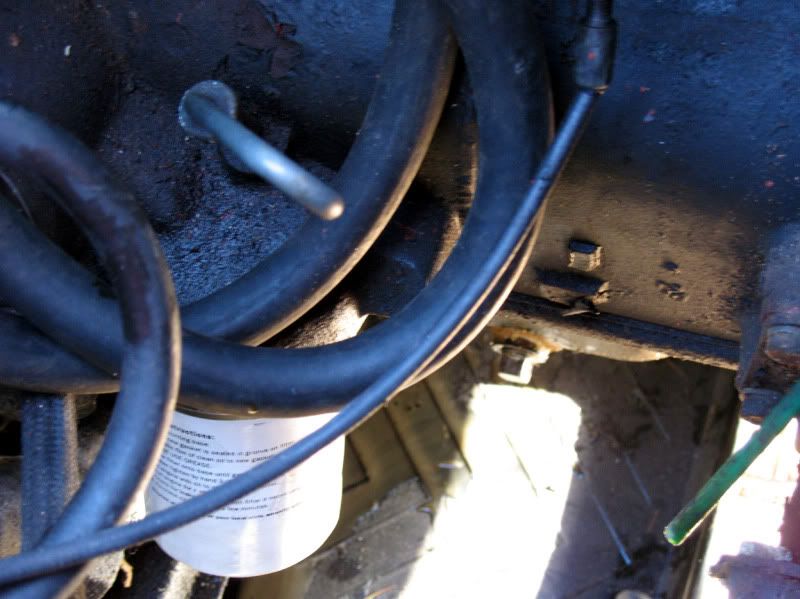
A familiar container makes an appearance:
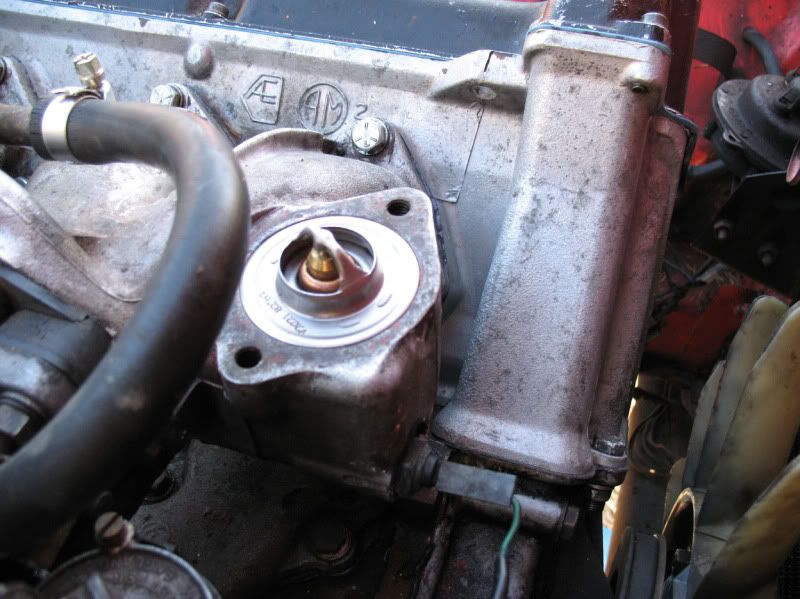
Then I pulled off my broken thermostat housing and took a moment to inspect and clean everything internally, as well as checking the already-new thermostat:
With that done, I could refit all the hoses and refill with the correct antifreeze and coolant mix. Yay!

Remarkably, with the Sprint holding 5.4 litres of coolant, all 5.4 seemed to go in without any issue - I kept the hoses low to fill them and the heater on hot. Hopefully there won't be too many airlock issues.
And done:
So after this, I decided it was time to be brave again. I knew the battery was still dead as a doornail (it was when I last used it and now it's been sat for 5 days) so I jammed the choke on full (haven't refitted that yet!), popped the dashpots up and down a few times with the fuel pump on to get some fresh fuel in and pumped the throttle a few times.
The battery really wasn't having much of it though - again, it barely had enough strength to get the engine going 1 rotation, let alone 2. Grind, grind, grind - sigh. I let it sit for a moment and dumped some more fuel down it.
Flicked the key and the engine turned about half a rotation, if that, groaning laboriously - then caught! It ran up to a 1500RPM idle and banged along, not pulling on all cylinders at all but running.
I let it 'idle' for about a minute, then switched it off. A quick post-flight showed no real leaks to speak of (barring one from the expansion tank hose, which is now renewed) from either the oil or cooling systems.
A quick check showed that one of the plug leads (silly deep-head plug tubes!) wasn't seating properly so I yanked it out and jammed it in, resulting in an audible click - that'll be the miss, cured, then!
Flicked it over again and it burst into life straight away this time:
This time I let it run for about 3 minutes, enough to get the thermostat open and get some heat into the pipes and radiator. All hoses seemed warm so water was clearly going around and everything was operating. Turning it off, I removed the bung in the thermostat housing and topped it up as per the manual - although it only needed a little.
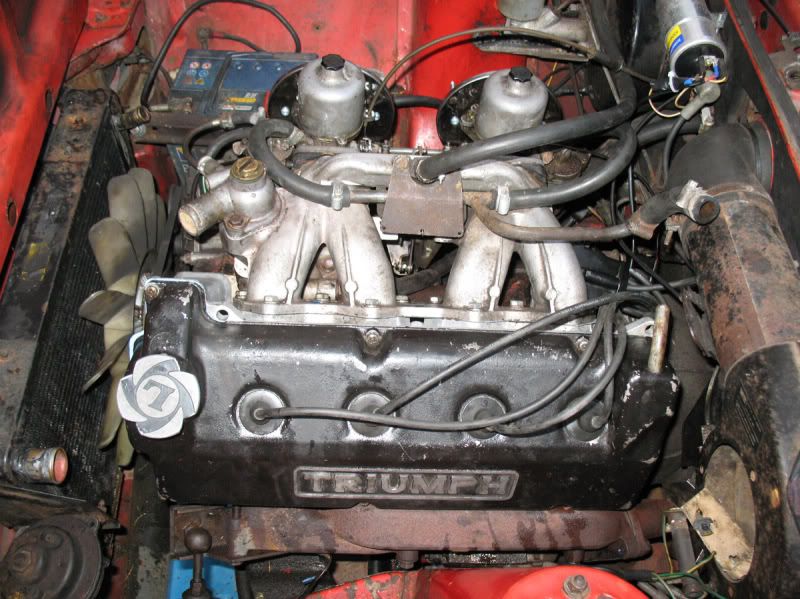
At this point, I checked the dipstick and there was no water in the oil and vica versa, so off to a good start. After a while I ditched the choke and the engine idled really nicely at 850, with a quick fiddle on the idle screws. I'd forgotten how quick it could rev up and as before it sounded great with that big ol' hefty draw through it's SUs.
So, tomorrow morning, it's first rite of passage. I'll retorque again (just to be safe), do some last minor checks and fitting.......then take it on it's first run up the road - get the brakes, suspension and steering all freed up and some warmth through it.
Time to get it hot and see what happens, really - Only problem is that I want to keep it now. So much potential and it's such a little trooper, it always runs when it shouldn't! Hmmm!
At this point, to restore the Himalaya-like landscape of the cylinder head, I took it to Headline in Milton Keynes, for a skim and pressure test. This would make sure that the head was not only flat and level but also leak and crack free.
They're a great bunch there and very friendly - he showed me the level check of the head, demonstrated how to observe the high and low points and where the blows were occuring. Loads of great tips!
After this, I concluded what I initially thought - someone has, at some point, let it boil over but kept at it and got it really, really hot but not attended to the problem. Once it got to the point where it could no longer maintain temperature at all, or run, they stuck a new gasket on it assuming that'd fix the problem.
Unfortunately, the gasket couldn't handle the level of damage to the surface of the head and failed within a very small timeframe. The fire rings were undamaged, to give an idea of how bad it was! Just blowing clean past (water into the combustion chamber, no oil contamination).
A few days later and I had it back:
Much improved.
Then it was just a case of flatting back all the surfaces, reassembling the valvetrain, torquing everything up and making sure the cam rotated freely.
Shims and buckets back on:
Rocker gear, cam and plug tubes reinserted:
Exhaust manifold mating surfaces cleaned up and flatted back - no gasket on the Sprint.
More conferring:
....and with a bit of help from my friend Mr. Torque:
Voila!
Would look great as a V8...
After all that, reassembly really was just a case of bolting it all back up, ensuring all mating surfaces were clean and everything was assembled to the correct torque.
Getting there:
I recovered my battery from the Toledostag as that's been it's source of power whilst this has been off the road. Unfortunately, it was flat as a doornail - it's been abused a bit and despite being charged frequently, doesn't seem to like being off the car.
It had barely any power to crank the motor over, even with the plugs out. After spinning it over a few times until a good 50PSI was showing, it could barely maintain 50RPMs. I politely told it that I make the rules and on the final crank it caught on full choke and thundered into an erratic, yet running, idle.
After a few seconds and burning off all the oil in the chambers, it settled into a smooth 1000RPM burble.
Very smokey, due to oil on the manifold and a missing exhaust downpipe bolt (past its best, the bolt) - but running!
I let it run up till it was warm to the touch then shut it off - this is still sans coolant - and allows the gasket to 'cook off', seating properly and allowing the adhesives to work. It also gets a bit of heat into the cylinder head studs and bolts, so they expand and everything settles.
I was then away for a few days, doing something involving silly hats and bits of paper, so, after an early rise, I set about finalising the work. It's a little cold out today - 3 degrees if that and a bit of windchill but no matter, I have my Santa Pod cap to protect me!
First port of call was to retorque the head studs, nuts and bolts:
I was really suprised by how much they'd slackened off by - I guess the combination of the gasket compressing, heat expansion, the studs, bolts and nuts all settling adds up a fair bit. They all needed a good half a turn if not more to clamp them up.
With that done, I could renew the oil filter (having previously drained the old sludge) and refill. My Sprint has the spin-on conversion that uses Fiesta filters so none of this faffing about with spring-loaded paper cartridges:
A familiar container makes an appearance:
Then I pulled off my broken thermostat housing and took a moment to inspect and clean everything internally, as well as checking the already-new thermostat:
With that done, I could refit all the hoses and refill with the correct antifreeze and coolant mix. Yay!
Remarkably, with the Sprint holding 5.4 litres of coolant, all 5.4 seemed to go in without any issue - I kept the hoses low to fill them and the heater on hot. Hopefully there won't be too many airlock issues.
And done:
So after this, I decided it was time to be brave again. I knew the battery was still dead as a doornail (it was when I last used it and now it's been sat for 5 days) so I jammed the choke on full (haven't refitted that yet!), popped the dashpots up and down a few times with the fuel pump on to get some fresh fuel in and pumped the throttle a few times.
The battery really wasn't having much of it though - again, it barely had enough strength to get the engine going 1 rotation, let alone 2. Grind, grind, grind - sigh. I let it sit for a moment and dumped some more fuel down it.
Flicked the key and the engine turned about half a rotation, if that, groaning laboriously - then caught! It ran up to a 1500RPM idle and banged along, not pulling on all cylinders at all but running.
I let it 'idle' for about a minute, then switched it off. A quick post-flight showed no real leaks to speak of (barring one from the expansion tank hose, which is now renewed) from either the oil or cooling systems.
A quick check showed that one of the plug leads (silly deep-head plug tubes!) wasn't seating properly so I yanked it out and jammed it in, resulting in an audible click - that'll be the miss, cured, then!
Flicked it over again and it burst into life straight away this time:
This time I let it run for about 3 minutes, enough to get the thermostat open and get some heat into the pipes and radiator. All hoses seemed warm so water was clearly going around and everything was operating. Turning it off, I removed the bung in the thermostat housing and topped it up as per the manual - although it only needed a little.
At this point, I checked the dipstick and there was no water in the oil and vica versa, so off to a good start. After a while I ditched the choke and the engine idled really nicely at 850, with a quick fiddle on the idle screws. I'd forgotten how quick it could rev up and as before it sounded great with that big ol' hefty draw through it's SUs.
So, tomorrow morning, it's first rite of passage. I'll retorque again (just to be safe), do some last minor checks and fitting.......then take it on it's first run up the road - get the brakes, suspension and steering all freed up and some warmth through it.
Time to get it hot and see what happens, really - Only problem is that I want to keep it now. So much potential and it's such a little trooper, it always runs when it shouldn't! Hmmm!
- Joined
- 2 Mar 2004
- Posts
- 11,919
- Location
- SE England
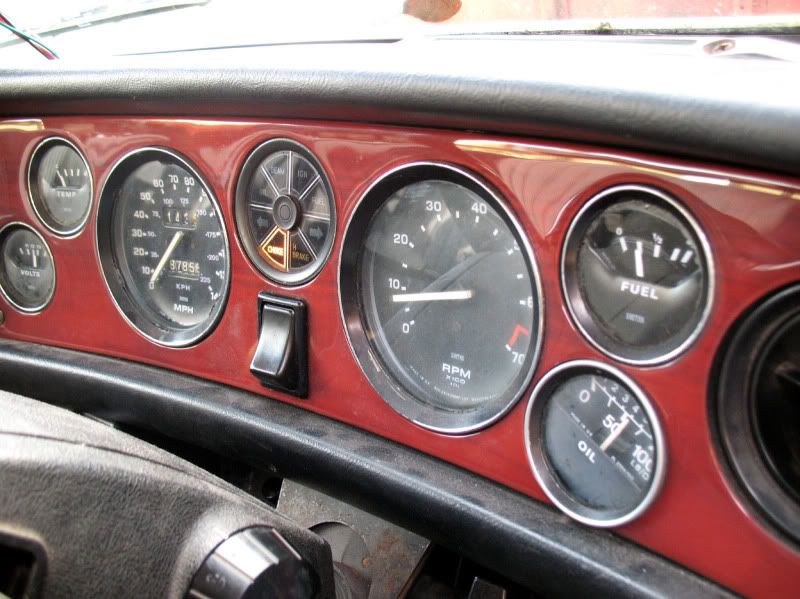
Thus follows as of today. I checked the torques again as I'd run it up for a little longer yesterday and wanted to make sure everything was OK. I even managed to venture it out for it's first drive, which it responded to well - the brakes, suspension and steering are all in good nick and remarkably all 4 tyres have only lost a little pressure, given how long it's been standing.
My temperature gauge, however, seems unable to rise above 1/4. Fuel gauge seems fine so I assume it's not a VS issue. Alternator is putting out ~13v when it's running, too. The top hoses are hot, water is cycling and the radiator seems toasty to the touch. I can just about bear, the acid test, my hand on the rocker when it's 'up' to temperature - it's hot but not scalding, unlike some others I've encountered which means the head temperature is fine.
I will refit and rewire the heater motor tomorrow as well as check it all over again. This will enable me to make sure water's circulating the system completely - then I can set about fettling the temperature gauge.
In most instances, it's just corrosion on the terminals, or a duff sender - will soon know! I'll only be happy when it's all running spot on and I have that peace of mind! Lovely car to drive, though, this one. A real rip snorter!
- Joined
- 2 Mar 2004
- Posts
- 11,919
- Location
- SE England
Well, again, as of today I finally had a chance to play again.
I replaced the temperature sender today and, on running it up to fully warm, the gauge sits below 1/2 which is where I'd expect it to be. The previous sender was knackered, would get to the 1/4 mark and just stick there, regardless. Not very much help when it comes to trying to work out how it's running!
Turn it off and let the heatsoak do it's work and the gauge rises gently above a half but as soon as you run the engine again it drops below 1/2 and stays there - so the cooling system is working properly.
I retorqued everything again (including the intake manifold - just in case as it has water passageways that can leak into no. 1 cylinder ) and it runs real sweet at the moment. Ran it up for about an hour in total today, partly to get some charge in the battery and secondly to get it nice and hot, get the oil up to temperature and so on. Heater works great too!
Just letting it cool off then I'll finish exhaust jobs and see what's what.....certainly seems OK at the moment!
Can't wait to run it on the road a bit. Tell you what, sounds ace with it popping out of the exhaust manifold - so I might knock up a side slashcut pipe for it!
Anyway - tomorrow, I'm gonna get it nice and warm then thrash it a bit......Then get it back on the drive, stand and look at it for a bit, think what needs doing or what might look good then maybe set about ordering some paint..............Blaaaaaaaaaaaaack! (I think)
I still would love to recreate the fabled Stag engine that had Sprint heads (with the other bank having a mirror casting of the head to fit), apparently put out approximately 400BHP and, at the time, pegged their dynos!
That was, of course, with other modifications - fuelling, exhaust, no doubt cams and other work.
Maybe I should dig out a twin DHLA pattern manifold for it....
Bram, bram! Induction noise anyone?
- Joined
- 2 Mar 2004
- Posts
- 11,919
- Location
- SE England
Well, the engine's now singing along quite happily. Needs a minor tune but other than that, job's a good'un.
Result.
I spent the first bit of today doing odds and ends - tightening up the exhaust manifold, refitting some missing door bolts and check straps, checking the fluids, pumping up the tyres (which, remarkably, after about 2 months have only lost a few PSI each) and spraying random bits with WD40.
I also fixed the choke linkage - part of the retainer for it had broken, so I headed to the local specialist, Carburetter Exchange, in Leighton Buzzard to see if he had a replacement part. Unfortunately he didn't (apparently it's not really classified as a 'spare' so not stocked) but he very kindly gave me a random jet adjustment screw he had that, reckoning it would do the job a treat.
Once home, I hammered it into the hole and...it fitted perfectly! Did the job a treat so I can now start the car in the cold from inside without having to faff about. Result!
You can find Carburettor exchange here - highly recommended by everyone who goes there:
http://www.carbex.demon.co.uk/
Now - I'm getting bored with the hodge-podge colours, so I rustled up some supplies from Homebase and set about seeing what I could do.
Quick bit of sanding, masking and cleaning with spirits to remove oil and dirt and:
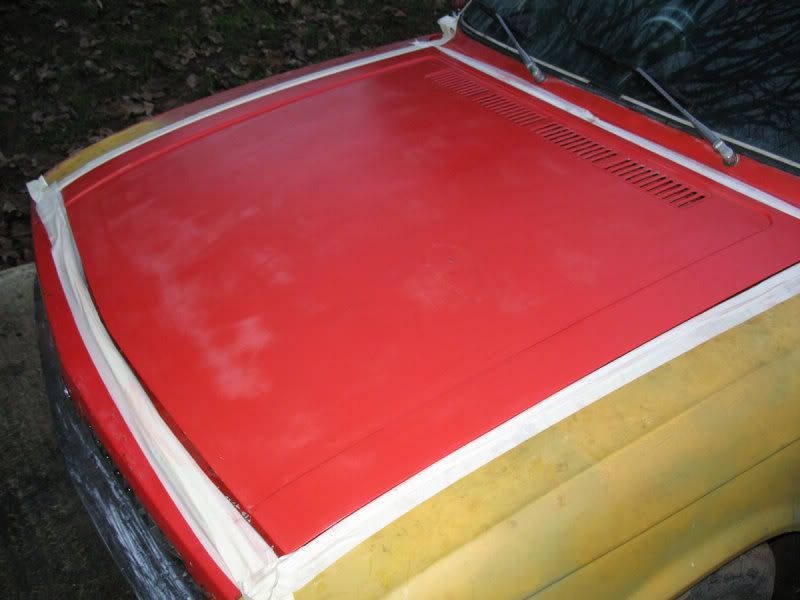
One clean bonnet.
Few quick rolls later (must stress this is just a guide coat and a test to see how it does being applied in this weather and ....
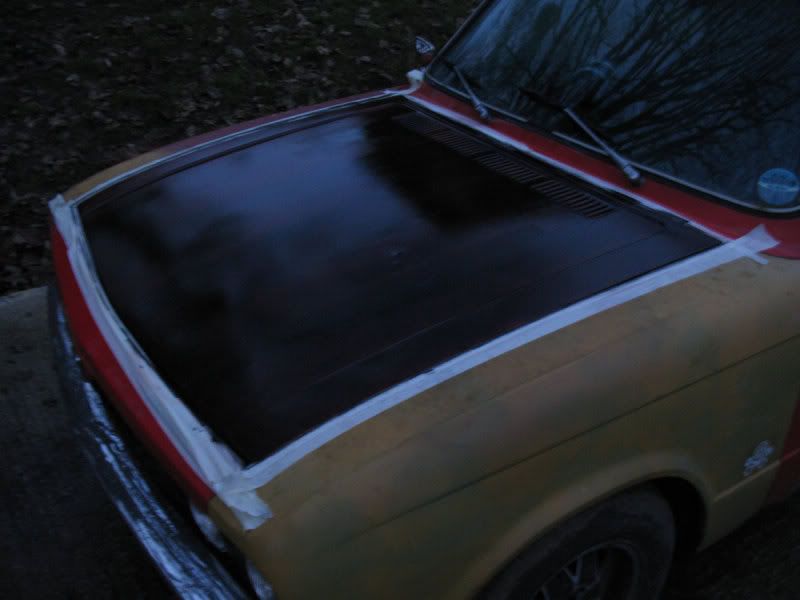
Voila!
A first test coat of some satin black paint. Doesn't really show much at the moment, so I'm looking forward to tomorrow when I can put on a 2nd coat and see what the finish, colour and effect really looks like.
Battery's coming back to life now too - after being abused so much running the V8 Toledo and cranking constantly it wasn't happy at all. Now it's being used, cycled and charged a little it actually managed to start the car up all on it's own today.
Onwards!
Result.
I spent the first bit of today doing odds and ends - tightening up the exhaust manifold, refitting some missing door bolts and check straps, checking the fluids, pumping up the tyres (which, remarkably, after about 2 months have only lost a few PSI each) and spraying random bits with WD40.
I also fixed the choke linkage - part of the retainer for it had broken, so I headed to the local specialist, Carburetter Exchange, in Leighton Buzzard to see if he had a replacement part. Unfortunately he didn't (apparently it's not really classified as a 'spare' so not stocked) but he very kindly gave me a random jet adjustment screw he had that, reckoning it would do the job a treat.
Once home, I hammered it into the hole and...it fitted perfectly! Did the job a treat so I can now start the car in the cold from inside without having to faff about. Result!
You can find Carburettor exchange here - highly recommended by everyone who goes there:
http://www.carbex.demon.co.uk/
Now - I'm getting bored with the hodge-podge colours, so I rustled up some supplies from Homebase and set about seeing what I could do.
Quick bit of sanding, masking and cleaning with spirits to remove oil and dirt and:
One clean bonnet.
Few quick rolls later (must stress this is just a guide coat and a test to see how it does being applied in this weather and ....
Voila!
A first test coat of some satin black paint. Doesn't really show much at the moment, so I'm looking forward to tomorrow when I can put on a 2nd coat and see what the finish, colour and effect really looks like.
Battery's coming back to life now too - after being abused so much running the V8 Toledo and cranking constantly it wasn't happy at all. Now it's being used, cycled and charged a little it actually managed to start the car up all on it's own today.
Onwards!
- Joined
- 2 Mar 2004
- Posts
- 11,919
- Location
- SE England
More progress!
Firstly, excuse the quality of the photography. By the time I got around to taking any pics it was half past three and already getting pitch black!
Anyway, to do it properly, all the trim's got to come off. I removed all the chrome edging strips and door trims. Now I've just got the rear bumper to go but it requires jacking up so I can get the towbar off too - weight saving!
I also spent what felt like an hour painstakingly removing the coach lines from the car, much nicer without.
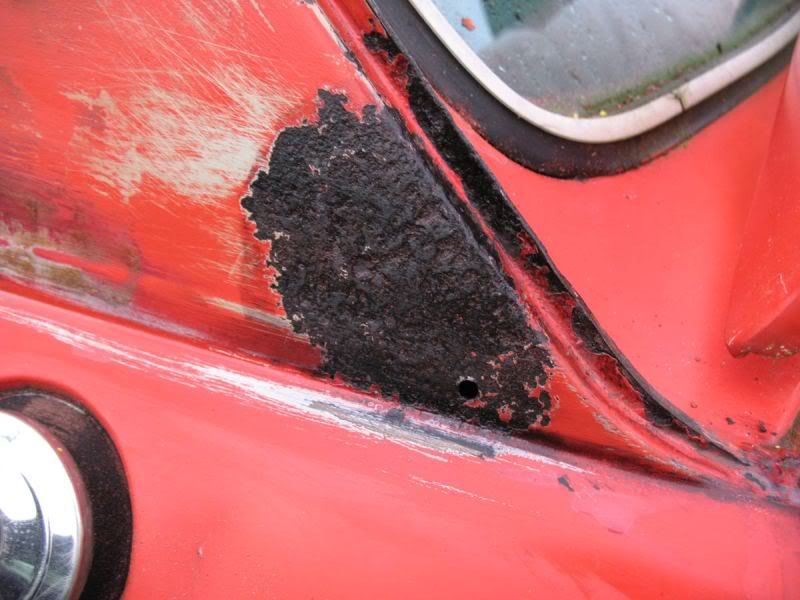
The rear vinyl pillar trims had not suffered the tests of time well; if I'm honest I've never really liked the vinyl much either. I prefer the clean, unblemished look of the earlier cars (like my old 1500) without the chrome as they seem to show their shape better and look sharper.
Consequently, I pulled them off

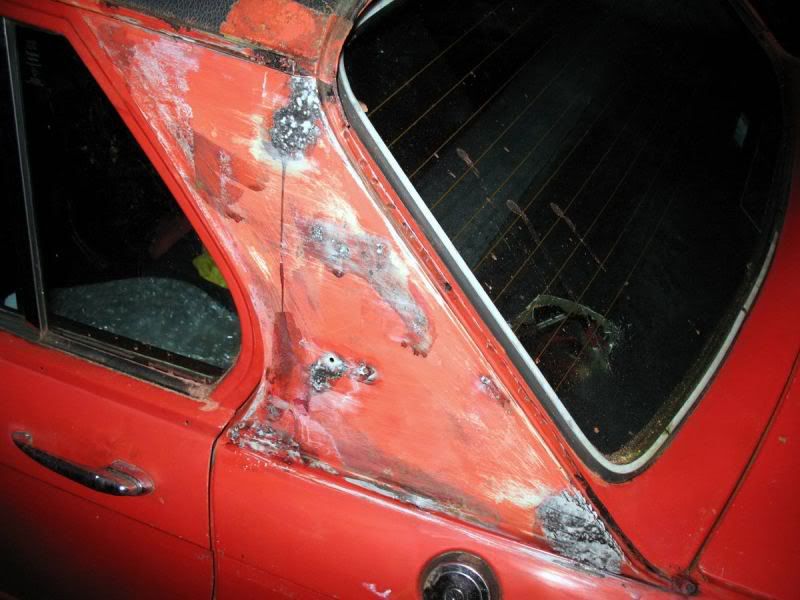
.......exposing the usual corrosion points behind. Vinyl makes a good rust trap, when it's not in great condition as these were.
I washed it, sanded it all down, cleaned it with thinners and let it dry. Then, to convert the rust to a safe, paintable material I sloshed some Kurust on it.
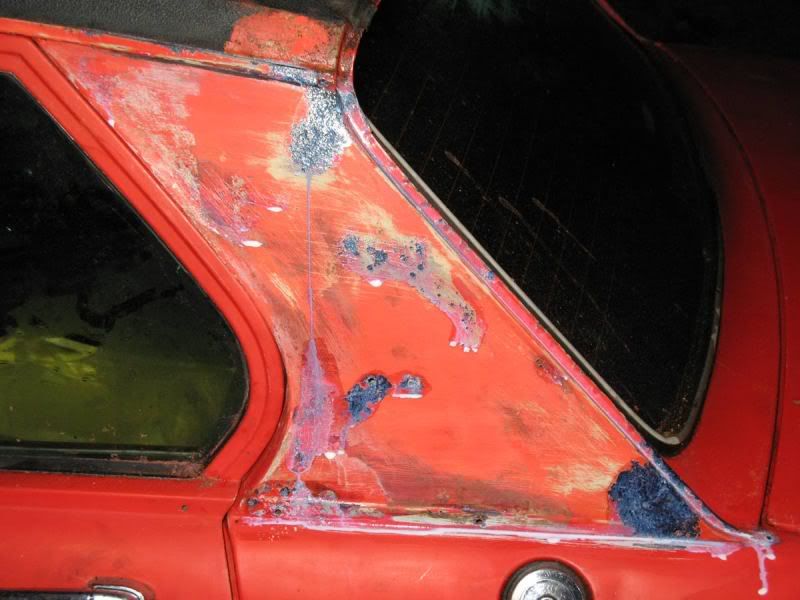
You can just see it starting to 'blue' here, indicating the rust is converted to 'safe' metal.

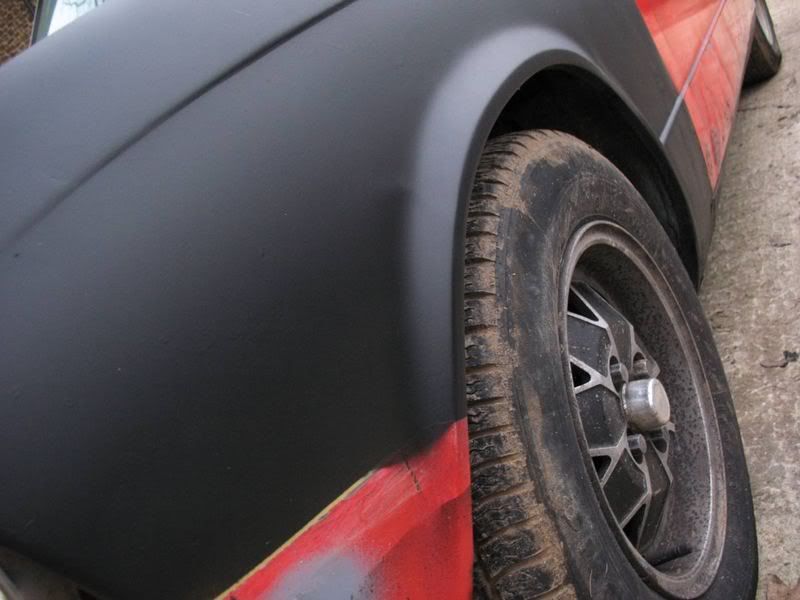
To check I really did like the look I was going for, I masked up the front wing roughly and with a can of matching spraypaint, ran a few quick guide coats over (still wet in the shots):
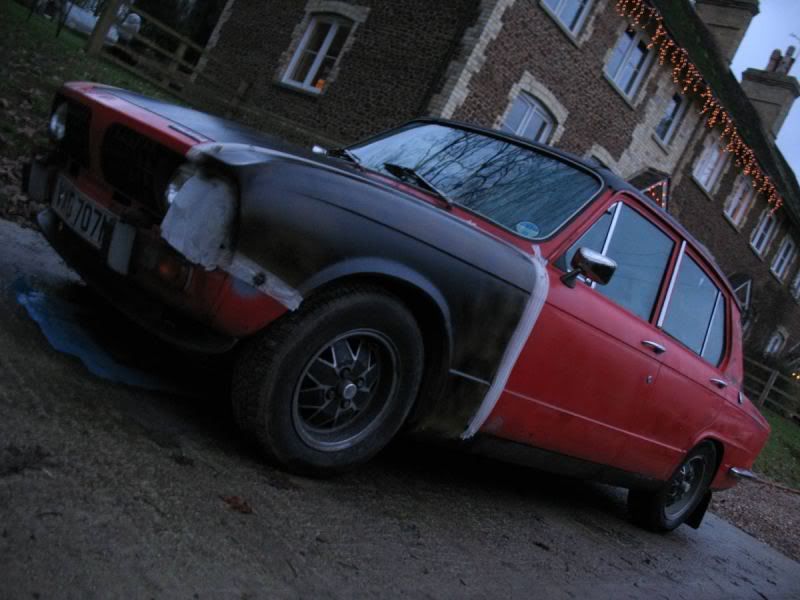
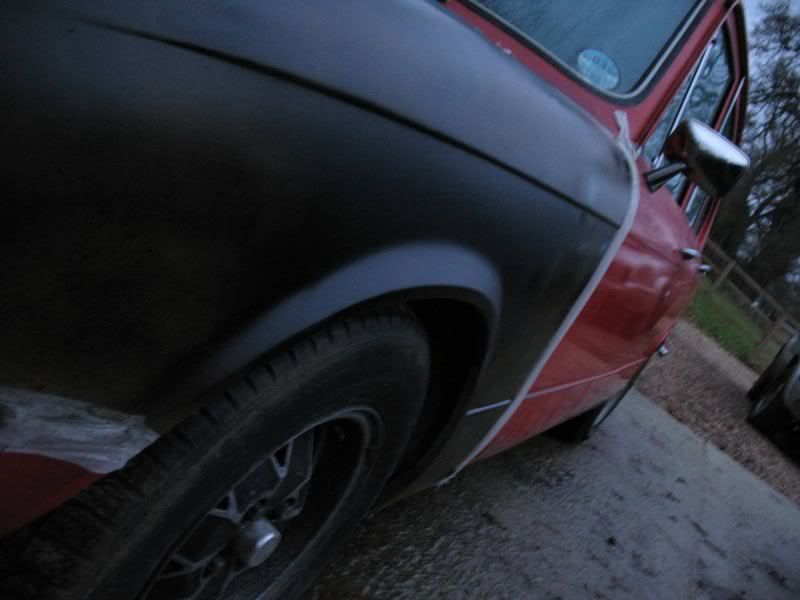
.....and I do like it, so that's definitely the look I'll be rolling out soon!
So, tomorrow, I'll finish removing the vinyl from the roof and start prepping in earnest. Today I just ran a knife around the trapped bits so I can pull the whole shooting match off but it requries preheating to soften the adhesives a bit (you can see in some of the shots where I've ripped bits off as a test!).
I'll also see if I can find the neater drop-down chrome rear as seen on the 1500 and fit it to my Sprint - not a fan of the 'wraparound' section under the tail lights, looks a bit messy.
I also think most of the chrome will be blacked out but I may photoshop that before I do it!
Blaaaaaaaaaack!
Firstly, excuse the quality of the photography. By the time I got around to taking any pics it was half past three and already getting pitch black!
Anyway, to do it properly, all the trim's got to come off. I removed all the chrome edging strips and door trims. Now I've just got the rear bumper to go but it requires jacking up so I can get the towbar off too - weight saving!
I also spent what felt like an hour painstakingly removing the coach lines from the car, much nicer without.
The rear vinyl pillar trims had not suffered the tests of time well; if I'm honest I've never really liked the vinyl much either. I prefer the clean, unblemished look of the earlier cars (like my old 1500) without the chrome as they seem to show their shape better and look sharper.
Consequently, I pulled them off
.......exposing the usual corrosion points behind. Vinyl makes a good rust trap, when it's not in great condition as these were.
I washed it, sanded it all down, cleaned it with thinners and let it dry. Then, to convert the rust to a safe, paintable material I sloshed some Kurust on it.
You can just see it starting to 'blue' here, indicating the rust is converted to 'safe' metal.
To check I really did like the look I was going for, I masked up the front wing roughly and with a can of matching spraypaint, ran a few quick guide coats over (still wet in the shots):
.....and I do like it, so that's definitely the look I'll be rolling out soon!
So, tomorrow, I'll finish removing the vinyl from the roof and start prepping in earnest. Today I just ran a knife around the trapped bits so I can pull the whole shooting match off but it requries preheating to soften the adhesives a bit (you can see in some of the shots where I've ripped bits off as a test!).
I'll also see if I can find the neater drop-down chrome rear as seen on the 1500 and fit it to my Sprint - not a fan of the 'wraparound' section under the tail lights, looks a bit messy.
I also think most of the chrome will be blacked out but I may photoshop that before I do it!
Blaaaaaaaaaack!
- Joined
- 2 Mar 2004
- Posts
- 11,919
- Location
- SE England
So I came out this morning to lovely solid, rust-free, metal:
That Kurust stuff is really good! Highly recommended and very easy to use. Don't be put off by the little containers either, as it has a very watery consistency and goes an awful long way.
Now, due to the pitting, the surface of the pillars wasn't quite level at some points. Primer might fill the gaps and level it out but I suspected I'd end up with a wavy surface at points. I headed out to Halfords and bought some filler, something I've never tried using before.
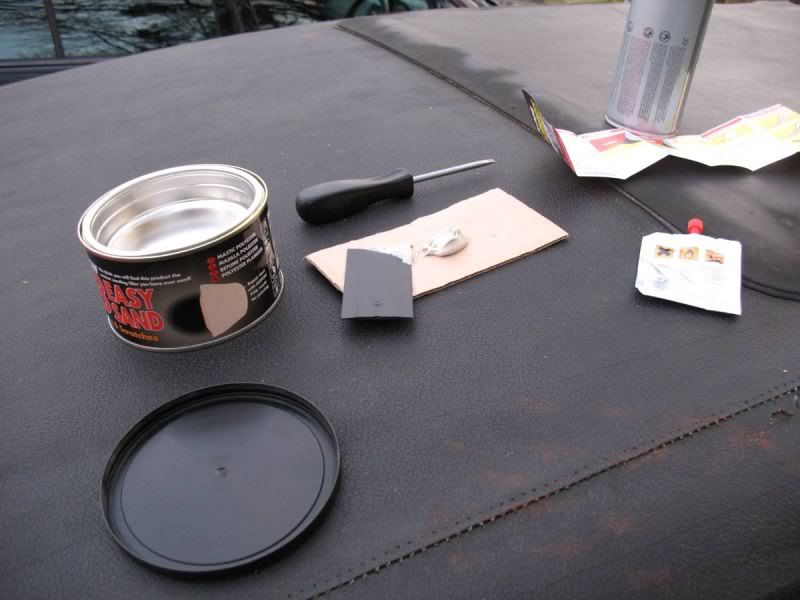
And on my "palette"
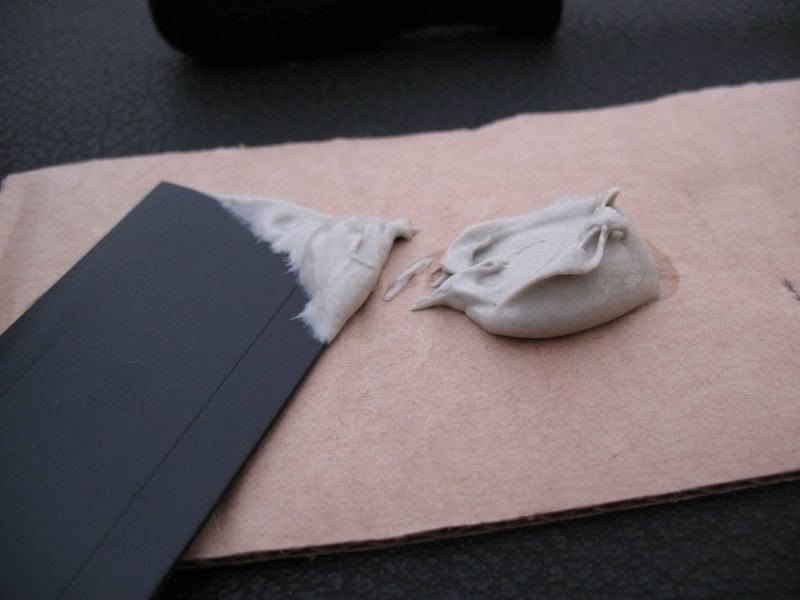
I have to say, I'm really impressed with how easy it is to use. Simply pile some filler onto some cardboard, drop some setting agent into it (the quantity really isn't overly critical), mix it thoroughly then apply it where needed, dragging a sharp-edged tool across to smooth it out and remove any excess filler.
It can be made to set very quickly too, using additional activator, which is really good for doing tricky or deep surfaces/holes. This was what I did when filling in some of the trim holes - as I'm not reinstating the chrome door trims, in line with my 'clean' look
After finishing the filling, I was left with two nice flat pillars with all unnecessary holes filled:

Tomorrow I'll quickly sand them back just to make sure it's dead even, then prime and paint!
I also grabbed a few cans of Halfords satin spray today, to test out:

Here I'd sprayed the grill in the bonnet to see how it matched up. The Halfords satin is slightly flatter than the paint I have, which is kinda what I'm looking for - so I intend to do as much as possible in the paint then go over the car lightly with the spray, just to take the edge off and give the spot-on finish that I'm looking for
That should also have the added benefit of getting any bits I missed with my rollers and brushes!
I'm hoping to get a lot done tomorrow - so I hope the weather holds out! Fingers crossed!
That Kurust stuff is really good! Highly recommended and very easy to use. Don't be put off by the little containers either, as it has a very watery consistency and goes an awful long way.
Now, due to the pitting, the surface of the pillars wasn't quite level at some points. Primer might fill the gaps and level it out but I suspected I'd end up with a wavy surface at points. I headed out to Halfords and bought some filler, something I've never tried using before.
And on my "palette"
I have to say, I'm really impressed with how easy it is to use. Simply pile some filler onto some cardboard, drop some setting agent into it (the quantity really isn't overly critical), mix it thoroughly then apply it where needed, dragging a sharp-edged tool across to smooth it out and remove any excess filler.
It can be made to set very quickly too, using additional activator, which is really good for doing tricky or deep surfaces/holes. This was what I did when filling in some of the trim holes - as I'm not reinstating the chrome door trims, in line with my 'clean' look
After finishing the filling, I was left with two nice flat pillars with all unnecessary holes filled:
Tomorrow I'll quickly sand them back just to make sure it's dead even, then prime and paint!
I also grabbed a few cans of Halfords satin spray today, to test out:
Here I'd sprayed the grill in the bonnet to see how it matched up. The Halfords satin is slightly flatter than the paint I have, which is kinda what I'm looking for - so I intend to do as much as possible in the paint then go over the car lightly with the spray, just to take the edge off and give the spot-on finish that I'm looking for
That should also have the added benefit of getting any bits I missed with my rollers and brushes!
I'm hoping to get a lot done tomorrow - so I hope the weather holds out! Fingers crossed!
- Joined
- 2 Mar 2004
- Posts
- 11,919
- Location
- SE England
I spent a mindless few hours stripping the vinyl and have still got to get rid of most of the adhesives, horrible stuff. The pillars are primed and ready to go, as is the bootlid - and I've stripped and prepped most of the surfaces now. Managed to get it all off without removing the webasto too, which is a bonus!
I have also filled a few more holes and a crease that was present in one otherwise solid arch. The door bottoms are tatty in places but to be honest, doors come off and I'd rather get it all one colour and look at it before going any further.
Started looking at MG metro carburettors and an Eaton M45 as an 'interesting' alternative for induction too. Just waiting on some mockup parts to turn up. It's either that or a little shot of nitrous for the road-warrior effect.
Still trying to decide what to do with the interior too - part of me wants standard, trimmed, the other wants stripped (or partially stripped) with lots of period (or earlier) gauges and switches. Will have to have a look and a think (any opinions welcome!).
My front windscreen seal arrived too, so that's next!
Have some pics:
Paint's holding well against the elements - had heavy rain, dew, frost and wind:
Vinyl - gone!

Arch and pillars ready to go:

Rear edge cleaned and tidied up:

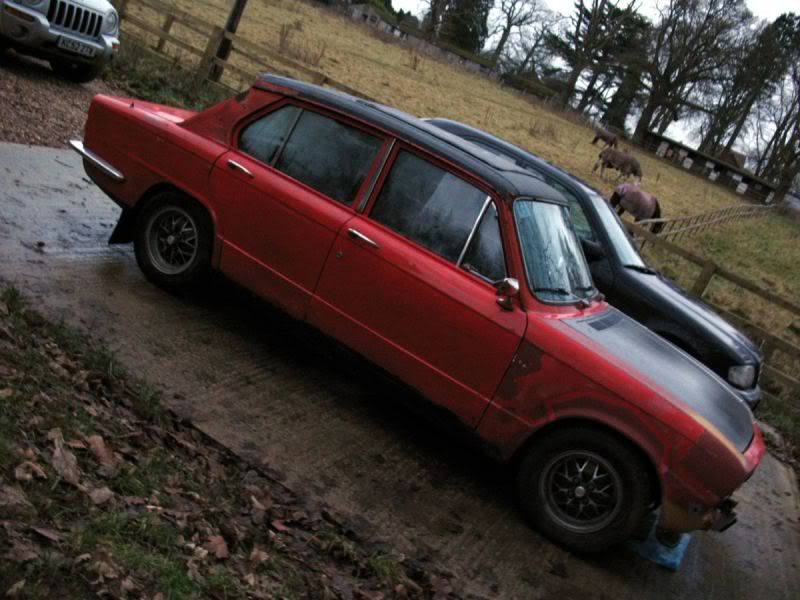
.......and a comparision shot:
Funny how similar they appear when you look!
I have use of a garage soon though, so will complete the paint job over the next few days! Being heated and undercover will give me all I need to get it done
Can't wait to see (and do) it!
I have also filled a few more holes and a crease that was present in one otherwise solid arch. The door bottoms are tatty in places but to be honest, doors come off and I'd rather get it all one colour and look at it before going any further.
Started looking at MG metro carburettors and an Eaton M45 as an 'interesting' alternative for induction too. Just waiting on some mockup parts to turn up. It's either that or a little shot of nitrous for the road-warrior effect.
Still trying to decide what to do with the interior too - part of me wants standard, trimmed, the other wants stripped (or partially stripped) with lots of period (or earlier) gauges and switches. Will have to have a look and a think (any opinions welcome!).
My front windscreen seal arrived too, so that's next!
Have some pics:
Paint's holding well against the elements - had heavy rain, dew, frost and wind:
Vinyl - gone!
Arch and pillars ready to go:
Rear edge cleaned and tidied up:
.......and a comparision shot:
Funny how similar they appear when you look!
I have use of a garage soon though, so will complete the paint job over the next few days! Being heated and undercover will give me all I need to get it done
Can't wait to see (and do) it!