Second Build - University

Soldato
Joined
13 Mar 2011
Posts
7,484
Location
Bada Bing
Project Othello

I would like to thank my sponsors, Mr Schultze and Mrs Kogan, I really appreciate your support throughout my project

phobyalogofinal.jpg


enermaxlogo.jpg


Project Othello


specs are:

- i7 2600
- MSI H67 E45
- 4GB OCZ Platinum
- TX650
- CM 690 lite
- 5850 Extreme
- H50
- Sharkoon white ccfl
- E700 tv card
- two sata dvd drives

I bought the components AGES ago, but due to family commitments, am starting the build today!

Right then, ive printed off the guide, got the cat out of the room and here are the pics so far:

DSC00004.JPG


DSC00005.JPG


DSC00006.JPG


I had a PITA replacing the 120mm coolermaster fan with the 140mm Xigmatel because the screws were of such poor quality that the teeth were gone in seconds - i need to see where i can get more of these :(

DSC00007.JPG


DSC00009.JPG


Got the bottom drive from MM, when i test it, ill leave feedback :)

DSC00010.JPG
 
Last edited:
Out of interest, why not a 2500K and P67/Z68 build? Would have allowed overclocking and for most purposes, the Hyper-Threading on the 2600(K) is negligible.

because i got a deal on the 2600 and H67 board i could not say no to!

Also, because this is a uni rig, i wanted COMPLETE stability and my home rig, which has OC 2500K and p67 bluescreens every once-in-a-while :)
 
Last edited:
update 2:

right then, ive relocated and finished the first half of building


i had to really think about the order of installation because of the h50 with push/pull

i ended up doing it like this:
1) screw rad into case with standard case fan
2) ram, and backplate onto mobo
3) install mobo into case
4) install cpu and h50 retention plate
5) connect h50 pump block and screw down
6) connect other fan for push/pull

it was quite hairy at times with such a small board, but here are the pics so far :)

dsc00023pq.jpg


dsc00024twj.jpg


dsc00025bzw.jpg


dsc00027gs.jpg


dsc00037y.jpg


dsc00046rq.jpg


dsc00049uk.jpg


dsc00050px.jpg


dsc00051xwh.jpg


dsc00058od.jpg


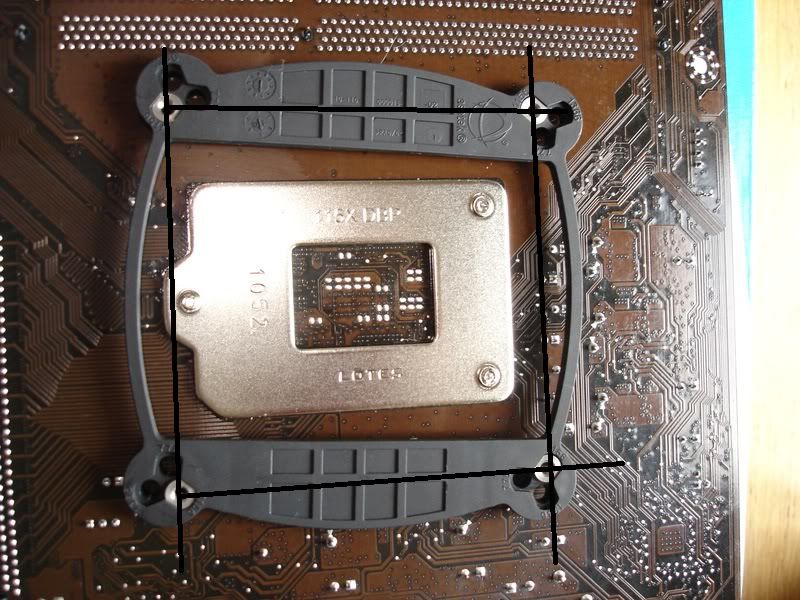
i think it is looking good now, but one thing i dont like is the h50 backplate - why is it wonky with 1155/1156!?

also, i bought a spare set of h50 screws from the bay for the push/pull config :)

the h50 isnt set an an intake, still as an exhaust, but from my readings, it will make little difference, especially with pushpull
 
Last edited:
just a quick update for this morning

i have put in the hard drives

ill be contacting coolermaster about the drive bays though as the rubber grommets have started to disintegrate already :confused::mad::confused:

i had a few thoughts about the ssd:

1) stick it under the mobo so that it could be seen - but becuase of where the leads go, it would have to updise-down.... nope

2) stick it on the psu somewhere - trailing leads aroung?... nope

3) stick it on the hdd cage - the nobules were in the way... nope

4) no 2.5/3.5 bay adapter so just used double-sided tape - result below :)

dsc00062bb.jpg

dsc00063be.jpg

dsc00064va.jpg

dsc00065qy.jpg


the reason for the backup OS drive is that this will my uni machine and i really need stability so if the ssd starts to BSOD or whatever, i can just swap the cables to the backup drive and get back to work
 
Coming along nicely.

Built into one of these a few months back and found it very nice to work with.

That wonky back plate thing is a bit of a concern though. looks like the retaining nuts are in the wrong holes to me.

Edit...

Had a bit of a closer look, hope you don't mind, it was bugging me, and I can see that all is fine. A bit clever really as by placing the holes as they have they can minimise the size of the back plate.

By drawing between the back plate holes we can see that although the plate is slightly rotated the holes are square with each other and parallel to the long and cross axis.

dsc00037y.jpg

yeah, the first thing i checked was that the nuts are in the right places, then i googled and apparently is is like that for 1155...

thanks for confirming it though :)
 
Just quoted your method of mounting the ssd over in general hardware. Hope that's ok.

Posted a link to the build as well. :)

EDIT

This is his thread.

no problem :)

Final update:

right then, what i did was to install everything i wanted onto the ssd, then use clonezilla to clone the ssd onto the backup OS drive

Clonezilla took about 15mins to copy ~30GB which i think is pretty decent :)

after, i unplugged the backup OS drive and connected my two 2tb storage drives

ive since attached the white sharkoon ccfl with the same take, but they kept falling down, so i cable-tied them to holes in the case :)

i have also bought a dremel and am practicing cutting with it as i intend to cut a window out - i know i could have bought a windowed sidepanel, but i wanted to do it myself - if i was going to go down the easy route, i would have bought a pre-built pc ;)

anyway, this is the machine as it is currently (minus the ccfl's)


i will post a FINAL final picture when i have cut the window and i can show you the lights as well :)
 
Final Final Update:

since the last time, i have gotten a proper ssd bracket, removed the double sided tape - i no lenger recommend it beucase it took off the warranty sticker as i was taking it off :mad::rolleyes::mad:

anyway, i have used cable ties to secure all the ccfl's and the inverter and that is all nice

I finally got delivery of the masking tape - i ordered it on the 15th of august!

That is the last time i buy from that "powerseller" :mad:

i am mid-way cutting the panel for the acrylic, ill update with pictures tomorrow

Tools for cutting:

- Dremel 300 - £40
- Dremel Speedclic mandrel - £8
- Dremel Metal 38mm cutting discs - £12
- 3M Scotch 4010 masking tape for car respraying - £6.50
- 3M Double sided tape (cant remember code) - £4.50
- U-Channel piping to go around window edge - £3
- Perspex Acrylic whatever its called :p - £9

Total cost: ~£80 when a windowed panel is under £20 :p :p :p

i am doing this for the experience and the tools, not the window - i already have a windows side panel and i dont like the acrylic they use :p

The BIG problem with the window was that the fan vents are very high at the top of the panel so it is very difficult to cut enough so that it will but a strip of double sided tape in there

anyway, im trying the lest i can and if i bodge it up - never mind - its my first time doing something like this! :p

I have left 1.5cm from the perspex edge to the window edge for the double sided tape, if the tape doesnt hold, ill use rivets - but im hoping that is avoidable

What i have done is draw the four straight edges and then use a compass to draw the rounded corners, i am cutting the straight edges first so that i can get my eye in and also so that the disc wears down so that it is smaller and easier to cut the corners - a tip i gleaned from many youtube videos :p

also, the BIG tip is to but from the back and do small touches with the dremel along the length of the line and then go back over doing deeper touches, if you try to force it down, you can shatter the disc, chip the paintwork, etc etc

it is better to do it bit by bit than rush and try to do it all at once - i frequently stop to have a drink and stretch my back - it is very tiresome using the dremel as it is a lot of concentration and a lot of vibrations going through your hands - not to mention your holding it at an odd angle for prolonged periods of time!

Remember to hold the dremel at the grip points and hold it like a pencil, with both hands, and apply pressure very gently with the tips of your fingers for the best finish

I practiced on an old dell side panel before going ahead with this ;)

I WAS using the unbranded B&Q fibre-glass cutting discs and i went through 4 of them cutting a window on the dell practice panel - the Dremel ones are 1000x better! they cut cleaner and i have dont four straight edges and it looks unworn - practically new!

Right then, when i finish the corners, sand it down and stick the perspex ill be doing some updated photos :)

off to watch Red or Black :cool:
 
Last edited:
UPDATE:

this is just a quick update to drop off some more photos of what i have been working on this week

everywhere i applied for project sponsorship had been denied - but i am hoping that i can get some for my next build

img4031k500.jpg


img4032k500.jpg


img4033k500.jpg


img4034k500.jpg


img4035k500.jpg


i am awaiting some PWM fans for spraying and sleeving

I am also awaiting some heatshrink as the stuff i have doesnt shrink tight enough :(

EDIT: BTW, iv i havent mentioned before, i am doing a black and white build :p :p :p
 
If you get sponsorship don't they send you parts for free? :p.

yes, but i didnt get sponsorship so i had to fund it myself :(

I like that fan, did you sleeve it? What sleeve are you using?

yep sleeved it myself, im using the sleeve from a a special competitor - and that is all i am comfortable saying :p

damn those are some hot cables!! did you do them yourself??

yep, did them one morning, i think they look rather nice too - thanks :D
 
right then

1) to edit the phobya logo, the backgound on overclockers is HEX colour 003366 and 1c5780

2) i have been sponsored by PHOBYA :D :D :D :D

the nexy update will be all the cables done and the goodies they send me :D :D :D
 
Last edited:
i recieved my first sponsorship delivery today - this is just something so salivate over ;):D;)

img4050b.jpg


img4053dr.jpg


i will be taking temps before and after the GT installation BTW :)
 
Last edited:
ive just given the gentle typhoon 10 coats of flat white spray paint

it was "plasti-kote fast dry enamel flat white"

fast dry - and it says on the tin "45 minutes touch dry, 3 hours completely dry" :confused::eek::confused:
 
i let the blades dry all night, i have just given the frame 3 coats of Flat Black of the same spray

i am about to do a test spray of the mesh to see if it would look good all being white
 
the fan has dried, ive reassembled it and thank god i didnt lose that small retention ring!

anyway, here are the pics :)


img4058k500.jpg


img4058k500.jpg


img4061k500.jpg


img4060k500.jpg


img4062k500.jpg


img4064k500.jpg


img4066k500.jpg


img4067k500.jpg


img4065k500.jpg


img4077k500.jpg


img4075k500.jpg


img4079k500.jpg


img4070k500.jpg


img4080k500.jpg


img4083k500.jpg


img4079k500.jpg


i will need to open her up again to incrorperate the Phobya Extension cables so i thought i would also remove the mesh panels on the front and back and spray them white

what do you think so far? any other suggestions?
 
Last edited:
If you're using the Typhoons as push pull on the H50, if you're blowing IN (as Corsair recommend) to the case you should do something about the ugly sticker on the fan back, that would surely be very visible through the window.

Maybe replace it with something plain black?

PS. Looking niiice so far.

i might try to replace it with an all black one, but im in no hurry, i think the grey, white and black look quite nice :)

and thanks :D

BIG UPDATE:

i reassembled the gentle typhoon, working lovely - what fantastic quality fans!

the way you can tell they are so good is that then they lose power (turn your computer off) they keep rotating for AGES - really top quality bearings - all from my sponsors! :)

anyway, i also removed and sprayed the front panel section of my CM 690 - i think it looks AWESOME :D :D :D

it actually really reminds me of something from my childhood :p

fn9zq9.jpg


ill leave you to make up your own mind though :p

img4085k500.jpg


before the extension cables from Phobya
img4087k500.jpg


shaky hands :p
img4091k500.jpg


stock fans
img4092k500.jpg


one of the sata power cables
img4095k500.jpg


img4096k500.jpg


these are fantastic quality
img4101k500.jpg


pcie extensions in
img4102k500.jpg


huge PITA trying to get these all parallel
img4103k500.jpg


img4104k500.jpg


4-pin cpu cable as well :D
img4105k500.jpg


the BIG BOYS in as well :D
img4106k500.jpg


img4107k500.jpg


after i closed her up
img4108k500.jpg


img4111k500.jpg


img4114k500.jpg


temp sheet
img4115k500.jpg


from my temps - stock h50 and case fans

30.0 degrees average idle, 55.5 degrees average load -> 25.5 degree difference

with the GT 1450rpm at 12V

27.5 degrees average idle, 50.0 degrees average load -> 22.5 degree difference

Conclusion about GT:
- make a lot less vibrations
- make a lot less noise
- move a lot more air
- have reduced temps by a fair amount
- but do have a SLIGHT pitch whine

all in all i an VERY happy - thank you to my sponsor Phobya
 
Back
Top Bottom