Securing posts for a compost bins

Soldato
Joined
27 Feb 2003
Posts
7,173
Location
Shropshire
Our existing 3 bay/bin compost heap is falling apart. It was assembled from old pallets and scrap wood by the previous owner.

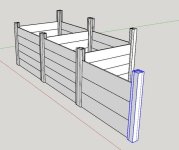
My plan is use to 75x75mm fence posts to build 3 new bays (so 6 posts). I'll use something like 25x38mm laths to create a vertical "grooves" on each post, then use 22x200mm boards as slats to drop in for the sides. So 25+25+22 is just shy of 75mm, so the slats should slide in with a tap but also be snug. The six corner posts will be 1.1m to 1.3m high and shielded by existing fences, so aren't that exposed to direct wind.

What I can't decide on is securing the corner posts. Options I've got so far:
  • Metal fence post spikes - in theory no digging but seem to be a loved or hated product when Googling. Cost about £7 each, so £42
  • Concrete in supports - Screwfix - £39 plus concrete
  • Dig holes and use Postcrete. Relatively quick but makes the inevitable job of digging out the concrete once the posts rot through a pain. Wins on price at £27 (£4.50 a bag from Wickes)
  • Fence fins - http://www.fencefins.com/ - about £10 each, so around £60 for the job. Hadn't seem them before I was Googling today though.
Thoughts or other options?
 
Associate
Joined
8 Aug 2015
Posts
1,495
Location
France
Fencing spike (straight piece of steel with a pointy tip) and a sledge hammer/post basher if you can't find anyone to hold the posts while you hit them. Rock solid when in, but easy enough to remove if/when the post rots*.

*To stop rot - cover tip of post in a mix of diesel and old engine oil. Works better then any off-the-shelf product.
 
Soldato
Joined
19 Oct 2002
Posts
6,831
Location
Bath
Fencing spike (straight piece of steel with a pointy tip) and a sledge hammer/post basher if you can't find anyone to hold the posts while you hit them. Rock solid when in, but easy enough to remove if/when the post rots*.

*To stop rot - cover tip of post in a mix of diesel and old engine oil. Works better then any off-the-shelf product.
This all day long! I have an odd looking oily mix from the engineers at work and it's great, keeps my shed base bone dry the rain the runs off it.
 
Soldato
Joined
13 May 2003
Posts
8,851
I would suggest postcrete use some wood to frame your posts in their final position get them all vertical and parallel then concrete in place. Metal fence post spikes invariably twist as the metal hits some pesky stone so your posts are twisted relative to each other annoying for a fence but a disaster for what you're proposing where you want to create a rebate to slot wood into.

Also can't you buy a suitably grooved treated post rather than mess about with laths? The oil trick is good for wood, I don't know about its affect on concrete? Personally I use bitumen paint to protect the wood going into the concrete and about 20cm above.
 
Soldato
OP
Joined
27 Feb 2003
Posts
7,173
Location
Shropshire
Cheers folks. Pre-grooved fence posts seem to be odd sizes & quite expensive, so don't mind screwing the laths onto the posts. Also means I don't have to buy different posts or corners or the middle posts (middle posts will need three slots).
 
Associate
Joined
14 Jan 2003
Posts
1,133
Also if you use wood and anything but concrete to fix them then use threaded rod on the tops of each post to help keep them up straight.
 
Soldato
OP
Joined
27 Feb 2003
Posts
7,173
Location
Shropshire
I can get 75x75 fence posts + roofing laths from my local timber yard for about £5+VAT each, so cheaper than concrete (or at least any I've found). Also means I can easily cut the posts to my length.

Knocked up a plan in Sketchup

bmzuoIkl.jpg

The different size boards on the right end were to see the difference in quantities required if I could get 22x300. However, both local yards only stock 22x200 so I'll use them.

I plan to build a roof - simple flat framework from 25x50, hinged on the back posts using T-hinges and then feather edge on the top. Back being higher than the front gives a natural slope for the rain to run off.

I might also leave some air circulation space between the boards, though want to get more warmth in the piles than our current open setup as the compost we've had out of those seems to bring a lot of weeds.
 
Associate
Joined
14 Jan 2003
Posts
1,133
A roof will be a waste of time. You want the rain water to get in and keep it moist. At most you could put old off cuts of carpet on the top but its not needed.

The compost bin will naturally keep itself warm.

You need an inch gap between the boards.
 
Soldato
OP
Joined
27 Feb 2003
Posts
7,173
Location
Shropshire
If you type "compost bin plans" into Google image search, you see open, closed, slatted, meshed, roof, no roof and more - everybody seems to have their own preference. I've seen carpet make a right mess once it rots down though, so don't like using that. Summer could leave the roof open but down in the winter to stop it getting too soggy.

The slats would just sit in the grooves, so can easily be lifted out for either turning into the next bin or emptying from the front.
 
Associate
Joined
14 Jan 2003
Posts
1,133
I've been a gardener since 1999 and experienced many different types of bins.

The best type are what you're building. A slated bin with gaps, a soil floor but no roof. A roof is a waste of time and only preserves whats inside. Carpet is also a waste of time, they take about 3 or 4 years to rot so youre forever replacing them.

I have emptied bins that are 3 years old with leaves that are in the same state they were when put in when they have a roof.

Your posts will move if placed in soil compacted round them. Its the best way if using wood and thats why I suggest threaded rod to minimise this. Place them in concrete and they will rot. Bins with 150mm posts have moved over time. Thats why I suggest concretre posts.
 
Joined
4 Aug 2007
Posts
21,432
Location
Wilds of suffolk
I agree on the roofs bit, although I must say that once the weather turns colder I have found they do improve things as long as you ensure the contents are damp, although I only used plastic beehive types when I found this.
Problem is people don't ensure its damp and thats where it goes wrong if you have a roof, it will dry out (gravity pulling water down), unless your constantly adding a little green material to the top to add some new moisture.

When I got my allotment there was a "pallet nailed together composter" that was lined with carpet, with a tarp over it. The straw and chicken refuse in it was bone dry and in stasis to all effect.
I put it in a plastic composter and added some water and put the lid on, it was dry again 2 weeks later, so I wet it again and left the top off, 4 weeks later it was almost composted and was just warm still, add some new, give it a good turn, 2 weeks later it was usable.

The other thing I found is that balancing what you put in really helps, if everything is "green" then its harder to generate good heat and efficient speed. Adding approx 50% by volume of dried material really helps, so I keep amazon boxes etc and add some torn up as i add decent amounts of green. The speed increase that you get with the added "brown" is quite noticeable. By green I mean wet material (kitchen waste, cut flowers, plant remains etc) and by brown I mean dried material (cardboard, leaves from trees, old tissues, newspaper etc)

My recent approach is to compost in various spots and I am starting to see the benefit. A lot of the goodness goes straight out the bottom in the liquid. So now I move the position on my plot. I have noticed when I planted some crops the ones that were in the ground that had the composter over them are noticably faster growing that the ones by their side that didn't.
 
Soldato
OP
Joined
27 Feb 2003
Posts
7,173
Location
Shropshire
Cheers again - will think further on the roof. Usel - can explain using the threaded rod idea more? Not sure quite what you're getting at.

No scope to move the composting round the garden but we do mix up the contents. We already compost kitchen waste, waste paper along with assorted garden garden (I don't overload it with grass cutting though, a lot of them go into the garden wheelie bin).
 
Associate
Joined
14 Jan 2003
Posts
1,133
Type threaded rod into screwfix. Drill holes almost at the top of each post to connect them together. Stops the posts moving outwards (over time)and your slats falling out.

These can easily be removed if you need to take out the slats.
 
Joined
4 Aug 2007
Posts
21,432
Location
Wilds of suffolk
Personally I wouldn't use slotted
The 3 sides you don't need to remove, either nail or screw the planks on, they then become part of the structure adding strength.
The "front", either concoct a similar to slotted arangement (using some strip wood on the front of the main posts), or what I would do personally is use bolts and wing nuts and washers on the front (so bolts through the posts, holes in front planks, push them on and wing nut the front. I mean realistically how often do you need to take them off? Twice a year max, 5 mins to undo some wing nuts and job done, again they are adding to the structural rigidity rather than just sitting there ;)
The other advantage of constructing by nailing/screwing is that as long as you do a decent job you don't even need to bury the posts. The structure will be pretty rigid and self supporting due to its own weight.
 
Back
Top Bottom