Hmm not thought of replacing mine. Its just the original wood frame and door with some insulation stuck to it I put on when I moved in a few years ago. This looks a bit more modern too.ripped out the old loft hatch that had 1 inch gaps around letting all the heat out of the house. replaced with a manthorpe GL250 insulated door (on sale currently @ screwfix) hopefully that will help a little still got to top up the insulation to 300mm from its current 100mm
You are using an out of date browser. It may not display this or other websites correctly.
You should upgrade or use an alternative browser.
You should upgrade or use an alternative browser.
What "man jobs" have you done today?
- Thread starter jaybee
- Start date
More options
Thread starter's postsSoldato
- Joined
- 23 Dec 2009
- Posts
- 18,214
- Location
- RG8 9
- Joined
- 13 Apr 2010
- Posts
- 18,455
- Location
- Sunny Sussex
Soldato
- Joined
- 13 Apr 2013
- Posts
- 12,996
- Location
- La France
Spent a happy hour trying to find where the immersion heater for one of our gites got power from.
From it’s own circuit? Nope.
Via a timer so that it’s only using off-peak electricity? Nope.
Did some utter bodge merchant remove a facia from a 16A socket and wire the immersion permanently live? Yup.
From it’s own circuit? Nope.
Via a timer so that it’s only using off-peak electricity? Nope.
Did some utter bodge merchant remove a facia from a 16A socket and wire the immersion permanently live? Yup.
Emptied half my office/playroom.
Taken my old desk out to the shed to turn into a workbench.
Painted the wall a nice bright RED
Assembled the 2 kitchen units to use as the base for my new desk.
Now need to work out what height the monitor shelf needs to be, mark that up ready for getting the worktop cut tomorrow. Then I can stick a monitor on it and work out where the wall mount for the 42" TV needs to go so it clears them. Tear the desk down and affix the mount to the wall. Then install the TV, base units, worktop, monitor shelf supports, monitor shelf and hopefully, it'll be done.
Yay!
Installed a Nest Thermostat today - just wonder if it was worth it or not now...
Not the same but our Hive that we installed about 4 months ago replacing a normal thermostat has already paid for itself.
You have any problems with the self install currently got a nest on order via their online shop so just waiting for it to ship out to meInstalled a Nest Thermostat today - just wonder if it was worth it or not now...
You have any problems with the self install currently got a nest on order via their online shop so just waiting for it to ship out to me
Self install isn't too much hassle as long as you take your time, photograph and label your wiring before dismantling it and ensuring you follow the correct wiring diagram for your specific setup.
Last edited:
Not the same but our Hive that we installed about 4 months ago replacing a normal thermostat has already paid for itself.
How so? I want to get one, but convinced it's going to make me use more gas; not less.
How so? I want to get one, but convinced it's going to make me use more gas; not less.
On our old thermostat, it was literally just a schedule and it was placed near a draught. Since getting the Hive, we've placed it in the living area, so it isn't constantly firing the boiler and we can turn it off it we aren't home at normal times, which is quite often.
Also, the old thermostat couldn't make its mind up with turning the heating on or off but the Hive just sticks it on until it reaches temperatures then doesn't come on again for ages as our front room holds the heat well.
Hive works on your temperature set point.
A 'traditional' thermostat works on your set point and a schedule.
Whilst Hive does learn and let you set schedules its primary trigger is temperature.
That being said if you set sensible temperatures the Hive will use less gas as it can skip firing the boiler if nobody is at home (for example)
A 'traditional' thermostat works on your set point and a schedule.
Whilst Hive does learn and let you set schedules its primary trigger is temperature.
That being said if you set sensible temperatures the Hive will use less gas as it can skip firing the boiler if nobody is at home (for example)
You have any problems with the self install currently got a nest on order via their online shop so just waiting for it to ship out to me
We have a Combi, so it was just 4 wires!. As other have said, label the existing and stick em in the right holes on the Nest Link = job done. Just remember to turn off and isolate the boiler.
Edit - I word from home so remains to be seen how much I save. Cool to set it though from the study.
Emptied half my office/playroom.
Taken my old desk out to the shed to turn into a workbench.
Painted the wall a nice bright RED
Assembled the 2 kitchen units to use as the base for my new desk.
Now need to work out what height the monitor shelf needs to be, mark that up ready for getting the worktop cut tomorrow. Then I can stick a monitor on it and work out where the wall mount for the 42" TV needs to go so it clears them. Tear the desk down and affix the mount to the wall. Then install the TV, base units, worktop, monitor shelf supports, monitor shelf and hopefully, it'll be done.
Yay!
And an update.
Yesterday, mounted the 2 kitchen units. Cut the worktop down to length. Unfortunately, both ends had to be cut as the area it's going in is a damn parallelogram! Both sides are on the wonk... ****! Made a temporary stand for the second worktop at the correct height to get the angles right as the walls of course, aren't even vaguely straight. Also, every time we needed to cut these, down narrow stairs, out the front door, around the side of the house... Fun. Thank god it was dry.
Then had to cut the second one down the middle for the monitor shelf. Temporarily assembled the desk, stuck my monitors on, worked out the height needed for the bottom of the tv, disassembled everything again. Did maths to work out where the mount needs to be. Found that there wasn't any studs there... of course...
Old desk had a chunk cut out. Screwed this to 2 joists, marked where the mount needed to go, drilled 3 small pilot holes through that into the plasterboard. Took board off again. Painted the board same colour as the wall. Drilled large holes for gripit fixings. Drilled holes for the gripit bolts in the board. Bolted the wallmount on with the gripit bolts first, then the screws into the joists. Other half can hang off the mount. It'll do. Put TV on mount so it's out of the way and it's not easy to get to with the worktop in place.
At that point, drilled a few largeish holes for cables in the 2 levels of worktop. Ordered some desk cable grommets for them.
Mounted the lower part of the worktop. Screwed down, all good. Put the legs I'm using on the monitor shelf, drilled the holds in the worktop for the bolts to hold it in place. 3 all good. 1.... Arse. Clipped on the of the horizontal supports in the cupboard. Will cut a chunk of it out tomorrow. But with 3 big bolts, it's already ok.
Not bad for a little under 8 hours
Powerstrips arrived today, so I can start to mount them tomorrow. Also attack the cupboard doors, removing the centre panel ready to be painted and for the mesh to go in to allow some airflow through to PC's, NAS, Amp and so on. Fan's can be added if needed, as can more holes near the rear and even some fans there too.
Soldato
- Joined
- 13 Aug 2004
- Posts
- 8,369
- Location
- England
- Joined
- 13 Apr 2010
- Posts
- 18,455
- Location
- Sunny Sussex
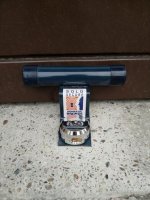
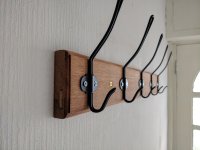
Fitted some extra locks and hinge bolts to the doors and made a coat hook rack for the hallway wall. I'm not sure on he exact type of wood this is, looks like some sort of fake mahogany, possibly african? Bought it from a wood recycling place.
That's nice

If you wanted to be really flash you hide the wall fixings behind the coat hook base.


