Project: Silent Overkill

Soldato
OP
Joined
4 Jun 2007
Posts
2,620
Location
Watford, UK
Oh, and after I hit 'order', I decided to screw a 16mm fitting (I have two but in the wrong shade of black....yeah, I know) into the pump outlet....and it doesn't fit. I'm going to have to make longer standoffs for the pump in order to accommodate the fitting :rolleyes:

Well, after the 6mm OD, 4mm ID aluminium tube turned up and I found it was so far out of tolerance that the M4 threaded rod wouldn't fit down it, I went down to the DIY shop I'd bought the last one from that was bang-on. Got home, same thing. Ended up having to run a 4mm drill down the whole length of the tube a piece at a time. Eight 65mm legs drilled, parted and deburred. Eight 76mm threaded rods parted and the ends re-threaded (they get damaged when cut sometimes). Plate 3D printed to hold those all parallel and also mount the Farbwerk that was seeming a bit neglected. Then, of course, I find that the slots in the bottom of the case aren't quite on 50mm centres so half the rods don't line up - not a problem when they all weeble-wobbled about. Also the slots were completely absent under two legs -as they were previously. So out comes the Dremel and the carbide burr set. Lots of metal swarf is going to be flying everywhere so of course, I completely stripped everything out the case....and didn't just mask it all off with gaffer tape and prayers :rolleyes: Thoroughly hoovered out afterwards so lets hope that doesn't bite me in the arse later. So the result:


It's mounted in the case now but less easy to get a clear picture of it. The black bits at the top of the aluminium rods are rubber isolation mounts by the way. Came with the DDC heatsinks if I remember correctly.

Work has commenced on soldering resistors to LED legs now. Shelled out for a spool of 26AWG wire with mPPE insulation. It's only 1mm in diameter so unlike the nice colour-coded silicone 26AWG wire (that's about 1.5mm) I got, it'll actually fit. Insulation seems quite soldering-iron resistant too - not as much as silicone but much more so than standard PVC. The last wiring that was stuffed in the bottom of the res was 1.2mm so it should give me a bit more breathing room.
 
Soldato
OP
Joined
4 Jun 2007
Posts
2,620
Location
Watford, UK
I kinda like a button head myself......but now you've said it, I had to check. 1.7mm head depth on an M3 CSK. Plate's just shy of 1mm so it'd have to take quite a bite out of the acrylic - which is already looking somewhat crazed in places - to be flush....and if a CSK isn't flush, why did you bother?! :p

Current sanity-destroying progress. Going ok so far....but fully aware that's because I've not got to the bit where every fraction of a mm counts! All the blue LED channels now have a 510 Ohm resistor the same as the Red channel. That's higher than the spec requires but should hopefully stop them dying off as fast at the expense of a little brightness.

 
Soldato
OP
Joined
4 Jun 2007
Posts
2,620
Location
Watford, UK
Hmm, well that's irritating. Started trying to line things up to at least measure for the glass. Turns out that either the bottom of the case is not parallel with the mid-deck (PSU shroud) or there's about 0.8mm askew somewhere. That means that a pipe exiting the pump does not run level; it dips as it gets towards the back. With 12mm acrylic (and 1mm wall at that) hand bent, that didn't seem to be a noticible issue. Given that we're now talking 16mm glass with a 2.5mm wall and the bends are pre-set at 90° rather than 'nearly' 90°, I think this will result in trouble - especially when combined with the fact that the pump is not square either so the exiting tube also slants away from the motherboard. Shimming the rear legs of the pump with 0.8mm washers seems to have got it to within what I think will pass but in order to rotate it, I'm going to need to grind the other set of slots larger to allow for adjustment. And with that, I make it beer o'clock :rolleyes: Cheers!
 
Soldato
OP
Joined
4 Jun 2007
Posts
2,620
Location
Watford, UK
A splash more progress. Got the slots widened and the pump about straight with where the tube runs will be. Coolant and PETG mock-up tube turned up at lunchtime. There's a massive irony that I've actually not used said tube now because when I cut the last piece of acrylic, it was just long enough to make the last mock-up run. :rolleyes: Since it didn't matter if I scratched the acrylic, I chucked it up in the lathe and parted it off for a perfectly square and really tidy cut. Noga external rotadrive made a lovely chamfer too. Acrylic didn't get even slightly scratched either so I reckon I could chamfer it in the lathe too....if it were staying!

Have started cutting glass. I'd definitely recommend the score-and-snap technique over the Dremel-and-diamond wheel I'm using. I'm doing it this way because some of my cuts are too close to an end or a bend for snapping....and also the plain bloody-mindedness I'm sure you've come to expect in this thread.
So, GPU-CPU is now glass and the straight from the pump (bottom right) to the first elbow is glass. The other two short links are acrylic at the moment but it gives a fair idea of the clarity difference.....and there's only so much bloody-mindedness that can usefully be applied in one session! :D Those two sections will be replaced with one pre-bent piece similar to the GPU-CPU link so there will only be the one elbow in there. I didn't fancy trying to free-hand bend by blowtorch for my first go!


I should point out that I'm wearing a massively over-the-top (would you expect anything else?!) JSP full face mask with P3 filters as I don't fancy breathing the glass dust much! :eek: If you apply a drop of water to the diamond wheel as it's spinning, you can see glass dust (and presumably water mist) burst in all directions....so yeah, no mask would be a bad plan for long-term staying-alive!
 
Soldato
OP
Joined
4 Jun 2007
Posts
2,620
Location
Watford, UK
Aaaaand we a are glassed up :D Did it go smoothly? Hell no, what do you think this is, some kind of professional outfit?! :p That last piece I measured, cut, fitted...and swore. Turns out the measurement was 5mm further along than 120mm....which obviously is 125mm.....unless you have the ruler upside down (only way it'd fit) and then it's 115mm and your piece is now 10mm too long. On the bright side, that's soooo much better than 10mm too short!


Pressure tester is on the job - as you can see. First time round, it did blow off after a bit. If the upright is Z and the tube to pump is X then it seems like the joint where the Y tube fits the elbow to the X tube can slide out. I've tightened the collar a bit and it seems to be holding but I may need to loosen all the pump mounting nuts and see if it'll find a position it's more happy with. Not a lot of flex in 2.5mm wall glass tube!

Oh and after such success cutting acrylic tube on the lathe, I had to try the glass! One piece had the arm short enough to spin once I'd cut it down so I scored it like this and then.....failed to snap it. Scored it deeper....and failed to snap it. Eventually I'd scored it deep enough that I could get it to snap. This pic is actually where I was using the same technique to mark out the 10mm re-cut which I then Dremel'd through once scored nicely all the way round - too short to snap. Same setup though.

 
Soldato
OP
Joined
4 Jun 2007
Posts
2,620
Location
Watford, UK
Well, it's holding pressure - perfectly in fact. There's only pump, GPU, CPU and up-and-over fittings chain in the loop currently. But this is what makes me nervous about how it is currently:


(click for larger - for all pictures in this thread)

It's not a great pic so I've professionally *cough* highlighted bits.
Red: the inner o-ring
Green: the end of the tube
Blue: the bottom of the fitting - where the end of the tube ought to be

This is despite pushing it completely in and tightening the collar; it just wants to sit dangerously close to pulling out of the o-ring. Possibly I've cut the tube 1mm too short but it worked perfectly with the acrylic. I suspect that the glass is a much more slippery surface than the acrylic so the fitting doesn't grip it as much. Hopefully loosening the pump mounts off, reseating the tube and then doing up the pump mounts again should close that gap.
 
Soldato
OP
Joined
4 Jun 2007
Posts
2,620
Location
Watford, UK
Alright, some overdue updates. I did loosen the pump mounts but I also marked up the chamfered end of the tube with a red peranent marker - yeah, I know it should have been green! :p Found that actually what I'd marked in the picture above was the edge of the groove the o-ring sits in and the glass was actually seated properly.

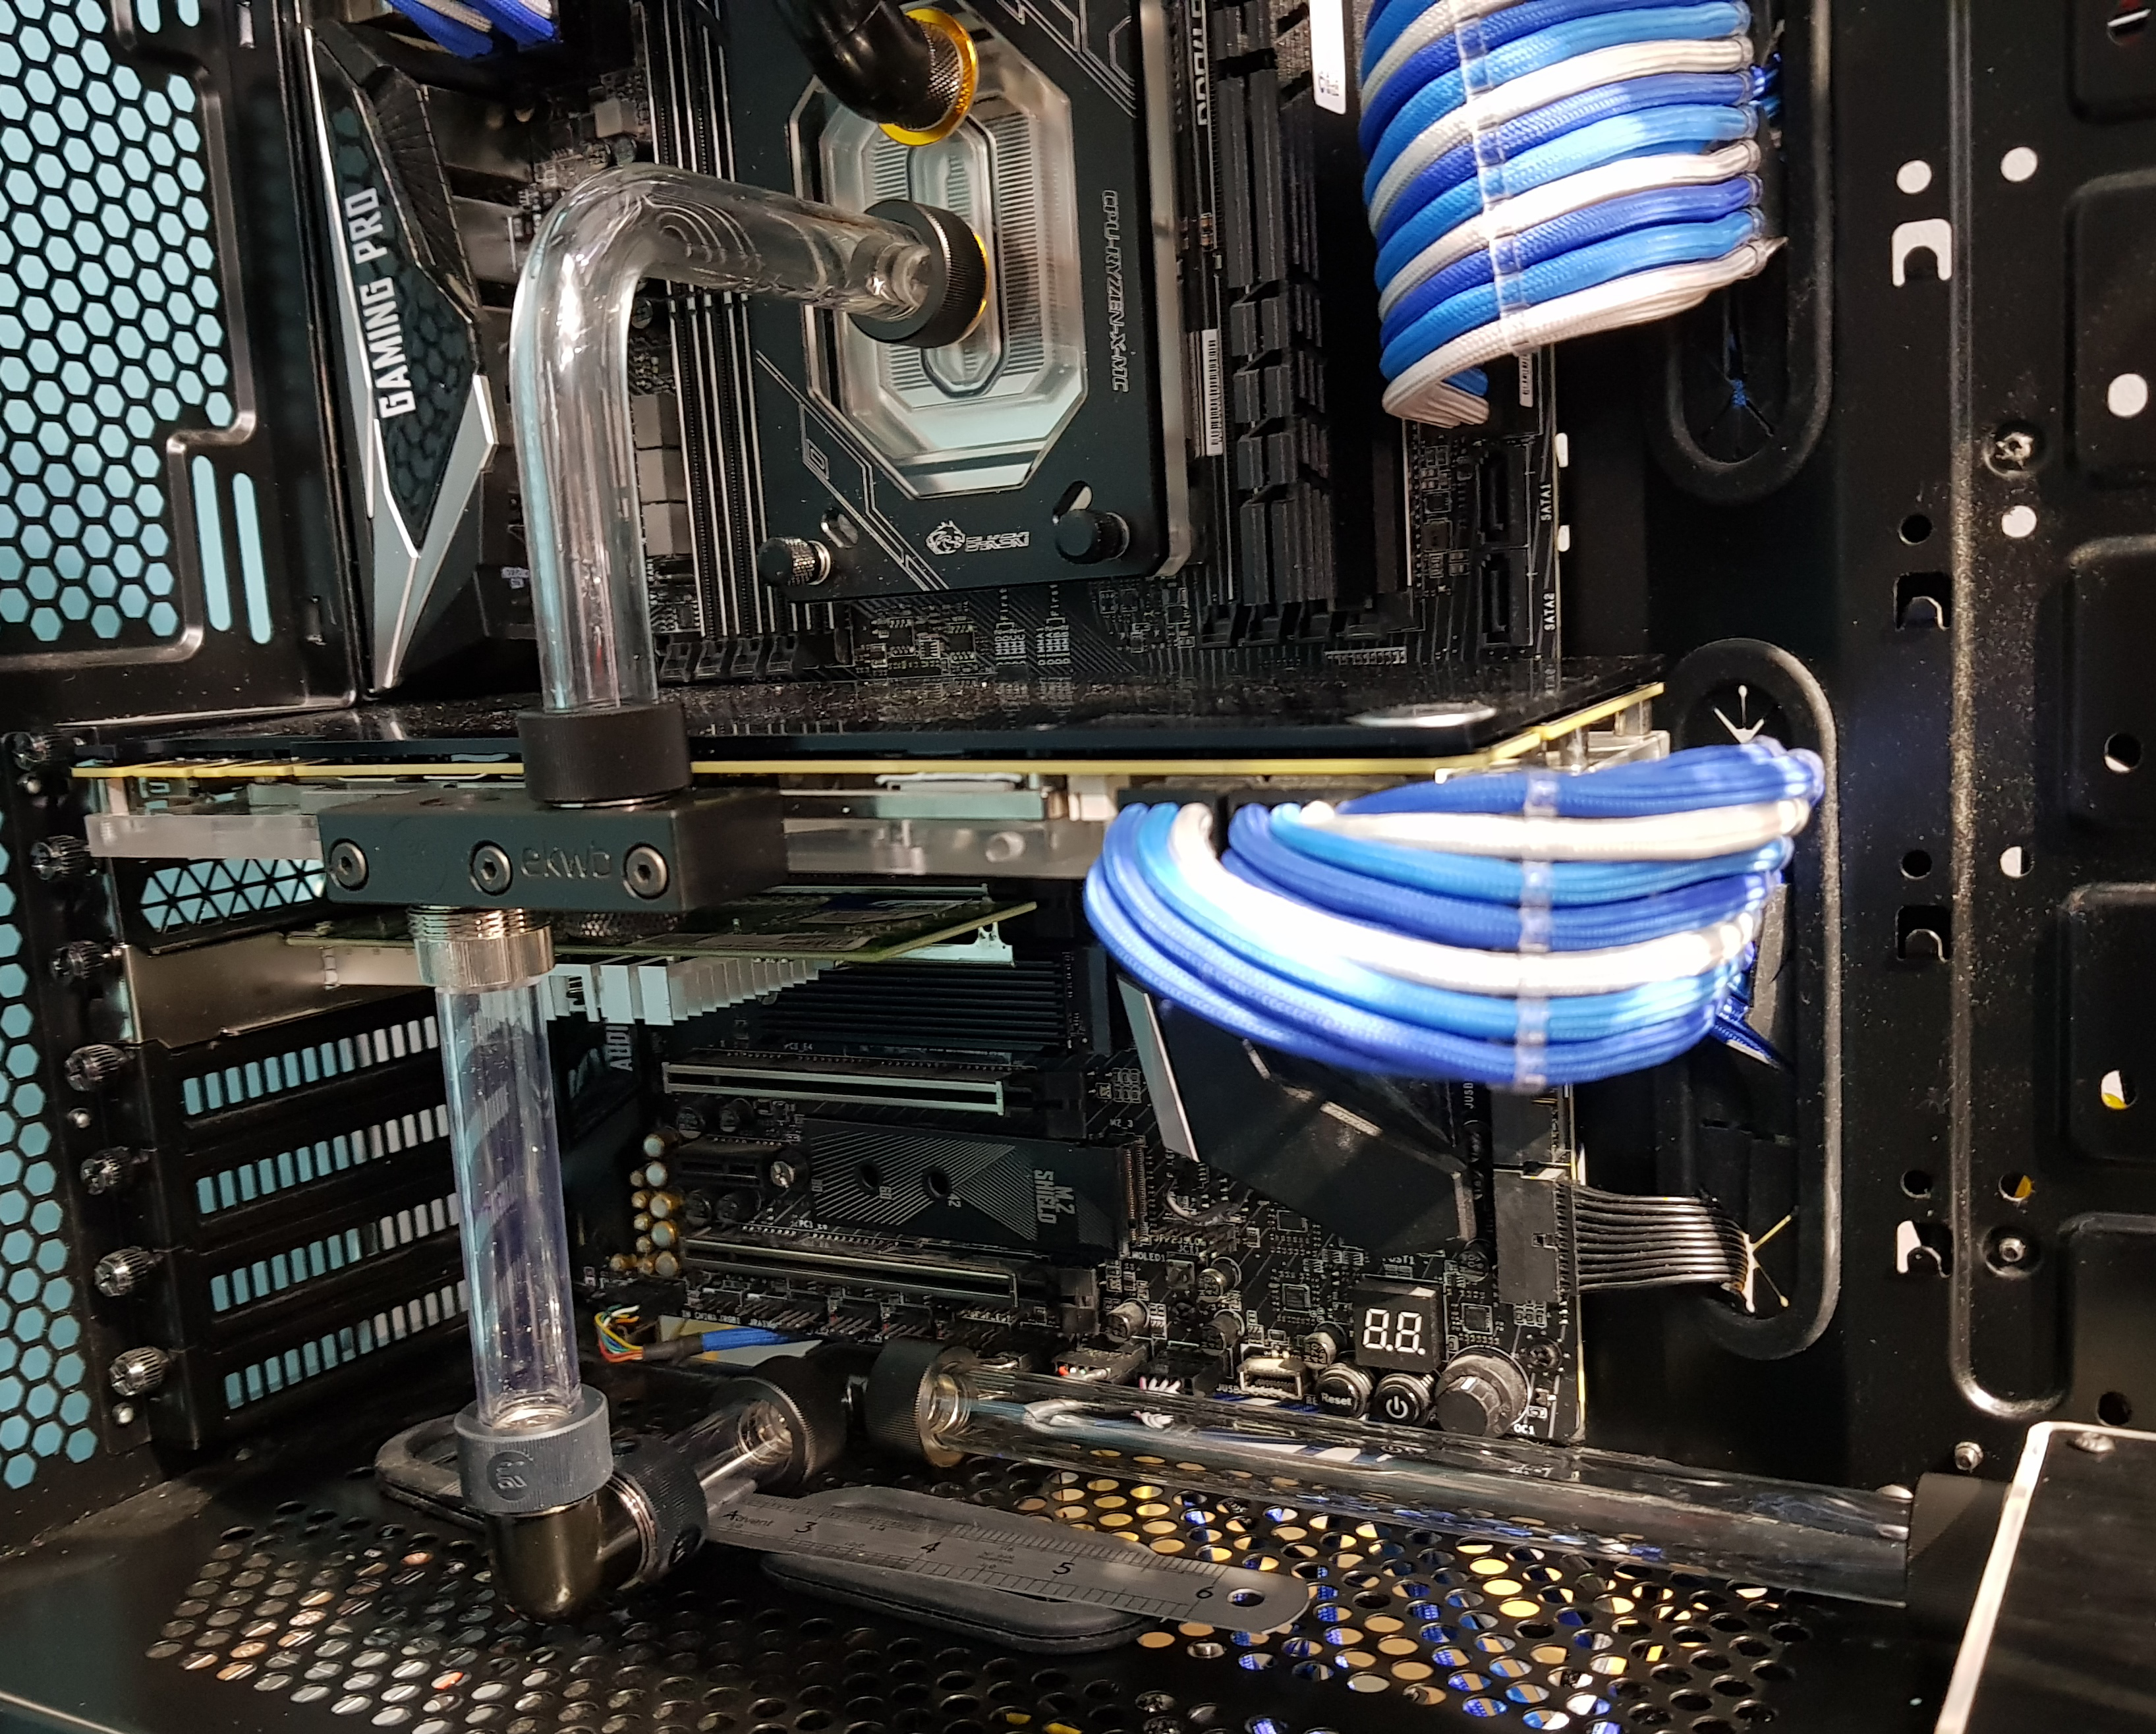
So, I pressure tested the half-loop (rad not connected) and it seemed good. A little drop of pressure (0.8 psi over night) but my res does seem to do that and not cause problems - I suspect the fill-level sensor is the culprit as that's effectively a hole in the bottom of the res with a pressure sensor bunged into it. Encouraged by that, I attached the rear door with its mounted rad, moved all the EPS cabling that I'd run through a convenient hole and been blissfully unaware that space would be fully taken up by the fitting on the top of the rad. Pressure tested again and all good so off we go.

Filled her up with two litres of fresh EC6 Clear. I'd got some sealed containers from before but they'd gone first-wee-of-the-morning orange (available from all good paint stockists!) and I didn't fancy that. Two litres in and res only 1/3 full so I've got another on order. Aquaero alarmed fairly quickly that Pump1 was not spinning. It was, I could hear it. After ignoring it for a while (2nd pump did its job nicely - and this is why they are in series) I speculated that I'd snapped one of the wires at the pump when I'd trained it downwards and envisioned having to strip the entire loop to remove a pump and resolder - yes, a drain on the cards already; what fun! :rolleyes: Then I wondered if, when I shortened the wires, I could have been stupid enough to swap the blue and green (PWM and tacho) wires over - that would explain why it was running at full speed (by the sound) but reporting zero rpm. Yup, turns out I was that stupid.

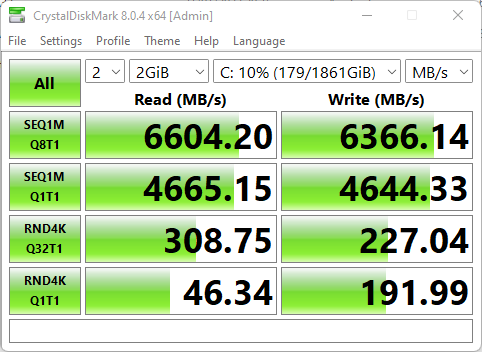
Updated the bios to support Windows 11 - got to bite the bullet sometime so while I have an empty disk seemed like a good time. CPU at stock as the RAM on XMWorked out the necessary hoops to get the Secure Boot, TPM and RAID0 for the two M.2 NVME drives. Got Windows 11 setup running and navigated the similar hoops to get it to recognise the RAID set (You need the right pair of drivers in the right order for AMD it seems). Updated Windows 11...and again...and again. You'd think it wasn't really finished yet! Ran Crystal Disk mark and got 6681 MB/s read and 6576 write. That’ll do very nicely :D Pair of 1TB Samsung 970 Evo’s on Black Friday. Wasn’t any point in going for pricier PCI-E 4 sticks when I don’t have it!
Then Windows threw a BSOD, then Firefox crashed, the Aquasuite crashed repeatedly. Looks like my RAM that's spec'd for 3733MHz couldn't handle 3466MHz (I went with the lower of the two XMP profiles). I'd suspected this as I'd had stability issues running XMP on the last board but thought it might have been the board. I've dropped it to 3200 and it seems to be stable so far but I might see if OCUK will warranty them.

So crashing sorted (sort of) I changed the LEDs back to a blue-red temperature spectrum now that the blue channels aren't all blown and also dimmed them to 40% - which isn't as dim as it sounds but takes the edge off - in the hope of them lasting longer. Shut down and went to bed. This morning, I was going to write this post from the 'new' system....and then I noticed that sound that sounds disturbingly like someone taking a really long leak (res set for fountain and only 1/3 full), had stopped. Looked down and the res is empty. Turned her off, knelt down to check what was happening...and got a wet knee. Somehow the fitting for the pump inlet was noticibly loose - not wobbly but definitely a larger gap between the end of the fitting and the block than there should have been. So this morning has been wet-vac'ing the carpet, drying out the bottom of the case, doing that fitting back up with long nose pliers and then touching up the black paint where it had scuffed it - couldn't face dismantling half the loop to do it by hand. I can only assume that I hadn't fully tightened it when I was working out the complicated chain of fittings that go from the res to the pump. Passed a pressure test and a water test though.

So now I'm offline until the coolant arrives - probably tomorrow - as there's not enough in the res to run it. Once it passes another pressure test, of course :rolleyes:

A long time ago when I was starting water-cooling and trying to decide on a coolant colour, a friend of mine wisely said (deadpan, too) "What colour stain would look best when you screw it up and it leaks all over your carpet?". The resulting clear, colourless coolant choice is one I've stuck to ever since. Cheers Fish!
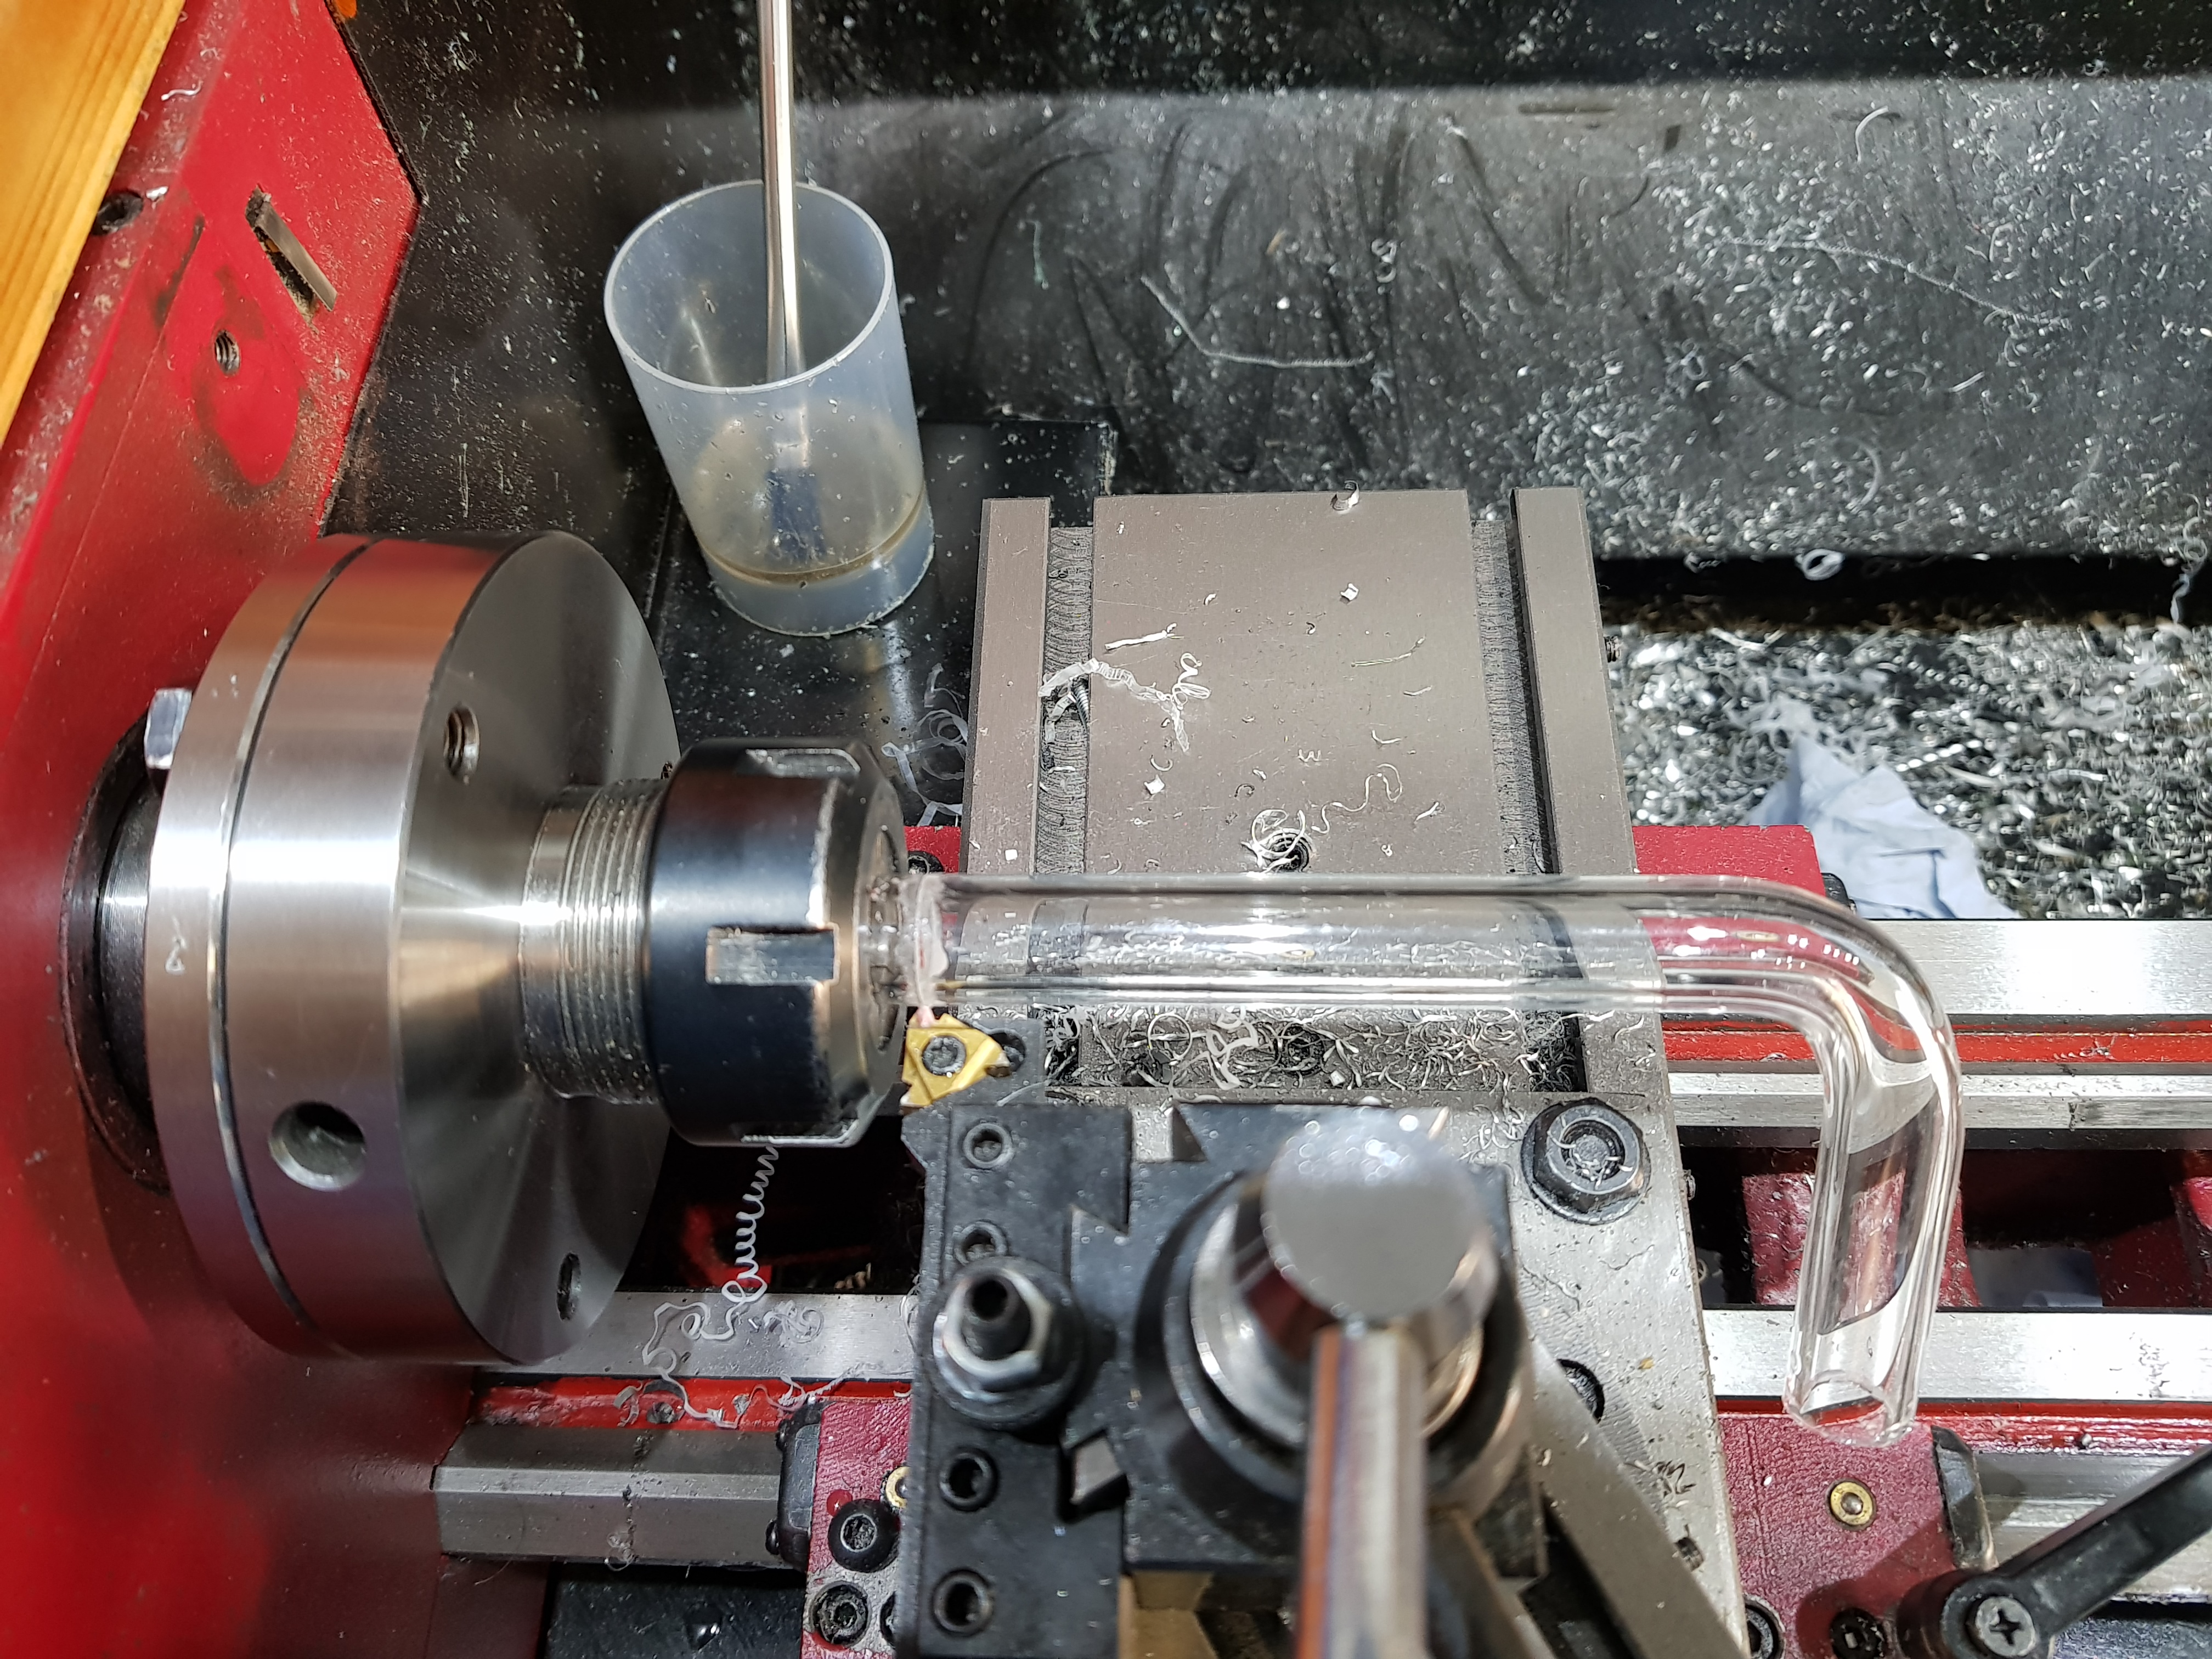
 
Soldato
OP
Joined
4 Jun 2007
Posts
2,620
Location
Watford, UK
Well, the coolant turned up and I poured it in. All good right? Well, if you've been reading this thread this far, you'll know that just isn't how things go :( For a change, the coolant didn't leak anywhere, it all stayed put. The usual noise whilst the bubbles went through the pump....only it didn't stop when the bubbles had gone down. It did stop when I unplugged (only) pump 1. It didn't stop when I unplugged (only) pump 2. And it was a sharper, louder sort of ticking that it should be. Eventually I came to the conclusion that when the fitting on the pump inlet leaked, it must have broken part of the acrylic thread and that was what was trapped in the pump and making a hideous noise. I'll confess that I did contemplate running it just on the other pump to avoid the inevitable drain within an hour of filling it but no.

I ended up draining the lot and then stripping the entire front end: res, pumps, fans, Farbwerk. Stripped the pumps down and found......nothing. There was damage to the thread though so it could be that it came out with the drain - which is at the inlet to the pump and would have had the coolant flowing backwards so it would make sense. I cleaned up the threads with a G1/4 tap and got rid of any swarf stuck to the impeller - they're quite strong magnets so anything ferrous will stick. Put them all back together and made the sensible decision to test them in the kitchen sink....while my wife wasn't watching! :D
Only issue with them was that with both at full power (only had power and no PWM to test) the hose wasn't really tough enough to not collapse under the pull....there's a reason it's called Overkill :D

So, everything back together again - with just a gnat's of swearing, cursing and colourful language. Pumps and everything else are silent again which is a delight as on the laptop even watching YouTube resulted in the fans spooling up to full speed.

Have to say that so far the AMD onboard RAID seems to be rather good. This is a pair of M.2 NVME 1TB Samsung 970 Evo Plus that turned up for Black Friday. Didn't see the point in paying extra for a faster PCIE 4 drive when I'm only running PCIE 3 and that tops out at just over what these drives are (nominally) capable of. Still, the pair of them in RAID 0 seem to do pretty well:

AquaXI-Disk speed.png


Those with a keen eye will notice the tell-tale rounded corners of Windows 11. I can't say I'm instantly keen but I need to get to grips with it as it'll be inflicted on customers soon enough and "I've no idea" doesn't pay the bills :eek:

I've currently got the ThreadRipper 1920X running at 4GHz on all cores by simply turning up the multiplier and nothing else. Seems to handle State of Decay 2 on Ultra settings without any sort of struggle and only 8°C over the coolant temperature. TimeSpy was a bit disappointing on the CPU speed (relative to other 1920X's) for some reason but I'm unsure why at the moment.

RAM is running at 3200MHz as it seems to fall over if I push it any higher - and I think that's the RAM rather than the board or CPU.

Completed inside and all plugged in under the desk. Yeah, it would have been smart to take the pictures before making it nearly impossible!
You can see the EPS cables across the top. I originally took those out at the top left corner....and then found that gap was taken up by the fitting for the top of the rad.
There may need to be some black insulating tape applied in places :cry:

 
Soldato
Joined
23 Apr 2010
Posts
11,896
Location
West Sussex
From what I remember 3200 was about the limit for first gen.

Looks great man. Those red LEDs are annoying though, but deffo look better with the blue than the green I had running.
 
Soldato
OP
Joined
4 Jun 2007
Posts
2,620
Location
Watford, UK
From what I remember 3200 was about the limit for first gen.

Ahh, it could then be that I just had vastly over-spec'd RAM but I've no been been able to run it stably at full speed. I think I could when it was new (on the Sky Lake) but that was a while back and it might have been less stable than I remember. It's been running at 2133 (ie non-XMP) for quite a while now in the name of stability over speed.

Looks great man.

Cheers. I think the glass looks good - certainly in person rather than phone camera at an awkward angle in the dark - but I'm not sure I could recommend it as a route. Straight glass with the bends done in fittings wouldn't be so much of a pain....but even then, the 16mm acrylic was so much easier to work with and it needed to be mocked up in that first to get the length right so....when you've got it all looped up in perfectly-functional acrylic it's kind of hard to justify an answer to the question "So why are you changing it?"!

Those red LEDs are annoying though, but deffo look better with the blue than the green I had running.

I think you can turn off the top two by the RAM using the Mystic Light software but they don't stay off and I'm not running the software all the time just to turn off two LEDs! ....not when tape will do it just as well :D
 
Soldato
OP
Joined
4 Jun 2007
Posts
2,620
Location
Watford, UK
....and this is why you project-log these things! :D
Been having trouble with Windows 11. Noticeable and irritating lag when you do something like press Windows+R and start typing "notepad". Tend to find you have a box with "tepad" in it and another app that's wondering what to do with an 'n' and an 'o'. Then started to find that YouTube (for when I'm really busy :D ) was a bit jumpy and then even typing started to have a massive lag....and that was annoying! So I figured it might be the AMD fTPM bug and did a bit of research. There's one newer bios revision 1D9 (beta) vs my 1D8 (beta) and it's rumoured (not stated outright in the release notes, obviously!) that it fixes this issue. So onto a FAT32 stick it goes, boot to BIOS, start flashing it and eventually it reboots by itself. There was no warning and I'm not sure if the bar got to the end or not....but it rebooted so it must be good right....and I'll see some life from the screen any second....ANY second now....nope.

POST debug gets to 54, pauses a while and then starts again. 54 isn't listed anywhere...which is helpful. Rumours that it's memory related so I tried clearing the CMOS in case it had defaulted to something daft....nope. So I pondered it over a beer - these things often look better through the bottom of a glass. Andy suggested a USB chip flasher with some (presumably) nice loooong shipping time - bound to be "UK" stock :rolleyes: Then I remembered the one other AMD I've touched this millenium and needing to be able to upgrade the bios without a CPU in and how Bios Flashback would let me do that.....if the board had it. That board, of course, did not...but this one does! ...and it worked :D Had to reconfigure everything in the bios...but much better than replacing the board!

So Windows 11 back up and running. Office decided the hardware was so different that it wasn't activated...which is odd because Windows had no such quibble. Maybe it's because I disabled the onboard NIC in favour of the 10Gbe card - gotta play with the toys sometimes :D
Lag seems to be gone...although that could also be installing the AMD chipset driver - a couple of which were slightly newer than what was installed. Obviously I did both things together so that I couldn't tell which one fixed it :D

I remembered that RAM speed couldn't be the full spec of the DIMMS so I went for the lower of the to A-XMP options: 3466MHz and everything went nicely...until I printed something and Windows dropped a KERNEL_SECURITY_CHECK BSOD :rolleyes: So I thought I'd check whether I'd mentioned on this thread what I'd set the RAM to before....and this is why you project-log these things! :D
 
Soldato
Joined
23 Apr 2010
Posts
11,896
Location
West Sussex
I had a similar issue with my 3950x and X570i Strix. Notepad, Wordpad and opening a file in Photoshop would take ages. This was on Win 10, though. I tried to fix it, but it remained. In the end on that I found out that if I opened a folder it made everything open immediately. So I used that workaround for over a year.

Oddly enough when I did install Win 11 it all went away. I did have to update the BIOS for PCIE4 and Rebar, though.
 
Back
Top Bottom