

Yeah, eventually. It involved digging up the entire back garden, half the new kitchen and nearly as much money as having it done in the first place to put right. Now at least the rainwater soaks away and the sewage gets to a sewer. Far better that than the sewage trying (and failing) to soak away and next door's rainwater flooding out of our toilet! *Facepalm*
You are using an out of date browser. It may not display this or other websites correctly.
You should upgrade or use an alternative browser.
You should upgrade or use an alternative browser.
Project: Silent Overkill
- Thread starter Cenedd
- Start date
More options
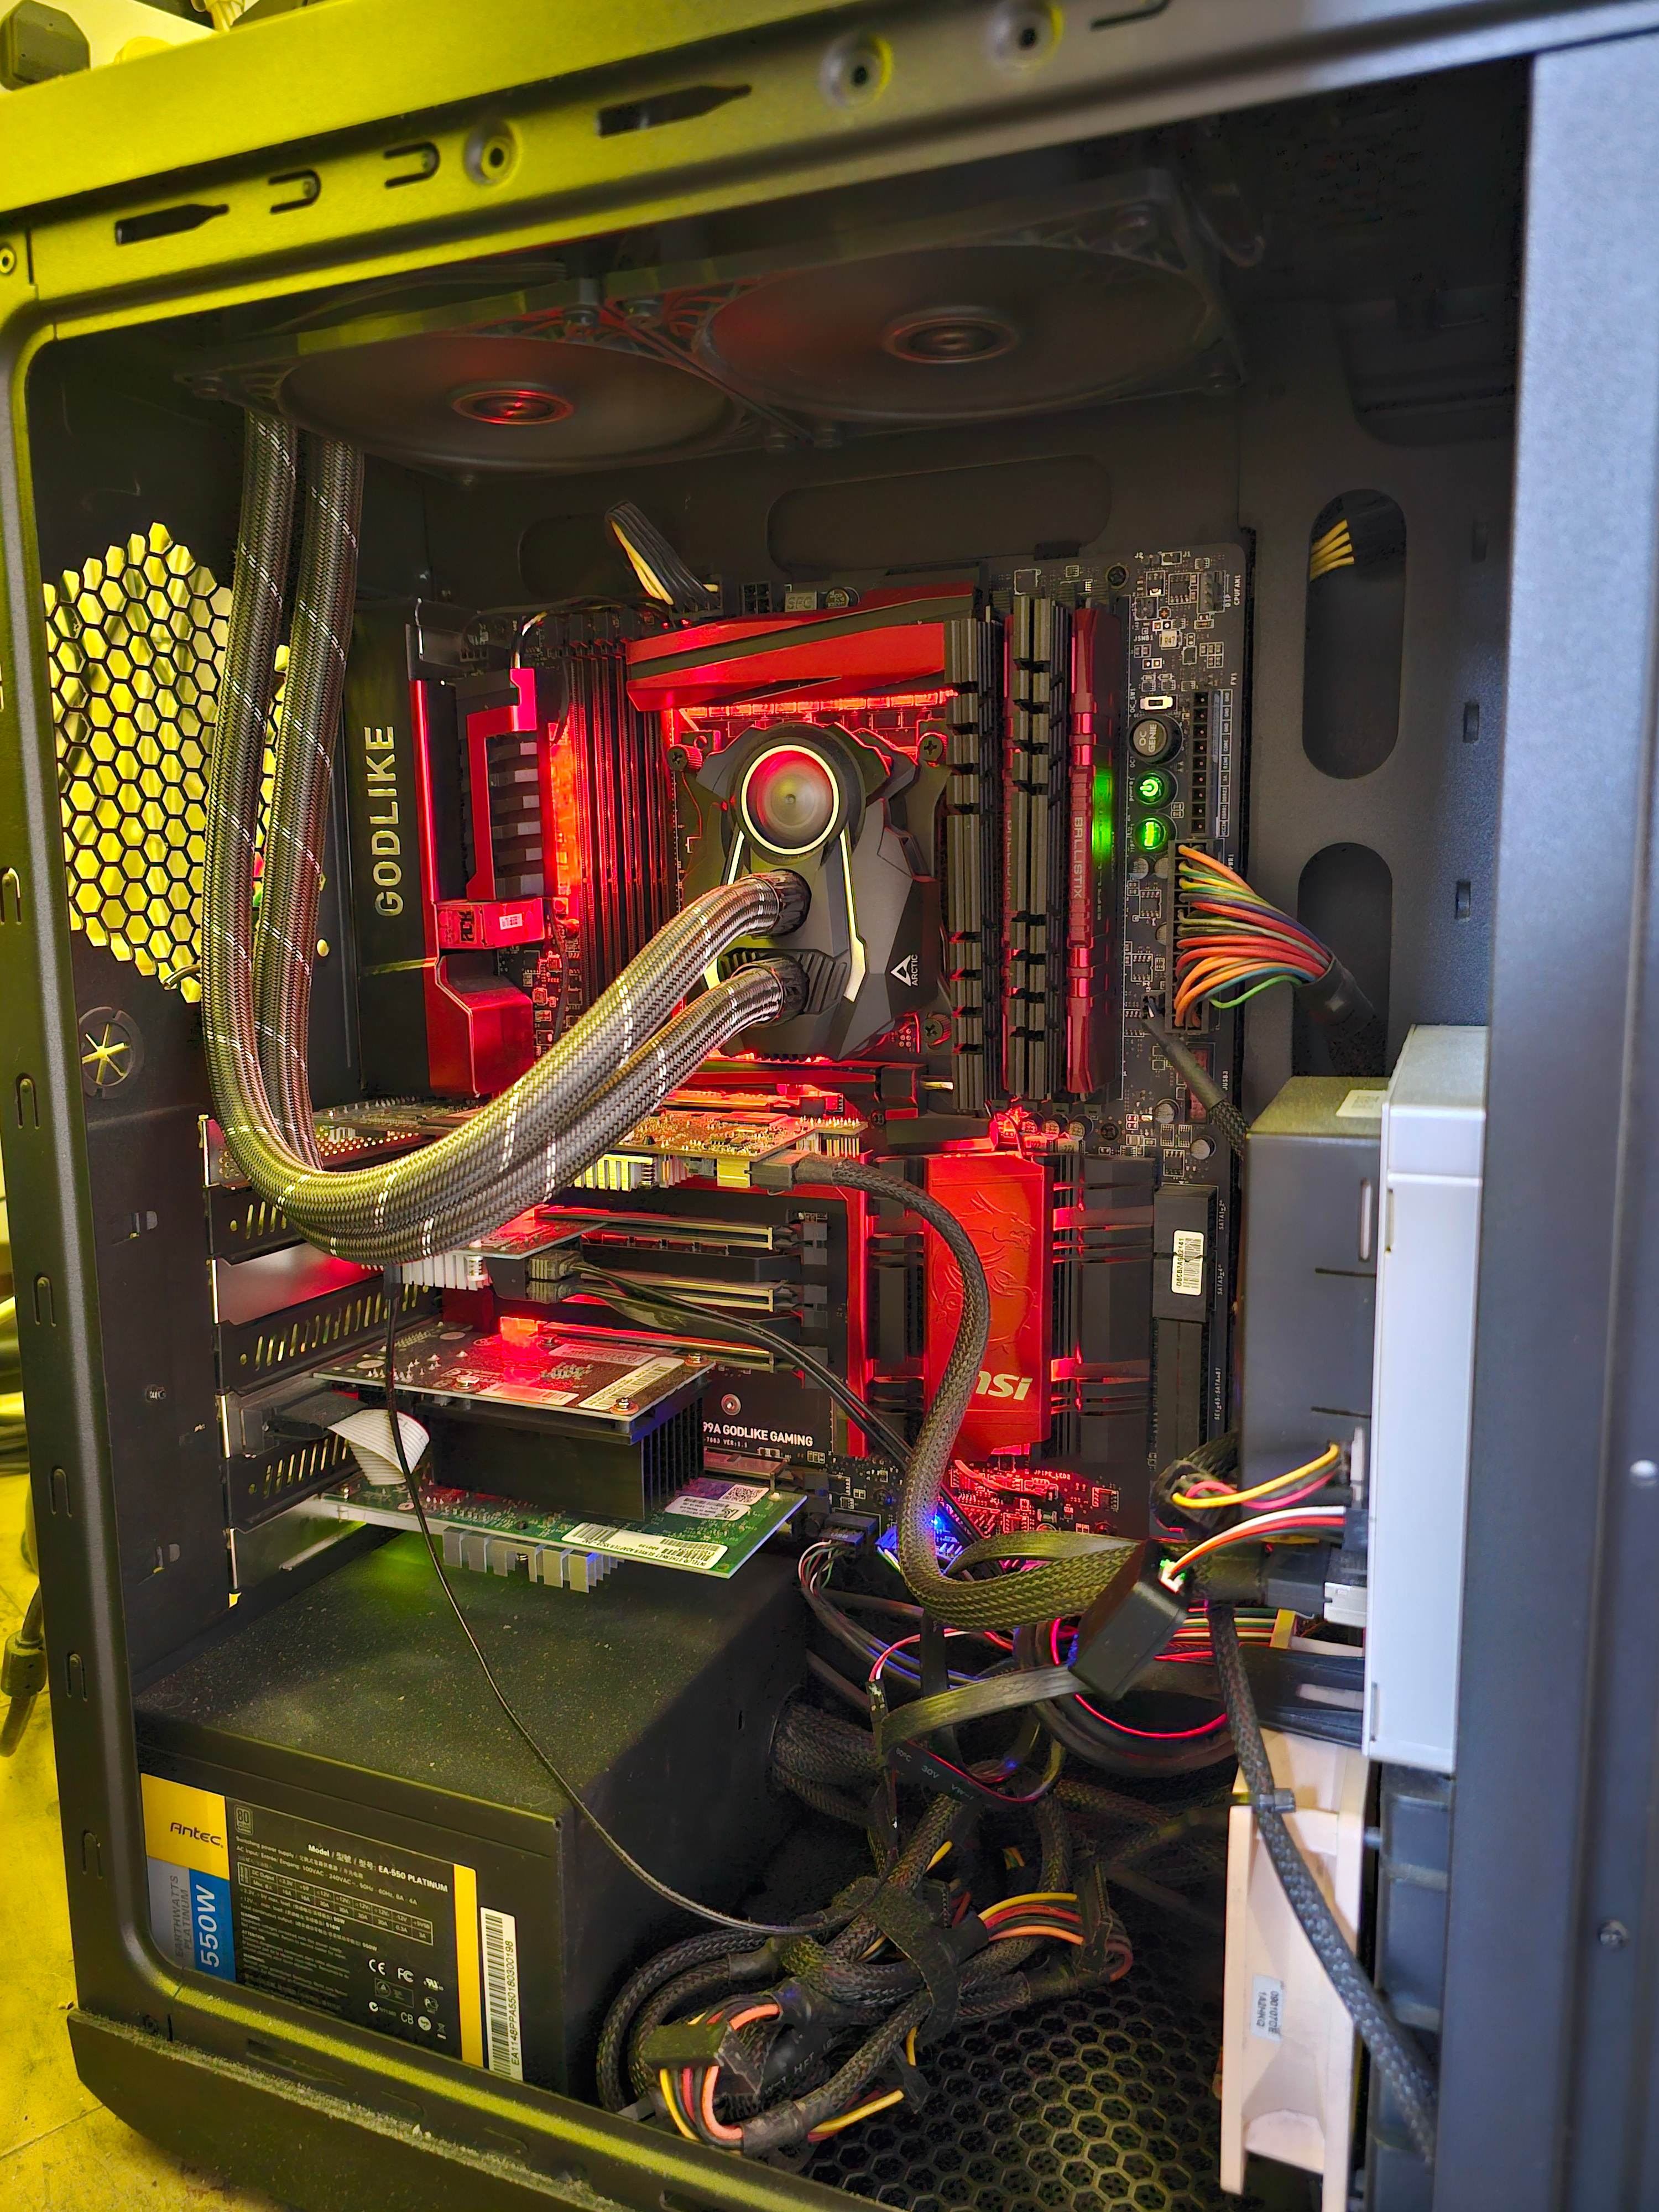
Thread starter's postsHello again all. "Fun" continues and may well do for years now. Like having a kid; when you think you've got it cracked, the rules change. But, I'm starting to look at what to do with my floor-mounted motherboard again. My plan was to look at some sort of custom distro plate and massively overcomplicate my life further. Something that (re-)dawned on me though is that I'll go to all the trouble, it'll look nice on the pictures....and then I'll never see it. The window is on the left of the case and with the room in its current orientation (I can't see if going back), it faces away from me and you could only see it if you came in the door and then hit the deck. So I could move some of my OOSOOM storage* around and try to get the PC on the other side of the desk...if I buy a load of longer moinitor cables etc. That's one option. The other is to change case for something that will invert so the window is on the right. If I do that, I could redesign the Mo-Ra to be on QDCs rather than permanently attached to the side...which does rather make the weight a little, shall we say unweildy! I'll be honest, I'm somewhat inspired there by the "Why didn't I think of that?!" in OC2000's build Could even go wall-mount...but I can't say I've seen anything that inspired me.
Couldn't I just put it all back together how it was but with the new motherboard, GPU etc? Yeah, totally...but I'll be honest, I'm looking at the chasis (with the thick aluminium plates all taken off) and...I don't know, I just don't really want to. It's sort of filling me with 'work' vibes rather than enthusiasm.
So what do people think? Got any suggestions for inverted cases if you're going to suggest that route? O11 Dynamic Evo seems to be one option.
*Out Of Sight Out Of Mind - ie shove stuff under the desk and forget about it
Haha that's a whoooole lot of coolant - I fully support the contingency planningPostie's been
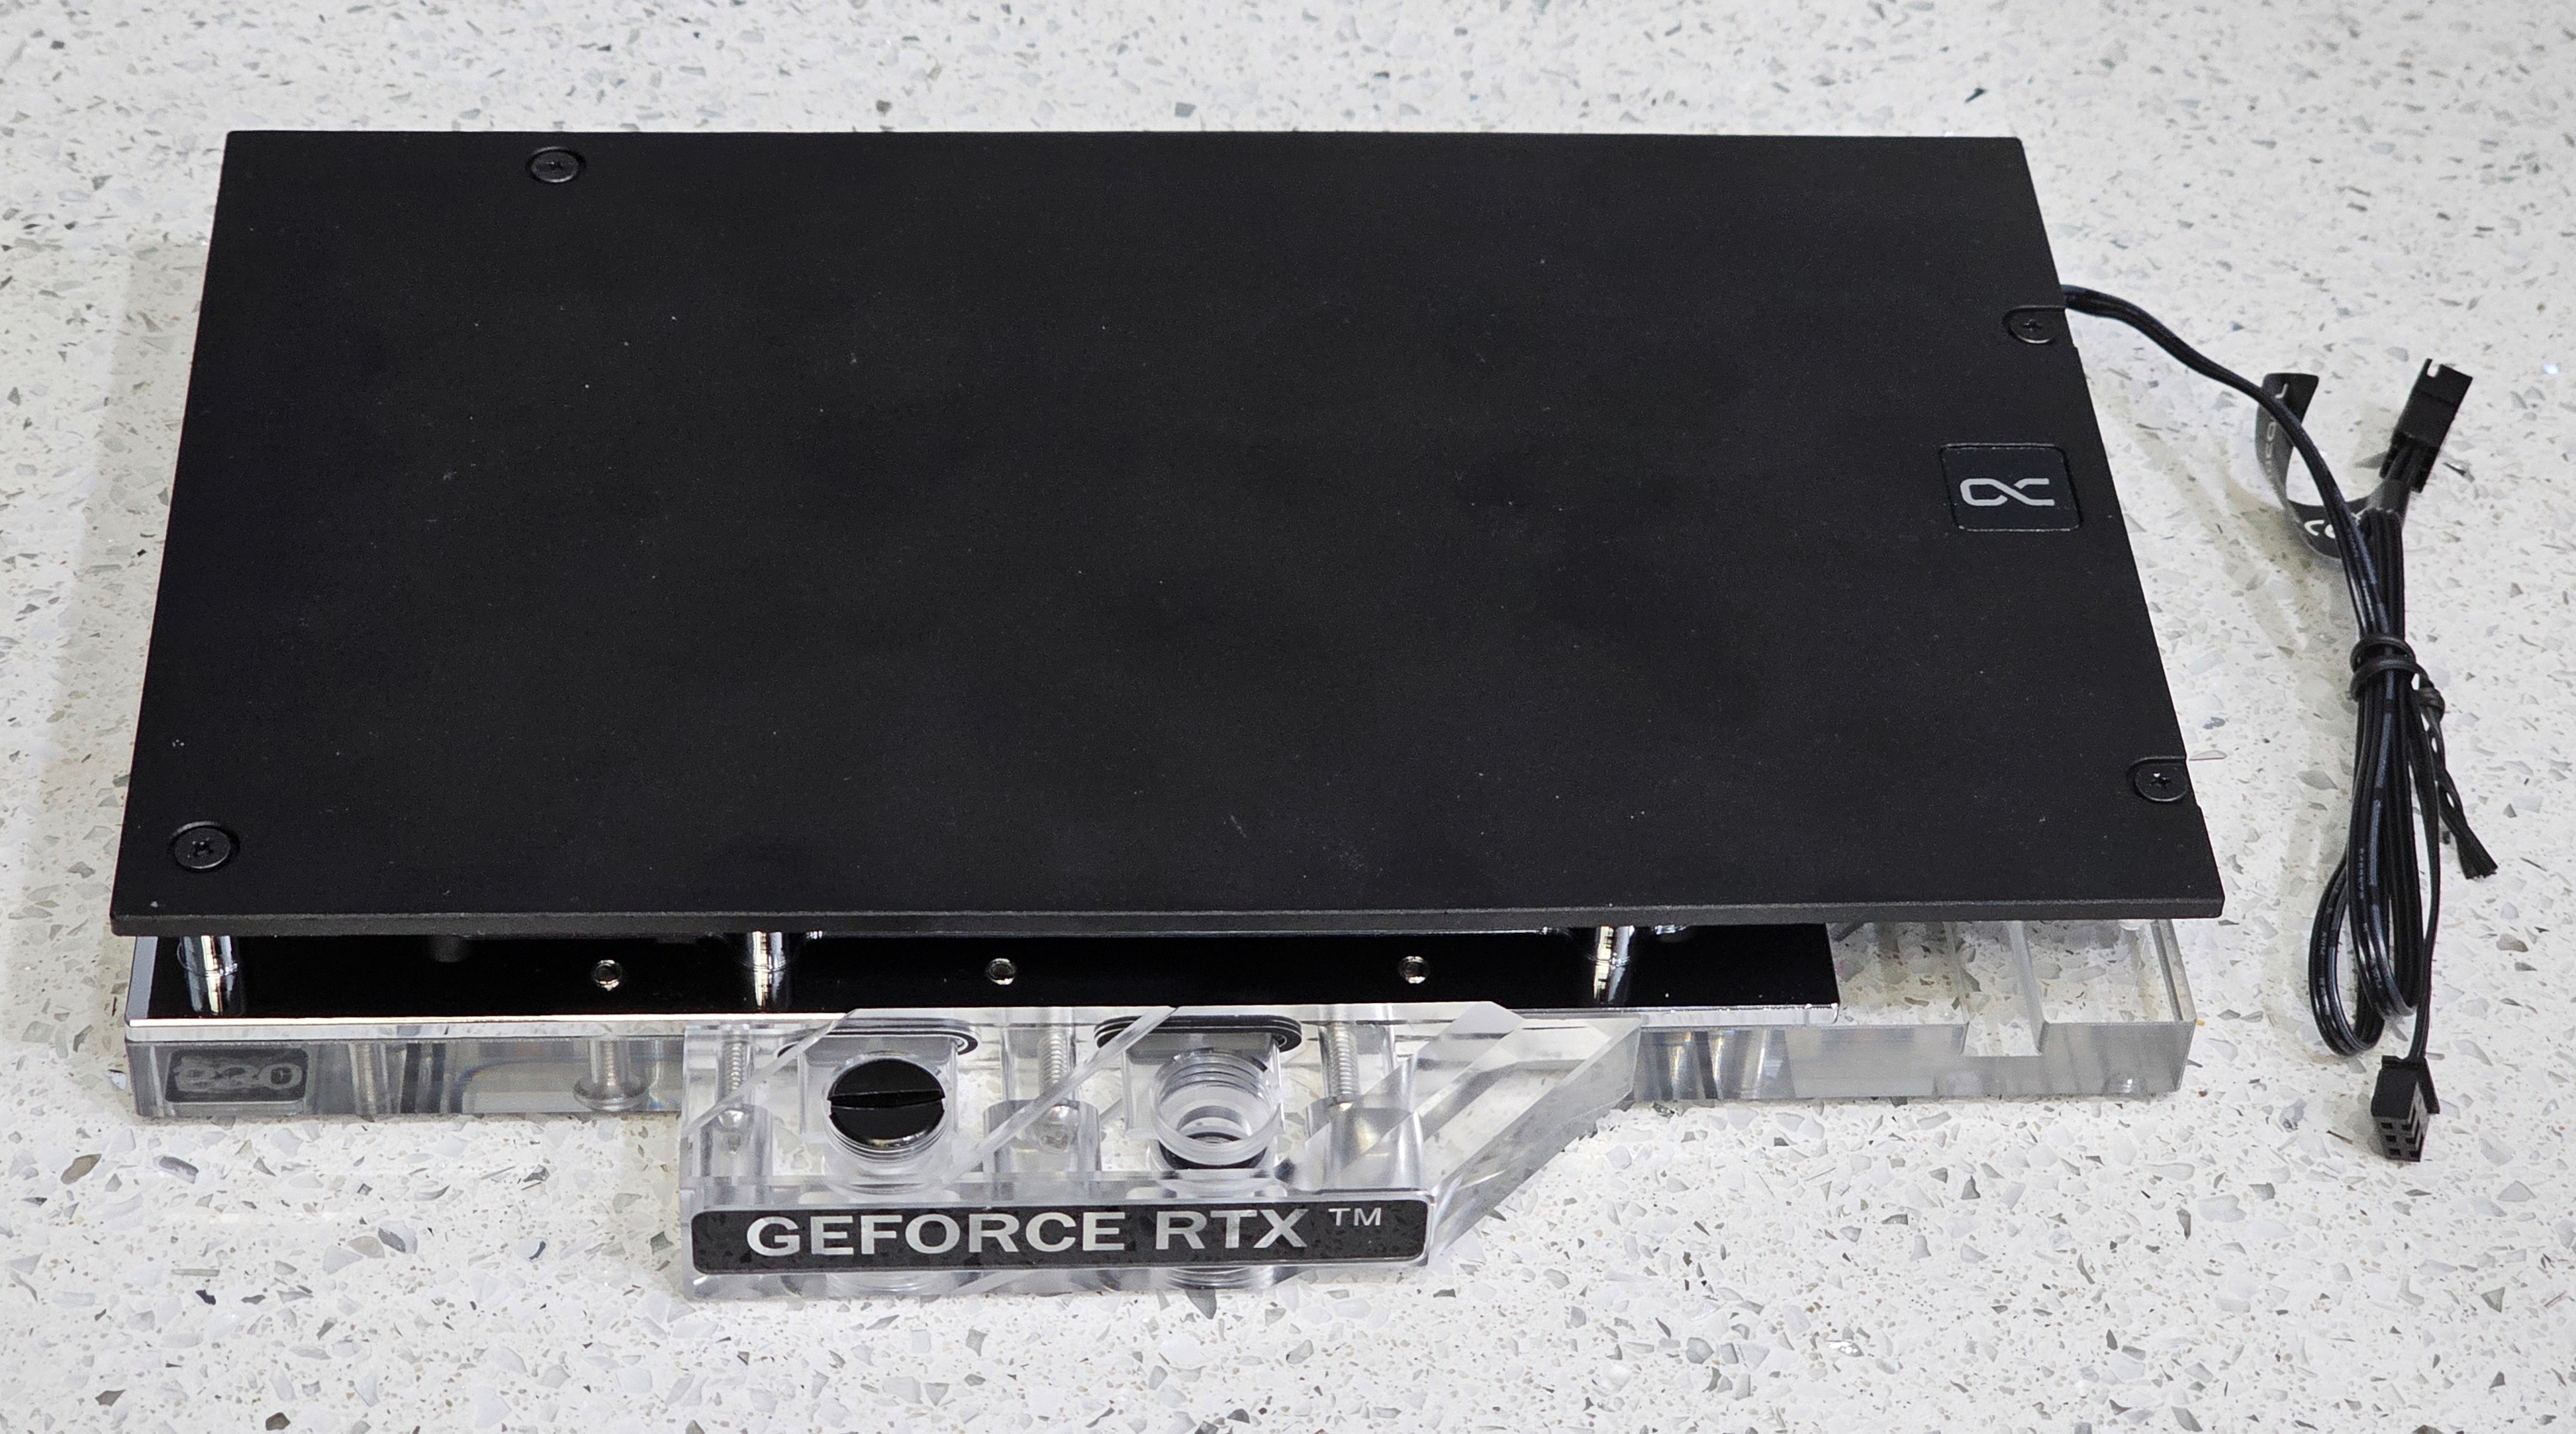
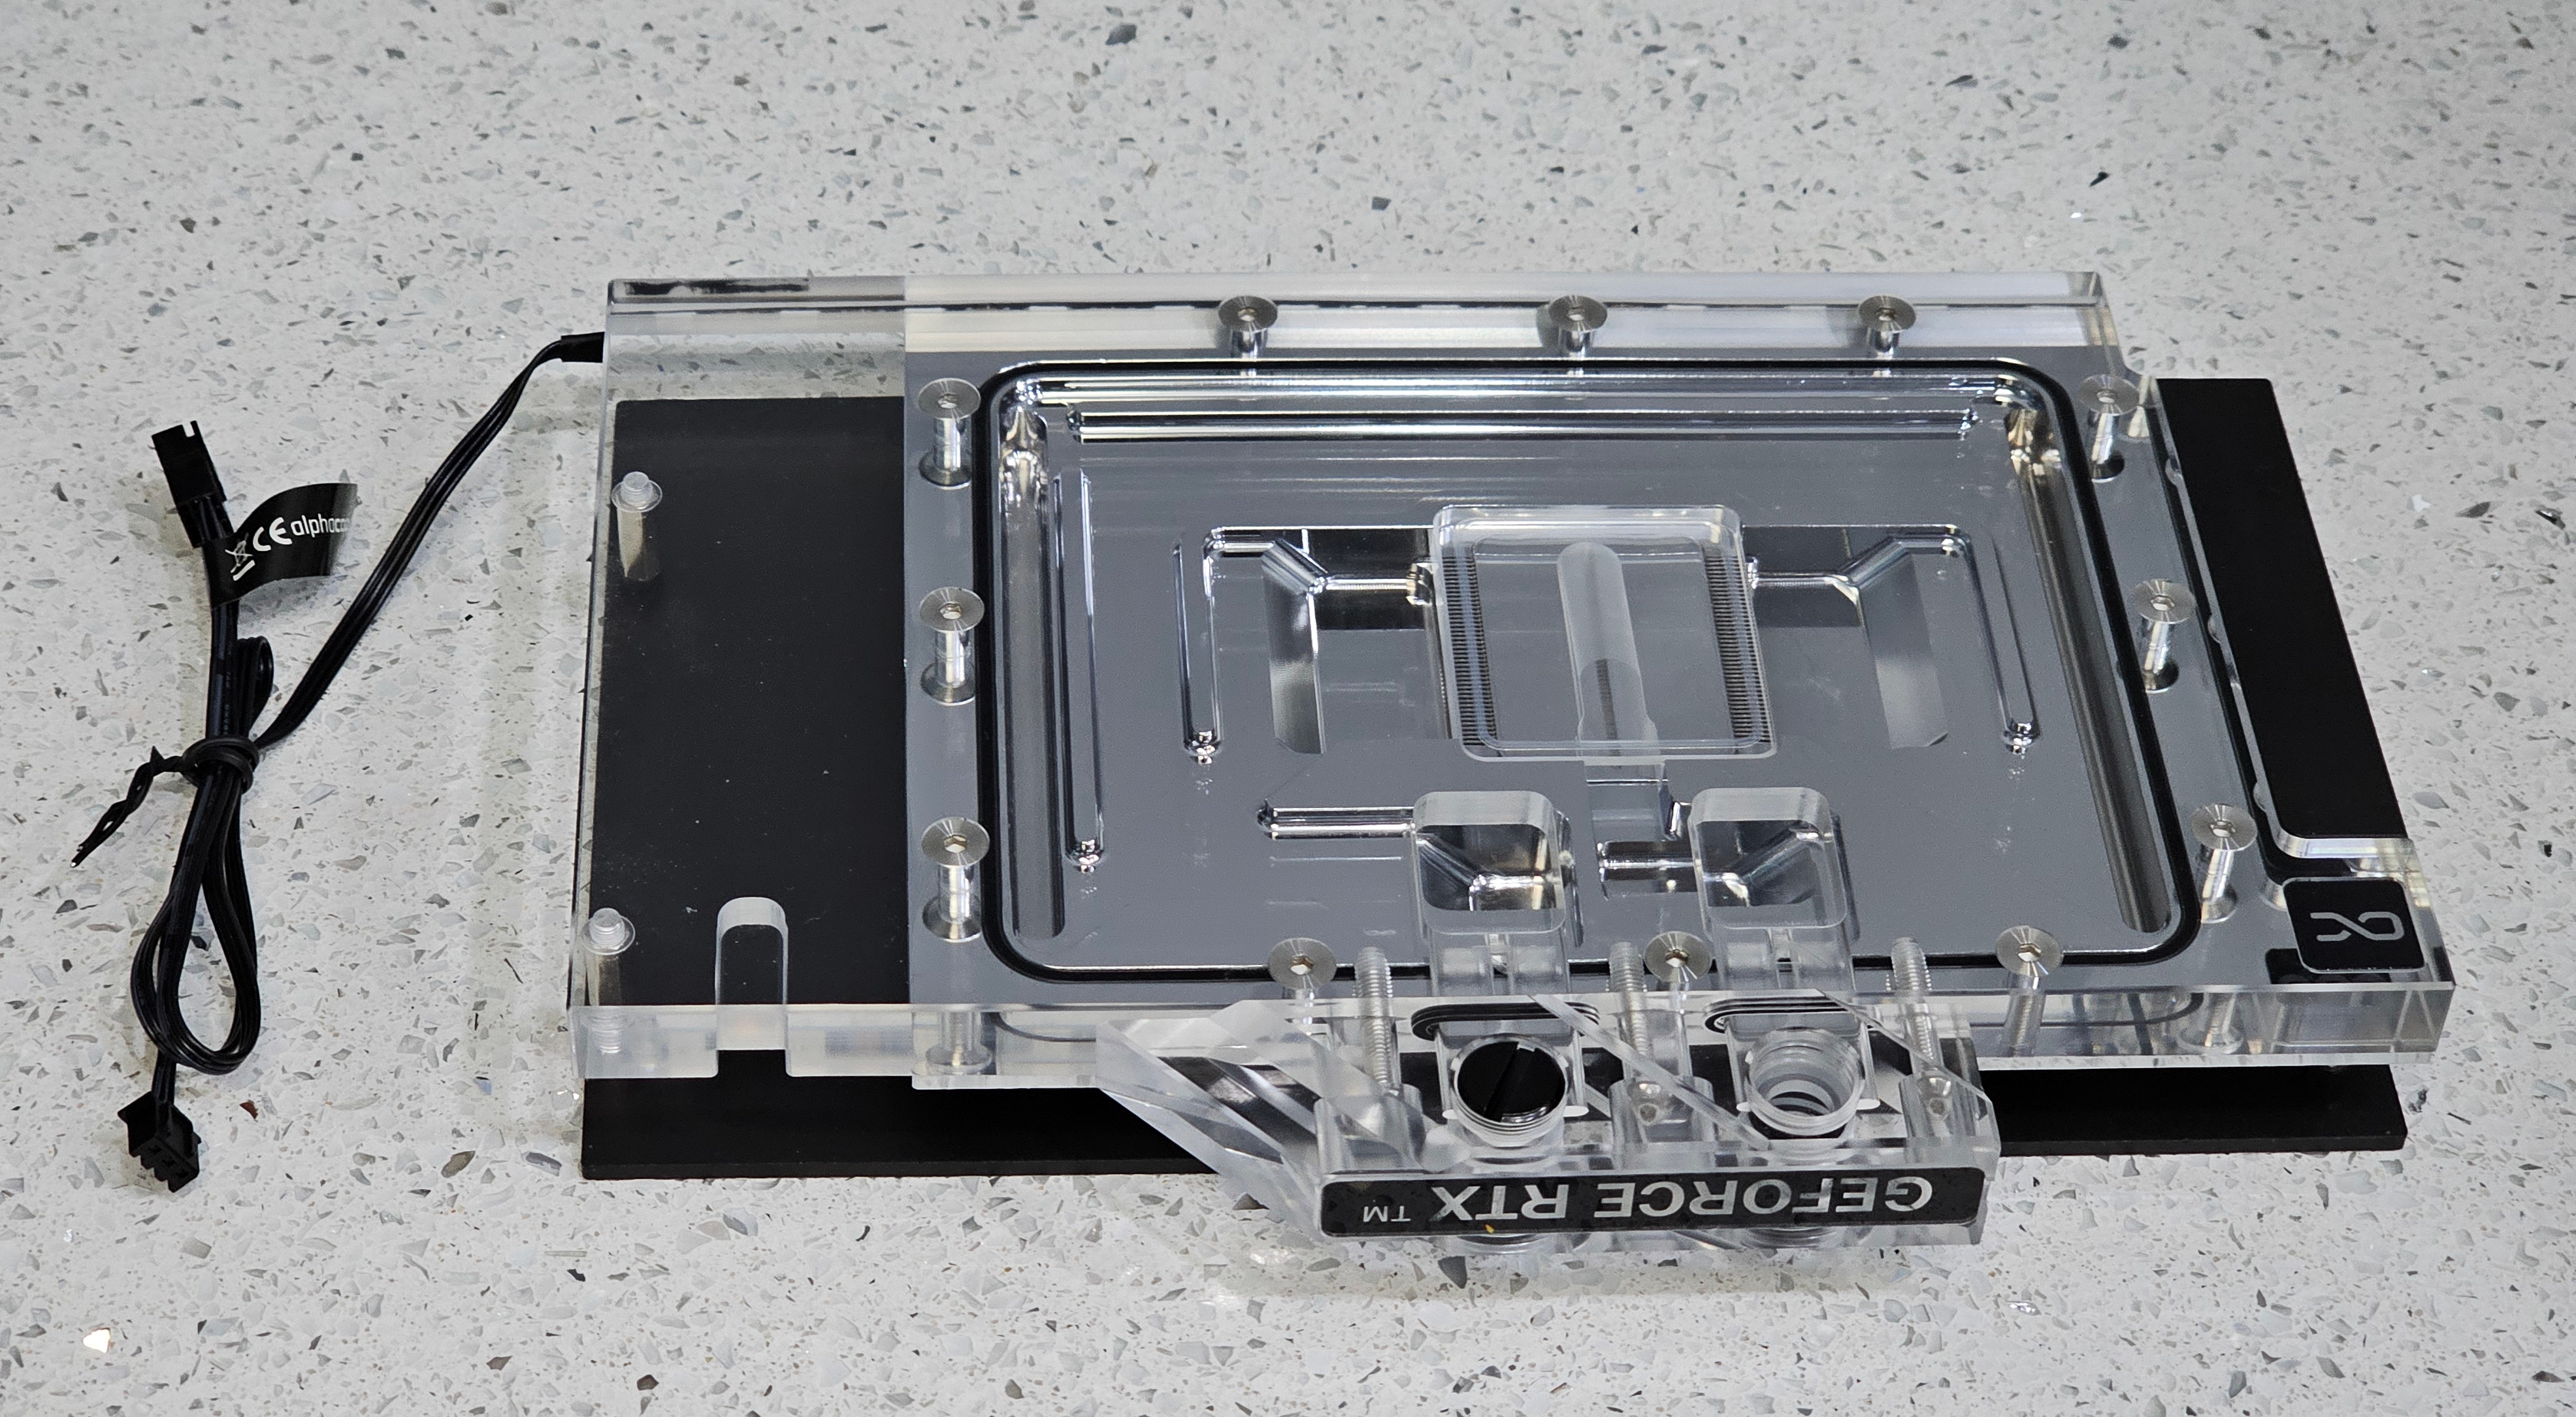
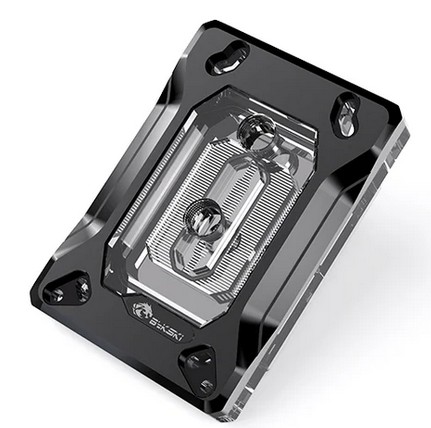
I give you, 1.3 kilos of GPU block!
Aaaaand....this is NOT my first rodeo and I'm fully aware I'm er, somewhat accident-prone with coolant


Great call with the extra coolant, everytime I filled my presvious loop I had a spill haha. I once had to take a late night trip to halfords!Postie's been
I give you, 1.3 kilos of GPU block!
Aaaaand....this is NOT my first rodeo and I'm fully aware I'm er, somewhat accident-prone with coolant
Haha that's a whoooole lot of coolant - I fully support the contingency planning
Great call with the extra coolant, everytime I filled my presvious loop I had a spill haha. I once had to take a late night trip to halfords!
Spills?! I'm way beyond spills...I can manage a full-power dual-pump spray directed towards the ceiling, I'm that
") Top tip, remember to close all the stop-plugs you opened to allow air in for a drain BEFORE you fire up the pump
Top tip, remember to close all the stop-plugs you opened to allow air in for a drain BEFORE you fire up the pump 
Now, I just need to work out what to put the coolant IN! Rather lost inspiration and motivation to be honest.
In the meantime, something slightly off topic that might be of interest if you happen to need one. A dummy fan. Why? I'm running a server with a drive cage in it. That drive cage has a fan connected and sounds an alarm if the fan fails. Great but I want the fan attached to the motherboard so it's controllable and remotely monitor'able. So the alarm goes off every time it starts until you press the mute button. Fine so long as you don't lose power in the middle of the night....which is how we've got here. Turns out that AdaFruit make a 555 based "Adafruit 555 PWM Output STEMMA" and it was inspired by someone wanting to generate a dummy fan signal. £4 later and a quick dash of 3D printing for a case and we have:
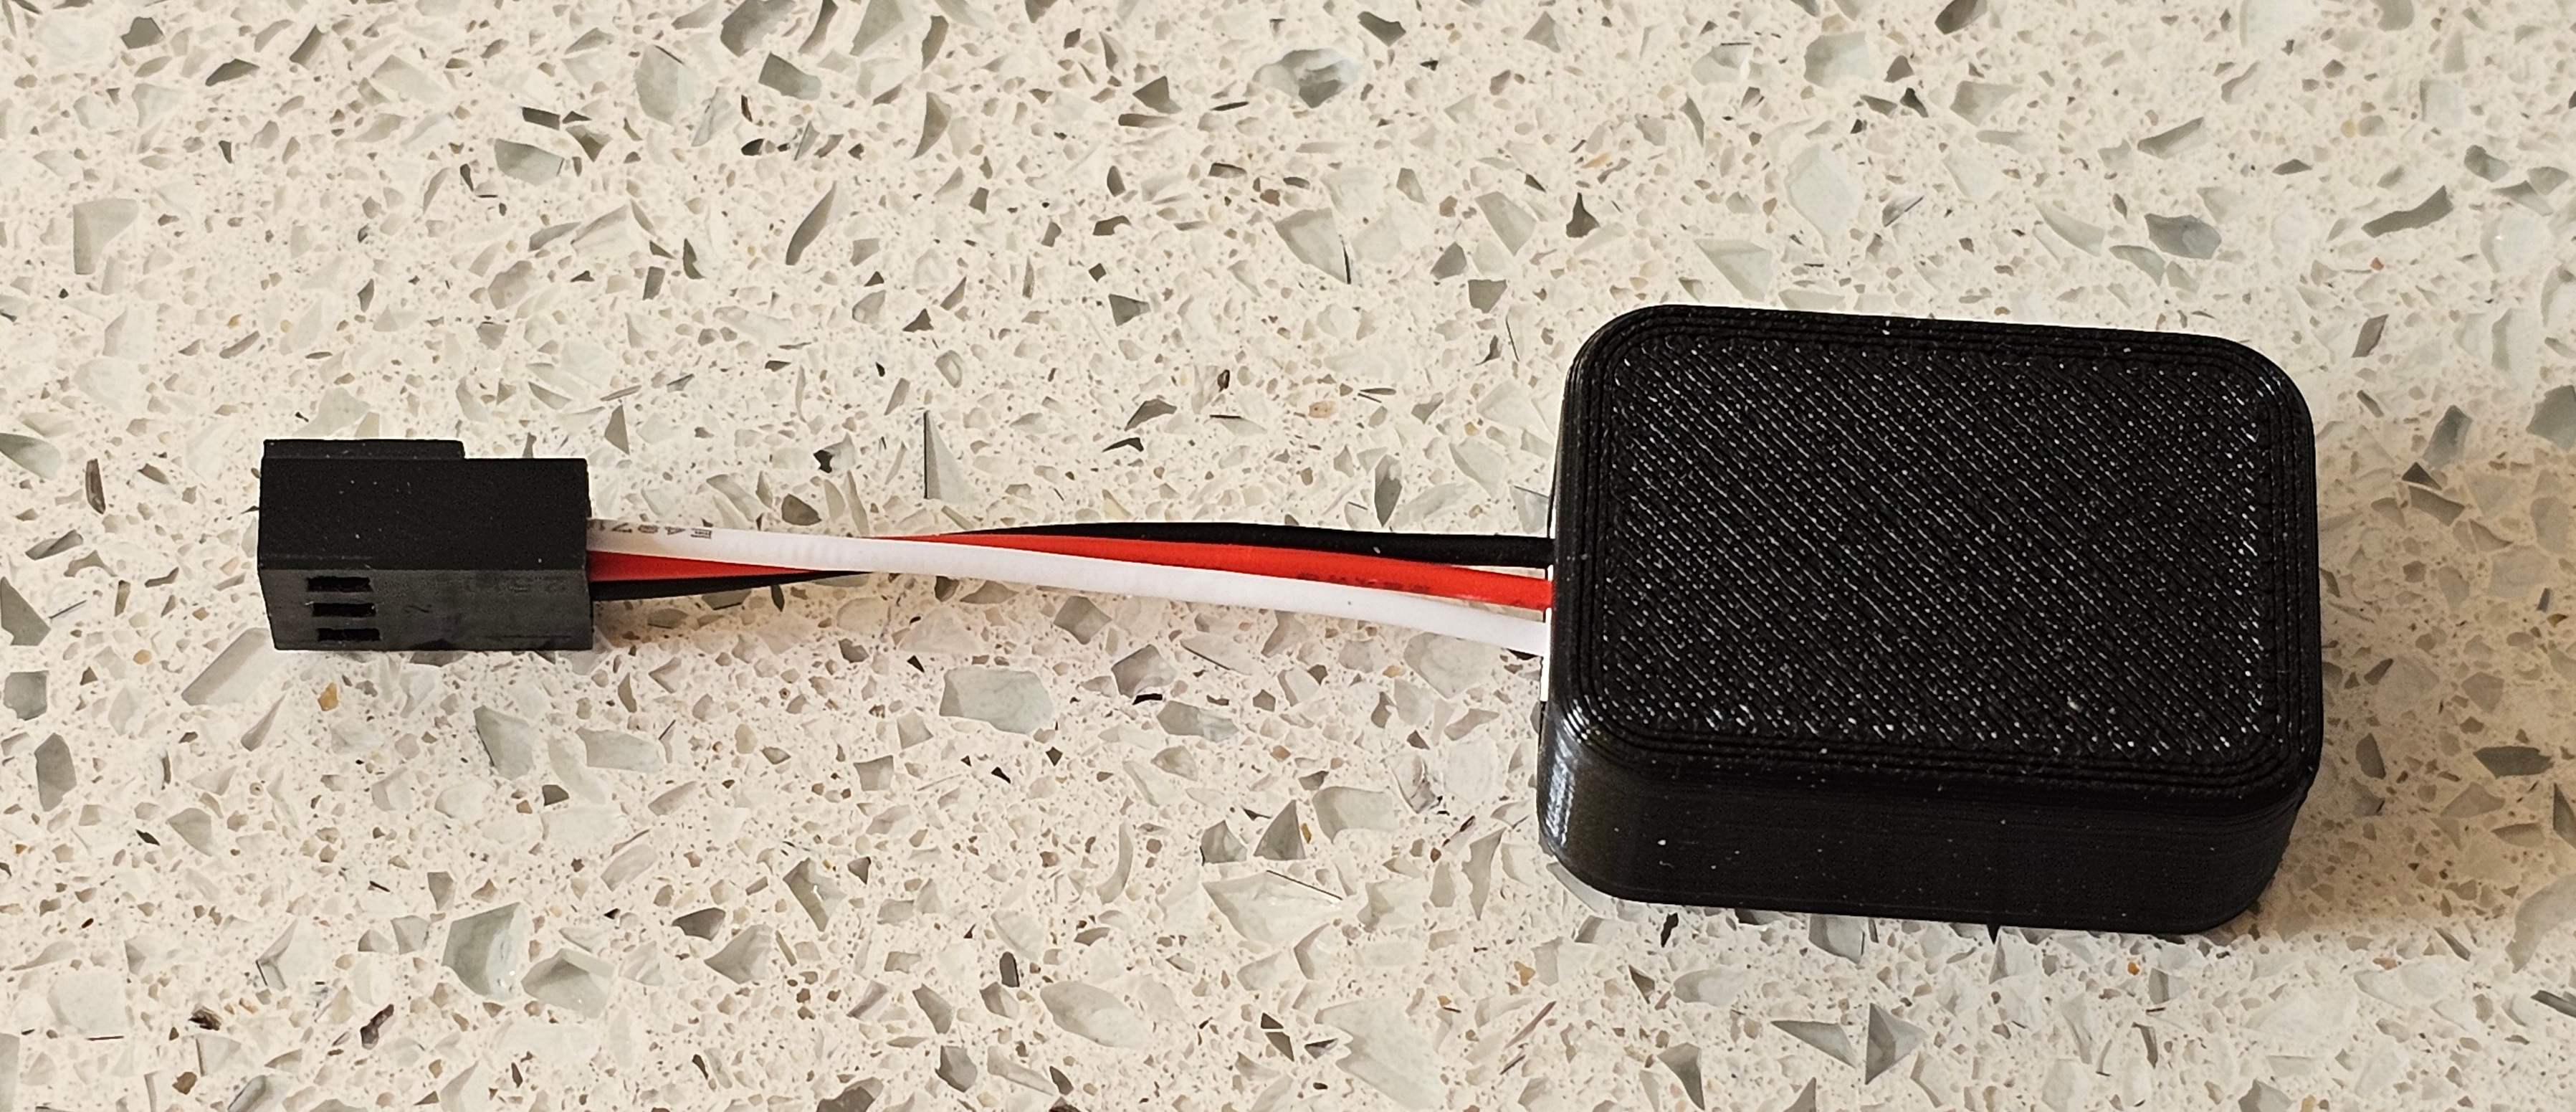
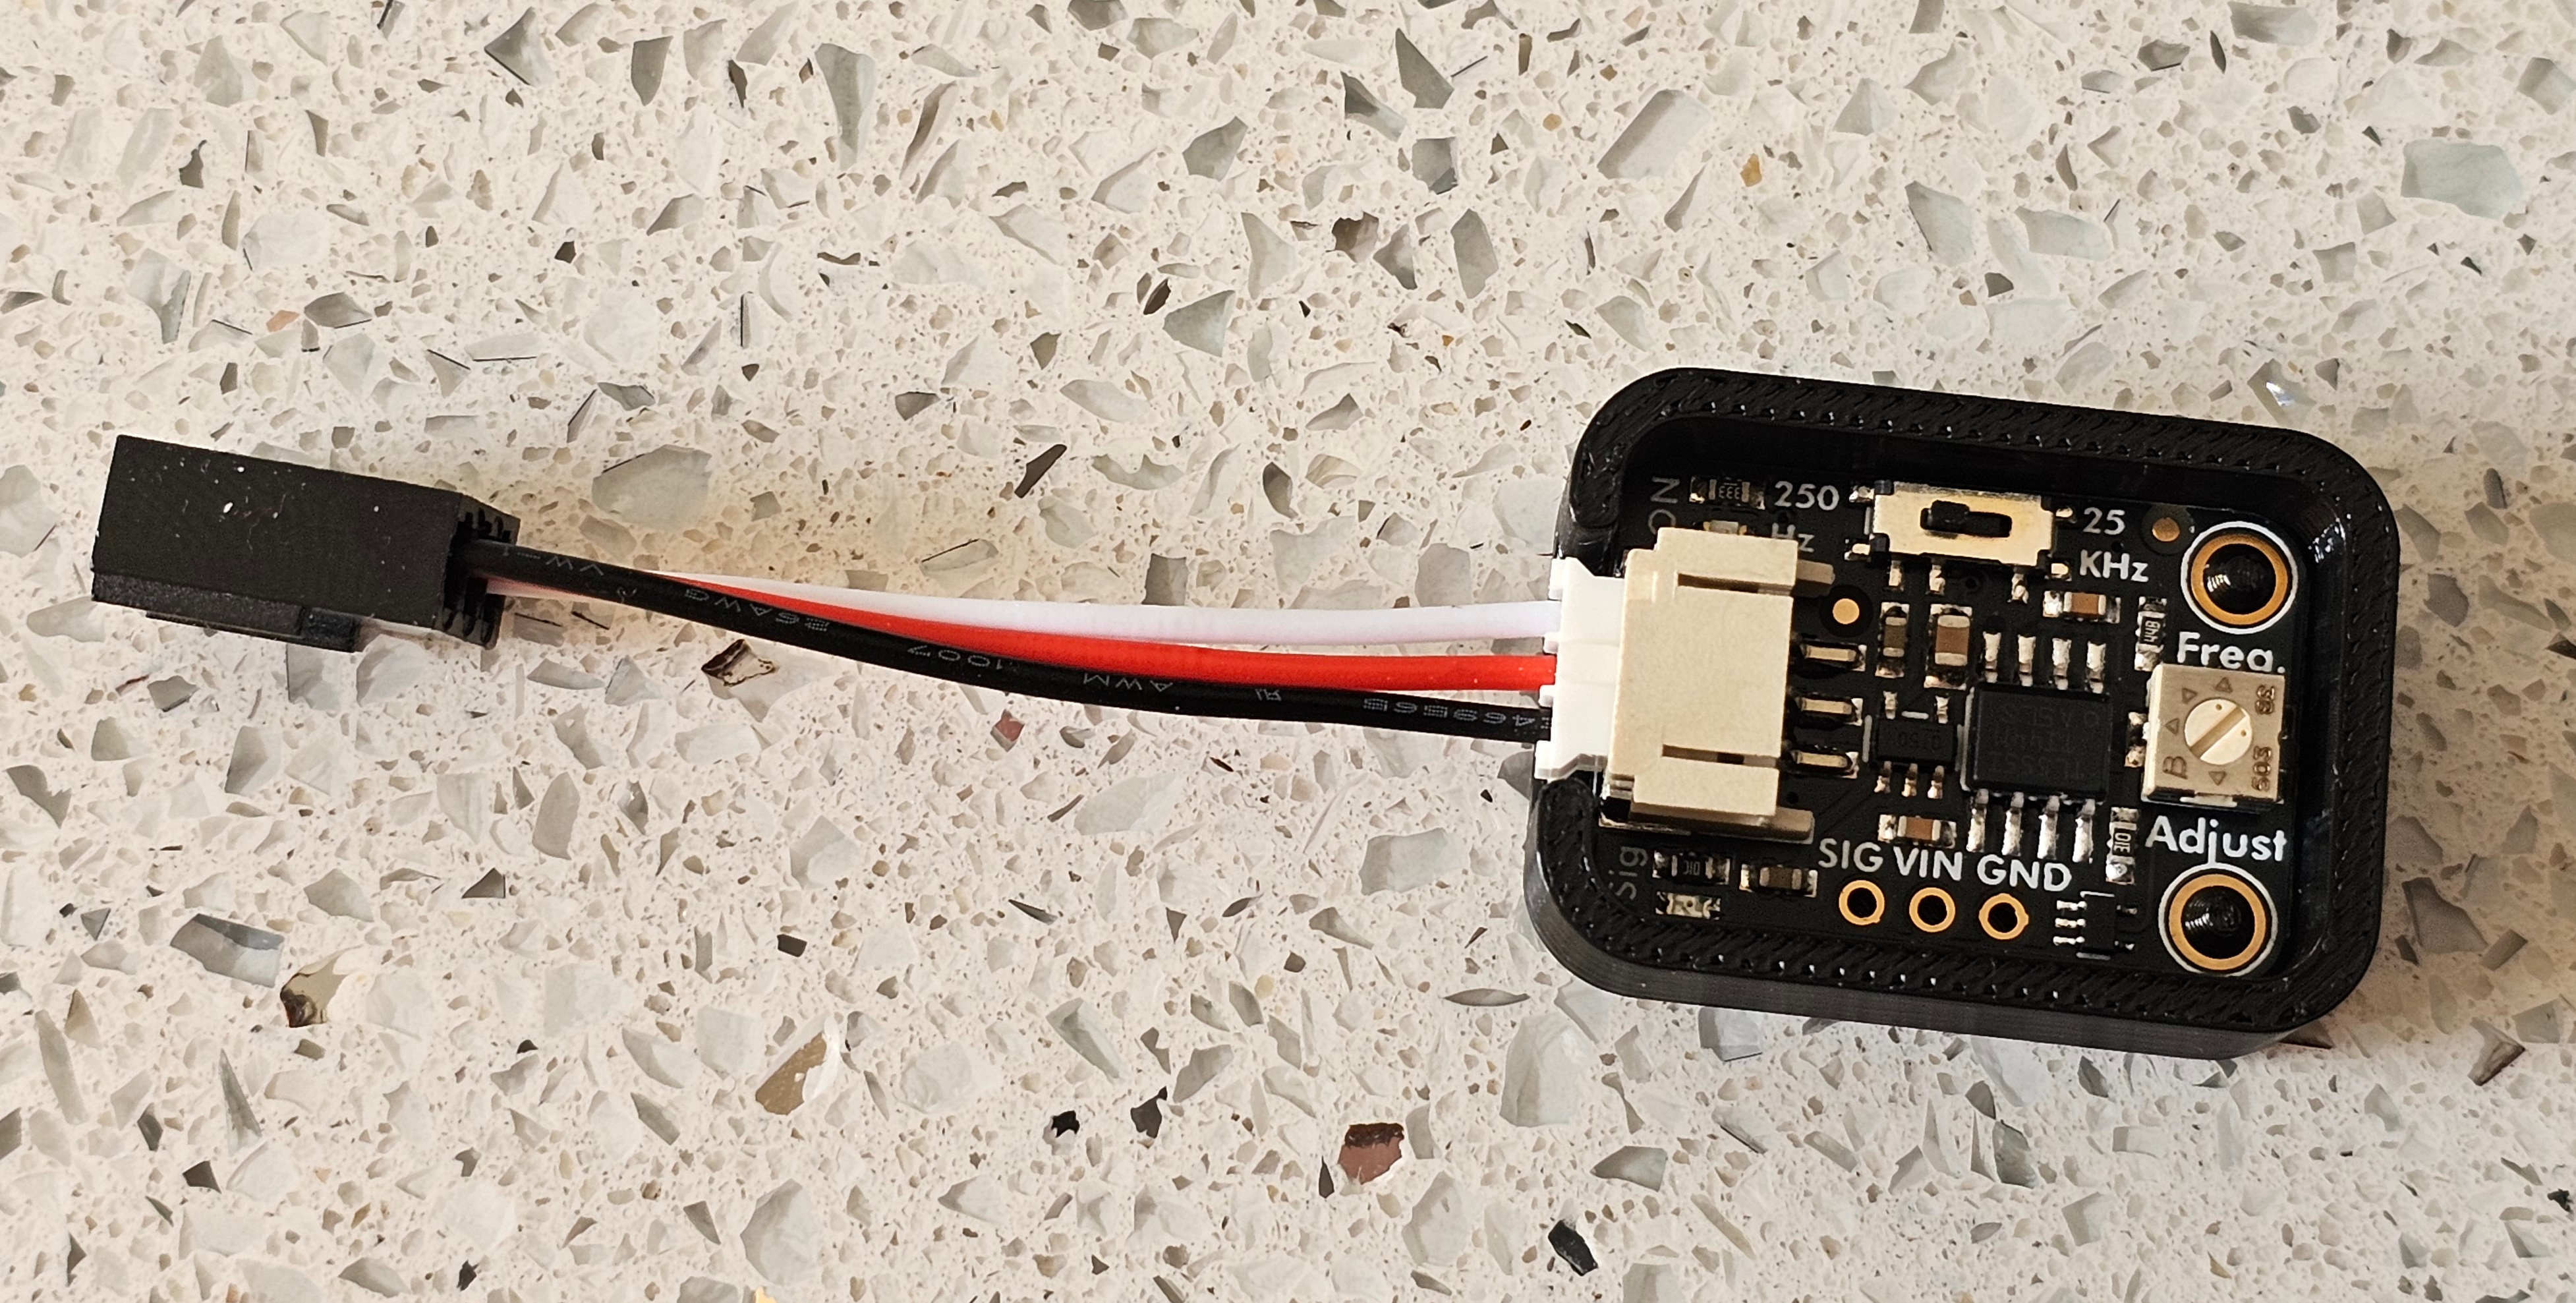
That then connects in here:
Server: 16-core 2GHz Xeon, 48GB RAM, 240GB mirrored SSD pair (Marvell 9200 SATA RAID) for OS (in Zalman cage), 11TB useable array LSI MegaRAID 9271-4i (doesn't support UEFI boot if I remember correctly) running 4x4TB SATA SSDs in RAID5
Which lives here (I said "slightly" off-topic, right?!):
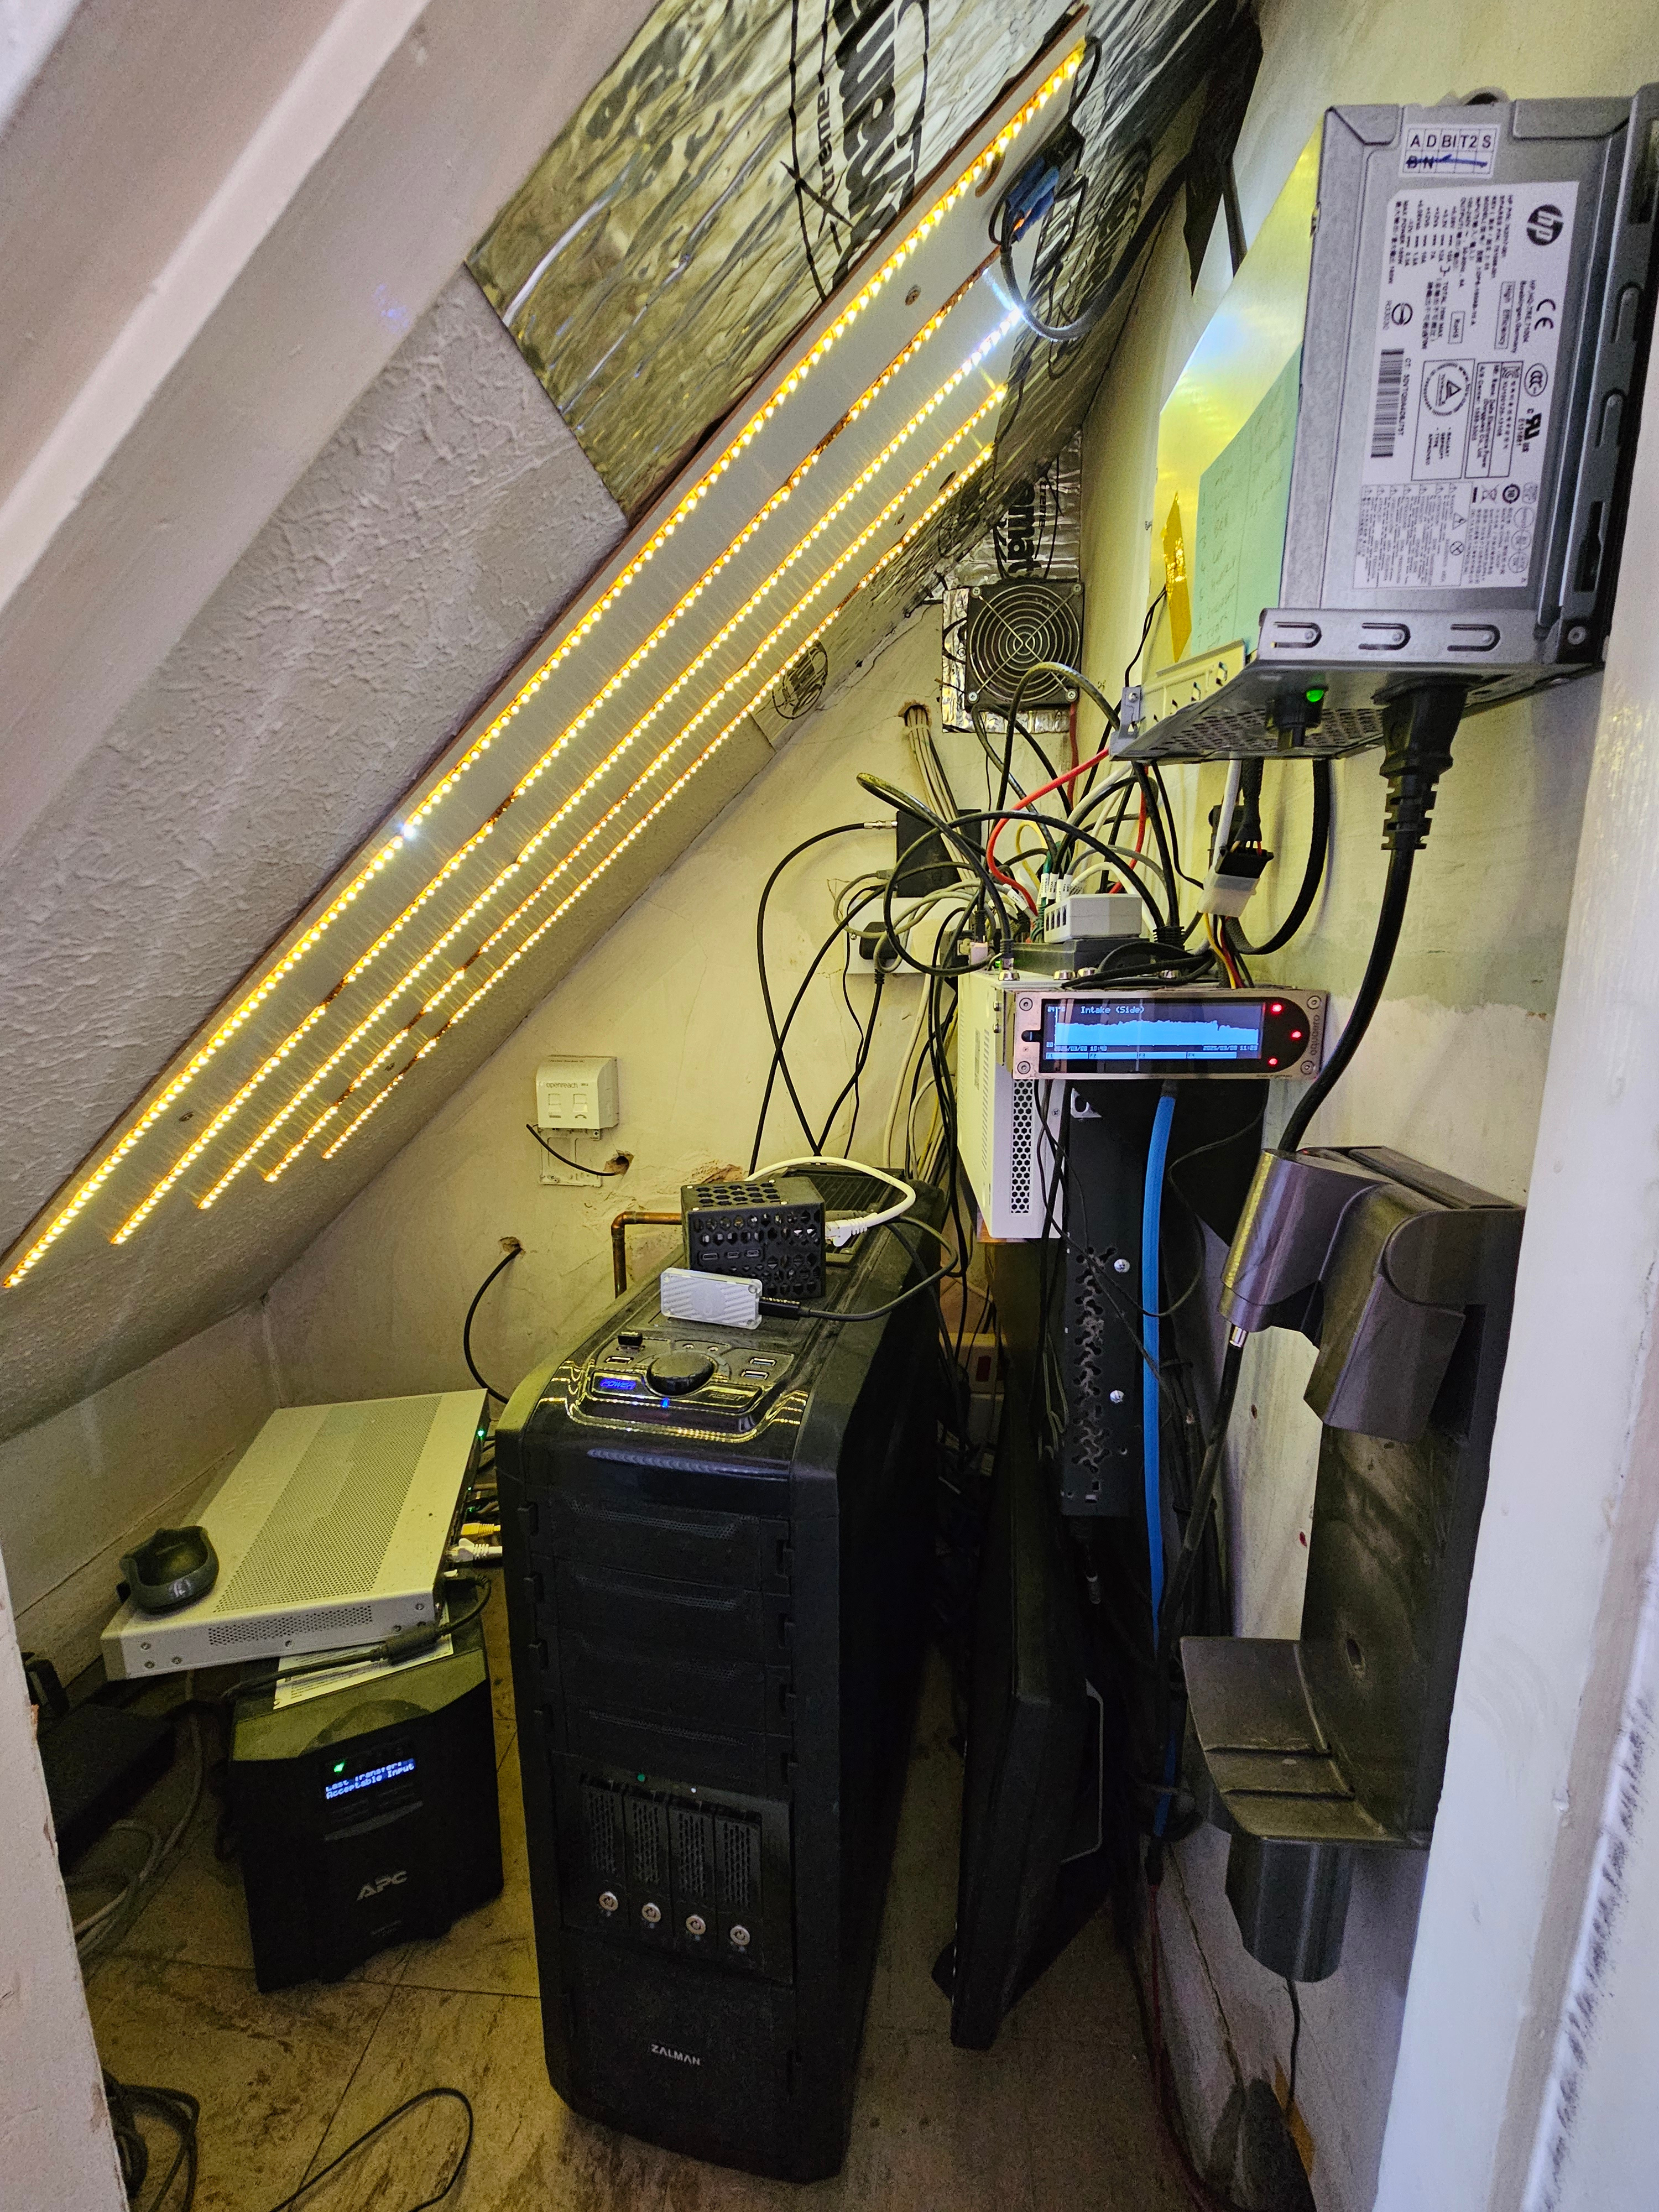
And that's how you yee-ha a server into an under-stairs cubbyhole
For reference, that's an EK Varder as exhaust at the top - down 100mm duct through an external cavity wall - and an EK Varder is on the other side of the hole you can just see in the bottom right for intake. The latter was sooo much easier to drill being only a single-layer breeze block wall rather than two layers (that's 13" total) of rock-hard 1940's brick with rock-hard mortar.PSU is for the (switchable, badly-aged) lighting, the Aquero and the fans.
Switches:
- Cisco 3750G-24PS (dark grey box hanging in the vertical rack on the right) for 24 ports of gigabit PoE and a stonking CLI. Runs PoE (backed by the UPS) to:
- Mikrotik CRS309-1G-8S+ (white box in the vertical rack) for the 10Gig link from the server to my PC in the
Man Caveoffice - currently an external grade Cat6A buried in ducting (the office is an outbuilding) but with an 8-core OM3 fibre for when I find someone with the kit to terminate it - Media switch (Netgear GS108T) running very little these days, just the amp and TV box
- FTTP ONT (behind media cupboard) via PoE to barrel jack breakout box. This is on a separate VLAN just to use the swtich to inject power.
- Loft switch (Ubiquiti Flex) via a PoE++ injector (switch only provides PoE - no plusses)
- CCTV Front
- CCTV Back
- Office switch (Netgear GS516TP) running the home office for my wife and I and also powering by PoE
- Ubiquiti UniFi UAP-AC-Lite access point in the office
- Ubiquiti Flex Mini switch in the office for the workbench - guest ports for updating PCs
- small Synology NAS with single disk (not PoE or UPS'd) for backup of server to 'off-site' outbuilding. Critical data also syncs to kit colocated in a data centre but you can't have too many backups!
- Mikrotik CRS309-1G-8S+ (white box in the vertical rack) for the 10Gig link from the server to my PC in the
- Cisco C1111-8PWE (white box sitting on the UPS) - and excellent bay find that's configured for a horribly complicated mess of VLANs, VRFs and VPNs...for when you need to mix business, pleasure, kids, guests, IoT, CCTV and secure access to customers.... and trust none of them to play nicely together.
- 350/50 FTTP line via switch to power ONT - the router's WAN port doesn't supply PoE and I don't want/need to complicate things further by running an SVI off the ports that do.
- Raspery Pi 5 with PoE+ hat and Google Coral TPU (black mesh case sitting on top of the server) running Home Assistant (home automation) and Frigate (CCTV NVR)
- HD HomeRun Quadro (little black box under exhaust fan) - FreeView TV recorded to Plex running on server. Means live and recorded TV are available to me (and family) wherever we are in the world. Also a VPN to the Cisco router means we can appear to be home to get access whilst abroad to TV services that require you to be in the UK.
- APC Smart-UPS 1500 - should run everything (about 300W) for an hour (optimistically!)
I think that about covers my slight diversion
Ok, I've delayed, I've diverted (see above ) and I've procrastinated. Perhaps it's time for just a little progress before I procrastinate some more!
So one of the things that's bothered me is that I put all the effort in and then once it's below the desk, because of the orientation after a room rearrangement, with the windows facing away from me, I can't see any of it. I can't really reorganise it to the other side of me without ending up with a storage pile at my feet and I can't put it on the desk without losing my mini bookcase and modular tool holder (this bag for networking jobs, this bag for some future use, another bag for other future use and no bags the rest of the time - it's tidy, sue me! ). What I need therefore is a case that is inverted but still has the PSU at the bottom (where it ought to live because of weight balance - old-school PCs were just wrong on that front....although, to be fair, we're talking 300W PSUs in those days). There aren't that many options but I was drawn to the Lian Li O11 Evo. Ooh, there's an XL version that you can remove the side pillar....but I don't need the extra rad room if my rad is (and must be!) external. I finally settled on the O11 EVO RGB (from OCUK, obvs) as it was between the two in size and still had the removable corner pillar as well as the best of both. I'm thinking that the rad can be completely external with QDCs so it can stay under the desk if I need to move the case for maintenance. What I want is lighter really.
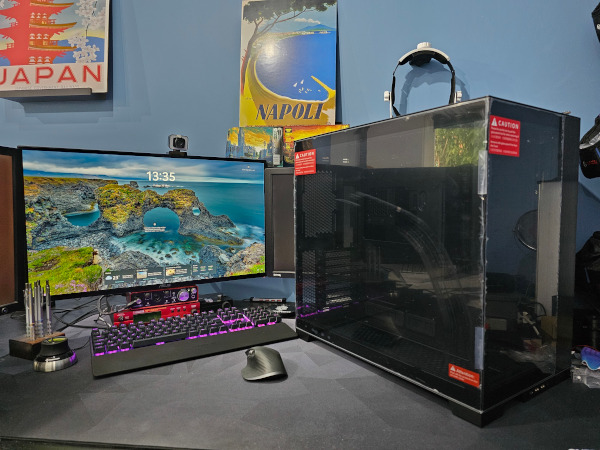
So case arrived and....mission failure already. This is NOT going to end up light! Ah well, on we go.
I'm not sure currently whether to mount the GPU traditional, vertical or upright (goes where the side fans are on the motherboard tray). There's pros and cons to all options - aren't there always?! If I go tradititional, you don't get to see the waterblock...but it costs nothing extra If I go vertical, it takes up all the PCIE slots and I'll need to see if I can add a 10 gig network card into the vertical bracket if I add another ribbon cable - not sure it'll work at all, let alone neatly.
If I go upright, the biggest con is that while the bracket is cheap, the required PCIE cable (60cm or 90cm) is £86. I'm also not sure where I'd put the res because that's currently where it goes and sticking it in front of the gpu waterblock would seem like a step forward only to take one backwards.
At this point, I should say that this isn't going to be a here's the case, let's shove all the stuff in it kind of build. I could but I kind of want to push the envelope a bit further each time and I'm thinking that some custom acrylic-work in the form of an overly complicated distro would be a good way to do that. Go big or go home, right?! I also think I'm going to need to swap from RGB to ARGB as this case has strips of that and I think the waterblocks do too, so no point in trying to keep the RGB elements from the old build. That will mean either reworking the res (custom PCB I think this time) or changing up the res entirely.
Since I'm planning to design this rather than just go at it and see what happens, how many drain ports should I go for this time!? Zero was clearly a bad plan, two (because of two sides to the loop) was a pain, maybe it should be three this time for maximum drain speed in the umpteen times history says this will need to be drained!
Right, I'm off to rebuild this case upside down
) and I've procrastinated. Perhaps it's time for just a little progress before I procrastinate some more! So one of the things that's bothered me is that I put all the effort in and then once it's below the desk, because of the orientation after a room rearrangement, with the windows facing away from me, I can't see any of it. I can't really reorganise it to the other side of me without ending up with a storage pile at my feet and I can't put it on the desk without losing my mini bookcase and modular tool holder (this bag for networking jobs, this bag for some future use, another bag for other future use and no bags the rest of the time - it's tidy, sue me!
). What I need therefore is a case that is inverted but still has the PSU at the bottom (where it ought to live because of weight balance - old-school PCs were just wrong on that front....although, to be fair, we're talking 300W PSUs in those days). There aren't that many options but I was drawn to the Lian Li O11 Evo. Ooh, there's an XL version that you can remove the side pillar....but I don't need the extra rad room if my rad is (and must be!) external. I finally settled on the O11 EVO RGB (from OCUK, obvs) as it was between the two in size and still had the removable corner pillar as well as the best of both. I'm thinking that the rad can be completely external with QDCs so it can stay under the desk if I need to move the case for maintenance. What I want is lighter really.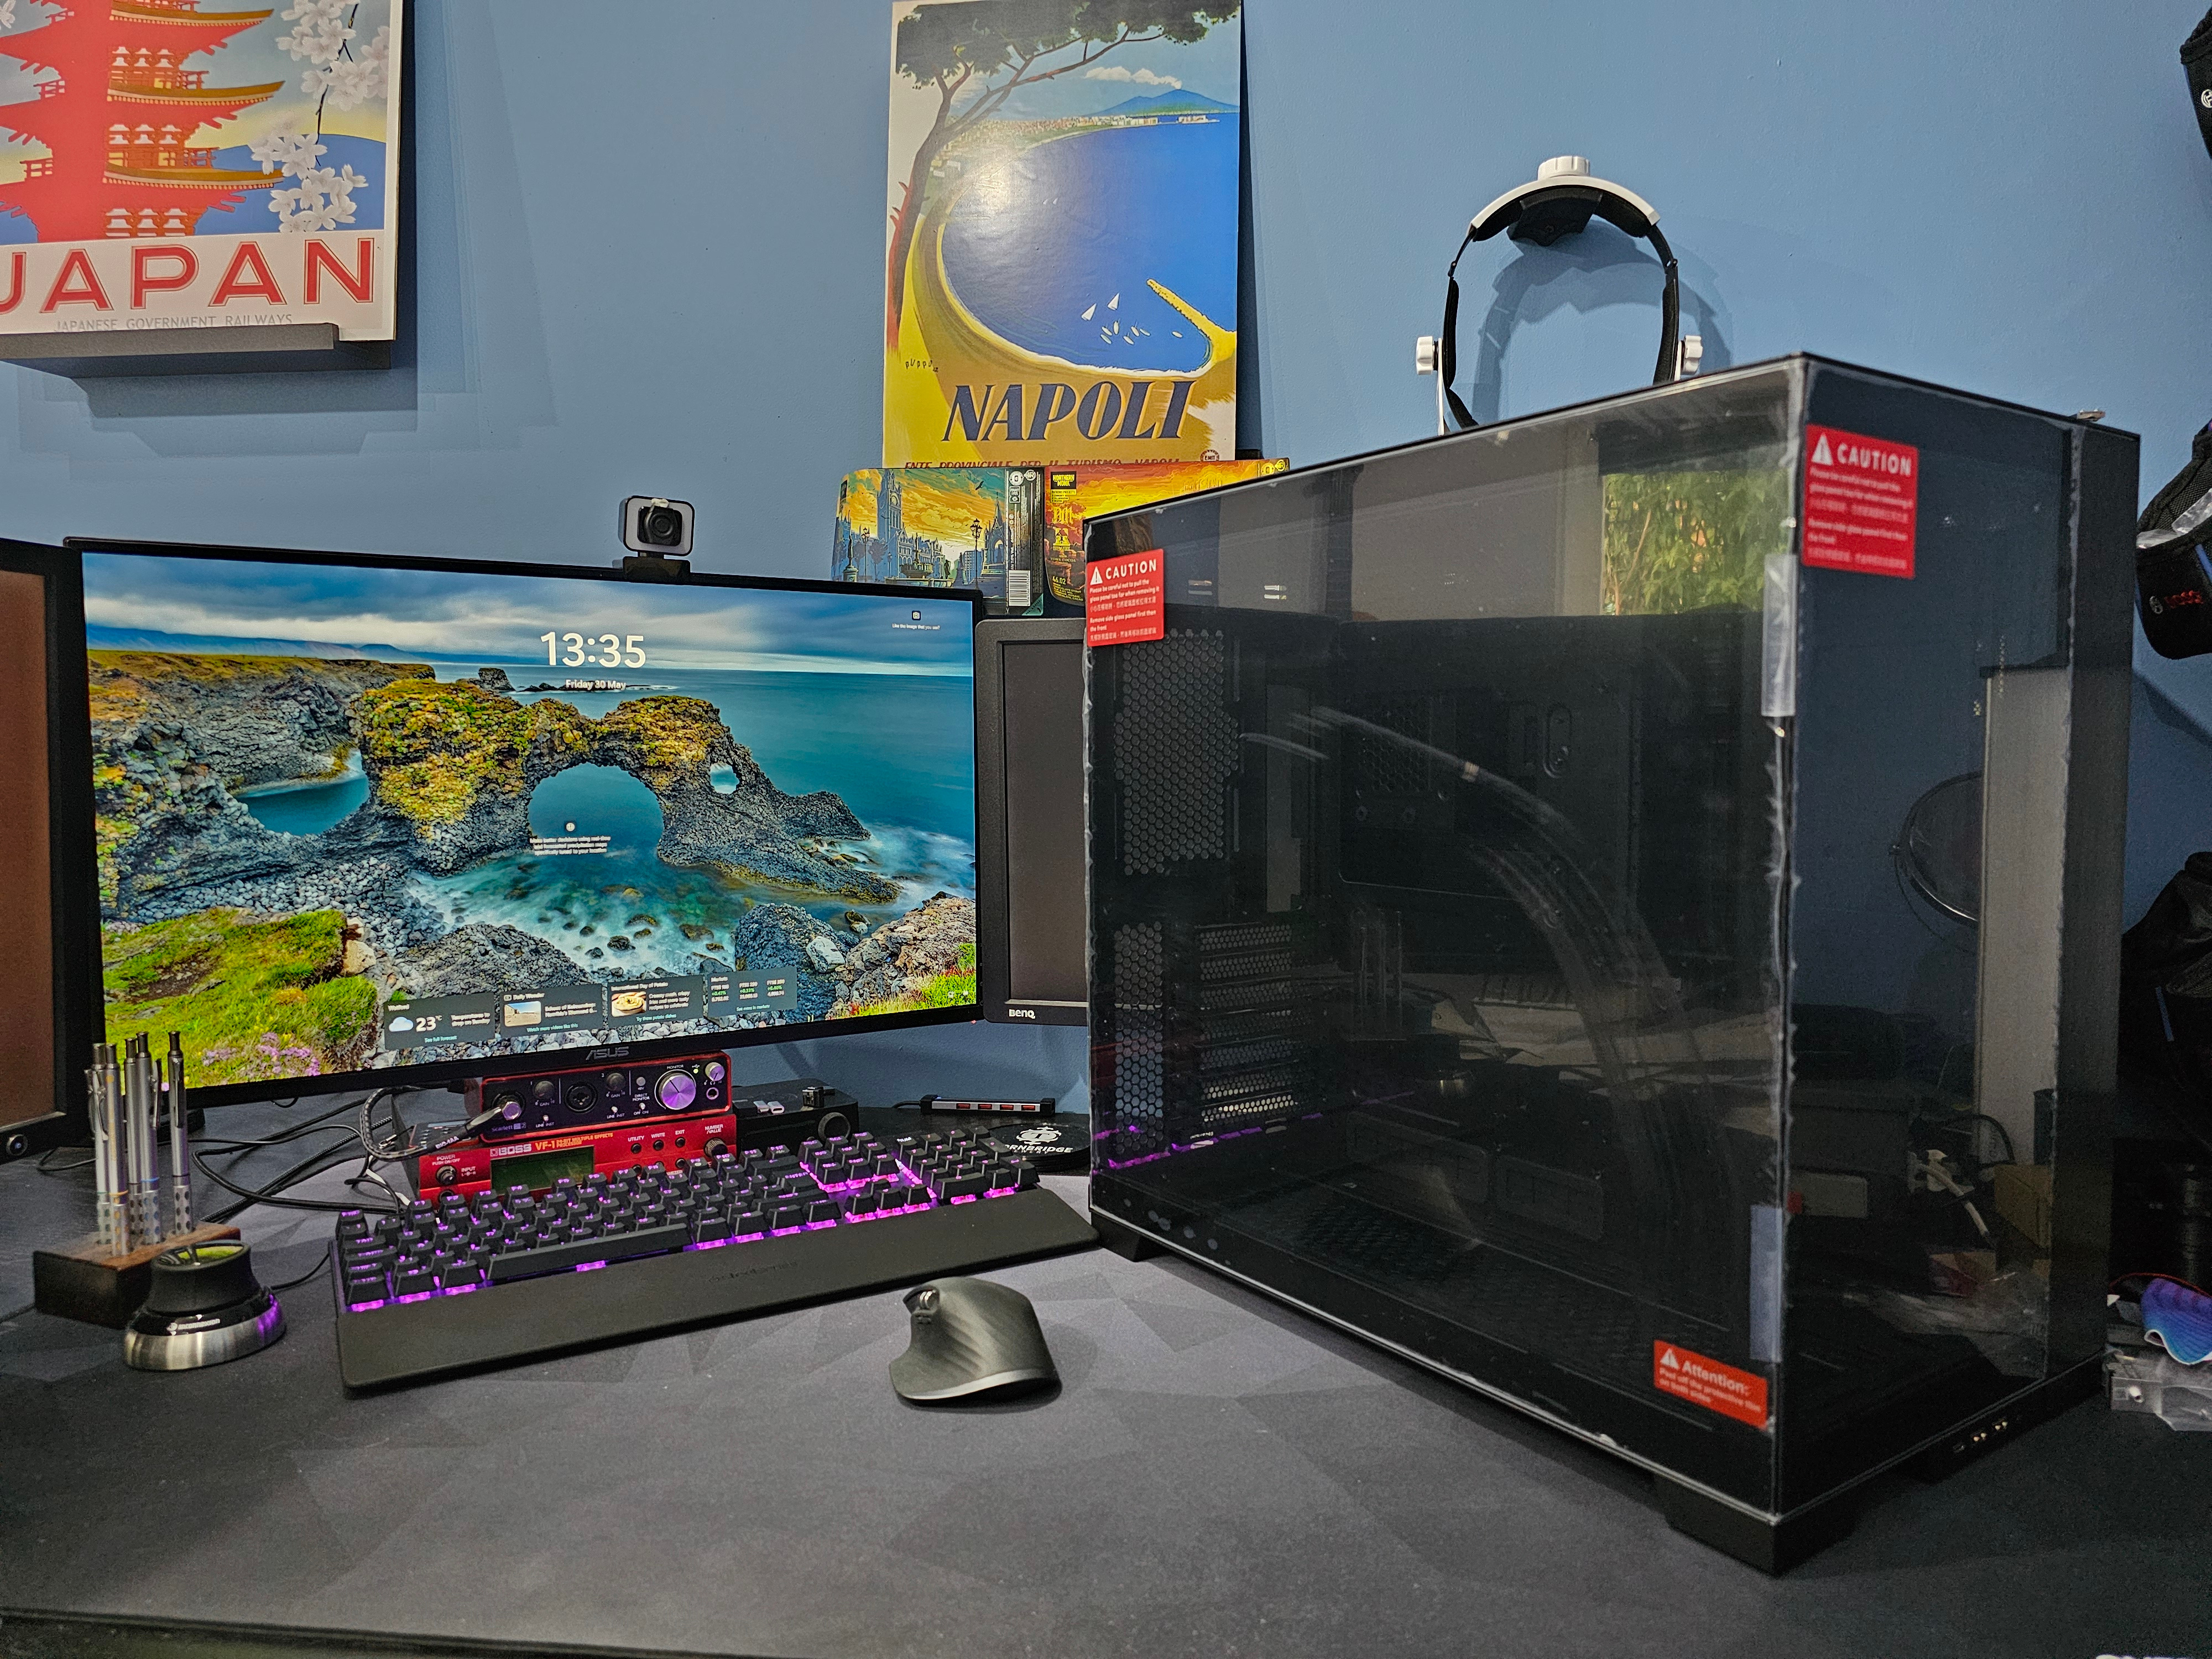
So case arrived and....mission failure already. This is NOT going to end up light!
Ah well, on we go.I'm not sure currently whether to mount the GPU traditional, vertical or upright (goes where the side fans are on the motherboard tray). There's pros and cons to all options - aren't there always?! If I go tradititional, you don't get to see the waterblock...but it costs nothing extra
If I go vertical, it takes up all the PCIE slots and I'll need to see if I can add a 10 gig network card into the vertical bracket if I add another ribbon cable - not sure it'll work at all, let alone neatly.If I go upright, the biggest con is that while the bracket is cheap, the required PCIE cable (60cm or 90cm) is £86. I'm also not sure where I'd put the res because that's currently where it goes and sticking it in front of the gpu waterblock would seem like a step forward only to take one backwards.
At this point, I should say that this isn't going to be a here's the case, let's shove all the stuff in it kind of build. I could but I kind of want to push the envelope a bit further each time and I'm thinking that some custom acrylic-work in the form of an overly complicated distro would be a good way to do that. Go big or go home, right?! I also think I'm going to need to swap from RGB to ARGB as this case has strips of that and I think the waterblocks do too, so no point in trying to keep the RGB elements from the old build. That will mean either reworking the res (custom PCB I think this time) or changing up the res entirely.
Since I'm planning to design this rather than just go at it and see what happens, how many drain ports should I go for this time!? Zero was clearly a bad plan, two (because of two sides to the loop) was a pain, maybe it should be three this time for maximum drain speed in the umpteen times history says this will need to be drained!
Right, I'm off to rebuild this case upside down
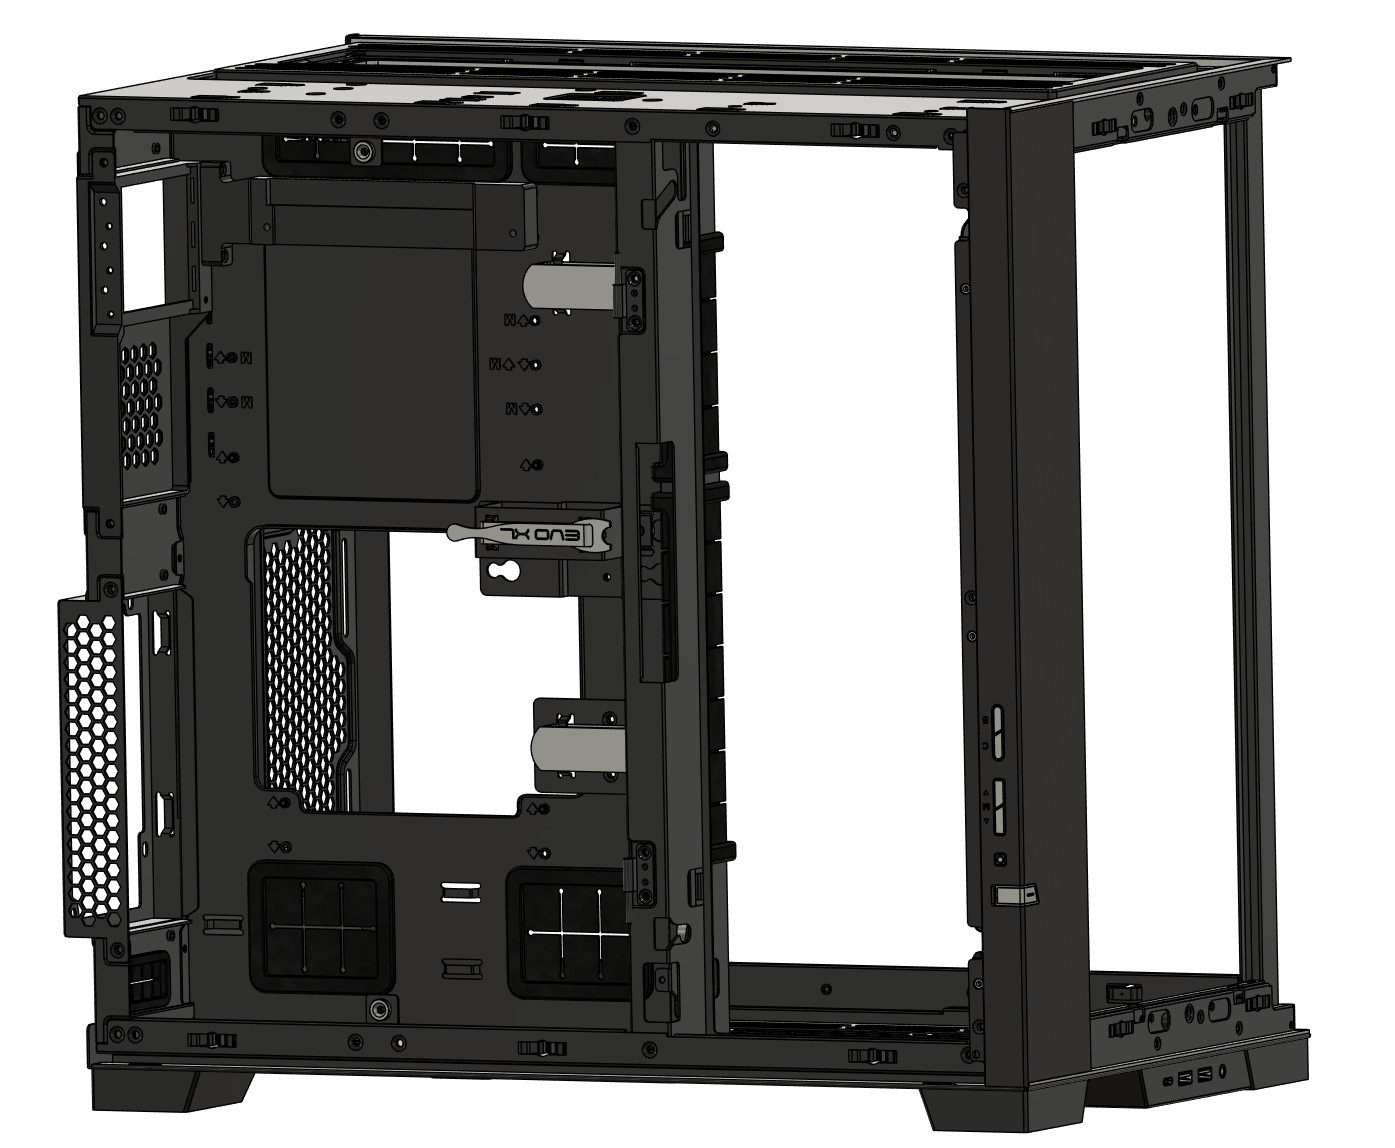
Ok, case stripped and flipped. You basically remove the top and bottom panels and flip the rest upside down. Only thing that caught me was you have to swap the rad/fan brackets too - they're not identical/mirrors and one is top and the other bottom even if you flip the case. Does it not mention that in the instructions? Yeah, probably...I wouldn't know
Glass panels go back on upside down (from how they were to start with) so they're secure too. Only the top and bottom panels are screwed in, the glass and the mesh side are tabs that go into slots at the bottom and friction pins at the top. Seem quite secure but maybe moving it once fully built would be wise to take them off first...we'll see.
So here we are stripped - don't need the drive bays or the corner support pillar - and CAD done. That's Cardboard Aided Design, for those not up with modern tech
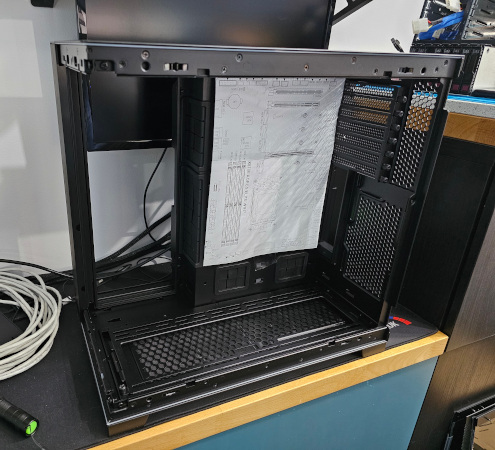
Should be plenty of room. Also a fair amount of space in the rear chamber - which will come in handy for Aquaero, Farbwerk 360 etc. Actually, I'm fairly sure there's enough space that you could mount the motherboard in the rear chamber if you were of a mind to!
PSU is at the top now but I think it should be moveable to the bottom and I think it may make sense cabling wise to do so. The bracket for the drive cages can be swapped with the PSU bracket by the looks of it. The only thing that might not fit is there is a support bracket for the free end of the PSU and that is attached to what is now the top with three screws. TWO of those screw holes exist on the bottom panel. Wouldn't be a disaster without it and should be fairly easy to add a hole....just surprising that it's not just a mirror of the top panel as it seems to be in every other way (that I've checked).
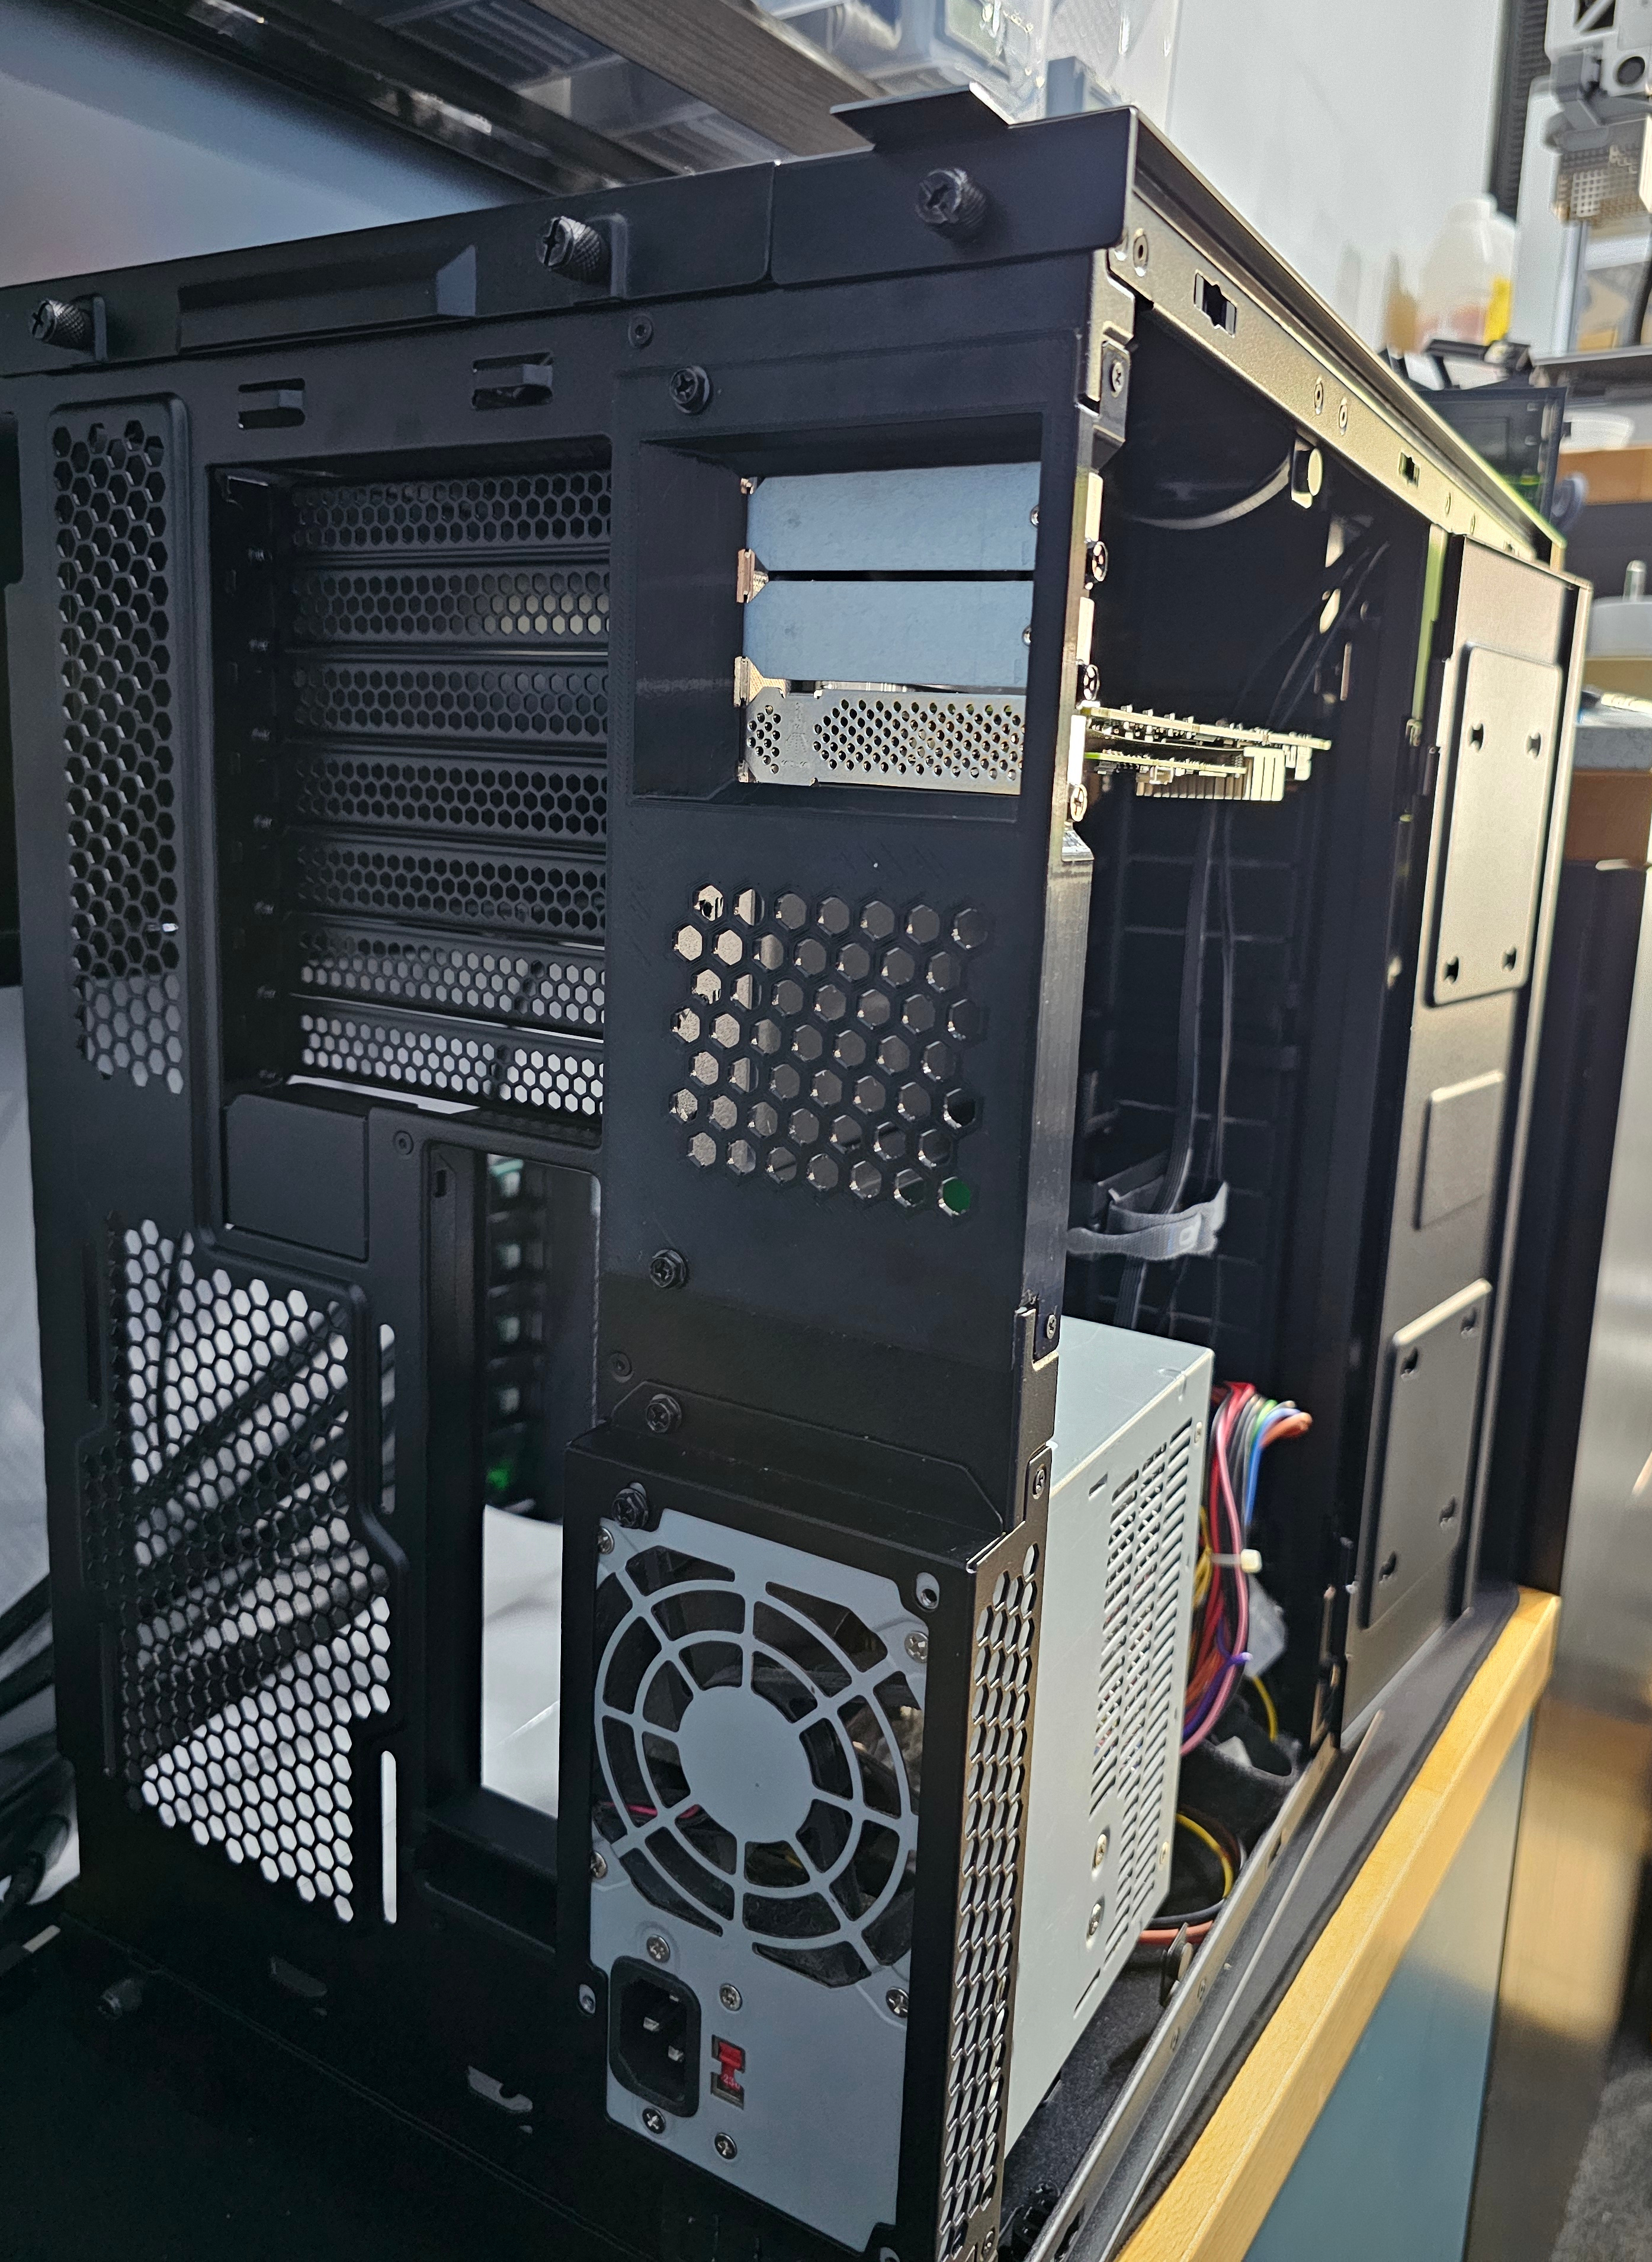
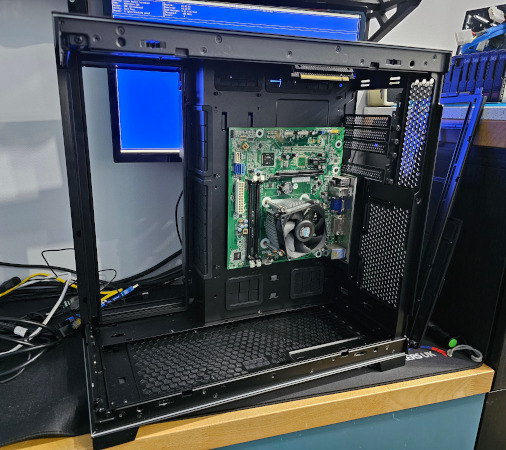
Alrighty. PSU now moved to lower bay - the support does move and is intended to be mounted with two out of three screws...but it doesn't reach the PSU anyway so I'm not sure what good it is. Possibly it does reach on the original side....but I'm not about to reverse everything just to check
Whether I go vertical or upright - or to be honest, leave it stock since as it's flipped, the GPU will actually be on display that way - the biggest problem I have is that the PCIE ribbon cable fouls the lower PCIE slots. You might be able to loop it over the top of the NIC but it's going to look dreadful....and maybe get melted by the NIC's heatsink - those 10 gig NICs get toasty! So I'm working on giving myself some options. This is the rear bay. Can you tell what it is yet?

Biggest problem with this is that it might write off too much of the space I'd use for ancilleries - pump, Aquaero, Farbwerk etc. We'll see.
Really? By 2030 I'm not sure we'll be past the 27th drain required for whatever disaster gets between now and 'finished'!
Model I'm working on is terrible - and I know which idiot made it too - so every time I make a slight fit tweak, other stuff moves. Like whoever made it (still not admitting to it ) had just picked up Fusion without a care for what is dimensioned off what and how that will affect things as they get tweaked. Print 4 is just coming off now and hopefully that'll be the basics. Just need to work out then how to extend it out so that I can bolt that PCIE board to it. Oh, and put enough hex holes in it to bring Fusion to its knees....again! Obviously once this is all perfect, I can scrap this plan and change direction
Model I'm working on is terrible - and I know which idiot made it too
- so every time I make a slight fit tweak, other stuff moves. Like whoever made it (still not admitting to it ) had just picked up Fusion without a care for what is dimensioned off what and how that will affect things as they get tweaked. Print 4 is just coming off now and hopefully that'll be the basics. Just need to work out then how to extend it out so that I can bolt that PCIE board to it. Oh, and put enough hex holes in it to bring Fusion to its knees....again! Obviously once this is all perfect, I can scrap this plan and change direction Talking of idiocy: you see that screw holding the low-profile plate in? Yeah, the side panel won't go on with that there. What short-sighted idiot designed this thing?! Wouldn't be so bad but there's a relief designed in for the thickness of the plate...so I'd clearly thought of the issue before forgetting all about it.
I was reading some of those professional, polished, sponsored projects with their shiny pictures and logical disaster-free steps from A to B....this sooooo isn't one of those!
Wouldn't be so bad but there's a relief designed in for the thickness of the plate...so I'd clearly thought of the issue before forgetting all about it.I was reading some of those professional, polished, sponsored projects with their shiny pictures and logical disaster-free steps from A to B....this sooooo isn't one of those!
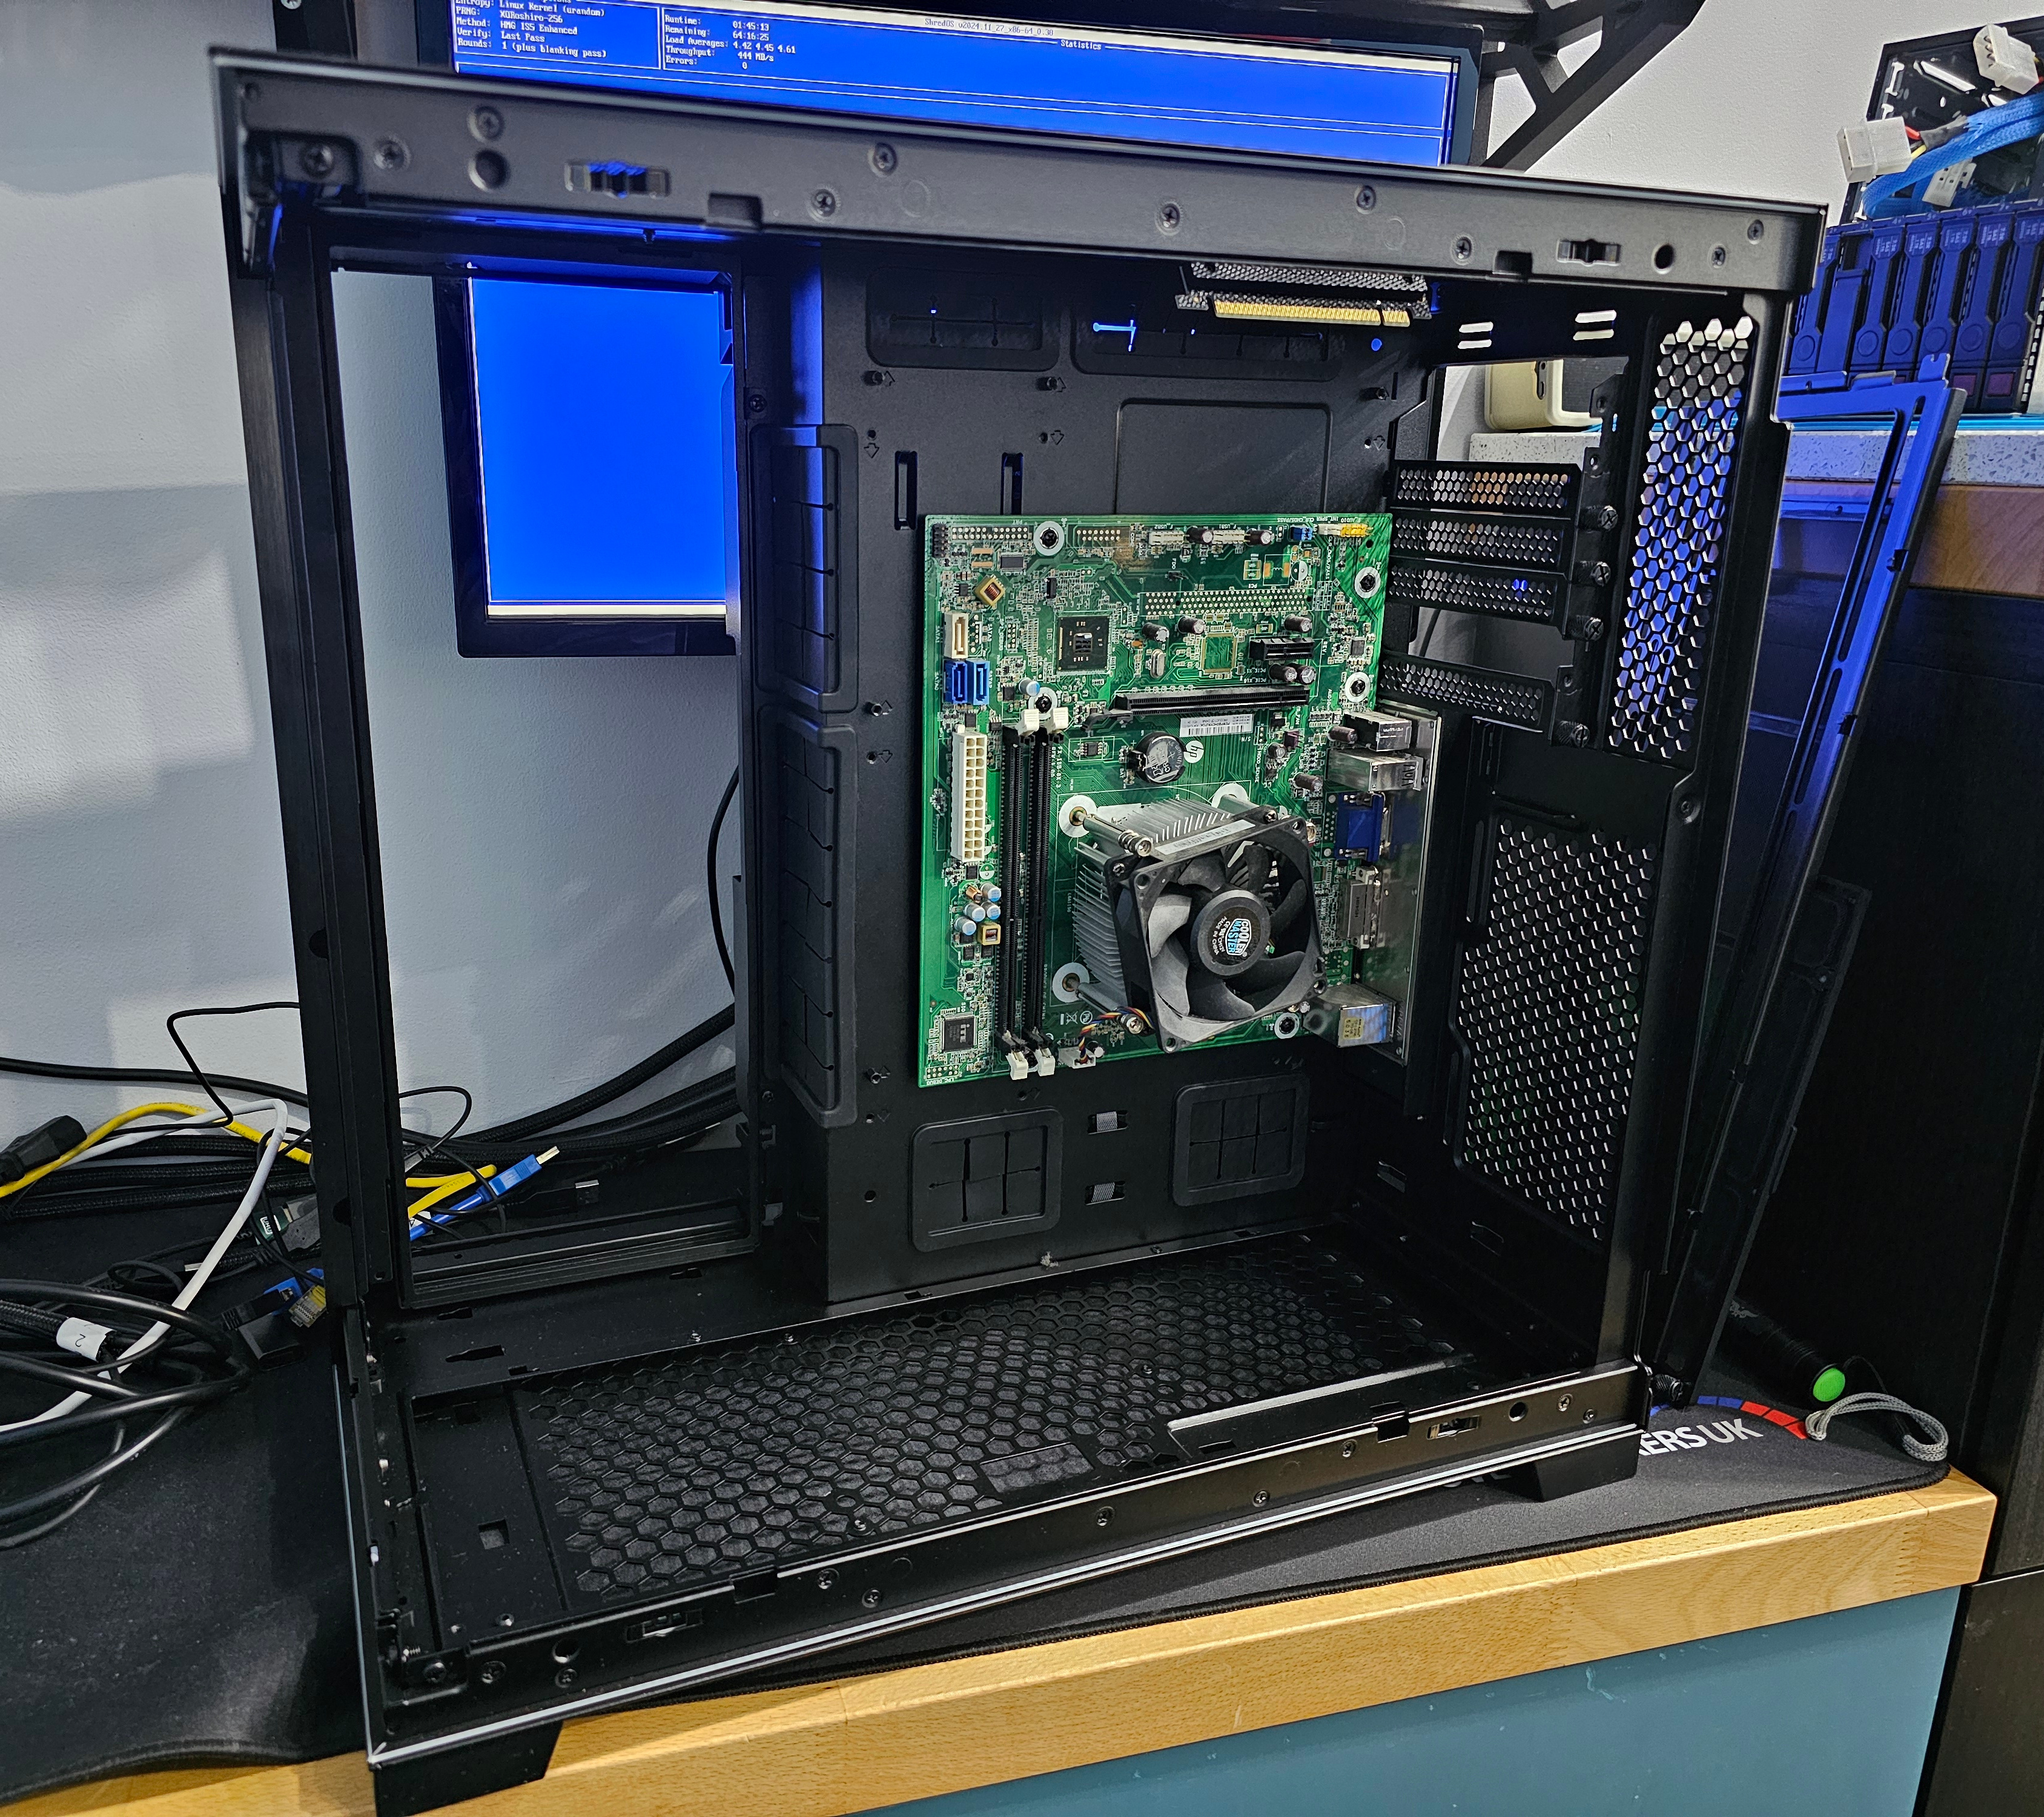
Well, after a little obsessing and a number of iterations, here we have it:

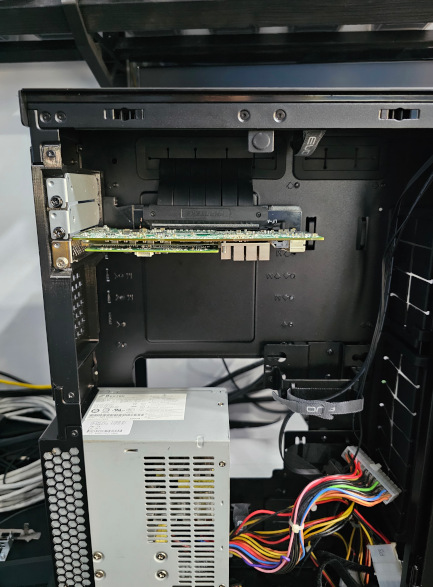
That's not a network card, I hear (just one of) you say! Nope, it's just a convenient low-profile card standing in for it for now. Doesn't it look good? ....about that....there's just one tiny issue. I say tiny, it's more of a show-stopper and back to the drawing board. If I install the upright GPU holder - which is rather the point of this, the ribbon cable runs through the same opening as this ribbon cable. Trouble is that they'd need to cross over. With this design, the only way of doing that is for it to cover the network card (run just inside the side panel) and go over the top of its ribbon cable. There's probably just enough room to do that but it's likely to write off all that space.
So I'm not sure about trying to redesign it so the cards hang vertically instead of 'normal' or re-think the upright GPU idea. First-up, does anyone know if running two PCIE ribbon cables next to each other (flat against) will cause interference issues?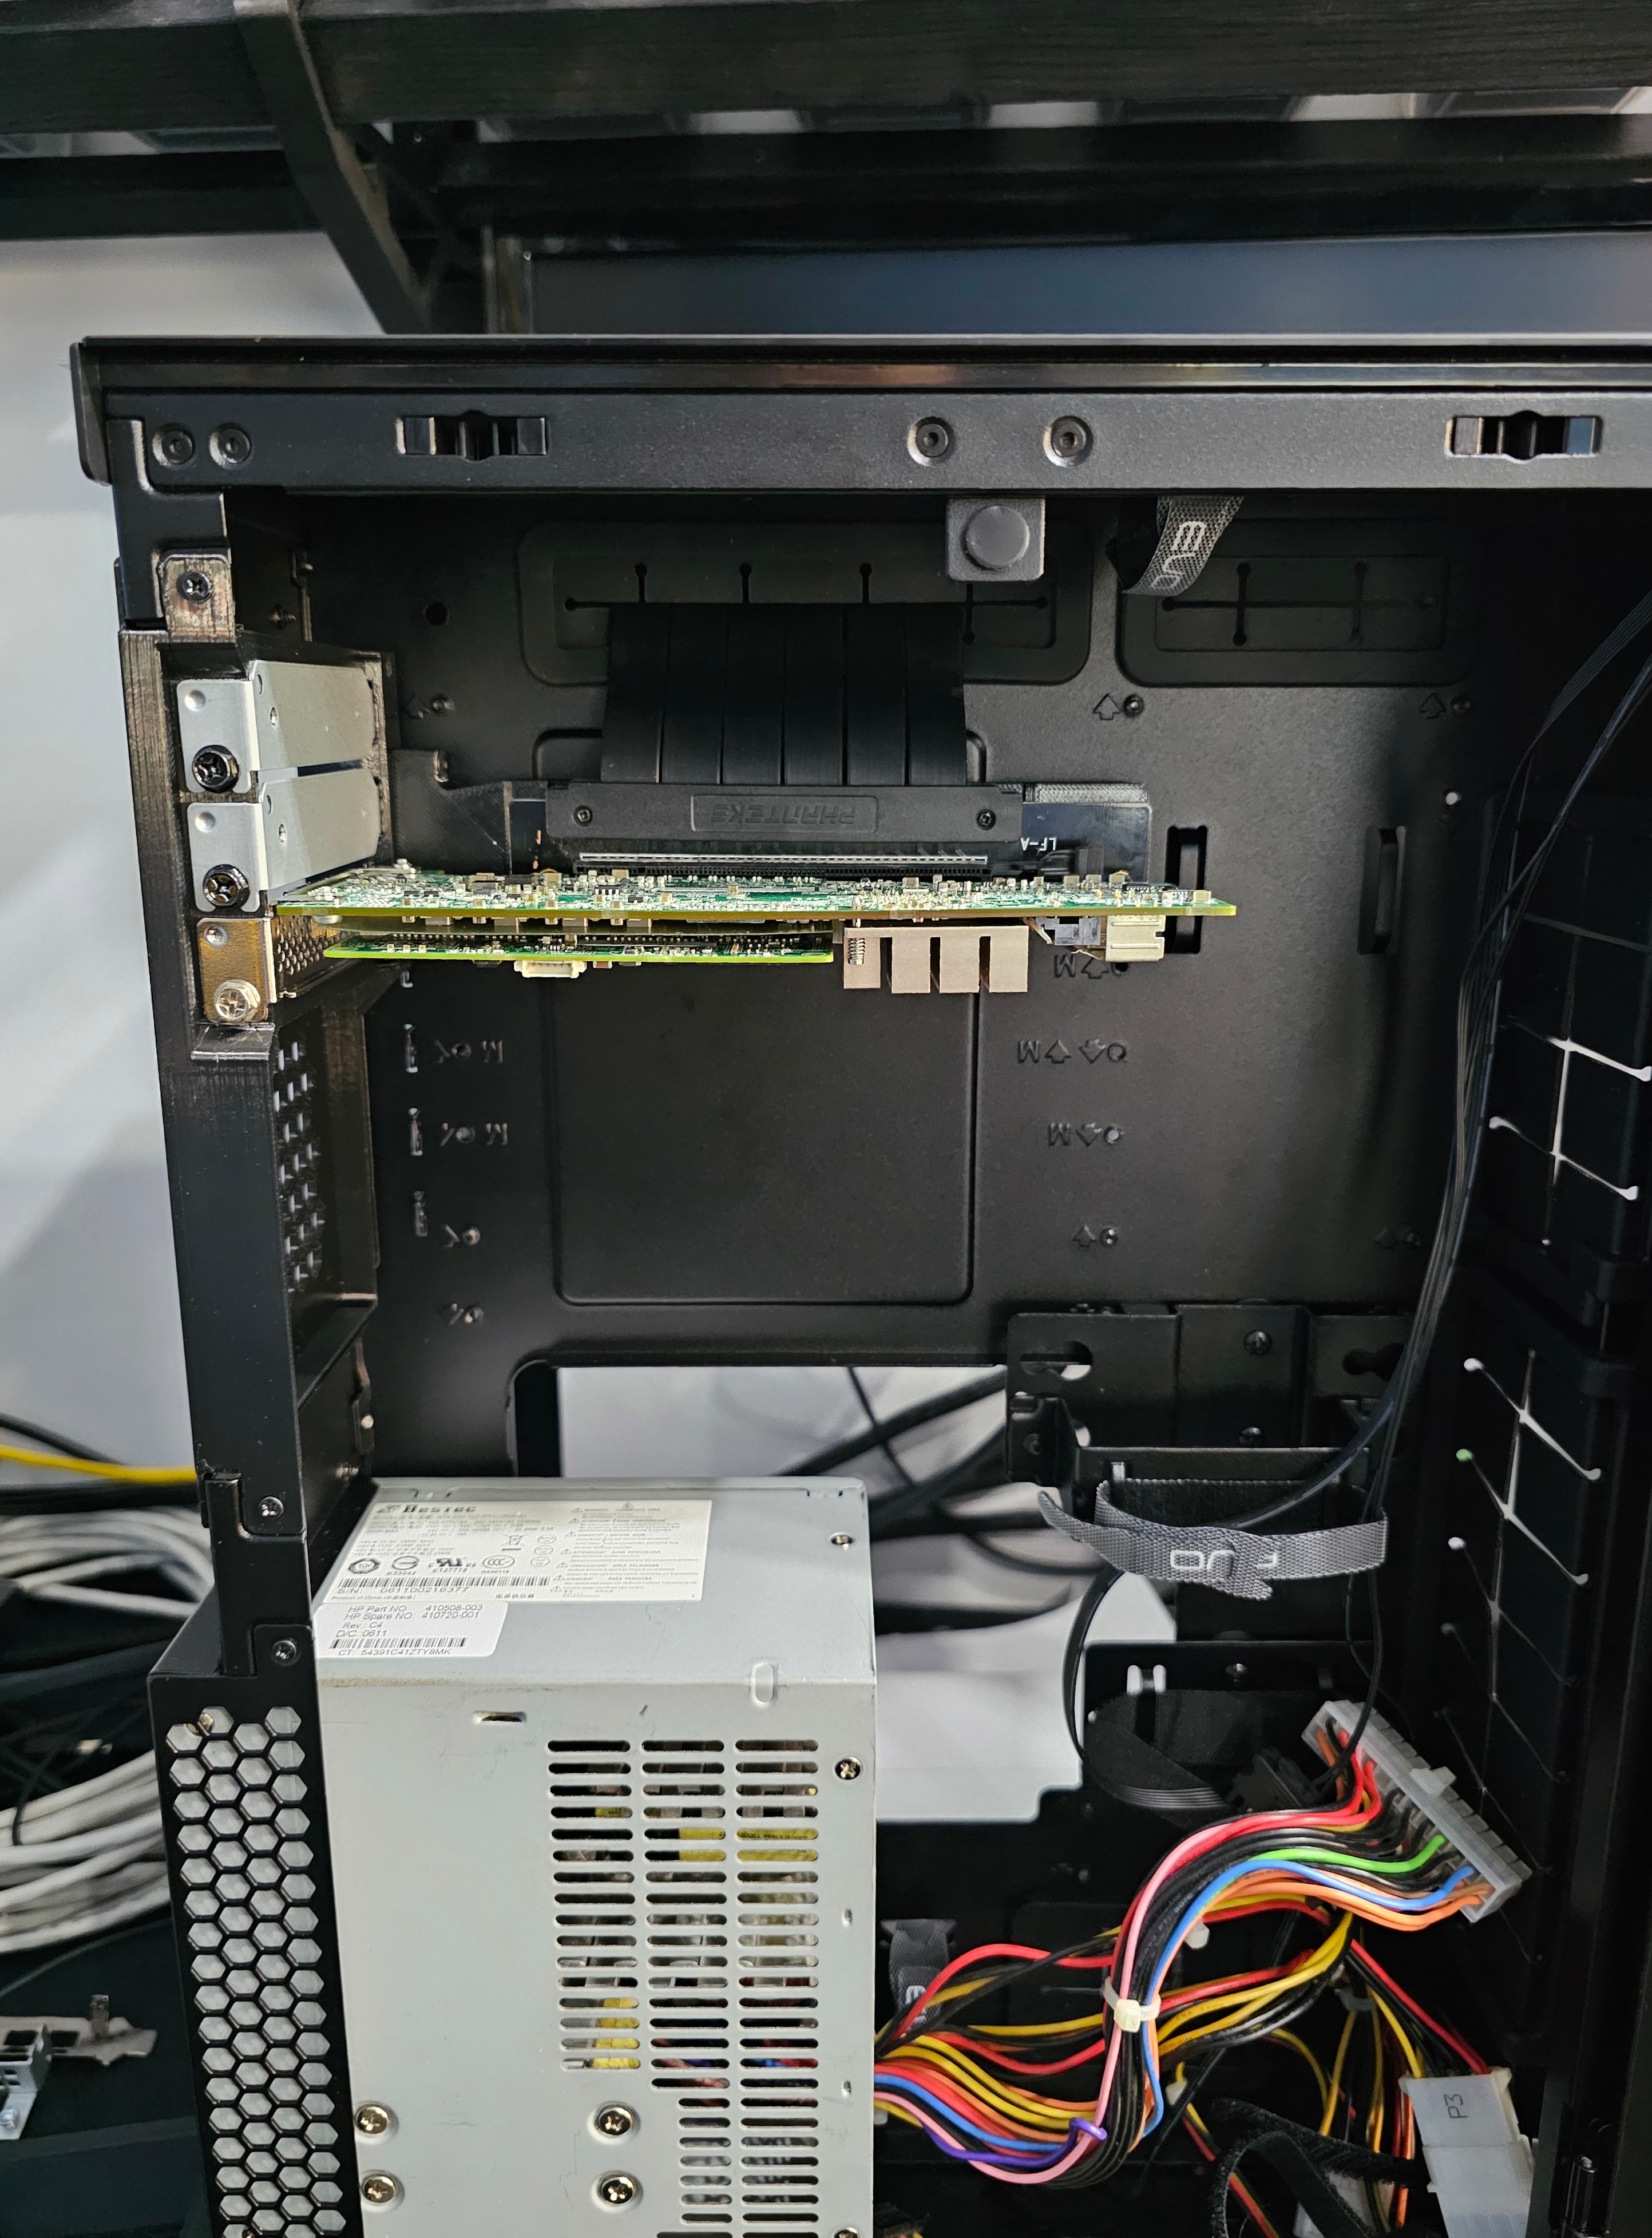
SCORE!! Was just looking to start the labourious task of modeling up the case so I can overthink some design elements. I wonder if anyone's already done this? Ooh, better than that, much better than that....Lian Li have released the STEP files (3D CAD)! They're just lurking on each product page next to the download manual link - I didn't spot them originally as it just says STP and I'd not realised it was a step file
So case flipped in CAD and my 3D printed brackets inserted and we have this:
Rather renders my Cardboard-Aided Design pointless....which is a shame as I'd just upgraded to Computer-Aided Design
So case flipped in CAD and my 3D printed brackets inserted and we have this:
Rather renders my Cardboard-Aided Design pointless....which is a shame as I'd just upgraded to Computer-Aided Design
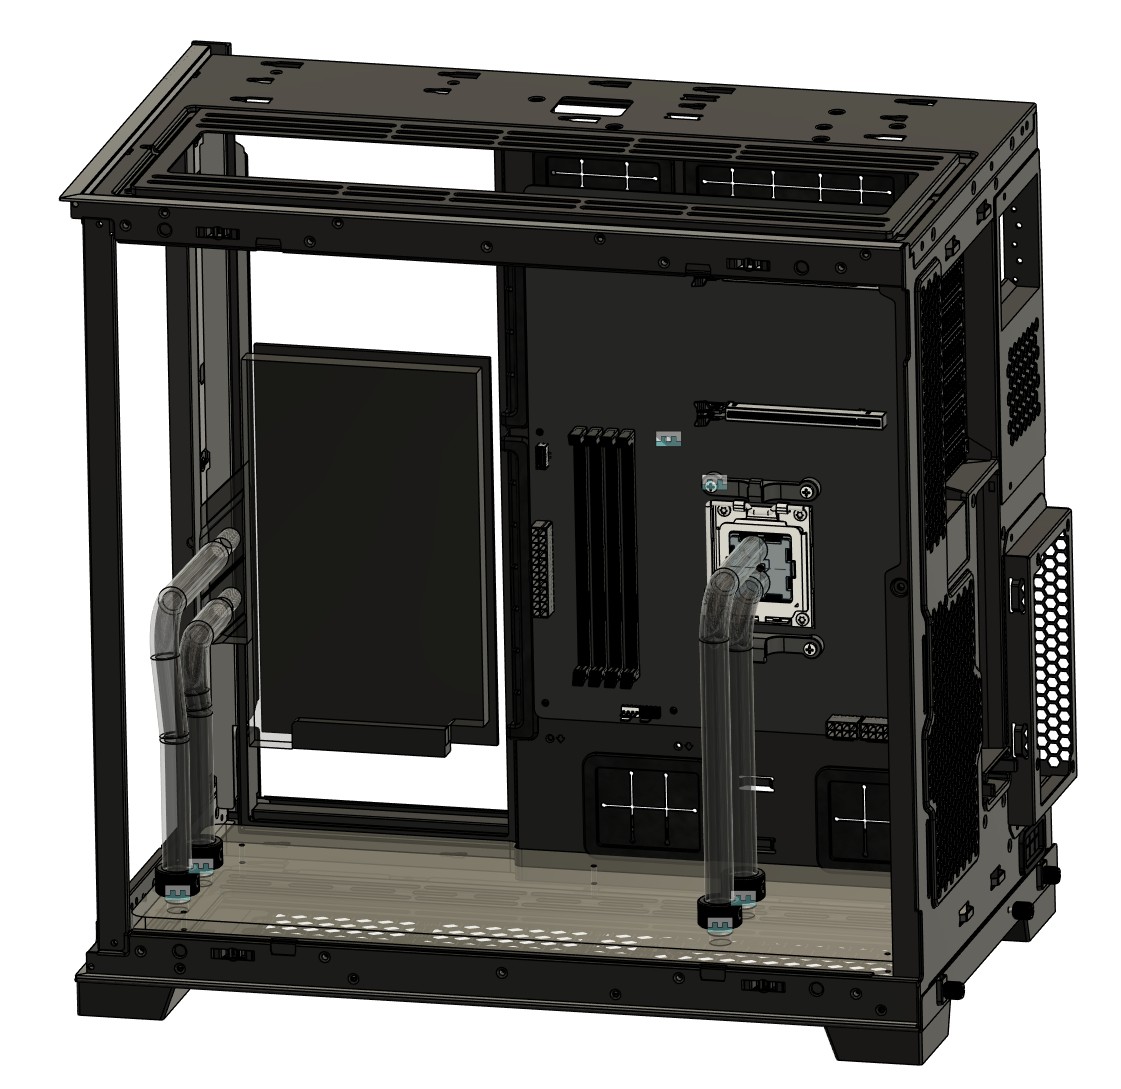
Ok, this is a very early stage of the sort of thing I have in mind. There's not detail of routing or res'ing in there yet, just an idea of look.
I've ordered the upright GPU bracket - that large rectangle hanging in space in the picture is the waterblock for the GPU so it'll go there....hopefully. I've not ordered the PCIE cable as it's £86 and if I can't/don't go this route, I won't need to have spent that
....errrr, yes....'bout that. Well I've hunted high and low for the CPU block, checked all my various boxes I might have 'filed' it away in, checked the old case. Nuffink! Yup, I left it screwed to the old motherboard before I shipped it *facepalm* Ah well, might not have fitted anyway
So I'm looking at Bykski - partly because they seem to have been decent and partly because they're 25-50% of the price of some other blocks.

There is this one that I quite like the look of but it's a 5 week lead time and the fins are much coarser - good for flow but not so much for performance...and I think my double-pump setup can handle the flow.
Any thoughts aesthetic or otherwise?
One issue I may have is that although this case is larger, there's oddly a lot less space to hide stuff - most of it's on-show. I will have an Aquaero, a Farbwerk 360 and a flow-meter to hide. Pumps and a filter, I might be able to design into the underside of the distro block....somehow!
I've ordered the upright GPU bracket - that large rectangle hanging in space in the picture is the waterblock for the GPU so it'll go there....hopefully. I've not ordered the PCIE cable as it's £86 and if I can't/don't go this route, I won't need to have spent that
I think the existing CPU block will fit as it seems to be AM3 / AM3+ / AM4 / TR4 and is almost identical to the one I was looking at.
....errrr, yes....'bout that. Well I've hunted high and low for the CPU block, checked all my various boxes I might have 'filed' it away in, checked the old case. Nuffink! Yup, I left it screwed to the old motherboard before I shipped it *facepalm* Ah well, might not have fitted anyway
So I'm looking at Bykski - partly because they seem to have been decent and partly because they're 25-50% of the price of some other blocks.
There is this one that I quite like the look of but it's a 5 week lead time and the fins are much coarser - good for flow but not so much for performance...and I think my double-pump setup can handle the flow.
Any thoughts aesthetic or otherwise?
One issue I may have is that although this case is larger, there's oddly a lot less space to hide stuff - most of it's on-show. I will have an Aquaero, a Farbwerk 360 and a flow-meter to hide. Pumps and a filter, I might be able to design into the underside of the distro block....somehow!
Ok, I feel it's more than past time we had some crazy ideas that'll never work here...it's been far too sensible lately! So, I like the UltiTube res but if I'm going to integrate it into something else (ie lose the bottom cap and replace the top with a LeakShield), I don't like the price. Also, it looks like they've epoxied aluminium rings on top and bottom to attach it....and that feels like cheating! I wonder if it can't be done as something like a large compression fitting. Something like this....
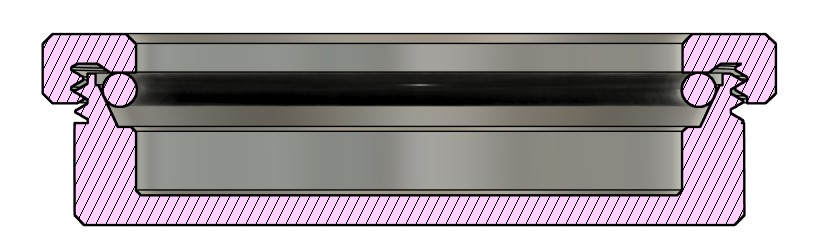
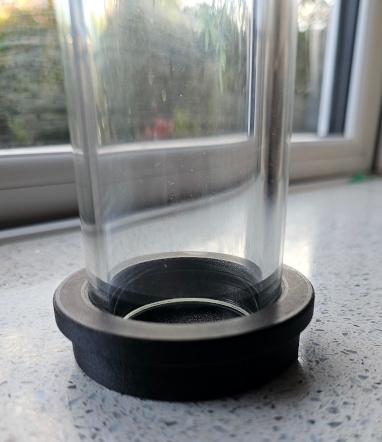
Well, once I'd got the thread tolerances sorted out, this is now screwed on as tight as I can do it by hand (bearing in mind there are no wrench flats or knurling). It has some resistance to being pulled off but it's not rock solid; you can slide it off. It's definitely not going to pass a pressure test but is it enough to be waterproof I wonder? So I've filled it with water (after taking this pic) and we'll see
I wonder if it can't be done as something like a large compression fitting. Something like this....
Well, once I'd got the thread tolerances sorted out, this is now screwed on as tight as I can do it by hand (bearing in mind there are no wrench flats or knurling). It has some resistance to being pulled off but it's not rock solid; you can slide it off. It's definitely not going to pass a pressure test but is it enough to be waterproof I wonder? So I've filled it with water (after taking this pic) and we'll see
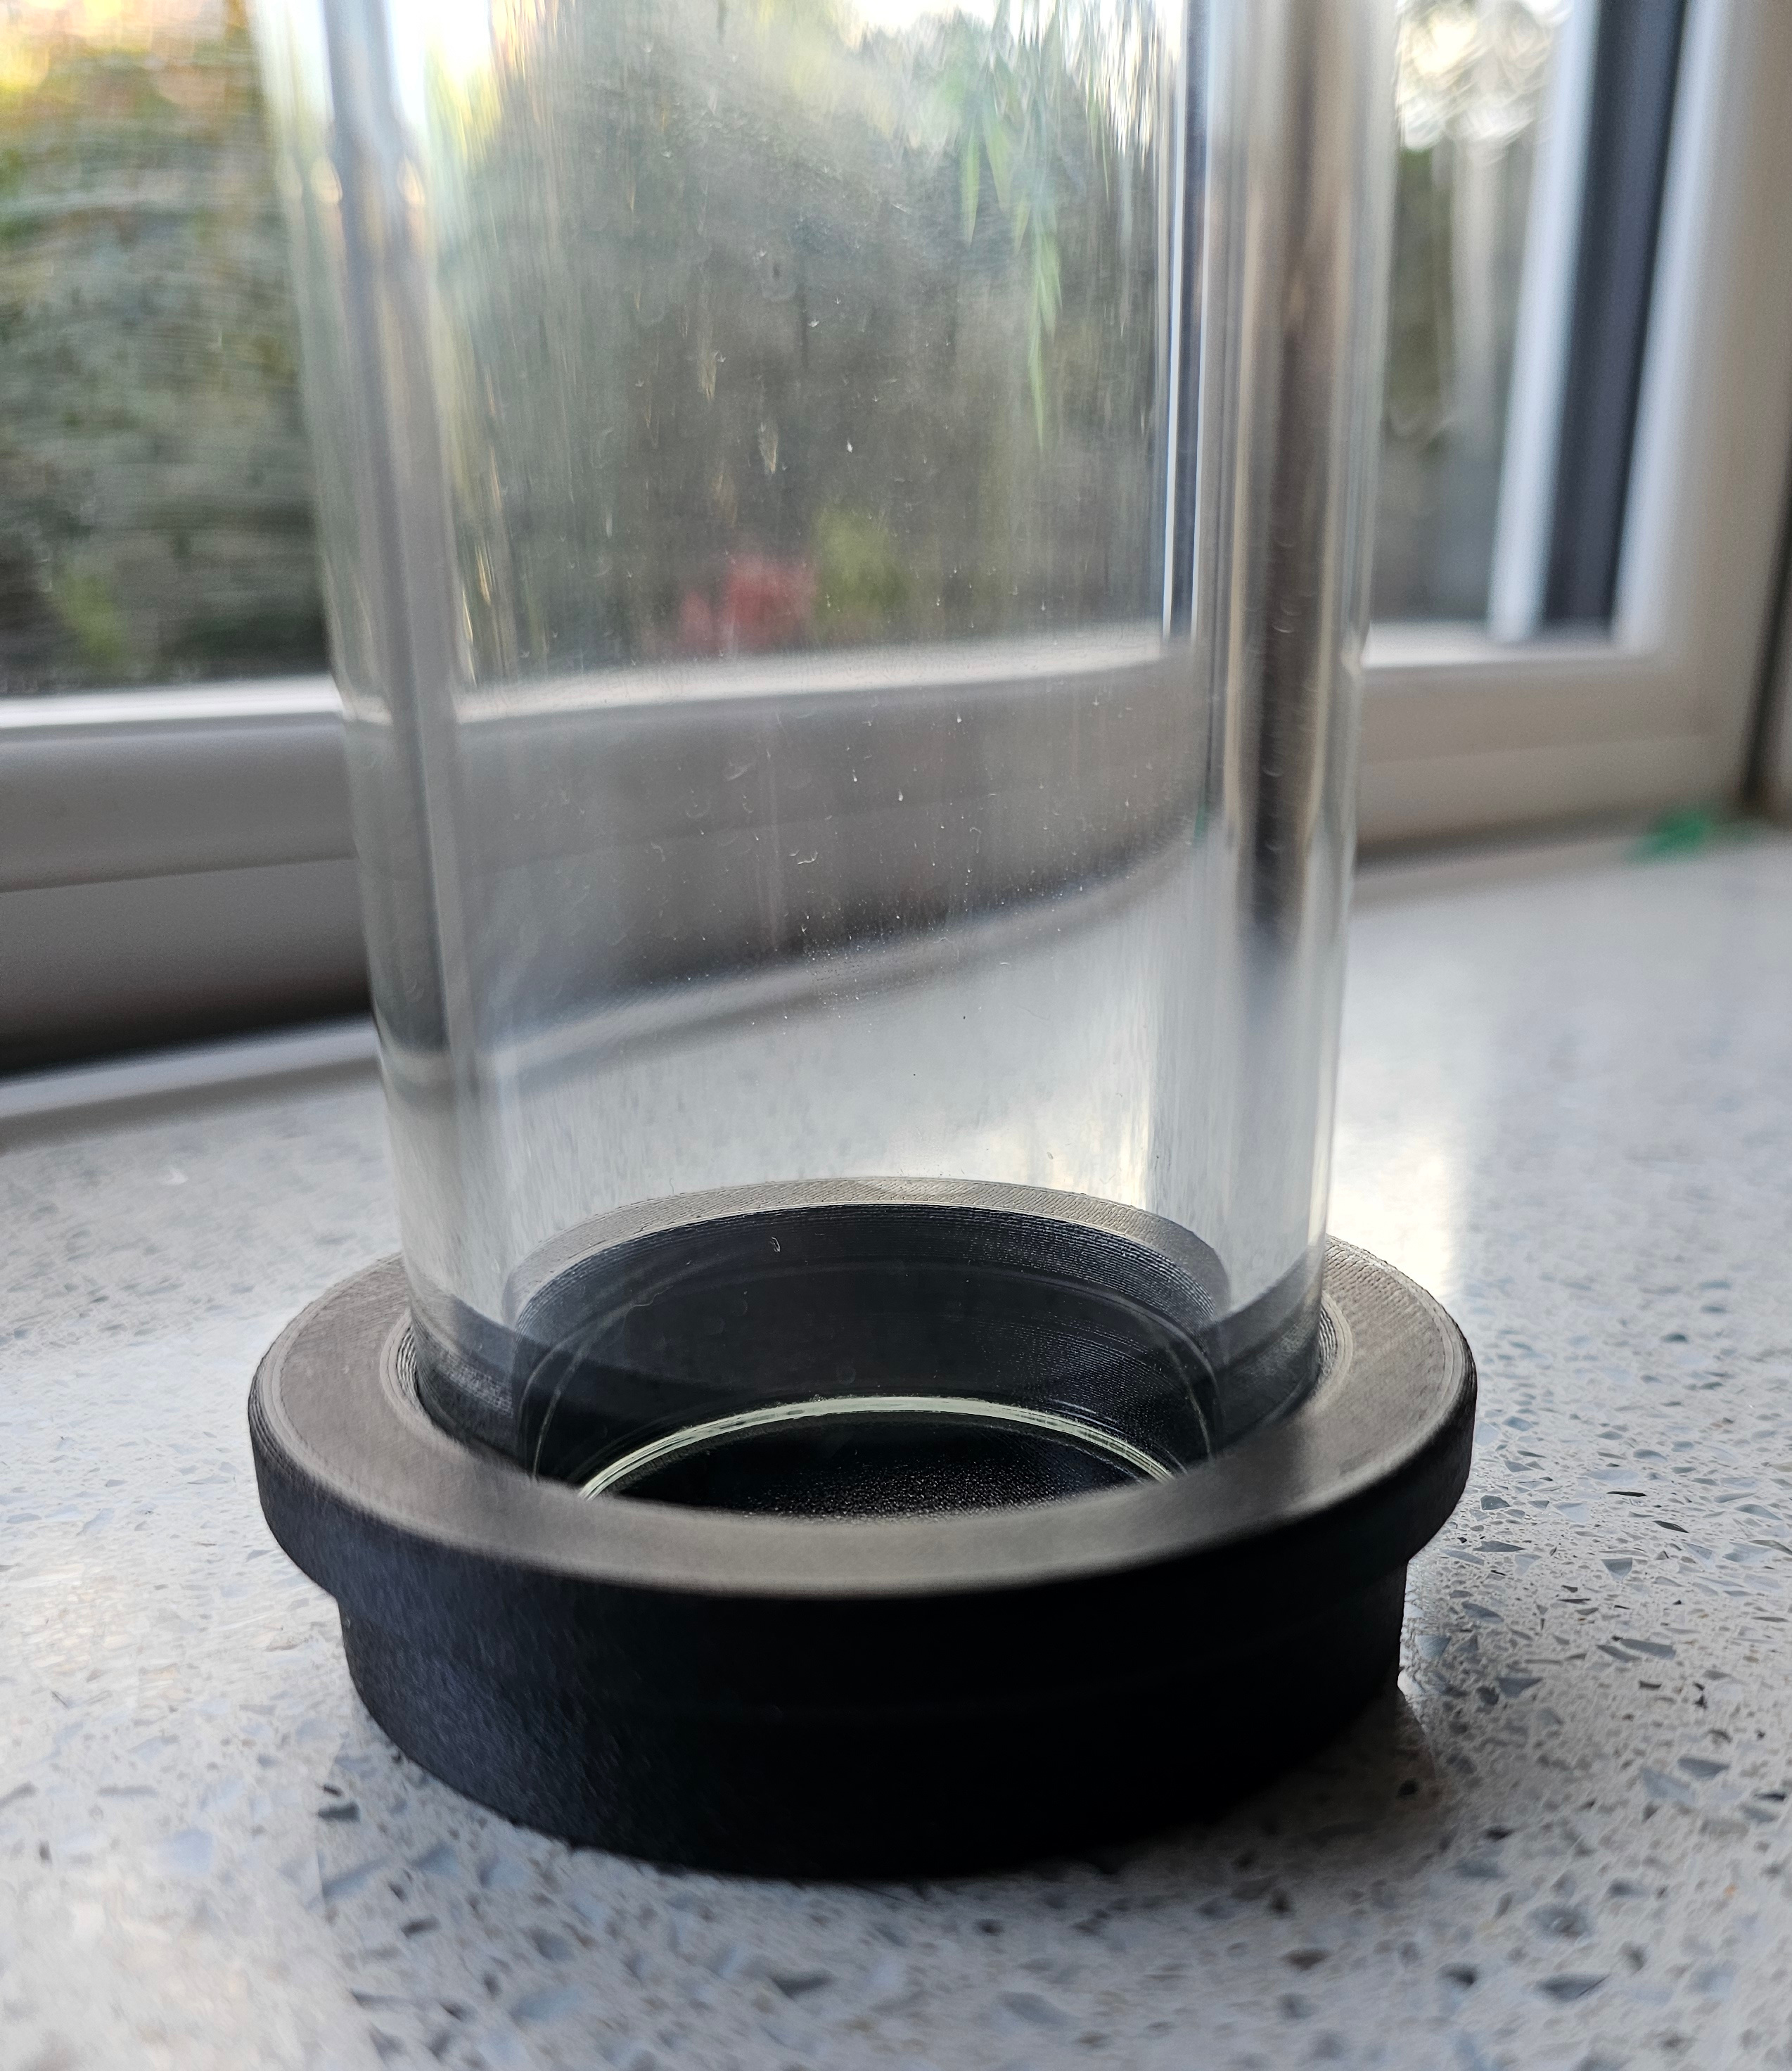
SUCCESS!! Alright, abject failure...but there's always room to prep another failure! It leaked in minutes. I'm not actually sure if it got past the o-ring or just soaked through the 3D print. So I've tweaked teh design to allow a bit more squish to the o-ring and then 3D printed it solid. Also put a G1/4 port for a stop plug in the top so I can test that too. So far, we're an hour in and there's not a drop. Also it's definitely much harder to pull the cap off the glass. This could actually work.....which is a sure sign it won't fit the final layout!
It leaked in minutes. I'm not actually sure if it got past the o-ring or just soaked through the 3D print. So I've tweaked teh design to allow a bit more squish to the o-ring and then 3D printed it solid. Also put a G1/4 port for a stop plug in the top so I can test that too. So far, we're an hour in and there's not a drop. Also it's definitely much harder to pull the cap off the glass. This could actually work.....which is a sure sign it won't fit the final layout! You'll likely still get some level of moisture creep simply because the print is done in layers, it's not a contiguous mass. Plus, which material did you print with? PLA is hygroscopic so that's gonna run the risk of getting brittle as it soaks up the moisture. ABS is also hygroscopic, but nowhere near to the same degree, plus you can give it a bath in acetone vapour to do a surface smoothing and seal up all the layers lines and improve its water-tightness.
Still damn cool though, how did you match threads?
Still damn cool though, how did you match threads?
PLA? Pah! This is glass-fibre reinforced PETG you know. Wouldn't prototype with anything else! To be honest, if proof on concept works well and it's an idea I actually end up using, I'd probably make it out of Delrin/POM/Acetal - but I'm not doing that until there's a point!
Threads are on both parts of the print so I'm only matching to myself. It's an M70x2 thread! I just offset both threads by -0.1mm in Fusion to get enough clearance to turn them....'cos for some reason I've not got that size as a tap!
It might be weeping through a thin-walled part which is only 1.2mm thick. I've just up'd the thickness to 2.2mm and added more walls for one more go at it. Just can't let it lie!
To be honest, if proof on concept works well and it's an idea I actually end up using, I'd probably make it out of Delrin/POM/Acetal - but I'm not doing that until there's a point!Threads are on both parts of the print so I'm only matching to myself. It's an M70x2 thread!
I just offset both threads by -0.1mm in Fusion to get enough clearance to turn them....'cos for some reason I've not got that size as a tap! It might be weeping through a thin-walled part which is only 1.2mm thick. I've just up'd the thickness to 2.2mm and added more walls for one more go at it. Just can't let it lie!
Definitely looking more and more like you're going to be annoyingly right There was just a drop or two coming out through the threads and nothing coming out the bottom where I'd screwed a stop plug. Given some time, it's started weeping round the o-ring of the stop plug so even though I've printed a new pair, I don't hold out much hope of it working. Wonder whether it's simply that PETG-GF is less waterproof than straight PETG or whether it's just a lost cause entirely - at least 3D printed. Might for giggles put a pressure test on it now I've got a pair of caps (one end is slightly bigger....because that's helpful) just to see how much the o-rings grip.
There was just a drop or two coming out through the threads and nothing coming out the bottom where I'd screwed a stop plug. Given some time, it's started weeping round the o-ring of the stop plug so even though I've printed a new pair, I don't hold out much hope of it working. Wonder whether it's simply that PETG-GF is less waterproof than straight PETG or whether it's just a lost cause entirely - at least 3D printed. Might for giggles put a pressure test on it now I've got a pair of caps (one end is slightly bigger....because that's helpful) just to see how much the o-rings grip.