011D Mini, ATX build with cobbled in ATX PSU, DIY vertical GPU, and configurable loop.

D4N

D4N

Associate
OP
Joined
7 Jun 2020
Posts
191
Got the shroud painted now, and cut out a blanking plate for where the original PSU
would have fitted, the proceeded to break the mandrel in my nut riveter on the first one.


My parcel of bits from Germany was delivered, so I’ve got a bit I can do over the weekend. The next hold up will be waiting for the vertical mount kit to release. Hopefully OCUK will get it listed soon!
 

D4N

D4N

Associate
OP
Joined
7 Jun 2020
Posts
191
Bit more progress now that some of the bits have arrived. Tried the reservoir on the shroud to see how it fits, and tried the radiator in. It’s an EK SE 360. Fitted the Noctua NF-12x25 PWM that seems to be rarer than hens teeth, on to the end of the rad so I can see where the pump needs to sit (got another 2 in the front of my current case I’ll use on the other spaces), and then I’ll have to make up some sort of mount.
I went for a D5 Next so that it can control the fans on the radiator from its built in water temperature sensor, and a Heatkiller top.


I made a backing plate to go behind the FLT reservoir out of mirrored stainless steel and cut it out to house the Lian Li badge that I moved from the back. Hopefully this will look good when the RGB is on. I can always take this out if I don’t like it, or make one out of a different material.


I’ll have to get the heat gun out and bend up some tubes to link here. The paint isn’t quite the same shade as the case either, but it will have to do.
 

D4N

D4N

Associate
OP
Joined
7 Jun 2020
Posts
191
This week, I have been mostly making brackets.

Finished off this one to blank off the original PSU hole, which also houses the power extension lead, a molex mini fit panel mount connector and a bulkhead fitting. Also cut a hole for the radiator outlet in one of the original blanking plates.


I made a brushed stainless pump mount to go on a fan too. It started like this


then hacked it about to make this


then fitted out with the pump and fan


D4N

D4N

Associate
OP
Joined
7 Jun 2020
Posts
191
Done a bit of pipe work this afternoon. I’ve used a spare psu just as a fill in until I finally transplant my system from it’s current case.


D4N

D4N

Associate
OP
Joined
7 Jun 2020
Posts
191
I’m thinking of maybe making my own vertical gpu mount seeing as the official one doesn’t seem to be available anywhere.
I’ll have a measure up and see if I can cobble something up.
 
Associate
Joined
10 May 2011
Posts
126
Location
Reading
I’m thinking of maybe making my own vertical gpu mount seeing as the official one doesn’t seem to be available anywhere.
I’ll have a measure up and see if I can cobble something up.

this mount is what's holding my build up in the mini, doesn't seen to be anywhere :(
 

D4N

D4N

Associate
OP
Joined
7 Jun 2020
Posts
191
this mount is what's holding my build up in the mini, doesn't seen to be anywhere :(
Same boat I’m in. The Phanteks one I’ve got in my other case needs the bars cutting out between the slots, and I think that’s how most of them are. I don’t think that type will work very well in this case because of how the modular brackets are. I think it wouldn’t be particularly secure compared to other cases. What I plan to make is a piece that replaces the cover to the right of the first 3 expansion slots, and the first modular slot underneath. It should be pretty solid as it’s got 3 bolt on the side of the expansion slots and the ones down the right side of the case I can use to attach it. It will place the gpu closer to the side panel than the official one, but I’m going to use a water cooled card, so it’s not a problem. It will be better for how I want to plumb it actually, as I will use the ports on the backside of the card, so being a little closer to the side will give me more room behind it for pipes.
 
Last edited:

D4N

D4N

Associate
OP
Joined
7 Jun 2020
Posts
191
I finished off making this today


to mount my Phanteks LED neon strip to the side of the radiator.


D4N

D4N

Associate
OP
Joined
7 Jun 2020
Posts
191
Got the first stage of the DIY vertical mount made and test fitted. Tried my trusty old 970 in there.


I had to trim back a bit underneath the rear fan mount to make a bit of room, but if you look at images of the official one, it is closer to the fan like mine. I did measure the one dimension a few mm too small, hence the gap between my mount and the top 3 pice covers. Never mind. I also swapped the thumbscrews holding the modular plates for some smaller stainless cap head bolts that are a lot less bulky than the thumb screws. Once it’s all together, the modular plates shouldn’t need to come off very often, so I’m not bothered about it needing an Allen key to remove them. I’ll keep the thumbscrews on the top and side panels though.

Next problem to overcome is I bought a 120 radiator to go on the rear exhaust, as I though you can’t have too many radiators. Trouble is that it sits too far down to clear the top of the GPU. It fitted in lovely until I went to try the old 970 in :o. I extended the slots on the fan mount to try and lift it up as high as it would go, but it’s not quite enough, so I’m probably going to try and get it on the outside somehow, which brings its own problem. Being on the outside means it’s in the way of the screws to mount the GPU. I’ve got a bit of an idea, and will try to bodge something up.
 

D4N

D4N

Associate
OP
Joined
7 Jun 2020
Posts
191
Radiator should be sorted now. I made a hinge to mount it on the outside so that I can swing it out of the way to access the screws on the GPU. Like so:
Open


Closed


It’s mounted so that it clears the top panel when you need to remove it, and it just about clears the GPU mounting screws. I have got a spare hole though, as I drilled one in the bracket for holding it closed, then when I checked the inside of the case, there were already 2 holes there for dropping the modular back plate, so I drilled these through the panel and used them instead.

I also tried in the card I’ll actually be using in it just to check clearances. It wouldn’t want to be much longer, or it would be on the pump! I have got a 3080 that’s a bit shorter in length on order, but I don’t know when that’s likely to arrive, and when it does, I don’t know if Watercool will be shipping to the UK or not for the waterblock I want. Still, my 2080 isn’t a bad card for the time being.


It’s starting to take shape now. Hopefully I’ll get the vertical mount finished this week. I’m undecided whether to paint the back radiator white to match the case, or leave it black to match the border on the glass.
 

D4N

D4N

Associate
OP
Joined
7 Jun 2020
Posts
191
I got the lower part of the vertical mount done today, just got to make a couple of spacers to go underneath the riser cable to support it. I should hopefully get some final components in at the weekend all going well.
 

D4N

D4N

Associate
OP
Joined
7 Jun 2020
Posts
191
A bit more progress has been made. I had a tin of paint mixed to match the case, so I have repainted the shroud to match rather than leave it with the warmer shade of white I used before. I gave the thumbscrews and radiator a coat of white too.


Finished the last few bits on my DIY vertical mount


I started to put in some of the bits for the system.


I’m quite pleased with how the power supply fits. The front of it is fairly level with the motherboard, and 90° sata connectors are a spot on fit in the space on the side. The PCIE power cables I had used before are too short though, so I’m going to have to make up a longer pair, and I also need a braided sata power cable for the D5 Next. I’m waiting on some 15mm Noctua fans to come back into stock, as 25mm ones cover the Phanteks neon strip along the top of the motherboard.
 

D4N

D4N

Associate
OP
Joined
7 Jun 2020
Posts
191
The pump protrudes out of the back of the flt pump/res combo, so would stick in over where the psu cables are. I’d have had to have made the shroud a lot deeper if I’d have gone that route. I like the Aqua Computer D5 Next as it’s got monitoring software with it, and you can controls the fans and pump by water temperature.
 

D4N

D4N

Associate
OP
Joined
7 Jun 2020
Posts
191
Nearly in a functioning condition now. I gave my waterblocks and rads a clean out while the system is apart


and made up some longer braided PCIE cables, so they would actually reach


Should just need a bit of plumbing now to get it up and running.
 

D4N

D4N

Associate
OP
Joined
7 Jun 2020
Posts
191
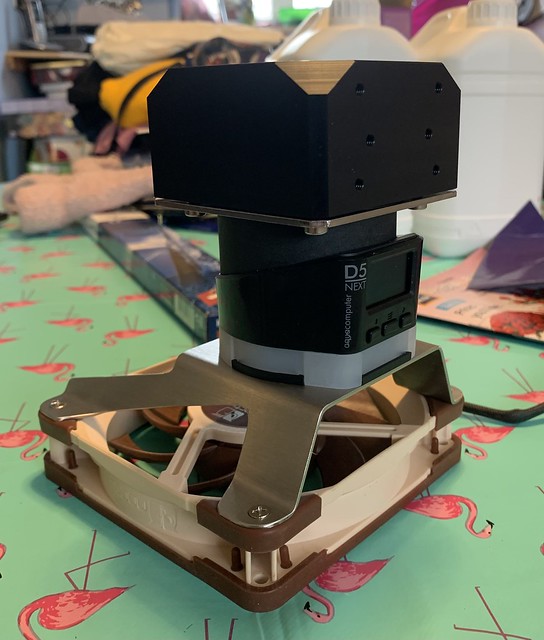
Some real nice work here. You could probably sell those pump mounts.
Shame you had to put the 120 rad external.

I’ve got a whole external loop to go with it, so I don’t mind a 120 on the back. More rads can’t be bad!

I’ve done the plumbing today. It’s a bit different to the norm. I’ve made it configurable so it can be used with just the rads on the case, or with the external loop plugged in, or as separate dual cpu/gpu loops. The pictures will show how.

This was the first bit of the plumbing puzzle. The gpu pipes.


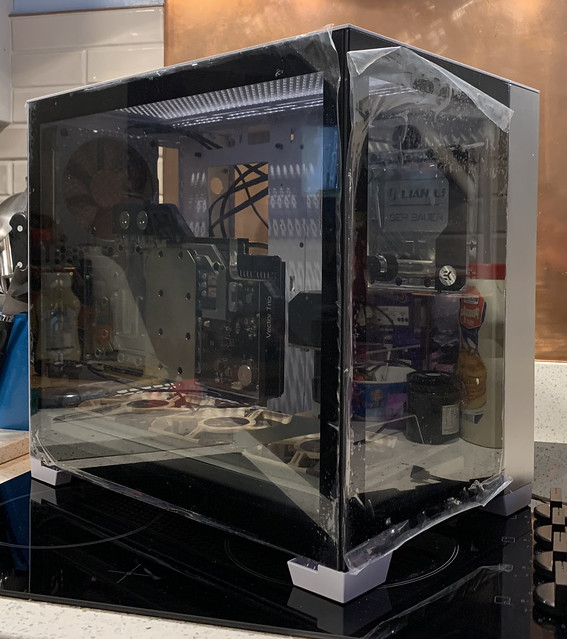
And how it sits in the case. I think it fits quite well with the 2 pipes for the gpu offset, and the cpu to radiator pipe to the left.


This is it configured to run everything from the internal loop, consisting of a 360 and a 120 rad. I used 2 45° fittings from the 120 rad to the GPU input, so there is enough movement in it to open the hinge on the radiator enough to get to the screws on the GPU. If I do want to remove the GPU for anything, I’ll probably just unbolt the back modular section with my vertical mount and pull the whole lot off with the rad and pipes attached.


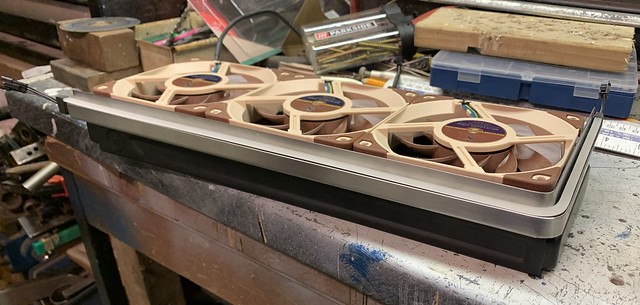
With the quick disconnects I can swap the pipes about to add in my custom external loop consisting of a D5 next, a Watercool Heatkiller tube 200 and 2 Alphacool XT45 280mm radiators paired with 4 Corsair ML140 fans in a custom enclosure. This is it configured as one big loop, with both CPU and GPU, cooled by a combination of 360, 120, and 2x280 rads.


The other possible configuration is like this, where the GPU is cooled by the external 280’s, and the CPU is cooled by the internal 360 and 120.


Currently I’m letting it run from the external pump to leak test it for a while.


I didn’t think I’d be able to get it done today as I couldn’t find one set of the disconnects so ordered a new one, only to find it about half hour later. Suppose I’ll have a spare one if I need it.
 
Back
Top Bottom