BeQuiet Dark Base Pro 900 Watercooled Build

Just found a build log to go with the Aquaero threads - not very observant me ;)

Only thing I was going to say seems to be far too late. I was going to say that you'd be better to mount the front rad with the ports at the top because with them at the bottom it'd be a $*%@ joy to bleed as you have to persuade all the air bubbles to go down to the bottom to leave. Not the end of the world but a consideration if you're ever planning to drain and refill. Worth giving it a rock and see if you can hear air at the top of that rad - it'll sound sort of echoey.

Ah I see. Bugger. Just gave it a shake and was silent so hopefully there all out.
 
You could be lucky, some are more of a pain that others but if the air is out its all good - otherwise you're making some of the rad ineffective. Just bear it in mind next time you fill and check it again once it's had a few days for the air to bubble out.

Yeah will do thanks mate.
 
Been watching your build....neat. Are you back to square 1 with regards to using original fans and heat issues?

Sort of. I've got the bequiet fans back in and an extra 120mm apache black that I had lying around so that helps. With the door open the temps are great. Might look into modifying the case front and door to allow extra airflow.

Watch this space.
 
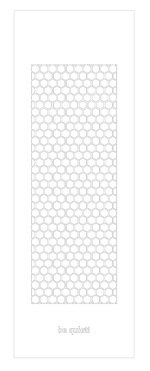
This is my plan for the front door to increase air flow. What do you think guys? The be quiet text will be cut out too and probably back lit.

fYyAPWd.jpg
 
Last edited:
I would move the fans just to the inside of the case, like the other side of where they are fixed.

Will give them more room to breath and should make a difference, they will have more air available to them to feed off.

Can't do that mate not enough room and would have to redo my loop and pump mounting etc.
 
If you feel you need extra ventilation there's unlikely to be anything any can say to persuade you otherwise. Even if you're wrong (and I'm not saying you are) it's not like extra ventilation is going to harm things. If you were talking about nastily hacking holes in the front with a can opener, I'd try to persuade you otherwise but it looks.like you're trying to do it properly and make a feature of it...so I say go for it!
I like the idea of some sort of logo at the bottom being back-lit. Does make it more complex depending how you're planning to make this. If you're hand cutting and then filling the gap with mesh, probably not possible. But if you're thinking of getting it CNC or laser cut its more possible as long as it can go detailed enough. Might be worth a chat with E22 (Nate or Victoria) to see whether they can help with that - assuming you've not got that sorted already.

Hi mate, it 100% needs more airflow. Done plenty of tests, it's night and day with the door open or closed. I don't bodge things it will be perfect or that's not good enough!

I plan to get it cut out with water jet and have done cad drawings for the design. Unfortunately the text on the bottom is too small even for the 1mm water jet.
 
Last edited:
All sounds good. Have you thought about putting a different logo at the bottom to back light? Maybe even a mounting that you could put some acrylic in and use vinyl or window tint to make the logo?

That's not a bad idea. Maybe cut out a rectangle in the bottom so I can add my own with acrylic and back lit. Thought about bonding a sheet of acrylic on the rear before getting cut so I could light up the hex's.
 
It would be the same size hex's as it would be bonded before being cut. If I get it done seperate that would double the cost. Love your idea on the flush hex but would cost far too much money. My idea should look cool from an angle and a slight glow from straight on.
 
Thank you :)

I'm loving the idea of a back lit logo with the temp. But what logo to have, that's the question? Could possible get it cut depends on what it is. Any ideas?

Your panel looks great.
 
If you're going to essentially mask the block with Vinyl, you could go with the original "Be quiet" logo as long as the cutter can go that fine or you enlarge it. Or as Andy suggested, have several and swap em out.

I'd rather cut a logo out than just a square really but just can't think of anything ATM. Maybe a thermometer.
 
Now that's an idea! With the RGB LED you can have the brightness change as well, so if mounted at the bottom of the thermometer you could start with a dim blue, then have it gradually getting brighter as it moves through to red, filling the thermometer as it goes... Sorry if I've just made a load of extra work for you!! :D

No mate I love it. That sounds perfect! Just need the thermometer logo now. Will look after work.
 
The front will look pretty much like the hexgear case I had for a bit, lights well as you're planning to do it. I'd got for a more interesting logo that describes the build theme really but it's gonna be a personal thing.

I can't think of anything mate. Been thinking all week.
 
What describes the rig best? Dark? Quiet? The kit inside? Search around those keywords on google images or deviant art. Like: dark, raven for example looks good simplified. Quiet, just says 'Shhh...' on the front. Kit inside, nemesis logo for the rads is quite different/cool.

Cheers mate :)
 
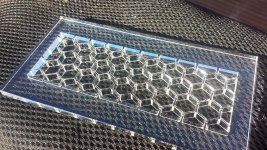
Having some issues with getting the front panel cut atm. Still trying to sort it out. I've got the acrylic panel ordered so should have that soon. This is an example (just a section of the top)

3flZv6v.jpg

What rgb stuff do I need for the Aquaero 6? Might have to lose this idea and just work on the lit hex's as its going to weaken the door quite a bit already.

Thinking blue for the hex leds.
 
Last edited:
I meant have the hex panel light up blue. I plan on drilling and inserting loads of leds all around the edge.

The rgb led would be for the smallish logo at the bottom if I can make it work. Was thinking of 1 led mounted in the acrylic pointing up through it. That's if I have enough space and it doesn't make it too weak.
 
Right just herd back from the water jet people and they want to charge me an arm and leg from the original quote so its not worth it.

I need to come up with another solution. How about I cut a rectangle hole in the door and screw the acrylic piece in through the front? Probs 6 x countersunk or button head bolts.
Spray the front of the acrylic black and then sand the paint off each of the holes?
 
Back
Top Bottom