

You are using an out of date browser. It may not display this or other websites correctly.
You should upgrade or use an alternative browser.
You should upgrade or use an alternative browser.
How to repair a Dead Dell 3008WFP Monitor
- Thread starter embalse
- Start date
More options
Thread starter's postsAssociate
- Joined
- 13 Apr 2013
- Posts
- 1
My Dell 3008Wfp went dark about 3 weeks ago, which by the way lasted 6 years. I knew immediately that it was something to do with the power supply, but I thought that there may be a fuse somewhere inside so I started searching the net on how to dismantle the monitor. Lucky me I came upon this thread that very day. Bought the Schottky diode took a week and a half to get here to Australia and commenced repairs.
At this stage I would like to thank "embalse" for his excellent repair guide, without which I would still be fumbling in the dark.
I have to emphasise that I am not an electrical engineer or electrician, I am a motor mechanic who merely had the skill to follow this guide.
I do not have a proper desoldering station, but used an 80 watt soldering iron with a 3mm tip and a hand vacuum plunger pump, and desoldering braid which I think was the most effective way to remove the solder.
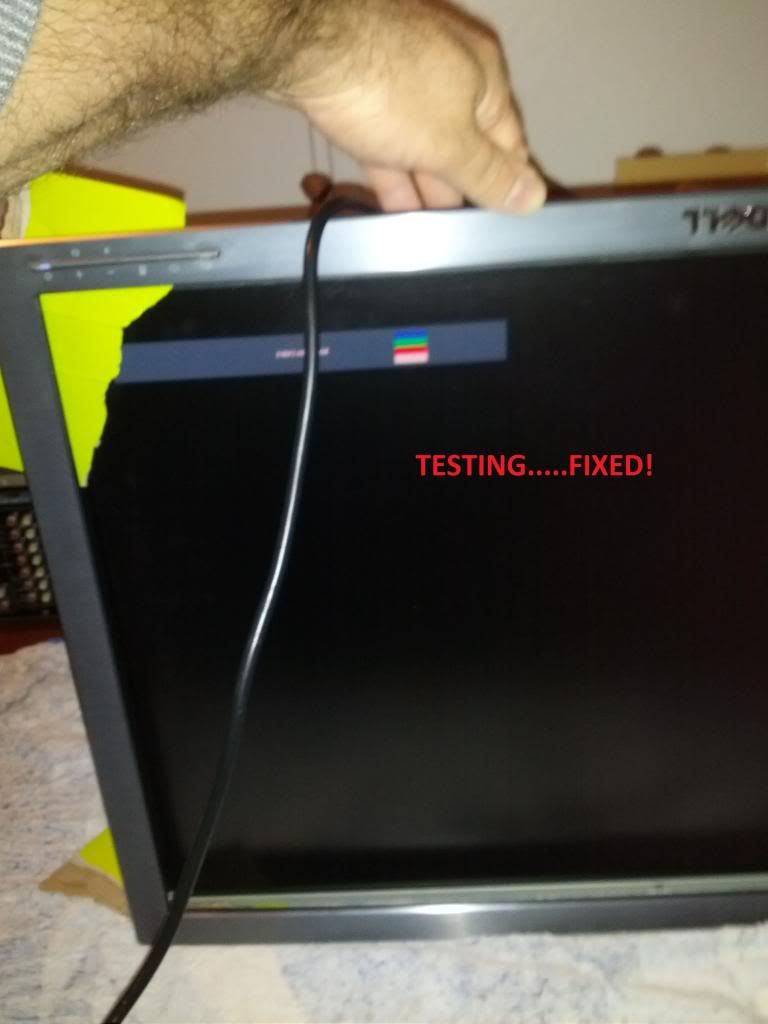
The repair took me about 6.5 hours, which is not bad with the basic equipment that I had available. And now I have a fully working Dell 3008Wfp again.
I wanted to share my personal experience of the repair itself and perhaps add a few extra pointers that don't seem to be covered or were perhaps forgotten by embalse, yet may make repairs easier for others out there.
The removal of the bezel is the hardest part of the job as mentioned already, it is especially hard to remove around the corners. I used two plastic spatchulas. Remove the length of two adjacent sides of the bezel by hand and work your way towards the corner from both sides bit by bit. Try to pry and wedge the tool that you are using (spatchulas in my case) under the bezel as close to the corner as you can on one side and repeat on the adjacent side, there will be a pop and the corner will be freed. Repeat on all corners. The monitor in embalse's pics is exactly like mine, however if you watch the youtube links he provided for dismantling, they are for the previous model of Dell 30 inch and cannot be used as a guide for taking off the bezel, because it is completely different.
When my bezel came off and I turned the monitor face down as in the pictures from embalse, for me the back refused to come away freely as described, in fact I had to stand it up on one of the long edges and while held in place by my helper (my 12 year old son) I had to use a screw driver to help it out of the casing, it seems that the card reader was getting caught on one side and the long metal screen was getting caught on the other side.
When you get to the bit where you are lifting the main back plate that holds the power board and once disconnected the two cables, while lifting the unit you have to slide it to the left to unlock the hooks that hold the opposite side in place.
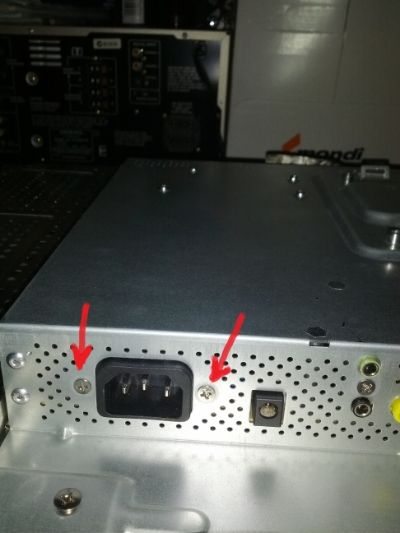
As mentioned the power board is held in place by 5 screws on the circuit side and 4 screws on the backing plate side, however there are also 2 screws on edge of the backing plate where the black power socket is held in place, these too have to be removed.
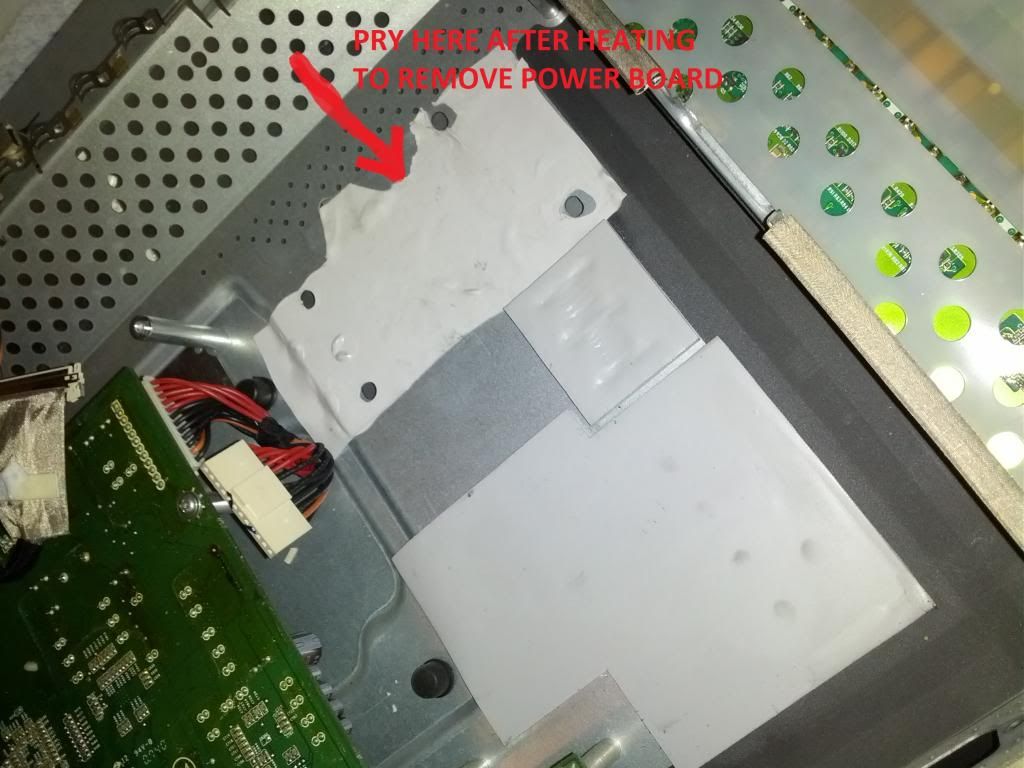
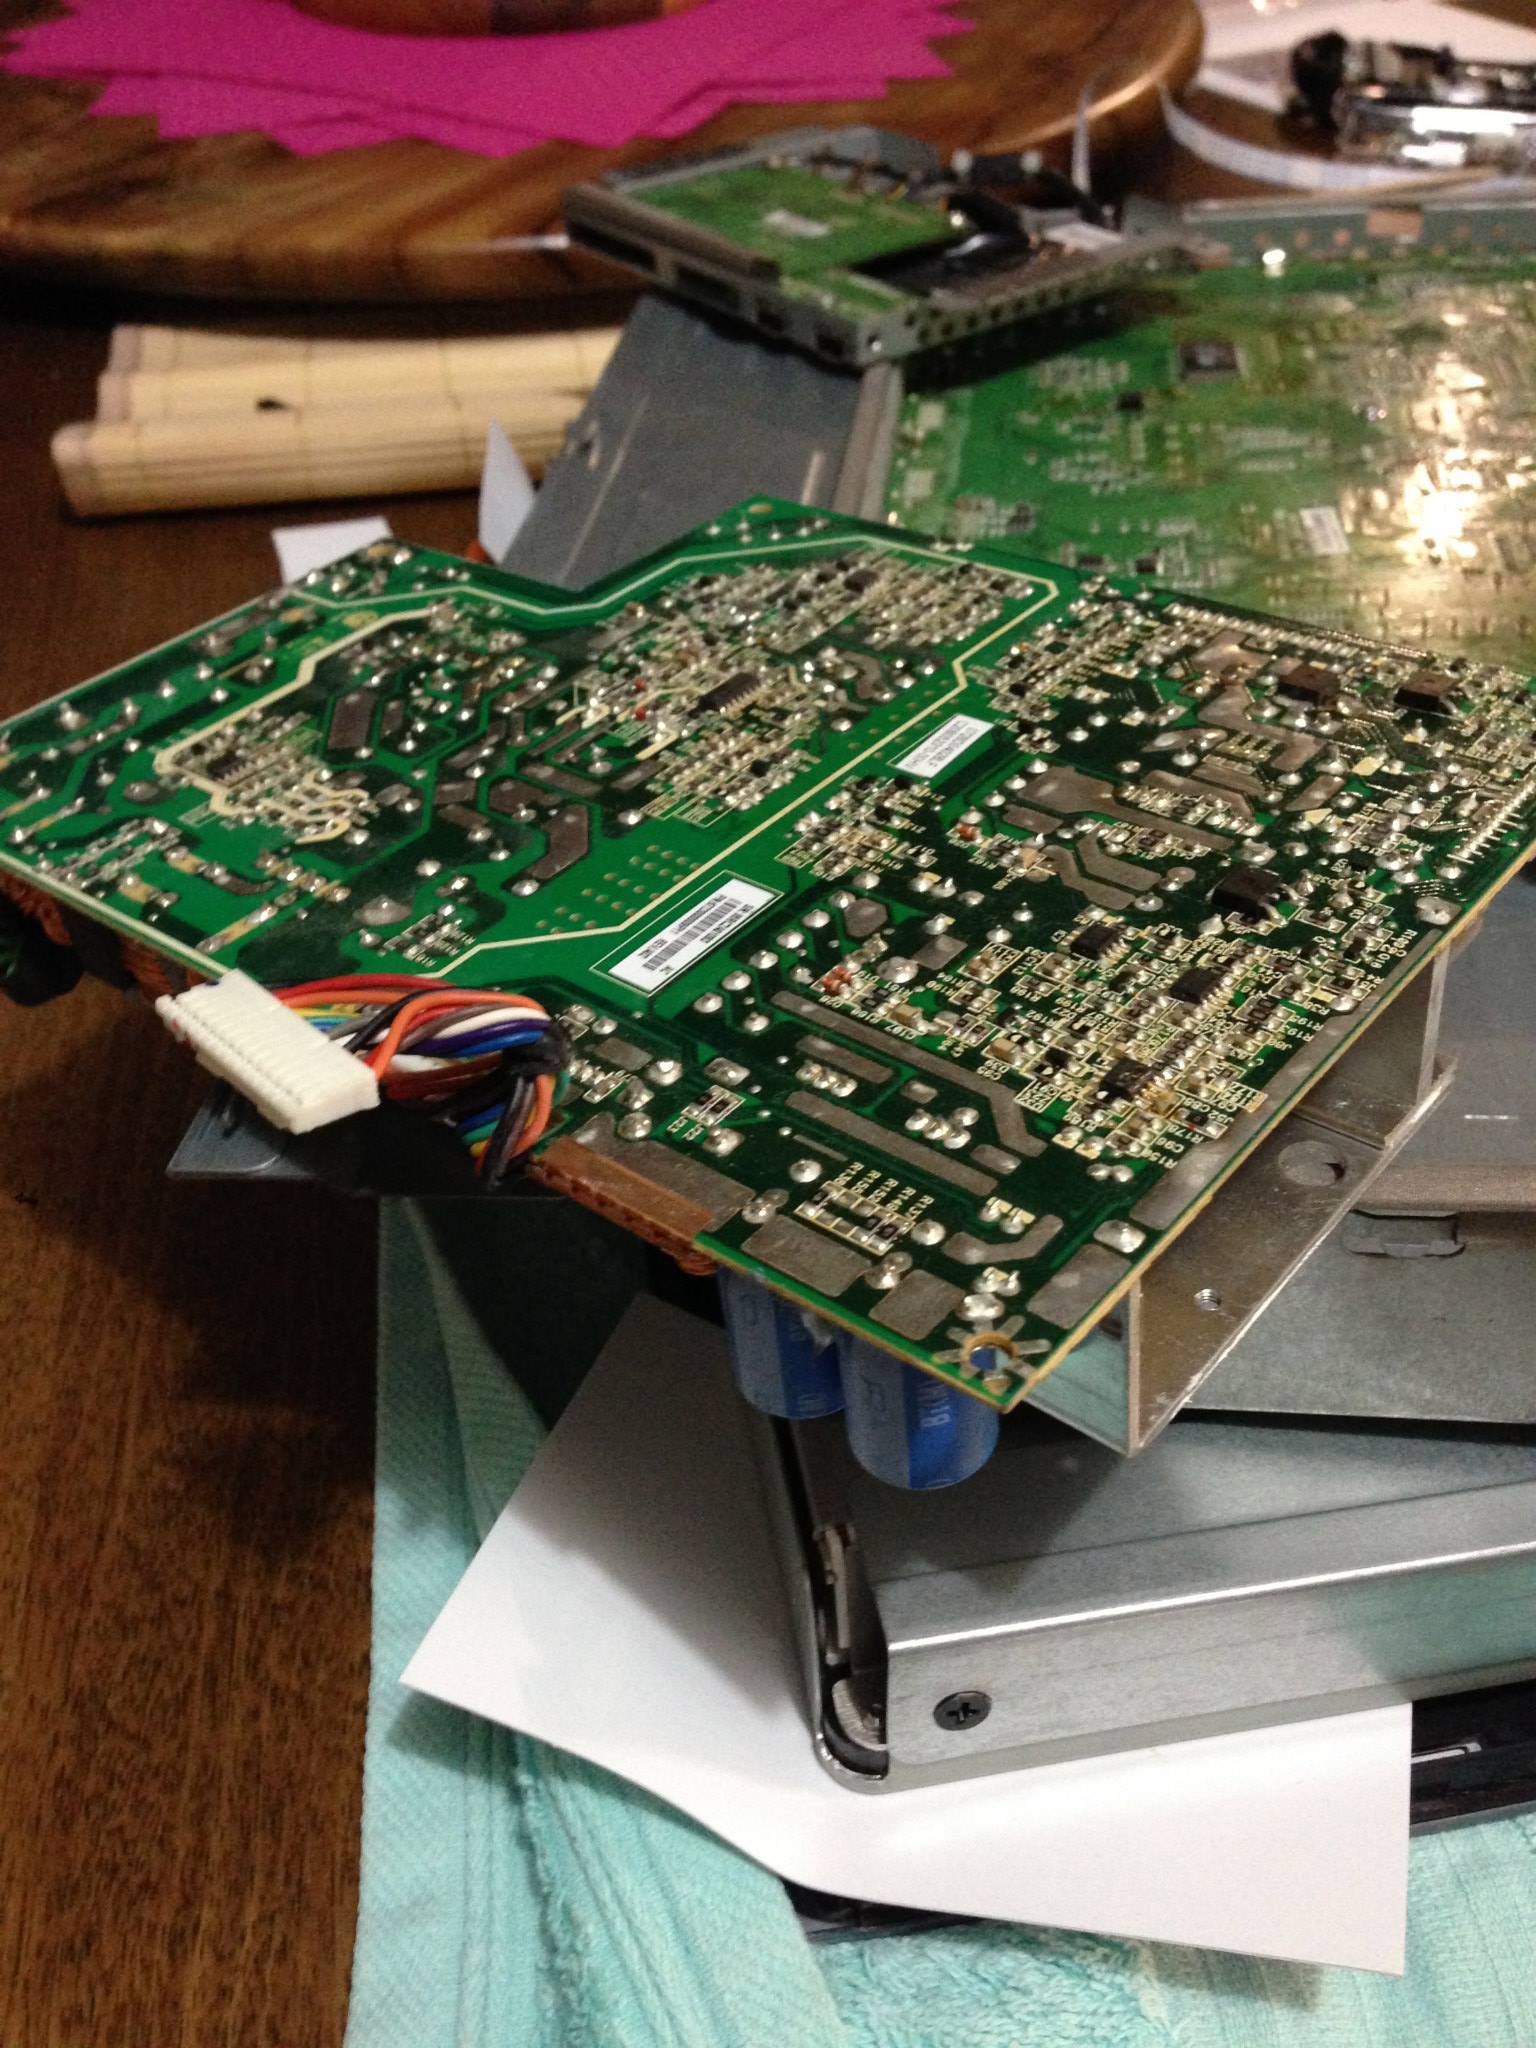
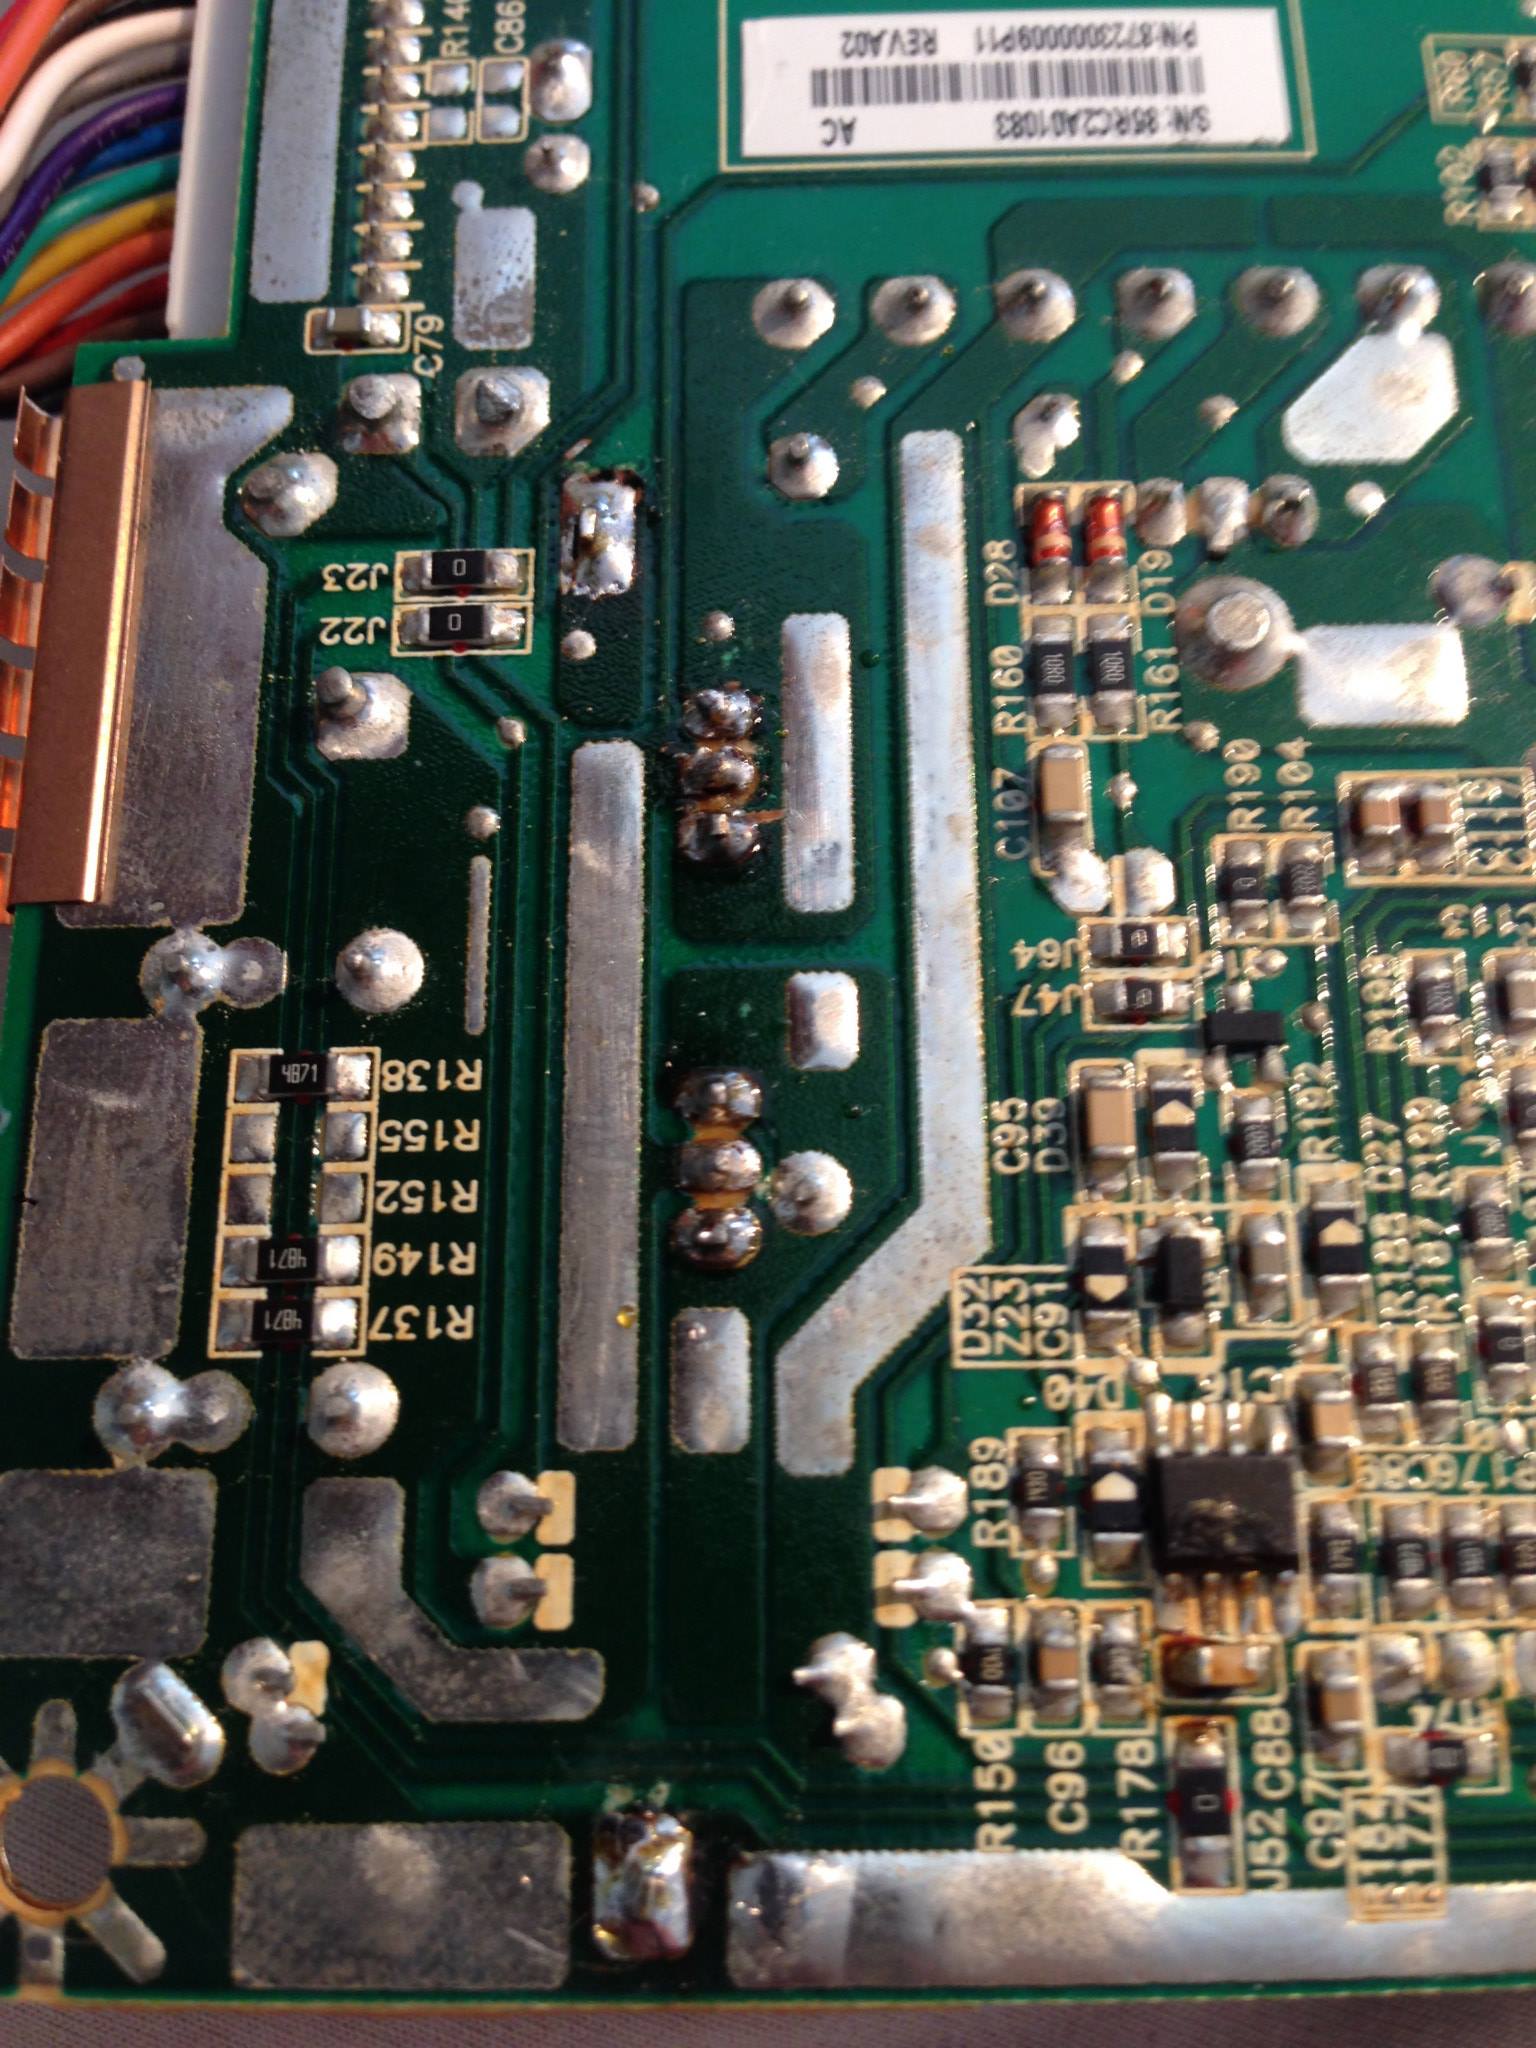
The power board will not come out because it is stuck in with a double sided heat transferring tape. You will have to heat the main backing plate under the power board with a heat gun or a hair dryer, when warm enough use a long flat head screw driver to wedge between the main backing plate and the heat sink and turn the screw driver this will separate the power board. My one was stuck in so hard that had I tried to lift it, I would have broken the circuit board.
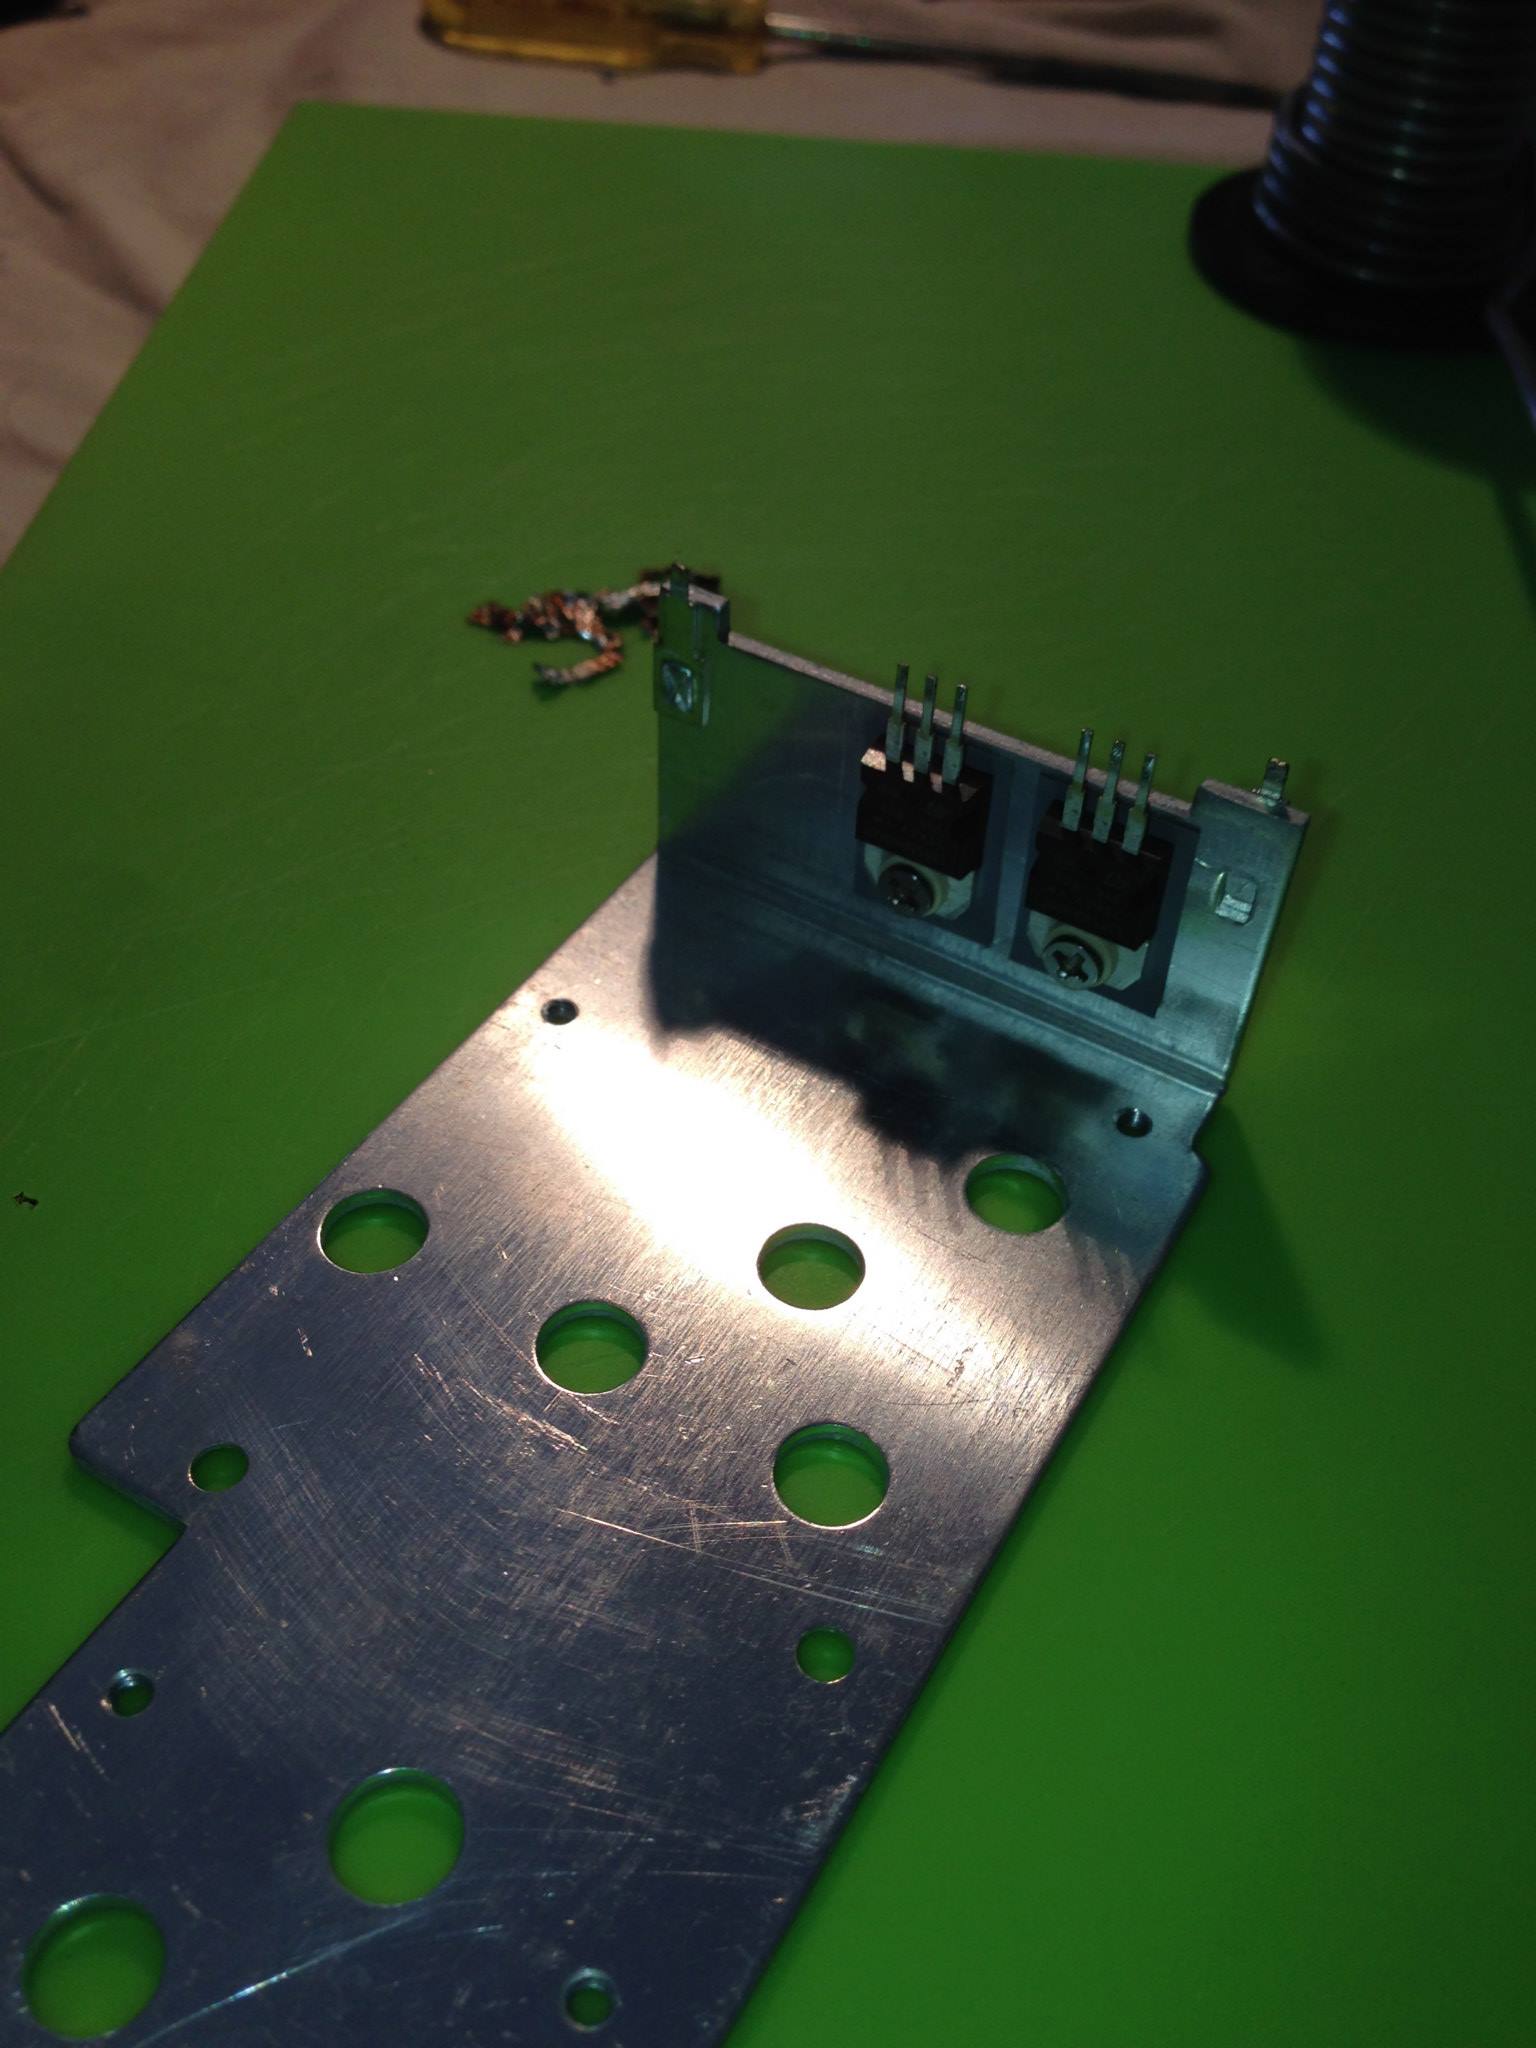
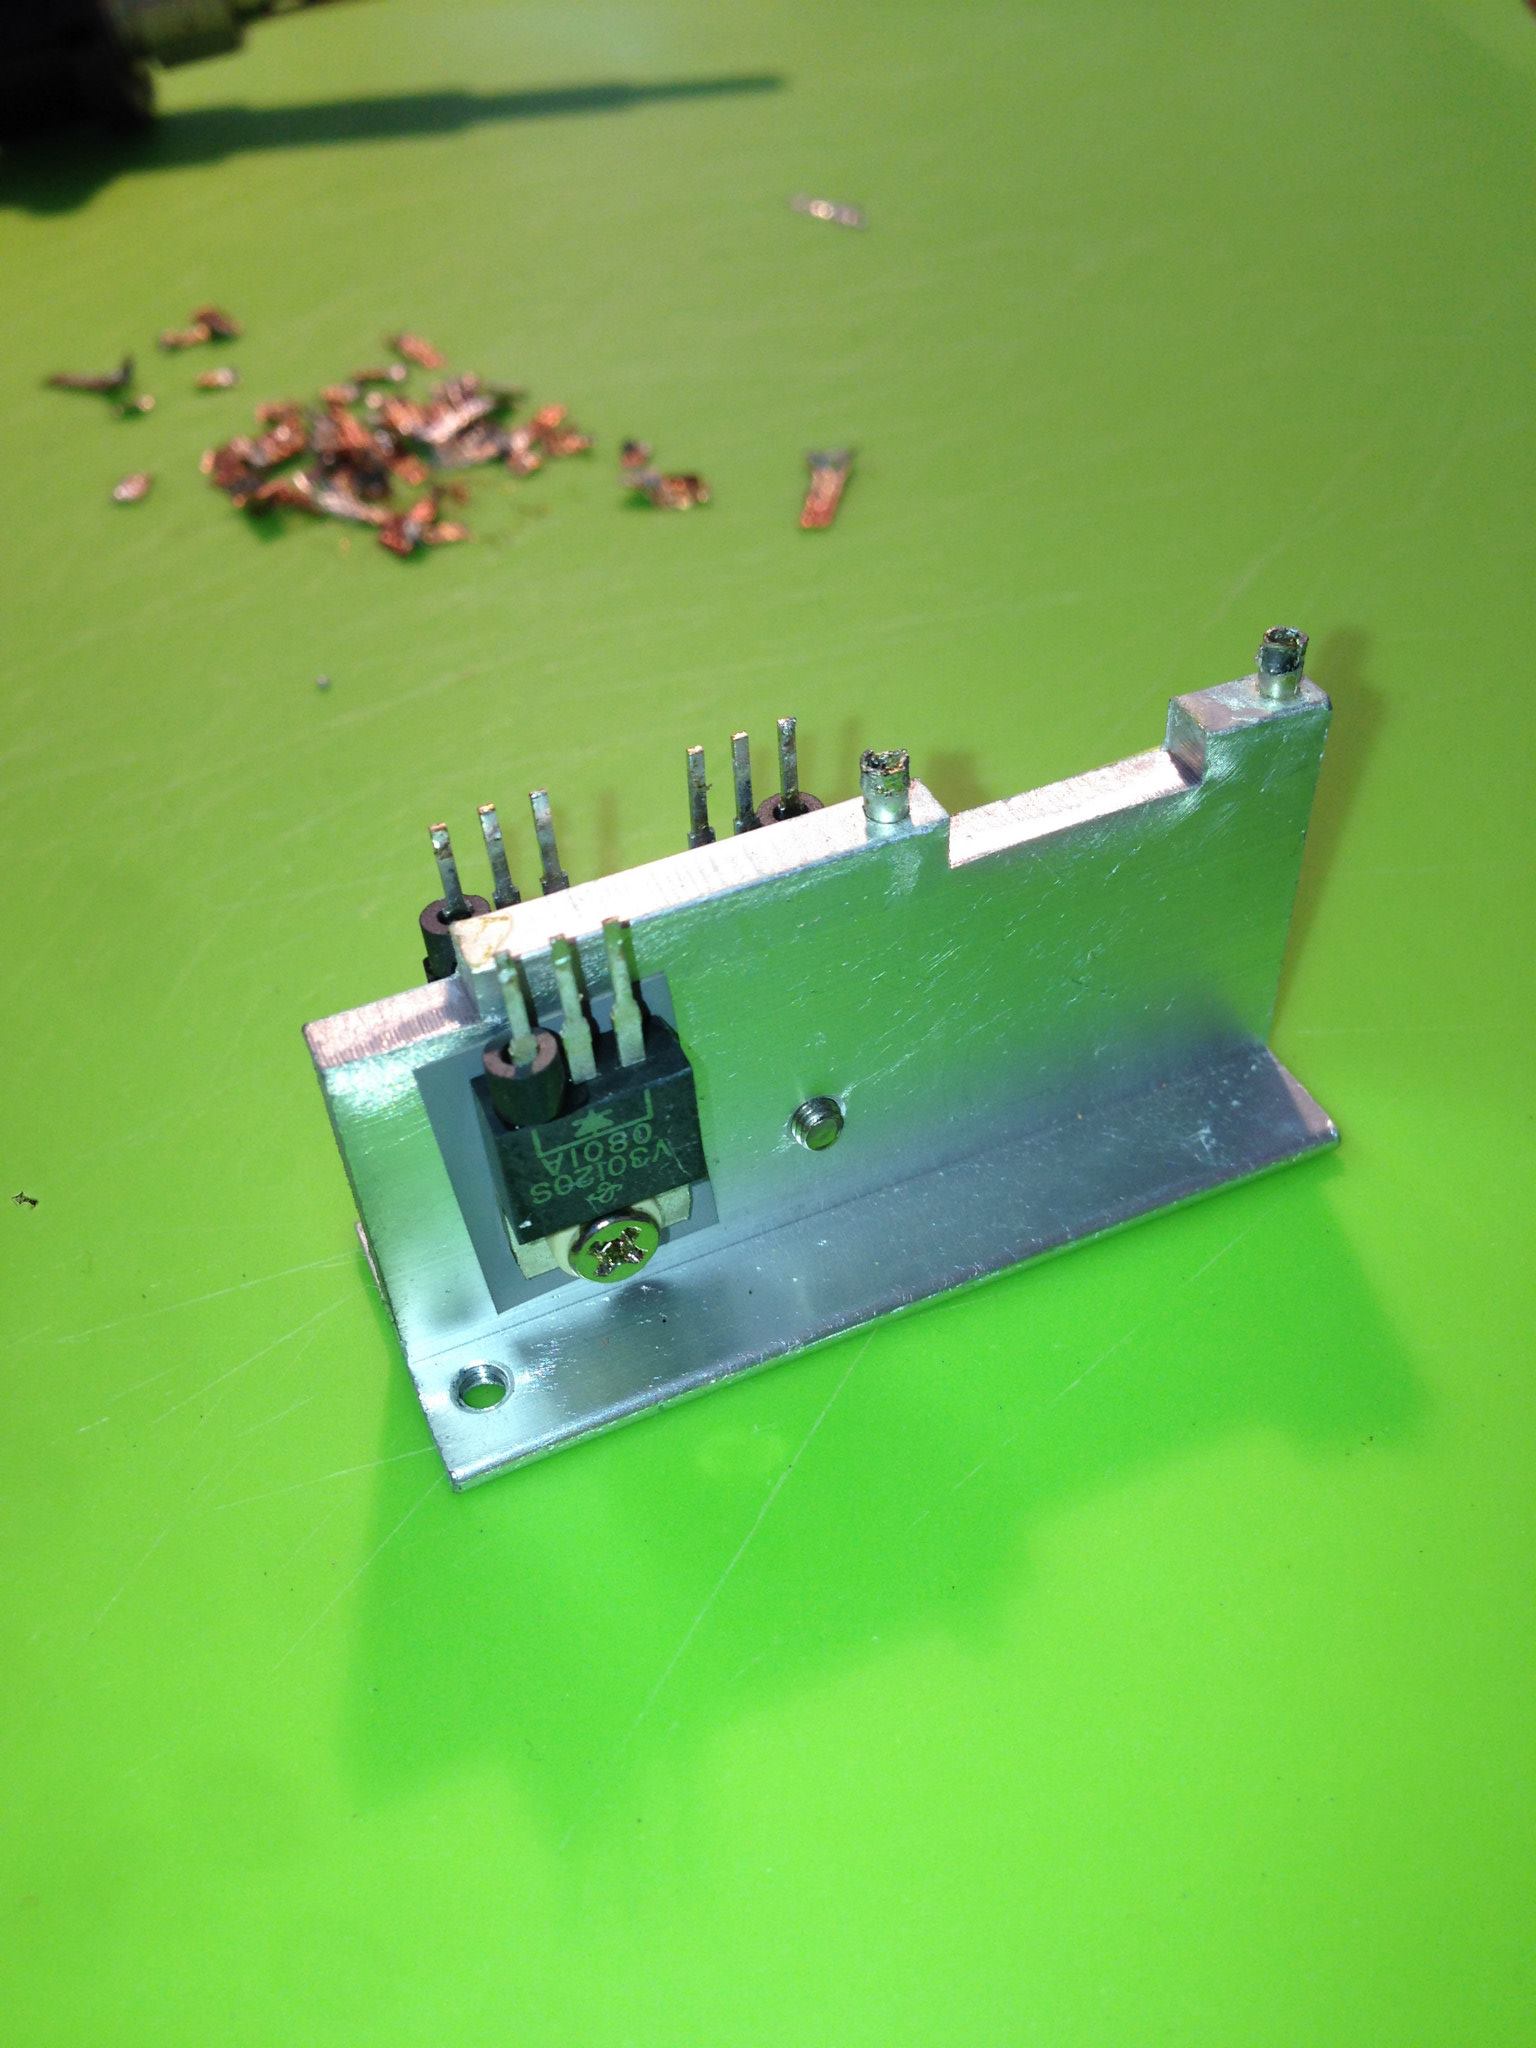
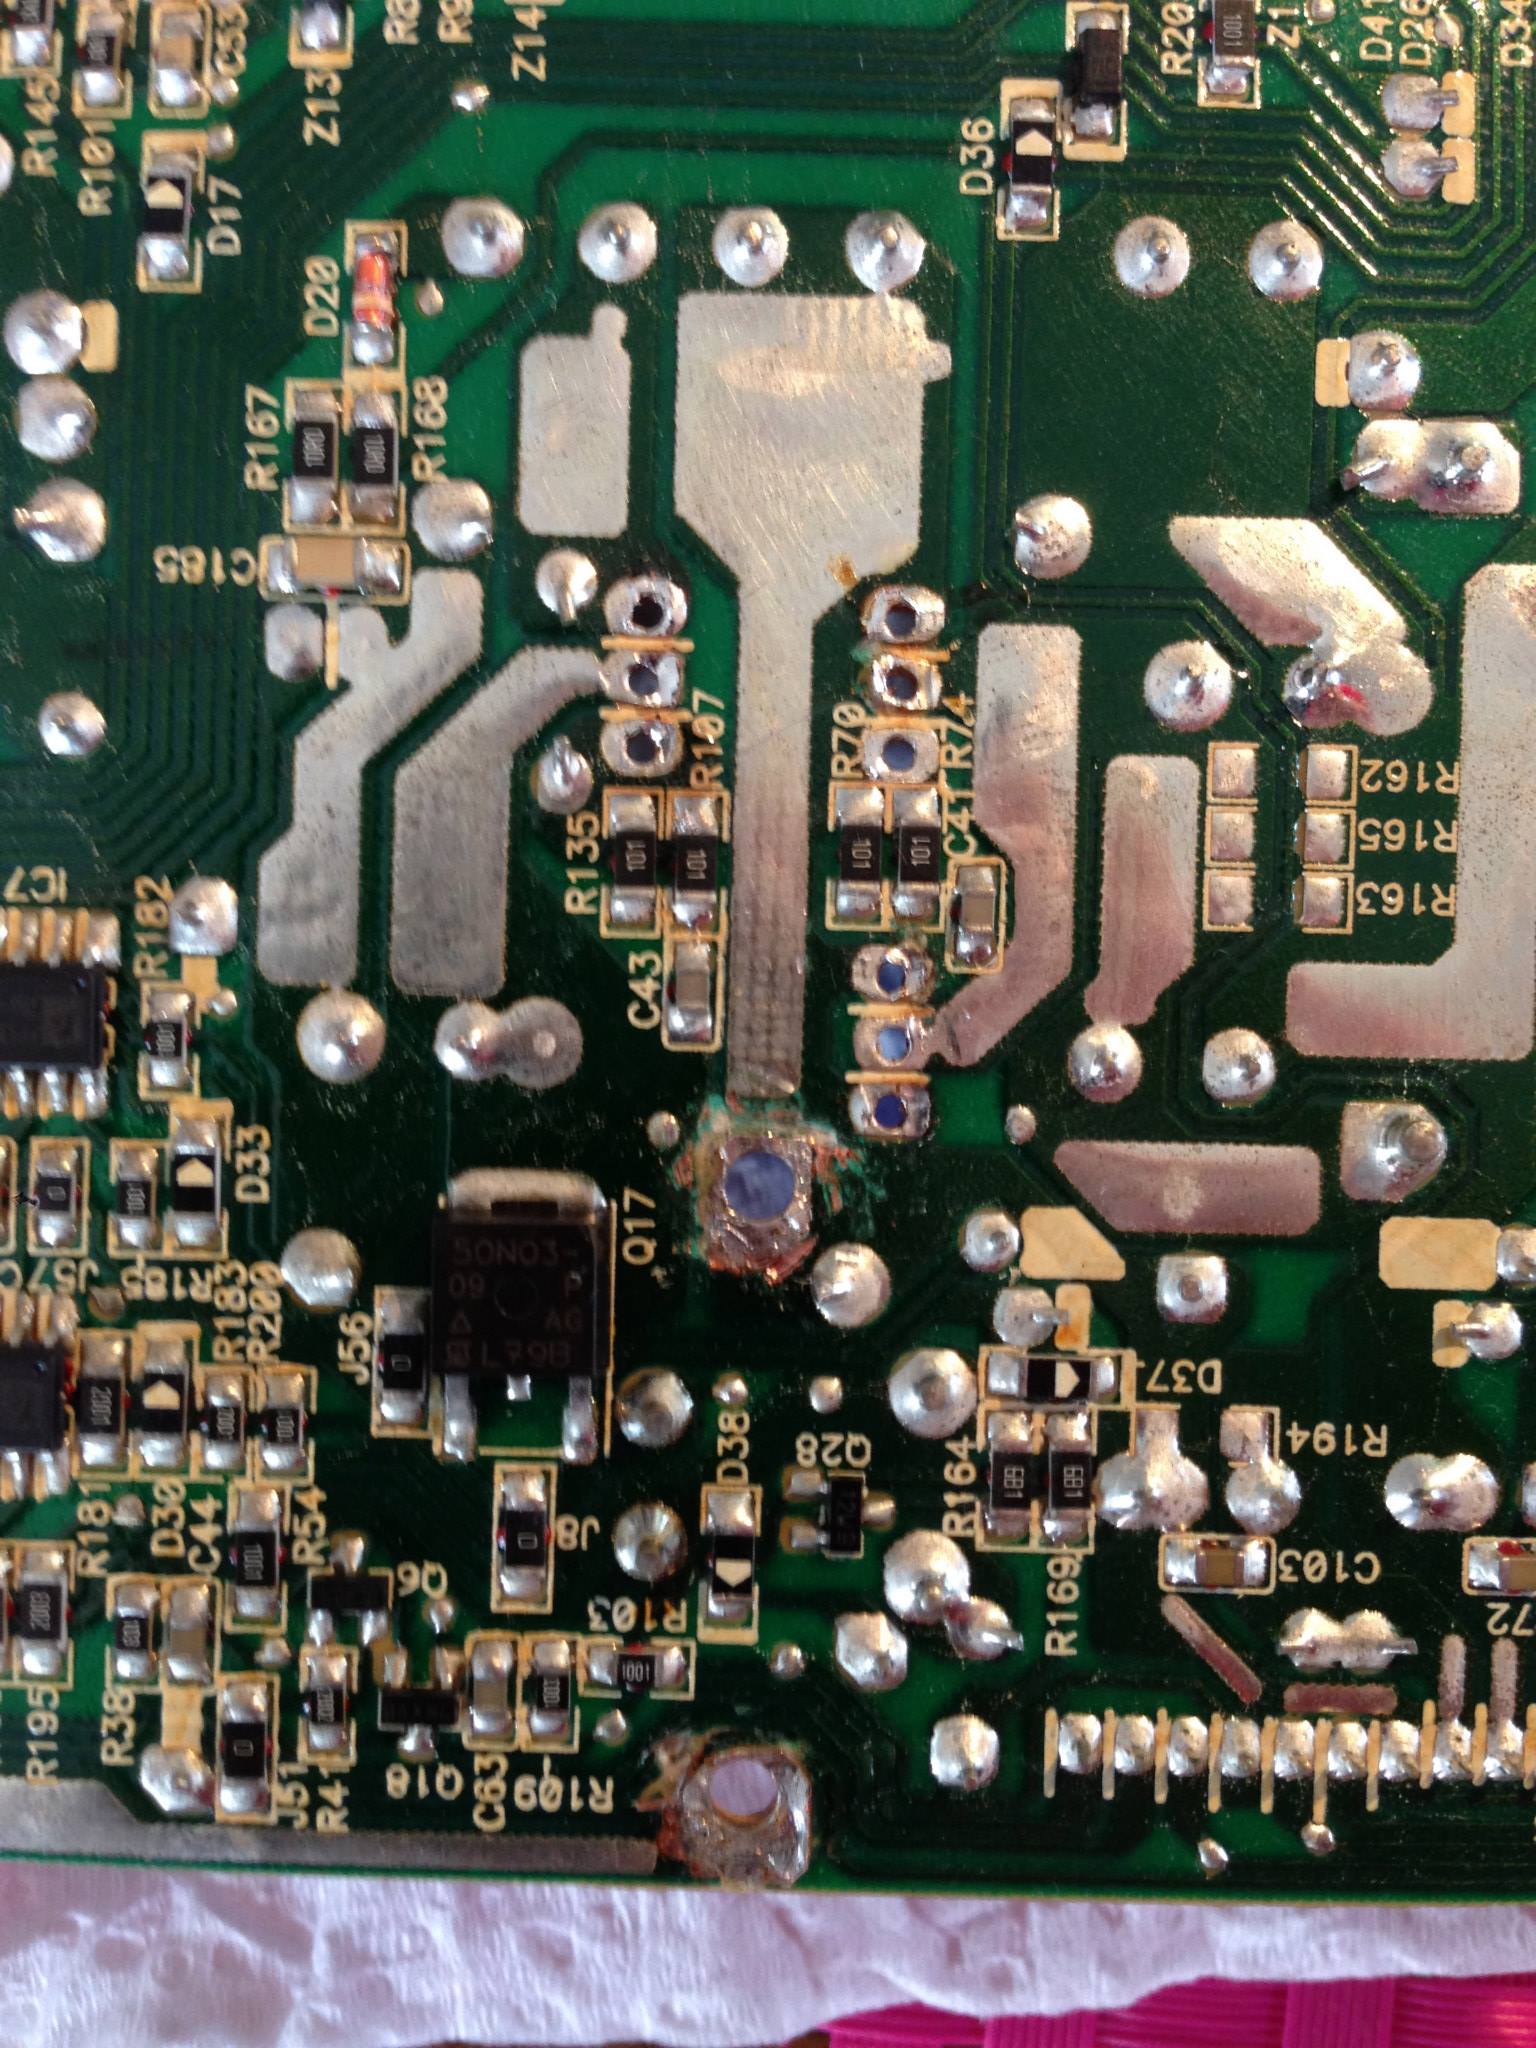
The actual faulty diode once desoldered is held in place with a screw, it is not mentioned in the guide that this screw passes through the heatsink and through another diode on the other side of the heatsink where there is a nut on it. You will need to hold the nut with long nose pliers or tweezers while loosening the screw. The screw is not easy to get to as there is a capacitor in the way. And putting it back is much harder, you will have to try holding the nut in place while trying to get the screw to catch and there are capacitors in the way on both sides and not much room.
I bought a roll of aluminium tape from the local electronics store and was able to replace the ones removed, 50m roll cost $11.95AUD. The whole job was around 40 bucks all up, not bad considering that I bought my 3008Wfp brand new 6 years back for $2400AUD and the current equivalent Dell 30 inch is around $1500AUD.
If by any chance someone else out there runs into the same problem, I too have 4 more Schottky diodes that I can mail to the needy.
Thanks once more "embalse". You're the MAN!
At this stage I would like to thank "embalse" for his excellent repair guide, without which I would still be fumbling in the dark.
I have to emphasise that I am not an electrical engineer or electrician, I am a motor mechanic who merely had the skill to follow this guide.
I do not have a proper desoldering station, but used an 80 watt soldering iron with a 3mm tip and a hand vacuum plunger pump, and desoldering braid which I think was the most effective way to remove the solder.
The repair took me about 6.5 hours, which is not bad with the basic equipment that I had available. And now I have a fully working Dell 3008Wfp again.
I wanted to share my personal experience of the repair itself and perhaps add a few extra pointers that don't seem to be covered or were perhaps forgotten by embalse, yet may make repairs easier for others out there.
The removal of the bezel is the hardest part of the job as mentioned already, it is especially hard to remove around the corners. I used two plastic spatchulas. Remove the length of two adjacent sides of the bezel by hand and work your way towards the corner from both sides bit by bit. Try to pry and wedge the tool that you are using (spatchulas in my case) under the bezel as close to the corner as you can on one side and repeat on the adjacent side, there will be a pop and the corner will be freed. Repeat on all corners. The monitor in embalse's pics is exactly like mine, however if you watch the youtube links he provided for dismantling, they are for the previous model of Dell 30 inch and cannot be used as a guide for taking off the bezel, because it is completely different.
When my bezel came off and I turned the monitor face down as in the pictures from embalse, for me the back refused to come away freely as described, in fact I had to stand it up on one of the long edges and while held in place by my helper (my 12 year old son) I had to use a screw driver to help it out of the casing, it seems that the card reader was getting caught on one side and the long metal screen was getting caught on the other side.
When you get to the bit where you are lifting the main back plate that holds the power board and once disconnected the two cables, while lifting the unit you have to slide it to the left to unlock the hooks that hold the opposite side in place.
As mentioned the power board is held in place by 5 screws on the circuit side and 4 screws on the backing plate side, however there are also 2 screws on edge of the backing plate where the black power socket is held in place, these too have to be removed.
The power board will not come out because it is stuck in with a double sided heat transferring tape. You will have to heat the main backing plate under the power board with a heat gun or a hair dryer, when warm enough use a long flat head screw driver to wedge between the main backing plate and the heat sink and turn the screw driver this will separate the power board. My one was stuck in so hard that had I tried to lift it, I would have broken the circuit board.
The actual faulty diode once desoldered is held in place with a screw, it is not mentioned in the guide that this screw passes through the heatsink and through another diode on the other side of the heatsink where there is a nut on it. You will need to hold the nut with long nose pliers or tweezers while loosening the screw. The screw is not easy to get to as there is a capacitor in the way. And putting it back is much harder, you will have to try holding the nut in place while trying to get the screw to catch and there are capacitors in the way on both sides and not much room.
I bought a roll of aluminium tape from the local electronics store and was able to replace the ones removed, 50m roll cost $11.95AUD. The whole job was around 40 bucks all up, not bad considering that I bought my 3008Wfp brand new 6 years back for $2400AUD and the current equivalent Dell 30 inch is around $1500AUD.
If by any chance someone else out there runs into the same problem, I too have 4 more Schottky diodes that I can mail to the needy.
Thanks once more "embalse". You're the MAN!
My Dell 3008Wfp went dark about 3 weeks ago,
Hey D_Monolith, glad to hear you got it working and that the guide was helpful.
.
hi all.. i would like to thank you for this post as i was given this monitor free of charge as it was suffering the same symtoms,, I Actually found a shortcut that saves desoldering the 2 diodes that are on the heatsink,, I was able to remove the 2 top screws on the heatsink then slighly push the heatsink up,, this gave me access to the 2 diodes,, i then removed the screws and insulators, that way i only had to desolder the 2 joints that hold the heatsink on and not the 2 diodes aswell..
Many thanks again
Many thanks again
I joined up so I could thank the OP and others for posting this thread. My second Dell 3008 died last week, the first was replaced under warranty but this time I was on my own.
Being in Australia I ordered 2 new STPS60170CT diodes from the US so I had a spare. All up the repair took me about hours I would guess. As mentioned removing the bezel is by far the most painful part of the job.
I found the key was push down the inside of the bezel while lifting from the outside to clear the clips holding it firmly in place.
I ended up desoldering both heat sinks off the power supply as I found it easier then trying to unscrew the old diode with it in place.
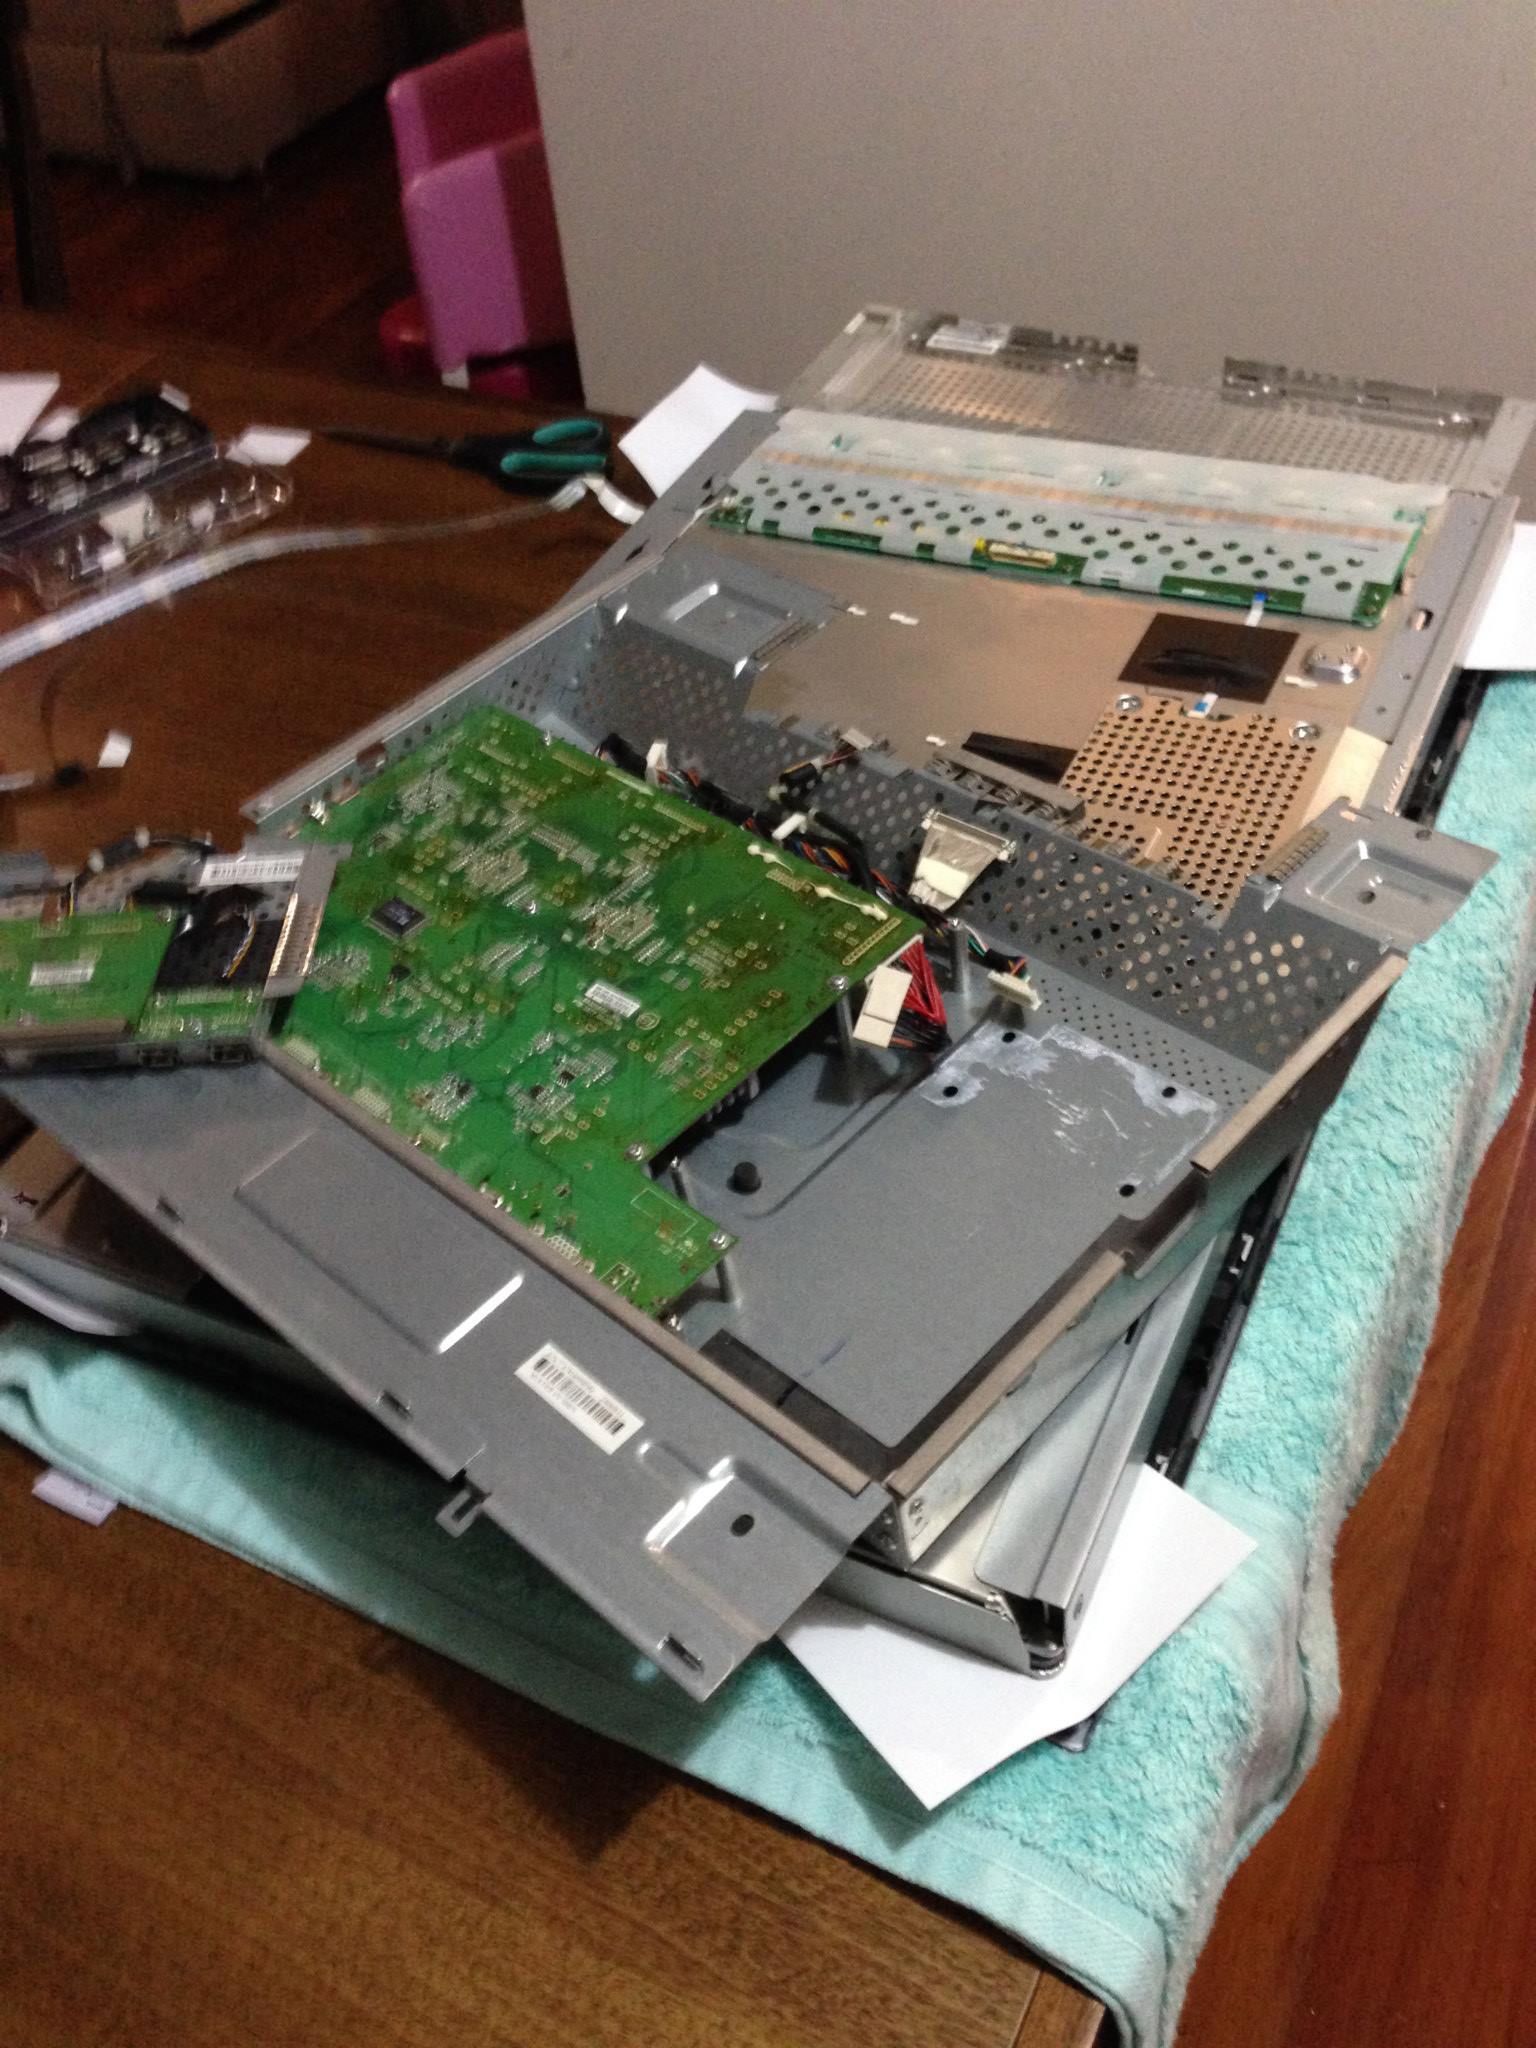
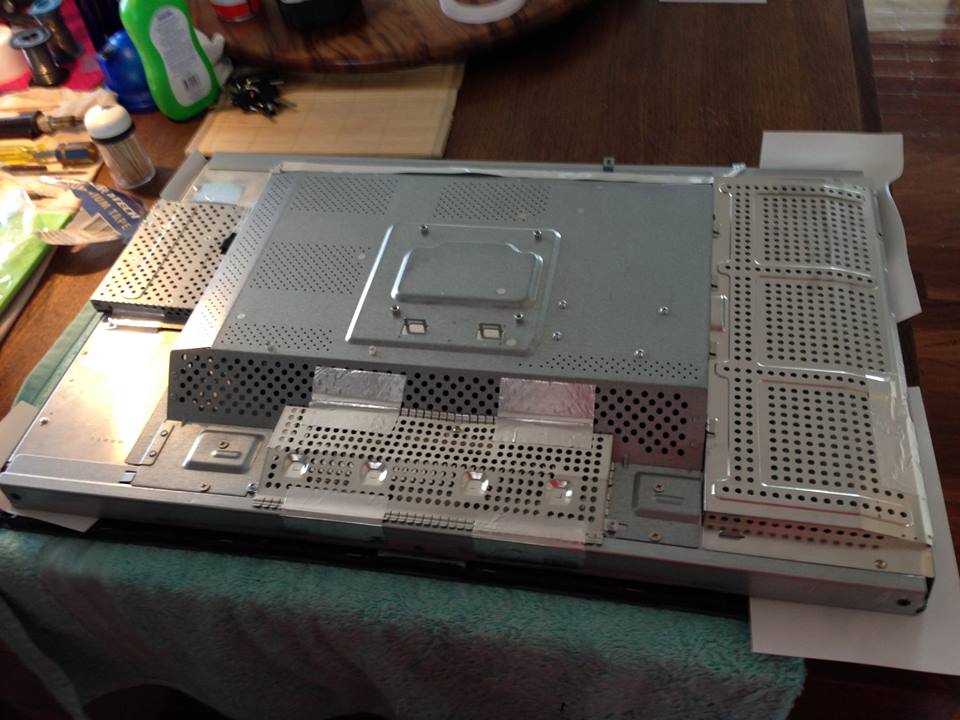
Anyway here are the pictures I took while I was doing the repair, note I replaced all the thermal paste, alloy heat tape, and double sided tape while I was at it.
So thanks again, saved me $1850, which is what Dell Aus charge for the new 30" model. All up the repair cost me about $100. Bargin!!!
Matt
Being in Australia I ordered 2 new STPS60170CT diodes from the US so I had a spare. All up the repair took me about hours I would guess. As mentioned removing the bezel is by far the most painful part of the job.
I found the key was push down the inside of the bezel while lifting from the outside to clear the clips holding it firmly in place.
I ended up desoldering both heat sinks off the power supply as I found it easier then trying to unscrew the old diode with it in place.
Anyway here are the pictures I took while I was doing the repair, note I replaced all the thermal paste, alloy heat tape, and double sided tape while I was at it.
So thanks again, saved me $1850, which is what Dell Aus charge for the new 30" model. All up the repair cost me about $100. Bargin!!!
Matt
I joined up so I could thank the OP and others for posting this thread. My second Dell 3008 died last week, the first was replaced under warranty but this time I was on my own.
Glad to see you got it sorted.
Hi to all, i replace the d22 and the monitor now turn on but with color cycling. i did all the reset button like this one:
* Turn the monitor off
* Press the buttons simultaneously Menu/Plus/Power
* Release all three buttons
* Press the Minus button
and no good. can you guys help me out what i can do to reset or something else?
thanks.
* Turn the monitor off
* Press the buttons simultaneously Menu/Plus/Power
* Release all three buttons
* Press the Minus button
and no good. can you guys help me out what i can do to reset or something else?
thanks.


Great success! 5 quid on a diode, a couple of hours and I have a working monitor again
Thanks for the guide!
I know this thread is over a year old. But I wanted to also thank the OP for raising this.
My DELL had also failed with the same issues - and this very cost effective fix worked perfectly (I did it a year ago on regged more recently though and remembered this).
Thanks OP!
")
First of all, a big thank you to the main contributors in this thread. I have been putting off this job for ages! I'm not sure why, as I'm now half way through, and just need to find my soldering iron to get at the final heatsinks. I used an old credit card to prise off the front bezel, and from then on the instructions on here have been extremely useful.
I am bitterly disappointed in Dell for their attitude towards this design fault, and I'm wondering if we might be able to harness the democratic power of the internet to raise the profile of their lousy customer attitude. I spoke to a senior customer rep at Dell US who advised me that there is "no known fault" with this unit, and that I should throw it away and buy a new one. This dismays me for many reasons, not least the environmental impact of chucking all that kit. Not to mention the waste involved for replacing a small part.
If we can pressure Dell into forcing them to acknowledge that they used a dodgy part, we may be able to make some progress. Although we're outwith the manufacturing warranty period, there are some legal avenues to pursue if a product is shipped with a known flaw. Or, if a great many products fail at the same time, for the same reason, we may be able to gain some traction.
At the very least, it would be damaging to Dell's reputation if it were widely publicised that one of their flagship (and extremely expensive) units failed consistently after 4 to 6 years. This is an unacceptably short lifetime, and raises the question why we should buy a high end Dell monitor again when their design is flawed, and their attitude stinks. If you feel similarly strongly, ie if you feel it's wrong for Dell to wash their hands of this monitor with its unreliable diode, then please post here and I'll start a new thread if required.
Once again, thanks for the amazing instructions, and fingers crossed I'll get mine up and running soon.
Associate
- Joined
- 22 Apr 2016
- Posts
- 1
I recently experienced a sudden power failure in my 8 year old Dell 3008WFP monitor. A Google search brought up this thread as the first entry; I was delighted to find this solution, as has been published by embalse, and augmented by D Monolith. I have joined the forum to express my thanks to all those who have worked out the solution for this annoying problem.
I was prepared to struggle getting the bezel freed, but with the use of a couple of plastic levers from an auto interior trim removal set, I had the case wide open in under 5 minutes. The unplugging and removal of boards and shields, and removal of the power board from the mainboard likewise was easily performed by following the illustrations.
A new STPS60170CT Schottky Diode was sourced from Digi-Key Corp. (USA) website, US$6.00 for a pair. www.digikey.com part #497-482-5-ND.
After I had the offending diode removed, the new one was easily bolted back into position with the use of a modified 15/64” box end wrench, ground away to fit under the inner heat sink. I actually put a blob of blue-tack into the cavity of the wrench, stuck the nut onto it, and was able to seat the screw with almost no effort, a simple work-around for the reassembly problem discussed by D Monolith.
After reassembly, the unit fired up right away....problem solved, and a pile of money saved. Once again I stand on the shoulders of giants! Thank you again for your expertise.
Success! The fix didn't work the first time, so I came back to it a few weeks later and discovered I hadn't reconnected one of the internal connectors.
Dismantling the monitor was SO much easier and quicker the second time round. I had the bevel off in about 3 mins (hint - you need to be quite forceful with it, and it can get snagged) and then undoing the screws and connectors was a doddle. I was worried I'd have to hook it up to the mains and prod around with a multimeter.
Anyway, I'm still ****ed off with Dell for their design flaw. I hope many more will find this site. Please post your experiences.