Lifting very old floorboards

Associate
OP
Joined
19 Aug 2019
Posts
257
An example. Scroll the pictures and you'll see what I mean by width. Obviously you want to match the wood to your floorboards. Who knows what would yours are as 7inches sounds like you've got rows of joists as floorboards :cry:
https://www.ebay.co.uk/itm/FLOORBOA...2349624.m46890.l49286&mkrid=710-127635-2958-0
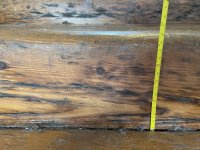
Here's a picture of a stair from the staircase leading up to my apartment. Presume it's the same wood. Probs ~6" I think.
Is it pine?
How would I match it with the slivers?
GgJFcXb.jpg
 
Associate
Joined
5 Apr 2004
Posts
1,199
Here's a picture of a stair from the staircase leading up to my apartment. Presume it's the same wood. Probs ~6" I think.
Is it pine?
How would I match it with the slivers?
GgJFcXb.jpg
I'm sorry I don't know enough to be able to identify different wood.
Certainly looks like you've got some staining which would make any slivers you use be a different colour. Presumably sanding and then retreating would help with that.
 
Associate
OP
Joined
19 Aug 2019
Posts
257
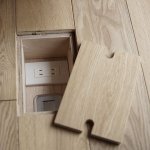
Does anyone know of a tool that would allow me to cut a section of the floorboard out (not going all the way through) leaving the section intact?
Bearing in mind that I don't have much access to the sides of the wood.
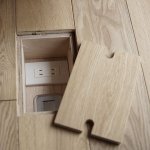
I'd like to be able to do this:
NkPzGc8.jpg

But, obviously, I can't cut all the way through the wood and I can't figure out a way to cut horizontally without having access to the sides (apart from maybe a cm)
 
Soldato
Joined
28 Dec 2017
Posts
8,488
Location
Beds
Does anyone know of a tool that would allow me to cut a section of the floorboard out (not going all the way through) leaving the section intact?
Bearing in mind that I don't have much access to the sides of the wood.
I'd like to be able to do this:
NkPzGc8.jpg

But, obviously, I can't cut all the way through the wood and I can't figure out a way to cut horizontally without having access to the sides (apart from maybe a cm)
Not really doable if I'm honest. The trick will be to find a good enough match for the boards, and remove the entire section you're replacing. Make the cover out of that nice match. Then use a router or Forstner drill bit to make the cavity.

You may be lucky enough to find that material elsewhere in the house if renovating. A handy thing is to wander around your neighbourhood to see if anyone else is working on a house built at the same time (look for skips). I found a perfect floorboard literally in next door's skip.
 
Soldato
Joined
18 Oct 2002
Posts
14,029
Location
Sandwich, Kent
Yes. A plunge saw. Allows you to accurately set the depth of your cut - so you can cut a floorboard without damaging the beam underneath.

Although the image you've attached I would hazard a guess that those cuts were done before being laid - to be that neat.
 
Associate
OP
Joined
19 Aug 2019
Posts
257
Fill in the small differences with a paste of sawdust and wood glue once you have the slivers in and level.

Oh. I was just coming back here to ask whether I should level them out with a circular saw and a jig or something?

I also need to cut out the filler from between a lot of the other floorboards. I've been using a multitool to do it but obviously I'm fairly clumsy and not very patient so I've made some mistakes. I thought perhaps it would be easier to just do it ALL with a circular tool and a jig. Good idea? Bad idea?
 
Associate
OP
Joined
19 Aug 2019
Posts
257
Dye the slithers to match the floorboards if you're going to leave it bare. But if you're going to cover it with carpet, parquet, or whatever, just don't bother. The gaps will let the wood breath.

Yeah I'm going to sand and treat the lot. The problem is more the gaps that I've left and the wonkiness of the board edges and the fact that the gap isn't the same along the length.

Also, I'm reticent to leave any gaps given the volume of MATTER that is between them. They're at least 7 inches deep and filled with what I can only assume is the same substance in which Dracula gets transported across the Atlantic in the movie Dracula with Keanu Reeves.
 
Associate
Joined
5 Apr 2004
Posts
1,199
Any idea what I do about the boards that aren't parallel; i.e the gap gets smaller then gets bigger.
When hammering in the wedge slithers some bits of the length will snap and go in deaper where the gap is wider or you might need to switch to a wider wedge part way through the run.

For bits where there's a a gap either side of the slither you can try wedging in a small bit at the side but I think you'll have limited success with that.

As suggested by someone else I'd be tempted to try the sawdust approach for these very small gaps or just leaving. Obviously the neater you get out the existing filler the better.

Just to check a couple of things. You are putting glue on these slithers before hammering them in right?

Also how are you taking off excess from the top of the slithers? Just want to check they're in really tight and that you're having to cut some proud slither off because you couldn't get anymore in.

I'd be tempted to try a circular saw too. I'd imagine you'd get cleaner cuts along the length, but I'm just some random commenting on the internet.
 
Last edited:
Associate
OP
Joined
19 Aug 2019
Posts
257
Just to check a couple of things. You are putting glue on these slithers before hammering them in right?


That was just a test. Yes, I plan on smearing wood glue on the sides of them.

Also how are you taking off excess from the top of the slithers? Just want to check they're in really tight and that you're having to cut some proud slither off because you couldn't get anymore in.

I was going to sand them down but videos on yt suggest a chisel first so I'll do that.
 
Associate
Joined
5 Apr 2004
Posts
1,199
That was just a test. Yes, I plan on smearing wood glue on the sides of them.


I was going to sand them down but videos on yt suggest a chisel first so I'll do that.

Yes that's
You might consider hammering them to just below the level of the boards then topping them with sawdust and glue for a more even finish.
I don't think you need to do this.

Chisel then sand the whole floor to get an even finish. Have glue / filler on the surface will mean you'll have patches that stand out more after coating. The point of the slivers is to try and avoid this.
 
Associate
Joined
5 Apr 2004
Posts
1,199
Here's some pictures part way through doing this at my old house https://photos.app.goo.gl/NuZwHqgkr892QvSbA

In the corridor pictures you can just about see how I've doubled up wedges in some sections.

Most pictures show post chisel, which is where all the splinters have come from. Some picture show tile boxes on top of wedges whilst they dry.
I then used a big floor sander to get an even finish on the whole floor.
 
Associate
OP
Joined
19 Aug 2019
Posts
257
Yes that's

I don't think you need to do this.

Chisel then sand the whole floor to get an even finish. Have glue / filler on the surface will mean you'll have patches that stand out more after coating. The point of the slivers is to try and avoid this.

The prob is w/r/t using the slivers on their own is that the sides of the floorboards are
a) not perpendicular often (so they get bigger, the gaps do that is, and smaller along the length of the two boards
b) a bit chipped on the sides (SOME of this is my fault and I accept responsibility)
c) When using a multitool to cut out the filler SOMEONE (me) may have slipped one or twice or 40 times and cut into the side of the boards making them further wonky.
d) just a THORN in my SIDE
 
Back
Top Bottom