PARVUM LIGHTNING

Associate
OP
Joined
25 Aug 2011
Posts
407
Location
CLASSIFIED
Banner1.6.jpg


Well this is a weirdly difficult update to make, with insomnia closing in immensely fast last week making posts or even taking photographs was impossible for me if I was going to get it finished on time. Consequently the log will have to be slightly unorthodox, the build was completed last Thursday, but the 3 days of sleeving, day of tubing and 2 days of assembly will have to go undocumented.

I'll show everything I never had chance to post a week ago now and then try to show how it all went together in the coming days. I haven't had much chance to consider how i'll do the final photographs just yet but it's epic size is going to warrant a different approach!

1.jpg


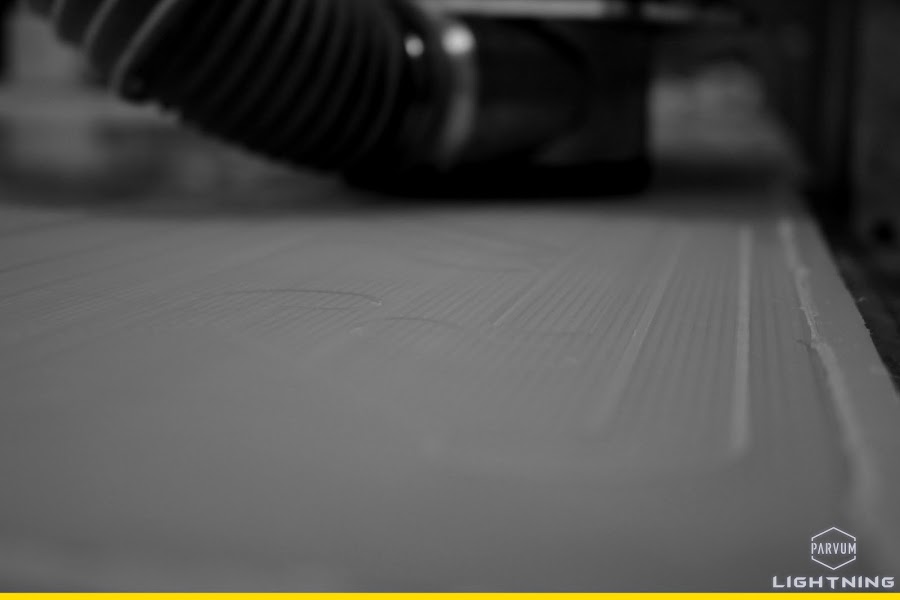
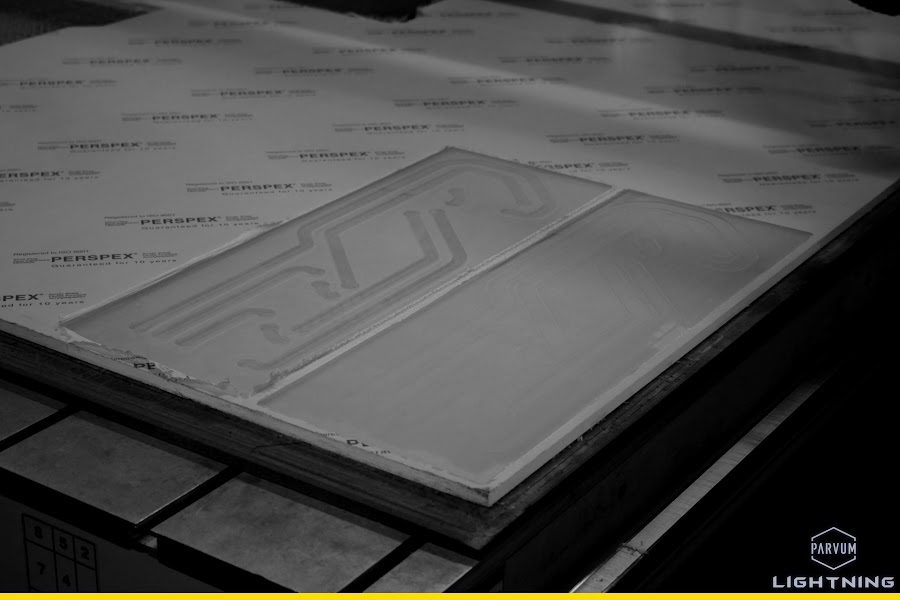
The first few photographs are from cutting the pass through plate, here you can just catch a glimpse of the tool making o-ring channels. As they require the finest tolerance they are cut first any mistakes here could cost the part so getting it out of the way before investing further machine time makes sense.

2.jpg


3.jpg


Next the areas covered by the black shroud were cleared as they were also depth critical, this part forms the lid sealing the pass through channels and accepting the fittings for the loop.

4.jpg


5.jpg


6.jpg


The tricky parts went well, especially considering how big these parts are.

7.jpg


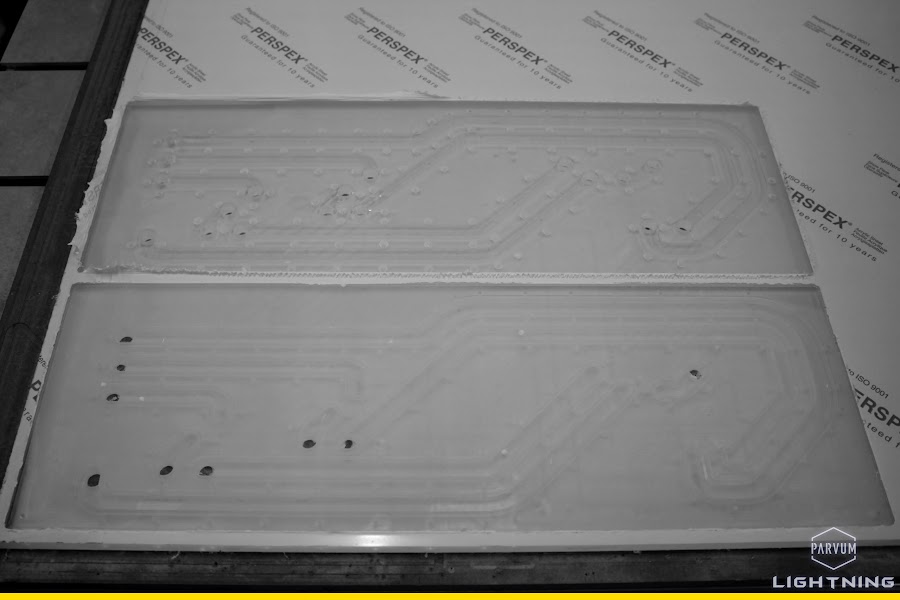
Following that all of the holes and countersinks were drilled in both the lid and block itself.

8.jpg


9.jpg


10.jpg


Cutting the coolant channels was a comparatively quick task for the 6mm tool.

11.jpg


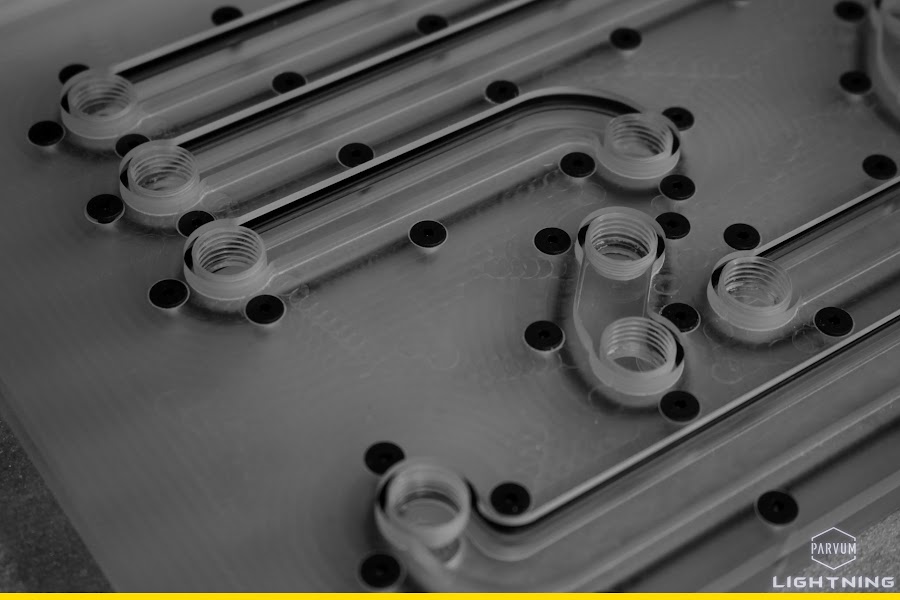
That just left the final cut out of the sheet and the large 11.7mm holes later to be threaded with 1/4" BSPF. Plenty of drain ports were added to the block itself, running pastel yellow I didn't want to take any chances!

12.jpg


13.jpg


14.jpg


15.jpg


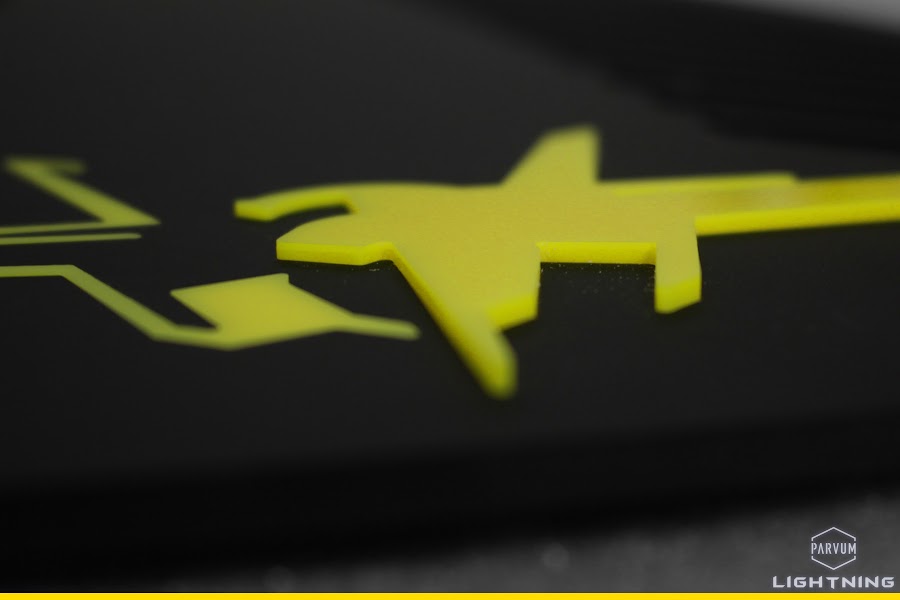
With all of the machining on the block complete it was time for a little inlay work. It would have been rude not addorn the symmetrical roof panel with MSI's impossibly delicate Lightning logo.

16.jpg


17.jpg


18.jpg


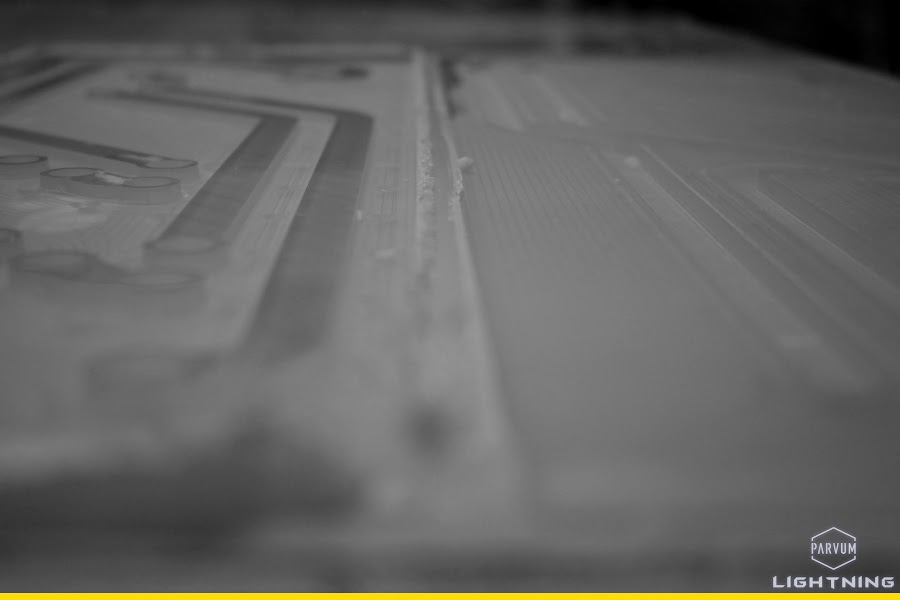
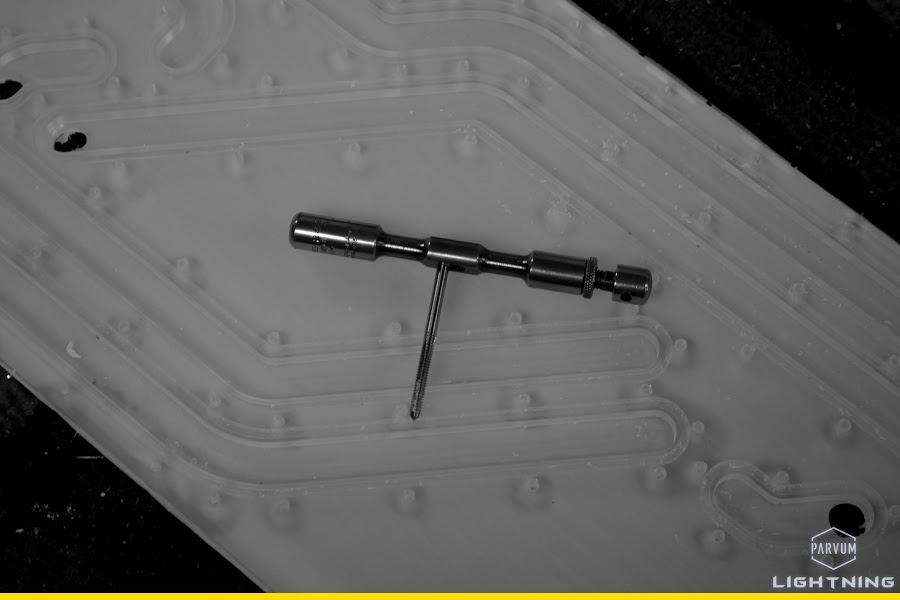
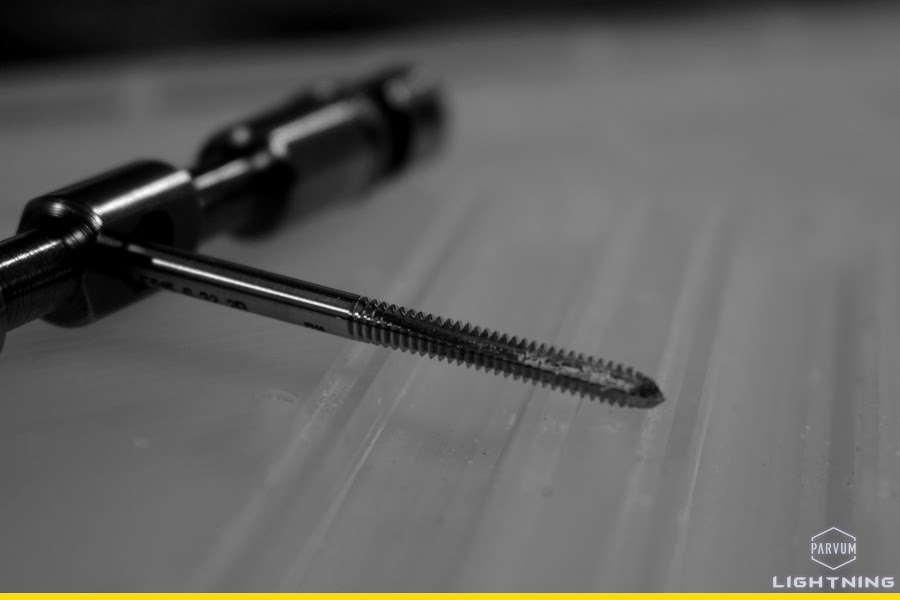
Lots and lots of hand finishing on the block tapping the tiny 6-32 UNC holes.

19.jpg


20.jpg


21.jpg


After days and days of waiting and eventually impatiently delivering the gloss yellow acrylic to Parvum HQ myself the 3 accents were cut, waiting for this really held up the build and put an insane amount of pressure on the final week.

22.jpg


23.jpg


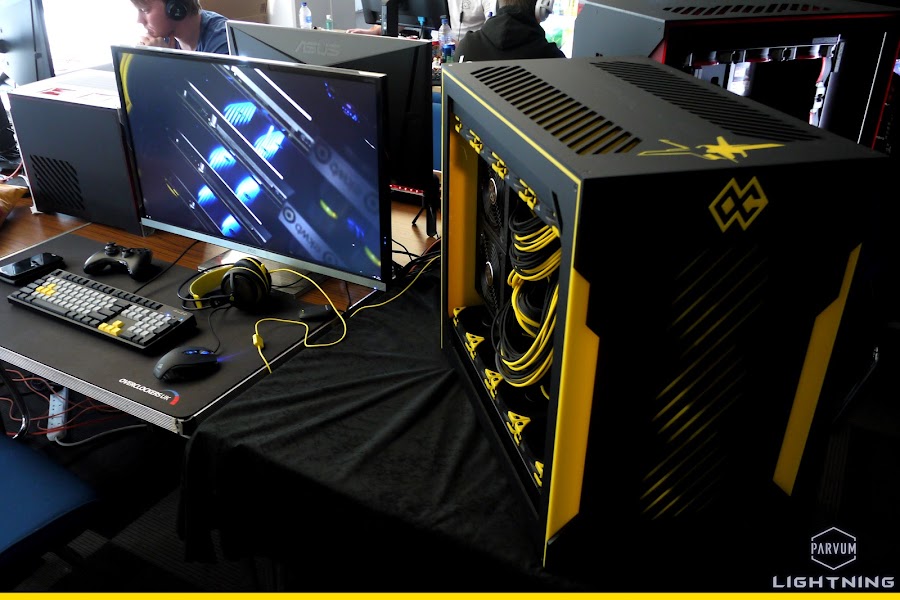
With just 6 days remaining until insomnia the case was finally completed!

24.jpg


25.jpg


Once I got home the first task was to finish, assemble and test the pass-through block. After tapping the 1/4" BSPF ports into both plates a lot of o-ring cord and a lot of screws were called for.

26.jpg


27.jpg


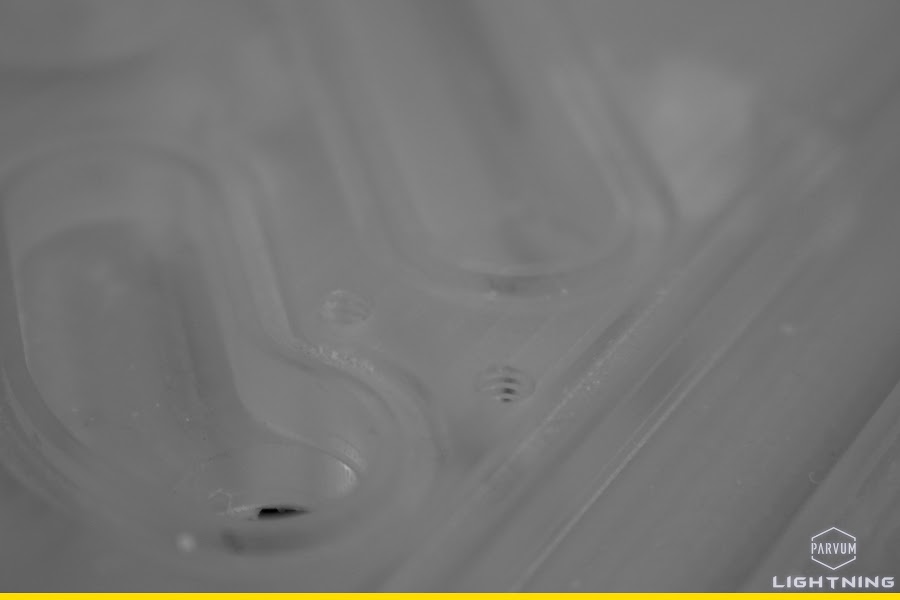
Lots and lots of drain ports, 9 should be sufficient!

28.jpg


29.jpg


30.jpg


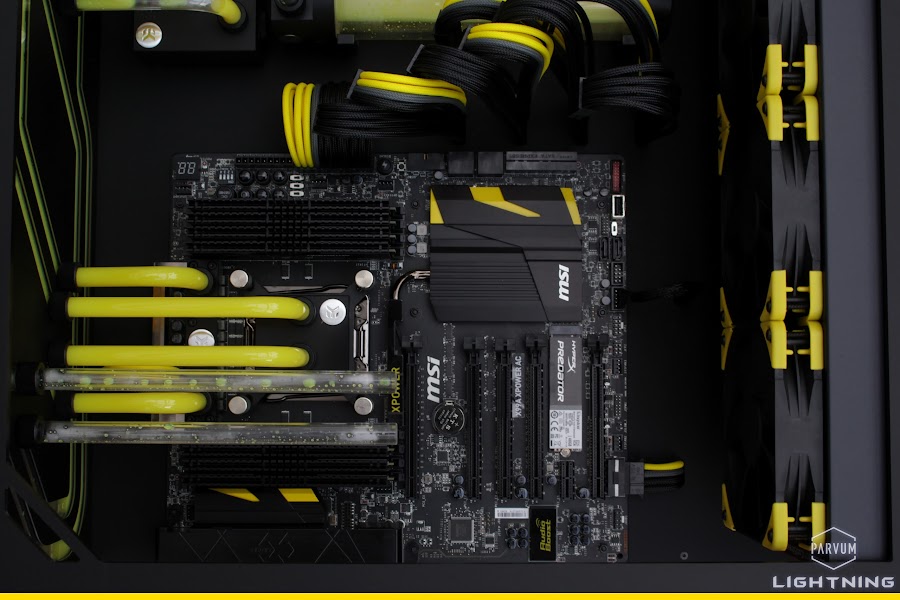
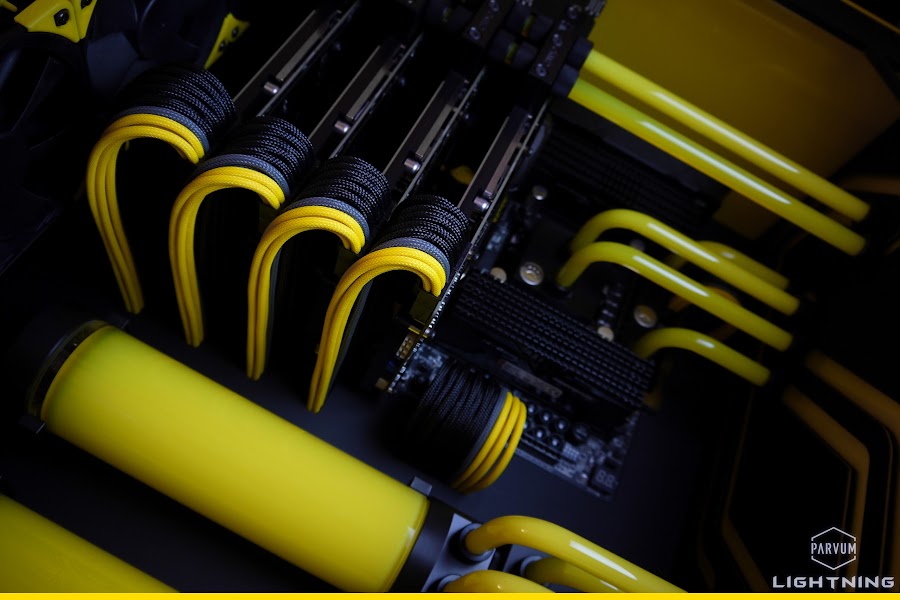
Just a little teaser as the motherboard went in, bolted straight through both 5mm midwalls.

31.jpg


I was quite anxious to see that the GPU mounting was succesful so that was the first thing to be tested once the case was assembled. Luckily they aligned perfectly and each of the 4 cards was secured in place by an M3 and 4x 2BA screws which threaded into the ports. A unique approach that really paid off, the cards sit beautifully true within the case and it looks extremely clean with no IO plates from the rear, just the DP's have been left exposed.

32.jpg


Well that pretty much gets you guys up to the 6th December and buys me some time to figure out the next update where it goes from parts to completely finished and tested! :D

JR
 
Associate
OP
Joined
25 Aug 2011
Posts
407
Location
CLASSIFIED
Banner1.6.jpg


The build was finished on 10th December in time for insomnia and spent the weekend alongside APIS and αclass 2.0. It got a huge amount of attention from the public, gamers, fellow builders and mostly the staff on the Overclockers UK stand popping up on various social media and news articles from the event.

11233791_787133498082956_2680403379118639117_o.jpg


JR
 
Associate
OP
Joined
25 Aug 2011
Posts
407
Location
CLASSIFIED
Lots of glamour shots to come guys once i've found a location which can handle it and figured out how to get it there! Not the easiest of tasks.

There are quite a few pictures of it from the weekend in this album on the OCUK main site.


Thanks all, I can't wait to get it set up on my desk some place, I just need a huge Christmas bonus for a U3216 and a custom Ducky now :D

JR
 
Associate
OP
Joined
25 Aug 2011
Posts
407
Location
CLASSIFIED
Banner1.6.jpg


As LIGHTNING is just a little on the large side it will probably be a little while before I can get final photographs taken, I just need to find a big enough space to light and photograph it, then make sure there is two people present at all times just to move it and get all of the equipment to hand! For those who didn't make it to insomnia I came across these pics on the multiplay flickr, I did take some myself but with someone else's camera, when I find them i'll upload them, I believe MakiRole has some on the way too.

1.jpg


2.jpg


3.jpg


4.jpg


5.jpg


JR
 
Associate
OP
Joined
25 Aug 2011
Posts
407
Location
CLASSIFIED
Banner1.6.jpg


I suppose the time has come to stop with the teasing and take some photographs myself outside of the incredibly warm lighting of the NEC. I'll try to cover some of the details missed between the last update and the build being completed without revealing everything to you guys just yet. Not that I don't want to show everything now but I don't want overlook the 6 days of insane paced work and getting something this big into neutral surroundings is quite challenging.

1.jpg


Most of my time went into sleeving the two immense PSU's, a 24-pin, 8x 8-pin PCIe, 8-pin EPS, 4-pin EPS, Auxillary PCIe molex and all of the annoying little cables needed for an Aquaero 6 with 15 fans were made entirely from scratch in the space of 3 days. They are all 3.1mm OD 16 AWG PVC insulated wire, black under the black and grey sleeve and yellow under the yellow. All of the little supplies came from Shakmods, Teleios sleeving from E22 and tri-rated wire from RS-Online.

2.jpg


To keep all of the cables in shape without lacing or combs the holes in the motherboard tray were all cut the perfect size and spacing for ATX spec connectors. Originally I had planned to cut individual holes however the OD of 16AWG sleeved wire is too big and there is no chance they will fit past each other anyway. Each cable was assembled in position and the tolerances worked out just right such that the cables hold neatly but aren't damaged by the sharp edges.

3.jpg


Noctua very kindly sent some (well 120!) press samples of their new Chromax vibration dampening corners and mounts. For the radiator fans I went with the extremely vibrant yellow and in the front panel where the A14's are set against a gloss yellow panel I opted for black to maintain the harsh contrast. They give a great functional accent to the fans really setting off the Neutral all black iPPC's.

4.jpg


Aside the physical assembly the other main time consuming process was bending all of the acrylic tubing. I used Shakmods 10/12mm Crystal Clear tube which was incredibly well priced (check out the 10m pack UK guys!) the quality was great and it took the heat very nicely making it quite straightforward to achieve incredibly consistent bends. I used monsoon mandrels and primochill bending cord. I find it's very helpful to have multiple bending cords just incase the tolerances between silicon and ID don't match up, to get a parallel bend without any flat spots or kinks it needs to be a tight fit.

5.jpg


6.jpg


HyperX also kindly set two 4x4GB Predator kits, rated at 3000C15, incredibly as soon as LIGHTNING booted for the first time all 32GB fired straight up at it's optimal XMP of 3000MHz. Although that may have something to do with the 4.5GHz i7-5960X OCUK lent to me for insomnia.

8.jpg


9.jpg


Thanks for all your kind comments everywhere guys, it's been a busy few weeks but i'll try to respond to everyone now I have a little PC time with my own rig again. In the next update I shall get someone to help turn it around and show you some details in the back!

JR
 
Associate
OP
Joined
25 Aug 2011
Posts
407
Location
CLASSIFIED
The amount of work and level of detail going into this build is stunning... and the rear looks incredibly clean, amazing work dude...

Thanks, I put quite a lot of work into the rear and everything about it is just a little different from conventional Parvum. It would be great if they all could all look like Lightning but for some reason not everyone uses 780/780Ti Lightnings with only the displayport exposed. From a structural point of view it performs well too, the cards are very flat even without the tubing considering the huge size of the blocks.


Excellent work and judging from the photo on KitGuru, you made it in time! I love those new Noctua coloured anti-vibration pads. Finally, they make their fans look good!

I think I got it filled and sealed at around 2PM on the day I left for insomnia, ran upstairs packed an entire setup, cleaned and prepared 3 other rigs, quickly packed some clothes and then ran straight back down and powered everything on. Straight into the BIOS observed all was good, M.2 showed up, all 8 DIMM's already sat at 3000MHz, OCUK's 5960X was running at 17°C. Cracked straight on with an OS, installed Aquasuite popped the fans to 30% and loaded everything in the car. I forgot what time I arrived, around 8PM I think.

Noctua always looked good, you just weren't ready ;)


I miss them already :(

I'll bring them over to play with one day!


I haven't checked this part of the forum in over a year and the first thing I see is this.

This is some masterclass stuff here well done!

Thanks, it's a great time to check it out again good sir! I went to the other part of the forums once, bit mad :p


This is absolutely awesome!! Very original cooling arrangement, masterfully implemented...

I doff my hat :D

Thank you!


More updates please! :D dying to see the rest of this

Updates are here and more are coming!


As always, fantastric work JR23. I love the manufactured water channels in the actual case as it looks much cleaner by removing a lot of potential piping from the system. Also the fact that there is two loops in a relatively small ATX case with four GPUs is quite brilliant as many would struggle to design and build such a loop in a Primo so something like this is quite rare. :)

Smashing work :D

Well it adds a lot of runs but takes away a lot of bends and a lot of fittings, using the really slender EK-HDC's does help to keep it from being a total overload but it's a busy build for sure. Admittedly it is quite fat, but compact for an overkill setup.


Can you please NOT post any more pictures, getting extremely jealous over here! Channels in the case is definitely the way forward :D

I already broke that promise, so, no... sorry.


That is absolutely incredible!

Thanks!


That pic needs a NSFW warning, some hardcore pc pron going on there!!

I wouldn't post them if they didn't ;)


Amazing as ever.... How does Shakmods tube compare to E22, do you know?

It's difficult for me to give you the answer I would like to on these forums. But lets just say when I needed it before insomnia, E22, EKWB and Bitspower were out of stock at OCUK. A supply problem was resolved and I was not disappointed and consequently neither were OCUK.

JR
 
Associate
OP
Joined
25 Aug 2011
Posts
407
Location
CLASSIFIED
Banner1.6.jpg


Although Lightning is complete and running much post arrived from afar, what could it be?

1.jpg


2.jpg


3.jpg


Time for Filco.

4.jpg


5.jpg


But also from Washington state USA, lots and lots of Signature Plastics DSA PBT keycaps.

6.jpg


Although I got lots of spares i'd already figured out exactly what layout I was going for to complement the build.

7.jpg


8.jpg


10.jpg


11.jpg


I'm not sure I actually wanted MX-Blues however the board came with 3 tiny blue LED's which pleases me greatly. I already have MX-Reds and MX-Greens, I don't like MX-Blacks so it seemed like a logical choice.

9.jpg


12.jpg


Really very pleased with how everything looks together!

14.jpg


Hopefully soon a very swaggy Filco cable will arrive from Pexon sleeved in the same black teleios as the build and my plans shall be complete :eek:

JR
 
Associate
OP
Joined
25 Aug 2011
Posts
407
Location
CLASSIFIED
Banner1.6.jpg


Another little detail on Lightning to be addressed was the SLI bridge, the motherboard didn't come with a quad bridge and we had just been using a plain black PCB style one and so decided to make a cover. 'LIGHTNING' or the jet would have been way too small on a bridge but the 'OC' logo had just the right amount of detail.

1.jpg


Obviously it had to be an inlay, just like on the front of the case the yellow piece is chamfered on both edges and stands slightly proud of black as it appears to in MSI's graphics.

2.jpg


Each piece is an individual piece of acrylic with the inner OC being held in it's original place. The reverse is area cleared so that the bridge sits inside it and the PCB edges aren't exposed.

3.jpg


All assembled together.

4.jpg


It looks very at home with the motherboards original accessories.

5.jpg


6.jpg


But even more so mounted to the Lightnings.

7.jpg


Hopefully over the weekend I have another little job to do so that the Aquaero heatsink can be fitted to my weird mountings without removing it from the case and then it will be ready for final pictures.

JR
 
Associate
OP
Joined
25 Aug 2011
Posts
407
Location
CLASSIFIED
Banner1.6.jpg


Just realized this picture was absent from the build log...

LightningRearEK.jpg


...and this one too.

tease3.jpg


I guess you could say that was a teaser, getting very ready for the final pictures now.

JR
 
Associate
OP
Joined
25 Aug 2011
Posts
407
Location
CLASSIFIED
Banner1.6.jpg


I got another small little task out of the way yesterday, the way I had mounted the Aquaero 6 in order hide hide screw heads in the front meant that the heatsink wouldn't fit.

1.jpg


2.jpg


Although it's not really needed to dissipate heat unlike on the Aquaero 5 it does look really clean so I wanted to find a way I could still fit it. The main issue was that the standoffs couldn't sit up to the PCB where i'd put nuts so I milled them all off flush with the heatsink.

3.jpg


4.jpg


5.jpg


6.jpg


It wasn't worth attacking them with any serious precision as they will no longer touch against anything hence I just end milled them off by eye with a small mill which cut really nice and didn't mark the rest of the part during the process.

7.jpg


9.jpg


8.jpg


10.jpg


It fits really neatly onto the Aquaero and makes it look a lot neater hiding the inside face of the connectors from view. At the moment it's just resting in place but i've ordered some adhesive thermal pads as used on memory to hold it in place.

13.jpg


12.jpg


11.jpg


Just a quick check to see all the fans are still operational after rummaging around with cables, all looking good :)

14.jpg


JR
 
Associate
OP
Joined
25 Aug 2011
Posts
407
Location
CLASSIFIED
Banner1.6.jpg


Just one more little detail to address was the very stock Filco USB cable so I ordered a dank one sleeved in black Teleios from Pexon PC's. With lots of options to choose from I figured this would best match the build and the keyboard.

17.jpg


18.jpg


19.jpg


20.jpg


Fitting it was a bit too awkward to photograph as my Filco didn't want to split completely in half, rather than scratching the front edge trying to get it to unclip I just gently slid the cable in from the back edge.

21.jpg


23.jpg


22.jpg


Top work from team Pexon! I'm really enjoying using this keyboard and i'm glad that I went for MX-blues the light tactility is well suited to my mashing style. I've started to use Lightning a little with a 32" 4k IPS AOC and GTA V is looking absolutely epic although something isn't getting on with Windows 10 and causing occasional freezes in game. It's got a few shows to attend over the coming weeks, one quite close to our friends studio so final photographs have been put on hold until then, i'll make sure to get lots of teasers at LSUCS LAN and PC Gamer Weekender though!

JR
 
Associate
OP
Joined
25 Aug 2011
Posts
407
Location
CLASSIFIED
Stunning work man!

Thanks!

Just keeps getting better... Great work!

Keeps getting yellower and blackerer.

Absolutely stunning piece of craftsmanship.

For me it wouldnt be about the cost of this build, it would be the fact i could turn around and say, i've designed this from scratch, took CAD and turned it into reality. I hope your sponsors are as happy with this as you are.

JR23, looking forward to see what you do next..

I know MSI and Noctua love it, HyperX just replied with 'want!' last time we updated them, but I hope they are pleased too. It looked phenomenal at i56, I'm sure all the OCUK crew would have taken it home. The next project for me PARVUM FURIA is in motion, expect something very different.

Everything on the inside of that case looks positioned perfect to the millimetre. Great work OP. So clean.

Yeah, it wouldnt of fitted if not :D the layout was devised over a year ago just as a hypothetical day dream, I never thought that I would have the chance to make it without compromise.

Look forward to seeing the final shots. :)

So close, more teasers and event photos first though!

JR
 
Associate
OP
Joined
25 Aug 2011
Posts
407
Location
CLASSIFIED
Banner1.6.jpg


A couple of shots of LIGHTNING in action.

blockstease.jpg


PREDATOR.jpg


I swagged a 32" 4k IPS AOC and have been putting some epicly pretty GTA V hours in. After a huge beef between nvidia drivers and Windows 10 things are finally running right and its glorious.

JR
 
Associate
OP
Joined
25 Aug 2011
Posts
407
Location
CLASSIFIED
Banner1.6.jpg


LIGHTNING, αclass and I just got back home from an awesome weekend at LSUCS Charity LAN 56. Much chocolate was consumed, chats were had and rather un-ordinarily multiplayer games were played with other people actually present!

1.jpg


3.jpg


After an initial and expected battle with Windows 10, which still thinks it knows best about drivers, both rigs ran very well. AOC kindly sent Parvum a few samples from their awesome IPS range so I picked out my favorite the 32" 4k to take along and stress LIGHTNING with but quite frankly the shear number of pixels was no match for 4 GK110-4250-B1's. GTA V looked epic as always and I also played some Vanishing of Ethan Carter for the UE4 greatness as well as my all time favorite LAN title Unigine Valley.

agar.io also very good at 4k!

4.jpg


5.jpg


Also I got a little more accustomed to my new Filco making a few forum posts and totally not having a Fast and Furious related meme war. As well as the Filco I tried out my gift from OCUK, the steelseries black and yellow thingy's. While less comfortable and pleasurable than my Beyers they are much better suited to the LAN environment than a condenser mic and open backs. :)

6.jpg


7.jpg


8.jpg


On the way home I managed to fit both rigs in my car although with no room left for monitors I may need to re-think my LAN setup for longer distances and maybe not take two giant ATX rigs. It was great fun and I can't wait for the next event!

JR
 
Last edited:
Associate
OP
Joined
25 Aug 2011
Posts
407
Location
CLASSIFIED
Banner1.6.jpg


A long long overdue update on LIGHTNING! Even though the system has been up and running for several months now I was overcome by a sudden urgency to extract just a little more performance. Who knows why, perhaps computex, maybe pascal or it could just be the need play with some Quad-SLI insanity with all this foolish chat of its demise.

0.jpg

www.3dmark.com/fs/8687219

After several attempts with different overclocking utilities, different drivers and piddling with a few other factors I eventually succeeded in breaking the 30k barrier with a clock speed of 1215/1750 on all 4 cards. Definitely an impressive score however I knew at least a couple of the cards were capable of more. So off I went to find the limits of each card under water...

1.jpg


ASIC Quality (%) - Max Core Frequency at stock volts (MHz) - Heaven score (fps)

So after a little testing I found that one card was much weaker than the others, one incredibly fast but inefficient and two somewhere in the middle. Although I had tested each card on air originally I really didn't pay attention to where they were placed on the board. Consequently with this new found knowledge it was decided that there probably was a more efficient order to go with.

2.jpg


Naturally this meant it was time to tear down the GPU loop and mess around with the placement of each card. Not a small task but actually quite a fun one and a decent opportunity to take some photographs of LIGHTNING in pieces.

3.jpg


Because it was originally assembled very quickly in time for insomnia I never had chance to show much of how it fits together so this should be quite insightful and a great chance to give everything a good clean ready for the next season of excursions and shows.

4.jpg


5.jpg


With the rearmost black panel removed all of the screws which secure the PSU's and GPU's are exposed. Once removed the yellow and grey rear panels can be taken off making it easy to swap around the cards.

6.jpg


And relatively quickly the back end of the case is removed :)

7.jpg


Time to take some cards out and already barely visible bits of hardware start to surface!

8.jpg


A motherboard, complete with chipset heatsink and M.2 drive! I knew it was under there all along.

9.jpg


With the back off and the cards out many other new sights appeared.

10.jpg


But it was time to start putting them back.

11.jpg


12.jpg


Lovely EK-HD fittings made it all so easy.

13.jpg


Bye bye M.2! Maybe I will see you again next year.

14.jpg


15.jpg


While putting back the final card I did a little oops and spilled coolant on the rear bank of memory. Nothing a few minutes with the hair dryer and a clean couldn't recover.

16.jpg


All neatly back and ship shape tucked right up to GPU1.

17.jpg


18.jpg


GPU1 check... GPU2 check... GPU3 check... GPU4 check... oh great, they all made it back.

19.jpg


Last chance for some weird perspectives before the case is reassembled.

20.jpg


21.jpg


Finally time for coolant again, the original pastel yellow still looks perfect, identical to the CPU loop, so back in it goes!

22.jpg


POWER!

23.jpg


25.jpg


26.jpg


24.jpg


Time for more tweaking!

28.jpg


Now the weak card is in the slot closest to the CPU followed by the two average ones and finally the fastest card furthest away.

29.jpg

www.3dmark.com/fs/8784147

The best score I got out of it at stock volts with the new GPU order was 31'782, a considerable gain. Now time to ascend to the realms of some serious overvoltage I think!

JR
 
Back
Top Bottom