Project: fanless

A little more to report durring the two hours the little one's been asleep.
Note: Only use your hands to bend heatpipes - tools will very easily dent/crush them.
Also unbending bends is very hard - if possable stick to bending straight bits.

Five1.jpg

Here's my model Mobo (with 3/4 of the Zalman flower ram mod visable to the rear

Five2.jpg

Here's my new X-Fi - complete with 'pin' Al Heatsink

Five3.jpg

And here's one of my MM heatpipes - it's been bend to match the x-fi.

Five4.jpg

Actual Asus P5Q in case - showing Left hand side Mosfet cooling

Five5.jpg

Heat pipe alturnative
 
Last edited:
The other MosFet was/is a problem currently
Heatpipe work best with mavity aiding the liquid condensate returning to the hot end.
So I wanted to rotate the pipe within the Finned MosFet block 180 so the pipe points up (and not down as designed) Not easy - will try cutting it free when I can make more noise.

Five6.jpg

Pipe in original form

Five7.jpg

Removing the linking fins (last three still joined) and losening the punched copper fins was still not enought to allow the pipe to rotate. The copper heatpipes are especially soft
 
Ok i'm seated how much are we talking for a length of Heatprofile

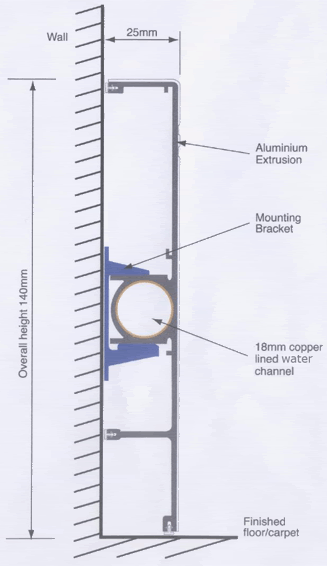
I have 6 length of 450mm (cut by them) - or .4m2 of radient surface (or about 1m2 surface area)

Oops, really must read peoples posts twice when I'm tired.
Cost me £30 as a 'sample' for work on a potential job.
And I did show a single section to the client btw ;)

Will try and post some images of the decreteheat and heatprofile sections when I get home.
 
Last edited:
No - but there as a picture of a finrad like that in my build log from someone else.

threerads.jpg

The decreteHeat profile I used was the one on the left and middle (you can see the 90+90 return barb)
The right hand profile is the new heatprofile rads I'm using.
You can also see the new profile is single pass and the tube dia is larger and copper lined.
I know its skirting but why paint a radient heater white - I'll be changing that :D

DSupgrade.jpg

I did increase the surface area of the DH rad by bolting on some amd stock heatsinks,
but it didn't make much differance, (fins to close really for passive)
and just took even longer to reach equilibrium. I did consider cuting every other fin but them i found
heatprofile and went a different direction

Pop the window and its a different story :D
I've a PA120.3 on the way so will do some tests to add to woody's results in O&C
 
Last edited:
XFi

Well I've done a spot of hacksawing tonight and trimed up the old SB heatsink
on one of the heatpipe arrays I collected via MM.
I'd already bent this pipe into shape and just need to attact it to the X-Fi.

cardsapart.jpg

Card with the plate removed so I don't get any metal dust on the card.
New recess visable where the plate turns 90 degrees

pipeofpeace.jpg

I've used some thermal tap and a bag tie to hold the pipe inplace.

Can you spot the mistake....

inthecase.jpg

The fins need rotating 90 degrees - Doh!
PC is back up and running now - so I'll keep and eye out for sound card issues over the next few days.
I know the rear fins need triming up - but it's late already and tbo I don't like it. Pleased I tried,
but I think I'll just use a larger normal heatsink or get a flexable riser card and rotate it.
 
You and me both - had two EK block arrive today and a price check thread gave me an idea on
reusing my reservator 2 without using the aluminum parts...

More on this when I’ve time to do something about it.
 
Little update - Xfi now sold and replaced with a Xonar D2
This can be mounted in the lowest pci slot as it only fall foul of 2/6 of the sata ports and not 4/6 of them like the X-Fi.

This also means it comes at the bottom edge of the window and will work with my revised airflow
concept. If it works that is :D

I've also had a chance to cut up the heat profile connectors.
As stock, these are rather smart as they allow for quite a bit of 3D tolerance on all junctions.
Unlike the DiscreteHeat plastic barbs - These are all metal -
copper ends with a welded stainless steel concertina section between
(Like one of the London bendy buses or trams)

The Stainless had to go, as the cut edge would be machined into the barb tail at a later date.
The extended ends are sealed with three O rings so I’ve no worried there. This will be drilled out
to increase the ID but more on that later. Was hoping to get some more work on the case done but I’m
the only one that isn’t ill in the house today and waking up two sick people is never a good idea.

coppercutting.jpg

Cut, bent and straight
 
Last edited:
Change in direction

This build has been on hold of too long and I've got side tracked with pump testing and playing with
a PA120.3 and a soundblocker fan - anyway to cut a long story short this
build isn't going to happen in it's current form.

My little boy getting older - and I did some pump test so now using a D5 vario
No longer a need to wall mount my pc - and a want the typoon 3 for a duel loop
No longer a need for a small case - current setup plus T3 will not fit
Fanless is just not worth the effort - will take the single fan route
So I'm in process of getting my first Lian li case.

But I didn't want to just end the thread - so spend the morning redoing the side panel and
mocking up the finished case. Ok I know it needs a paint job and there not 'glamour' shots
but it's better than nothing I'm sure your agree

mockflat.jpg

Additional 120m grill to bass - this would have been at the base of the stack effect chamber.
The front half of the case would be warm - with the wings on the ram heating the air
that would rise and draw cool air in from below. There was going to be baffels to
minimise air moving to the rear of the case.

mockside.jpg

Top grill to 'stack' - vented window to allow limited air flow over all watercooled components
The E8200, 8500GT, NB, MosFet, PSU and HHD's were to be in the single passive loop.
This would be cooled by just the Rad section (convective) of a zalman Resertor 2.
And the 6 pieces of heatprofile (radient) skirting rad I've got. The aim was to have an all copper loop.

mockfront.jpg

I wanted too modify the front so you see the Reservoir through the silver hoop.
But the typhoon would only fit where the optical drive was and that either ment a
major rebuild or an external optical - both of which I didn't want.

For all the subscribers - sorry I didn't finish - but there'll be someing in the next month or two
that should be worth the wait.

Happy to take questions and will try and build a mockup with the watercooling
 
Last edited:
Back
Top Bottom