

You are using an out of date browser. It may not display this or other websites correctly.
You should upgrade or use an alternative browser.
You should upgrade or use an alternative browser.
Project: Silent Overkill
- Thread starter Cenedd
- Start date
More options
Thread starter's posts(although I'd be more concerned about the red G1 logo with the green)
Well, if you're gonna clash, might as well do it properly!
Might look at the possibility of making up a PCB to sit in the bottom of the res with through-hole mounting for the RGB LEDs. Depends if there's enough room for the resistors in the rather limited space - currently they're in the deep holes the LEDs sit in. If they're on the board it'd be less grief to wire and stuff in the space but I suspect it'd need surface-mount resistors to fit. Will have to model it up when I get time - current project is to build a belt grinder. Currently have a 2HP 3-phase motor sitting on my bench and I'm wiring up the controls. Nothing like variety eh?!Well, hello again all. Hope you're all keeping well (and sane!) through all of this and that OCUK have been kind enough to post you things to play with!
This isn't exactly completion of this project - to be blunt, I got to a point where it was all good, everything worked and...I kinda just enjoyed it rather than worrying about the finer details. So I still haven't, for example, sleeved the ATX power wires. So what is this then? Well, it's very likely to be a (yet another) descent into insanity....don't say you've not been warned!
So, a very nice man (I won't name him in case he doesn't wish to be) posted me a shiny thing to play with in my boredom. Specifically a water-cooled Titan X (the Pascal version in the 1000 series) which should be a very nice step up from the 980Ti. Don't get me wrong, I wasn't looking to replace it just yet but you don't look such a gift-horse in the mouth....and it should, in theory, let me enable hardware acceleration in Handbrake as well as turn up the settings in the games (that I am occasionally granted time to play!)
So in gratitude of such a gift, obviously the first thing I did was see how many pieces I could dismantle it into and then drill some holes in it.

Those should let me mount the RGB LEDs I previously wired up for the GPU block. The holes needed to be 5mm not 3mm but I've put them in different locations to the stock holes so they line up with the LEDs....it was that or solder another 6 resistors and fight with the sleeving!
So this'll be a straight forward swap with no drama then, right? Nope. The water terminals are shifted 30mm towards the front of the case relative to the old card. No problem, there's enough flex in the hoses to cope with that, no? Yeah, if I'd not gone hardline there would be...but I did and both links are bent pieces too! I'm hoping that one I'll get away with because it finishes in a double-45 connector that might just have enough scope to swing the other way. The other I might get away with sawing 30mm off the straight part of the link....I hope! So place you bets, how much will end up on the carpet this time?!
This isn't exactly completion of this project - to be blunt, I got to a point where it was all good, everything worked and...I kinda just enjoyed it rather than worrying about the finer details. So I still haven't, for example, sleeved the ATX power wires. So what is this then? Well, it's very likely to be a (yet another) descent into insanity....don't say you've not been warned!
So, a very nice man (I won't name him in case he doesn't wish to be) posted me a shiny thing to play with in my boredom. Specifically a water-cooled Titan X (the Pascal version in the 1000 series) which should be a very nice step up from the 980Ti. Don't get me wrong, I wasn't looking to replace it just yet but you don't look such a gift-horse in the mouth....and it should, in theory, let me enable hardware acceleration in Handbrake as well as turn up the settings in the games (that I am occasionally granted time to play!)
So in gratitude of such a gift, obviously the first thing I did was see how many pieces I could dismantle it into and then drill some holes in it.
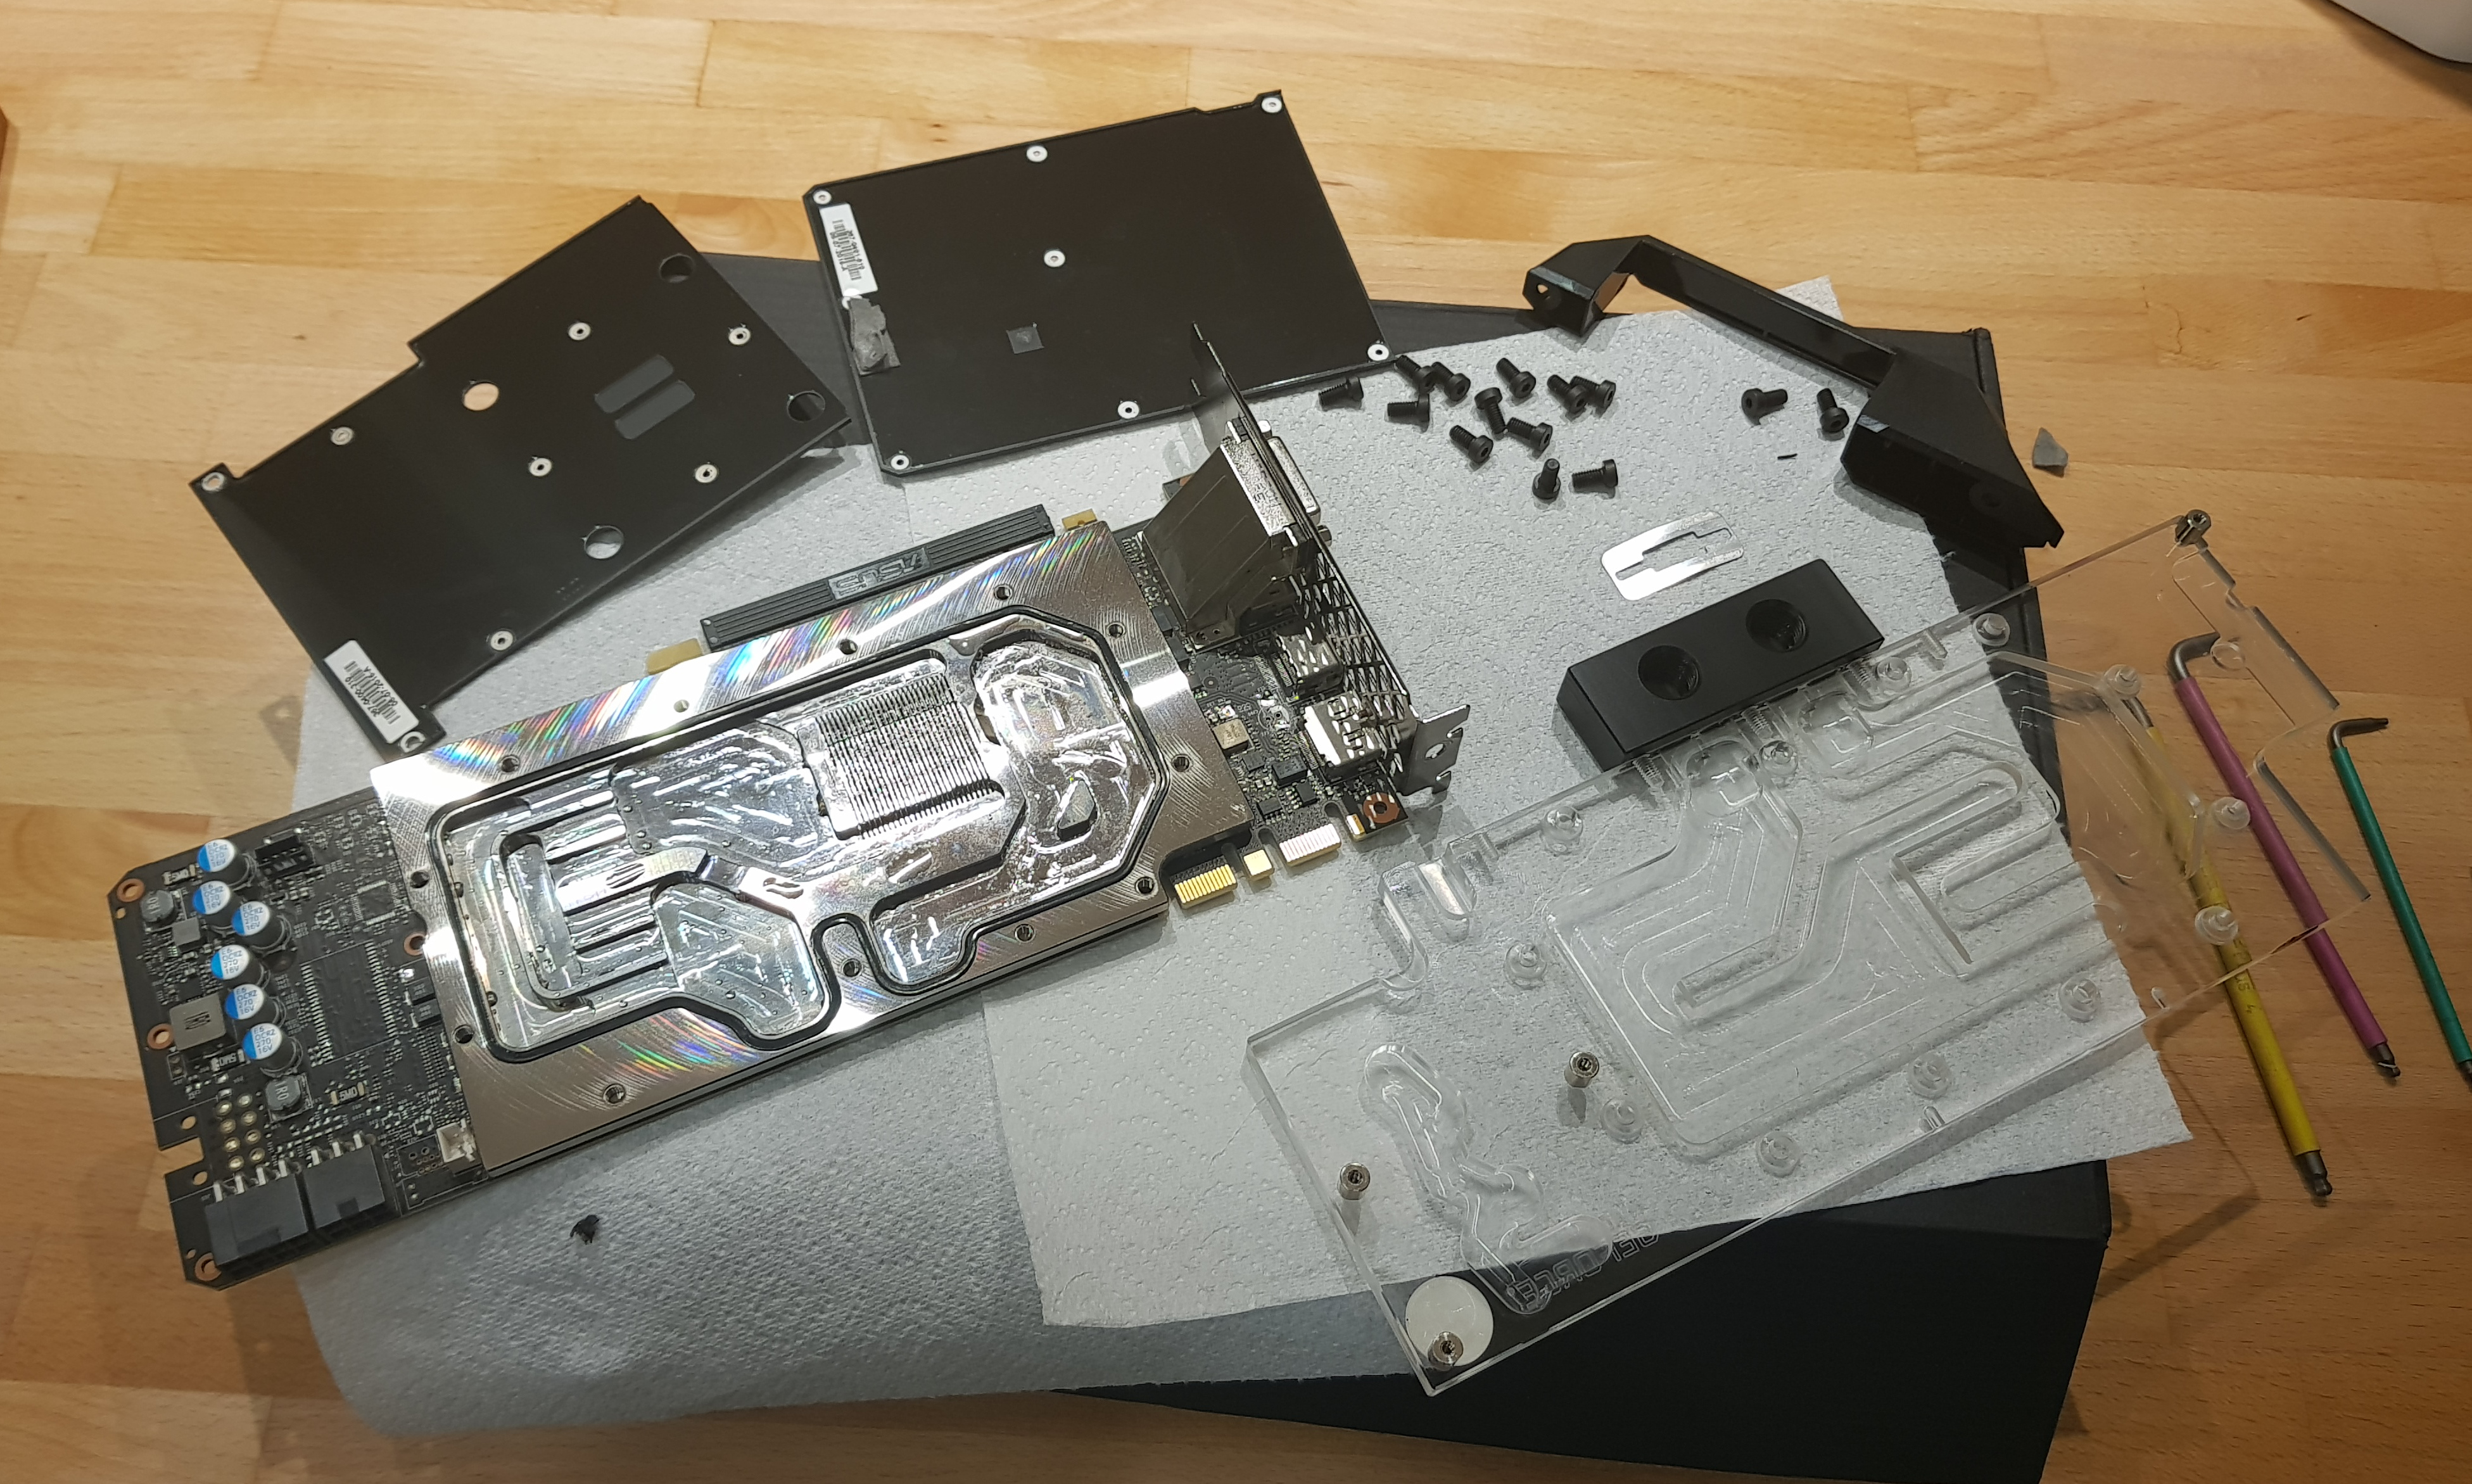
Those should let me mount the RGB LEDs I previously wired up for the GPU block. The holes needed to be 5mm not 3mm but I've put them in different locations to the stock holes so they line up with the LEDs....it was that or solder another 6 resistors and fight with the sleeving!
So this'll be a straight forward swap with no drama then, right? Nope. The water terminals are shifted 30mm towards the front of the case relative to the old card. No problem, there's enough flex in the hoses to cope with that, no? Yeah, if I'd not gone hardline there would be...but I did and both links are bent pieces too! I'm hoping that one I'll get away with because it finishes in a double-45 connector that might just have enough scope to swing the other way. The other I might get away with sawing 30mm off the straight part of the link....I hope! So place you bets, how much will end up on the carpet this time?!
Ok, took stock of the coolant I thought I had and....ordered more from OCUK. Opportune time for a coolant change if I have to drain and refill anyway. I suspect I'll lose some to the VAX anyway (went and split the loop after installing a drain port). So for now, a benchmark of the existing card as a baseline. Click for a larger version (same as all my pics on this thread).

LOL crikey you weren't joking when you said you'd taken it apart
She's a good card. Looking forward to seeing it with RGB. I never even knew it had led holes lol. I'd been waiting that long I just fitted it as quick as I could.
She's a good card. Looking forward to seeing it with RGB. I never even knew it had led holes lol. I'd been waiting that long I just fitted it as quick as I could.
So if a gift horse has landed you a Titan XP, does your 980Ti need some love and gift horse it to me?
Too late. I hear his wife got in first
LOL crikey you weren't joking when you said you'd taken it apart
She's a good card. Looking forward to seeing it with RGB. I never even knew it had led holes lol. I'd been waiting that long I just fitted it as quick as I could.
Well, if you're gonna do it....OVERKILL it!
Yep, had a pair of 3mm holes and now it also has a pair of 5mm holes.
Too late. I hear his wife got in first
Yup. She's currently running the GTX580 and her third monitor won't run off it so it's on a USB to VGA adapter that flakes out periodically. I bought a new monitor a while back and thought of passing one down to her....and then thought better of it! She got jealous and added a third so now we have a wall of monitors between us so that we can't see each other while we're at work. On the plus side, already working from home is a definite bonus at the moment! Pic in post 253 is now her PC.
lol if I send you anything else I'm going to superglue it all together
You already tried! The 3M tape sticking one half of the back plate on was a delight to get off without breaking anything! Had to get that off to remove the top of the block to clean it - it looked like it needed cleaning but turned out not to - just the air getting to the nickel plate.
haha I wasn't about to spend £35 on a back plate. I didn't like the EK one either. Was the same as every other back plate they ever made only it had 1080TI on it. Clearly making my phallus smaller than the stock one which says TITAN XP.
Ok, coolant delivered and PC drained. Had a go at getting the backplate from my 980Ti - which, ironically says "TITAN X" on it - to fit and I could probably persuade it to fit by milling down one of the mount points on it but I decided not to. Partly because it was liable to fit poorly, or I'd scratch it but mainly because doing so would render the 980Ti unusable. Alright, that's probably not entirely fair but the backplate on the 980Ti does provide cooling (passive heatsink) to a bunch of VRMs on the back of it whereas it doesn't seem to on the Titan. Maybe they moved from analogue power to digital or perhaps they're hidden under the block on the front...which I refrained from taking off to be honest.
I cursed my only half-effective drain system again....and then failed to do anything about it....again.
Got the new card in and found - as expected - that the water ports were shifted towards the front of the case. I'd estimated 30mm without taking anything out. Actual shift was 25mm....which I don't think was bad!
The GPU to CPU hardline link fits (fittings rotate) but is now at an angle. Not sure I like that...but equally sure I couldn't be posteriored (substitute your own vocabulary here) to do anything about it.
Pump to GPU link is also hardline and there was nothing to do here except take a saw to it. Well, I could have broken out the heat gun and bent a new one....but I remember it being a joy last time round. 25mm cut off the end and it cracked half way through the cut. Words were uttered that caused the sun to hide behind the clouds. Managed to save it by carefully sawing an extra few mm off the end and then filing it flat. Got away with it too! Just fits.
I had a look at trying to mount an eSATApd port in the back of the case without it being ugly. I have a BluRay drive (read only) connected at the moment and that involves cables out the door currently. Would need to order an eSATAp cable and it ought to work if I start Dremeling slots in the back of the case and making up brackets. I got that far and pretty much lost the will to live to be honest. Pressure test was good so I filled 'er up and moved on!
I'd gone back through this log as a useful and obviously accurate account of how much coolant I'd need for a complete fill....turns out that "accurate" wasn't exactly, well, accurate. Just shy of 2 litres I'd previously said. Nope. An incomplete drain - there were bits left in the bottom somewhere but all the parts I needed to access were clear. In went two litres and.....it's not quite full. Enough to power up though, just needs topping off.
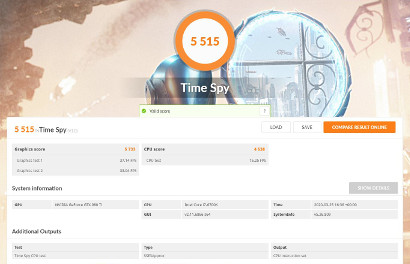
So, just a tiny performance gain then!

So that's a 60% gain in FPS and a 50% gain in score. The only downside is that MS Office now thinks I've pirated it and won't activate. I haven't, by the way. The joys of "Now enter the second block" await!
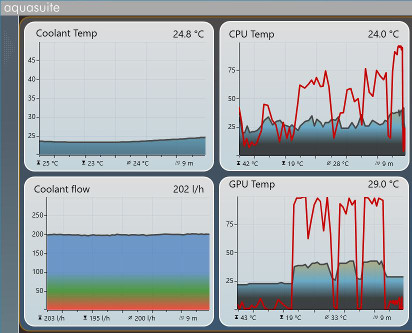
And now the temps. You can see in the GPU graph (blue is temp, red is load) the peaks from demo, gpu test 1, gpu test 2 and then the last bit where there's a peak on the CPU load but not the GPU is the CPU test.
To be fair and honest here, this is from a cold system so the coolant hasn't got up to temp. Currently the coolant is at 29°C....but the fans don't even start until the coolant gets to 36°...and that's only at one third speed. They flip to 'panic mode' (100%) at 37° but I've never seen that happen.
Cleaned up the 980's block. Some corrosion in the last four years. Couple of spots near the seal where it's taken off the nickel plating. Nothing flaky though so it should be good to go.
So, the future involves ordering more coolant to top mine off and enough to replace my wife's coolant when I swap her card. I think I'll also try to treat the Titan to a matching backplate. Although, in a fit or irony, it looks like the only ones that may be available are going to say "1080Ti" on them instead of "Titan X". Ah well.
Well, cheers Andy. Much appreciated.
I cursed my only half-effective drain system again....and then failed to do anything about it....again.
Got the new card in and found - as expected - that the water ports were shifted towards the front of the case. I'd estimated 30mm without taking anything out. Actual shift was 25mm....which I don't think was bad!
The GPU to CPU hardline link fits (fittings rotate) but is now at an angle. Not sure I like that...but equally sure I couldn't be posteriored (substitute your own vocabulary here) to do anything about it.
Pump to GPU link is also hardline and there was nothing to do here except take a saw to it. Well, I could have broken out the heat gun and bent a new one....but I remember it being a joy last time round. 25mm cut off the end and it cracked half way through the cut. Words were uttered that caused the sun to hide behind the clouds. Managed to save it by carefully sawing an extra few mm off the end and then filing it flat. Got away with it too! Just fits.
I had a look at trying to mount an eSATApd port in the back of the case without it being ugly. I have a BluRay drive (read only) connected at the moment and that involves cables out the door currently. Would need to order an eSATAp cable and it ought to work if I start Dremeling slots in the back of the case and making up brackets. I got that far and pretty much lost the will to live to be honest. Pressure test was good so I filled 'er up and moved on!
I'd gone back through this log as a useful and obviously accurate account of how much coolant I'd need for a complete fill....turns out that "accurate" wasn't exactly, well, accurate. Just shy of 2 litres I'd previously said. Nope. An incomplete drain - there were bits left in the bottom somewhere but all the parts I needed to access were clear. In went two litres and.....it's not quite full. Enough to power up though, just needs topping off.
So, just a tiny performance gain then!

So that's a 60% gain in FPS and a 50% gain in score. The only downside is that MS Office now thinks I've pirated it and won't activate. I haven't, by the way. The joys of "Now enter the second block" await!
And now the temps. You can see in the GPU graph (blue is temp, red is load) the peaks from demo, gpu test 1, gpu test 2 and then the last bit where there's a peak on the CPU load but not the GPU is the CPU test.
To be fair and honest here, this is from a cold system so the coolant hasn't got up to temp. Currently the coolant is at 29°C....but the fans don't even start until the coolant gets to 36°...and that's only at one third speed. They flip to 'panic mode' (100%) at 37° but I've never seen that happen.

Cleaned up the 980's block. Some corrosion in the last four years. Couple of spots near the seal where it's taken off the nickel plating. Nothing flaky though so it should be good to go.
So, the future involves ordering more coolant to top mine off and enough to replace my wife's coolant when I swap her card. I think I'll also try to treat the Titan to a matching backplate. Although, in a fit or irony, it looks like the only ones that may be available are going to say "1080Ti" on them instead of "Titan X". Ah well.
Well, cheers Andy. Much appreciated.
Ok, starting to plan the fixes for the things I've bodged. First order of business is a second drain port so I can drain both halves of the loop - the fountain return of the reservoir effectively splits the loop in two so you get the back half (rad, filter, drain port) and the front half (res, pump, GPU, CPU) separated. If you'll excuse the potato drawing, I could do with some opinions and/or other ideas on this one. Do I go with the ideal location (lowest point of the loop) for the drain as (badly!) drawn in blue or do I go with more tucked away and install it on the spare port of the res. That wouldn't be the lowest point (pump would still be full) but it wouldn't be the eyesore I think a drain port pointing straight at the window would....and that's assuming it would fit in the space!
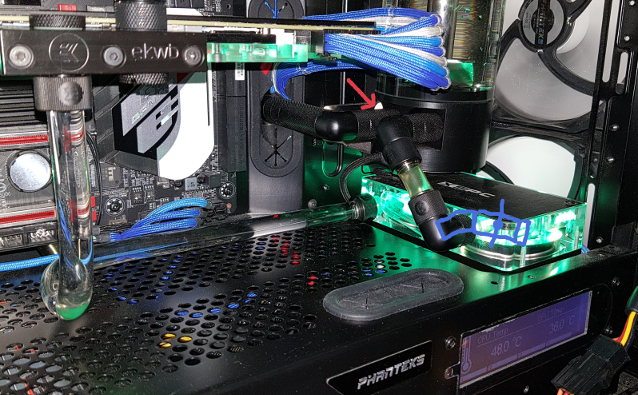
The 'red' route could just be a male to male rotary to a tap and then a stop plug to make sure. Shouldn't even show if it's all in black.
The 'blue' route would have to be some sort of cube splitter (this or this), then a tap and a stop. If there's room a 30 degree fitting would make the tap about level. Can't get a measurement on how long the body of the EK tap is though.
Any thoughts, preferences, better ideas?
Change that 90 degree rotary with the blue penis drawn over it into a T-piece. The right-angle turn goes into the pump as normal, the straight-over passes through the PSU shroud. Then you can hook up some soft tubing to route past your Aquaero and through a bulkhead fitting out of the case somewhere you won't see.
Hmmm. You mean drill a hole in the PSU shroud and go down through it? Couldn't easily go through the rubber grommet as it's not in line with the fitting (back edge is about in line with the front edge of the fitting) and there is cabling to the Aquaero immediately below it that would block it. I might get away with a T/cube with the outputs up and down. The up then should just about fit to the res with a 30° fitting on it and the down would go into the rats nest. There's a lot of cabling under there for the Aquaero, Farbwerk, pumps etc but it might work with some flexible tubing with a stop fitting on the end.
I've checked and to remove the shroud from the case would involve pretty much total disassembly since the screw heads are behind the motherboard and I think the pumps would have to come out too. At the risk of sounding like I have something better to do, I'm not sure I can face that much until I'm forced to replace the motherboard at some point in the unspecified future. Might be able to shorten the tap run by putting the tap facing straight towards the door and the 30° fitting at the top though.
I've checked and to remove the shroud from the case would involve pretty much total disassembly since the screw heads are behind the motherboard and I think the pumps would have to come out too. At the risk of sounding like I have something better to do, I'm not sure I can face that much until I'm forced to replace the motherboard at some point in the unspecified future. Might be able to shorten the tap run by putting the tap facing straight towards the door and the 30° fitting at the top though.