

You are using an out of date browser. It may not display this or other websites correctly.
You should upgrade or use an alternative browser.
You should upgrade or use an alternative browser.
Project: Silent Overkill
- Thread starter Cenedd
- Start date
More options
View all postsOk, coolant delivered and PC drained. Had a go at getting the backplate from my 980Ti - which, ironically says "TITAN X" on it - to fit and I could probably persuade it to fit by milling down one of the mount points on it but I decided not to. Partly because it was liable to fit poorly, or I'd scratch it but mainly because doing so would render the 980Ti unusable. Alright, that's probably not entirely fair but the backplate on the 980Ti does provide cooling (passive heatsink) to a bunch of VRMs on the back of it whereas it doesn't seem to on the Titan. Maybe they moved from analogue power to digital or perhaps they're hidden under the block on the front...which I refrained from taking off to be honest.
I cursed my only half-effective drain system again....and then failed to do anything about it....again.
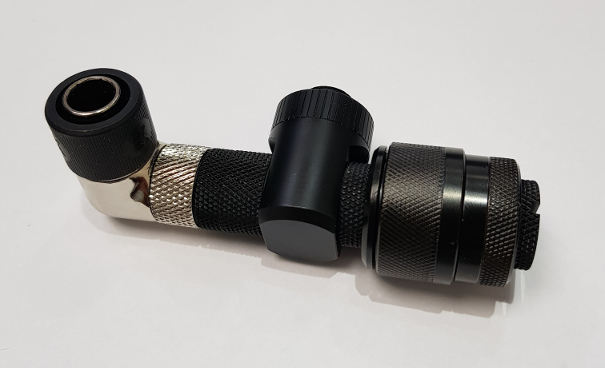
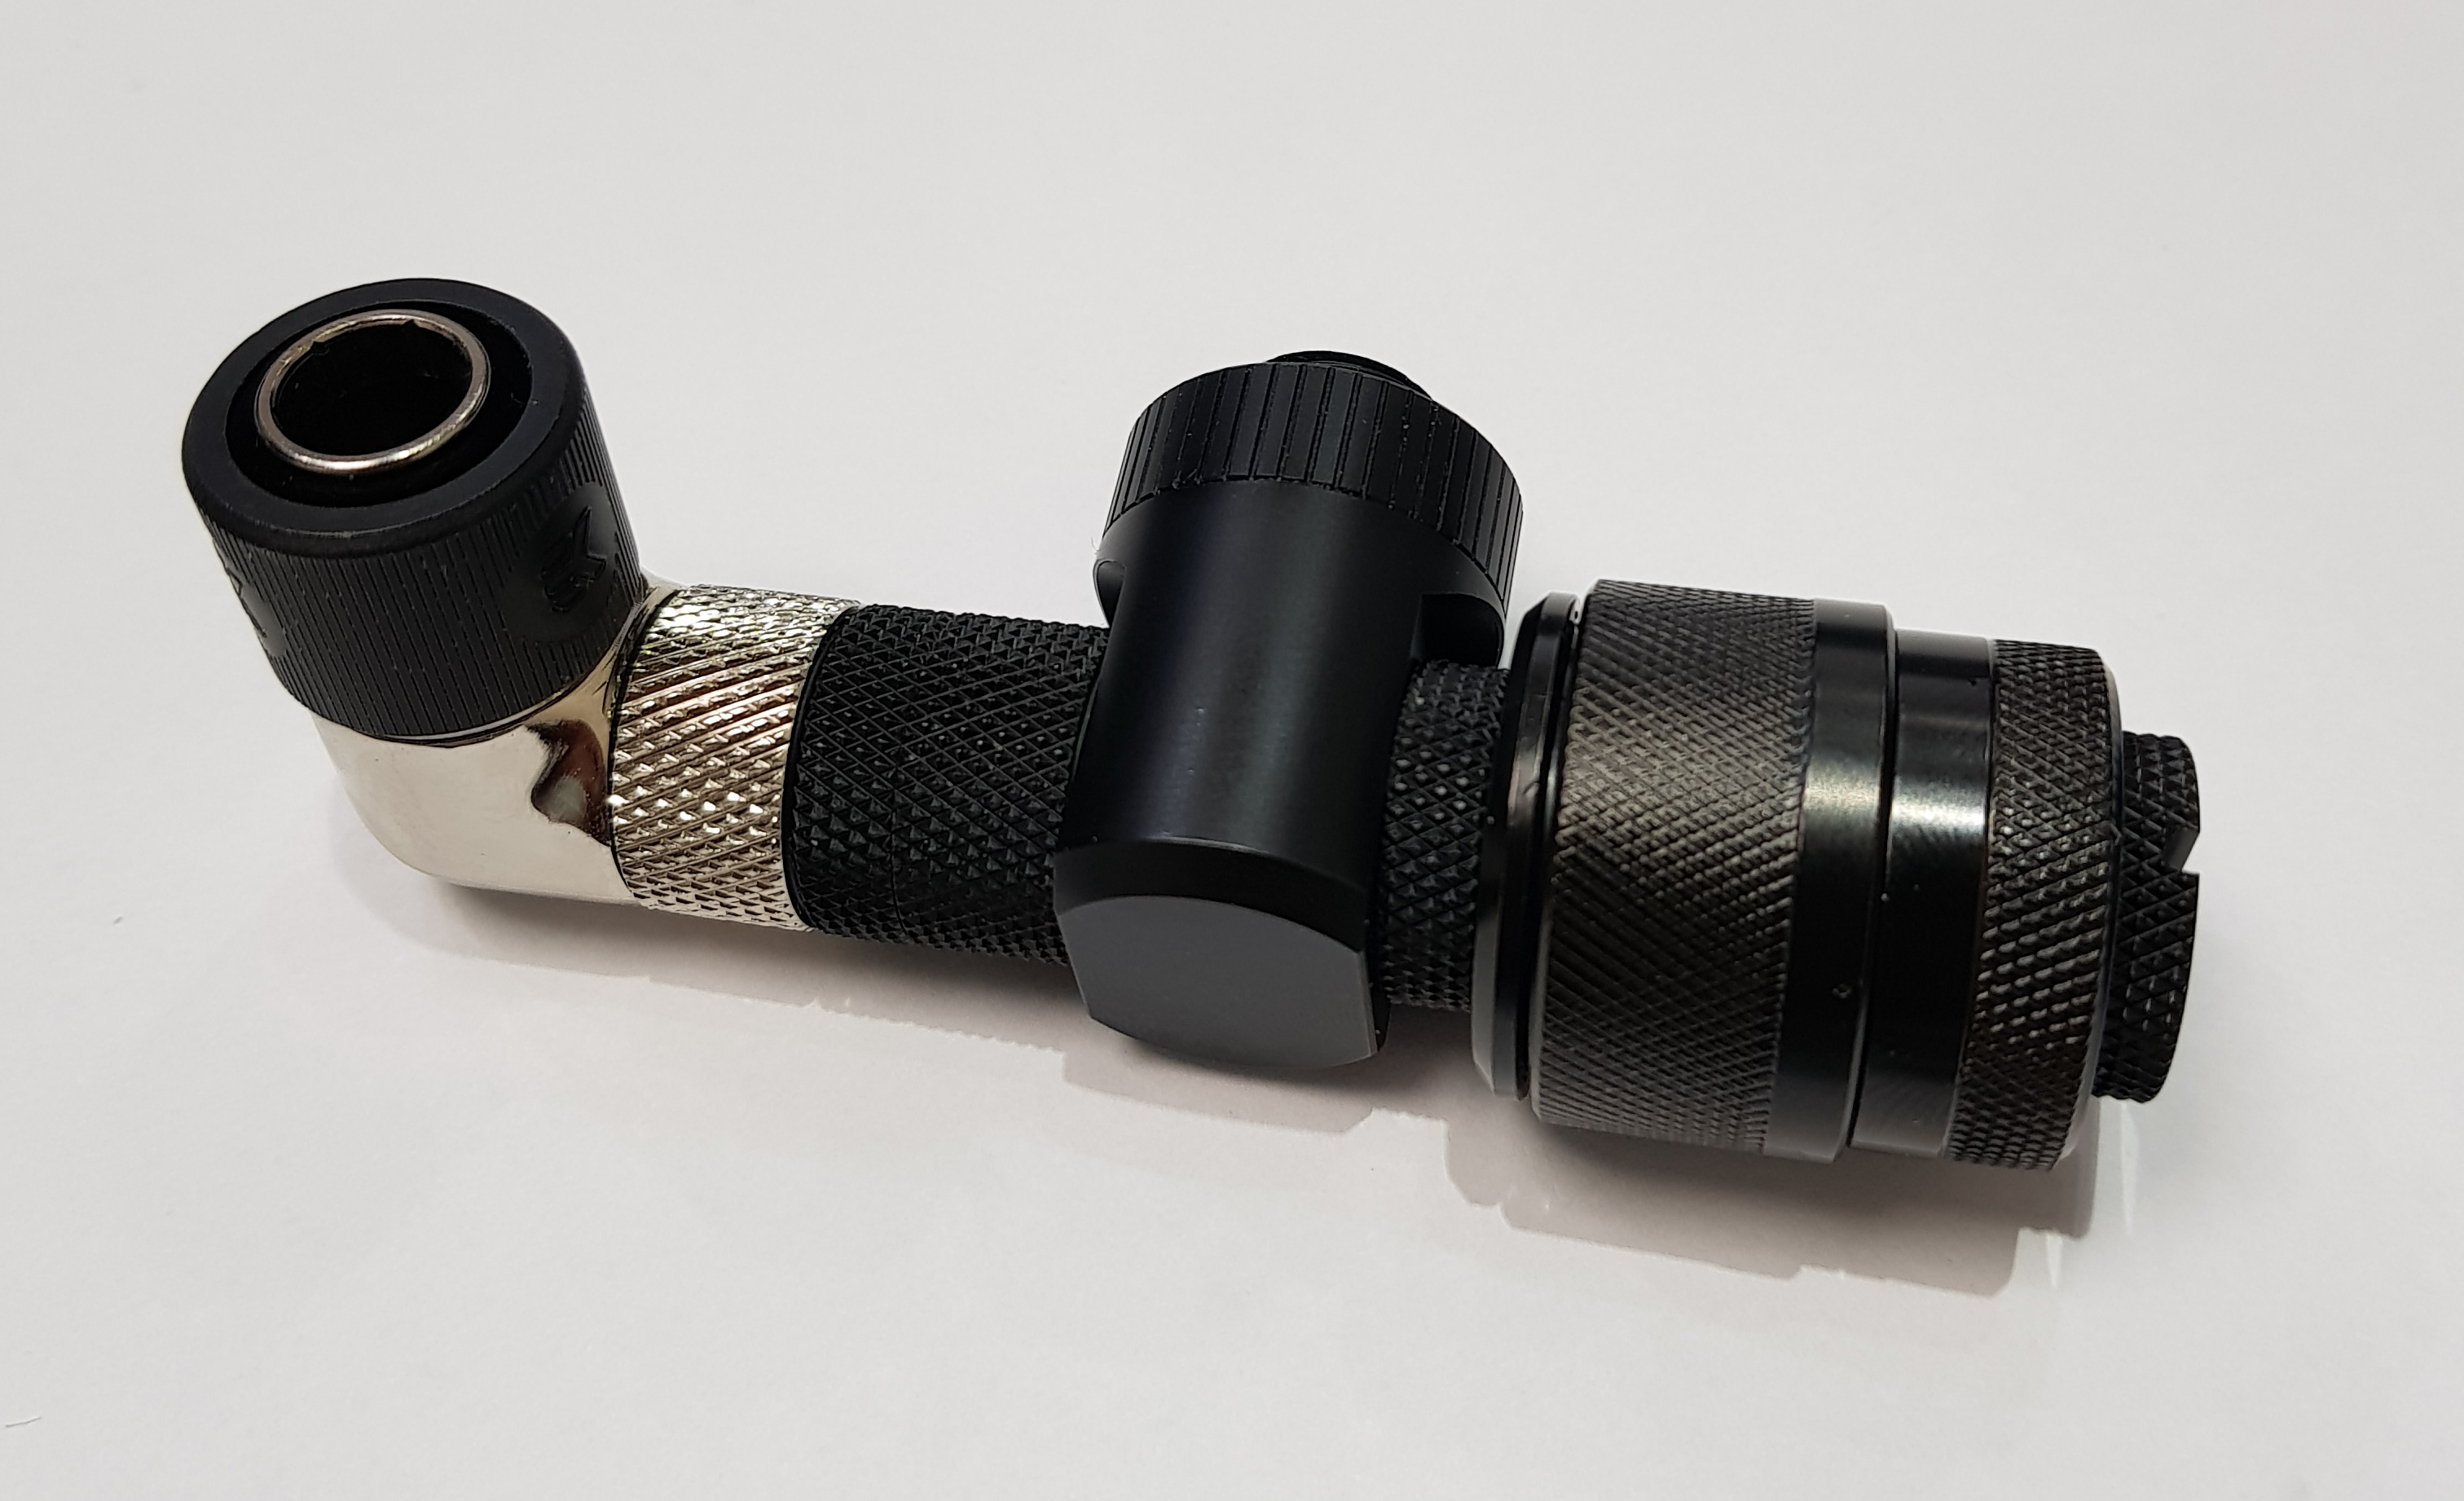
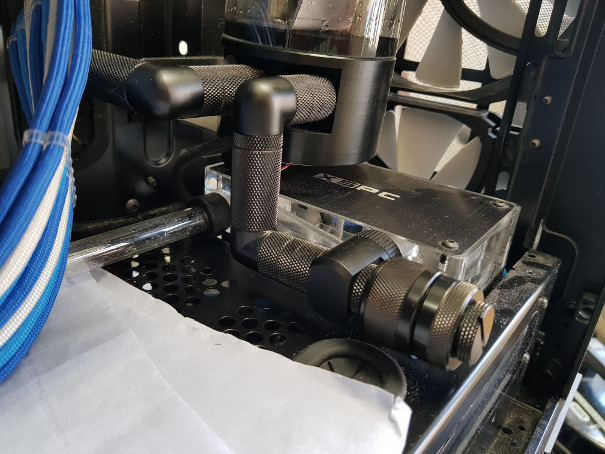
Got the new card in and found - as expected - that the water ports were shifted towards the front of the case. I'd estimated 30mm without taking anything out. Actual shift was 25mm....which I don't think was bad!
The GPU to CPU hardline link fits (fittings rotate) but is now at an angle. Not sure I like that...but equally sure I couldn't be posteriored (substitute your own vocabulary here) to do anything about it.
Pump to GPU link is also hardline and there was nothing to do here except take a saw to it. Well, I could have broken out the heat gun and bent a new one....but I remember it being a joy last time round. 25mm cut off the end and it cracked half way through the cut. Words were uttered that caused the sun to hide behind the clouds. Managed to save it by carefully sawing an extra few mm off the end and then filing it flat. Got away with it too! Just fits.
I had a look at trying to mount an eSATApd port in the back of the case without it being ugly. I have a BluRay drive (read only) connected at the moment and that involves cables out the door currently. Would need to order an eSATAp cable and it ought to work if I start Dremeling slots in the back of the case and making up brackets. I got that far and pretty much lost the will to live to be honest. Pressure test was good so I filled 'er up and moved on!
I'd gone back through this log as a useful and obviously accurate account of how much coolant I'd need for a complete fill....turns out that "accurate" wasn't exactly, well, accurate. Just shy of 2 litres I'd previously said. Nope. An incomplete drain - there were bits left in the bottom somewhere but all the parts I needed to access were clear. In went two litres and.....it's not quite full. Enough to power up though, just needs topping off.
So, just a tiny performance gain then!

So that's a 60% gain in FPS and a 50% gain in score. The only downside is that MS Office now thinks I've pirated it and won't activate. I haven't, by the way. The joys of "Now enter the second block" await!
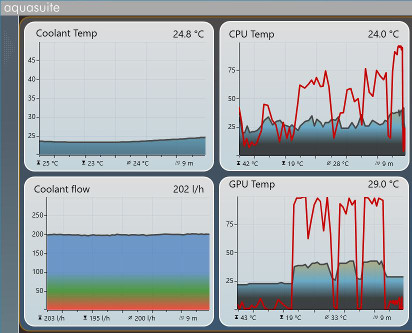
And now the temps. You can see in the GPU graph (blue is temp, red is load) the peaks from demo, gpu test 1, gpu test 2 and then the last bit where there's a peak on the CPU load but not the GPU is the CPU test.
To be fair and honest here, this is from a cold system so the coolant hasn't got up to temp. Currently the coolant is at 29°C....but the fans don't even start until the coolant gets to 36°...and that's only at one third speed. They flip to 'panic mode' (100%) at 37° but I've never seen that happen.
Cleaned up the 980's block. Some corrosion in the last four years. Couple of spots near the seal where it's taken off the nickel plating. Nothing flaky though so it should be good to go.
So, the future involves ordering more coolant to top mine off and enough to replace my wife's coolant when I swap her card. I think I'll also try to treat the Titan to a matching backplate. Although, in a fit or irony, it looks like the only ones that may be available are going to say "1080Ti" on them instead of "Titan X". Ah well.
Well, cheers Andy. Much appreciated.
I cursed my only half-effective drain system again....and then failed to do anything about it....again.
Got the new card in and found - as expected - that the water ports were shifted towards the front of the case. I'd estimated 30mm without taking anything out. Actual shift was 25mm....which I don't think was bad!
The GPU to CPU hardline link fits (fittings rotate) but is now at an angle. Not sure I like that...but equally sure I couldn't be posteriored (substitute your own vocabulary here) to do anything about it.
Pump to GPU link is also hardline and there was nothing to do here except take a saw to it. Well, I could have broken out the heat gun and bent a new one....but I remember it being a joy last time round. 25mm cut off the end and it cracked half way through the cut. Words were uttered that caused the sun to hide behind the clouds. Managed to save it by carefully sawing an extra few mm off the end and then filing it flat. Got away with it too! Just fits.
I had a look at trying to mount an eSATApd port in the back of the case without it being ugly. I have a BluRay drive (read only) connected at the moment and that involves cables out the door currently. Would need to order an eSATAp cable and it ought to work if I start Dremeling slots in the back of the case and making up brackets. I got that far and pretty much lost the will to live to be honest. Pressure test was good so I filled 'er up and moved on!
I'd gone back through this log as a useful and obviously accurate account of how much coolant I'd need for a complete fill....turns out that "accurate" wasn't exactly, well, accurate. Just shy of 2 litres I'd previously said. Nope. An incomplete drain - there were bits left in the bottom somewhere but all the parts I needed to access were clear. In went two litres and.....it's not quite full. Enough to power up though, just needs topping off.
So, just a tiny performance gain then!

So that's a 60% gain in FPS and a 50% gain in score. The only downside is that MS Office now thinks I've pirated it and won't activate. I haven't, by the way. The joys of "Now enter the second block" await!
And now the temps. You can see in the GPU graph (blue is temp, red is load) the peaks from demo, gpu test 1, gpu test 2 and then the last bit where there's a peak on the CPU load but not the GPU is the CPU test.
To be fair and honest here, this is from a cold system so the coolant hasn't got up to temp. Currently the coolant is at 29°C....but the fans don't even start until the coolant gets to 36°...and that's only at one third speed. They flip to 'panic mode' (100%) at 37° but I've never seen that happen.

Cleaned up the 980's block. Some corrosion in the last four years. Couple of spots near the seal where it's taken off the nickel plating. Nothing flaky though so it should be good to go.
So, the future involves ordering more coolant to top mine off and enough to replace my wife's coolant when I swap her card. I think I'll also try to treat the Titan to a matching backplate. Although, in a fit or irony, it looks like the only ones that may be available are going to say "1080Ti" on them instead of "Titan X". Ah well.
Well, cheers Andy. Much appreciated.
Ok, starting to plan the fixes for the things I've bodged. First order of business is a second drain port so I can drain both halves of the loop - the fountain return of the reservoir effectively splits the loop in two so you get the back half (rad, filter, drain port) and the front half (res, pump, GPU, CPU) separated. If you'll excuse the potato drawing, I could do with some opinions and/or other ideas on this one. Do I go with the ideal location (lowest point of the loop) for the drain as (badly!) drawn in blue or do I go with more tucked away and install it on the spare port of the res. That wouldn't be the lowest point (pump would still be full) but it wouldn't be the eyesore I think a drain port pointing straight at the window would....and that's assuming it would fit in the space!
The 'red' route could just be a male to male rotary to a tap and then a stop plug to make sure. Shouldn't even show if it's all in black.
The 'blue' route would have to be some sort of cube splitter (this or this), then a tap and a stop. If there's room a 30 degree fitting would make the tap about level. Can't get a measurement on how long the body of the EK tap is though.
Any thoughts, preferences, better ideas?
Hmmm. You mean drill a hole in the PSU shroud and go down through it? Couldn't easily go through the rubber grommet as it's not in line with the fitting (back edge is about in line with the front edge of the fitting) and there is cabling to the Aquaero immediately below it that would block it. I might get away with a T/cube with the outputs up and down. The up then should just about fit to the res with a 30° fitting on it and the down would go into the rats nest. There's a lot of cabling under there for the Aquaero, Farbwerk, pumps etc but it might work with some flexible tubing with a stop fitting on the end.
I've checked and to remove the shroud from the case would involve pretty much total disassembly since the screw heads are behind the motherboard and I think the pumps would have to come out too. At the risk of sounding like I have something better to do, I'm not sure I can face that much until I'm forced to replace the motherboard at some point in the unspecified future. Might be able to shorten the tap run by putting the tap facing straight towards the door and the 30° fitting at the top though.
I've checked and to remove the shroud from the case would involve pretty much total disassembly since the screw heads are behind the motherboard and I think the pumps would have to come out too. At the risk of sounding like I have something better to do, I'm not sure I can face that much until I'm forced to replace the motherboard at some point in the unspecified future. Might be able to shorten the tap run by putting the tap facing straight towards the door and the 30° fitting at the top though.
Ok, I think I have a compromise.
One of these on the pump inlet:
They seem to be really low profile as the connections are cut into the piece rather than extruded out - if you see what I mean. Also rotary which is a must I've come unstuck on previously!
Then one of these for the drain. Pricier even than an EK tap but it should look less in-your-face without the tap on the top. It just twists for on/off and uses the same principles as a 1/4 turn ceramic tap valve. Obviously a stop plug as a backup!

I already have a low-profile male to male connector to connect tap and T-piece and a selection of fittings (30, 45, 90) if I need to re-work the link to the res. It's not as stealth as I'd like in that OCD sort of way...but it does mean not having to try drilling the shroud in-situ without either drilling through stuff that shouldn't be drilled through or filling things with nice, conductive swarf! Will post pics once stuff arrives. More coolant ordered too - for top-up and for t' wife's PC.
One of these on the pump inlet:
They seem to be really low profile as the connections are cut into the piece rather than extruded out - if you see what I mean. Also rotary which is a must I've come unstuck on previously!
Then one of these for the drain. Pricier even than an EK tap but it should look less in-your-face without the tap on the top. It just twists for on/off and uses the same principles as a 1/4 turn ceramic tap valve. Obviously a stop plug as a backup!
I already have a low-profile male to male connector to connect tap and T-piece and a selection of fittings (30, 45, 90) if I need to re-work the link to the res. It's not as stealth as I'd like in that OCD sort of way...but it does mean not having to try drilling the shroud in-situ without either drilling through stuff that shouldn't be drilled through or filling things with nice, conductive swarf! Will post pics once stuff arrives. More coolant ordered too - for top-up and for t' wife's PC.
No coolant yet but started looking at rebuilding the software side of my wife's PC. It's got a 240GB OCZ Revodrive in it and an i7-2600k so it shouldn't be slow....and...yet...it's...like....treacle. Annoyed me so much I started sorting it out before the coolant arrived.
The plan: out comes the Revodrive, in goes the Muskin Scorpion you can fry eggs on, install Windows 10 afresh. Worry about changing graphics cards later when the coolant arrives.
The reality: What, you're surprised it's going to be different?! The reservoir is mounted such that it blocks removal of the RevoDrive from the lowest slot. Moving the res and swapping out that card eventually led to me having to drain part of the loop - and mop coolant off the desk, my trousers, the usual. Not loads but enough to cause....frustration. So, cards swapped, loop adjusted to fit, leak tested and Windows reinstalled. Disk performance varies by benchmark test but anywhere from 2 to 6 times improvement.
What was learned: If QDCs are used to make the rear panel-mounted rad removable for access, and you've disconnected the one that's directly connected to the pump outlet.....no amount of blowing or pipe-squeezing is going to get that pump primed! Doh!
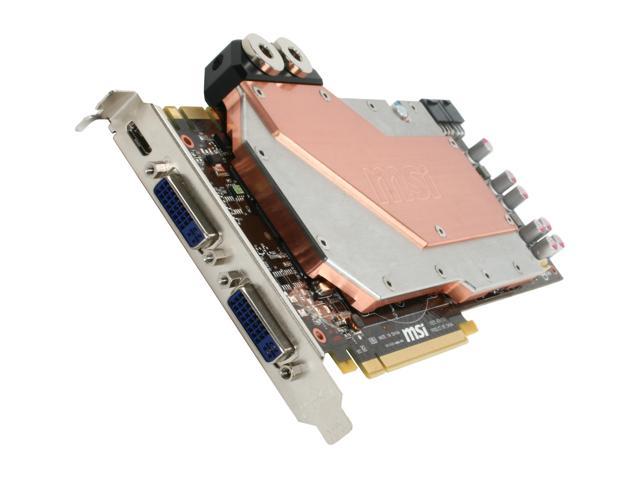
The leftovers: This now means I have a spare MSI GTX580 Hydrogen O/C. If this is of use to anyone, I'll happily post it to them for the cost of the carriage. I know it's an older card but who knows what you guys can make use of....better than letting it rot in a box. Looks like this one (port on the left is mini HDMI - can chuck in a mini HDMI to HDMI cable if needed):
The plan: out comes the Revodrive, in goes the Muskin Scorpion you can fry eggs on, install Windows 10 afresh. Worry about changing graphics cards later when the coolant arrives.
The reality: What, you're surprised it's going to be different?! The reservoir is mounted such that it blocks removal of the RevoDrive from the lowest slot. Moving the res and swapping out that card eventually led to me having to drain part of the loop - and mop coolant off the desk, my trousers, the usual. Not loads but enough to cause....frustration. So, cards swapped, loop adjusted to fit, leak tested and Windows reinstalled. Disk performance varies by benchmark test but anywhere from 2 to 6 times improvement.
What was learned: If QDCs are used to make the rear panel-mounted rad removable for access, and you've disconnected the one that's directly connected to the pump outlet.....no amount of blowing or pipe-squeezing is going to get that pump primed! Doh!
The leftovers: This now means I have a spare MSI GTX580 Hydrogen O/C. If this is of use to anyone, I'll happily post it to them for the cost of the carriage. I know it's an older card but who knows what you guys can make use of....better than letting it rot in a box. Looks like this one (port on the left is mini HDMI - can chuck in a mini HDMI to HDMI cable if needed):
Well, I've got one of the two litres of coolant from OCUK and the T-piece. Now had a delay notification on the other delivery as they cannot find the drain valve in the warehouse. Given their site now says stock expected 30/4 this may take a while! Gah, anyone would think there was some sort of pandemic disrupting things! ")
Liking the idea of human malware! It's ironic though, you finally have time (and motivation) to do these things....but no parts. For one of the mini projects I'm planning (just many of those small things you know you ought to get round to but haven't previously been bothered) I'm actually going to make the right screws rather than buy them as stuff just isn't turning up in any sort of predictable timeframe. Don't get me wrong, I'm not whinging at OCUK or anyone else that's trying to stay working as a business when I say any of this...it's just....ah, well you guys of all people understand already. Sometimes you just need toys to play with 
To be honest Nigel, you're coming from somewhere that's not all that dissimilar. Back when watercooling a PC was something that only lunatics did, a lot of the pumps were things like Eheim and Iwaki - which are probably familiar names to you.
There's no reason, functionally, that you can't use fairly similar plastic tube (just needs to no leach plasticisers into the coolant) and compression fittings for a build. Compression fittings are generally rock-solid for reliability with the only gotcha I can think of being that if a piece of hose twists the fitting and loosens the o-ring enough for it to leak there. The reason for less reliable connectivity isbecause we like living on the edge! purely aesthetics, experimentation. Technically there are losses for every bend in the system. These are measurable as you can see if you read Martin's Liquid Lab's tests (frustratingly the image has been lost to time) but generally the very minor drop in performance is outweighed by the gains in aesthetics and not having tangles of tubing. I would suspect the loses of such bends are more of an impact when you're talking much higher flow rates that I'm guessing could be relevant to a large aquarium. For reference, I'm pushing about 200 l/h and I could manage closer to 300 at max. That's more than I need so I turn it down to reduce noise.
I've done builds long ago before there was as much choice and it's perfectly possible to do it with just barbs (and something like jubilee clips to retain them for paranoia's sake) and hose to get round the bends. It works but doesn't always look pretty. Point is if you have some of the relevant aquarium gear, you could have a dabble without as much outlay. The rules are simply what you're happy with and what works. I contemplated going through a wall at one point so all the pump and fan noise was the other side of an insulated wall
I can't imagine my marriage surviving 100 gallons of leakage! Well done for getting away with it!
There's no reason, functionally, that you can't use fairly similar plastic tube (just needs to no leach plasticisers into the coolant) and compression fittings for a build. Compression fittings are generally rock-solid for reliability with the only gotcha I can think of being that if a piece of hose twists the fitting and loosens the o-ring enough for it to leak there. The reason for less reliable connectivity is
I've done builds long ago before there was as much choice and it's perfectly possible to do it with just barbs (and something like jubilee clips to retain them for paranoia's sake) and hose to get round the bends. It works but doesn't always look pretty. Point is if you have some of the relevant aquarium gear, you could have a dabble without as much outlay. The rules are simply what you're happy with and what works. I contemplated going through a wall at one point so all the pump and fan noise was the other side of an insulated wall
I can't imagine my marriage surviving 100 gallons of leakage!
Well done for getting away with it!Delidding is a fairly extreme place to start but if it's a CPU that potentially you don't mind killing, it's not that hard. Just make sure it isn't a CPU that's got the IHS (lid) soldered onto the die first. Personally I went with the razor blade technique - you have to be a little bit careful you don't slip and slice your fingers off but I couldn't justify buying the delidding tool to use just once. The liquid metal paste is good for under the IHS but I'd recommend something to insulate any exposed contacts on the top of the CPU wafer. Clear nail varnish worked for me.
If it's just a practice, there's nothing that says you even have to build it in a case. Just make sure nothing shorts out the bottom of the board and that nothing falls onto the board or into a fan and you can get to grips with things and test performance without having to make it fit a case.
If it's just a practice, there's nothing that says you even have to build it in a case. Just make sure nothing shorts out the bottom of the board and that nothing falls onto the board or into a fan and you can get to grips with things and test performance without having to make it fit a case.
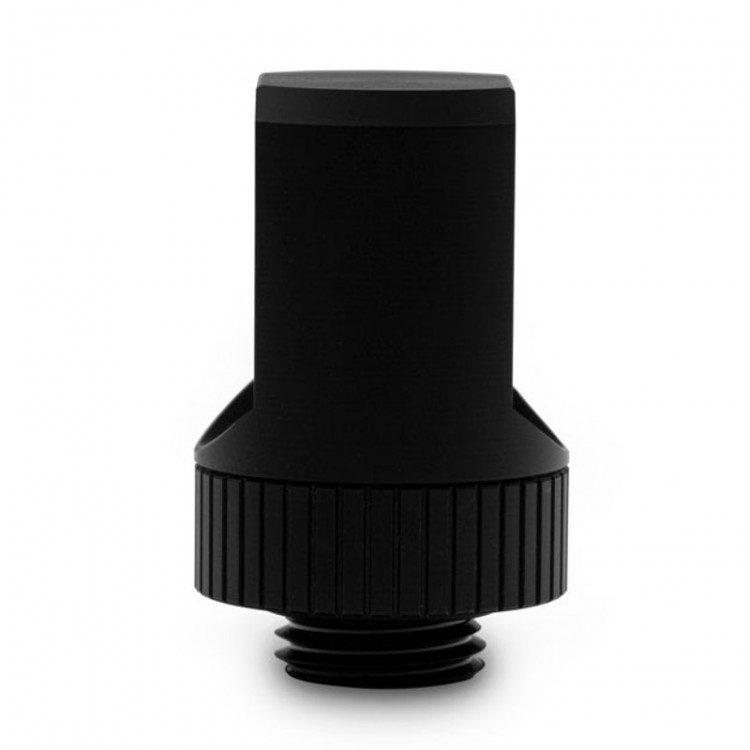
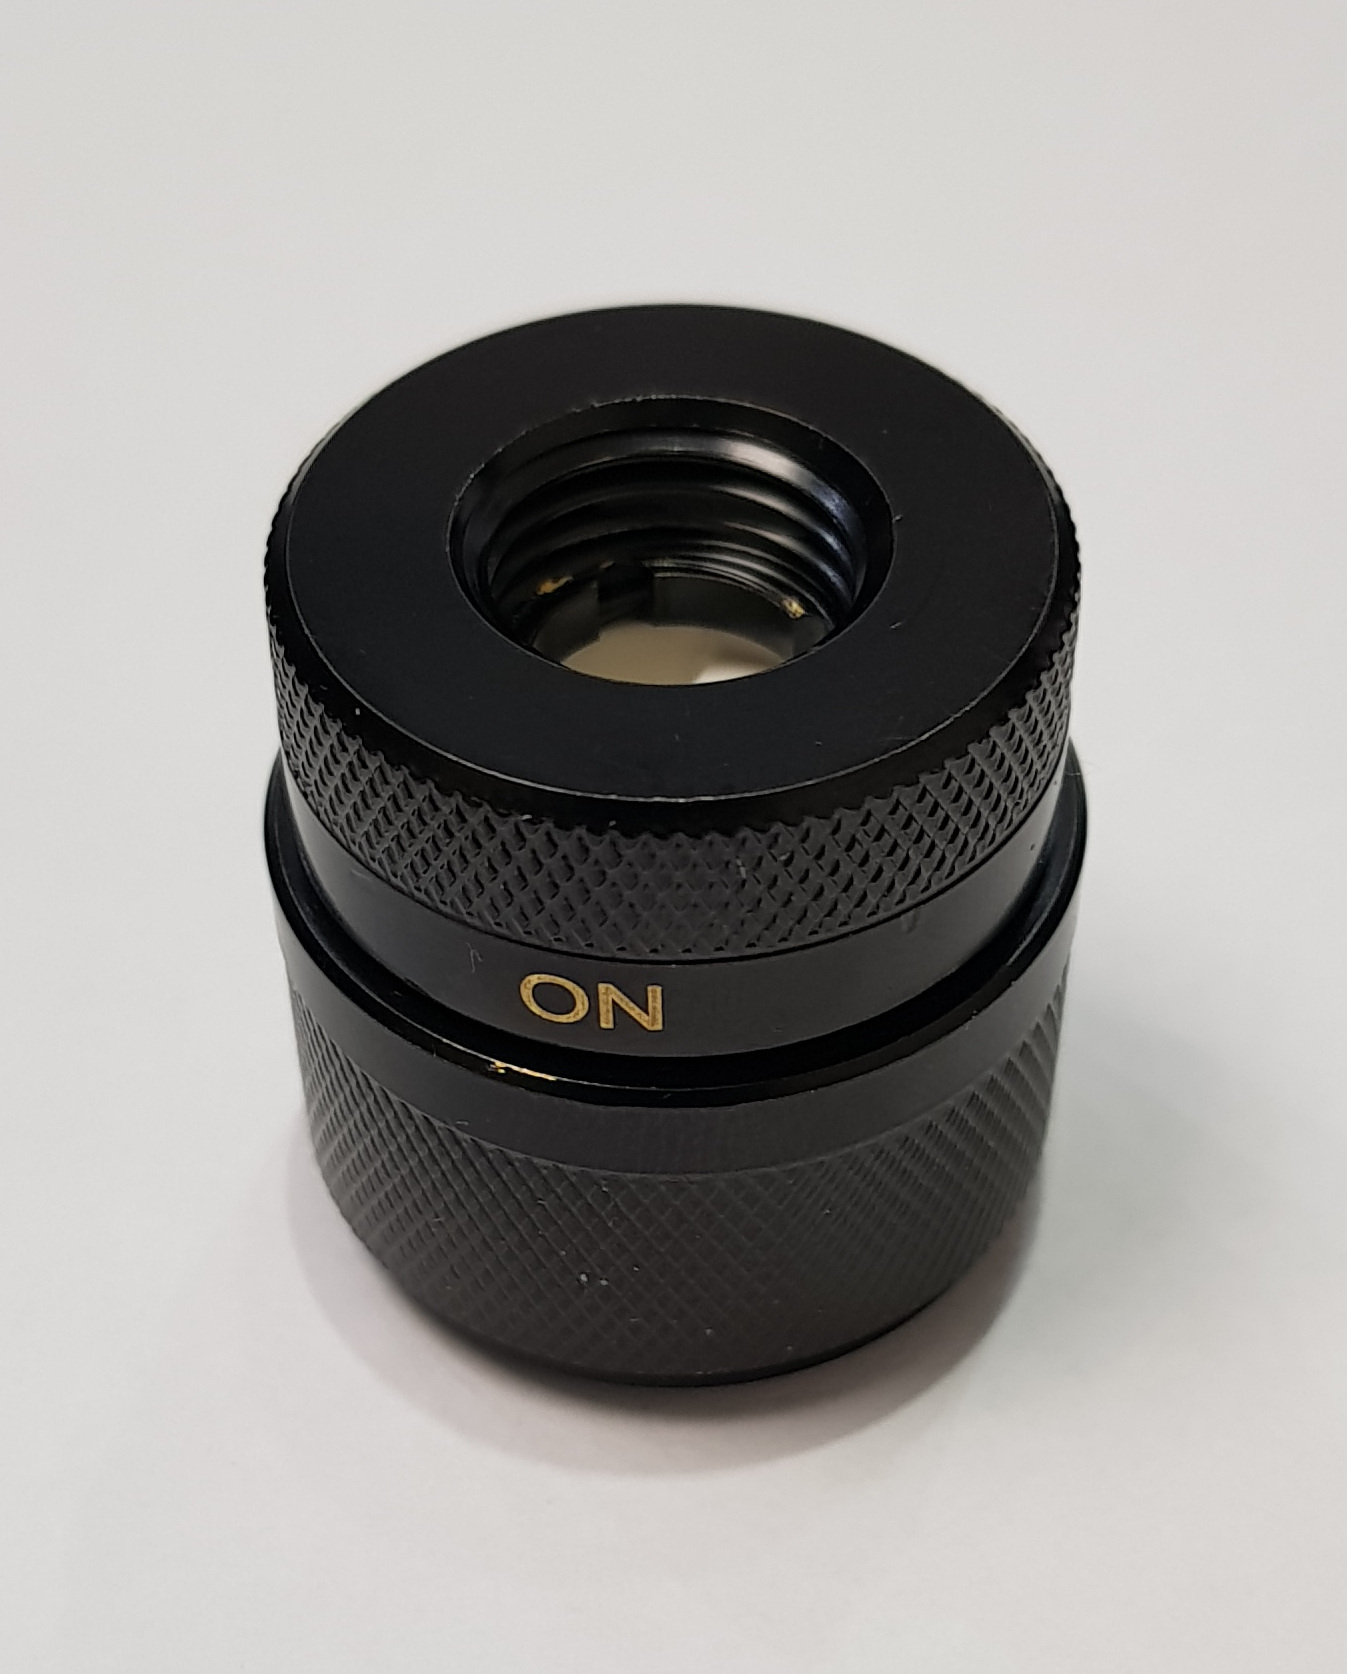
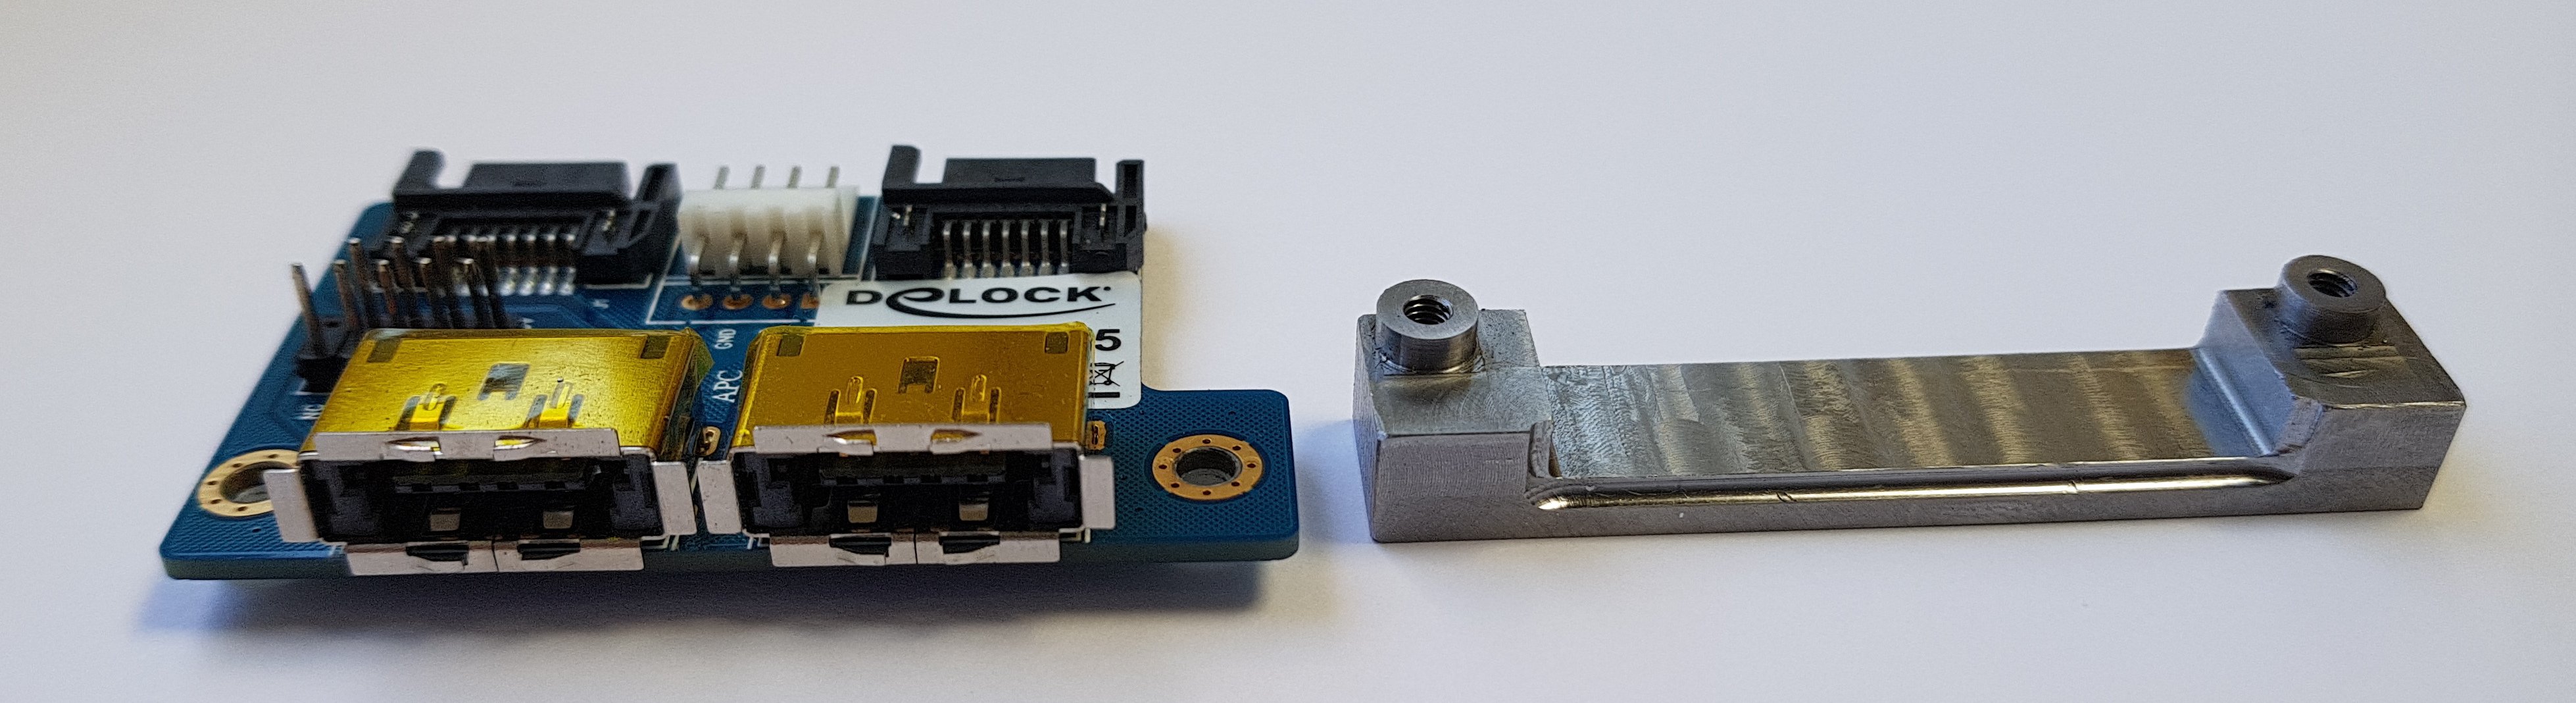
Postie arrived today carrying a new backplate and these:

For those in space-constrained builds, that's 28.65mm long and 28.06mm at it's widest diameter. Female threads both ends, so you'll need a coupler. This one's 5mm and gives me something like this:
The silver fitting is just a mock-up as the black version is currently full of coolant. It's going to be a case of fiddling around with that side to see what fits best: this is one option but I could also go with two swivel 90's (to get adjustable angle in that plane) or a 60° fitting that I could rob out my wife's machine. Worst case, I could make it all from fittings but I'd prefer to avoid that lest it transfer pump vibration into the res and that act as an amplifier. Will post pics when I get as far as having drained it....to fit a drain port, nope, the irony is not lost on me!
Yesterday I thought I'd just slap the backplate on the Titan while is still in place. Nope, ONE screw that's sheltered under the motherboard and just too close to get anything on it to undo it.
So this afternoon I set abouttrying to cover the carpet in coolant draining it....again. This time, I'm saving the coolant as it's only a couple of weeks old....but this time I have another bottle so the res won't end up half empty!
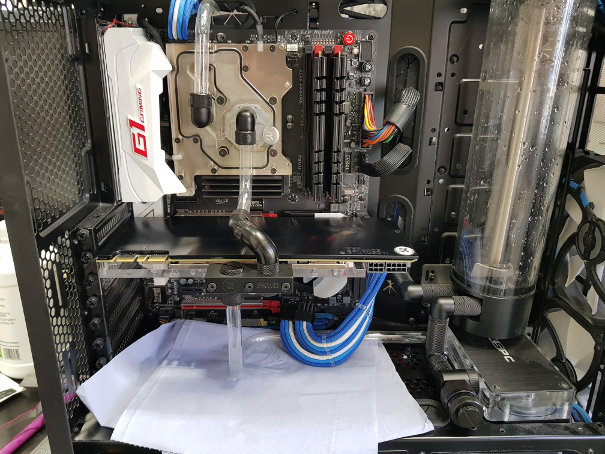
So: card out, backplate on and fittings adjusted so that CPU to GPU link isn't at a weird-looking angle.
Drain port is in and Dr Drop is on the case overnight.
I'd hoped to get at least a short length of hose between res and pump to absorb vibration. Wasn't going to happen though. Rather than being a totally rigid chain of fittings though I got a Narrow D Plug in there which is essentially two cylinders that slot into each other and seal with a pair of o-rings. Might hopefully absorb some vibration....and also, it's about half a mm longer than the rigid version. Yup things are that tight again.
Hoping tomorrow that I might be able to cut some eSATAp ports into the back of the case. I could do with a neat way of connecting an optical drive (once the cable arrives) and I don't really want it mounted in a PCI slot as it'll look ugly with four cables hanging off it.
So this afternoon I set about
So: card out, backplate on and fittings adjusted so that CPU to GPU link isn't at a weird-looking angle.
Drain port is in and Dr Drop is on the case overnight.
I'd hoped to get at least a short length of hose between res and pump to absorb vibration. Wasn't going to happen though. Rather than being a totally rigid chain of fittings though I got a Narrow D Plug in there which is essentially two cylinders that slot into each other and seal with a pair of o-rings. Might hopefully absorb some vibration....and also, it's about half a mm longer than the rigid version. Yup things are that tight again.
Hoping tomorrow that I might be able to cut some eSATAp ports into the back of the case. I could do with a neat way of connecting an optical drive (once the cable arrives) and I don't really want it mounted in a PCI slot as it'll look ugly with four cables hanging off it.
Ok, some progress, some plans and some fails.
Got the GTX 1080 Ti backplate delivered and clad the Titan X Pascal in it. Yes, I know it's got the wrong name engraved on it but there's very little of such old stock available and beggars it seems can't be choosers. It fits, it looks nice and it gives it some protection.
I just need to take it all out again and fit the last screw I missed out *sigh*
So, on to the drain. First I tried to get it all to link up with a short section of soft tubing as it was previously. This is just for vibration absorbtion between pump and res - don't want the res acting like a sound box and amplifying the sound. Well, that failed. Just not enough space. So I tried a hard link with a Barrow D-Plug in there which is essentially two cylinders that slide into each other sealed with a pair of O-rings. This short video (8 MB) shows that fail under pressure testing from Dr Drop.
D-Plug Fail video 8 MB
So this is the current link that works. Hopefully it won't cause too much noise - the pump can still move on its mounts so I don't think it's too rigid.
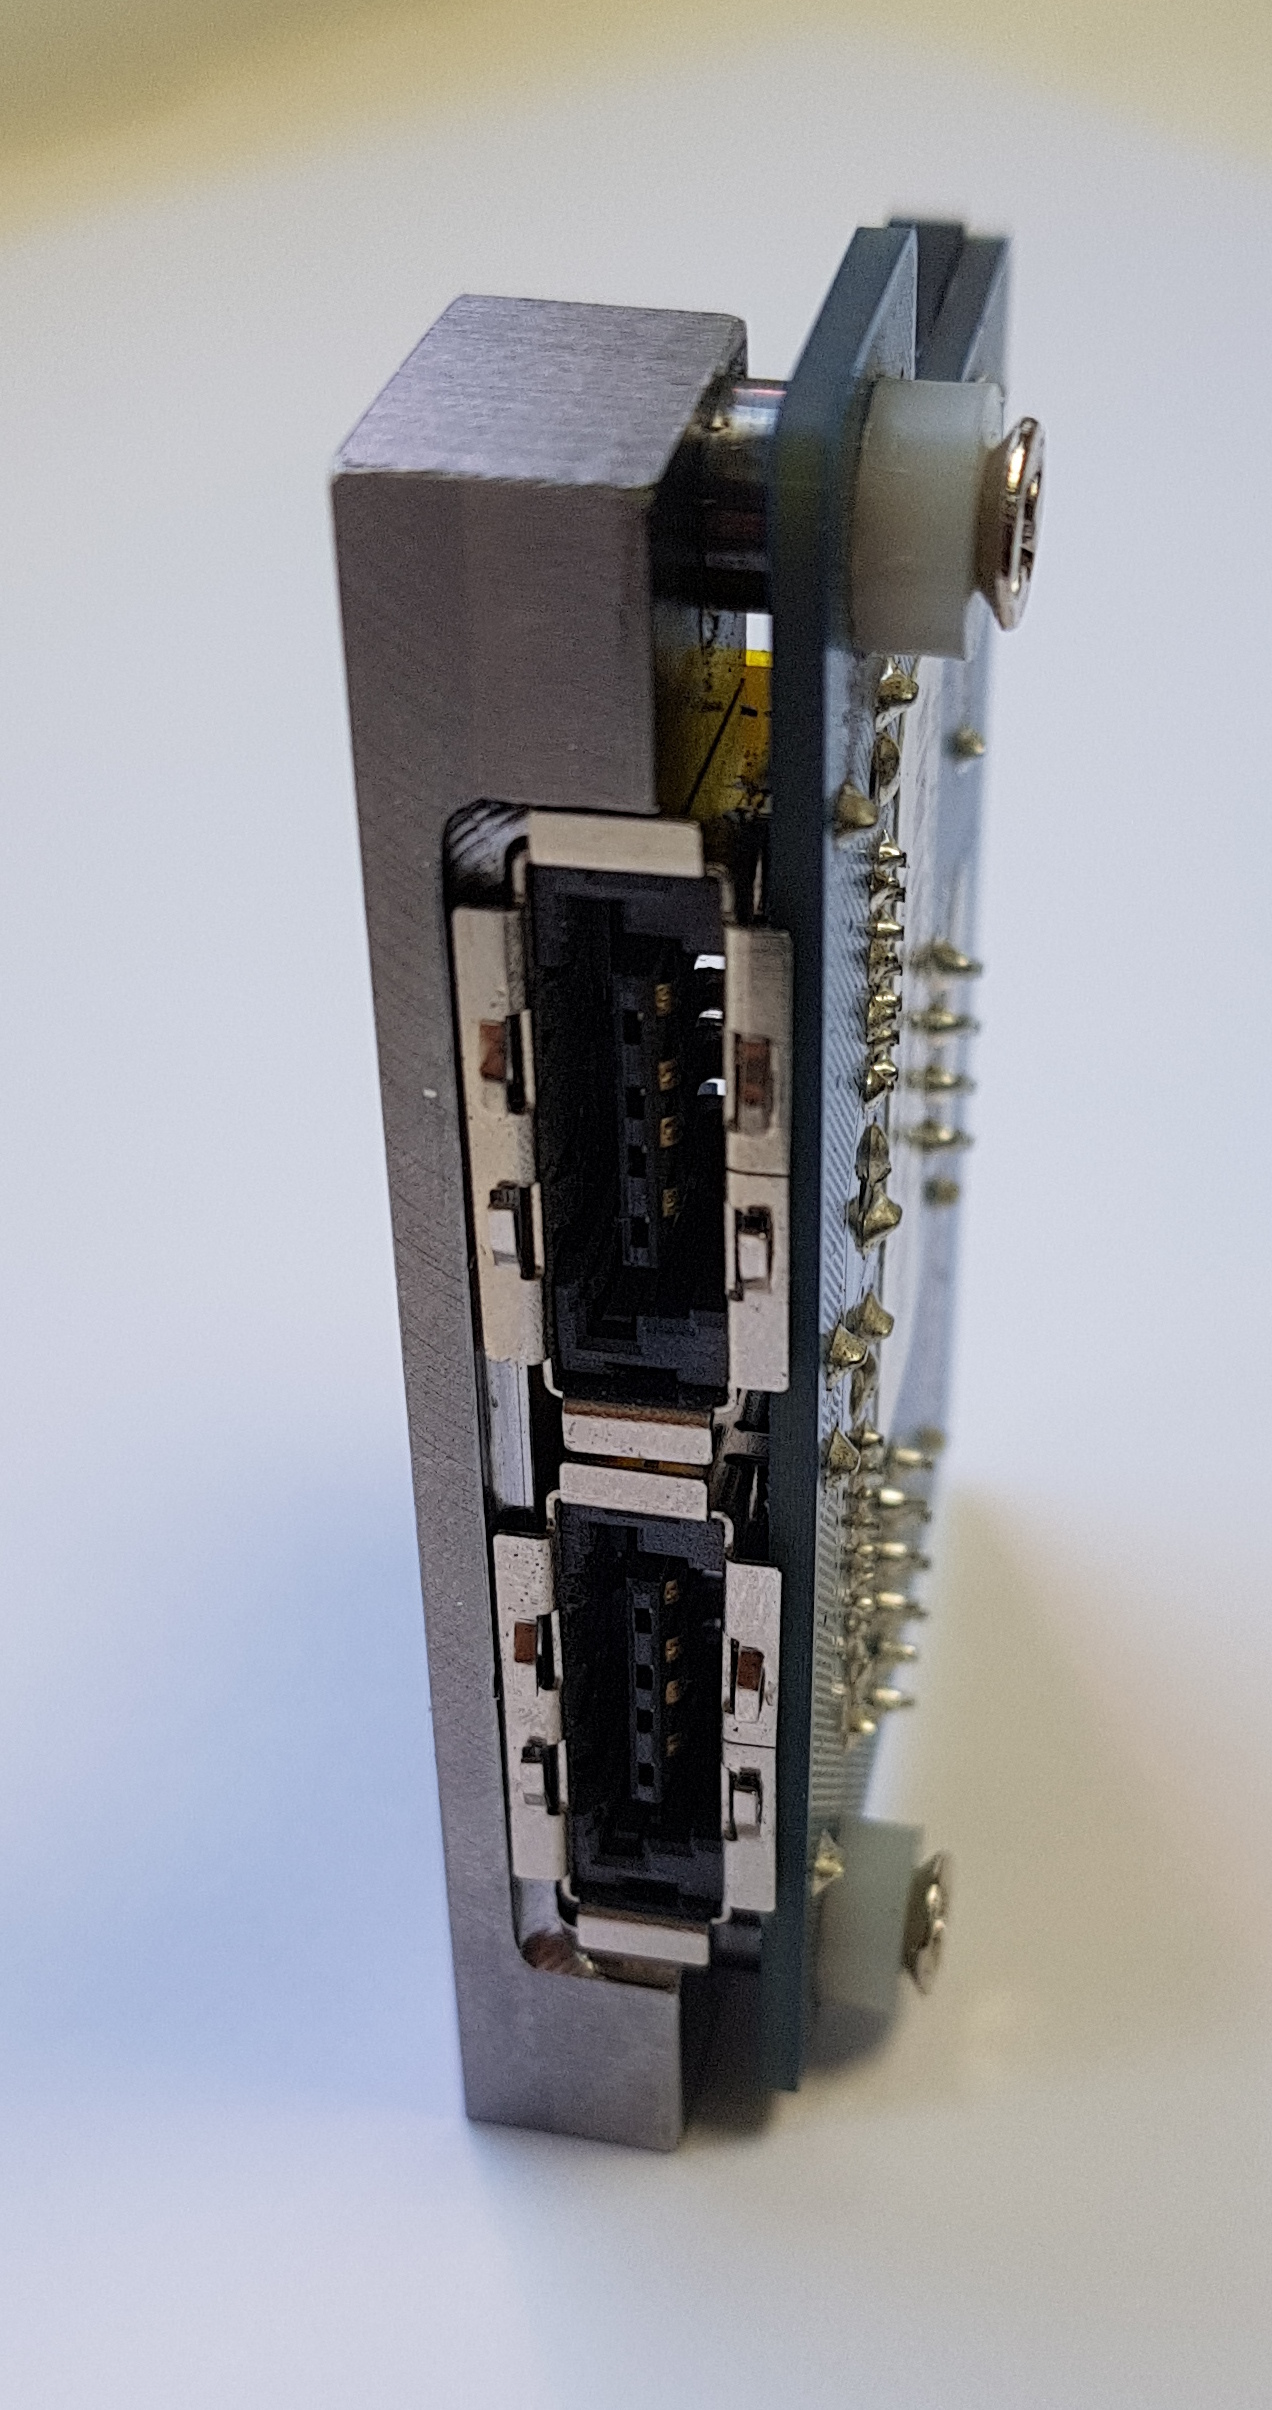
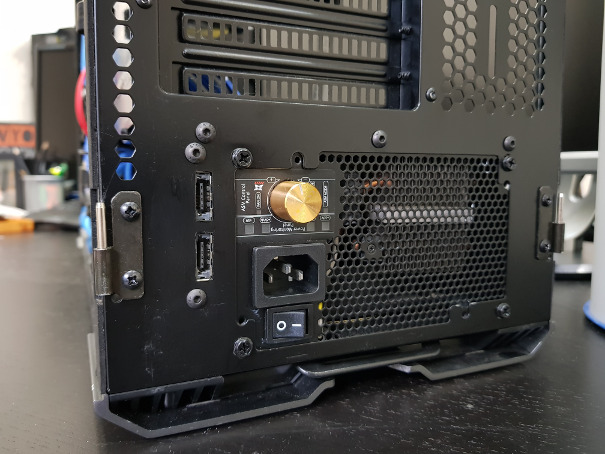
Next up, I want to add some eSATAp ports. This should, in theory, allow me to connect a SATA BluRay drive as and when needed. Currently it means hanging the cables out the door to plug in....which isn't great. eSATAp carries USB (you can use them as additional USB ports which could be a bonus) as well as SATA and in this case (not all ports do) both 5V and 12V so it should run the optical drive.
It comes with a slot mount but with four cables hanging off it (floppy power, USB and two SATA) it's....well, it's ugly and I've put a fair amount of effort into making things not ugly. So the plan is to mount it in the back of the case between the PSU and the rad. There should be JUST enough space.
I've taken the plate off and made up a steel bracket. This will mount to the inside of the case and holes will be drilled and tapped (threaded) into it once it's in place.


I was going to use the slot-mount plate as a filing guide for the port holes in the back of the case.....but I managed to screw up and it got chewed through the rollers in the band saw. On the plus side, it could have been chunks of me so all in all, I think I got out of that one fairly lightly. In theory there may be a spare low-profile plate I can use but the chances of having it and finding it seem slim.....so I've called Beer O'clock and stepped away from the machinery for today!
Got the GTX 1080 Ti backplate delivered and clad the Titan X Pascal in it. Yes, I know it's got the wrong name engraved on it but there's very little of such old stock available and beggars it seems can't be choosers. It fits, it looks nice and it gives it some protection.

I just need to take it all out again and fit the last screw I missed out *sigh*
So, on to the drain. First I tried to get it all to link up with a short section of soft tubing as it was previously. This is just for vibration absorbtion between pump and res - don't want the res acting like a sound box and amplifying the sound. Well, that failed. Just not enough space. So I tried a hard link with a Barrow D-Plug in there which is essentially two cylinders that slide into each other sealed with a pair of O-rings. This short video (8 MB) shows that fail under pressure testing from Dr Drop.
D-Plug Fail video 8 MB
So this is the current link that works. Hopefully it won't cause too much noise - the pump can still move on its mounts so I don't think it's too rigid.

Next up, I want to add some eSATAp ports. This should, in theory, allow me to connect a SATA BluRay drive as and when needed. Currently it means hanging the cables out the door to plug in....which isn't great. eSATAp carries USB (you can use them as additional USB ports which could be a bonus) as well as SATA and in this case (not all ports do) both 5V and 12V so it should run the optical drive.
It comes with a slot mount but with four cables hanging off it (floppy power, USB and two SATA) it's....well, it's ugly and I've put a fair amount of effort into making things not ugly. So the plan is to mount it in the back of the case between the PSU and the rad. There should be JUST enough space.
I've taken the plate off and made up a steel bracket. This will mount to the inside of the case and holes will be drilled and tapped (threaded) into it once it's in place.
I was going to use the slot-mount plate as a filing guide for the port holes in the back of the case.....but I managed to screw up and it got chewed through the rollers in the band saw. On the plus side, it could have been chunks of me so all in all, I think I got out of that one fairly lightly. In theory there may be a spare low-profile plate I can use but the chances of having it and finding it seem slim.....so I've called Beer O'clock and stepped away from the machinery for today!
Ok, some semblance of sanity has returned and I've actually got a *spoilers* functioning PC again. eSATAp ports fitted and working. Even found the long eSATAp cable I was convinced I had but couldn't find.....after I'd ordered a replacement, obviously!
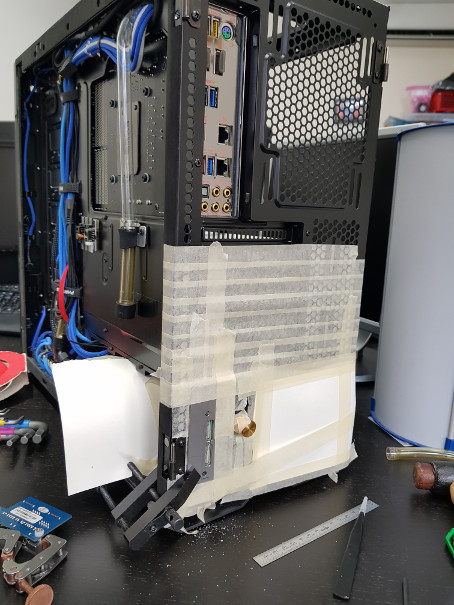
So, to cut chunks out of your case, you should obviously first remove all electronics because the swarf (metal filings) will conduct and short circuit things that could be expensive. So, with that in mind, I masked everything up, cut it, hoovered out well and prayed! Do as I say, not as I do does seem to be the mantra of the times, no?!
New filing template was made out of 2mm stainless steel. Did it need to be stainless? Nope, but that's what I had. Clamped and taped it on in an insufficient fashion, drilled out the two holes and then bolted it on properly!
Drilled out the bulk of the rectangles, joined the holes with a Dremel and a carbide burr and then filed until I'd got this:

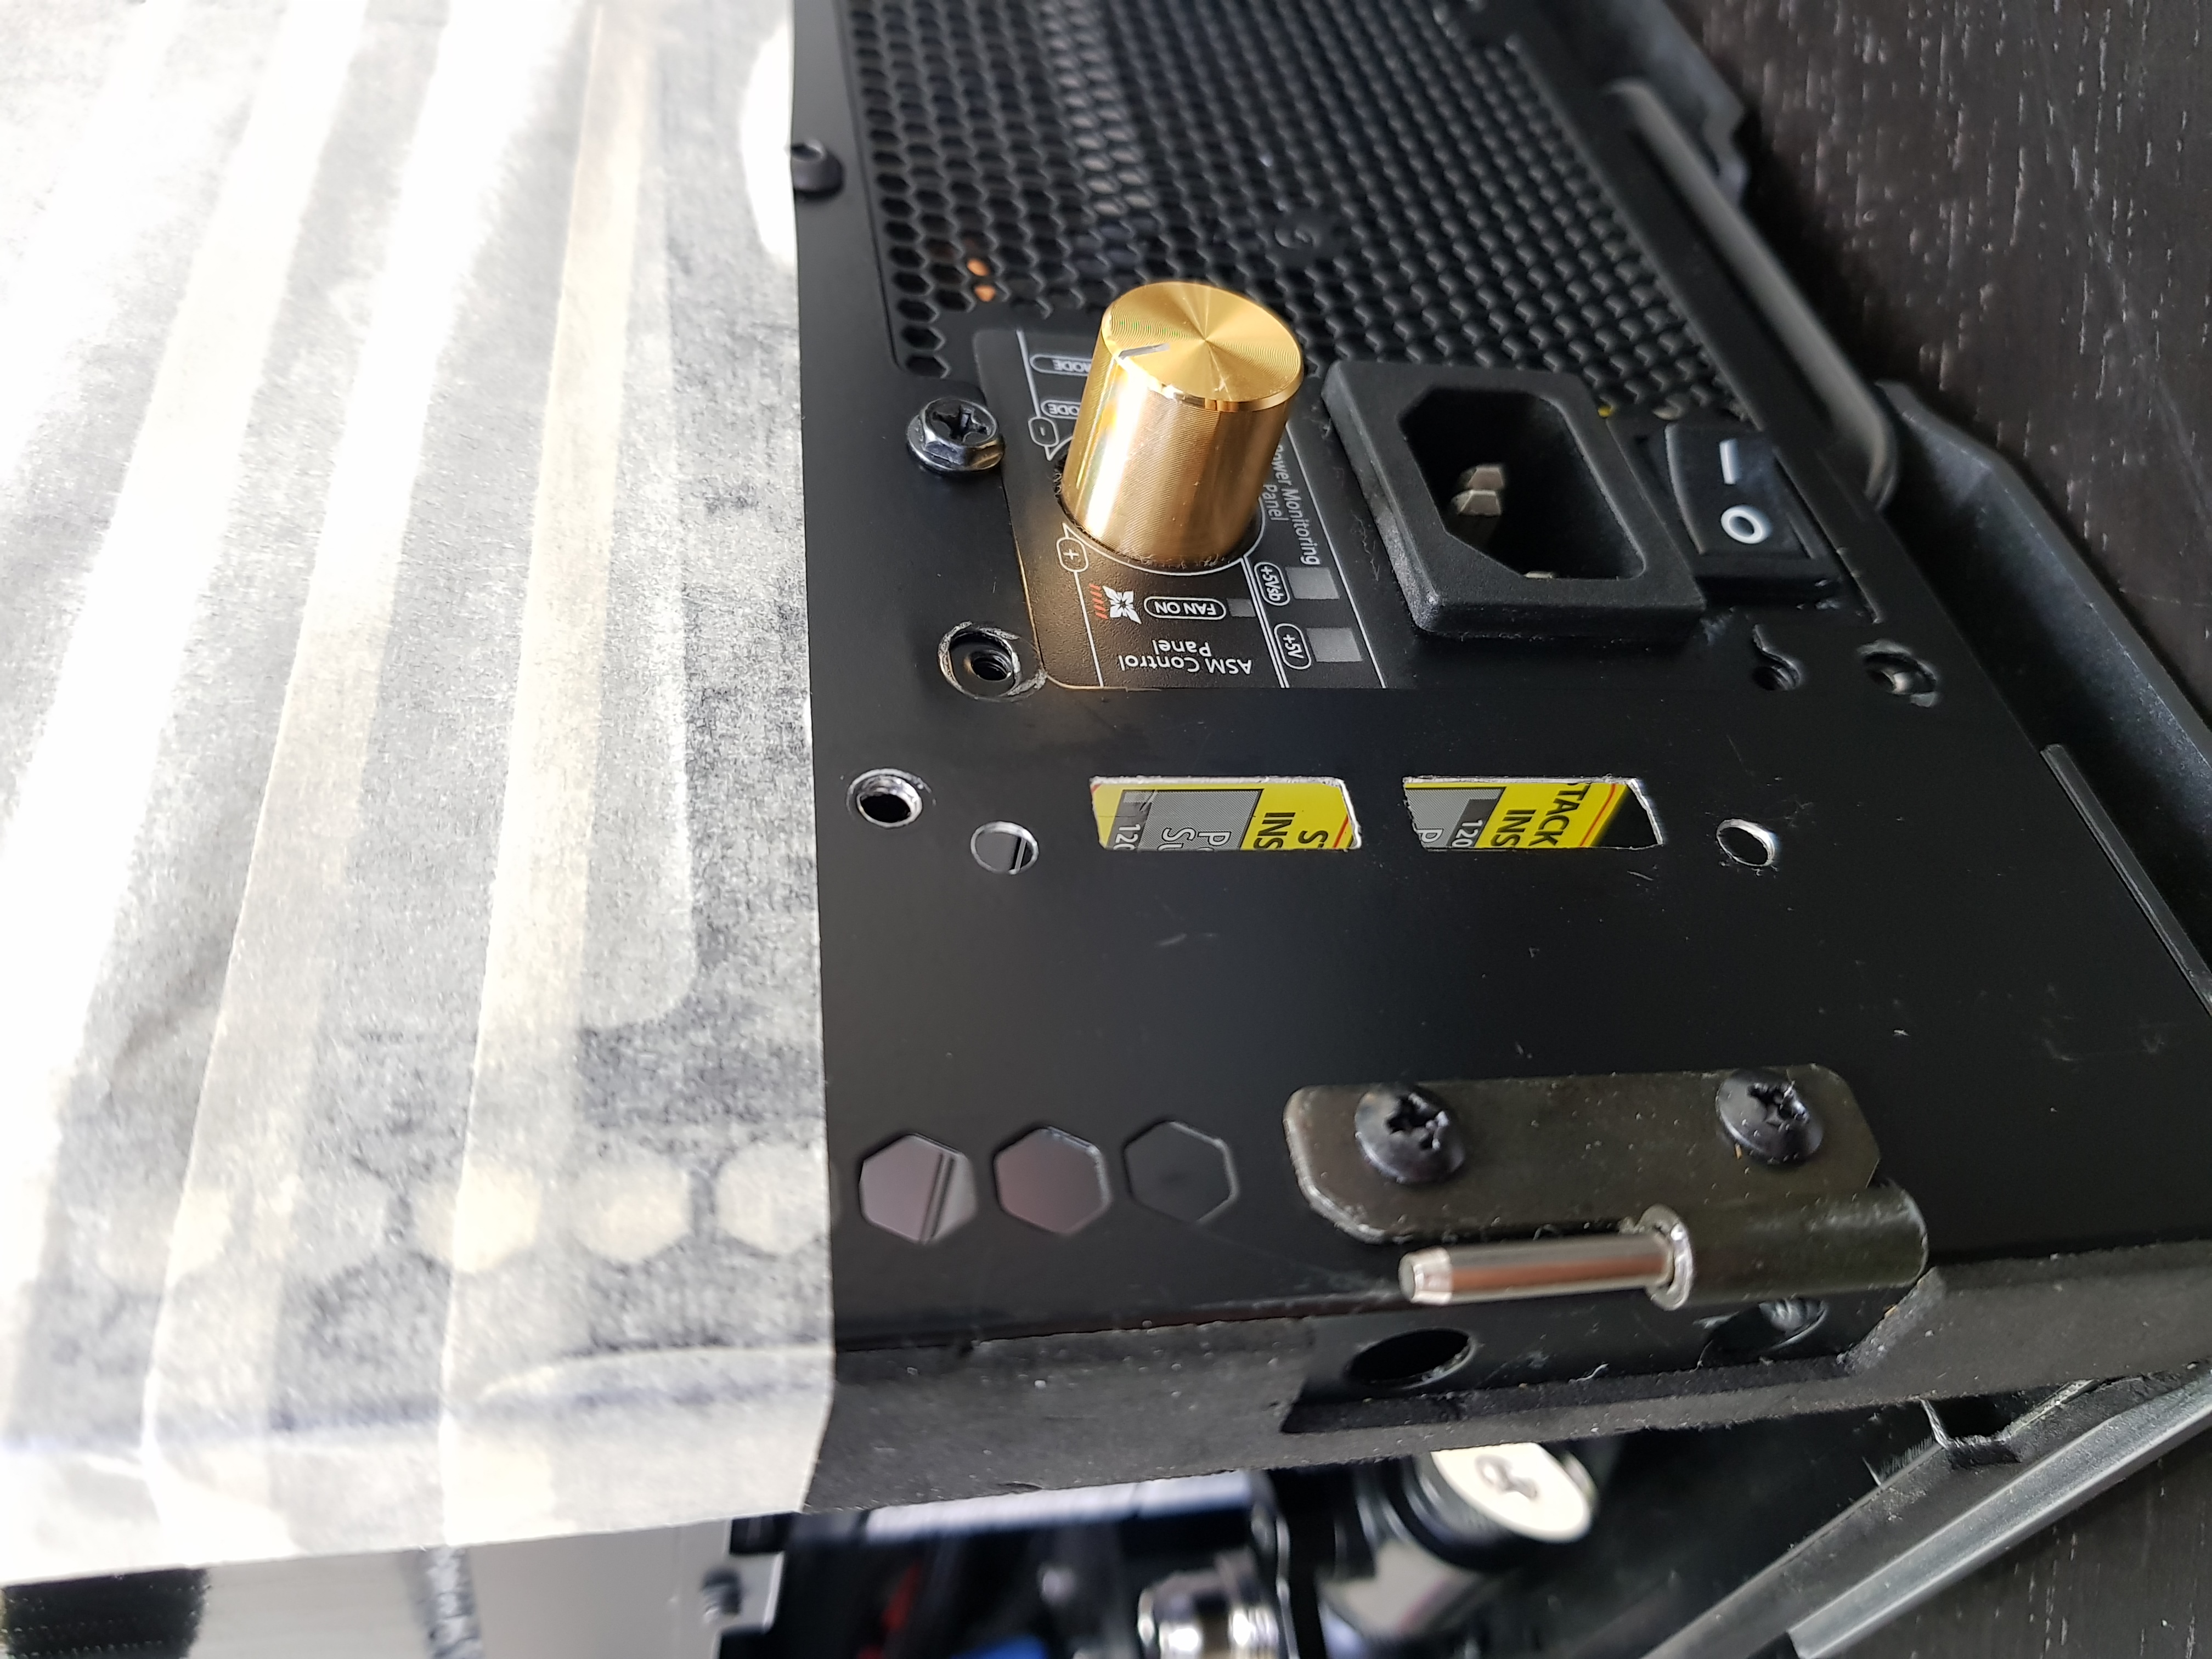
Painted the edges and screwed in the module:
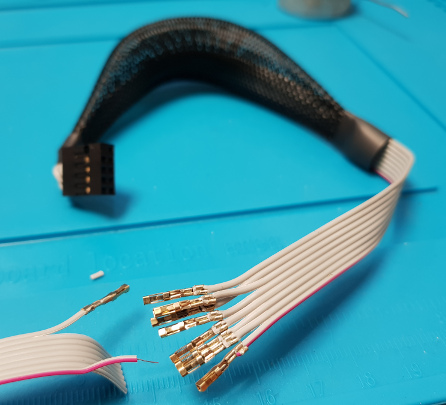
Module came with an internal USB header (eSATAp ports also carry USB - you can plug a USB device or eSATA device) but it was too long and ugly. Cut it down and then found out just how thin the wire is! It's 0.2mm but at least it's solid not stranded....or you could argue that it is stranded, but just one of 'em! So these crimps were a joy to do. Used the Engineer (brand) crimps again that do just one pair of wings at a time....fiddly but they do get a decent connection.
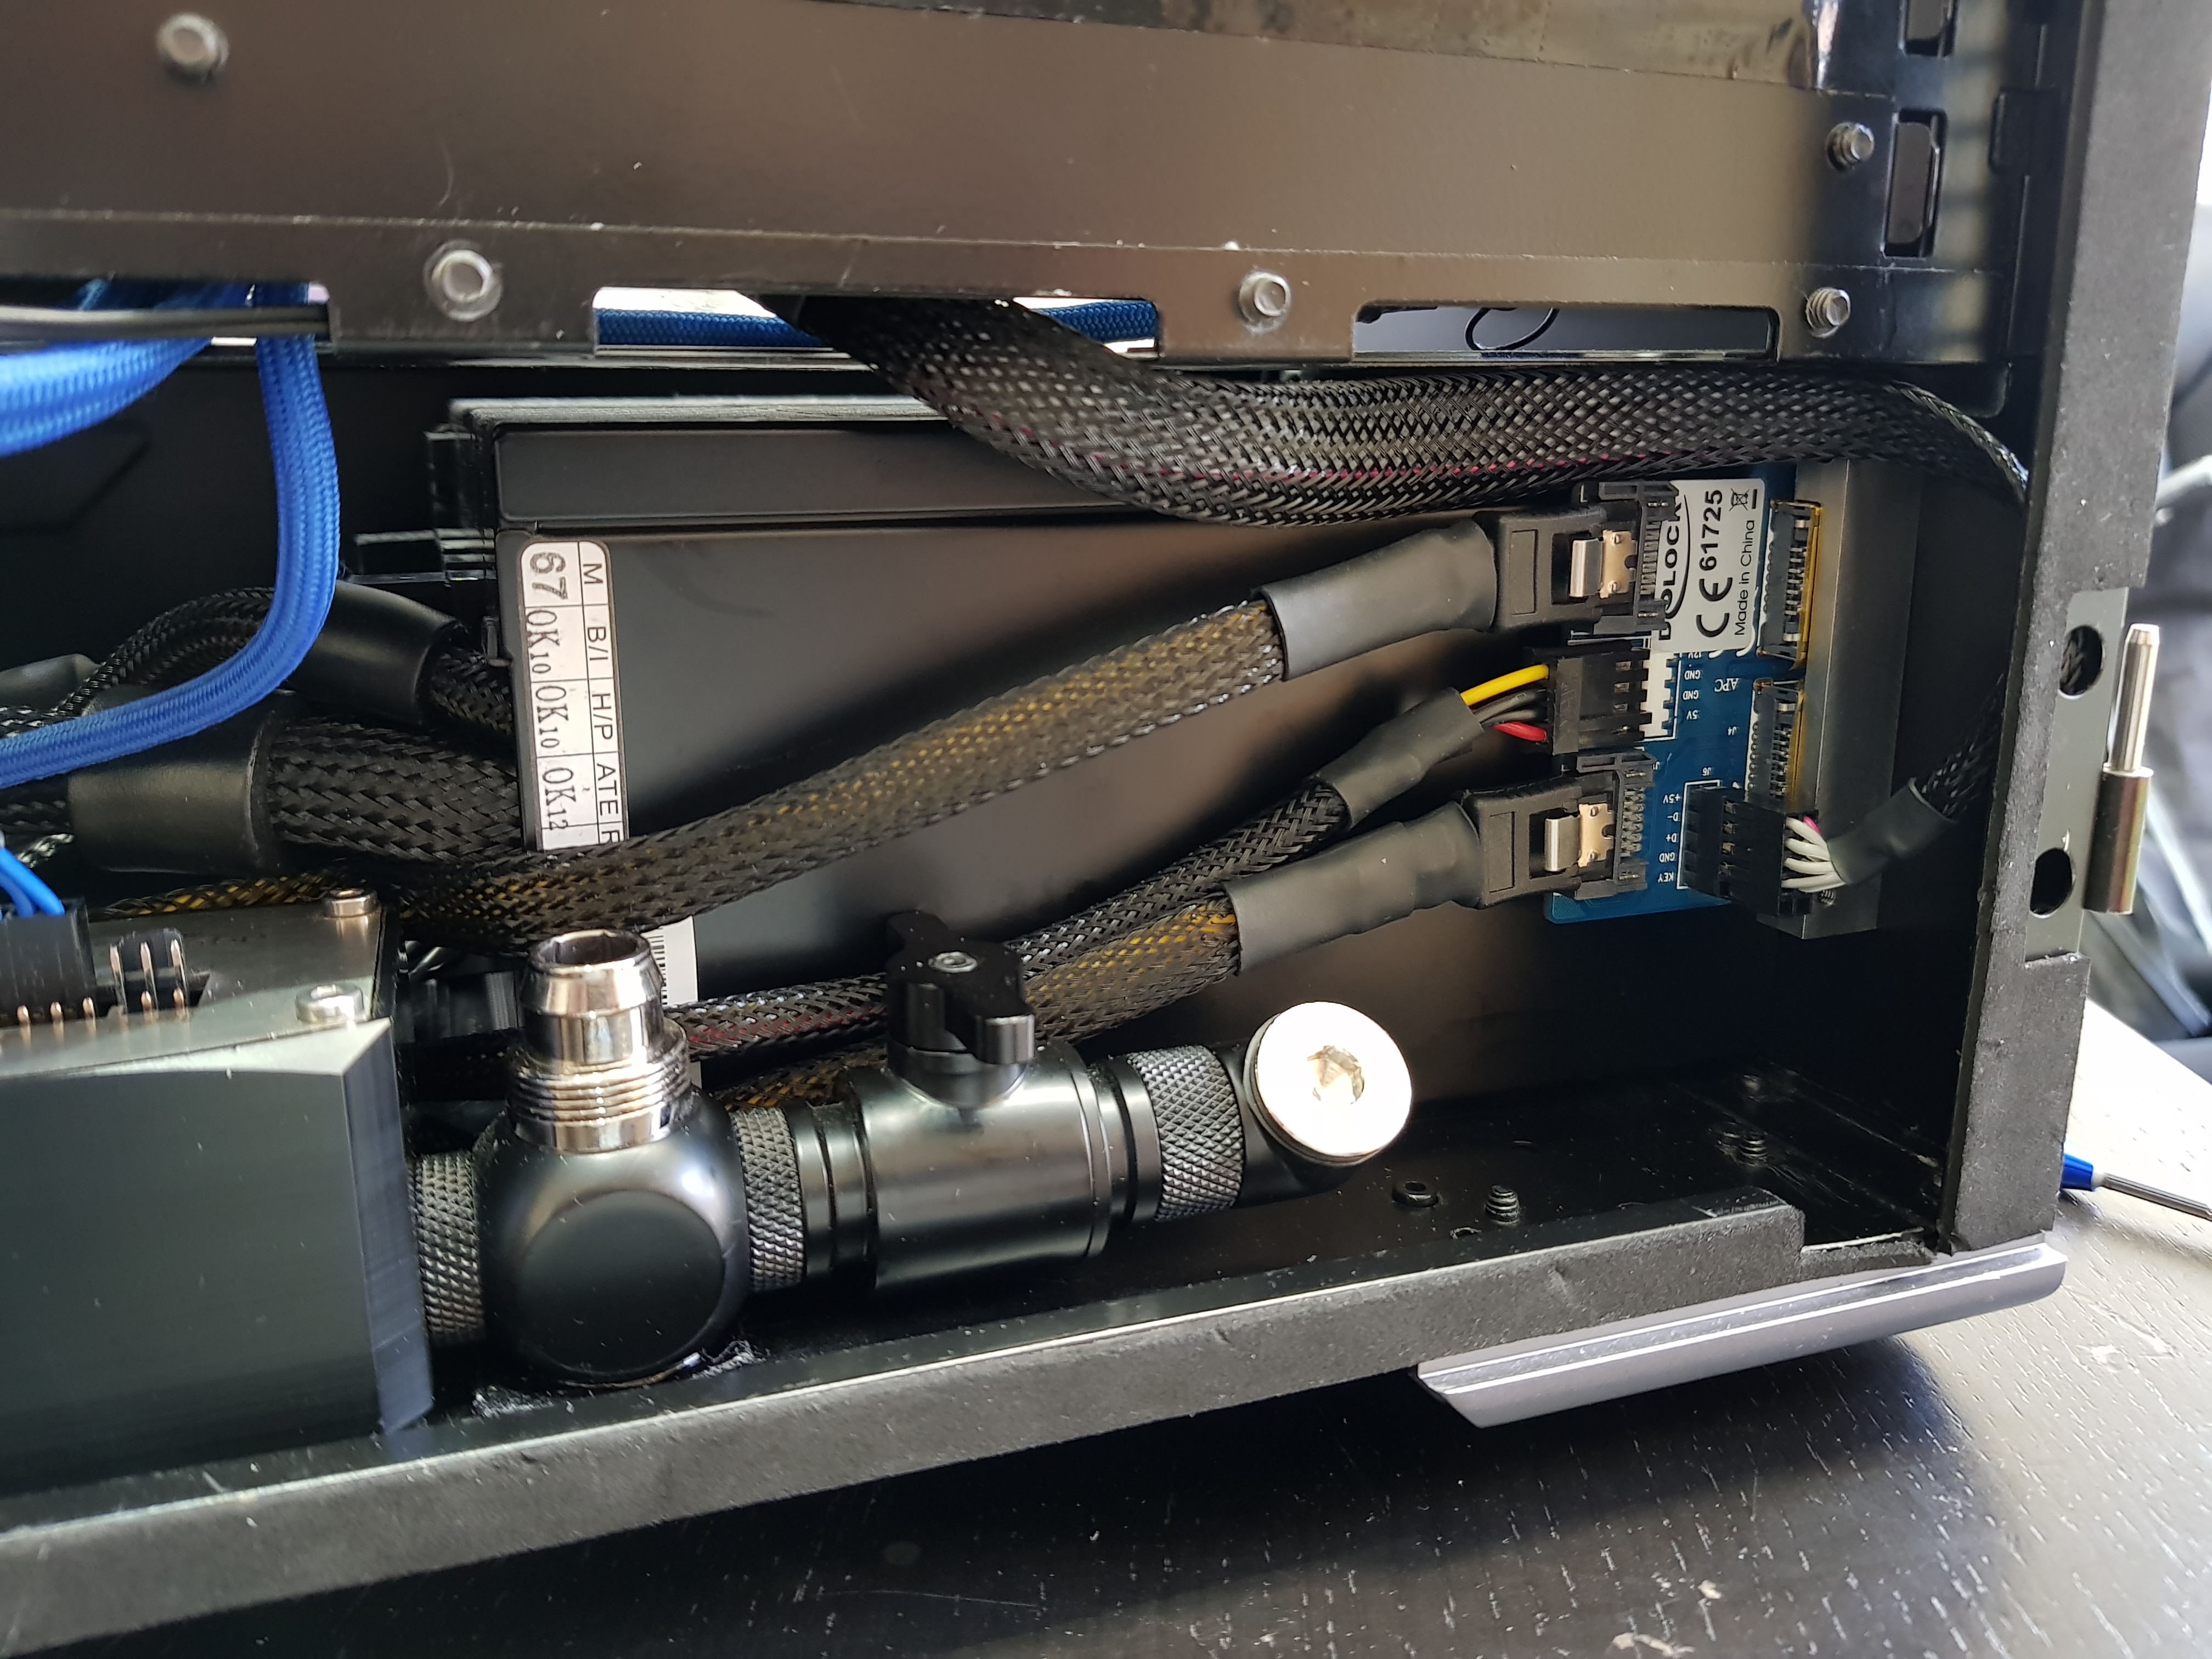
And here we are. That's two SATA, one floppy power (which needed making up) and one cable carrying a pair of USB channels. You can see why I didn't want this slung in the bottom PCIE slot, right?

Next was to find out whether the door still shut....since the right-angle bend that returns from the rad sits in that cut-out at the back of the lower edge of the case. It did....but there wasn't much in the way of clearance!
About as soon as this was back together, my wife declared that the office needed to be a different layout. It all looks lovely now but because of the layout changes, the window of the PC is now pretty much obscured by her PC (shared home office) so you've got to question whether it was worth the time to do it without making it look ugly. Ah well.
Might get round to sleeving an ATX extension so that you might call things "finished"....as much as they ever are!
So, to cut chunks out of your case, you should obviously first remove all electronics because the swarf (metal filings) will conduct and short circuit things that could be expensive. So, with that in mind, I masked everything up, cut it, hoovered out well and prayed! Do as I say, not as I do does seem to be the mantra of the times, no?!
New filing template was made out of 2mm stainless steel. Did it need to be stainless? Nope, but that's what I had. Clamped and taped it on in an insufficient fashion, drilled out the two holes and then bolted it on properly!

Drilled out the bulk of the rectangles, joined the holes with a Dremel and a carbide burr and then filed until I'd got this:
Painted the edges and screwed in the module:

Module came with an internal USB header (eSATAp ports also carry USB - you can plug a USB device or eSATA device) but it was too long and ugly. Cut it down and then found out just how thin the wire is! It's 0.2mm but at least it's solid not stranded....or you could argue that it is stranded, but just one of 'em! So these crimps were a joy to do. Used the Engineer (brand) crimps again that do just one pair of wings at a time....fiddly but they do get a decent connection.

And here we are. That's two SATA, one floppy power (which needed making up) and one cable carrying a pair of USB channels. You can see why I didn't want this slung in the bottom PCIE slot, right?
Next was to find out whether the door still shut....since the right-angle bend that returns from the rad sits in that cut-out at the back of the lower edge of the case. It did....but there wasn't much in the way of clearance!
About as soon as this was back together, my wife declared that the office needed to be a different layout. It all looks lovely now but because of the layout changes, the window of the PC is now pretty much obscured by her PC (shared home office) so you've got to question whether it was worth the time to do it without making it look ugly. Ah well.
Might get round to sleeving an ATX extension so that you might call things "finished"....as much as they ever are!
It's good. Big, but that is sort of the point. I tend to run mine passively most of the time and a Aquaero kicks the fans in for a bit when the coolant gets up to near 40°C and stops once it's cooled a few degrees. The one thing I'd say is that the grill is a necessity - if it's on the floor, at some point you're going to kick it. Maybe they've changed the design slightly since I bought it but the gap between the rad and the grill is quite slim. This means there aren't many 200mm fans that will fit in the gap - hence why my 200mm fans are off most of the time. They're not loud exactly but louder than a decent fan would be at that speed but all the decent ones are too thick. You could, of course, mount the grill on washers or pieces of tube to space it off the rad a bit. That would let you put thicker fans in but leave a gap between the rad and grill that I didn't want. If you're looking at 200mm fans (4x200 fans are cheaper than 9x120) let me know and I'll measure the clearance between grill and rad for you.
The other thing to note is that you'll need a bit more coolant than a small rad. Mine takes slightly more than 2 litres from a casual drain (not trying to get all of it dry) and the res is 880ml if 100% full.
The other thing to note is that you'll need a bit more coolant than a small rad. Mine takes slightly more than 2 litres from a casual drain (not trying to get all of it dry) and the res is 880ml if 100% full.
Passive is definitely a bonus. I've been similarly obsessed with silence since I had a particularly noisy small form-factor PC. The only trouble is that when you quieten something, you usually end up hearing something else that bothers you instead. This is why my wife's PC is now watercooled and blessed with a new PSU!
I checked and my fans start running at 36°C at 1/3rd speed, ramp up to full speed at 37°C (which has never happened) and stop running again at 35°C. The room is currently at 21°C and over the last hour the rad fans haven't spun up once (there are others that run quietly inside the case to cool things like SSDs). If I start a game the rad fans will run now and again but it's not constant. If they were decent (ie quiet) fans I'd probably run them at a steady slow speed for silence but these ones are just a bit disappointing if I'm honest. Just checked and these Aerocool ones are 20mm thick (22 if you count the head of the screws that hold them in) and there's a total of 26mm of space...so you'd just about be able to squeeze in a 25mm fan with this grill. If I remember correctly, most were 30mm or 35mm so the high-rise grill would be your best bet by the sound of it.
I checked and my fans start running at 36°C at 1/3rd speed, ramp up to full speed at 37°C (which has never happened) and stop running again at 35°C. The room is currently at 21°C and over the last hour the rad fans haven't spun up once (there are others that run quietly inside the case to cool things like SSDs). If I start a game the rad fans will run now and again but it's not constant. If they were decent (ie quiet) fans I'd probably run them at a steady slow speed for silence but these ones are just a bit disappointing if I'm honest. Just checked and these Aerocool ones are 20mm thick (22 if you count the head of the screws that hold them in) and there's a total of 26mm of space...so you'd just about be able to squeeze in a 25mm fan with this grill. If I remember correctly, most were 30mm or 35mm so the high-rise grill would be your best bet by the sound of it.
Only way you can mount it really. Nothing stopping you from having it free standing, of course. I think that was Watercool's intention originally. You'd just need some form of entry/exit for tubing (some bulkhead connectors would work) and then have it stand next to the PC.....or even through a wall in another room, outside wherever. Depends on the lengths you're willing to go to for the peace and quiet. Mine's bolted to the side because I'm married...and I like peace and quiet too!
Well, I said I'd get around to it eventually!
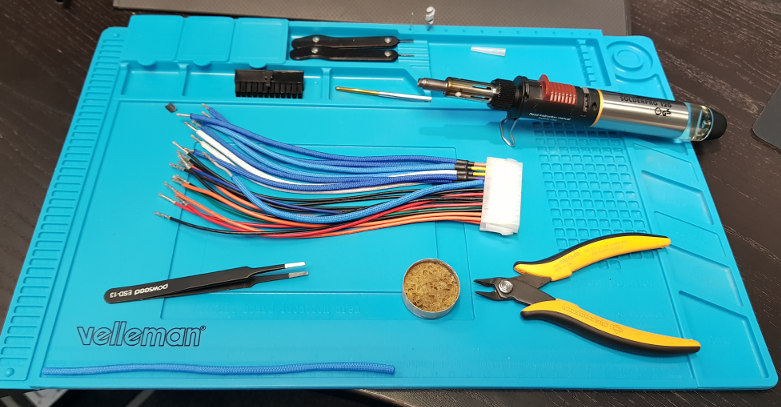
The little soldering sponge was a revelation. I watched a YouTube video of a Girl Guide making woggles out of paracord (had to make one for my son) and it dawned on me then that yeah, only an idiot wouldn't have thought of that basic precaution to provide temporary immunity to the molten paracord!
Flush cutters with blades that aren't made of cheese help too. These make a nice neat cut through paracord. The last ones? Well, one blade is embedded in a wall somewhere after I dared cut something as substantial as a 16 gauge wire!
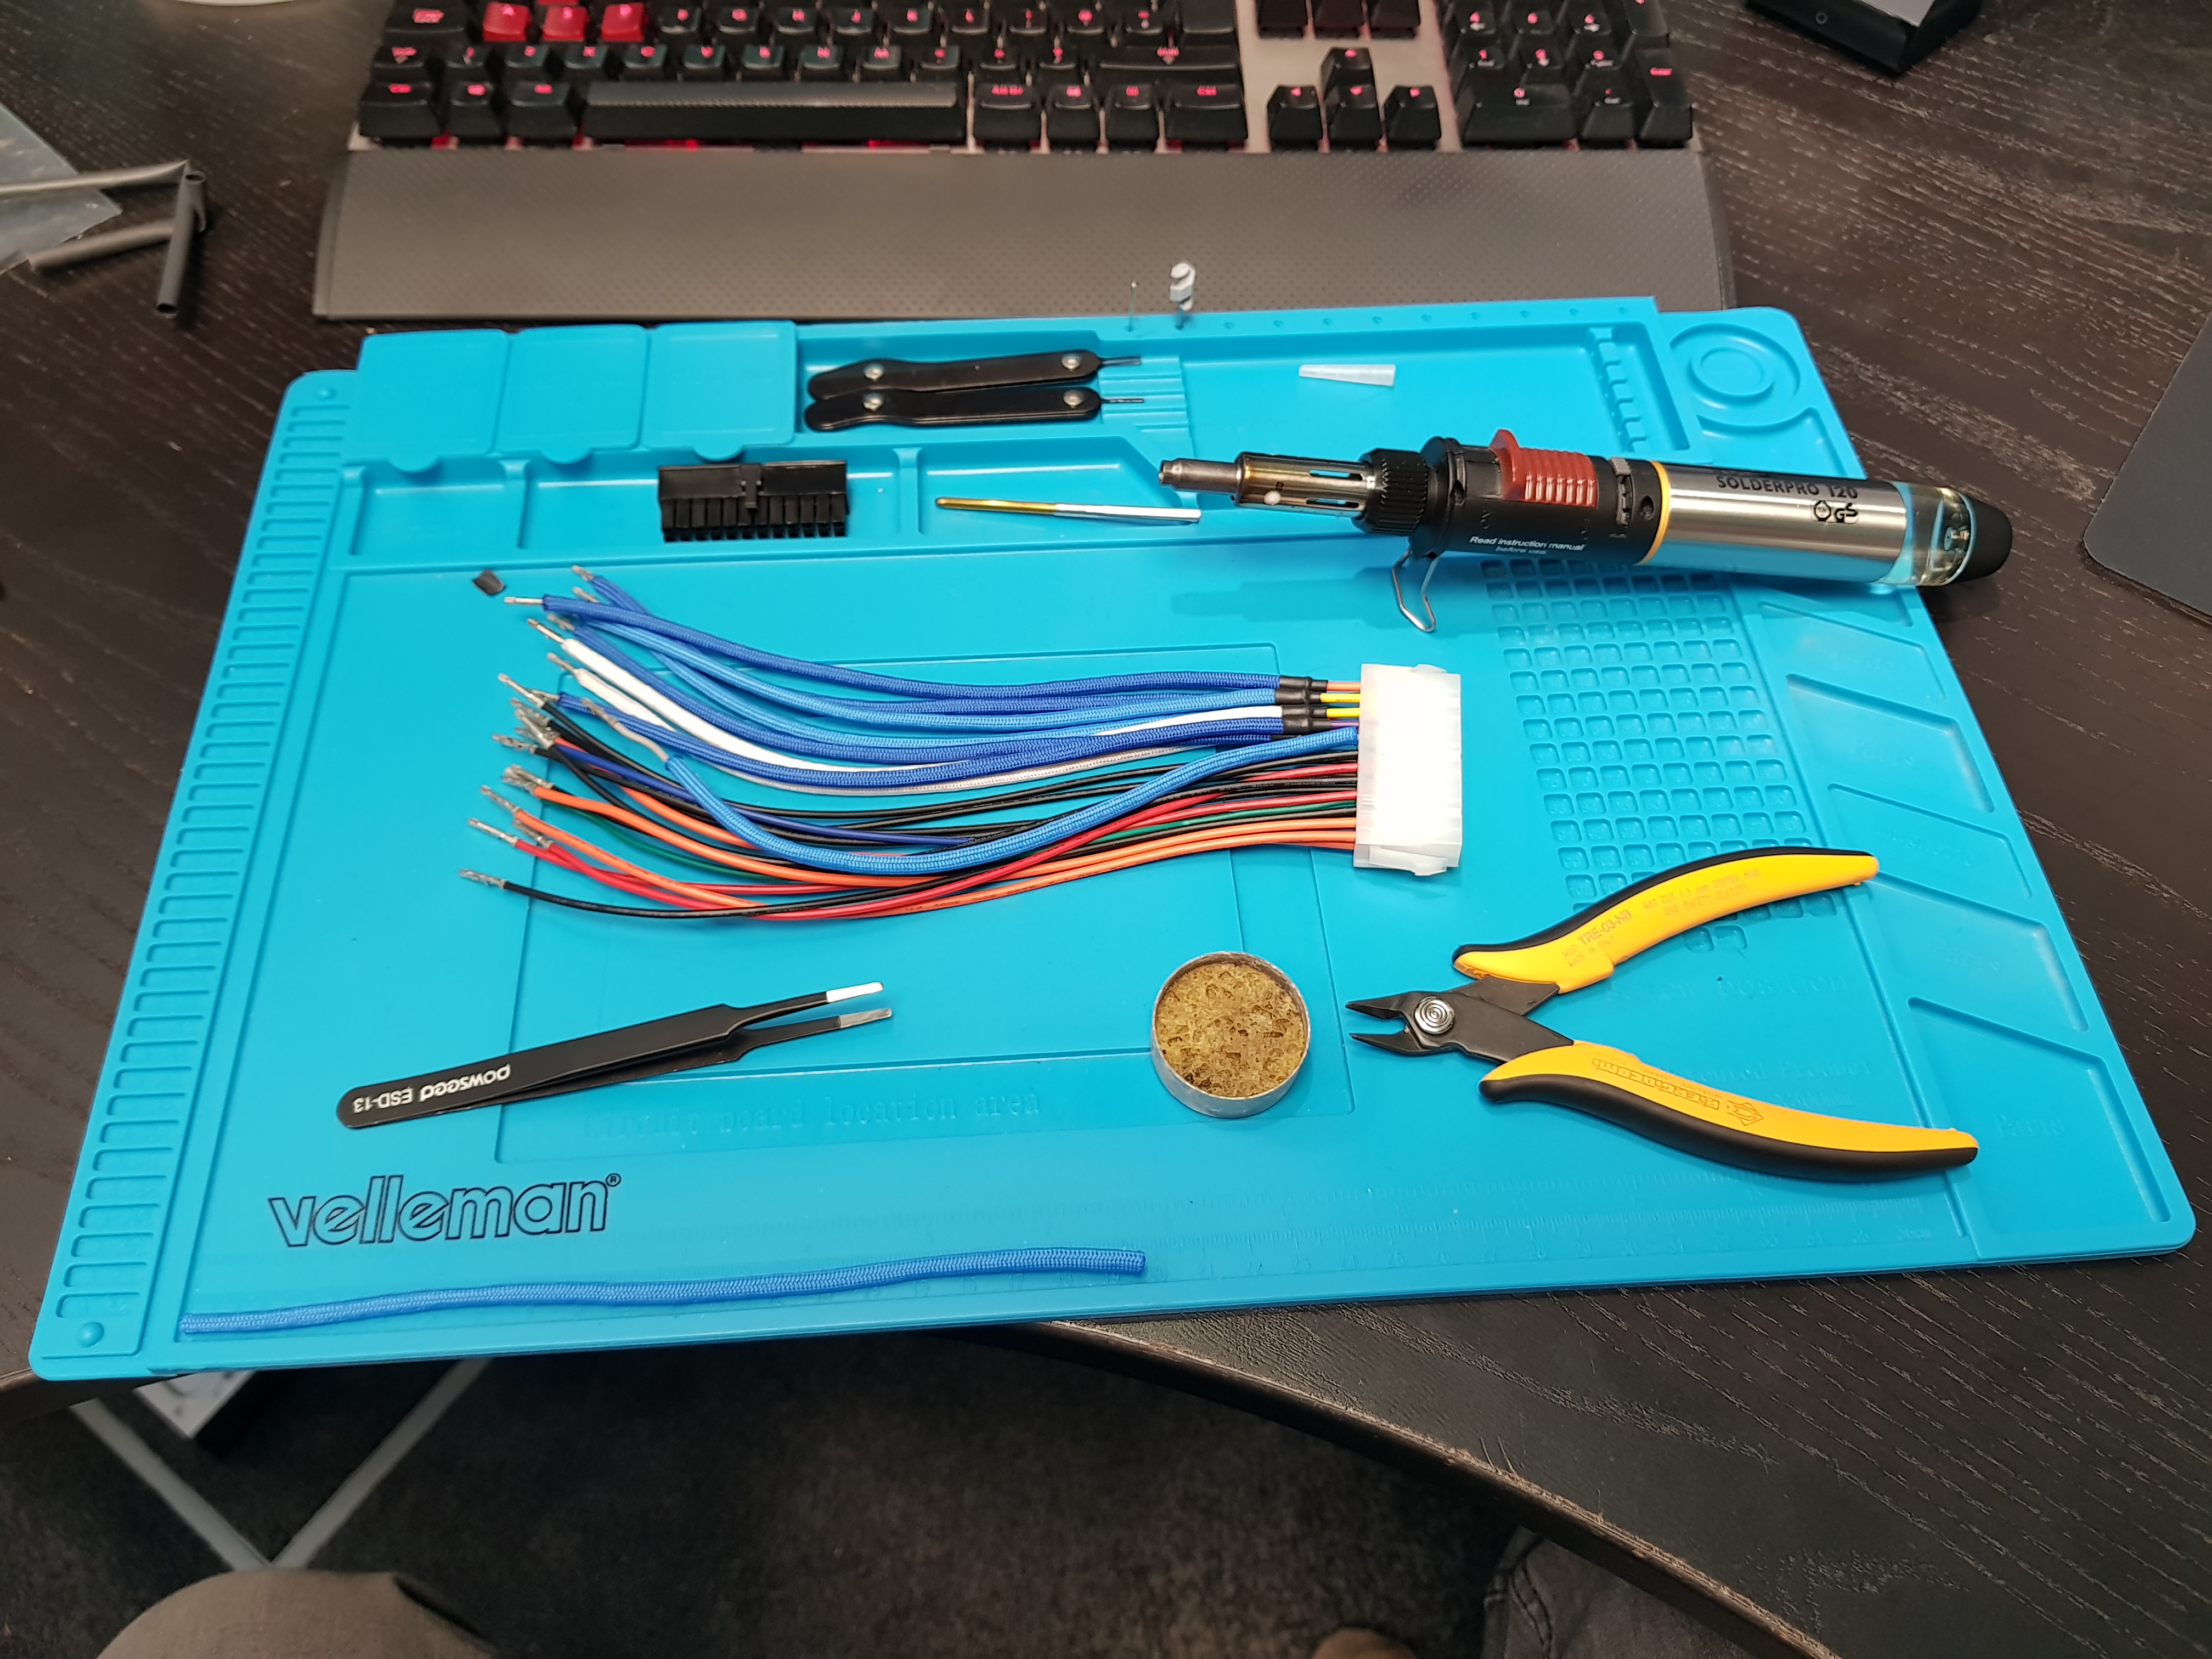
Pretty much, yes.
- Pull the core threads out (being careful not to fray either end),
- lightly melt both ends so it doesn't fray
- Use the threading tool (gold and silver stick in picture above) which was very generously gifted to me by ALXAndy to get it on over the spiky parts of the pin
- dip fingers in water!
- melt the pin end of the paracord and smush it into the pin so that it stays there - this is the method without heatshrink.