

You are using an out of date browser. It may not display this or other websites correctly.
You should upgrade or use an alternative browser.
You should upgrade or use an alternative browser.
Project "well, I don't know what to do with it yet"
- Thread starter Lashout_UK
- Start date
More options
Thread starter's posts- Joined
- 2 Mar 2004
- Posts
- 11,919
- Location
- SE England
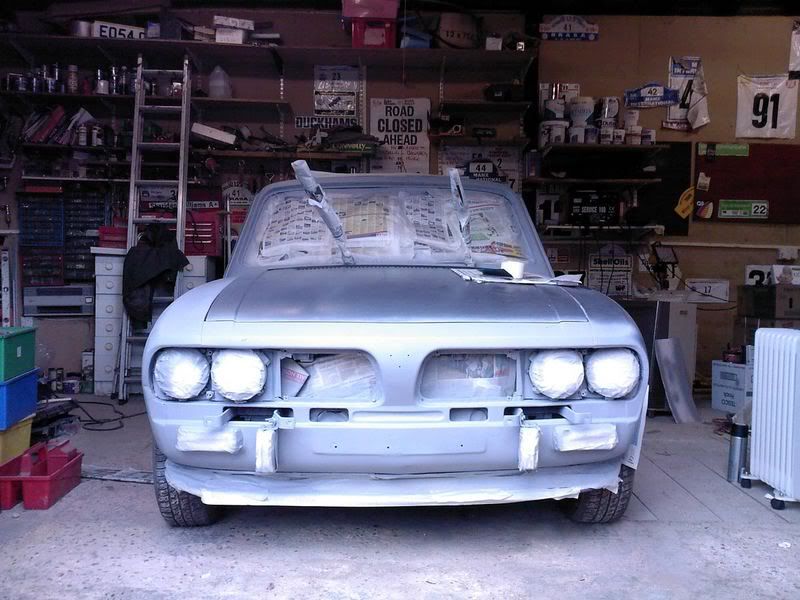
Bashed on some more primer today:
Just putting it on where I think it'll be needed most, really - and to give a bit of grip and durability to the paint in the areas it'll probably get worn.
....and more rust killing:
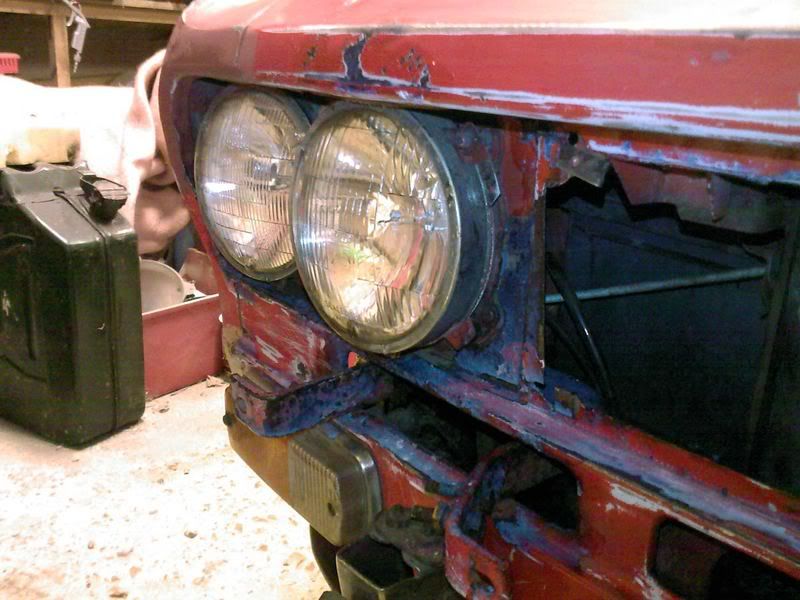
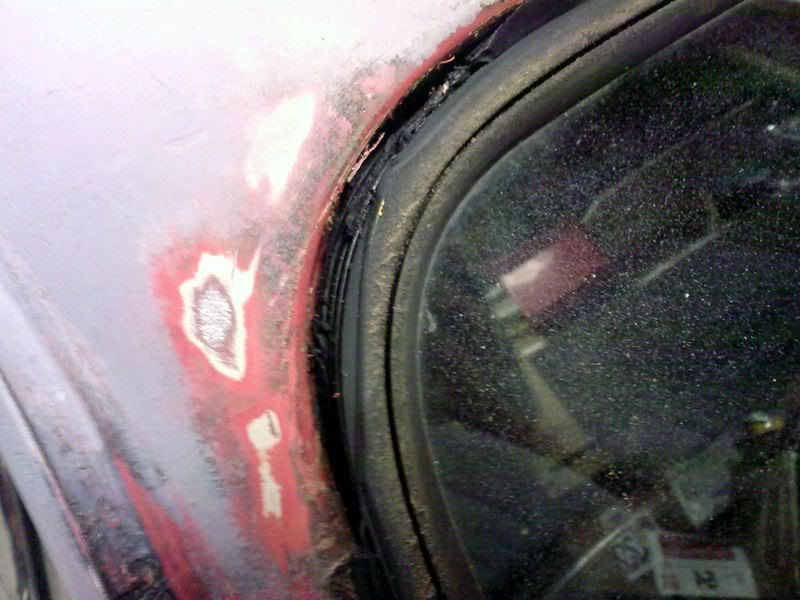
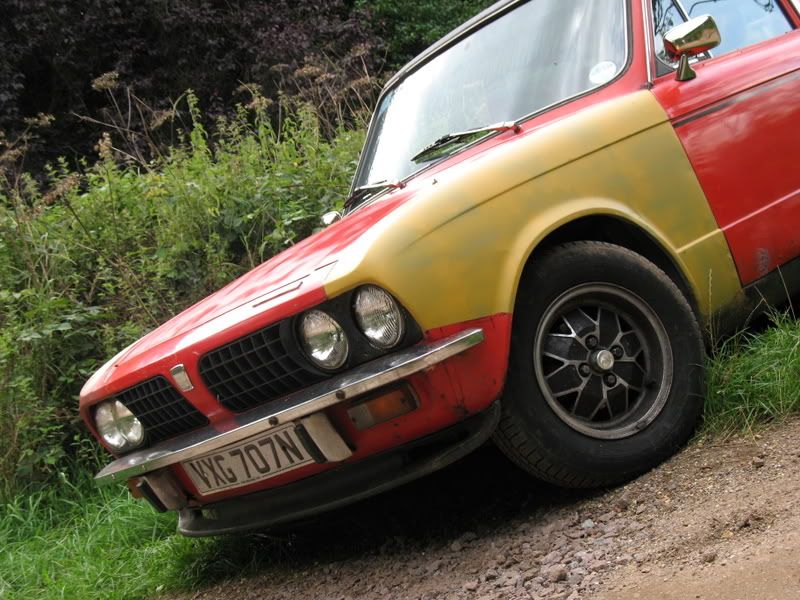
The front end's actually pretty good, just lots of light surface corrosion. I sanded it down roughly, wiped it clean then stippled plenty of Kurust into it. I then spent 30 minutes or so just crawling around the car making sure I hadn't missed anything important and dabbing Kurust on anything that looked even vaguely dubious.
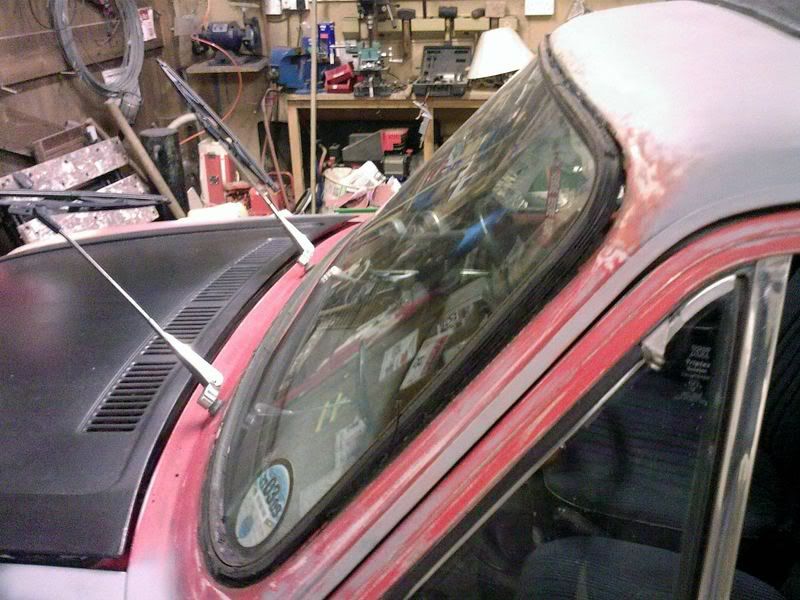
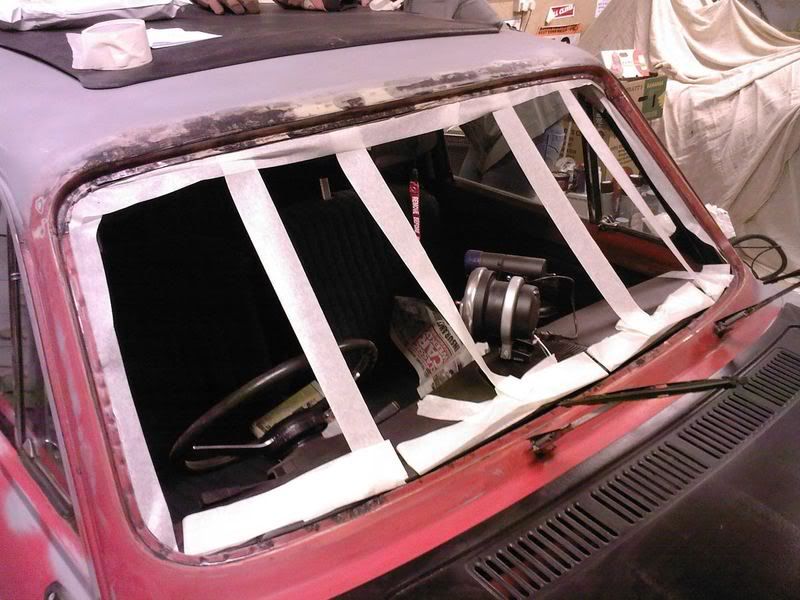
I also started removing the windscreen whilst I was free for a moment:
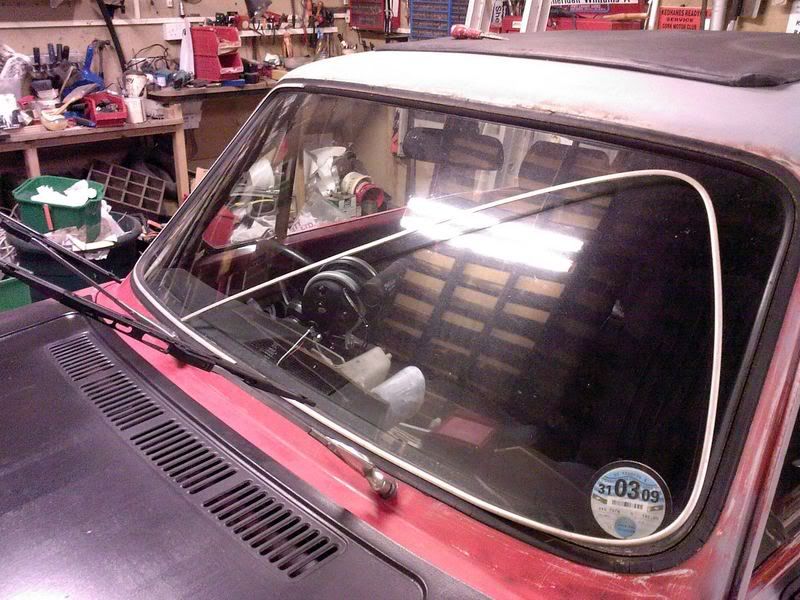
Getting the trim strip out without damaging it is quite difficult, especially if it's been hacked about previously and suffered the tests of time. This one's seen better days anyway, as a few chunks are missing, so it may just do an interim job whilst I order up a new one.
At this point I thought it advisable to get an extra pair of hands so wondered back home for some lunch and to see if anyone else was about. In the end I couldn't be bothered finding anyone, so just thought "man up" and got on with it myself. Can't be that hard!
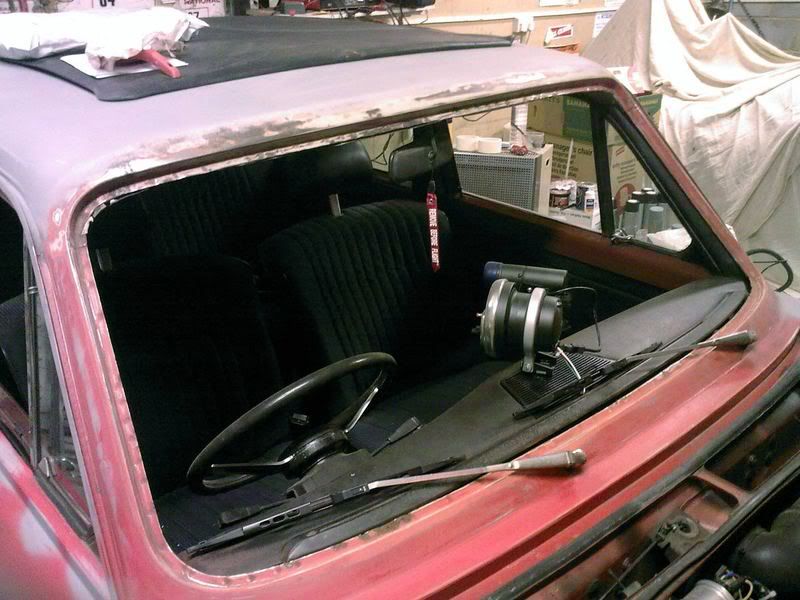
I hacked as much of the old seal away as possible to make removing the windscreen a smooth process:
Then, applying pressure evenly to the glass:
.....gently popped it out. This took a bit of time, easing it out slowly - but it was infinitely preferable to giving it an almighty heave and propelling it across the bonnet of the car to a swift demise on the floor of the garage!
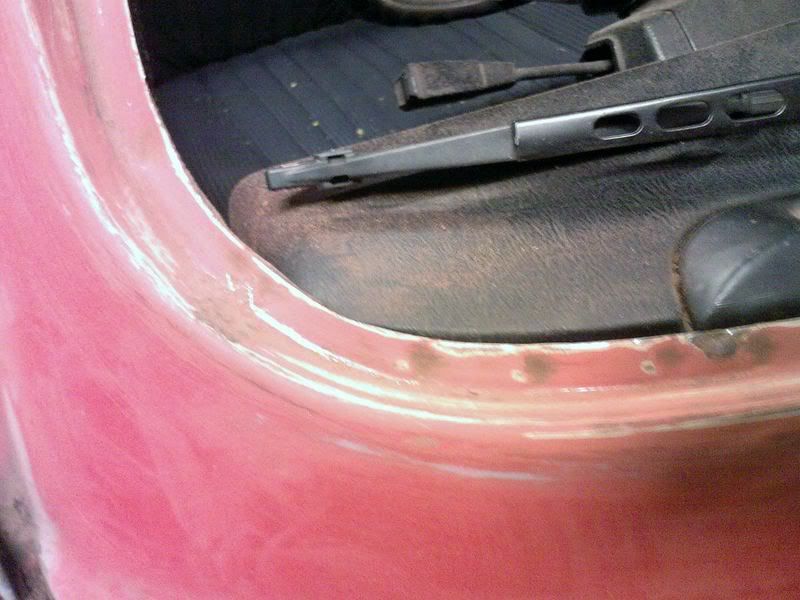
I then just cleaned up any blebs that had developed under the old and very crusty seal as well as generally tiding the area ready for paint:
I was also very happy to see that the usual trouble spot, at the bottom corners of the windscreen, were in fact fine. I put a load more Kurust on any exposed metal so now that's settling overnight prior to being painted tomorrow.
So, masking and more paint are upcoming - I did prime pretty much the whole car today but the battery on my phone went dead, killing any further photography!
Should have the first coat of black on most of it tomorrow....Fingers crossed!
Just putting it on where I think it'll be needed most, really - and to give a bit of grip and durability to the paint in the areas it'll probably get worn.
....and more rust killing:
The front end's actually pretty good, just lots of light surface corrosion. I sanded it down roughly, wiped it clean then stippled plenty of Kurust into it. I then spent 30 minutes or so just crawling around the car making sure I hadn't missed anything important and dabbing Kurust on anything that looked even vaguely dubious.
I also started removing the windscreen whilst I was free for a moment:
Getting the trim strip out without damaging it is quite difficult, especially if it's been hacked about previously and suffered the tests of time. This one's seen better days anyway, as a few chunks are missing, so it may just do an interim job whilst I order up a new one.
At this point I thought it advisable to get an extra pair of hands so wondered back home for some lunch and to see if anyone else was about. In the end I couldn't be bothered finding anyone, so just thought "man up" and got on with it myself. Can't be that hard!
I hacked as much of the old seal away as possible to make removing the windscreen a smooth process:
Then, applying pressure evenly to the glass:
.....gently popped it out. This took a bit of time, easing it out slowly - but it was infinitely preferable to giving it an almighty heave and propelling it across the bonnet of the car to a swift demise on the floor of the garage!
I then just cleaned up any blebs that had developed under the old and very crusty seal as well as generally tiding the area ready for paint:
I was also very happy to see that the usual trouble spot, at the bottom corners of the windscreen, were in fact fine. I put a load more Kurust on any exposed metal so now that's settling overnight prior to being painted tomorrow.
So, masking and more paint are upcoming - I did prime pretty much the whole car today but the battery on my phone went dead, killing any further photography!
Should have the first coat of black on most of it tomorrow....Fingers crossed!
- Joined
- 2 Mar 2004
- Posts
- 11,919
- Location
- SE England
Yea, I think so at least.....they have a wider track at the front than rear for certain. I'll just have to buy them and find out 
Started off today by turning it into a stock car:
Yeaaaaa
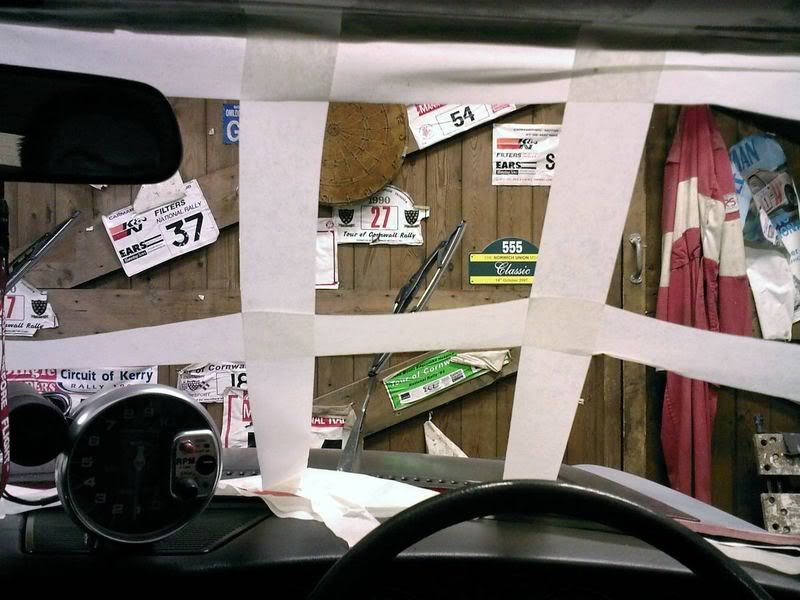
What I was actually doing was building a web to hang newspaper on, to mask off the interior from the frame, so I could get a good few layers of paint around the windscreen aperture.
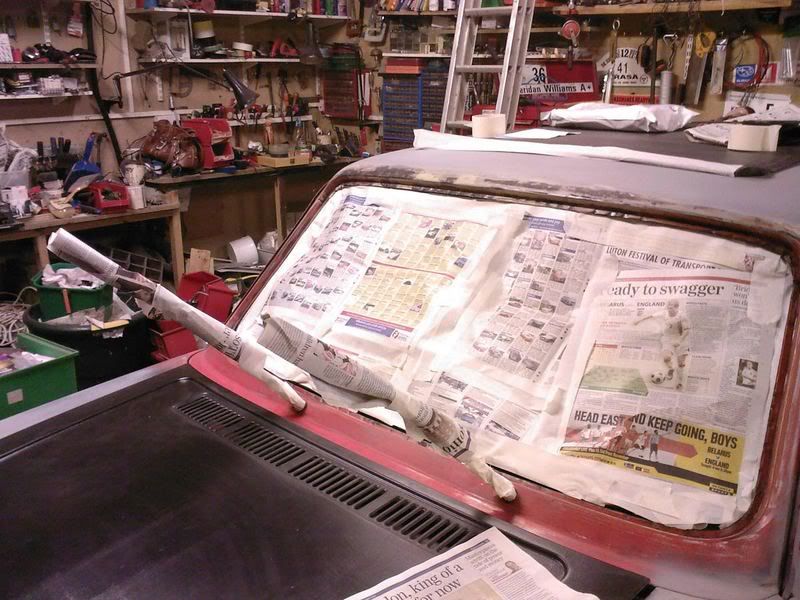
Like so. A little bit of paint and....

Sorted.
Mum was helping yet again today, so we quickly finished all the remaining masking and got on with the process of laying down the last of the primer. As such it is now ready for the satin to go on!
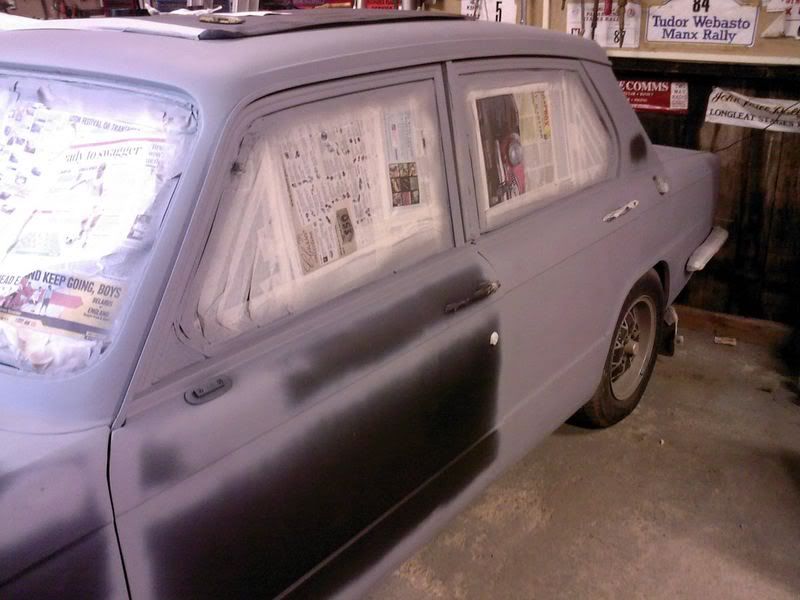


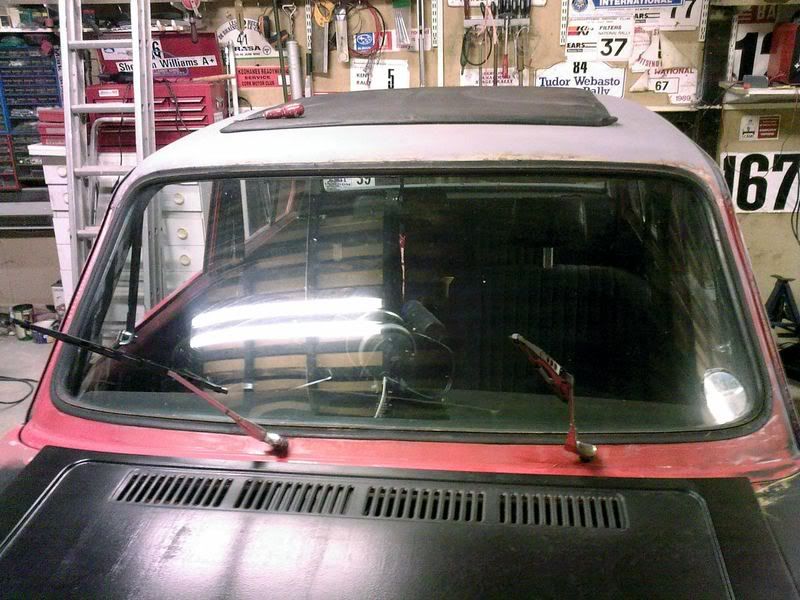
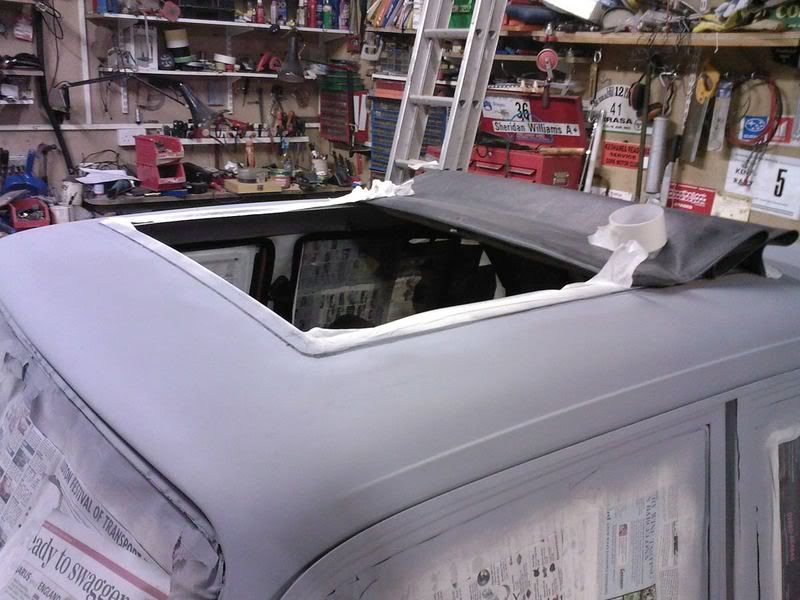
The only bit that requires any more thought and attention is around the Webasto roof, as I didn't want to remove it for the meantime. As such it's been folded back to allow painting around as much of the edge as possible then once that is finished in black, will be slid forwards allowing access to the bits at the back edge by lifting it up slightly.
I've got a few coats of black on there now so it should be sorted come the morning. I would have done more today but I wanted to let all the primer and black edging I'd done go off properly, rather than rush it. For the meantime I'm just going to concentrate on getting the exterior panelling done then I can do the inner detailing at my own leisure")
So, first thing in the morning:
"Hold still!"
Started off today by turning it into a stock car:
Yeaaaaa
What I was actually doing was building a web to hang newspaper on, to mask off the interior from the frame, so I could get a good few layers of paint around the windscreen aperture.
Like so. A little bit of paint and....
Sorted.
Mum was helping yet again today, so we quickly finished all the remaining masking and got on with the process of laying down the last of the primer. As such it is now ready for the satin to go on!
The only bit that requires any more thought and attention is around the Webasto roof, as I didn't want to remove it for the meantime. As such it's been folded back to allow painting around as much of the edge as possible then once that is finished in black, will be slid forwards allowing access to the bits at the back edge by lifting it up slightly.
I've got a few coats of black on there now so it should be sorted come the morning. I would have done more today but I wanted to let all the primer and black edging I'd done go off properly, rather than rush it. For the meantime I'm just going to concentrate on getting the exterior panelling done then I can do the inner detailing at my own leisure
So, first thing in the morning:
"Hold still!"
- Joined
- 2 Mar 2004
- Posts
- 11,919
- Location
- SE England
"Pssssssssshtttttttt"
Nice work! I can see this coming on so well from the first pictures, still can't wait to see the result.
I hope that garage is well-ventilated! It certainly doesn't look very dustry for the amount of sanding and priming that's going on.
Did you decide on new wheels yet?
I hope that garage is well-ventilated! It certainly doesn't look very dustry for the amount of sanding and priming that's going on.
Did you decide on new wheels yet?
- Joined
- 2 Mar 2004
- Posts
- 11,919
- Location
- SE England
Haha, this stuff's much the same so no doubt I'll be able to scrawl on it to my heart's content.
Alex, the garage ain't that well ventilated - I am using a toytown mask though and going outside now and then I have to keep the doors shut to keep what heat I can generate in as it's not sealed, so I'm constantly trying to heat the world up. To lay a complete coat on doesn't take long, mind, so it's not too bad.
I do keep it clean though, sweeping it out now and then to keep contamination down a bit.
With luck I should be getting the silver Corvette styled ones, auction finishes in a day and a bit. Should suit it quite well plus they're that little bit wider and bigger, so should make it look pretty mean. Assuming I get them, I'll keep them silver just to see what they look like then photoshop them black or alternative colours to see what it looks like.
I got my hands on a pair of NOS 1500 grills as well, to replace the eggbox-style ones on at the moment They're a bit sleeker and make them look a little meaner:
Standard:
1500:
So they'll be going on along with my louvres in all probability
Alex, the garage ain't that well ventilated - I am using a toytown mask though and going outside now and then
I have to keep the doors shut to keep what heat I can generate in as it's not sealed, so I'm constantly trying to heat the world up. To lay a complete coat on doesn't take long, mind, so it's not too bad.I do keep it clean though, sweeping it out now and then to keep contamination down a bit.
With luck I should be getting the silver Corvette styled ones, auction finishes in a day and a bit. Should suit it quite well plus they're that little bit wider and bigger, so should make it look pretty mean. Assuming I get them, I'll keep them silver just to see what they look like then photoshop them black or alternative colours to see what it looks like.
I got my hands on a pair of NOS 1500 grills as well, to replace the eggbox-style ones on at the moment They're a bit sleeker and make them look a little meaner:
Standard:
1500:
So they'll be going on along with my louvres in all probability
Last edited:
- Joined
- 2 Mar 2004
- Posts
- 11,919
- Location
- SE England
Interesting! (Did update the pic).
I always thought the 1500 ones were a bit sleeker and made the nose a little more aggressive.
Well, I have both sets still so I'll have to do a back-to-back and see what suits it more!
I always thought the 1500 ones were a bit sleeker and made the nose a little more aggressive.
Well, I have both sets still so I'll have to do a back-to-back and see what suits it more!
I see, not the best time of year for it, as you've shown in your previous posts!
Have to say the eggbox-style looks better to me, probably because it fits the countours of the nose of the car and looks more finished. Seems a little faded though, some TLC would improve the looks no end i'm sure.
Not sure about the colour of the wheels, though do like that style. I'm sure someone on here can shop them on in a few mins.
- Joined
- 2 Mar 2004
- Posts
- 11,919
- Location
- SE England
Haha, I'm not going to derby it, don't worry (it was only a reference to the windscreen net lookalike!)!
I might use it in some form of competition, though, just for kicks!
I might use it in some form of competition, though, just for kicks!
- Joined
- 2 Mar 2004
- Posts
- 11,919
- Location
- SE England
God-damn I'm going through rattlecans like there's no tomorrow - not loads but more than I expected, for sure.
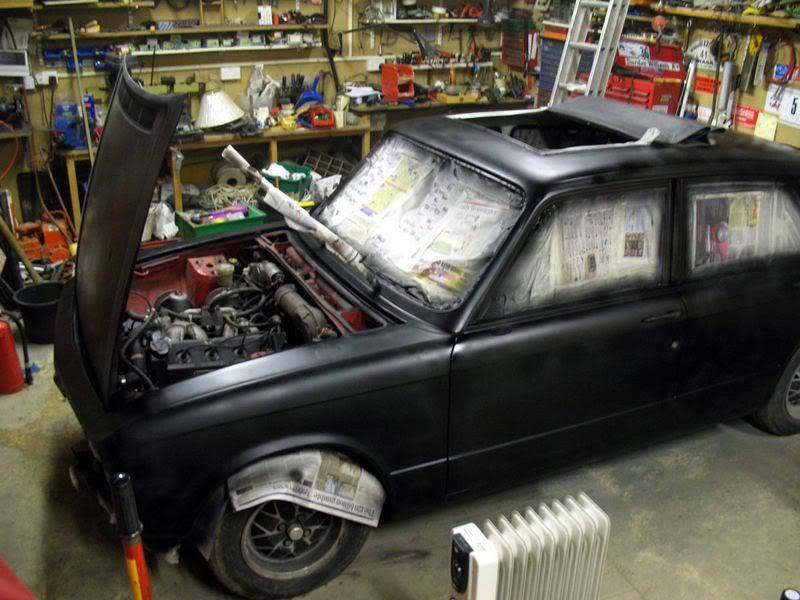
However, on the flipside - I think I'm done! There's only a very small patch at the back I haven't covered yet, due to it's inaccessability but I shall roll her forwards a bit and finish that up. I even managed to do enough of the door shuts, inner panelling and edges to prevent any red being seen from outside.
I'm leaving it to cure overnight now and see how it is tomorrow. The only bits that aren't so great are the roof - it seems despite having a 'perfect' surface it's a bit lumpen here and there. Still, no bones! Ain't going to be perfect using this method anyway...
It's still wet (hence the patches) but it's now very black!
Excuse the mobile photography. Again.
I like it.
I reckon it'll look proper good once I've got my detail bits on it like the louvres, rear spoiler, better wheels and it's all dried and settled a bit. Quite happy to say the least - probably more so due to not having to hold onto a rattlecan anymore!
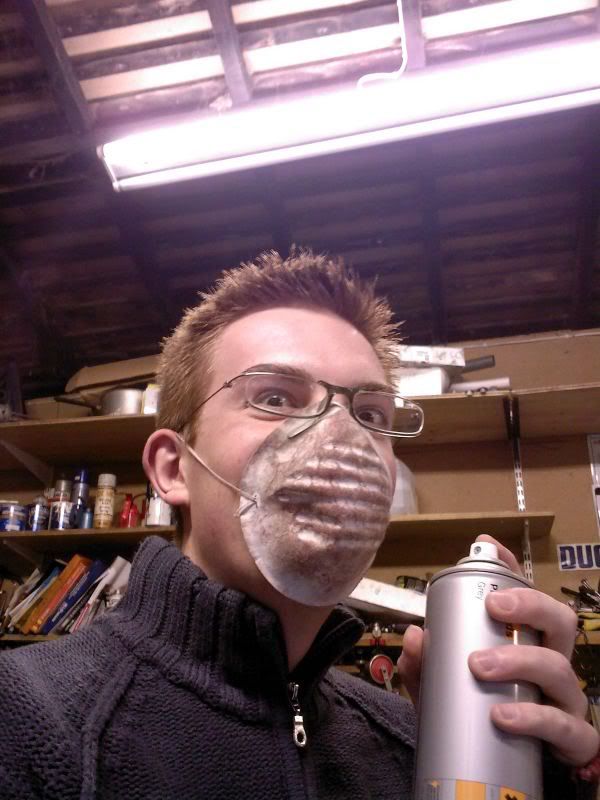
Two things about rattlecanning I've observed. One - It has been scientifically proven that you cannot use rattle cans without taking a stupid picture of yourself with mask and paint in hand, Altern 8 style. Two - It's also scientifically proven that you can't do this and not end up with one hand frozen and cramped into a death claw
However, on the flipside - I think I'm done! There's only a very small patch at the back I haven't covered yet, due to it's inaccessability but I shall roll her forwards a bit and finish that up. I even managed to do enough of the door shuts, inner panelling and edges to prevent any red being seen from outside.
I'm leaving it to cure overnight now and see how it is tomorrow. The only bits that aren't so great are the roof - it seems despite having a 'perfect' surface it's a bit lumpen here and there. Still, no bones! Ain't going to be perfect using this method anyway...
It's still wet (hence the patches) but it's now very black!
Excuse the mobile photography. Again.
I like it.
I reckon it'll look proper good once I've got my detail bits on it like the louvres, rear spoiler, better wheels and it's all dried and settled a bit. Quite happy to say the least - probably more so due to not having to hold onto a rattlecan anymore!
Two things about rattlecanning I've observed. One - It has been scientifically proven that you cannot use rattle cans without taking a stupid picture of yourself with mask and paint in hand, Altern 8 style. Two - It's also scientifically proven that you can't do this and not end up with one hand frozen and cramped into a death claw
Last edited:
This happens when using proper painting gear too :One - It has been scientifically proven that you cannot use rattle cans without taking a stupid picture of yourself

- Joined
- 2 Mar 2004
- Posts
- 11,919
- Location
- SE England
Ahahahaha
Bonus points for you though
Bonus points for you though
- Joined
- 2 Mar 2004
- Posts
- 11,919
- Location
- SE England
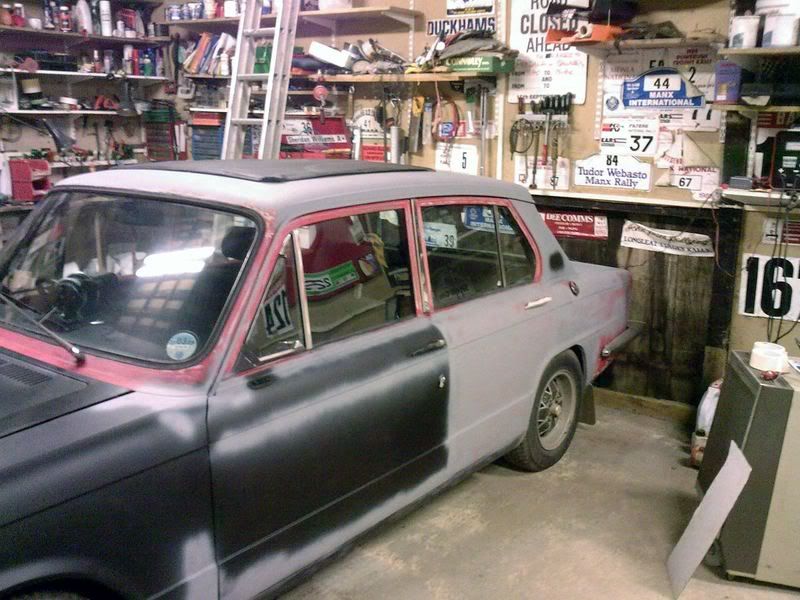
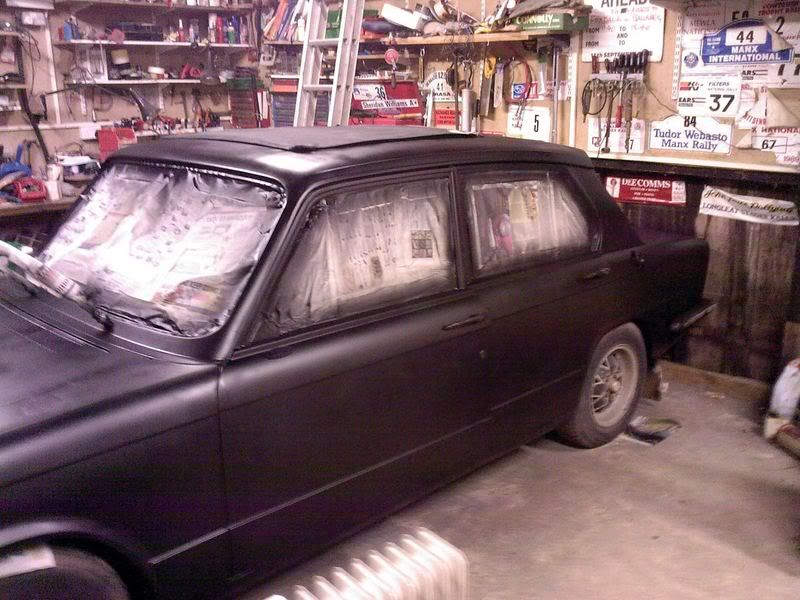
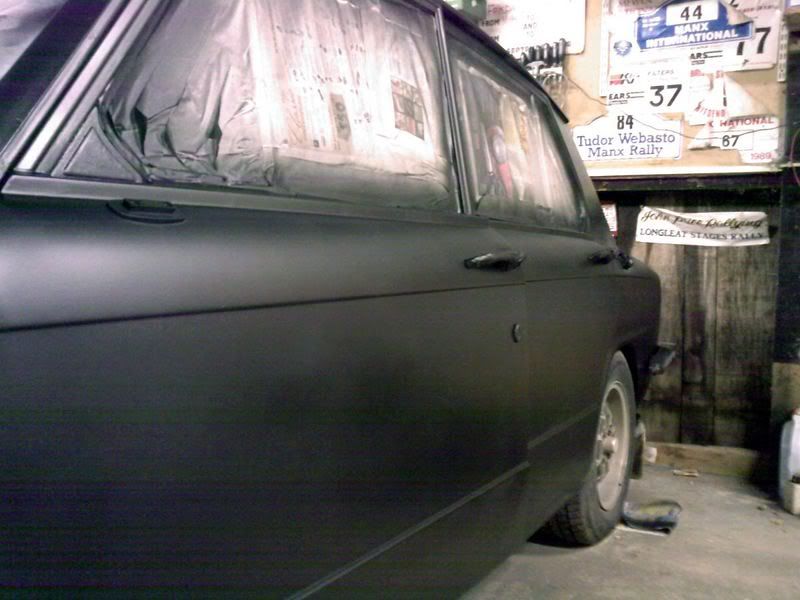
Right, it's had roughly 3 complete coats so far, although some panels have had paint and primer before. Areas that will endure heavy wear, such as the valance corners, arches and sills have had more.
Today I put the last one of those coats on, a lightish coat just to even out some rough spots and blend some joins better. So far I'm more than happy with the finish (especially given the circumstances) but I do think the roof and bonnet could do with some improvement. The joy of this is that satin paint isn't hard to match or blend, so if I do go to sort it out, it won't be an issue
I also rolled the car forward enough to access the rear panels, so the back is now black too:
So, just waiting now. At 4:30ish I'll put the windscreen in and then take off all the masking...