

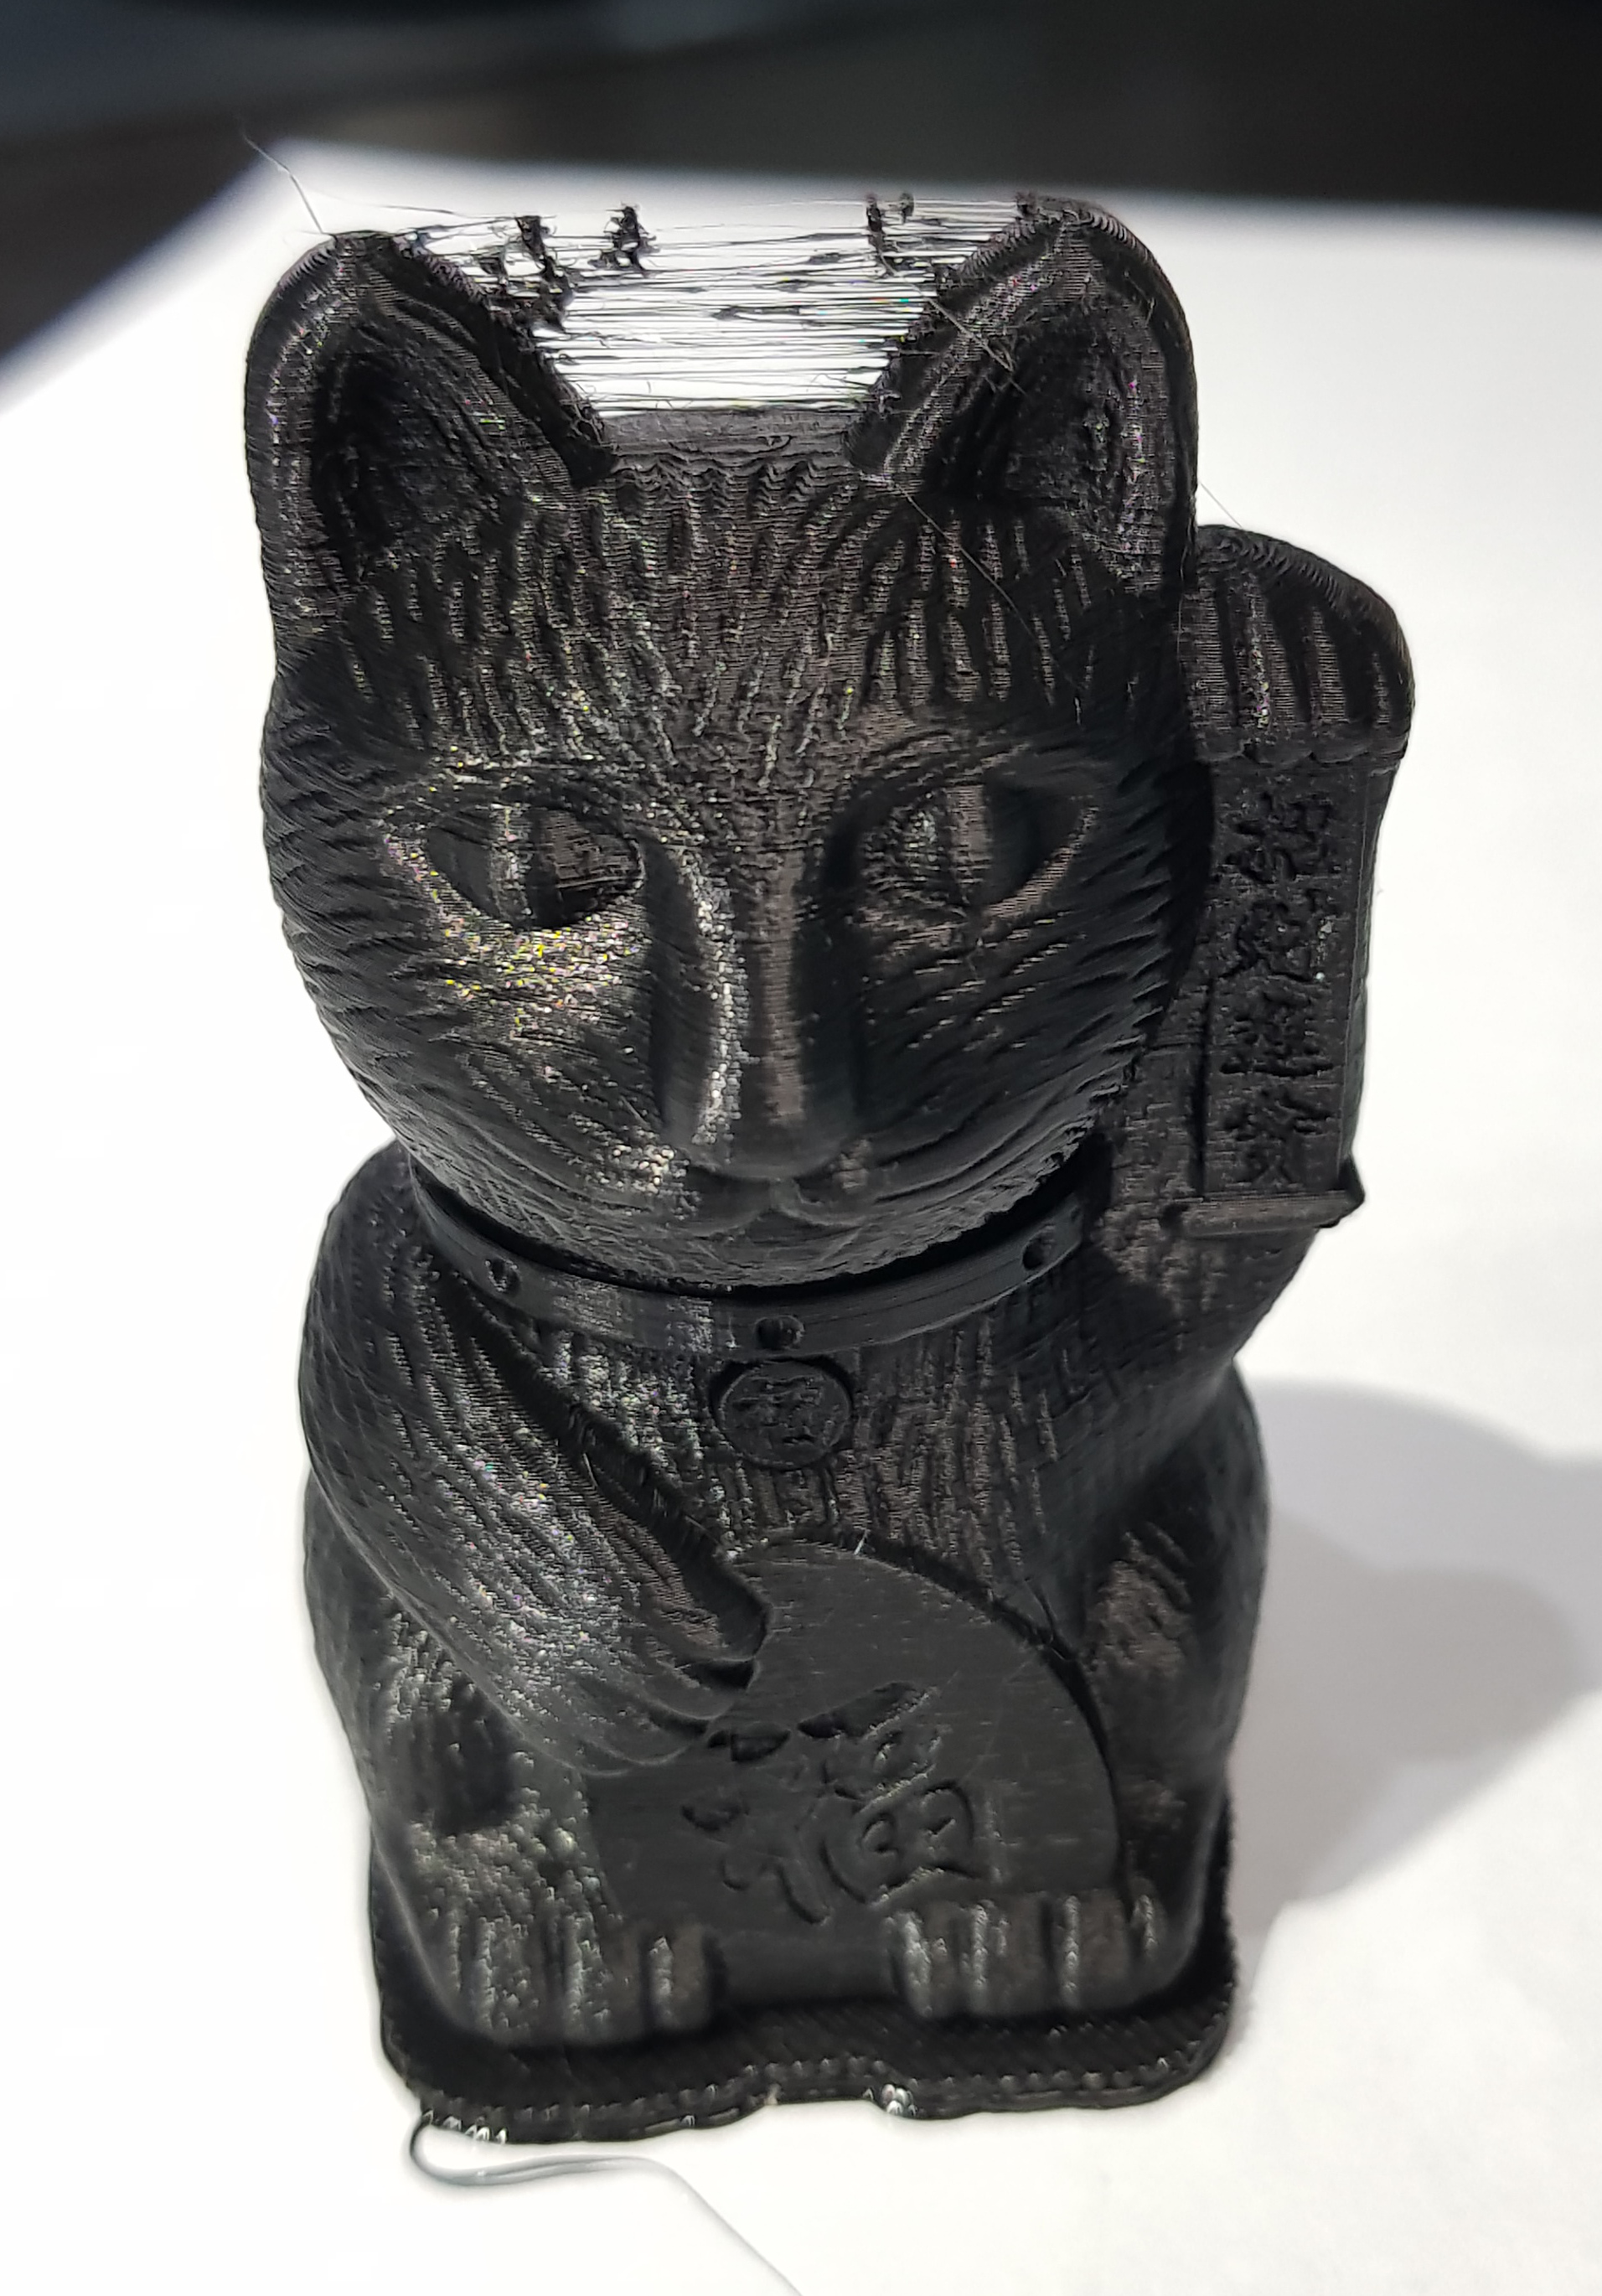
Yeah, that's a raftIt's like a mat where the filament loops back on itself at the end of each row. Could definitely be just rafting though. It took me a while to realise (as the layers slowly built up) that what appeared to be poor finish was actually deliberate texture in the model! Ah noobs!
You are using an out of date browser. It may not display this or other websites correctly.
You should upgrade or use an alternative browser.
You should upgrade or use an alternative browser.
Random 3D printing chatter
- Thread starter Cenedd
- Start date
More options
Thread starter's postsCool, cheer LePhuronn. Consider me educated! ....well, a little
Quick (well, I hope!) strain relief from Thingiverse loaded into Fusion, scaling problem solved (it was initially 10x size!) and sliced ready to go. Gotta give it a try to see if it works or not!
Cat finally finished after 5 hours 40!
Some stringing between the ears. Is this just a normal artefact of printing or does it indicate some tweaks are necessary to temp or something?
"stringing"? You're using proper terms this early on?  Stringing is caused mostly by incorrect retraction settings and the hot end temperature set too high. Have a read
https://all3dp.com/2/3d-print-stringing-easy-ways-to-prevent-it/
Other than that though that's a pretty damn fine print.
I'd suggest grabbing a calibration cube from Thingiverse and printing to see how dimensionally accurate (or not) you are. And don't print with a raft, you don't need it for flat faces.
Stringing is caused mostly by incorrect retraction settings and the hot end temperature set too high. Have a readhttps://all3dp.com/2/3d-print-stringing-easy-ways-to-prevent-it/
Other than that though that's a pretty damn fine print.
I'd suggest grabbing a calibration cube from Thingiverse and printing to see how dimensionally accurate (or not) you are. And don't print with a raft, you don't need it for flat faces.
Other than that though that's a pretty damn fine print.
Well, if it makes you feel any better, today nothing will stick to the bed so I'm now getting the fails they talk about.
"stringing"? You're using proper terms this early on?
I'd suggest grabbing a calibration cube from Thingiverse and printing to see how dimensionally accurate (or not) you are. And don't print with a raft, you don't need it for flat faces.
Well, it was either that or cobwebbing! I shall have a good read and try some calibrations once I can get them to stick. Out of wifely patience now!
For now you'll have to level your bed every time. I don't know about the Ender 5, but the Ender 3 is notorious for its spongy springs on the bed. the very first thing you do on a 3 is upgrade the springs and attach nuts to stop the bolts spinning as you turn the levelling knobs.
The sort out your adhesion issues, make sure the bed is level and clean every time (IPA wipe down). Start at 60 degree bed and use a brim and take the bed down a couple degrees until you get consistent adhesion. Lowering your print speed helps too (I was diagnosing at 35mm/s but print at 55mm/s, I'm in no rush). When you're consistent, remove the brim and try again.
The sort out your adhesion issues, make sure the bed is level and clean every time (IPA wipe down). Start at 60 degree bed and use a brim and take the bed down a couple degrees until you get consistent adhesion. Lowering your print speed helps too (I was diagnosing at 35mm/s but print at 55mm/s, I'm in no rush). When you're consistent, remove the brim and try again.
Gave the nozzle a wipe - and got the obligatory burn. Knew it was hot (well, obviously) but it went through the cloth quicker than I thought. Managed to kick off a print and it just about stuck while it printed the brim. Baby-sat it for a bit and it printed most of the first of the temp tower steps. Came at the hour and a half poin to find the part moved across the bed and tumbleweed filling the space 
Thanks for the IPA suggestion, I was pondering whether that was a good idea. Seems like it may have helped it stick - which was absolutely no issue for the two prints yesterday - but I'm definitely getting nozzle ooze. Like you tell it to preheat the nozzle and when it gets up to temp, it starts slowly extruding only the feed isn't running. Tried stepping the extruder back a mm or two but I'm not sure it managed it....perhaps it wasn't hot enough to have fully melted yet.
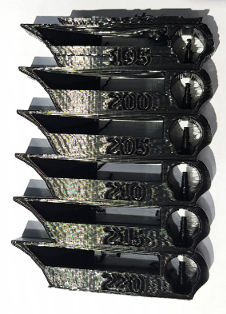
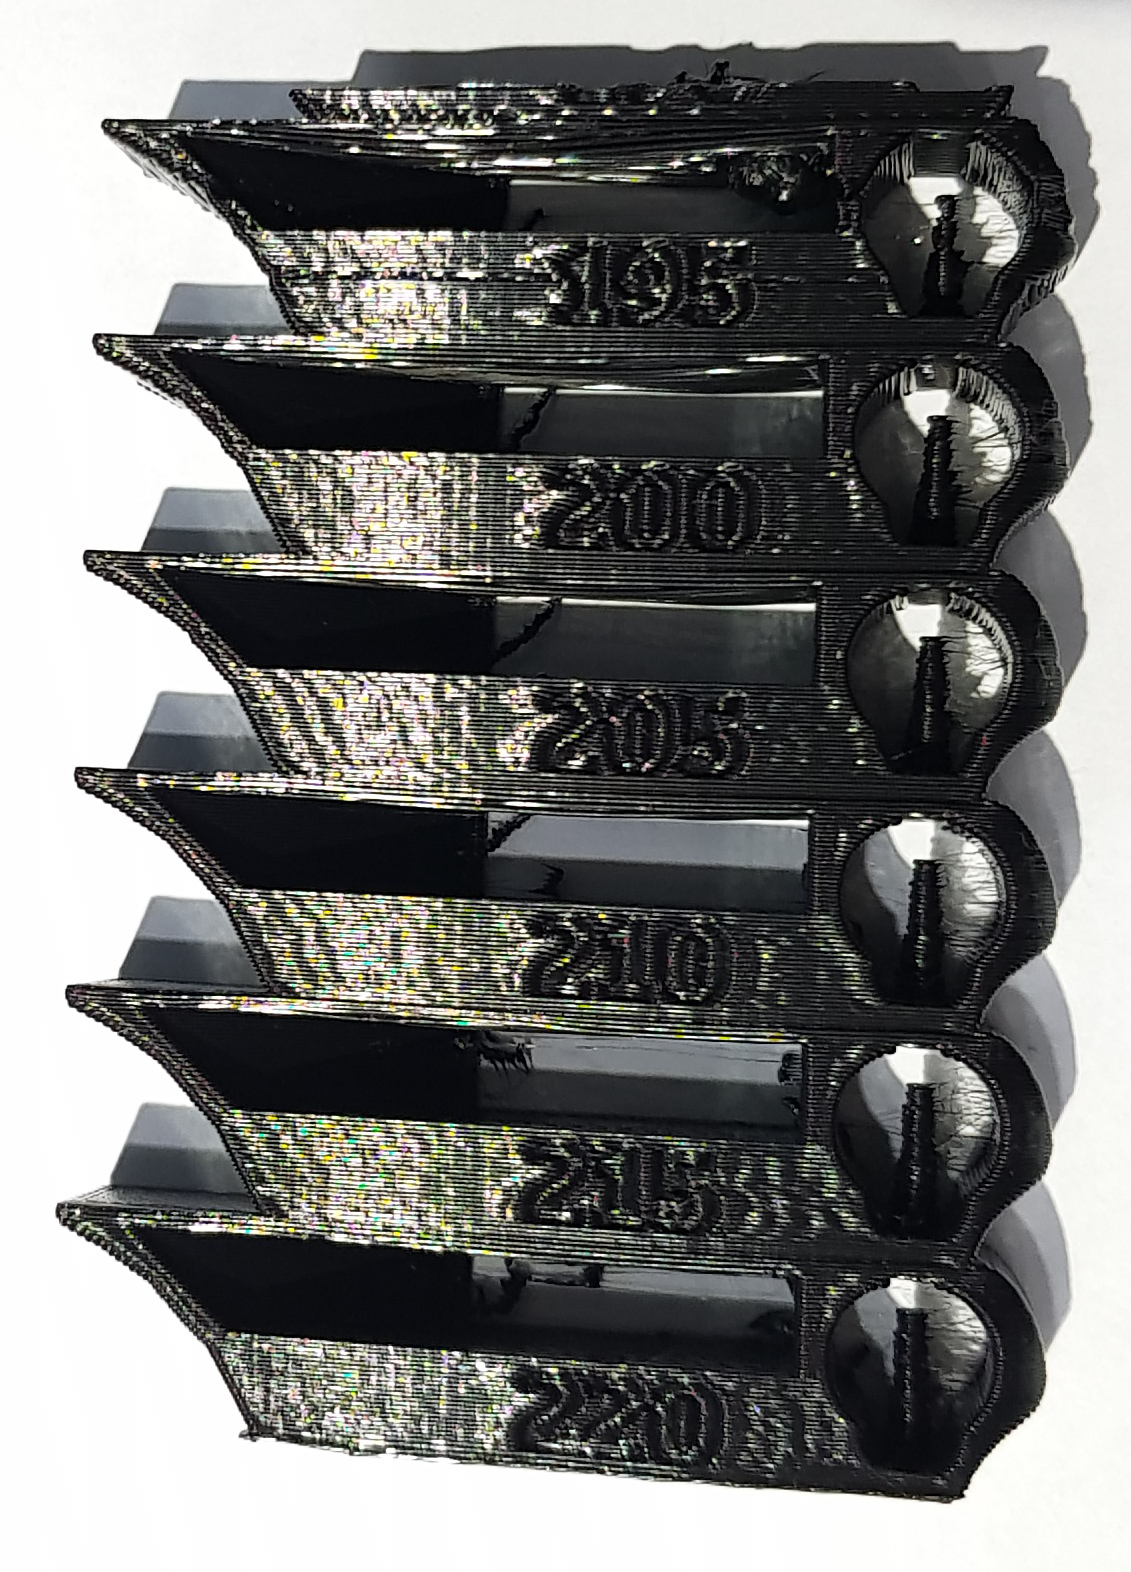
Incidently the Fusion 360 sliced print (strain relief for the bed cable) yesterday came out ok. Not the best quality - it looked like draft mode - but I suspect that was the slicer settings for speeds and feeds. Also the bridged holes that should take a cable tie were pretty much filled but I suspect that's probably the stringing as it was at 215°C like the strung ears on the cat. Also have Cura installed so will compare and contrast settings in that.
Thanks for the IPA suggestion, I was pondering whether that was a good idea. Seems like it may have helped it stick - which was absolutely no issue for the two prints yesterday - but I'm definitely getting nozzle ooze. Like you tell it to preheat the nozzle and when it gets up to temp, it starts slowly extruding only the feed isn't running. Tried stepping the extruder back a mm or two but I'm not sure it managed it....perhaps it wasn't hot enough to have fully melted yet.
Incidently the Fusion 360 sliced print (strain relief for the bed cable) yesterday came out ok. Not the best quality - it looked like draft mode - but I suspect that was the slicer settings for speeds and feeds. Also the bridged holes that should take a cable tie were pretty much filled but I suspect that's probably the stringing as it was at 215°C like the strung ears on the cat. Also have Cura installed so will compare and contrast settings in that.
Hmmm. Temp tower got a lot further after the IPA wipe (cheers LePhuronn). It had done 220, 215, 210, 205, 200 and 195 successfully. It started 190 and I came back to find the print nozzle in contact with the part and moving it about - so I don't think it had happened long ago. All of them exhibit stringing in the same places with possibly 215 showing slightly less. 195 has definite artefacts so is presumably too cold and I'm guessing that's why 190 fell apart but without time lapse (yeah, I'm already thinking Octoprint) I'm not sure. Thing that puzzles me is that I wound the extruder back a few mm and before long it starts losing steps as it can't pull hard enough. I gave it some assistance and the filament broke free....and yet it was still oozing for quite a while. This is at 200°C. Maybe I'll try the white that came with it and see if it's a filament issue....although I'm not sure how since yesterday's prints were no issue. The spool was vacuum sealed with dessicant too.
As the hot end heats up you are going to get some oozing, that's just mavity for you. But when you're actually printing, you shouldn't get any run off unless your PLA is far too hot or your retraction settings when you slice aren't correct. You can also get over-extrusion too, which is where e-step calibration comes in.
"The Edge Of Tech" is the YouTube channel I followed to the...um...letter (?) when building my 3 Pro. Watch this video about e-steps and flow rate, although you'll want the "free air" method since you don't have Octoprint just yet")
"The Edge Of Tech" is the YouTube channel I followed to the...um...letter (?) when building my 3 Pro. Watch this video about e-steps and flow rate, although you'll want the "free air" method since you don't have Octoprint just yet
Thanks for the replies guys. I'll have to get back to this. Two things: I seem to have had a bad reaction to rosin fumes (that I've not previously) and now it feels like my lungs have been fed through a cheese grater. Don't think it's the dreaded virus as it started after the soldering and I have no other symptoms. Also, I have clear enough mental space to look after my mum...and I can't say it's a conversation I'm looking forward to. I'll be back to this - probably sporadically - but didn't want to leave the impression I didn't appreciate the time you guys have taken to give advice.
Thanks for the replies guys. I'll have to get back to this. Two things: I seem to have had a bad reaction to rosin fumes (that I've not previously) and now it feels like my lungs have been fed through a cheese grater. Don't think it's the dreaded virus as it started after the soldering and I have no other symptoms. Also, I have clear enough mental space to look after my mum...and I can't say it's a conversation I'm looking forward to. I'll be back to this - probably sporadically - but didn't want to leave the impression I didn't appreciate the time you guys have taken to give advice.
Dude its never a worry and there is never any pressure, thats the great thing you just have your projects and take your time. Look at my 3d printer build, i was cracking through it at a decent pace until the work project came up and now i havent touched the printers in about a month. Life has a funny way of getting in the way like that.
@LePhuronn - Could you do me some pics of how the ender 3 bed attaches? Im just throwing up how to make that bottom axis.
Quick product shot from elsewhere showing the difference between the stock 3 and the 3 Pro
Now add 4 M4 countersunk bolts to each corner of that X plate with springs and screw the heated bed to it. Underneath the X plate are 3 Delrin wheels with an eccentric nut on one to run along the extrusion.
I'll try and get some potato pics of the real thing later.
Now add 4 M4 countersunk bolts to each corner of that X plate with springs and screw the heated bed to it. Underneath the X plate are 3 Delrin wheels with an eccentric nut on one to run along the extrusion.
I'll try and get some potato pics of the real thing later.
The print bed to the Y carriage?
Yes and how it connects at the end of the extrusion front and back.
")
If you're going for a moving print bed design, what other way is there to mount than slapping a motor at one end, pair of pulleys at both ends and roll a plate along the extrusion?
The Ender 5, however, has a static bed and runs the hot end X and Y (I forget the proper name for such a design)

Still motors and pulleys strapped to the ends of the extrusions, however
The Ender 5, however, has a static bed and runs the hot end X and Y (I forget the proper name for such a design)
Still motors and pulleys strapped to the ends of the extrusions, however