Random 3D printing chatter

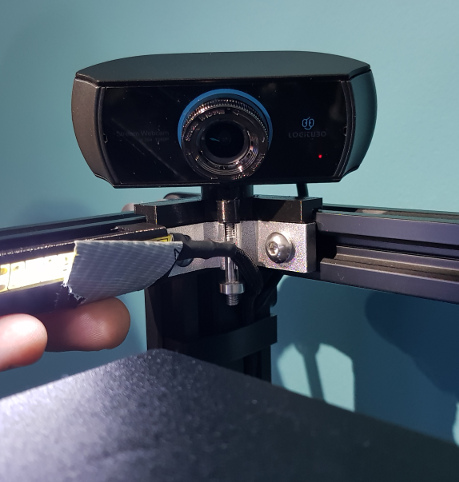
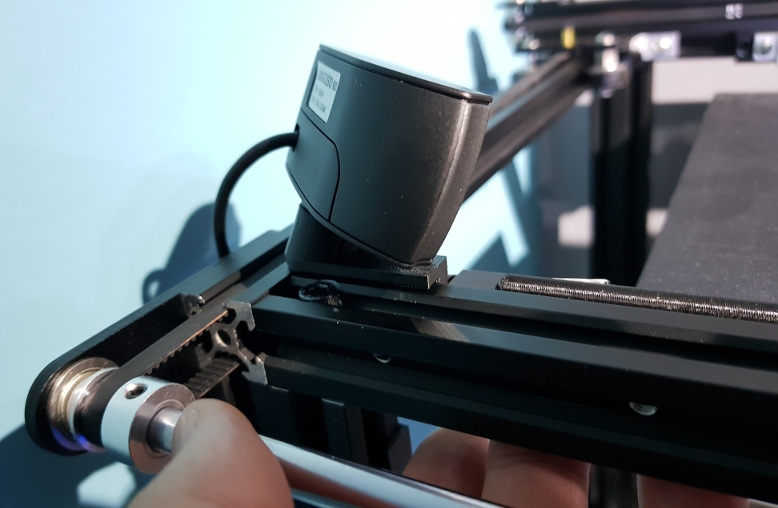
Trying out the new webcam but realise it's not in an ideal position - too close it needs moving further away

I got excited and jumped the gun. That cam was delivered today and all is not as it seems. It proudly proclaims H.264 on the box and in the listing and I thought this would be the answer. Nope. As far as I can work this out the situation is this:

  • OctoPi only supports MJPG compression.
  • The Spaghetti Detective (TSD) only supports H.264 so it kills off OctoPrint's webcamd and runs its own if you're in premium mode. I think if you disable that, it'll convert the webcamd feed but only at 1f/10s
  • This cam does seem to support H.264 but only on /dev/video2. By contrast, a Logitech C920 (which I refuse to pay between £80 and £200 for!) shows YUYV, H264 and MJPG all on /dev/video0 and hence works nicely.
Force webcamd to use that device and it doesn't like it because it only offers h264 and webcamd doesn't support it. TSD then doesn't stream because there's no cam.
Let it default to /dev/video0 and it'll work but it only offers 30fps in any resolution. Cue Pi 3b+ topping out its CPU trying to handle running an MJPG stream and FFMPEG convert it to H.264 for TSD.
For contrast, the Logitech C920 offers 5,7.5,10,15,20,24,30 in all resolutions and in any of YUYV, MJPG, H264.

So, the manual focus is good. The FoV is good. Quality seems ok too. But no use for TSD.
Just to add insult to injury, even with a C920, TSD seems to force it to 4:3, 640x480@25fps (which the cheaper cam wouldn't support anyway) and ignores any options such as manual focus specified in /boot/octopi.txt

If you're not running TSD in premium mode or are running a Pi4 (more power to throw at it) this may well not be an issue.

So, I'll be returning it, obviously. Well, that's what I was thinking up till a minute of so ago. With the Sony Playstation 3 Eye I can have a max of 640x480 but at silly fps that aren't any use. At 10fps it takes about 70% cpu usage to run the mjpg_streamer (for the cam) ffmpeg (to convert for TSD) processes. Quality is a bit fuzzy and low light is ...adequate. By low light, I'm talking about a 30cm strip of LEDs rather than having the room lights on. If I specify the options well, I can have 800x448@10fps with sharper picture courtesy of the manual focus, wider FoV (widescreen res) and better low light for 'only' 60% CPU....so I think it'll stay.

camera_usb_options="-d /dev/video0 -yuv -r 800x448 -f 10"​

Hope this is of some help to some of you!
 
Very pretty. Mostly, I think, down to OctoLapse making the timelapses. I guess it depends what you're after. If you want a more studio quality build video that definitely looks the way to go. I'm more after something I can check in on it using OctoRemote for paranoia's sake and currently it's a bit too fuzzy to get more than "Stiiiiiiill printing - no spaghetti!". TSD is important to me because I had massive adhesion issues at first so paranoia kicked in. To be fair, I think most of those were that my print head was too far away from the bed - perfect at the edges but too far away in the middle where it's dished. The mahoosive print I just did with a 200-odd square by 10mm base plinth was actually quite difficult to get off the bed.....even with the removable magnetic layer. Thing is, it was clearly vital so I paid for it.....and I'll be damned if I then run it at only 1/10fps! :D
 
Oh, incidently the commands for checking out the webcam are:

V4L2-ctl --list-devices
V4L2-ctl --list-formats
V4L2-ctl --list-formats-ext
Also:
lsusb
lsusb -s 001:005 -v (where 001 is the bus IS and 005 is the device ID got from the first lsusb command. Pipe through grep to filter or copy to notepad and browse)

Note that capitalisation of the v4l2 command is solely to differentiate between an L and a 1.
 
Very true. May have to replace my cat with the PLA one that my son calls "Chairman Meow". Chairman Meow has NEVER left bits of wildlife smeared across the hall floor!
 
Got my replacement TMC2209's yesterday from Aliexpress, only 18 days for delivery which is pretty good. Printer back up and running now. I'm going to tidy up the wiring to improve airflow in the electronics box jus tin case they were getting too hot.

If you're running a 40mm Noctua, have you room to cut in a bigger one? Or at least measure the temps things are getting to? I ran a 92mm Noctua for my control box - it was the only one they did thin enough - and that seems to do ok cooling the control, PSU, Pi and buck convertors. Box wasn't warm to the touch after 33½ hours of print time so I'm figuring it's happy enough.
 
I bought a 1/4-20 UNC die (tripod thread) to make a mounting post for the new webcam. Like I'd done for the PlayStation 3 Eye but it has an existing thread. Made a lovely aluminium post that screws into the thread and mounts through the hole in the game's corner reinforcement. Nice. Moved the carriage about to test.....crunch. New cam sticks out just touch more. Going to have to remove all the cam's mounting and design something from scratch. :-/
 
That's bound to be a "feature". Possibly a consequence of the power-fail resume feature. Either that or they cheaped out and there's not enough RAM to hold the gcode.....no, surely they wouldn't :-o
 
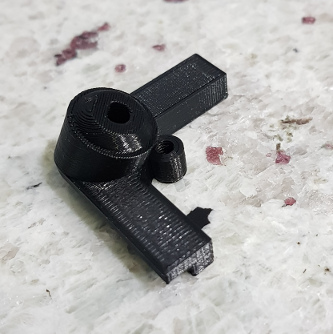
Got the camera mount done. In the end I opted to keep it simple and do a fixed mount. Got rid of the male thread (which worked well) and replaced with a female M4 thread purely to make it easier to print - awkward protrusion on only one side then. Didn't immediately fit a bolt but ran a tap through it carefully and it cleaned up fine. The piece of duct tape you can see is a 'magic' "repair" for the first set of LEDs flickering on the light strip....already.


Any of you guys had issues with extruder jamming and can shed any light on mine? I'm trying to print a part that has some complicated support - it's essentially a lid and there are cut-outs in the top of it so it's running support from the bed to where it starts the roof. Don't ideally want to print it the other way up as there would be marring on the show-face then. Problem I'm getting is that it gets 1.5 to 2.5mm up the print and then you can hear the extruder clicking as it fails to feed. I've pulled it back out, cleaned the nozzled just in case and re-threaded it. Feeds smooth. What seems to happen is that the teeth of the extruder chew up the filament enough that it flattens it - this happens a few times and then it's too difficult to push it down the tube and it fails. Had it print a number of layers with no filament. I've been running a 6mm retract as guides said to start at 5mm and go up from there to cure dribbling. This worked pretty well for a 23.5 hour print the other day but I'm guessing that with the small, intricate supports being printed, that there are lots of repeated retracts and that's chewing it too much. It could be though that it's getting chewed when it fails to feed - I'm not really certain if it's cause or effect. I'm trying a print now (same model) but with the retract set to 1mm to see if that helps. Mainly after anyone's experience of this to know if I'm barking up the right tree. Printer, for reference, is an Ender 5 Pro running a Capricorn bowden tube.

Managed some Evryone TPU prints earlier. Pretty much same settings as PLA - including the 6mm retract. Tried it without and it was too dribbly. I think the speed settings in Fusion 360 (as a slicer) are pretty slow anyway as the recommend 'slow' speeds were significantly faster than the defaults - which are 26mm/s for internal perimeters, 18mm/s for external perimeters, 0.4 multiplier for first layer, 250mm/s for rapid travel (not extruding) and I've no idea for infil - can't find anything else with a mm/s unit!

Edit: ....and now, I find it! 60mm/s sparse infill, 40mm/s solid infill.
 
It doesn't seem to be the nozzle that's presenting the resistance to be honest. It seems to be the filament in the tube when there are multiple locations of chewing on in - one is ok but a few and it becomes a problem. I've probably printed half a roll of this stuff so far - it's dribbly and shatters if you look at it wrong but hasn't previously given me this sort of problem until Fusion sliced some overly stupid support at it. I'm printing it at the moment with 1mm retraction and it so far it's got about 4mm up which is a significant improvement. Doesn't seem to be too dribbly either for some reason. Have noticed it hitting the support it's just roughed as it travels (often seemingly pointlessly) to another area to print some other support and then back again. The joy and bane of Fusion here is that it is constantly updated.....sometimes for the better and sometimes not so much. One I particularly noticed was that they briefly got rid of the move bed down (or up, if you prefer) after the end of the print. It still had a park command but no Z move so the nozzle sat where it finished and melted a little puddle in the print. That's back again now - which saves editing it in manually.
 
Retractions, I had this on a print a while back and I just slowed down the retractions. I used to retract at 100mm/s now its down at like 60mm/s, I retract 7mm as I found a longer retraction actually helped rather than a shorter one.
Ok, Fusion defaults to 30mm/s for retracts. Good to know I'm not well outside the retraction range for this setup. Not sure why it's not dribbling more with only 1mm when it did at 5mm and 0.5mm. The joys of the 3D printer eh?!
 
Cheers, that's helpful. Makes sense to have a setting for "unretract distance". I have multiple references to "prime" in Fusion....but none of them, of course, look related to what you've said.
There's "nozzle priming" but that's a line before printing to get it flowing.
There's "Change Extra Restart Length" but I think that's if you have multiple extruders since it describes as "Extra restart extrusion after tool change".
Some stuff on "Prime Extrusion Width" and "Prime Edge Clearance Distance" but it's on the "Skirt-brim" tab.

My dimensions don't seem to be coming out exactly as they should so I'm not sure things are going to fit quite right anyway. eg length modelled at 118.1mm and printed at 117.6mm. Width modelled at 56.5mm, printed at 56.1mm. These are near enough the same error margin over a long enough distance that I don't think it's a percentage size difference....although, they are in different axes so I suppose it could be different percentages per axis. Definitely a problem for tomorrow to be replaced with a beer!
 
Found the black Geetech filament had shattered between reel and extruder and also multiple times in the tube. So thought I'd give the white Creality filament a shot. Is it terrible or does it just require very different settings? First layer had gaps in the extrusion and it doesn't seem to be filling the gaps very well leaving a very streaky finish where the lines don't meet all that well. I've turned the temp down from 210 to 200 and adjusted the flow up to 130% on the machine. Am I barking up the wrong tree or is this just bad or wet filament?
 
I don't think it's blocked as I swapped to some TPU and it printed fine. I heated the nozzle, pulled it back out the tube and shoved the new stuff through until it came out red instead of white.
There was quite a bit of chewing of the filament by the extruder and it had flattened in places so it could be the retraction issue again...but that doesn't explain why there was interrupted flow during and after priming. I cancelled the first attempt, scraped it off and started again and it was the same. There shouldn't really have been more than the one retraction between priming and first perimeter.
 
Evening guys. I'm trying to print a control panel faceplate with text labels for buttons and LEDs. I've got two problems that I think I know the answer to but would like some advice/recommendations:

Problem 1: Printing upside down, the finish of the bottom - which is the top face once finished - the surface finish isn't great. Partly I think this could possibly be tuned a little in slicer but there are two issues mainly responsible: rough surface (deliberate) on the magnetic bed which transfers its pattern into the print and a dip in the middle of the bed that causes variation of 'squish' in the first layer that shows as variations in the 'blending' of each extruded line.

I think both of these could be solved with a glass bed that doesn't have a patterned surface. These seem to be a minefield of quality. Anyone got any recommendations?

Problem 2: The text needs to be quite small to fit (2mm letter height) and I cannot make any more space for it. I believe the definition of this might be improved if I swap to a 0.2mm nozzle. Am I right and what nozzle would you recommend?

I'm trying to flood the letters with paint to make them show up. Currently the paint bleeds down the layer lines through capillary action. Hoping a smoother finish off a glass bed, should stop that.
 
STLs are mesh files, aren't they? Are you actually feeding those direct to the printer (an onboard slicer?) or are you running them slicing them through a slicer first and then giving the printer gcode?
I would have thought a different slicer would be the best bet as it'll spit out slightly different gcode.
I'm using Fusion 360 (free for personal use) and that will import a mesh and then slice it for you. It's definitely a work in progress as it will do the odd weird thing but I don't think I've had anything fail due to that - loss of adhesion, filament snap, extruder-chewed filament jam, yes...but not an outright refusal to print.
 
Any way of seeing which line of gcode it gets stuck on? Would Octoprint (or PC even) controlling it over USB show you the line of Gcode last sent? That might let you see what's causing it to choke and you can then look up if there's an alternative to that - a command that is supported.
 
I'm after some sanity advice please guys. I've got a 0.2mm nozzle on now and a glass bed. I resorted to adding some hairspray to the bed because of adhesion issues. It seems that whatever I try to fix issues seems to make something else worse.
I've raised the bed to 70 and the nozzle to 220 and for a while, it seemed to be extruding and sticking. Trouble is that it seems to stop extruding properly and start a thinner a less consistent bead. You can see what I mean if you compare the top outer perimeter to the circles in this pic.
I'm assuming this is a partial nozzle clog? What can I do to stop that? I've already raised the temp and tried bringing retract down from 1.5mm to 0.5mm - which of course resulted in more dribbling. Should I be turning off retract entirely?
I did notice that the extrusion seemed to be being laid onto the bed rather than extruded onto it - ie it is extruded slightly above the bed and drops onto it. Fine for straight lines but turn a corner and it doesn't stick well. I've levelled the bed to A4 thickness, then moved the entire print to the back edge because the middle still seems like a larger gap than the corners. I've then tried giving all the bed wheels about an 1/8th of a turn to reduce the gap. I've read there are offsets that perhaps I should be looking at instead but I'm not really sure where to go with that. I did try reducing the first layer height in the slicer but I'm not sure if I'm in the wrong place.

Oh, before I switched nozzles, I printed a calibration cube. 20.0, 20.0, 20.4 (rounding to 1 dp). It would seem the Z axis is off but I'm not really sure what to do about it. Any hints?

Thanks in advance.
 
Back
Top Bottom