Random 3D printing chatter

I’ve racked up 250hrs on the a1 since getting it on July 4th. Starting to slow down the last week. The majority of my prints have been figurines across different games and shows.

I will try a tri colour and marble print next I think. Definitely printed less multicolour prints than I thought with the ams but it does offer that colour switch without changing spools which is fantastic
 
Had a play with some of Bambu's new PETG-HF. Fair warning, it clearly states that it needs to be dried before use....so obviously I just chucked it in and started printing. Why? I figured that it's a brand new product and I'd had to wait for the stuff to come back in stock so how much water could it have absorbed in that time in a vacuum sealed bag?!

Printed a model that was 60x35x30 with a separate lid. It was about 10% faster with the HF than the normal. Quality? Well, a somewhat mixed bag - but bearing in mind I didn't dry it. A little under-extruded out the gate - a few very slight smears on the top surface. Ran a flow and PA calibration and it's difficult to tell if that made it better or worse to be honest. I started losing bed adhesion at that point - so that could be it was wet. Third go round, it let go the bed and pulled the tool head cover off. Ended up printing it in SunLu PETG on the A1. Trying another print with the 1st layer speed dropped to 60% of normal.....and nope. It just doesn't like interrupted 1st layers on my (G10) print bed. So, stuff with a solid bottom only then, it seems. Maybe I'll try shoving a textured bed in there and have a last failure! :rolleyes:
 
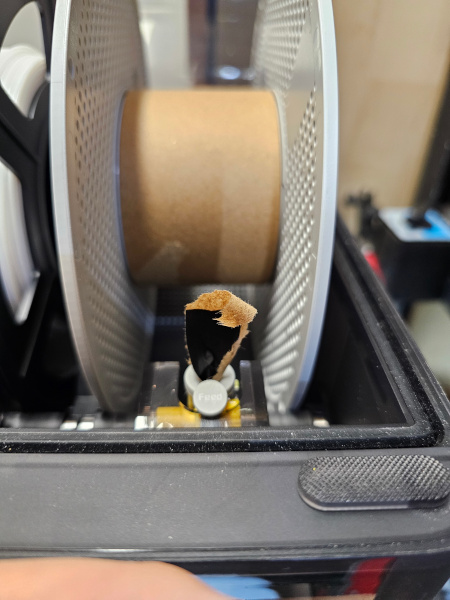
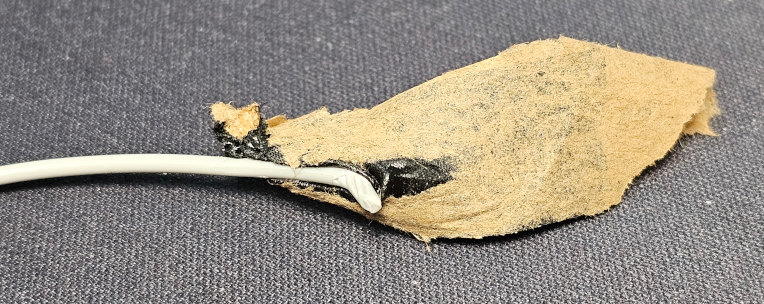
A couple of updates on the PETG-HF: one good, one bad. With the textured PEI bed it stuck fine and I got through the whole reel printing filament bunker inserts. That's the good. The bad: when it got to the end of the roll, it nearly trashed my AMS:


A joy to get out of there!


This is the result of the Bambu PETG-CF by the way. Just don't look round the other side where it was insufficiently supported :D


I did find on subsequent parts that I needed to turn down the speed of internal solid infill so that the second top-layer stuck. Without it, the first layer after infill went down slowly and was fine but then the next layer went down at 250mm/s and a significant amount didn't stick leaving ends sticking up which mostly got ironed down but did make imperfections in the surface.

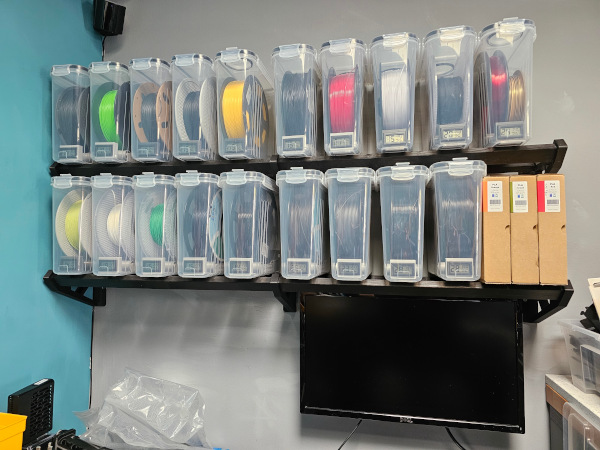
Lastly, have I gone overboard on tidying the filament storage?! Don't worry...there's more en route for those last remaining boxes! :D


Shelf brackets are PETG-CF (Eryone for the top, Bambu for the bottom). Corner wall bracket for the Valve Index base station is PETG. Wall mount for the workbench monitor is PETG (although not visible). Hmmm, I may have a plastic problem! :cry:
 
I’ve racked up 250hrs on the a1 since getting it on July 4th. Starting to slow down the last week. The majority of my prints have been figurines across different games and shows.

I will try a tri colour and marble print next I think. Definitely printed less multicolour prints than I thought with the ams but it does offer that colour switch without changing spools which is fantastic
Yes, everyone's the same with the AMS!! It's actually quite handy as a 'runout reel', so I often have a backup of the same colour, so if it runs out overnight, it moves onto the next rather than stop
 
Sorry to ask one of these questions but I prefer you people for advice for some reason.
I'm interested in getting a 3D printer mainly for miniatures like Warhammer etc. And hoping it can do some of the bigger vehicles.

I see the Elgoo Saturn mentioned a lot but I see there is a new one.

Based on my use case, would this be a bloody good start? I'm not interested in getting just an okay one. I generally want the best I can afford to start with.
And I have watched some videos so I understand the basics about splicing software and the other things I need for curing etc.
 
Couldn't see it mentioned but apologies if I missed it, what boxes are you using for those dry boxes? I've got more than a few rolls of open filament wrapped up in plastic that could do with a more permanent storage setup! Cheers
You know, I could have sworn I posted more details somewhere...but I can't find them either :rolleyes:
So, I printed what confirmed my suspicion that this would fit (remarkably difficult to find reliable dimensions of these things!): Marsgizmo Filament Bunker v3. There are plenty of remixes and so on but this seems to be the original.
There's also a video with an idea about making them upside-down that might be of interest:
The containers I used I'm not sure if I can post a link but search for "Skroam 4 Piece Plastic Storage Containers" and you'll find them. They're the 4 litre size and they have the three grooves for a handle rather than the deep inset handle that reduces the width of the container significantly.
Edit: I think the octagonal shape of the opening on the top panel is also a giveaway of the correct type.

So far, most of my containers read either 10% or 14%. I think this is the lowest they read. I've got one at 19% and a roll of PETG that I hate (cardboard spool that gave me no end of grief) that's sitting at 26% even after drying it twice.

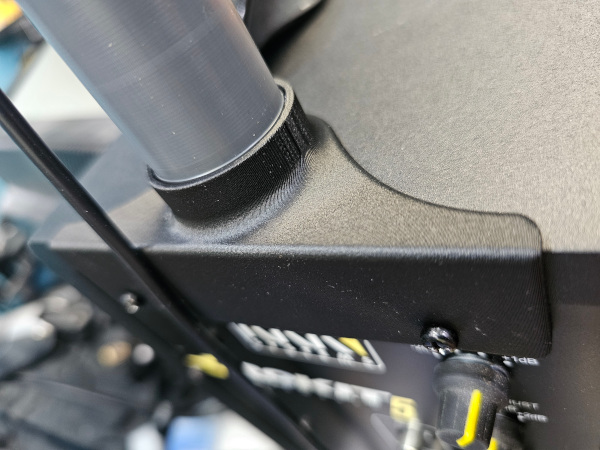
Rather than make holes in all of mine, I printed a plug for one of the spouts and put a tube in that:
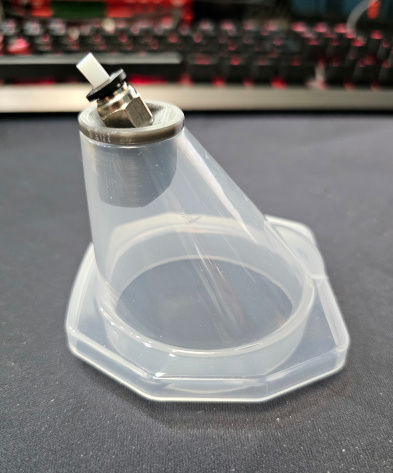


Help yourself to the step file if you're using the same containers. I've got the Fusion 360 model if that more helpful...but it's one of those that's evolved during the design process so it's not a masterpiece of concise design :D
Edit: Another option is to design directly for the octagonal opening as there is more of a seal there. You might be able to start from the design in the video and modify from there if that's the way you want to go.
The inserts are PC4-M10 pneumatic push connectors by the way.... although it's worth noting that if you're designing a model with the thread included, it's NOT an M10 thread but a G1/8 which is a BSPP series thread (in Fusion it's under BSPP Pipe threads).
 
Last edited:
You know, I could have sworn I posted more details somewhere...but I can't find them either :rolleyes:
So, I printed what confirmed my suspicion that this would fit (remarkably difficult to find reliable dimensions of these things!): Marsgizmo Filament Bunker v3. There are plenty of remixes and so on but this seems to be the original.
There's also a video with an idea about making them upside-down that might be of interest:
The containers I used I'm not sure if I can post a link but search for "Skroam 4 Piece Plastic Storage Containers" and you'll find them. They're the 4 litre size and they have the three grooves for a handle rather than the deep inset handle that reduces the width of the container significantly.
Edit: I think the octagonal shape of the opening on the top panel is also a giveaway of the correct type.

So far, most of my containers read either 10% or 14%. I think this is the lowest they read. I've got one at 19% and a roll of PETG that I hate (cardboard spool that gave me no end of grief) that's sitting at 26% even after drying it twice.

Rather than make holes in all of mine, I printed a plug for one of the spouts and put a tube in that:


Help yourself to the step file if you're using the same containers. I've got the Fusion 360 model if that more helpful...but it's one of those that's evolved during the design process so it's not a masterpiece of concise design :D
Edit: Another option is to design directly for the octagonal opening as there is more of a seal there. You might be able to start from the design in the video and modify from there if that's the way you want to go.
The inserts are PC4-M10 pneumatic push connectors by the way.... although it's worth noting that if you're designing a model with the thread included, it's NOT an M10 thread but a G1/8 which is a BSPP series thread (in Fusion it's under BSPP Pipe threads).
That's great, thank you very much for the detailed reply! As soon as I get my garden office up and running, I'll have to do something very similar.
 
No problem.

As soon as I get my garden office up and running,

If you can, go for an Aircon unit (proper split system) rather than convector heaters or (god forbid!) storage heaters like they were trying to foist on me. It's a bit pricier to buy but you run it in reverse to heat the place over the winter, it's cheaper to run than a convector and in the summer you don't broil while you're trying to work.

Also, don't put roof lights in a flat roof unless you have utmost confidence in your roofer and you know where he sleeps! AMHIK! :rolleyes:
 
No problem.


If you can, go for an Aircon unit (proper split system) rather than convector heaters or (god forbid!) storage heaters like they were trying to foist on me. It's a bit pricier to buy but you run it in reverse to heat the place over the winter, it's cheaper to run than a convector and in the summer you don't broil while you're trying to work.

Also, don't put roof lights in a flat roof unless you have utmost confidence in your roofer and you know where he sleeps! AMHIK! :rolleyes:
Oof...I did put a ventilation pipe through the wall as we built it for a portable AC and fume extraction for soldering / resin / whatever so kinda in hand for that piece (albeit nowhere near as good as a split unit setup). I do, however, have a roof light ready to go in...its a raised frameless unit though so hoping that we won't get any issues with water ingress - but who knows! Still waiting for the roofers to come and do the rubber roofing though...
 
Rubber may be better if sealed well as it goes round the rooflight. The thing you may want to ask them about is, if the rooflight is square, should there be some wood (to form a slope) under the rubber on the uphill side so that the water can run off and not pool behind the rooflight. That's the issue I had in that when the water pools, it eventually finds a way in. The other option would seem to be to mount them at 45° so that they are diamond shaped with respect to the roof - then there's not a flat side for the water to pool by. Hope that makes sense - can send pictures in a PM if it's potentially useful but clear as mud.
 
Sorry to ask one of these questions but I prefer you people for advice for some reason.
I'm interested in getting a 3D printer mainly for miniatures like Warhammer etc. And hoping it can do some of the bigger vehicles.

I see the Elgoo Saturn mentioned a lot but I see there is a new one.

Based on my use case, would this be a bloody good start? I'm not interested in getting just an okay one. I generally want the best I can afford to start with.
And I have watched some videos so I understand the basics about splicing software and the other things I need for curing etc.
Elegoo are excellent resin printers, I'm just about to cover their Mars 5 Ultra, I think you'll not be disappointed with the Saturn!
 
Looking to buy my first 3D printer, it will be used to make medium to large one colour prints using PLA and PETG with a view to perhaps do multi-colour in the future. I know the general feedback I have been getting is to buy the P1S and even get the AMS as it’s cheaper than buying it down the road.

However, I have been back and forth between the P1S and the Prusa MK4S. The reason being is the noise. This printer will be next to my desk in the dining room of an open plan house. So, the noise is a big concern especially when doing 8hr plus prints. There are also another couple of other pros; slightly better energy consumption, the customer service, no cloud required when updating etc, long term part support and if I do add the MMU3 is significantly faster and less wasteful than the AMS. However, the P1S still pulls me back due to price and the enclosure. Being in the living space with kids the enclosure is appealing due to VOC I do however also have a Hepa filter I can use in the room and I’m sure the P1S enclosure probably vents out the back anyway?

Also looking through the Bambu Trustpilot, Facebook, discord and Bambu community group while majority of the issues are easy repairs that you can fix with parts that are available but there’s still quite a few that require customer service and that seems to take anywhere between a day and 2 weeks. Just looking today and there’s two people in the UK that have had damaged P1S’s delivered, one has his going back for replacement so not sure how long that takes but the other person had his collected over 3 weeks ago and can not get an update so he's having to do a credit card charge back. Also makes me question what happens in two years’ time and the P1S is a generation or two behind, are they still going to have parts available I know they have promised software updates until 2028 but who knows when it comes to part support.

I keep chopping and changing my mind, maybe you guys have something to add?
 
Last edited:
Hmmm, post is gone now but in case it's a mistake. I don't think you'll have regrets about going for either a Prusa or a Bambu to be honest. I have Bambu and it's very good. Yes, I'd prefer it to be less cloudy based but you can do it if you want - there are even integrations into Home Assistant.
Noise, yeah you're going to have trouble with that. I have an X1C and had to put it on the other side of a partition wall because of the noise. Maybe you can run it slowly in "silent" mode but you lose the speed. I now have an A1 Mini in the room and that's mostly fine noise wise.... although when the part cooling fan ramps up to 100% for a burst at intervals, you wouldn't want to be trying to concentrate on something complicated.

Fumes: for PLA and PETG you're not going to notice anything. I just printed my first ASA (in enclosure) and there was a smell but nothing that having a door open didn't completely fix.... although I believe that one is somewhat toxic like ABS.

You might want to consider (if possible) putting the printer somewhere that has WiFi coverage but doesn't disturb anyone. Then you're fine for noise even on a long print overnight. A dry shed with power even.
I was having second thoughts but i put the post back up.

Thanks for confirming about the noise I keep thinking it cant be too bad and then have to remind myself it could be for 8hrs or so a day, it would most likely drive me crazy and unfortunately the only place I can place it other than next to my desk is my downstairs cupboard but that has all the central heating pipes running through it and the humidity is around 60% so while I get rid of the noise issue I introduce loads especially when using PETG. Good to know with the PETG fumes too.

I think the MK4S is the correct choice but just wanted to be sure I’m making an obvious mistake.

Thanks
 
Last edited:
You may find that the noise isn't a Bambu thing. Any high speed printer is going to make noise when whatever moves, moves fast. Motor noise cancellation does help a bit but it mainly makes the character of the noise less irritating. Bursts of high-speed fan are also annoying - as I'm sure you know - and it's often not at a fixed speed, it will ramp up for a short section and then down again so it doesn't fade into the background so much. The hot cupboard probably isn't so much of a problem as you think as for some prints, a warm breeze-free environment help (mainly ASA and ABS). The humidity is fairly easy to deal with too - just get either a dry box or one of the cereal containers (see post 1467 above), screw in a pneumatic fitting, slide in a bit of bowden tube and you're good to go. A good dose of desicant in the bottom and external humidity isn't a problem.
 
A couple of updates on the PETG-HF: one good, one bad. With the textured PEI bed it stuck fine and I got through the whole reel printing filament bunker inserts. That's the good. The bad: when it got to the end of the roll, it nearly trashed my AMS:


A joy to get out of there!


This is the result of the Bambu PETG-CF by the way. Just don't look round the other side where it was insufficiently supported :D


I did find on subsequent parts that I needed to turn down the speed of internal solid infill so that the second top-layer stuck. Without it, the first layer after infill went down slowly and was fine but then the next layer went down at 250mm/s and a significant amount didn't stick leaving ends sticking up which mostly got ironed down but did make imperfections in the surface.

Lastly, have I gone overboard on tidying the filament storage?! Don't worry...there's more en route for those last remaining boxes! :D


Shelf brackets are PETG-CF (Eryone for the top, Bambu for the bottom). Corner wall bracket for the Valve Index base station is PETG. Wall mount for the workbench monitor is PETG (although not visible). Hmmm, I may have a plastic problem! :cry:
Really like these containers, are you able to share a link to them at all please
 
@goldy6660 Not sure a link is allowed as while this product isn't something the would compete with OCUK, they do on other products.
All the details are in this post though and if you search Google for that term you'll get a link as the first result. Current price is £19 for four. There are probably other sellers of an identical product in various places round the world but the ones you want have three grooves at the back instead of a deep handle and an octagonal shape on the top for the spouts.
 
Could someone point me in the right direction on the best place to start learning how to design from scratch? Which apps etc and how to get them across to my A1, I have a little experience with sketchup if that helps?
 
You've got a few options that probably will depend on where you want to end up (personal use, business use etc).
I personally use Fusion 360 as there is a free for hobby/personal use version if you jump through the right hoops in the right order and renew it each year AFTER it has expired - you can't do it before.
OnShape is another that's all web-based and seems to be quite popular too.
Solidworks is also well thought of but I don't think there's a free version so it's probably more applicable if you're going to be usiyit professionally and the field you're looking at prefer it.
There's also things like Tinker CAD but - and I may be doing it a disservice - I think it's more aimed at STLs and tweaking stuff than a full featured package.
Irritatingly, I'm not sure you'll find SketchUp a lot of help - it's the path I started down but doesn't seem to have kept up and other things are different enough that it doesn't help a lot.

As for where to learn, YouTube is probably your most accessible. There are paid for online courses too, depends on your learning style/pace.
 
Back
Top Bottom