You are using an out of date browser. It may not display this or other websites correctly.
You should upgrade or use an alternative browser.
You should upgrade or use an alternative browser.
Repairing/Restoring my damaged Ford Capri 2.8i
- Thread starter Iamzod
- Start date
More options
View all postshi new to this forum ,i have a capri same as you thats been laid up in the back garden since 2002, but the body works in a poor state ,id like to start stripping it back ,but cant weld .can you tell me if your using a mig welder there or something else ,also where have you been getting those new pannels from thanx
Yes I'm using a Clarke Pro 90 mig welder & an auto dimming mask, I could not weld when I started either, I learned by watching youtube & practicing on scrap. The panels I got from various sources but mainly from a company called Imperial Panels in Doncaster.
The NOS Front panel I found on E-Bay & had to pick it up from Manchester, cost me £300 if I remember correct. One thing I will point out is don't bother with pattern wings as they are an absolute nightmare to get to fit so I ended up getting a 2nd Hand one and a pattern one & basically making one decent wing out of two naff ones, it's not perfect but far better than the pattern one I had tried.
Be prepared for it to take some time before you start. I have seen threads on other forums where people have started a restoration and it has turned into a major job then given up as they uncovered all sorts of horrors, I have been extremely lucky as mine wasn't that bad really.
Whilst I am posting this I may as well provide a minor update, I have just started re-assembling the front suspension & steering, all gaiters have been replaced with nice new ones even though the originals were still good enough for an MOT for £15 it was pointless not to, likewise with the track rod ends, all new just because I felt like it so I've basically replaced the entire front suspension with new stuff apart from the top mounts, arb & the lower strut casing.
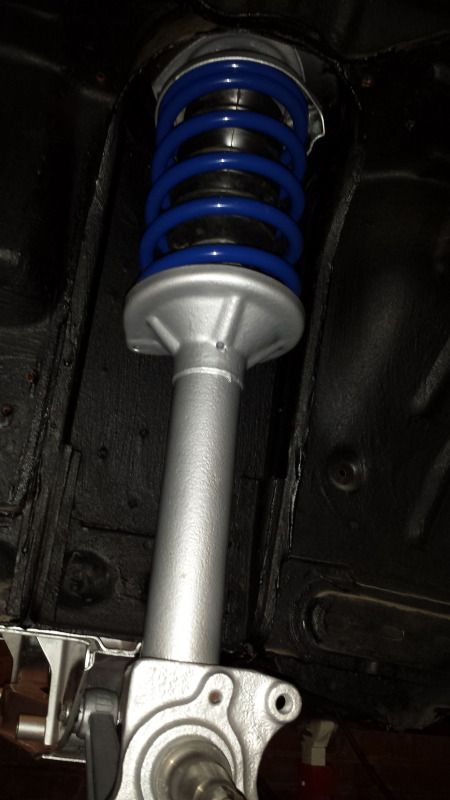

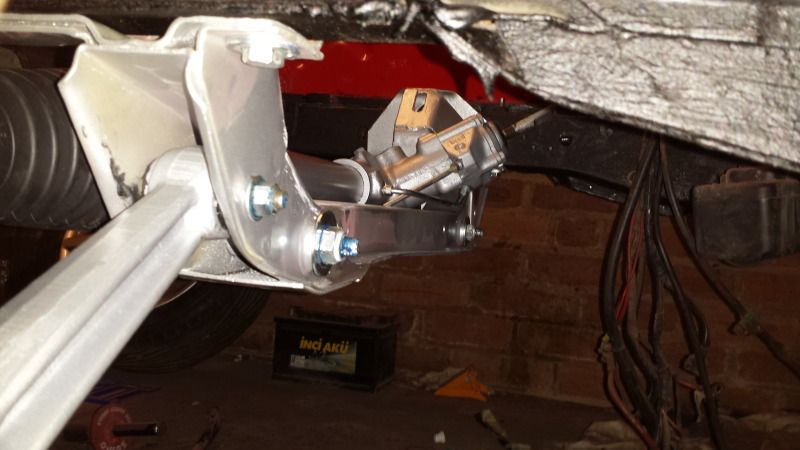
I wonder how long I can keep it all that clean?
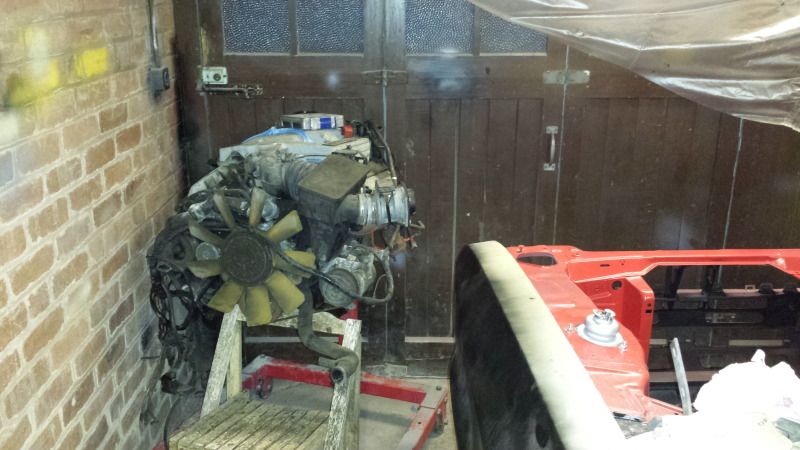
I spent all of last weekend finally recovering the engine from it's resting place a few miles away in someone elses garage, got it home and onto an engine stand as I need to start working on it.
For the first time the entire car is now all at one address

It needs a serious tidy up though as it's absolutely filthy, I have noticed a set of later model camshafts on E-Bay at the moment too which are tempting but somewhat overpriced or I'd have bought them.
Another month another update!
The front suspension is now fully re-assembled, I got the ARB fitted last week but I am really unsure about the polybushes fitted to the outer part of the control arm where the ARB goes through it as they seem to distort when I try & torque the bolts up. I will try again once the suspension is loaded up with the weight of the car & engine and see if it makes a difference.
I have also been in touch with a local engineering firm about Modifying the hubs to take the discs from a RWD Sierra Sapphire Cosworth which should hopefully help with the terrifying brake fade that the standard brakes demonstrate at speed.
The fuel system seems to be far simpler than the 2.8i engine, I just need to get a couple of new hoses made up & connect the return pipe up below the passenger footwell & one from the fuel filter to the fuel rail. This would have been very simple if the numpty I bought the engine from had not cut the old lines so short.
The EGR system needs blanking off so I shall be either welding a bolt into the exhaust manifold hole for the pipe or getting the hole threaded so I can stick a bolt in there.
I have been attempting to tidy up the engine and have ended up painting the camshaft covers red, painting the block silver & I am planning on polishing up the plenum chamber for a maximum bling mirror finish.
As you can see, 20 years of crud leaves a rather thick coating!
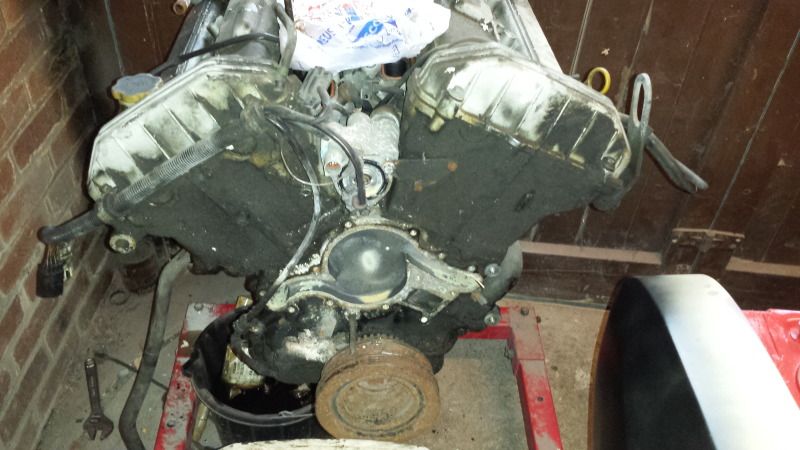
It now looks a bit cleaner!
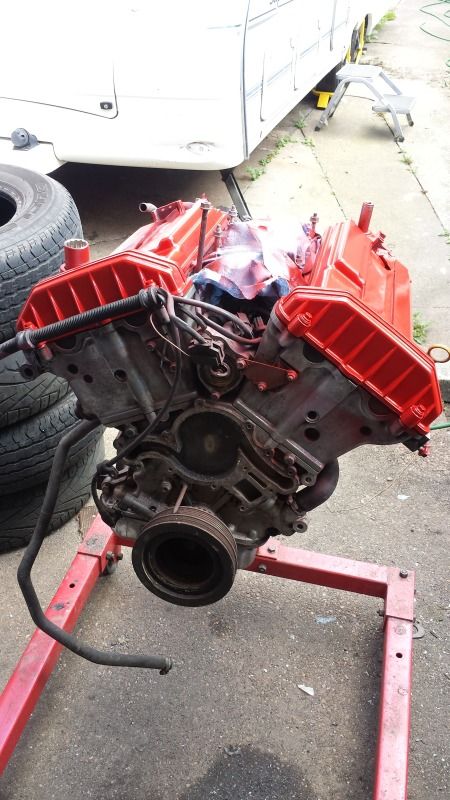
(Overspray since cleaned off)
It will never be as clean as some peoples engines but I'm doing this on a budget and with a set of cam cover gaskets alone coming in at £90 a full stripdown gets very expensive, besides i'll likely forget where half of it goes!
The front suspension is now fully re-assembled, I got the ARB fitted last week but I am really unsure about the polybushes fitted to the outer part of the control arm where the ARB goes through it as they seem to distort when I try & torque the bolts up. I will try again once the suspension is loaded up with the weight of the car & engine and see if it makes a difference.
I have also been in touch with a local engineering firm about Modifying the hubs to take the discs from a RWD Sierra Sapphire Cosworth which should hopefully help with the terrifying brake fade that the standard brakes demonstrate at speed.
The fuel system seems to be far simpler than the 2.8i engine, I just need to get a couple of new hoses made up & connect the return pipe up below the passenger footwell & one from the fuel filter to the fuel rail. This would have been very simple if the numpty I bought the engine from had not cut the old lines so short.
The EGR system needs blanking off so I shall be either welding a bolt into the exhaust manifold hole for the pipe or getting the hole threaded so I can stick a bolt in there.
I have been attempting to tidy up the engine and have ended up painting the camshaft covers red, painting the block silver & I am planning on polishing up the plenum chamber for a maximum bling mirror finish.
As you can see, 20 years of crud leaves a rather thick coating!

It now looks a bit cleaner!

(Overspray since cleaned off)
It will never be as clean as some peoples engines but I'm doing this on a budget and with a set of cam cover gaskets alone coming in at £90 a full stripdown gets very expensive, besides i'll likely forget where half of it goes!
Another month so I thought I'd post a minor update. I have spent a ridiculous amount of time on the plenum chamber due to it being sat slap bang in the middle of the engine bay & being rather large.
The engine is pretty much ready to be fitted now, just a few small bits to do before it goes in.
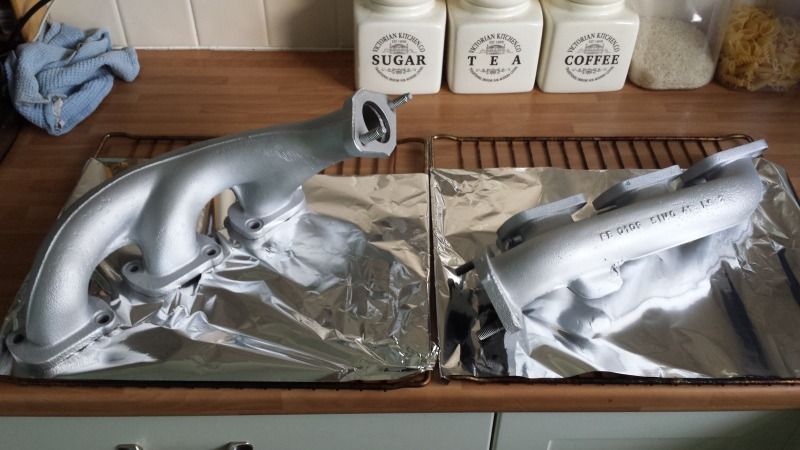
I have now got the exhaust manifolds cleaned up & painted in VHT paint which I had to bake on in the oven & I also welded a large bolt into the hole where the EGR pipe was fitted as all the EGR gubbins belongs in the bin.
And people say I never do any proper cooking!-
A few days work then on the plenum chamber (those polishing kits are great)-

Almost done-

I'm hoping my next update involves wiring the engine up
The engine is pretty much ready to be fitted now, just a few small bits to do before it goes in.
I have now got the exhaust manifolds cleaned up & painted in VHT paint which I had to bake on in the oven & I also welded a large bolt into the hole where the EGR pipe was fitted as all the EGR gubbins belongs in the bin.
And people say I never do any proper cooking!-

A few days work then on the plenum chamber (those polishing kits are great)-

Almost done-

I'm hoping my next update involves wiring the engine up

For someone who never changed brake pads before, how have you been teaching yourself?
Forums like this one basically & a Haynes manual with massive amounts of patience thrown in.
If you can't figure something out there is always someone on a forum willing to help. Just 5 minutes ago I posted a query on another forum regarding deleting a pipe from the cam cover to the plenum as I have no idea if this is possible or even what the purpose of the pipe is. All I know is I don't want oil in the plenum (just nice clean fresh air!) so want it either vented to air via a filter or possibly route it via an oil catch tank if that isn't possible.
Thought I'd update this as the engine is finally in the car & I am currently trying to figure out the rest of the wiring however the more me & my dad look into it the easier it seems as there is a lot of wiring that simply wants binning. I have decided to keep the loom fitted to the car for the original engine but it is being hidden behind the brake servo out of the way with three plugs remaining on the opposite side of the engine bay which will need tucking away somewhere.
Not that I ever plan to go back to a 2.8 but it keeps the car compatible with the old engine if for any need I had to go back. (like the 24v goes bang & I want to run the car over the summer one year whilst I source another)
I also need to figure out the power steering & am going to have to give a local hydraulics company a visit as I need hoses which are part Scorpio & part Capri.
The fuel system is a piece of cake & far simpler than I originally thought it's literally just a case of connecting the original 2.8i fuel filter to the fuel rail via a 7mm pipe and then running a return back from the rail to the original 2.8i pipework under the passenger side footwell.
I now need to source a pair of lambda sensors & a couple of coolant hoses and decide whether I either want to re-locate the battery to the boot in which case i'll need to weld the battery tray into the spare wheel well or run a gel battery which are much smaller and should still fit under the bonnet.
I need to look at making a pair of downpipes too.
Some pics of todays adventure-
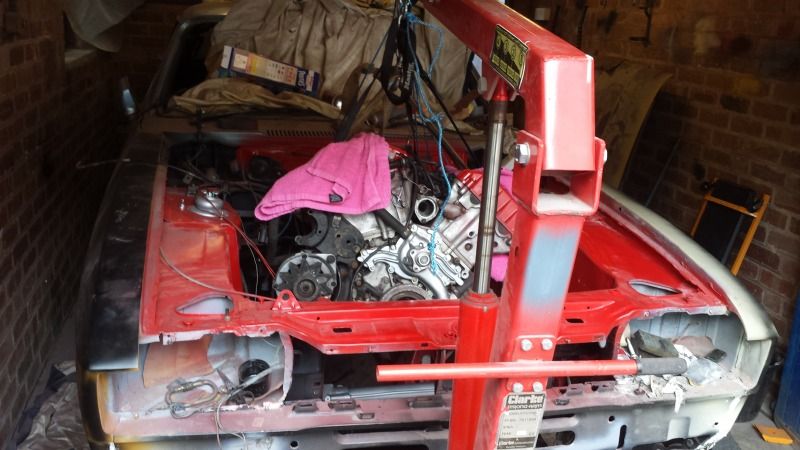
We couldn't get the engine to lift level so we spent ages gradually dropping it down with a high lift trolley jack under the back of the sump to level it off.
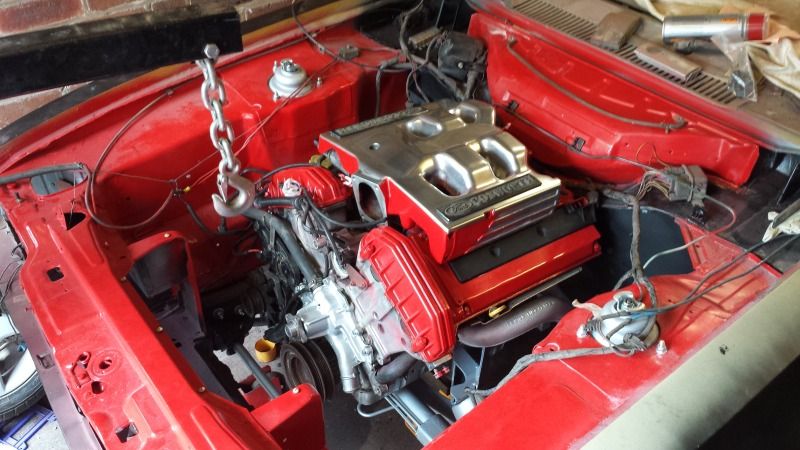
It will probably be a couple of months before I can try firing it up as there are lots of bits to fork out for & my commission which pays for this is non existent in August & September as I'm in B2B sales and everyone seems to be on hols in July & Aug.
Not that I ever plan to go back to a 2.8 but it keeps the car compatible with the old engine if for any need I had to go back. (like the 24v goes bang & I want to run the car over the summer one year whilst I source another)
I also need to figure out the power steering & am going to have to give a local hydraulics company a visit as I need hoses which are part Scorpio & part Capri.
The fuel system is a piece of cake & far simpler than I originally thought it's literally just a case of connecting the original 2.8i fuel filter to the fuel rail via a 7mm pipe and then running a return back from the rail to the original 2.8i pipework under the passenger side footwell.
I now need to source a pair of lambda sensors & a couple of coolant hoses and decide whether I either want to re-locate the battery to the boot in which case i'll need to weld the battery tray into the spare wheel well or run a gel battery which are much smaller and should still fit under the bonnet.
I need to look at making a pair of downpipes too.
Some pics of todays adventure-

We couldn't get the engine to lift level so we spent ages gradually dropping it down with a high lift trolley jack under the back of the sump to level it off.

It will probably be a couple of months before I can try firing it up as there are lots of bits to fork out for & my commission which pays for this is non existent in August & September as I'm in B2B sales and everyone seems to be on hols in July & Aug.
Another slight update. I got the gearbox cleaned, painted & installed-
Shiny!
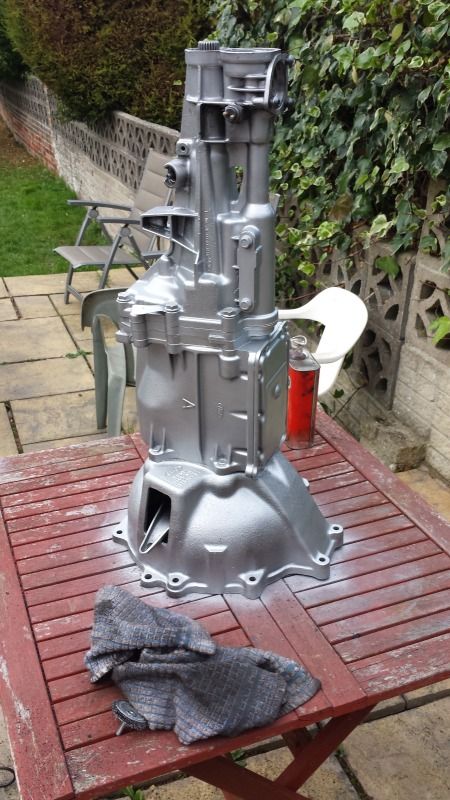
However due to the clutch alignment tool I borrowed being a "Universal" one which was naff me & my dad spent several hours trying to manhandle the gearbox into place and failed miserably, a week later I went and picked up a better one from machine mart and within 45 minutes the clutch & gearbox were fitted & operating properly.
I used the pilot bearing from the original engine which I removed by shoving bread into the hole and compacting it in with a 10mm socket. I read about it online & wish I'd filmed it actually working as I thought there was no chance.
I now have this mess to figure out-
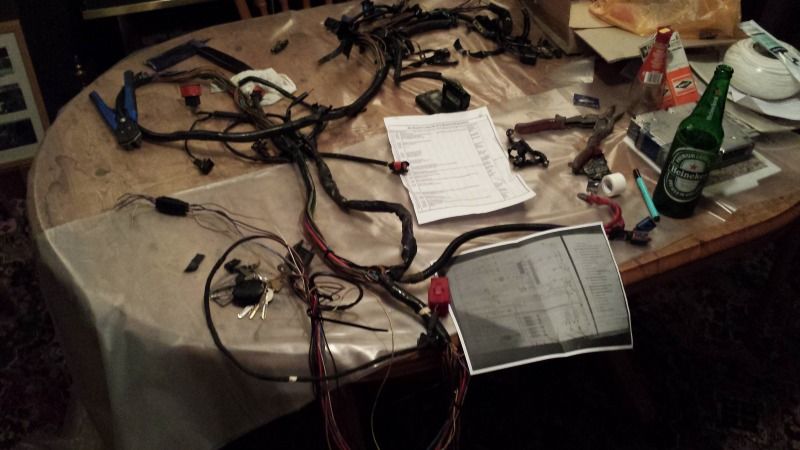
It isn't as bad as I initially expected and after working through the loom from a pin out list & wiring diagram I am removing the bits that need to go in the bin such as the stuff for the auto box, air-con & EGR system.
There actually appears to only be four wires that need connecting to the original loom however I can't even wire up a light switch.
Wish me luck!
Shiny!

However due to the clutch alignment tool I borrowed being a "Universal" one which was naff me & my dad spent several hours trying to manhandle the gearbox into place and failed miserably, a week later I went and picked up a better one from machine mart and within 45 minutes the clutch & gearbox were fitted & operating properly.
I used the pilot bearing from the original engine which I removed by shoving bread into the hole and compacting it in with a 10mm socket. I read about it online & wish I'd filmed it actually working as I thought there was no chance.
I now have this mess to figure out-

It isn't as bad as I initially expected and after working through the loom from a pin out list & wiring diagram I am removing the bits that need to go in the bin such as the stuff for the auto box, air-con & EGR system.
There actually appears to only be four wires that need connecting to the original loom however I can't even wire up a light switch.
Wish me luck!
Did you paint the engine bay yourself buddy?
Yeah, it still needs sanding & polishing but I only intend to do the tops of the wings & the slam panel as nobody will see further down.
For the engine bay, no I had to use Acrylic based paint. The rest of the car will be done in 2K but I can't do it here so i'll be paying someone to do it as the cost of buying all the breathing gear, compressors & gun etc makes it too expensive.
Thought I would update this as it's been several months. Everything got put on hold shortly after my last post as I ended up starting a new job on the 2nd of January which caused short term financial chaos & it's been damn cold in that garage, I can't work on a car in 3c temperatures as it is horrendous when you can't feel your fingers after 20 minutes and your face goes so numb you can't feel the snot running down your face due to the cold.
Anyway, it's warmer now so I got stuck in last week.
The wiring loom is now installed (just need to connect a few earth leads & mount the ECU securely), it's a bit of a rats nest at the moment along the rear passenger side but I'm going to sort that once it's confirmed as running.
The cooling system is basically done, I just need to make some brackets to hold the various pipes where I want them to sit & hold the expansion tank, that is tomorrows job (still need to get an electric fan ordered too but that can wait.)
All that is left to do then is make a pair of downpipes, I ordered the parts for this last night & hopefully should get it done Saturday next week.
The engine bay now looks a lot smaller, my next post should hopefully contain a video of it running, initially I will run it off of a jump start pack & then once it is confirmed as running I'm either going to relocate the battery to the spare wheel well or get a smaller gel battery & mount it in the engine bay, I need to read up more on gel batteries though.
Anyway, pictures-
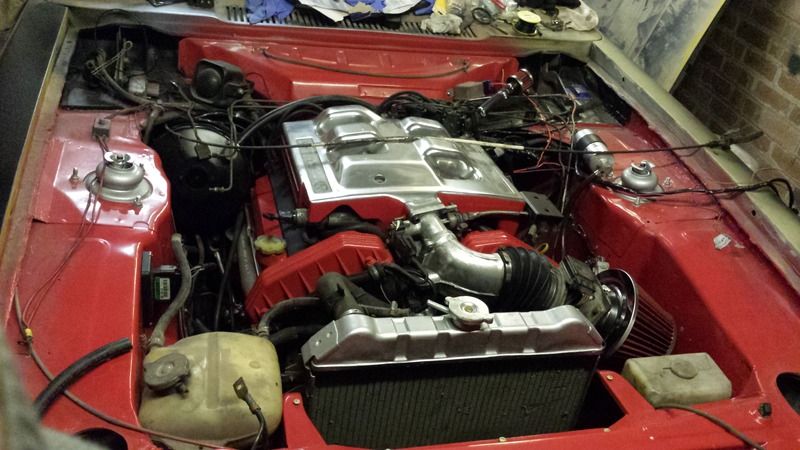
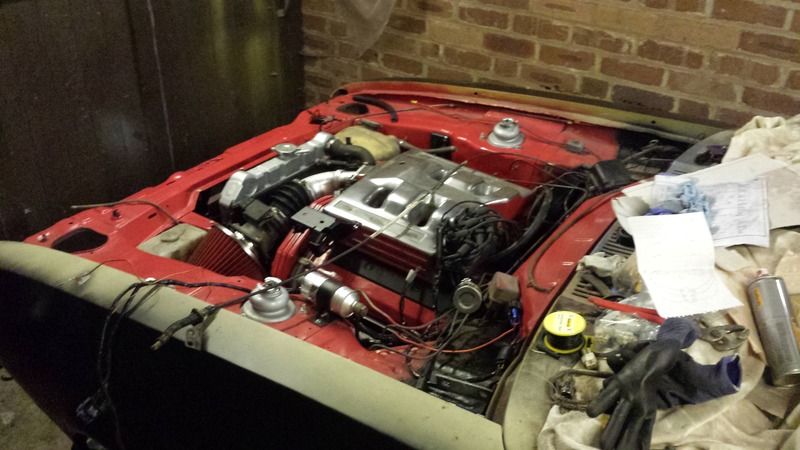
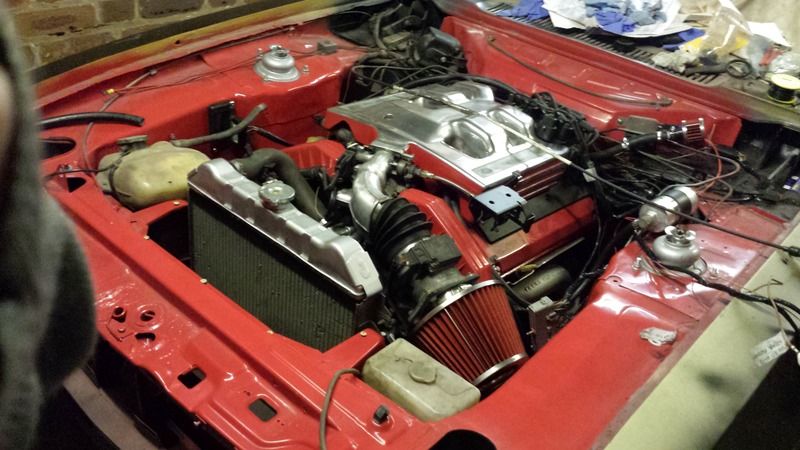


I hope there is enough clearance for torque twist re: that air filter !
There should be, the pipe it is attached to is very flexible so I could make a bracket to hold the air filter still if needs be. The brake servo is very close to the cam cover on the other side though.
Well, the day arrived to fire it up (with open manifolds  ), had the "Clarke Jump Start 4000" on charge all night. My dad got here early this afternoon with the fire extinguisher just to be safe and to provide a 2nd set of eyes to spot problems.
We rigged up the wiring to the battery terminals and then flicked the switch on and heard the immobiliser power up then waited for sparks or smoke, nothing, all seemed good! The alarm then went off as the car has no bonnet so I jumped in & de-activated it.
Turned the ignition on, all the dash lights lit up as expected, again no smoke or sparks, all good so far!
Then came the moment of truth, clutch down, turned the key & got a brief spin out of it then click, click, click, click, click, click from the starter motor. The damn jump start pack has given up the ghost. Frustration is an understatement! It is dropping to 10V when cranking & won't turn it over, it won't even charge for some reason, just says it is fully charged when plugged in but dies as soon as you put any load on it.
I don't want to fork out for a battery just yet so may now have to resort to using the battery off the Grand Cherokee which should provide more than enough juice, however the girlfriend was out in it so I will have to wait another week.
On the positive side I know that the immobiliser & alarm are happy to work with the new engine.
 ), had the "Clarke Jump Start 4000" on charge all night. My dad got here early this afternoon with the fire extinguisher just to be safe and to provide a 2nd set of eyes to spot problems.
We rigged up the wiring to the battery terminals and then flicked the switch on and heard the immobiliser power up then waited for sparks or smoke, nothing, all seemed good! The alarm then went off as the car has no bonnet so I jumped in & de-activated it.
Turned the ignition on, all the dash lights lit up as expected, again no smoke or sparks, all good so far!
Then came the moment of truth, clutch down, turned the key & got a brief spin out of it then click, click, click, click, click, click from the starter motor. The damn jump start pack has given up the ghost. Frustration is an understatement! It is dropping to 10V when cranking & won't turn it over, it won't even charge for some reason, just says it is fully charged when plugged in but dies as soon as you put any load on it.
I don't want to fork out for a battery just yet so may now have to resort to using the battery off the Grand Cherokee which should provide more than enough juice, however the girlfriend was out in it so I will have to wait another week.

On the positive side I know that the immobiliser & alarm are happy to work with the new engine.
Nearly a month has passed..............nothing went to plan, but that's pretty normal so I should stop making plans & predictions!
Turns out that one of the management team at the company I started working at has been following this thread since well before I started working there, small world!
Also had an attempted break into the garage which thankfully failed due to 8 stone of slobbering & barking hound at the patio doors & his yappy girlfriend making loads of noise, CCTV recorded it all, police think they know who they are.
Anyway, we tried jumping the car using the Jeep & had no luck, still a slow crank & clicking starter, we also noticed at the same time that the fuel pump was suspiciously silent so spent ages checking the wiring only to discover that the £5 relay I had bought brand new from Halfrauds was faulty, swapped this out and the fuel pump sprung into life but still no real life from the starter.
Another weekend passed and after going over the wiring and using two sets of jump leads in attempt to get more juice flowing still not much action so I took to the internet & got warned about the standard earthing from the 2.8i being inadequate & got a story from one person that even had a car catch fire (luckily he had a fire extinguisher to hand).
I dug out the old off cuts from the original loom & found a couple of meters of the starter motor wiring from the donor car, connected one end to the cylinder head & the other end directly to the negative terminal on my Mondeos old battery which had been on charge for a couple of days. The results were somewhat encouraging given that the battery was known to be stuffed & got replaced about 5 months ago as it was struggling to start my car on cold mornings, it was the original factory battery, so did well to last 12 years. -
https://www.dropbox.com/s/4wj3zgs0l213rv3/20150512_195316.mp4?dl=0
Tonight I decided to see what happened if I took the 5 month old battery off my Mondeo & gave it a whirl, I wasn't expecting it to almost instantly fire up and promptly cut the ignition as I was on my own & can't put out any fires from inside the car. Needless to say I'm currently rather pleased that considering I have no electrical knowledge I appear to have followed the wiring diagrams & pin out list correctly with no errors.
I had to edit some coughing into the following video right at the end to make it forum friendly as my sudden surprise & cheerfulness caused an expletive to be aired.
https://www.dropbox.com/s/ak6phc26ubo0g6q/VideoEditor1.mp4?dl=0
Need to finish making the downpipes which I started last week & sort out the power steering then i'll get my dad round again as a 2nd set of eyes & run it up to temperature.
The tunnel definitely has light at the end of it now!
Turns out that one of the management team at the company I started working at has been following this thread since well before I started working there, small world!
Also had an attempted break into the garage which thankfully failed due to 8 stone of slobbering & barking hound at the patio doors & his yappy girlfriend making loads of noise, CCTV recorded it all, police think they know who they are.
Anyway, we tried jumping the car using the Jeep & had no luck, still a slow crank & clicking starter, we also noticed at the same time that the fuel pump was suspiciously silent so spent ages checking the wiring only to discover that the £5 relay I had bought brand new from Halfrauds was faulty, swapped this out and the fuel pump sprung into life but still no real life from the starter.
Another weekend passed and after going over the wiring and using two sets of jump leads in attempt to get more juice flowing still not much action so I took to the internet & got warned about the standard earthing from the 2.8i being inadequate & got a story from one person that even had a car catch fire (luckily he had a fire extinguisher to hand).
I dug out the old off cuts from the original loom & found a couple of meters of the starter motor wiring from the donor car, connected one end to the cylinder head & the other end directly to the negative terminal on my Mondeos old battery which had been on charge for a couple of days. The results were somewhat encouraging given that the battery was known to be stuffed & got replaced about 5 months ago as it was struggling to start my car on cold mornings, it was the original factory battery, so did well to last 12 years. -
https://www.dropbox.com/s/4wj3zgs0l213rv3/20150512_195316.mp4?dl=0
Tonight I decided to see what happened if I took the 5 month old battery off my Mondeo & gave it a whirl, I wasn't expecting it to almost instantly fire up and promptly cut the ignition as I was on my own & can't put out any fires from inside the car. Needless to say I'm currently rather pleased that considering I have no electrical knowledge I appear to have followed the wiring diagrams & pin out list correctly with no errors.
I had to edit some coughing into the following video right at the end to make it forum friendly as my sudden surprise & cheerfulness caused an expletive to be aired.

https://www.dropbox.com/s/ak6phc26ubo0g6q/VideoEditor1.mp4?dl=0
Need to finish making the downpipes which I started last week & sort out the power steering then i'll get my dad round again as a 2nd set of eyes & run it up to temperature.
The tunnel definitely has light at the end of it now!
Another 5 hours in the garage today, thought I'd pop an update on as I'm rather pleased with myself for making a pair of downpipes. I leak tested them by sticking a condom over the end & filling them with water. 
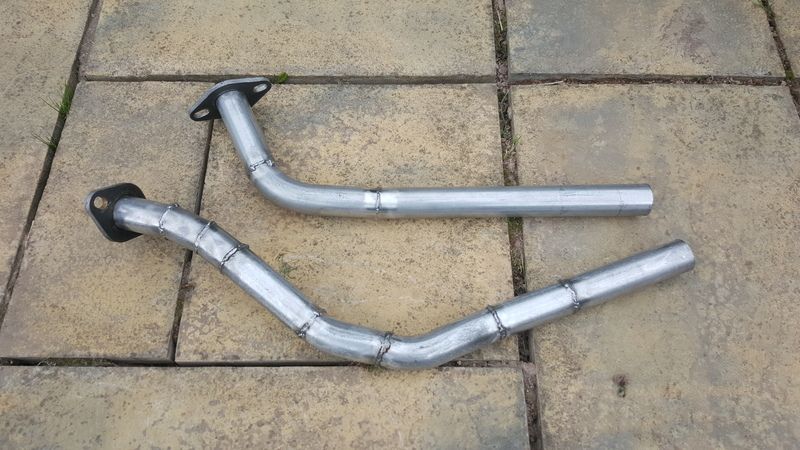
Got them test fitted but without using any gaskets or clamps as they need to come off again. They actually fit better than the ones I bought for the original engines 9 years ago & sit a bit closer to the cars underside which is essential here as it's going to be an inch lower than standard & speed ramps were already an issue.

Of course it would have been rude not to try and get a glimpse of what it's going to sound like so I started it up briefly, can't leave it running for long as the belt for the water pump can't be installed until I sort out the power steering pipework.
It's idling at about 1500 RPM I reckon as it's stone cold.
https://www.dropbox.com/s/bx4adn9yfne111x/Shortened testrun 3.mp4?dl=0


Got them test fitted but without using any gaskets or clamps as they need to come off again. They actually fit better than the ones I bought for the original engines 9 years ago & sit a bit closer to the cars underside which is essential here as it's going to be an inch lower than standard & speed ramps were already an issue.

Of course it would have been rude not to try and get a glimpse of what it's going to sound like so I started it up briefly, can't leave it running for long as the belt for the water pump can't be installed until I sort out the power steering pipework.
It's idling at about 1500 RPM I reckon as it's stone cold.
https://www.dropbox.com/s/bx4adn9yfne111x/Shortened testrun 3.mp4?dl=0
Little update, not had the motivation recently as over the last few weeks I've started playing Eve Online again & it has been consuming all of my spare time, bit of a waste really as I've had a couple of weeks off work so could have got loads done!
Having said that it's been red hot in that garage, you can feel heat radiating from the brickwork so I'd have probably melted in there anyway.
Anyway, last couple of days I have made some progress, I have painted & de-rusted the prop-shaft so it is now a nice shiny silver, this is now back on the car, gearbox has had fresh fully synthetic oil so the engine is now fully connected to the rear wheels.
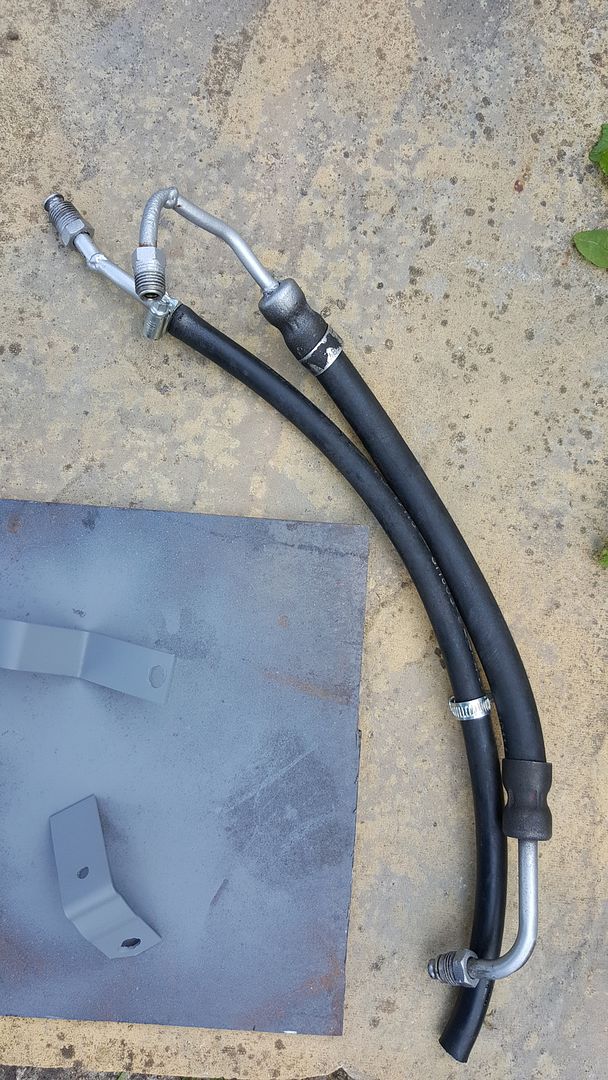
I then had to make my own power steering system as the pump & reservoir on the old engine were part of the same unit & I didn't get the reservoir from the Scorpio so I've used a MK3 Mondeo TDCi reservoir Granada pump & one of the pipes that goes from this to the pump & then I've had to cut up the original 2.8i pipework as the pump is on the opposite side of the engine now & a lot of the pipe was solid steel, I ended up with these-
I have also made brackets to hold everything in place including the air filter & ECU which is mounted on the inner wing, can't say I'm too happy with the ECU mounting as it looks as ugly as hell but it certainly isn't going anywhere. Also on the ECU subject I got in touch with Superchips yesterday regarding the add-on bolted to this ECU, apparently it's running advanced ignition timing & has likely had the rev-limiter raised, not sure I like the idea of a raised rev limiter so may remove it.
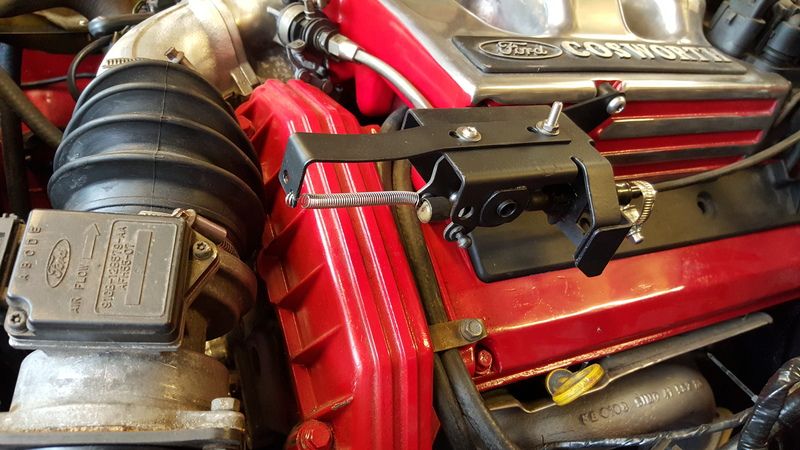
I also had to remove the spring from the 2.8i throttle cable assembly as it wasn't allowing the throttle to open fully, although the existing engine mechanism is spring loaded it left the throttle pedal far too light so I've added a spring to it just for a bit more weight and a snappier throttle return-
I have also had to fit a rev counter from a late model 2.8i as mine was incompatible with the engine & had to use a temperature sender from a completely different engine too as the standard one wouldn't work with my temperature gauge.
Still need to get an electric cooling fan and a pair of lambda sensors aswell as mount some of the fuses & injector relay on the inner wing but other than that I think the engine bay is basically finished.
I ran it upto operating temperature today, seems there is a bit of an oil leak from the cam cover on the drivers side so it smokes a bit when it's been stood for a while whilst the oil burns off the exhaust manifold, that is going to have to wait until the car is on the road as I want to replace the cams & i'll do both jobs at the same time due to the cost of cam cover gaskets being ridiculous for this engine.
I let it have some revs today too, after about 3000 RPM it is deafening, to the point where you have to scream at anyone else in the garage to communicate, get some nice crackling & popping on throttle release though
What to do with the brakes is now up in the air, I have been advised against a big brake & rear disc conversion due to them being a nightmare to set up & issues with balancing the front & rear, having a soft pedal & handbrake issues, basically they are not worth the hassle unless it's going to be a track car. I therefore may go with standard size & fitment discs, but grooved variants, a larger master cylinder from a Granada (£162 ) & possibly a set of direct replacement wildwood calipers with some braided hoses. If I do this i'll keep the rear drums but just replace everything with brand new stuff so it's all nice & fresh.
Having said that it's been red hot in that garage, you can feel heat radiating from the brickwork so I'd have probably melted in there anyway.
Anyway, last couple of days I have made some progress, I have painted & de-rusted the prop-shaft so it is now a nice shiny silver, this is now back on the car, gearbox has had fresh fully synthetic oil so the engine is now fully connected to the rear wheels.
I then had to make my own power steering system as the pump & reservoir on the old engine were part of the same unit & I didn't get the reservoir from the Scorpio so I've used a MK3 Mondeo TDCi reservoir Granada pump & one of the pipes that goes from this to the pump & then I've had to cut up the original 2.8i pipework as the pump is on the opposite side of the engine now & a lot of the pipe was solid steel, I ended up with these-

I have also made brackets to hold everything in place including the air filter & ECU which is mounted on the inner wing, can't say I'm too happy with the ECU mounting as it looks as ugly as hell but it certainly isn't going anywhere. Also on the ECU subject I got in touch with Superchips yesterday regarding the add-on bolted to this ECU, apparently it's running advanced ignition timing & has likely had the rev-limiter raised, not sure I like the idea of a raised rev limiter so may remove it.
I also had to remove the spring from the 2.8i throttle cable assembly as it wasn't allowing the throttle to open fully, although the existing engine mechanism is spring loaded it left the throttle pedal far too light so I've added a spring to it just for a bit more weight and a snappier throttle return-

I have also had to fit a rev counter from a late model 2.8i as mine was incompatible with the engine & had to use a temperature sender from a completely different engine too as the standard one wouldn't work with my temperature gauge.
Still need to get an electric cooling fan and a pair of lambda sensors aswell as mount some of the fuses & injector relay on the inner wing but other than that I think the engine bay is basically finished.
I ran it upto operating temperature today, seems there is a bit of an oil leak from the cam cover on the drivers side so it smokes a bit when it's been stood for a while whilst the oil burns off the exhaust manifold, that is going to have to wait until the car is on the road as I want to replace the cams & i'll do both jobs at the same time due to the cost of cam cover gaskets being ridiculous for this engine.
I let it have some revs today too, after about 3000 RPM it is deafening, to the point where you have to scream at anyone else in the garage to communicate, get some nice crackling & popping on throttle release though

What to do with the brakes is now up in the air, I have been advised against a big brake & rear disc conversion due to them being a nightmare to set up & issues with balancing the front & rear, having a soft pedal & handbrake issues, basically they are not worth the hassle unless it's going to be a track car. I therefore may go with standard size & fitment discs, but grooved variants, a larger master cylinder from a Granada (£162
 ) & possibly a set of direct replacement wildwood calipers with some braided hoses. If I do this i'll keep the rear drums but just replace everything with brand new stuff so it's all nice & fresh.
It's been some time since I last posted, I started a new job (yes the 2nd this year) & due to the way my commission works there is a delay of a couple of months from making a sale to getting paid, needless to say it should be a much more stable source of income & also has a decent jump in basic pay so things should start moving along nicely if I can get my arse motivated in that cold garage over the winter.
With this in mind I went out & bought a pair of modified front hubs, a pair of used MK2 Mondeo calipers & carriers along with some new Brembo pads, a pair of Sierra Cosworth front discs, a set of braided hoses, some longer wheel studs, a caliper rebuild kit, some new hub seals and various greases & paints.
The standard Capri 2.8i brakes use a 2 pot M16 caliper with 54mm pistons which squeeze a 247mm vented disc which is mounted on the inside of the hub rather than behind the wheel like on a modern car, therefore it can't lose any heat from the disc through the wheel, it is basically the same design as they were fitting to cars in the 1960's, it is all pumped via a master cylinder with a 22mm bore.
Whilst they do work they lack feel & they quickly overheat & fade, the only way I can describe them are like someone has greased the pads.
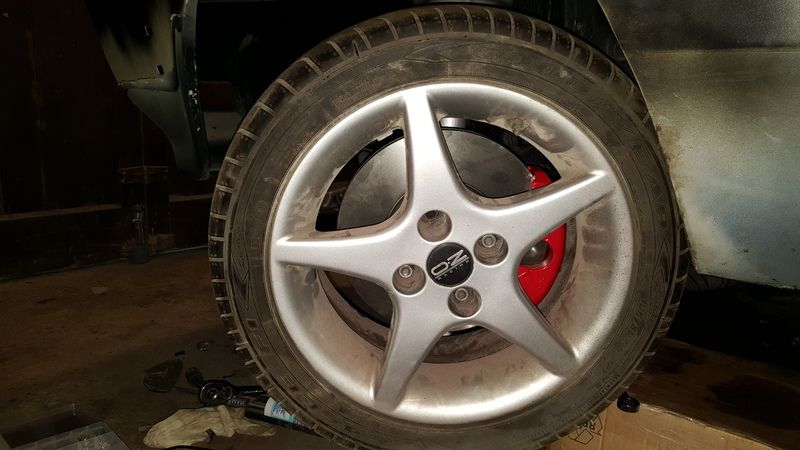
Effectively I am swapping to a more modern single piston caliper with a 60mm bore & has pads with a much larger surface area along the outer edge of the disc, the disc is now a 283mm unit which has been moved to where it should be, right behind the wheel. It will be pumped by a 23.8mm master cylinder.
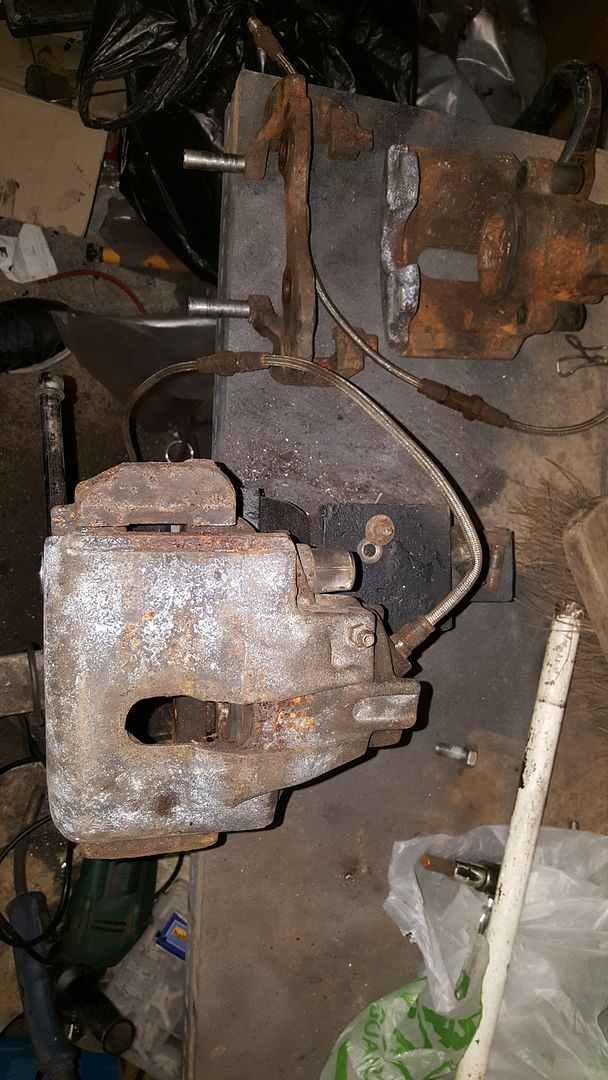
I started out with these piles of rust which I picked up from a guy on a Capri Forum, as you can see, they weren't pretty-
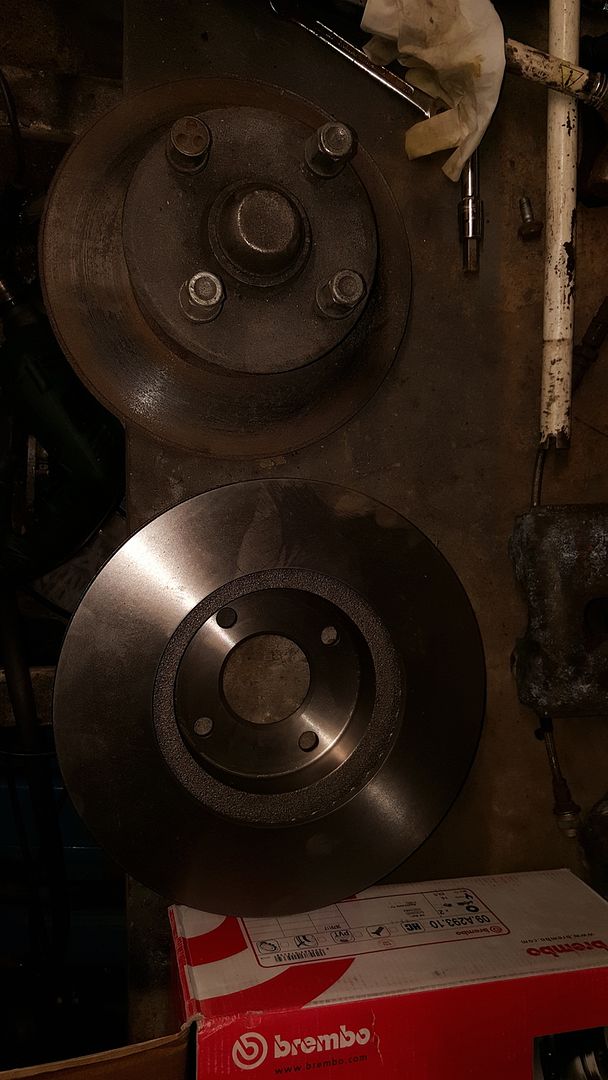
New discs a little bigger than standard-
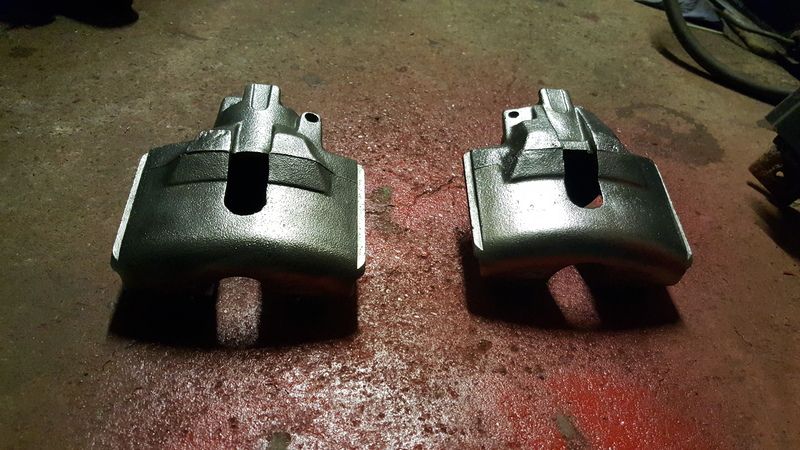
Obviously the calipers can't be used in that state so they got a soaking for 24hours in rust remover & then I removed the pistons & seals.
They came out much better-
I was unsure whether to go with silver or red for the calipers, however given that they car is going to be red & they are much larger than the standard items red won-
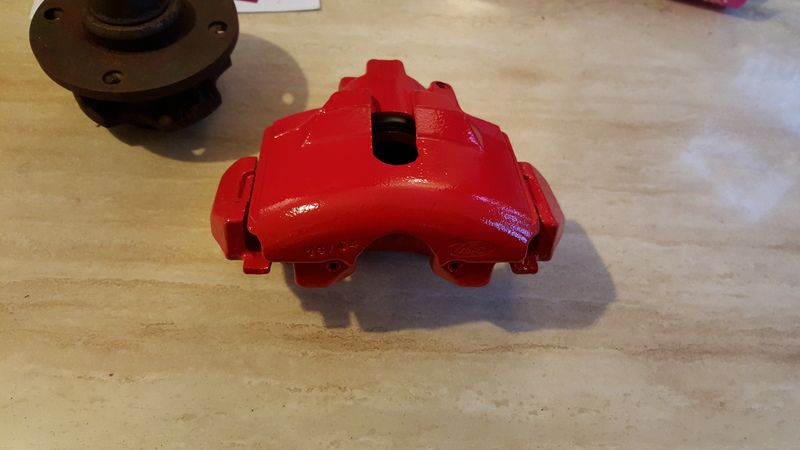
The seals for the hubs have not arrived just yet so I just did a test fit to make sure all is OK and it all fits like a glove. You certainly wouldn't get these brakes under the standard 13" wheels, they really should have done this from the factory.
With this in mind I went out & bought a pair of modified front hubs, a pair of used MK2 Mondeo calipers & carriers along with some new Brembo pads, a pair of Sierra Cosworth front discs, a set of braided hoses, some longer wheel studs, a caliper rebuild kit, some new hub seals and various greases & paints.
The standard Capri 2.8i brakes use a 2 pot M16 caliper with 54mm pistons which squeeze a 247mm vented disc which is mounted on the inside of the hub rather than behind the wheel like on a modern car, therefore it can't lose any heat from the disc through the wheel, it is basically the same design as they were fitting to cars in the 1960's, it is all pumped via a master cylinder with a 22mm bore.
Whilst they do work they lack feel & they quickly overheat & fade, the only way I can describe them are like someone has greased the pads.
Effectively I am swapping to a more modern single piston caliper with a 60mm bore & has pads with a much larger surface area along the outer edge of the disc, the disc is now a 283mm unit which has been moved to where it should be, right behind the wheel. It will be pumped by a 23.8mm master cylinder.
I started out with these piles of rust which I picked up from a guy on a Capri Forum, as you can see, they weren't pretty-

New discs a little bigger than standard-

Obviously the calipers can't be used in that state so they got a soaking for 24hours in rust remover & then I removed the pistons & seals.
They came out much better-

I was unsure whether to go with silver or red for the calipers, however given that they car is going to be red & they are much larger than the standard items red won-

The seals for the hubs have not arrived just yet so I just did a test fit to make sure all is OK and it all fits like a glove. You certainly wouldn't get these brakes under the standard 13" wheels, they really should have done this from the factory.


