Robocain - Robocop 2 robot

Yeh I tend to quote most jobs at between £10-£30 an hour depending on the complexity. In some cases things turn out much easier than expected, or harder.

This, however, is a challenge for me. I couldnt have made this a couple of years ago, only finishing the DSR1 and the rifle stock I did has given me confidence to try this. It would have to be a 5 figure sum to part with Cain.
 
Building Candy - Where did you learn to do this? Did you do "NVQ 2 Performing Engineering Operations" by any chance?

a what what what? no I have never studied engineering, or ever done a course or even been to university for that matter im afraid. I just started making rc truck chassis about 6 years ago, then 2 years later onto the guns and now this. I think im getting better with every day that passes, certianly 3 years ago I would never have concidered this project. When I finished the dsr1 I felt like I could make anything and do anything, thats why im doing this. Im lucky to have a natural talent for this although im sure my own brand of self taught engineering would probably have a "proper" engineer cringing at some of my methods and techniques!

How much for a DSR1 replica? Don't need the scope as I've got a nice Leupold vari-xiii from my target shooting days.

I wouldnt sell this DSR and to make another would be tough, im not sure I could give it the same attention to detail. I have thought about selling them when people offer large sums of money, but money is money, you can always make more money. These guns are 1 off, if I sold it, it would be gone forever and thats not something I want to do.

Its no good, ive got to post the DSR pic! im so proud of it! :D:D

dsr245.JPG


im gonna have to get it out and hug it now!

------------------------------------------------------------------------

Back to Cain, onto the waist/torso,

bit of guess work here, hard to estimate the shape and size of the plate.

DSC08611.JPG


trimmed and rounded

DSC08613.JPG


...after looking at the pics again i decided this is too thick

DSC08614.JPG


so took 1mm off the top and put the holes in it. Picture in the background for reference.

DSC08615.JPG


used a slitting saw to cut the slots

DSC08616.JPG


onto the big lump in the middle

DSC08617.JPG


this looks a bit big too..... hmm

DSC08618.JPG


might end up taking it down a bit, be glad to get this stupid bit out the way!

DSC08619.JPG


im struggling to see the parts on this plate, a lot of it is molded and im not going to do it exactly as it'll be all but covered by the cylinders and all the pipes and wires. So:

DSC08625.JPG


i'll have to fill all the gaps before painting, most of it will be covered anyway

DSC08626.JPG


onto the little U brackets fo the cylinders, I have to make 8 of these all exactly the same.

DSC08628.JPG


cop them all off

DSC08629.JPG


mill each one to the same size, both ends, boooooring

DSC08630.JPG


then file the curve on each one exactly the same.... booooooooooooring

DSC08631.JPG


then mill the gap out......... STILL boring

DSC08636.JPG
 
Thanks for the continued kind words and support guys! :D

If i had the cash i'd make you an offer you simply couldn't refuse.

Yeh i hope one day an oil barron will visit me with his cheque book.

Not sure if anyone has asked you this yet but what will be your next project or what other project are you wanting to do?

I have about 800 hours more to do, I need to remain focused on this for the moment and not let my mind wander.

Weird coincidence; just got back in from dropping the missus of at work (Equality gotta luv it. ) last song I heard on the radio (2) was "The Candyman" sang by Sammy Davis Jr.

lol someone once sent me the video from charlie and the chocolate factory with gene wilder(?) singing that!

Get the bread out

You ask, you get:

ocukpoliceproof.jpg
 
AOD has said nothing but fact, well done.

As my guns are based on an existing weapon its classed as a modification to that weapon, like a big body kit if you will.

yes the barrels extend as far as the outer barrel allows, I have a chrono they are all bellow 500fps.
 
Well an hour later. The gap is only 3mm so I have to cut 10mm (i think) down using a 3mm cuttter, the 3mm mill is quite delicate so I

have to take light cuts so as not to clog the cutter. So something like .3mm per cut, so thats 30 passes per U bracket, times 8 brackets

is.... tum tee tum 240 passes.

DSC08637.JPG


now drilled them all sides and bottom

DSC08638.JPG


got some material for the cylinders.... im not 100% on this, it looks a bit thin, the detail on the cylinders is crazy, im not sure there

is enough room

DSC08640.JPG


turing away

DSC08641.JPG


cutting the rod first for a trial fit

DSC08644.JPG


cylinder

DSC08645.JPG


oh dear :( my initial suspisions are realised , after adding the 4 screws there is no material for the 2 verticle screws and it does look
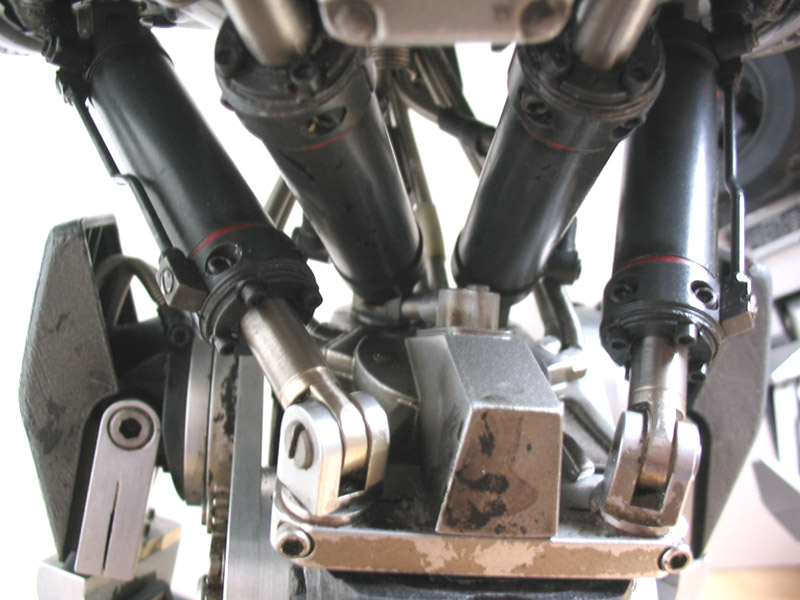
too small, which I suppose is a good thing.

DSC08647.JPG


pic of the real thing for reference:

cainref1.jpg


while I wait for thicker rod to be delivered i'll get on with a left leg bit.

DSC08648.JPG


a lot easier with one to copy

DSC08649.JPG


finishing off the other thigh

DSC08650.JPG


cold up the garage the other night, didnt help the gas in my heater ran out :( brrrrrrrrrr

DSC08651.JPG


easy when there is a part to copy

DSC08652.JPG


center it up with a little pointer i made.

DSC08654.JPG


then take it round

DSC08656.JPG


nearly there, just the easy bits to do.

DSC08657.JPG


boring the holes in the sides and drilling and tapping everything

DSC08659.JPG


turned the other spacer and there we are

DSC08660.JPG


gave myself a big pat on the back for getting this hard bit out the way for good.

DSC08661.JPG
 
thanks

Ok got the material for the cylinders, this "feels" right, progress will apear slow on these for 2 reasons. 1, I have to do 4 of these the same, so each operation has to be replicated 4 times and 2 I have to make a note of every measurement so I can get each one exactly the same.

drilled a deep hole for the rod to move in.

DSC08663.JPG


put the 2 steps in.

DSC08664.JPG


one thing I learnt from the 1st one I did wrong is that no matter how carefully you clamp it your gonna get marks, so I am purposfully using a piece of rod that is 1mm too fat, then ignoring the extra 1mm (0.5 each side) in my measurements, so at the end I will have a finished cylinder that I can then turn down for a perfect finish.

for scale the milling cutter here is 3mm

DSC08665.JPG


all done here, 4 x 3mm countersinks with 1.7mm holes per cylinder AND the 2 verticle holes that I couldnt fit before.

DSC08666.JPG


cutting the flat on the other end

DSC08667.JPG


taking off the additional 0.5 form the ends and 1 or 1.5 I cant remeber form the middle of the cylinder to leave the flawless (hopefully) finish.

DSC08668.JPG
 
Not sure yet, probably just painting, duraility wont be an issue it not like its going to be handled....... ever :D

Thanks again for the praise from you all, its a great help .

main bits done and all the same,

DSC08669.JPG


one of the 4 rods, had to start with 8mm rod then turn the whole length down to 6mm and test fit in the cylinders until it was perfect, then trim the 8mm end and round it off

DSC08674.JPG


the m2 screws are still a bit too big to fit so I had to turn the heads down from 3.7mm to 3mm so they sit in the recess. 6 per cylinder, 24 screws to turn down.

DSC08675.JPG


then tap all 24 holes with M2 thread and were starting to look like it

DSC08676.JPG


then whilst drilling one of the U brackets I did somthing silly and took another whack on my previously damaged thumb, good grief, thats enough for today i think :(

DSC08677.JPG
 
Anymore updates?

of course

I managed to get the right screws for the U brackets :)

DSC08678.JPG


had to drill, tap and recess each one

DSC08679.JPG


...and finish the other rods off, I have also put a tiny line where the rod meets the flat bit, too shallow to see here really.

DSC08680.JPG


first one drilled and in, still a bit of work to do on the cylinders yet, I need to make the high pressure pipe work.

DSC08681.JPG
 
Cut a very thin strip of metal, only 3.5mm across, then had to cut a bevel in the top, did this by wrapping a rod in sandpaper and carefully rubbing away at it.

DSC08682.JPG


next had to trim 8 of these into this shape then drill them and countersink, no mean feat, I can hardly hold them!

DSC08684.JPG


needless to say the M2 flathead screws where a bit too big, so I had to carefully turn all thoses down too.

DSC08690.JPG


One installed, used a piece of 1.5mm wire for the pipe

DSC08693.JPG


DSC08694.JPG


and another set of fittings for the pipework

DSC08695.JPG


and attached.

DSC08696.JPG


Thats pretty much job done on these, im glad I didnt screw anything up :)

DSC08697.JPG


DSC08698.JPG
 
You’re doing a fantastic job. :)
How far through the project are you now?

Im not sure, maybe 20%

ive just had a good read though the 7 pages while trying to look productive at work on monday morning :/

Very nice work. Im always impressed by someone who is self taught. You should offer yourself to do some commision work rather than recreating something you have already done!

How long untill we can see the bottom half stoodup by its self? or does it not work like that ? :)

I do commision work, over the years I have made all sorts of things for people.

I HOPE this will be done by the end of the year, 8 more months..... fingers crossed.

It only has 1 leg so standing it up is a no go at the moment, plus it takes time to assemble it all and I want to spend all my time working on it rather than playing with it...... ooo eerr
 
This is going to be hard for a bit..... im even breaking out the cardboard, just about reached the limit of what I can do in my head.

first up the plate to conect all the rams in the body, this is all guess work as you cant really tell from the pics whats going on


DSC08699.JPG


decided to knock that out of metal but i think its a bit short.......

DSC08700.JPG


trying to estimate the sizes and angles of the shouler fixing points, its like a rubix cube, you get it looking good from 2 angles then look from the top and its wrong!

DSC08701.JPG


made some heavy duty mounts out of metal

DSC08702.JPG


started making the main parts up and fitting them into the "skeleton" very wrong on some places, need to extend the main chassis

DSC08703.JPG


pushed the front pistons further forward and then re calculated the position of everything, it looks beter, but still spent a few hours moving everything around.

DSC08705.JPG


made a start on a simple bit

DSC08707.JPG


also realised the plate is not flat but tilted up at the front so mounting it higher up and again recalculating for the position of everything.

DSC08710.JPG
 
To be honest this is a real big challenge, im struggling through it.

section above the door thing

DSC08711.JPG


the screws in this are very small, ive ordered some.

DSC08712.JPG


DSC08713.JPG


I tried to make the inside of where the trap door goes by bending a thin bit of metal to shape..... but it looked and felt crap, so im doing it the hard way.

DSC08714.JPG


DSC08715.JPG


DSC08716.JPG


took forever to mill the inside out, put the angles on it and milled a recess for the bit I made earlier to sit on it (this is the back of it)

DSC08721.JPG
 
drilled through the box thing and made a pin to pivot it on, took ages to get it to close flush

DSC08722.JPG


DSC08723.JPG


made some mounting points at the back to screw it to the mounting plate

DSC08724.JPG


and decided to cut a fresh plate out this one has been modified one time too many.

DSC08725.JPG


DSC08726.JPG


starting on the chest, looking like a big washing machine drum

DSC08727.JPG


DSC08728.JPG


realised after cutting the big disk that it just wasnt big enough, looks wrong to the pics

DSC08729.JPG


so ended up making a slightly larger one

DSC08730.JPG


profile....

DSC08731.JPG
 
Well im in Florida this week but you'll be pleased to know I kept some updates back so you dont get Cain withdrawal! good thinking huh :p

I recessed where all the screws sit with a 3mm mill then drilled and tapped them, turned the screws down too.

DSC08732.JPG


Next I made a pair of these blocks on a slight angle that will go into the back of the drum and allow them to be adjusted a bit and then held in place

DSC08733.JPG


something like that

DSC08734.JPG


on to the other side, turned more or less the same size with some beveling and recesses

DSC08735.JPG


it needs a U shaped piece on the front of it, after a bit of thought I decided just to do it by hand. Its only a 1 off and by the time I'd setup the rotary table and clamped such a small piece down I could have made it.

DSC08736.JPG


DSC08737.JPG


something like that

DSC08738.JPG


bolt it on for a trial fit

DSC08744.JPG


next back to the delrin for the cover that goes on the chest

DSC08745.JPG


after fixing the "U" on I milled out room for the cover.

DSC08746.JPG


and that sits in there nice :)

DSC08747.JPG
 
Ok starting on the pipework, turned some pieces up and then milled a flat on them to get them to sit right, bit of trial and error here.

DSC08748.JPG


as for fixing it all together im drilling and then screwing in from the middle of the dude .. in the middle.

DSC08749.JPG


DSC08750.JPG


trial fit , something like that

DSC08751.JPG


not a bad likeness

DSC08752.JPG


more turned rod then I had to to swing on it to bend it.

DSC08753.JPG


one each side slots between everything, this took ages to get right so it slotted into place with no gaps.

DSC08764.JPG


looks ok I think

DSC08765.JPG
 
im back in the UK now, when I have adjusted to UK life again cain progress will resume at the normal rate.

had to turn these screw heads down a lot to fit.

DSC08766.JPG


they fit in there, I have ordered some even smaller screws for the other 4 holes.

DSC08767.JPG


drilled , tapped and put screws in these "collars"

DSC08768.JPG


trial fit with pistons attached, the angle of this photo was taken head on quite close and makes it look narrower than I think it really is, after looking at all the pictures im quite happy with the position of everything.

DSC08769.JPG


all that to one side for now, I need to work on the positioning and mounting for the shoulders.

DSC08770.JPG


these will form the sides of the chest, the shoulders will butt up to these, I was thinking about only having 1 axis of movement for the shoulders, up and down, but in the film when they reveal cain at the press conference he drops his shoulders down and back. So I am working in 2 axis, also with it needing t sit flush at rest it also needs to move in and out, so the full 3 axis of movement is required. Oh yeh and they rotate as well, depending on what set of arms he wants to use.

after a lot of trial fitting I decided the plate didnt go far enough back so I have added an aditional plate on the back and moved everything back a bit.

DSC08771.JPG


back to the cardboard, the placement of everything looks right now from all 3 angles.

DSC08772.JPG
 
one lump of 6mm plate, tough stuff this, anyone want to hacksaw 4 circles out for me?

DSC08773.JPG


ok i'll do it then, this is with the distraction of my dad nearly setting fire to the "curtain" partition I put up in the garage to keep his dust out of my build area!

DSC08774.JPG


hacked out rough then spun on the lathe, my lathe isnt really big enough to turn pieces this big so I had to improvise.

DSC08775.JPG


Now we will have a leason in making little pipe fittings, if in doubt make some fittings, i'll be needing a lot of them!

DSC08776.JPG


turn 6mm down to 5mm and step the end to 4mm

DSC08777.JPG


centre drill, then drill the rod with a 2mm hole

DSC08778.JPG


cut the piece off and face the rough end, fit in vice and mill with a 4mm cutter a half moon.

DSC08779.JPG


turn and face another piece of 4mm with a 2mm hole in it, making it 5mm tall

DSC08780.JPG


make LOTS of these, drill a 1.7mm hole in the side of the last piece and tap M2 thread, then countersink the top of it with a 3.5 drill/mill so the screw will sit inside it a bit.

DSC08781.JPG


then assemble it

DSC08782.JPG


... the rest too

DSC08783.JPG


and after a few hours careful work you have another eight 4mm fittings.
 
Back
Top Bottom