

Currently exporting at around 8kW.
You are using an out of date browser. It may not display this or other websites correctly.
You should upgrade or use an alternative browser.
You should upgrade or use an alternative browser.
Ronski's Solar & battery DIY build with whole house backup
- Thread starter Ron-ski
- Start date
More options
View all postsThe battery heating system works, as I'm not currently force discharging the batteries don't get their late afternoon warm up, so they are dropping to 8°c and the heaters turn on and warm them up to 12°c
The first big hump is when the charging kicks in at 2am, then it starts dropping at 5am, where the green and orange lines start rising again is the heating system warming the batteries up. Temperature outside at the moment is 0°c, and the garage is 3°c

The first big hump is when the charging kicks in at 2am, then it starts dropping at 5am, where the green and orange lines start rising again is the heating system warming the batteries up. Temperature outside at the moment is 0°c, and the garage is 3°c
They are not bolted to the terminals, they are fitted to the side of the cells, located between the bar which holds the pack together and the cells, the only source of heat there is the cells themselves.
They both measure a few degrees lower than the BMS temperature sensors, so should be plenty of safety margin.
I also calibrated the sensors - beaker full of water and ice cubes, left it to stabilise then set to zero.
They both measure a few degrees lower than the BMS temperature sensors, so should be plenty of safety margin.
I also calibrated the sensors - beaker full of water and ice cubes, left it to stabilise then set to zero.
@reef I'm in total control, so its whatever I want, hopefully I'm not damaging them! I charge them between 2am and 5am at 130A, as there are two batteries that's split in half, so each battery is receiving about 65A, or 0.23C which is battery speak for the charge current related to the Ah capacity of the battery. The manufacture of the cells states "The maximum charge current of the battery does not exceed 1C under 0℃~45℃", I think under should mean between. So I should be perfectly safe charging the cell's as I am. Below freezing they should not be charged, or only with very low currents.

Last night the temperature in the garage got down to 2°c.
PS. There's some interesting info at https://community.victronenergy.com...w-charging-lifepo4-when-freezing-weather.html
.
EVE LF280K 3.2V 280Ah LiFePO4 Prismatic Battery Cell
Factory sale grade A prismatic cells lifepo4 3.2v 280ah battery for energy storage and power lifepo4 battery
www.evlithium.com
Last night the temperature in the garage got down to 2°c.
PS. There's some interesting info at https://community.victronenergy.com...w-charging-lifepo4-when-freezing-weather.html
.
Last edited:
I'm pretty sure I'm doing things correctly, the BMS is set to stop charging at 4℃ and start again at 6℃, battery heating kicks in at 8℃ and stops at 12℃, so hopefully all will be OK. Only issue might be if we get very cold weather, and the heating can't keep up, just means charging will stop, or more to the point won't start, once charging they warm up pretty quickly.
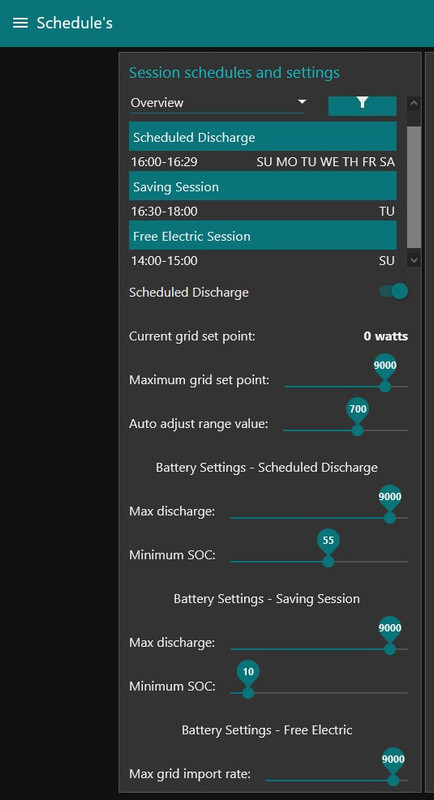
Updated my scheduling system for saving sessions, and the elusive free electric sessions. Schedules and settings can all be changed on my phone/tablet/PC.
Last edited:
My batteries currently down to 12%, so I thought I'd look at home assistant and see how much I'd discharged today, it shows 23.12kWh. This is a calculated figure.
Now if we divide that by 88, then times it by 100, it gives me 26.27kWh, which is not that far off my maximum battery capacity of 29 kWh. Considering I don't use the full cell voltage range, that's pretty good.
Edit. Actually, that's not quite right, there was some discharged between midnight and 2am, then the battery was only charged to 87% by 5am, so usable capacity is greater than above.
Last edited:
Before 2am the battery discharged 1.48 kWh.
2am to 5am it charged to 87%
The SOC never increased through out the day.
By 22:51 it reached 10% and stopped discharging - I reserve some in case of a power cut.
Between 5am and 22:51 it discharged 21.99 kWh
I used 77%, so if I divide 21.99 by 77 and times by 100 I get 28.55kWh capacity.
Heatings been on four times this winter, its set to come on when a battery reaches 8c and go off at 12c

Heating relays

2am to 5am it charged to 87%
The SOC never increased through out the day.
By 22:51 it reached 10% and stopped discharging - I reserve some in case of a power cut.
Between 5am and 22:51 it discharged 21.99 kWh
I used 77%, so if I divide 21.99 by 77 and times by 100 I get 28.55kWh capacity.
Heatings been on four times this winter, its set to come on when a battery reaches 8c and go off at 12c
Heating relays
Last edited:
Happy birthday Battery A, its just turned 1 year old 
Cycle count is 275, so an average of 0.75 a day, not bad considering how hard I push my batteries, although battery B is at 0.83 a day which is probably more representative, as battery A had an easy life to start with. Battery B is 259 days old.

Cycle count is 275, so an average of 0.75 a day, not bad considering how hard I push my batteries, although battery B is at 0.83 a day which is probably more representative, as battery A had an easy life to start with. Battery B is 259 days old.
Last edited:
Getting very close on my plan for my third solar install
I've just popped round to our local City Plumbing, to see if I can get any discount off the web prices, got a little bit off, but minimal really, but every bit helps.
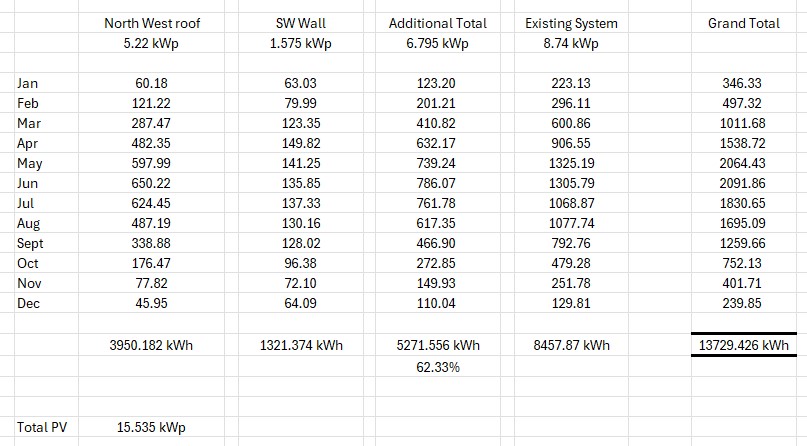
For my NW roof array of 12 panels I've got these short listed.
 www.cityplumbing.co.uk
www.cityplumbing.co.uk
For the extra £130 I may just go for the 435w panels, they are a newer series, and are a bit better on efficiency and degradation over time.
For the three on the SE wall I'm looking at these, they work out quite expensive per panel including delivery, but I want a physically larger panel (2063mm x 1134mm) as it would look better, would prefer all black, but can't seem to find all black in that size.
 www.powerland.co.uk
This would give an additional 6.795 kWp of solar, and make a total of 15.535 kWp, and should give an estimated 62% more generation.
Figures for the existing system below, are actual figures for the last 12 months, at some point I'll have to see what PVGIS thinks my existing panels should be producing.
I've just popped round to our local City Plumbing, to see if I can get any discount off the web prices, got a little bit off, but minimal really, but every bit helps.
For my NW roof array of 12 panels I've got these short listed.
LONGi Solar Hi-MO 6 435WP Black Frame PV Module LR5-54HTH-435M
LONGi new generation HPBC cell technology opens a new chapter in the mass production of high-efficiency cells and continues to lead the reform of the industry.The efficiency of LONGi HPBC cells exceeds 25.0%.The efficiency of the PRO version HPBC cells exceeds 25.3%.
LONGi Solar Hi-MO 5m 410WP Full Black PV Module LR5-54HPB-410M
LONGi's high-efficiency PV modules are widely used all over the world, from alpine grasslands to desert wastelands, and from ponds and vegetable beds to household dwellings. LONGi's ultra-high-value PV module products continue to benefit customers and local economy with its advantages of higher...
For the extra £130 I may just go for the 435w panels, they are a newer series, and are a bit better on efficiency and degradation over time.
For the three on the SE wall I'm looking at these, they work out quite expensive per panel including delivery, but I want a physically larger panel (2063mm x 1134mm) as it would look better, would prefer all black, but can't seem to find all black in that size.
JA Solar 525W Mono PERC Half-Cell MBB LB Silver Frame MC4
High stock levels available on all panels, please contact us via live chat for up-to-date stock before purchase, as stock levels are subject to change. Alternatively, you can email or call us. Part No: JAM60D-42-525-LB-SF Panels - Double Glass Bifacial Rating: 525W Efficiency: 22.4% Width...
www.powerland.co.uk
This would give an additional 6.795 kWp of solar, and make a total of 15.535 kWp, and should give an estimated 62% more generation.
Figures for the existing system below, are actual figures for the last 12 months, at some point I'll have to see what PVGIS thinks my existing panels should be producing.
Last edited:
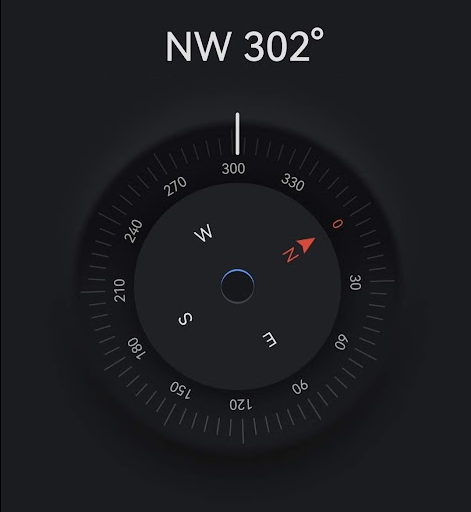
@reef yes they will be a bit more westerly, WNW and 12 panels most likely 435w. Nice curve and power production.
Direction of my NW panels.
This is the system as it was last night, there is going to be quite a bit changing here.
The DC isolators on the right will be going, these are not required, and in fact considered a fire risk. The combiner boxes at the top have suitable isolation switches for incoming PV, these boxes will also be changed and reconfigured as well.
The 48v to 12v converter next to the inverter will be relocated, as will the 12v fuse box, and the box with the voltmeter in it.
The white fuse box with clear lid will also be going, as its not required, the SCC's (MPPT solar charge controllers) will be wired direct to the Lynx Power In which is fused.
The two external inverter fuses and the DC isolator switch next to them have gone today.
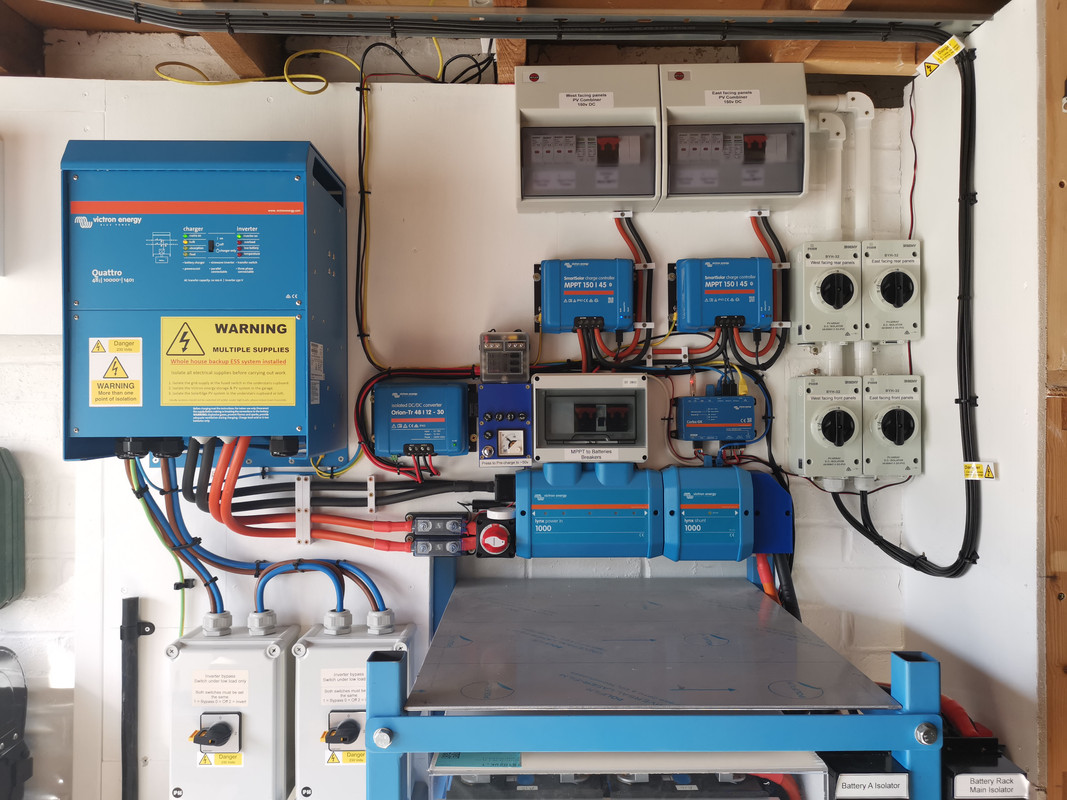
I didn't want to loose solar generation today, so I left the SCC's live, and charging the batteries. This did mean that the Lynx busbars were live with around 50v, and a lot of amps available.
So to lessen the risk of a serious short once the additional Lynx power in was fitted, I removed the positive busbar whilst I modified the negative inverter cables. The Quattro inverter was switched off and isolated from the grid via the change over switches that you can just see bottom left.
This meant the SolarEdge system was powering the house, and any excess from that was exported.
There will eventually be two more solar charge controllers going in, for the two additional arrays.
I also wanted to get rid of the DC isolator, its gets rather hot when passing a lot of current, I've seen 40c on top the case, and 70c+ internally. Its not required, to isolate the inverter I'd switch off the battery and the PV isolators.

The Power In has been modified to take fuses, I also had to cut off and crimp new lugs on the negative cables to get them to sit better.
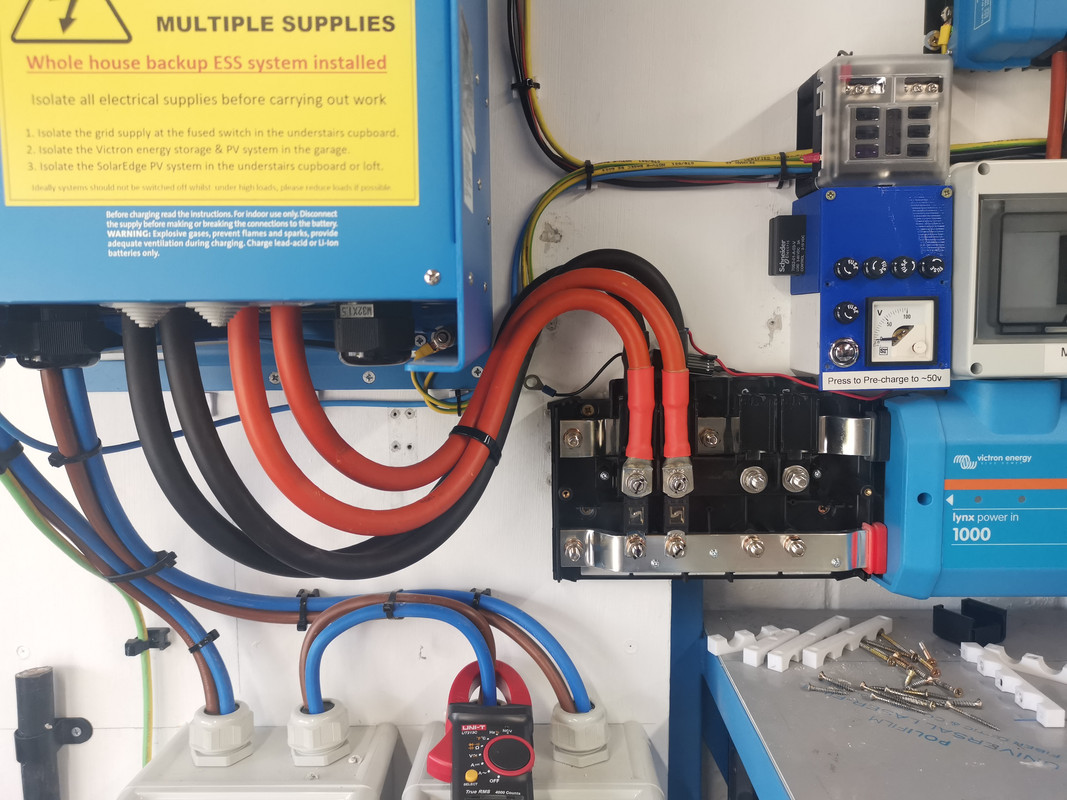
And with the lid on.
Whilst the inverter was disconnected from the house, I also took the opportunity to update its firmware.
The DC isolators on the right will be going, these are not required, and in fact considered a fire risk. The combiner boxes at the top have suitable isolation switches for incoming PV, these boxes will also be changed and reconfigured as well.
The 48v to 12v converter next to the inverter will be relocated, as will the 12v fuse box, and the box with the voltmeter in it.
The white fuse box with clear lid will also be going, as its not required, the SCC's (MPPT solar charge controllers) will be wired direct to the Lynx Power In which is fused.
The two external inverter fuses and the DC isolator switch next to them have gone today.
I didn't want to loose solar generation today, so I left the SCC's live, and charging the batteries. This did mean that the Lynx busbars were live with around 50v, and a lot of amps available.
So to lessen the risk of a serious short once the additional Lynx power in was fitted, I removed the positive busbar whilst I modified the negative inverter cables. The Quattro inverter was switched off and isolated from the grid via the change over switches that you can just see bottom left.
This meant the SolarEdge system was powering the house, and any excess from that was exported.
There will eventually be two more solar charge controllers going in, for the two additional arrays.
I also wanted to get rid of the DC isolator, its gets rather hot when passing a lot of current, I've seen 40c on top the case, and 70c+ internally. Its not required, to isolate the inverter I'd switch off the battery and the PV isolators.
The Power In has been modified to take fuses, I also had to cut off and crimp new lugs on the negative cables to get them to sit better.
And with the lid on.
Whilst the inverter was disconnected from the house, I also took the opportunity to update its firmware.
Not much to update this weekend.
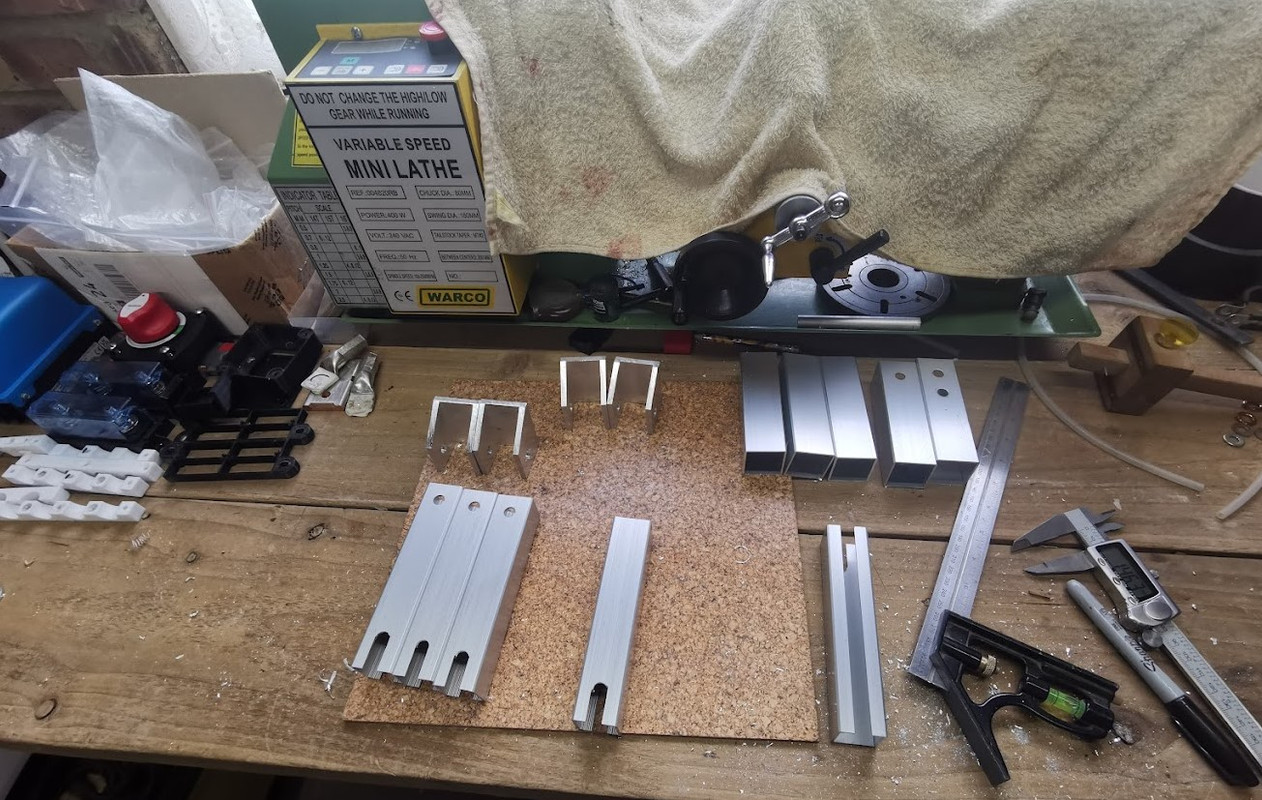
I took this bit of channel.
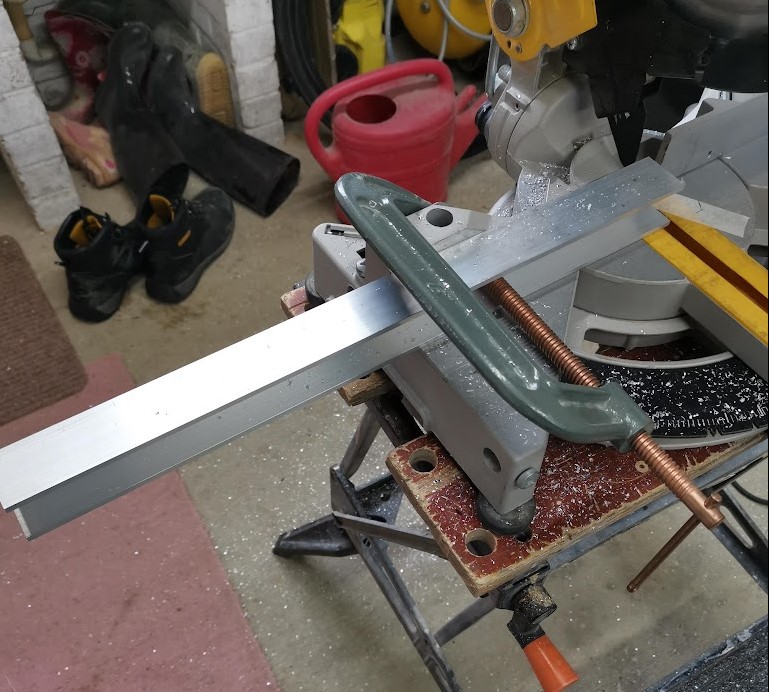
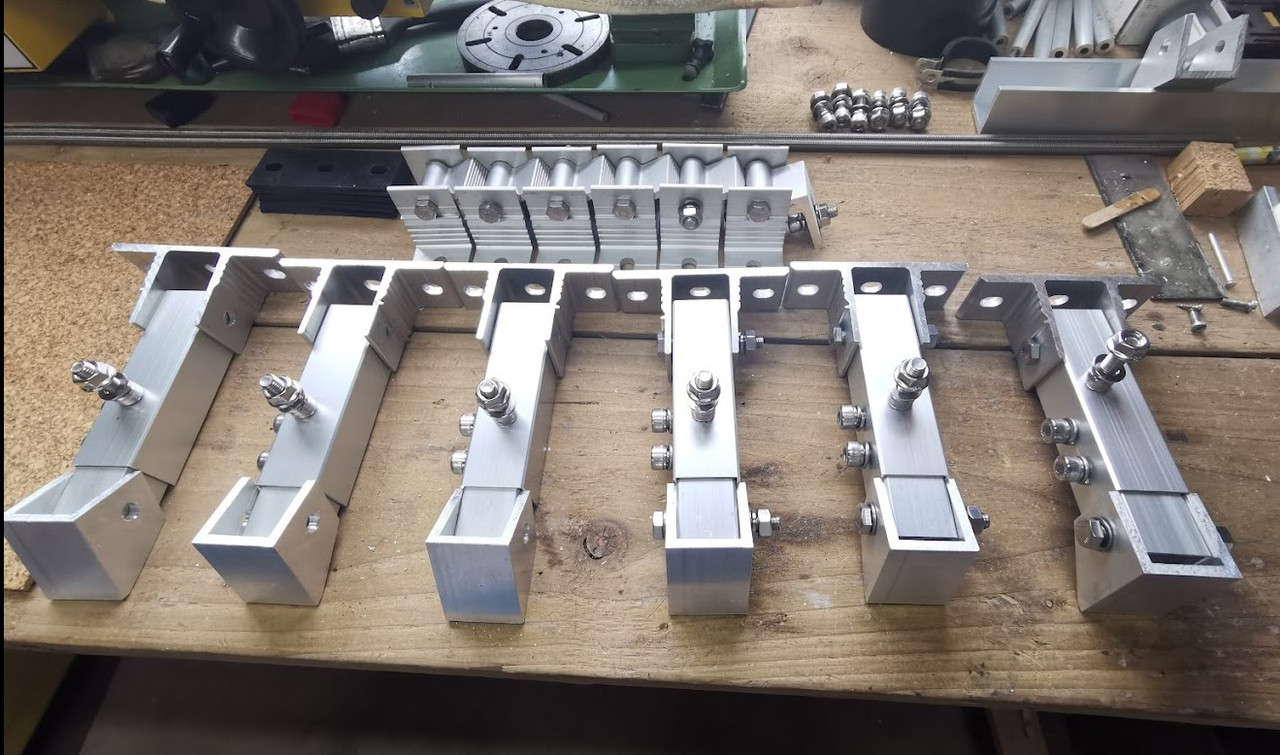
And made six of these, they need another hole drilling in the rear face, but not until I have the panels.
In case you're wondering why I made the brackets instead of using the ones in the kit, it makes fitting the wall brackets simpler, the bottom wall brackets are directly below the upper wall brackets, and not offset.

Then I took this kit, which I got for £20 each, cheaper than usual.
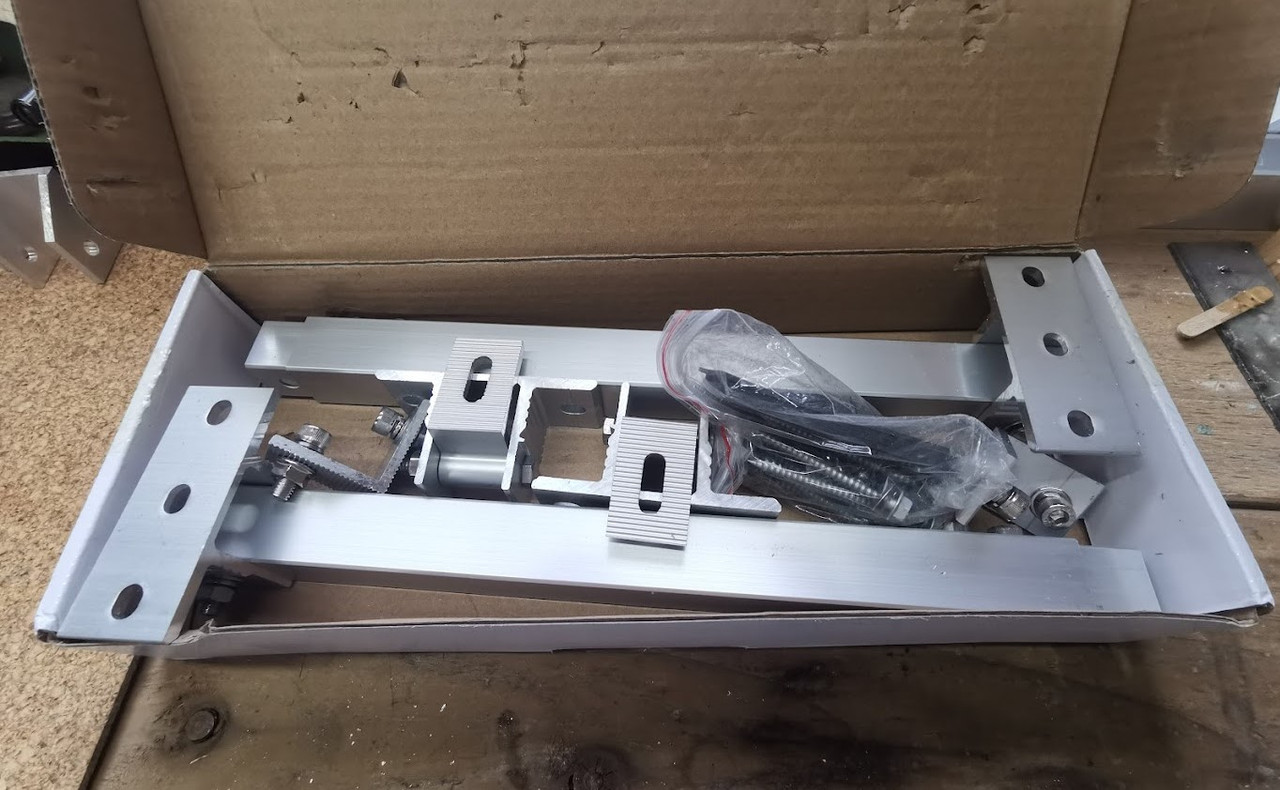
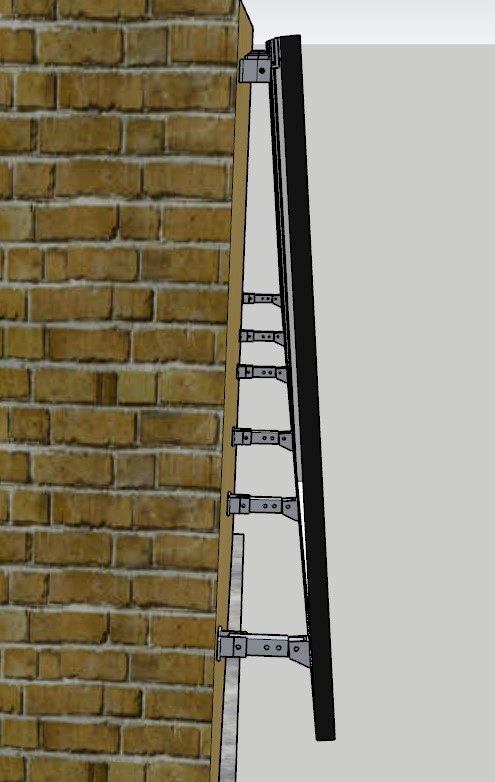
Which is far too long, whilst they'd make for a nice angle, they would need planning permission, and wouldn't get wife approval!
So modification time.
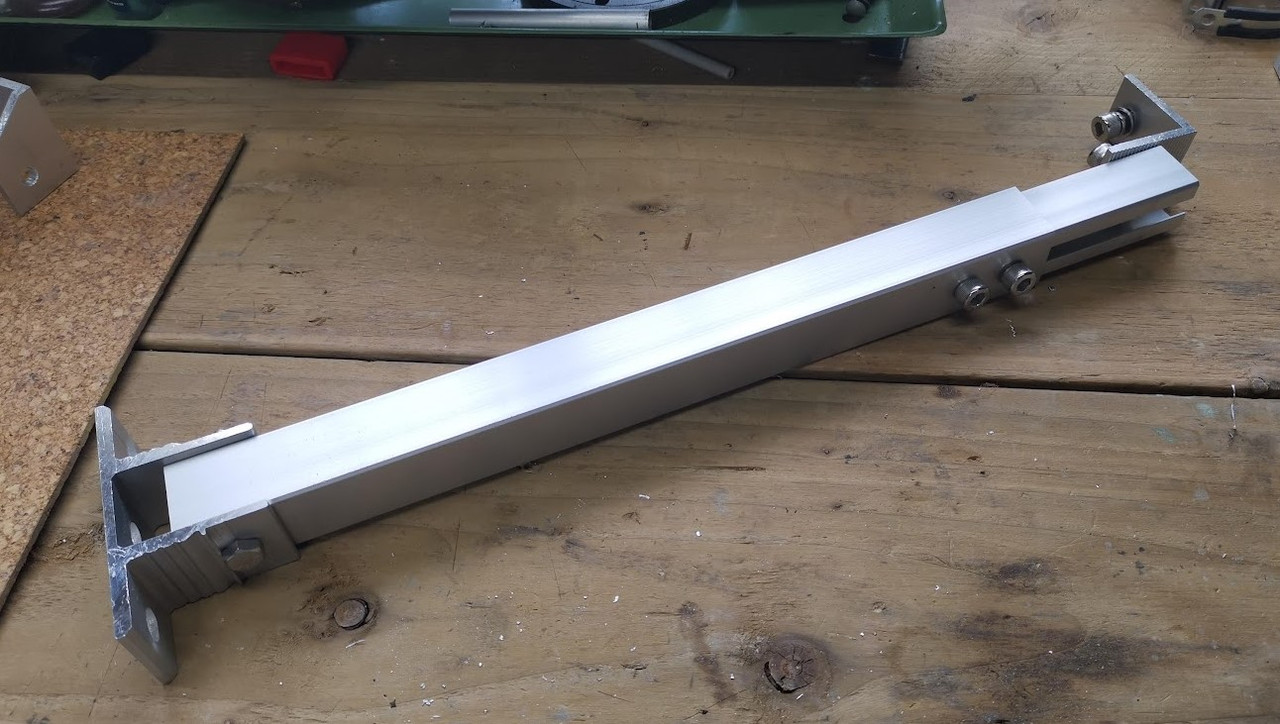
And this is what I end up with, although I need some more bolts.
These are adjustable from 165 to 225 overall length, the 165mm will give me an angle of 84 degrees, or 200mm from the wall, which is the maximum allowed under permitted development.
Now I'd best go and get the grass cut.
I took this bit of channel.
And made six of these, they need another hole drilling in the rear face, but not until I have the panels.
In case you're wondering why I made the brackets instead of using the ones in the kit, it makes fitting the wall brackets simpler, the bottom wall brackets are directly below the upper wall brackets, and not offset.
Then I took this kit, which I got for £20 each, cheaper than usual.
Which is far too long, whilst they'd make for a nice angle, they would need planning permission, and wouldn't get wife approval!
So modification time.
And this is what I end up with, although I need some more bolts.
These are adjustable from 165 to 225 overall length, the 165mm will give me an angle of 84 degrees, or 200mm from the wall, which is the maximum allowed under permitted development.
Now I'd best go and get the grass cut.
Last edited:
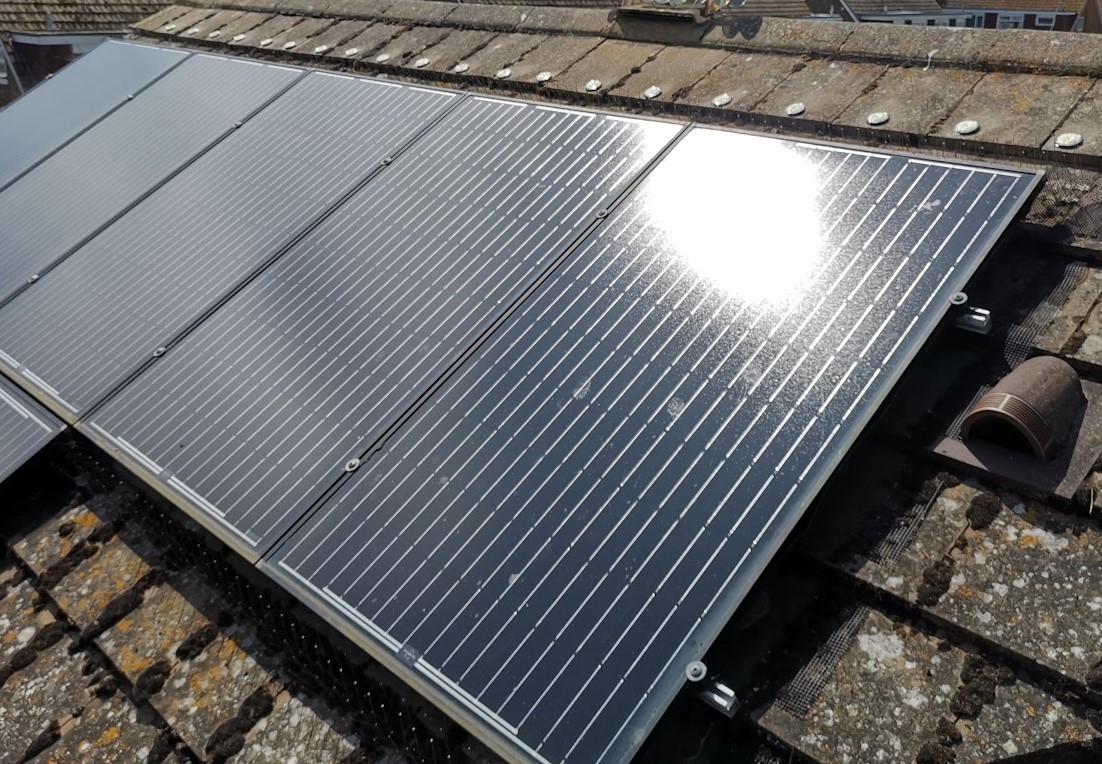
Went up on the roof again today to install the "Bird Free", hopefully it works as advertised.
I didn't get enough to do both strings, so done all of this one, and some of the other.
There was signs of the seagulls building another nest, but just a few sticks and pieces - I've only seen them up there once since I put my CD rack up, but that's far too noisy in the wind so will have to go.
Incidently, I was looking at the specs for these panels (installed December 2015), they are Solarworld Sunpower 250w panels (I've never washed them), and measure 1675 x 1001, and there efficiency is just 14.91%
Compare that to the ones I've got lined up, 1722 x 1134, 435w and 22.3% efficient, huge improvement.
@Welshman check the specs, yours are the same size at 1722 x 1134
I've been out there myself this afternoon, on the deck and the roof, may even have got some sun burn.
Well that "Bird Free" is about as much use as a chocolate tea pot!
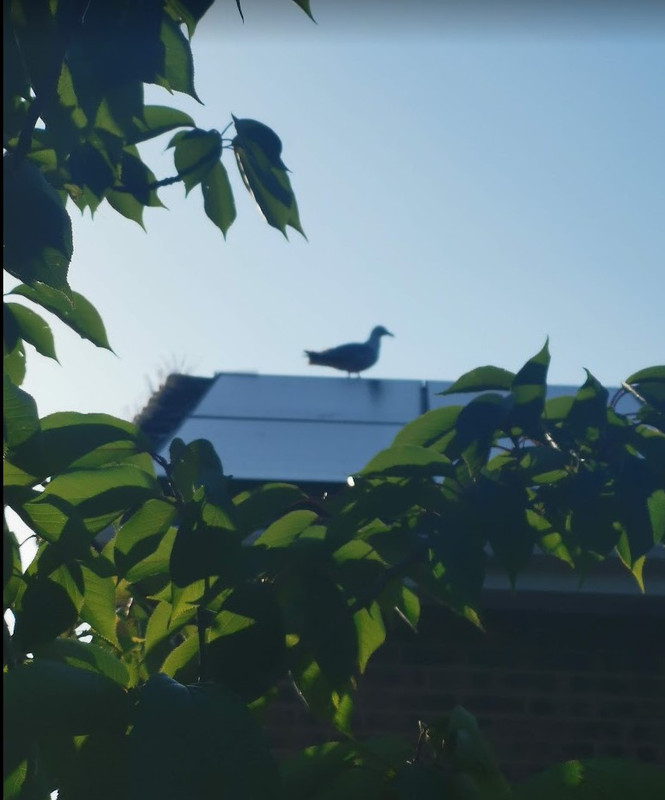
Paint ball gun???You need to scare them off. I heard that throwing tins of white gloss paint at them is the best.
I just don't want the pesky things living up there and having young, plenty of cliffs around here with a good sea view.