Ronski's Solar & battery DIY build with whole house backup

Soldato
Joined
7 Sep 2020
Posts
3,013
Location
Gods Country
Getting very close on my plan for my third solar install :D

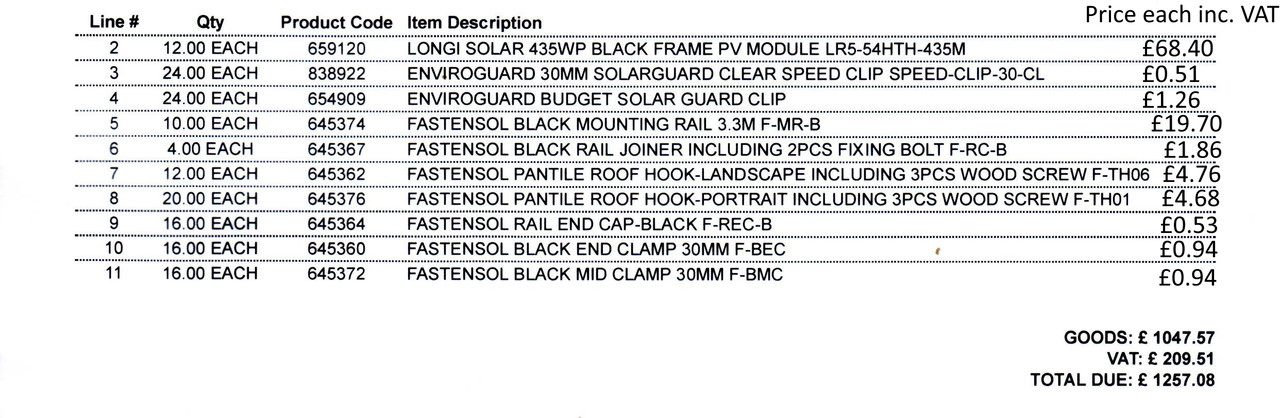
I've just popped round to our local City Plumbing, to see if I can get any discount off the web prices, got a little bit off, but minimal really, but every bit helps.

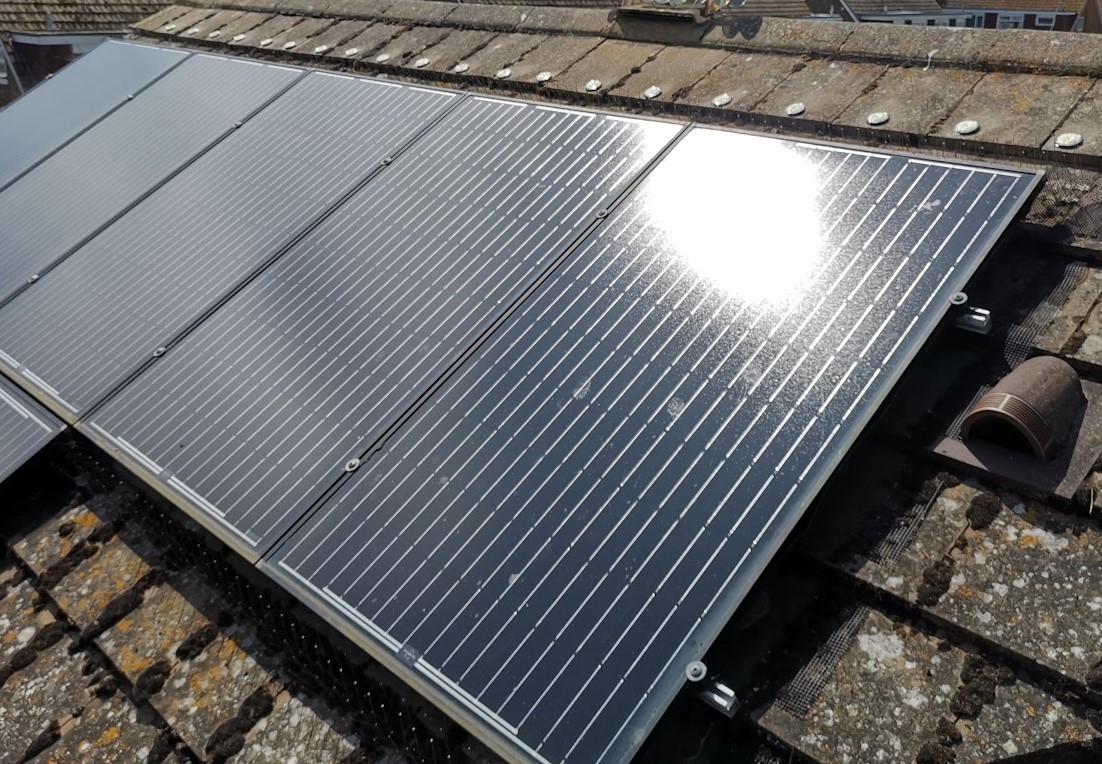
For my NW roof array of 12 panels I've got these short listed.


For the extra £130 I may just go for the 435w panels, they are a newer series, and are a bit better on efficiency and degradation over time.

For the three on the SE wall I'm looking at these, they work out quite expensive per panel including delivery, but I want a physically larger panel (2063mm x 1134mm) as it would look better, would prefer all black, but can't seem to find all black in that size.


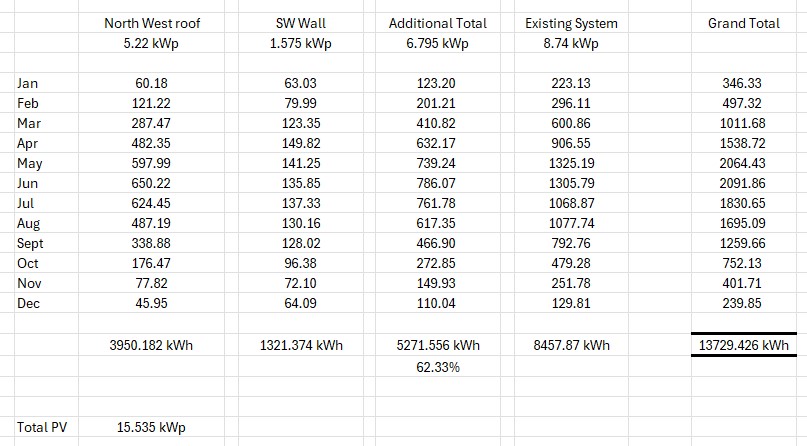
This would give an additional 6.795 kWp of solar, and make a total of 15.535 kWp, and should give an estimated 62% more generation.

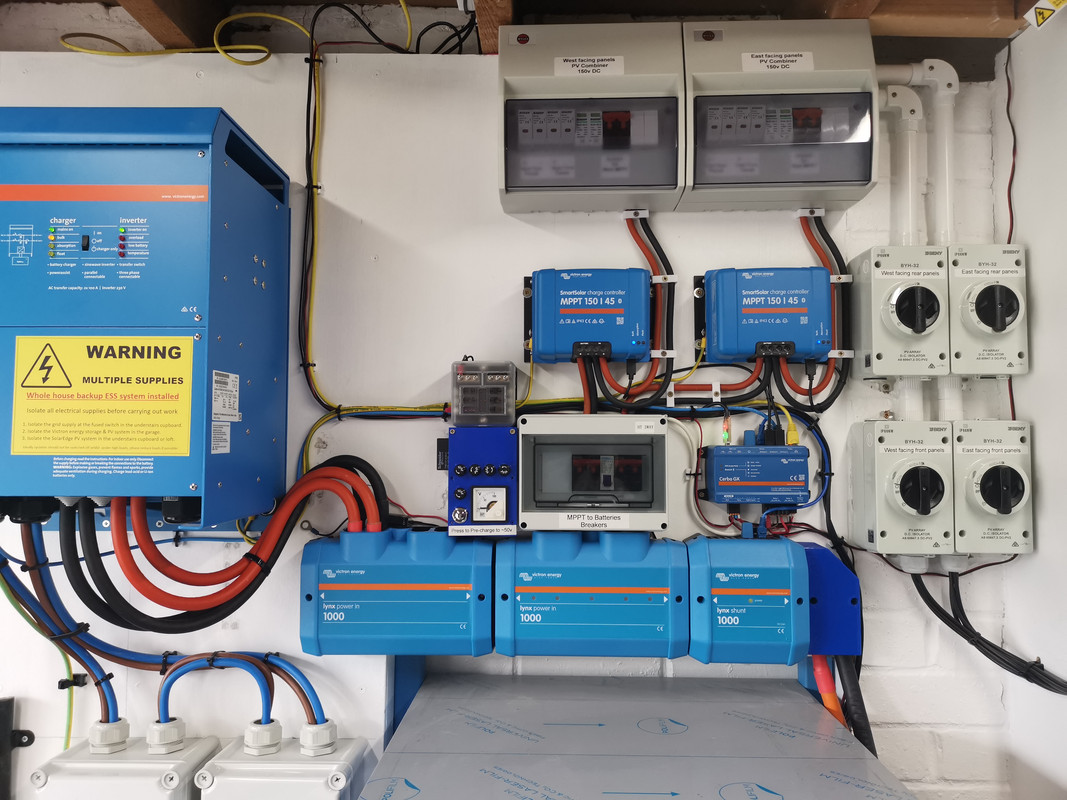
Figures for the existing system below, are actual figures for the last 12 months, at some point I'll have to see what PVGIS thinks my existing panels should be producing.

Additional-Panels-1.jpg
I stopped reading after you said 3rd install lol :cry:
 
Associate
Joined
3 Sep 2014
Posts
807
Location
East Yorkshire
As you're getting NW panels, this is the sort of curve you'll get on a decent day at this time of the year. From your PVGIS figure, I'm guessing yours is more WNW compared to mine which is 2 degrees north of exactly NW (and 4.62kW). It was clear after about 1pm today:

NWarray-180524.png


I couldn't find any information anywhere about how it might perform when I was looking into it, so hopefully its helpful. It did 24.4kWh today which is a record and better than the theoretical maximum on pvwatts for the solstice.
 
Soldato
OP
Joined
3 Dec 2012
Posts
3,639
Location
Kent, much sunnier than Scotland
This is the system as it was last night, there is going to be quite a bit changing here.

The DC isolators on the right will be going, these are not required, and in fact considered a fire risk. The combiner boxes at the top have suitable isolation switches for incoming PV, these boxes will also be changed and reconfigured as well.

The 48v to 12v converter next to the inverter will be relocated, as will the 12v fuse box, and the box with the voltmeter in it.

The white fuse box with clear lid will also be going, as its not required, the SCC's (MPPT solar charge controllers) will be wired direct to the Lynx Power In which is fused.

The two external inverter fuses and the DC isolator switch next to them have gone today.

2024-05-24-17-33-46.jpg


I didn't want to loose solar generation today, so I left the SCC's live, and charging the batteries. This did mean that the Lynx busbars were live with around 50v, and a lot of amps available.

So to lessen the risk of a serious short once the additional Lynx power in was fitted, I removed the positive busbar whilst I modified the negative inverter cables. The Quattro inverter was switched off and isolated from the grid via the change over switches that you can just see bottom left.
This meant the SolarEdge system was powering the house, and any excess from that was exported.

There will eventually be two more solar charge controllers going in, for the two additional arrays.
I also wanted to get rid of the DC isolator, its gets rather hot when passing a lot of current, I've seen 40c on top the case, and 70c+ internally. Its not required, to isolate the inverter I'd switch off the battery and the PV isolators.


2024-05-25-11-14-52.jpg


The Power In has been modified to take fuses, I also had to cut off and crimp new lugs on the negative cables to get them to sit better.

2024-05-25-13-59-53.jpg


And with the lid on.

2024-05-25-15-57-15.jpg


Whilst the inverter was disconnected from the house, I also took the opportunity to update its firmware.
 
Soldato
OP
Joined
3 Dec 2012
Posts
3,639
Location
Kent, much sunnier than Scotland
Not much to update this weekend.

I took this bit of channel.

Channel.jpg


And made six of these, they need another hole drilling in the rear face, but not until I have the panels.
In case you're wondering why I made the brackets instead of using the ones in the kit, it makes fitting the wall brackets simpler, the bottom wall brackets are directly below the upper wall brackets, and not offset.

Channel-Brackets.jpg


Then I took this kit, which I got for £20 each, cheaper than usual.

Mount-Kit.jpg


Which is far too long, whilst they'd make for a nice angle, they would need planning permission, and wouldn't get wife approval!

Kit-too-long.jpg


So modification time.

Modification-Time.jpg


And this is what I end up with, although I need some more bolts.

Lower-Mounts.jpg


These are adjustable from 165 to 225 overall length, the 165mm will give me an angle of 84 degrees, or 200mm from the wall, which is the maximum allowed under permitted development.

Wall-Panel-Mounts.jpg


Now I'd best go and get the grass cut.
 
Last edited:
Soldato
OP
Joined
3 Dec 2012
Posts
3,639
Location
Kent, much sunnier than Scotland
Went up on the roof again today to install the "Bird Free", hopefully it works as advertised.

I didn't get enough to do both strings, so done all of this one, and some of the other.

There was signs of the seagulls building another nest, but just a few sticks and pieces - I've only seen them up there once since I put my CD rack up, but that's far too noisy in the wind so will have to go.

Incidently, I was looking at the specs for these panels (installed December 2015), they are Solarworld Sunpower 250w panels (I've never washed them), and measure 1675 x 1001, and there efficiency is just 14.91%
Compare that to the ones I've got lined up, 1722 x 1134, 435w and 22.3% efficient, huge improvement.

Bird-Free.jpg
 
Soldato
Joined
7 Sep 2020
Posts
3,013
Location
Gods Country
Went up on the roof again today to install the "Bird Free", hopefully it works as advertised.

I didn't get enough to do both strings, so done all of this one, and some of the other.

There was signs of the seagulls building another nest, but just a few sticks and pieces - I've only seen them up there once since I put my CD rack up, but that's far too noisy in the wind so will have to go.

Incidently, I was looking at the specs for these panels (installed December 2015), they are Solarworld Sunpower 250w panels (I've never washed them), and measure 1675 x 1001, and there efficiency is just 14.91%
Compare that to the ones I've got lined up, 1722 x 1134, 435w and 22.3% efficient, huge improvement.

Bird-Free.jpg
That some big panels for the wattage…..mine are 1700x1000 give or take a few mm’s for 405w panels.
 
Back
Top Bottom