What "man jobs" have you done today?

Solve this..
U_CGHnCQocCHkO-q2nC55Jk3_nj5gY-xTqp4qGQMtWtTFWe-CPeW_s562Nv11WlDMDJ8i_MNBS-2goQQ1KoDkxUgczS6C94gO8wqmw=w3024-h4032-no


Looks like someone tried to surface filler this one before at the lower section.

Turns out some of the blocks behind need repointing and better still remove the block and replace but I don't have the time.

Rebuild from the bonding plaster up .. currently drying then sand, base coats and paint.
 
Put up a washing line. I removed the bracket from higher up and re-drilled lower down the post.

20181001_174347.jpg


Got a nice snug fit on the screws for the bracket, very solid. The only drill bit I have that was the right size for the screws was this 2.5mm cobalt bit. It worked fine, though I had to put the drill to hammer mode for it to go through the wood panel. Didn't take much effort though and the bit isn't damaged. It's HSS, so I guess it's meant for masonry and metal and not wood?

20181001_174544.jpg
 
There was a void under my stairs which was looking very untidy with all of my son's outdoor toys, wellies etc there. Decided to make a cupboard.

All built from 1x2, pine cladding, and ply. Took a day but looks OK.

GRXFBy1.jpg

vURVSF8.jpg
 
Put up a washing line. I removed the bracket from higher up and re-drilled lower down the post.

20181001_174347.jpg


Got a nice snug fit on the screws for the bracket, very solid. The only drill bit I have that was the right size for the screws was this 2.5mm cobalt bit. It worked fine, though I had to put the drill to hammer mode for it to go through the wood panel. Didn't take much effort though and the bit isn't damaged. It's HSS, so I guess it's meant for masonry and metal and not wood?

20181001_174544.jpg

There’s different types of drill bits for metal, masonry and wood.
 
Put up a washing line. I removed the bracket from higher up and re-drilled lower down the post.

The cobalt bits are masonry (altho will work on wood if in a rush) . The ones in the yellow packet you have are for wood.

You didn't even need to drill into the post? Just screw straight in with a self tapping screw? (tbh most screws would work) . No pilot holes required.
 
After having a new boiler fitted in a different part of the house I was left with an 8" square hole in the bathroom wall.

I bricked it up yesterday then today tried to replicate the surrounding Tyrolean render. I've read various methods but settled on roughing up the area with some screwed up bubble wrap, then flicking render at it with a stiff brush. Looks an absolute pigs ear at the moment :o but hopefully once it's been painted, along with the rest of the upstairs walls, it won't be too bad.
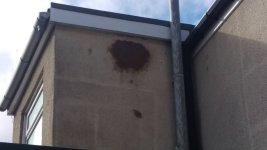
VCgmtJs.jpg

Inner wall was blocked up with 50mm kingspan offcut, some plasterboard, then plaster. Didn't need to look brilliant as I've covered over it with two wall units I saved from our old kitchen.

PZzRU6D.jpg

Would have made sense to paint the walls first but her indoors hasn't decided on a colour scheme yet! They are easy enough to remove when we get around to decorating.
 
There was a void under my stairs which was looking very untidy with all of my son's outdoor toys, wellies etc there. Decided to make a cupboard.

All built from 1x2, pine cladding, and ply. Took a day but looks OK.

GRXFBy1.jpg

vURVSF8.jpg


Tidy... I would have been tempted to make the other half open as well, put it on a hidden drop bolt arrangement so normal use is the door, but you can 'fully open' when needed.

Definately oil or paint it, will pick up every little bit of grub otherwise.
 
That's a really good idea. No reason why I can't do this in the future. The "wall" is just a box frame screwed to the floor and the stairs. I could unscrew it, hang it, and do what you say with drop bolts.
 
Had a go at back lawn - scarified it - got moss out - got weeds out and finally got healthy grass - Problem is there isn't much left so my job now until next summer is -- Water in nematodes when they come - that should do chaffer grubs in - let any grass grow then weed killer the lot - give it a load more scarifying and get up as much thatch as possible followed by death by burning. Hopefully by next March I should have a clean base (I am not digging it over) then spread compost till it's smooth and level then Seed it.

A good hard frost this winter would be helpful to kill off any pests.

414017632.jpg
 
Yeah, I agree but the Mrs says "no". I also wanted to paint it but the mrs says "no" to that too. I'm not sure why on either count though.

Put the Mrs in the cupboard and put a good lock on it. :D


Gotta ask why you used a drill bit at all and didnt just screw it straight into the wood with self tappers.

You didn't even need to drill into the post? Just screw straight in with a self tapping screw? (tbh most screws would work) . No pilot holes required.

Shows how little I know about proper DIY. Self tapping screws have little drill bits on them right? I can buy some. Should I get a selection of sizes for wood?

But anyway, I just removed the screws my builder put in (he replaced some of the fencing) and reused them lower down. They needed to be drilled into the post, they wouldn't have gone in with just using the electric screwdriver I don't think?
 
Put the Mrs in the cupboard and put a good lock on it. :D


Shows how little I know about proper DIY. Self tapping screws have little drill bits on them right? I can buy some. Should I get a selection of sizes for wood?

But anyway, I just removed the screws my builder put in (he replaced some of the fencing) and reused them lower down. They needed to be drilled into the post, they wouldn't have gone in with just using the electric screwdriver I don't think?

Of cource the would have done. Guaranteed thats what he did originally, only time you would pre drill for screws is in wood that's likley to crack. Dont think a screw would crack that huge post!
 
Back
Top Bottom