

Associate
You are using an out of date browser. It may not display this or other websites correctly.
You should upgrade or use an alternative browser.
You should upgrade or use an alternative browser.
8pack Supernova - build log!
- Thread starter Shawy
- Start date
More options
View all posts

No Acrylic? Boring.
Not yet.
Got a question on the existing Supernova though- how come you went all parallel flow with the 3 Titan Blacks? I can't see what you got in terms on pump power for that loop.
Better temps & aesthetics. The blocks are all the same so the flow through each block is the same, there's also hardly any restriction in the loop so the pumps can be undervolted a fair amount.
We usually use D5s in this build, but we're trying to get the best out of the Aquaero this time, so we're using PWM DDC pumps with EK housings. Each rad will have it's own channel on the Aquaero, so will each pump. There will also be temperature sensors and flow meters in each loop for 100% monitoring and automatic control of the system.
Wow, those boxes need their own room
A normal system has a box of components that sits on top of the case box.
This build had 6 boxes.

Zotac Titan Blacks?
Flashed with a special BIOS made just for 8pack, and then fine tuned by the man himself.
Out of interest, what antistatic measures do you guys use when doing a build? Just a wrist band or a antistatic matt?
There's an antistatic layer in the floor throughout the whole of tech. Our workbenches are grounded and we're constantly touching cases/PSUs that are also grounded.
So a question, what box is bigger? The box with the PC or the box with the boxes? (Assuming you give them the components)
Caselabs cases come flat pack. Still a pretty big box though.

We demand more pictures
Here you go
")
Inside the Caselabs box:

Found this down my shorts, 10 points if you get the joke.

Each panel was vacuum wrapped:

Had to remove the window for laser etching.

Starting the assembly:

Quite easy to assemble, quite a few screws though

Motherboard tray slides in the back, makes things a lot easier to work on outside of the case

HDD and SSD cages at the back

The most annoying part is adding the little clips that hold the external panels:

All of the external panels stay in their vacuum sealed packs until the build is finished to make sure they don't get damaged or scratched during the build.
What are the specification/ extra you have on the super nova case setup, I went to case labs site and soon realized there were so many addon options I thought *pffft* leave it lol
ScottieB will have to answer that one.
Once the case was assembled, the preparation began.
I used the Mayhems Blitz Pro Cleaning System to flush out the radiators.

And this is what I had to clean:

3x 480mm SR1s and a 240mm SR1. That's 14 120mm fans worth of radiator space.
The first job is to calibrate the pH meter using the calibration solution:

The next step is flushing the rads with diluted acid solution. The 14x120mm rads used up the whole bottle of cleaning formula diluted to 2litres.

And here's the set up used to flush the radiators:

And the spoils:

A fair amount of bits in the bucket, not the best picture though.
After running the acid solution for a couple of hours, the rads were drained and washed out with distilled water.
The next step involved a pH neutraliser to clean up all of the acid used in step one.

This got very frothy .
It took a while to wash out all of the bubbles.

The 5litres of Mayhems Ultra Pure distilled water wasn't enough. I had to break out the big guns.

All in all, the kit is quite time consuming, uses up quite a lot of distilled water, but there is no doubt in my mind that these are the cleanest radiators I've ever used.
How tall is that case in the bottom?
About 180mm, but I'll have to measure it to be sure.
Great thread.
@Shawy How long are you given to build it?
It's built.
")
I did the prep work on Saturday - building the case, flushing the radiators, fitting water blocks etc. Then 3 days putting everything together.
There's still a couple of things needed to finish off the build, but both loops have been filled and no leaks so far.
I'm gonna keep you all waiting on the end results though.

Shawy, I have the same Mayhems Blitz kit and I thought part 2 was for the whole loop?
It is. It was hard enough to flush out of just the rads, I can't imagine how long it would take to flush it out of waterblocks too.
Not cool Shawy not cool! I need to see this badboy built and running.
Thanks
Now stop being a tease and show us the end results.
Alrigh, alright!
You've twisted my arm..
Here's a photo of after both loops have been filled!

Sorry the angle isn't great..
But check out that plastidip on the optical drive! Sooooo stealthy!
Sorry the angle isn't great..
But check out that plastidip on the optical drive! Sooooo stealthy!
You massive tease
Love the plastidip, I might do that too. Ya, I saw heard people say the entire loop froths like crazy and takes hours to clear up. I haven't yet gone to that stage so that's why I was wondering if I can get away like you did with just the rads. They are the culprit pretty much every time anyway.
Yeah, waterblocks, pump tops and reservoirs are usually milled out of solid pieces and then screwed together and are generally clean. It wouldn't hurt to flush them out, but it's not strictly necessary.
Woops, I meant the bottom pic sorry, not the bottom compartment. *Dies of embarrasment*
My mistake, vsg28 is right - about 780mm tall. When the feet and external panels are installed it sits at around 820mm
Hehe, Shawy, 6 boxes
You should see my spare room - it's full of boxes of stuff that went inside my S8 and there is still more to come.
Your build is going to be epic too.
Can't wait for more updates
At least you have a spare room! My bedroom is still full of my own build log (still in pieces, really need to get it finished
 ). That plus my next build log that I haven't even started yet but keep spending money on lol. Oh and a bunch of car audio and interior trip pieces…
I need an intervention with all of this modding.
That 25 litres of distilled water is out of date. Unacceptable, never buying from OCUK again, etc etc.
(Who am I kidding, I'm probably going to get an Infinity this week. The fans in my XClio Windtunnel are starting to die.)
That's the date it was made.
Ask ScottiB to pop in and tell us the case specs please
Will do when I'm back in tomorrow.
But for now, some more prep work from the build.
3 little Titan blacks before

A cheeky little nude shot of the cards


And quickly covered back up

Similar story for the DDC pumps

Their new house inside the EK mod kit

And with a Bitspower top

A comparison of stock DDC to the EK mod kit and Bitspower top:

The kit makes the unit quite a lot taller, but looks much better, is far easier to mount, and will run a lot cooler.
Next up the board

And, of course, the chip specially binned by 8pack himself!
Naked again

Don't worry, that filth was soon covered up

As was the processor

All EK Nickel Acetal water blocks in this build.

All nice and uniform


Time to get some fittings & tubing on board with some Bitspower Blood Red compressions and rotaries.

I'm not gonna lie and say this piece was easy

This bit was

But the tubing didn't even stick out of the compression ring

And once the tubing was on the fitting, the compression ring was touching the threads

And it was finally screwed in

The second piece was a lot easier to fit

And a quick look of how the graphics cards will contrast with their black fittings.

Eagle eyed amongst you will notice one of the crystal link fittings is missing - don't worry, it was on it's way from CaseKing at the time, and I did remember to fit it before filling the loop.
How come you didn't go with a couple of 90 degree adapters and an extender instead of that ridiculously small piece of tubing and compressions? It would have made your life a lot easier.
Example from an older build:
I will be re-doing it with a single fitting in the middle but you get the point. Love the acetal blocks + red fittings color scheme!
Aesthetics & uniformity.
Thread gets better.
You ain't seen nothing yet.
Wow... I really need to understand how the **** you got those fitting to work being so close... I'd have snapped them in anger
I've had quite a bit of practice and my thumbs have no feeling anymore!
Moar I need MOARRR!
Ease me into the weekend by finishing the build log today. Please I am already bored at work and need some decent to look at!
Pwease, there is some Harribo in it for you
Haha! Sorry for the lack of updates, been a busy weekend for me - only partly due to locking myself out of my car 100 miles from home!

You guys should do a time lapse video of one of these builds.
We could try and live stream it and that would turn out like a time laps with our internet lol.
Shawy, could I get a point of clarification on these systems. I have 5TB of data drives in my current PC that are perfectly fine. If I wanted to transplant them to my Infinity, would it be possible to not have any secondary storage installed in my Infinity build and do the transplant myself without voiding the warranty? It'd be a heck of a lot faster than trying to copy 3.5TB of data.
As Bicepo said - we can do pretty much any customisation you'd like to our systems - just phone our sales teams and they'll sort you out.
Update time!
Time to mount all 14 of these eLoops:

Some of the quietest fans I've ever heard - well, I haven't really heard them but you get the picture.
Mounting to the rads with Bitfenix Alchemy fan splitter cables

And the 8pack fan grills:

I know they're not on the fans, but they still look sweet!
Mounting the Bitspower res to the fans

That thing is huge
Maybe a little too huge…

We had to swap it for a slightly smaller res

Nice and cosy now.
Next was mounting the pump

Had to disassemble the pump top to drill the mounting holes.
Perfect fit

And with some extra sound dampening

Once inside the case it was easy to see the tubing path

I'd like to stress that this was not an accident.

A lot of careful planning and measuring went into this.
There's even room at the side for tubing

'To where' you might be asking..

Using some spare rotaries to help plan out the loop
And some more planning at the front end

Very busy!
And it got busier!

Using the Aquaero to the max with these flow meters & temperature sensors.
That's it for this update!
But here's a little sneak peak of Bicepo getting involved ready for the next update:

(He wont be too happy when he sees how messy the desk is)
Time to mount all 14 of these eLoops:
Some of the quietest fans I've ever heard - well, I haven't really heard them but you get the picture.
Mounting to the rads with Bitfenix Alchemy fan splitter cables
And the 8pack fan grills:
I know they're not on the fans, but they still look sweet!
Mounting the Bitspower res to the fans
That thing is huge
Maybe a little too huge…
We had to swap it for a slightly smaller res
Nice and cosy now.
Next was mounting the pump
Had to disassemble the pump top to drill the mounting holes.
Perfect fit
And with some extra sound dampening
Once inside the case it was easy to see the tubing path
I'd like to stress that this was not an accident.
A lot of careful planning and measuring went into this.
There's even room at the side for tubing
'To where' you might be asking..
Using some spare rotaries to help plan out the loop
And some more planning at the front end
Very busy!
And it got busier!
Using the Aquaero to the max with these flow meters & temperature sensors.
That's it for this update!
But here's a little sneak peak of Bicepo getting involved ready for the next update:
(He wont be too happy when he sees how messy the desk is
)How many Infinity systems have overclockers sold in total?
I don't know for sure but I'd say easily one a week. There were 6 including scimitars in one week last month. And that's just the watercooled ones!
Hence why the tube res didn't fit
Good looking build
It's the res we've used in the past but, as Bicepo demonstrated, we have some new tools to play with to make the Supernova even better this time around.
Oh god those close knit compressions! I am sorry for your hands, Shawy.
I've never been able to use the finger print scanner on my iPhone because my thumbs are always like this:

Can You put up a diagram of how you have set up the aquaero please
will help me out a lot
Honestly, that thing is a build log in itself. I'll try to get some photos of the back of it later on in the build log. Bicepo spent a good few hours getting it all set up though, and I still think there's some more tweaks to be made.
Threads like this certainly make you appreciate how much time, effort and care goes into these builds.
There's a lot more work that goes into it before the build even begins. People like ScottieB and 8pack himself sitting down planning, designing, organising custom hardware and BIOS's. Not to mention binning hundreds of processors to find a single chip good enough for these builds, and then the hours 8pack puts into overclocking and tweaking settings to get the absolute maximum from all of the hardware with rock solid stability.
My fingers used to bleed, so those seem better off in comparison. Likely from doing this all the time?
Yeah, built up some fairly thick skin from all the compression fittings over the past months. The back of my hands get cut/scratched on a daily basis still - all part of the job!
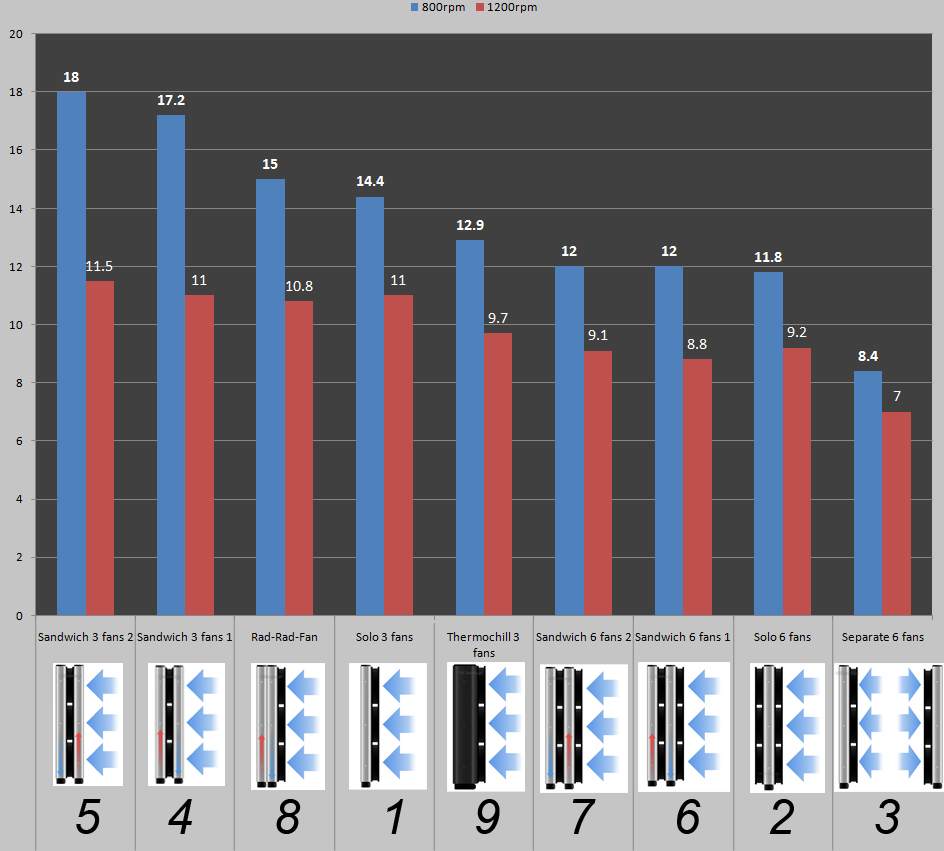
I'm looking at that top pedestal - is that 6 exhausts (7 including PSU?) and no intakes? Is that the best performing/lowest noise option?
If you check out the image below, having fans pulling in fresh, cool air is the best configuration:
Unless I'm blind the BP kit doesn't seem to have any "anti-vortex" bit although I do like the idea of the mounting kit. How does the BP tube perform for bleeding when laid horizontal like that as I'm looking for a new reservoir.
It has a riser tube that separates the inlet and outlet when used in a vertical set up, or allows the input to be at the top of the res. There aren't really any issues with mounting the reservoir horizontally like this, as long as the outlet to the pump is higher to the inlet to the pump and the inlet to the reservoir is lower than the water level to reduce noise.
This looks Amazing! cant wait to see it up and running.
Still waiting on the finishing touches, but I'll try to keep the updates fairly regular until then.
Time for a quick update - tubing up the top section.
In the last update I shared a picture of Bicepo with his safety gear on drilling one of the case panels, and you're about to find out why..
In this 8pack system, we've used some Bitspower pass through fittings for the cleanest looking build to date.

Not only that, but for the first time in recorded history, I have managed to use a non-rotary 90 degree fitting in a loop that actually faces the right direction!

It's a miracle!
After the angled fittings were in place, it was time to start the tubing.

Mmmmmm straight lines…

The flow sensors were not easy to fit between the rads like this...

...but they don't half look good there.
And theres only long piece of tubing in the top loop

Also happens to be the only piece that isn't completely straight.
And it's mostly hidden

Such straight. Many angles.

Wow.
And here's a quick teaser of the next update when the board is finally installed inside the case:

In the last update I shared a picture of Bicepo with his safety gear on drilling one of the case panels, and you're about to find out why..
In this 8pack system, we've used some Bitspower pass through fittings for the cleanest looking build to date.
Not only that, but for the first time in recorded history, I have managed to use a non-rotary 90 degree fitting in a loop that actually faces the right direction!
It's a miracle!
After the angled fittings were in place, it was time to start the tubing.
Mmmmmm straight lines…
The flow sensors were not easy to fit between the rads like this...
...but they don't half look good there.
And theres only long piece of tubing in the top loop
Also happens to be the only piece that isn't completely straight.
And it's mostly hidden
Such straight. Many angles.
Wow.
And here's a quick teaser of the next update when the board is finally installed inside the case: