

You are using an out of date browser. It may not display this or other websites correctly.
You should upgrade or use an alternative browser.
You should upgrade or use an alternative browser.
Project: Silent Overkill
- Thread starter Cenedd
- Start date
More options
Thread starter's postsSweet job on your mates PC, looks proper tidy from the front and nobody is gonna pull the back off to look at the spaghetti 
Liking the idea of ripping the Aquaero apart to split the screen from the main unit, wouldn't have the balls to do it myself but as you say, gives you a lot more room to play with and should make life simpler in the future if gaining access to it is simpler. Don't like the idea of removing the pump just to change fans!
One thing though: Are you SURE that radiator is big enough? Looks like it could do with another couple of inches
There's a gag there somewhere. Something about an actress and a bishop?
Would it make any difference if I said it was a 140mm fan for scale, not a 120?
I think I can get the parts to make up a cable from a popular radio spares wholesaler. Should cost me about £20 though as everything is in packs of 5. To be honest, I only came up with the idea when I saw the connector from the touch screen to the display and thought a USB lead (with internal headers at each end) would fit and the whole thing would be easy....should have known better!
My trouble now is that I haven't got time until next week to look at how the rad mounting can be done...but when I go to bed, all that swirls round my head is possible methods and problems!
That wouldn't just make ANY difference, it would make ALL the difference
That's not too bad, why make life simple for yourself when for only £20 you can make it a lot more difficult? Bargain! Definitely be worth it though to not have it hidden behind the pump, best of both worlds if you could keep the screen in the shroud but the main unit where it's accessible")
At least it gives your head a week to run through all the other possibilities for mounting the rad. You never know, it could still find an even more complicated method for fixing it
That's not too bad, why make life simple for yourself when for only £20 you can make it a lot more difficult? Bargain! Definitely be worth it though to not have it hidden behind the pump, best of both worlds if you could keep the screen in the shroud but the main unit where it's accessible
At least it gives your head a week to run through all the other possibilities for mounting the rad. You never know, it could still find an even more complicated method for fixing it
Now you see where the "overkill" in "Project: Overkill" comes from! If it's worth doing, it's worth doing properly in an over the top fashion!
If it's worth doing, it's worth doing Associate
- Joined
- 20 Sep 2009
- Posts
- 99
Looking forward to seeing the finished product
Associate
The radiator is beastly in every way you want it to be. Get the stag out of the way and on with the build!
Get the stag out of the way and on with the build!
Is it wrong to say I kinda want to skip the stag and just get building?! Obviously I'm either getting old or grumpy....but the two aren't mutually exclusive!
Got home from work last night to find that E22 had posted me replacement 12/10 Acrylic hardline. The new stuff seems to be clearer - less streaky - and it fits the EK fittings! Still tight enough not to worry about it coming out but not so tight that you have to use destructive (to say the graphics card) force to get them in. Also, there were enough to cover my bending learning curve! So many thanks to E22 for sorting this out and also to Davido Labido for hooking me up with them in the first place. Much appreciated both of you.
Right, it's rad mounting theory time!
I want to mount the rad on the off-side panel. Let's call it spaghetti side (as opposed to window side) but I want to still be able to open the panel on its hinge. I'm not going to count on the hinge to support the full weight - although if it does, it's a bonus. I plan to mount the rad at the exact height (hopefully) so that if I put the feet on, they'll take the weight and stop the case tipping.
Now the difficulty is connecting the loop to the rad in such a way to keep it openable.
I was thinking QDCs (for obvious reasons) but there's only 20mm between M/B tray and door - enough (just) for an EK 12/10 fitting ring but not a QDC. I was thinking through the panel and then 90 degree fitting. There isn't space for a bulkhead and then 90 but if the fitting stuck through the panel it might work as long as I could find exactly the right size extension - which is unlikely.
Then I thought a swivelling fitting exactly in line with the hinge...but that would mean cutting chunks out the back of the case and having fittings sticking through.
I looked at mounting it backwards (fittings to the front of the case) and it could be done either by going through the front panel into the drive bay area (resulting in an overhang of rad at the back) or even through the wider spaces at top and bottom of the front panel (with some modification to the top panel mount connection). I thought this would be really neat for a minute....but then realised the panel couldn't be opened if connected at the front.
My current plan is a piece of hardline through the panel with a 90 bend as soon as it's through. This is much more slimline than a 90 fitting and, bending skill permitting, should be exactly the right dimensions. I looked at making the loop parallel so that input and output are at the bottom of the case but I'm not comfortable assuming that flow will be even vaguely similar through go and cpu. I can take hardline out the cpu, through the top grommet and then 90 downwards.
I looked at various combinations of swivelling fittings but I don't have the space or the layout is wrong to make a hinge. So I'm thinking of shoving some soft tubing onto the end of the hardline, running it downwards for a bit, 90, short length, 90, back up and then onto the hardline into the rad. The flexibility in the hose (and Tygon is extra flexible) would give me the hinging effect so I could open the door without disconnecting the loop. The 90s are to make it a nice down and up drop with fairly narrow width rather than a larger radius loop.
The same would have to be done for the bottom connection.
The 13/10 Tygon I have does fit over the 12/10 E22 acrylic and I'm thinking a cable tie or a hose clamp or a jubilee clip (space being the decider) would secure it. The alternative would be a hardline fitting, female to female swivel fitting (XSPC make one) and then a 13/10 compression fitting. If need to check the ring for the 13/10 fitting fits in the 20mm space but I think that's probably over complicating it too.
Assuming this makes sense to anyone, can you foresee any problems with it? Can you think of a better solution?
Thanks for making it this far through his rather wordy post. There will be some more pictures forthcoming soon. Just need to get this clear so I can sleep at night without it going round and round in my head!
I want to mount the rad on the off-side panel. Let's call it spaghetti side (as opposed to window side)
but I want to still be able to open the panel on its hinge. I'm not going to count on the hinge to support the full weight - although if it does, it's a bonus. I plan to mount the rad at the exact height (hopefully) so that if I put the feet on, they'll take the weight and stop the case tipping.Now the difficulty is connecting the loop to the rad in such a way to keep it openable.
I was thinking QDCs (for obvious reasons) but there's only 20mm between M/B tray and door - enough (just) for an EK 12/10 fitting ring but not a QDC. I was thinking through the panel and then 90 degree fitting. There isn't space for a bulkhead and then 90 but if the fitting stuck through the panel it might work as long as I could find exactly the right size extension - which is unlikely.
Then I thought a swivelling fitting exactly in line with the hinge...but that would mean cutting chunks out the back of the case and having fittings sticking through.
I looked at mounting it backwards (fittings to the front of the case) and it could be done either by going through the front panel into the drive bay area (resulting in an overhang of rad at the back) or even through the wider spaces at top and bottom of the front panel (with some modification to the top panel mount connection). I thought this would be really neat for a minute....but then realised the panel couldn't be opened if connected at the front.
My current plan is a piece of hardline through the panel with a 90 bend as soon as it's through. This is much more slimline than a 90 fitting and, bending skill permitting, should be exactly the right dimensions. I looked at making the loop parallel so that input and output are at the bottom of the case but I'm not comfortable assuming that flow will be even vaguely similar through go and cpu. I can take hardline out the cpu, through the top grommet and then 90 downwards.
I looked at various combinations of swivelling fittings but I don't have the space or the layout is wrong to make a hinge. So I'm thinking of shoving some soft tubing onto the end of the hardline, running it downwards for a bit, 90, short length, 90, back up and then onto the hardline into the rad. The flexibility in the hose (and Tygon is extra flexible) would give me the hinging effect so I could open the door without disconnecting the loop. The 90s are to make it a nice down and up drop with fairly narrow width rather than a larger radius loop.
The same would have to be done for the bottom connection.
The 13/10 Tygon I have does fit over the 12/10 E22 acrylic and I'm thinking a cable tie or a hose clamp or a jubilee clip (space being the decider) would secure it. The alternative would be a hardline fitting, female to female swivel fitting (XSPC make one) and then a 13/10 compression fitting. If need to check the ring for the 13/10 fitting fits in the 20mm space but I think that's probably over complicating it too.
Assuming this makes sense to anyone, can you foresee any problems with it? Can you think of a better solution?
Thanks for making it this far through his rather wordy post. There will be some more pictures forthcoming soon. Just need to get this clear so I can sleep at night without it going round and round in my head!
Progress!
I'll try to get some diagram of what the hell I was on about above soon cos either it made no sense or TL;DR.
I've been hard at work with a Dremel, a diamond wheel and a large selection of hand files. This is the result:
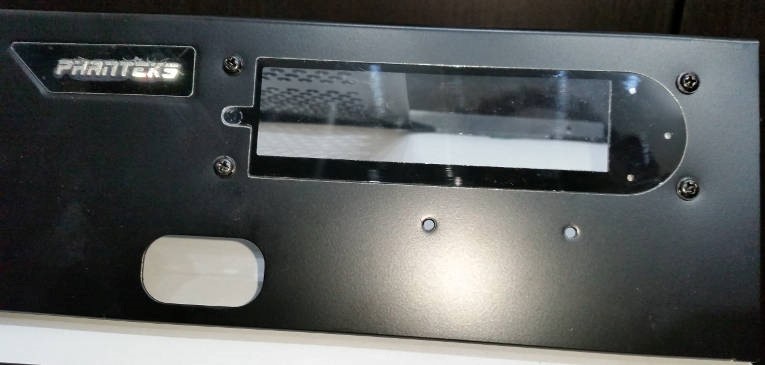
I think it needs a touch of black paint and I have some smooth black Hammerite. Trouble is, I think it will be too thick and stop the glass fitting....yes, it's that tight! It dawned on me as I was editing the pics for this post that I can probably get away with a dab of black permanent marker at zero thickness.
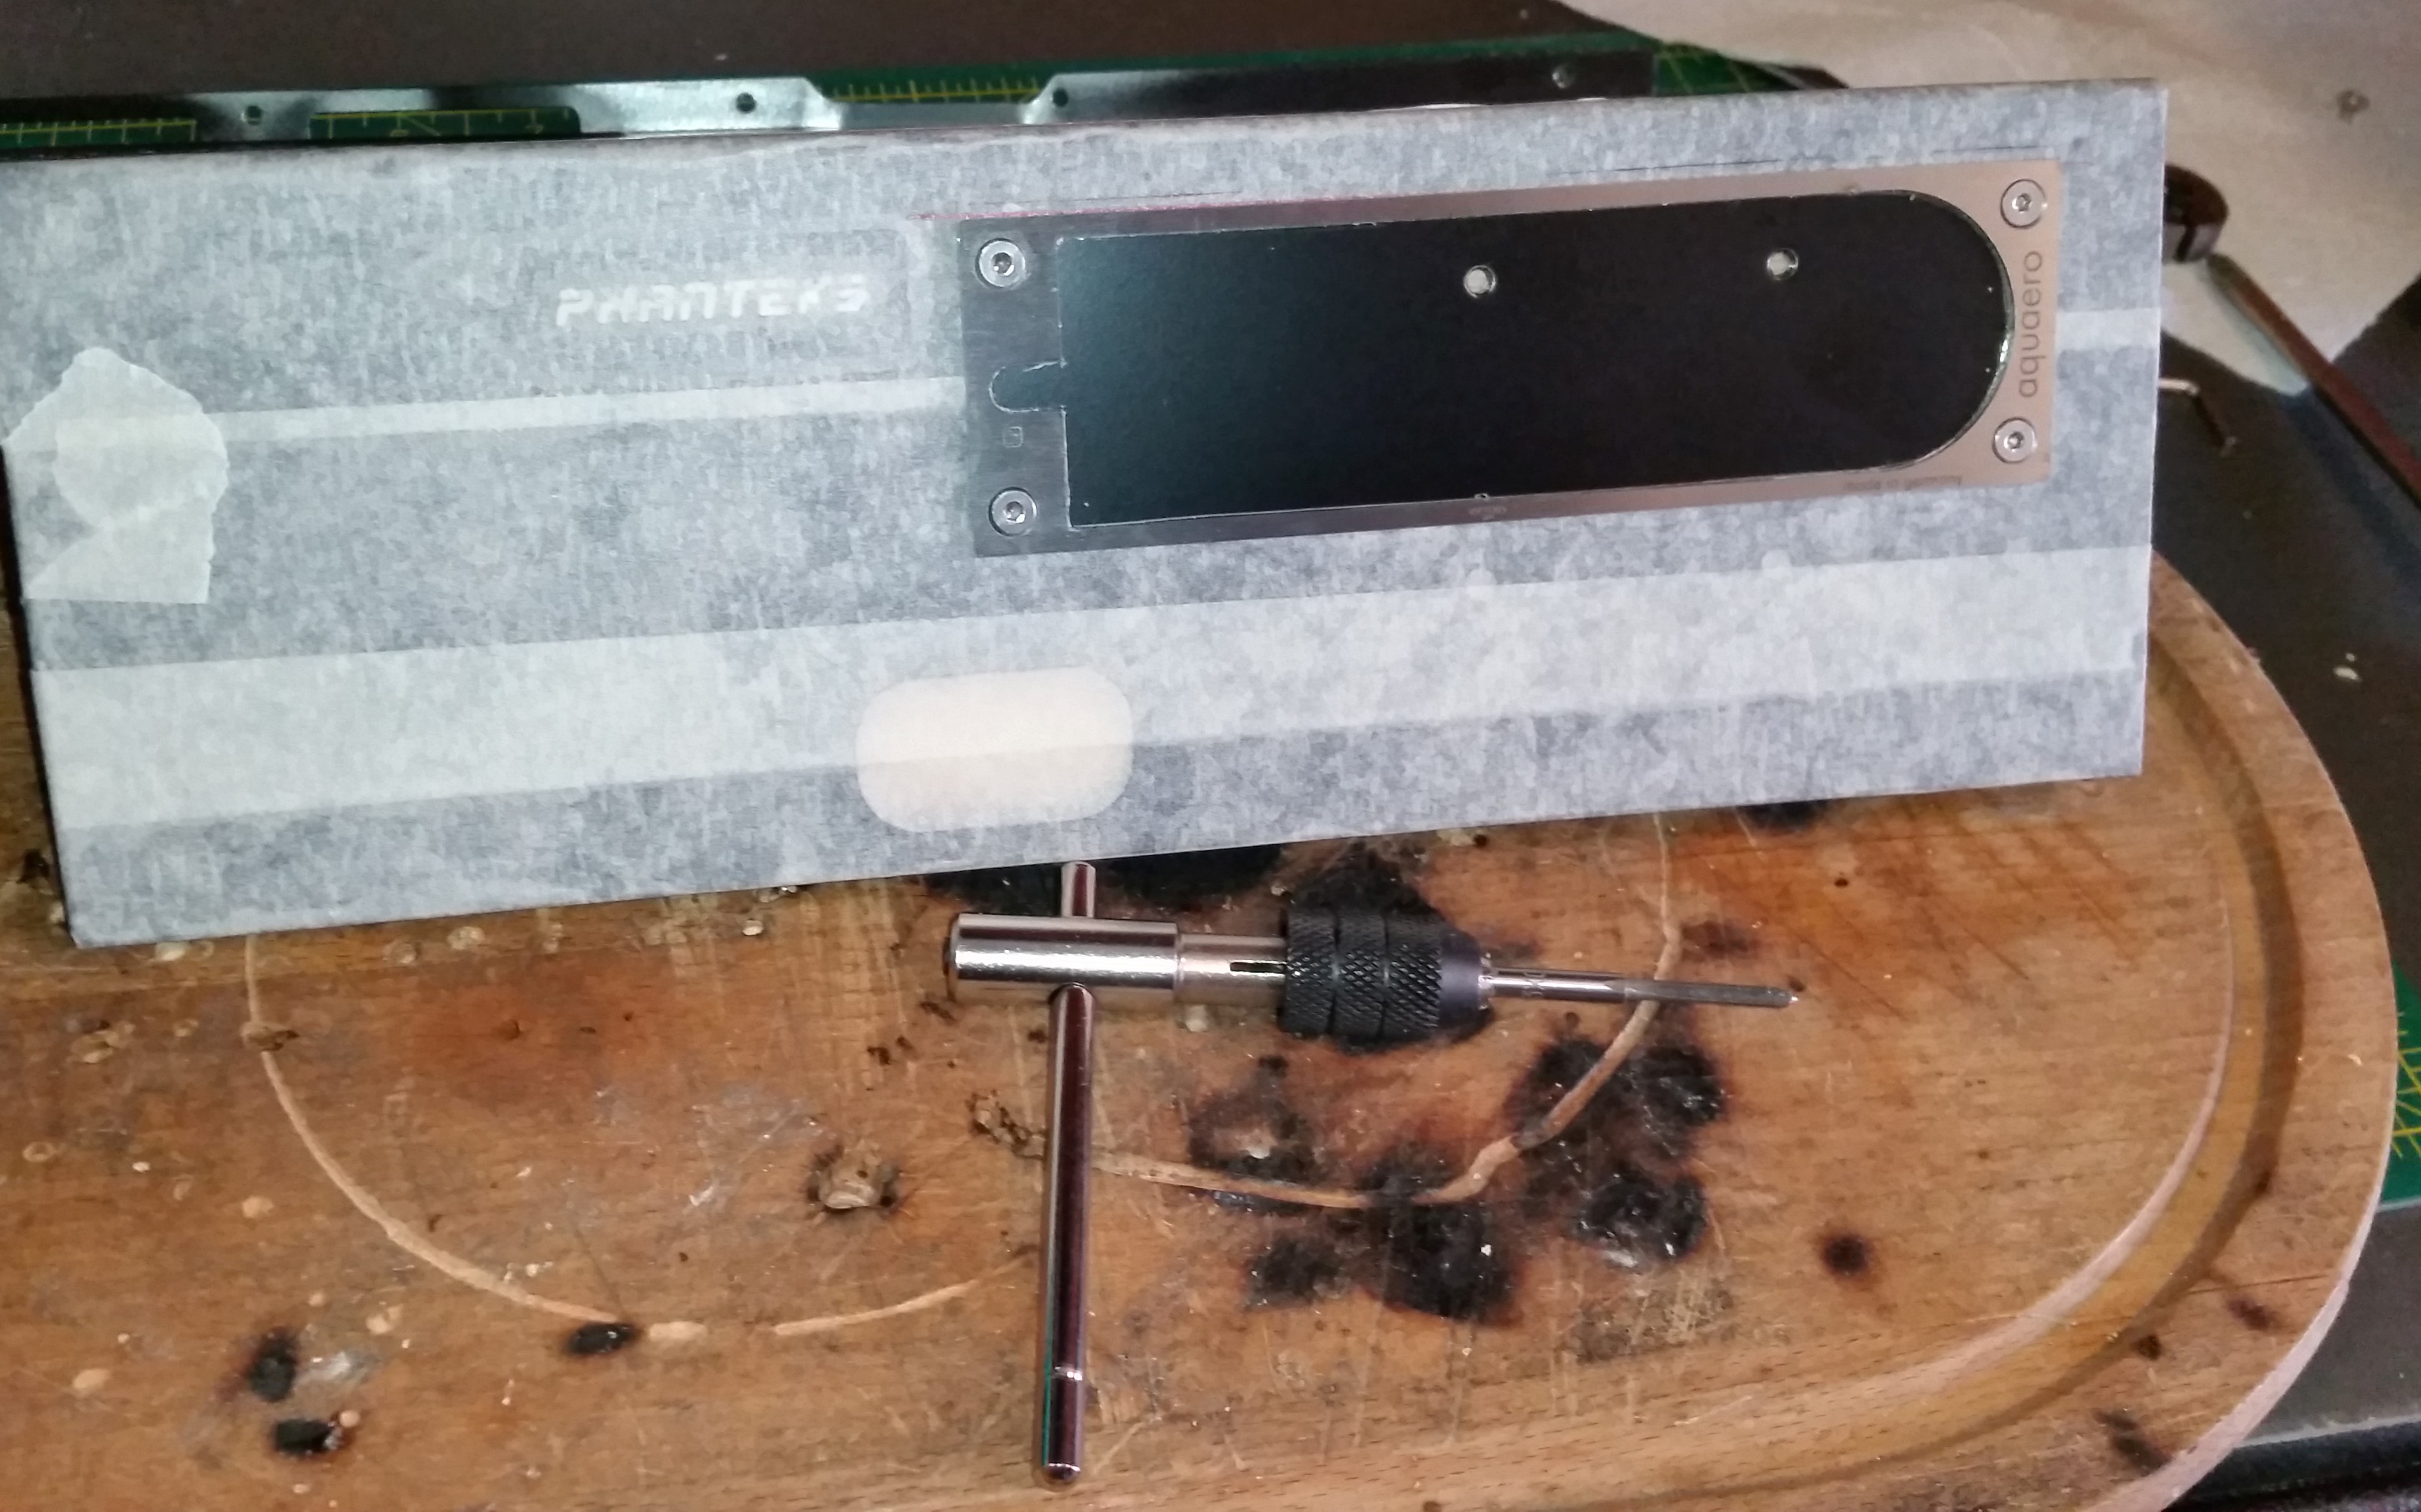
Also, the Aquaero extension cable parts have started arriving. I've got the plugs for each end - just waiting for the ribbon cable to arrive from China. There's going to be some issues with the mounting screws clashing with the connector but I think I can get around it using some hex spacers and M3 threaded rod....which are also on order from parts foreign
I'll try to get some diagram of what the hell I was on about above soon cos either it made no sense or TL;DR.
I've been hard at work with a Dremel, a diamond wheel and a large selection of hand files. This is the result:
I think it needs a touch of black paint and I have some smooth black Hammerite. Trouble is, I think it will be too thick and stop the glass fitting....yes, it's that tight! It dawned on me as I was editing the pics for this post that I can probably get away with a dab of black permanent marker at zero thickness.
Also, the Aquaero extension cable parts have started arriving. I've got the plugs for each end - just waiting for the ribbon cable to arrive from China. There's going to be some issues with the mounting screws clashing with the connector but I think I can get around it using some hex spacers and M3 threaded rod....which are also on order from parts foreign
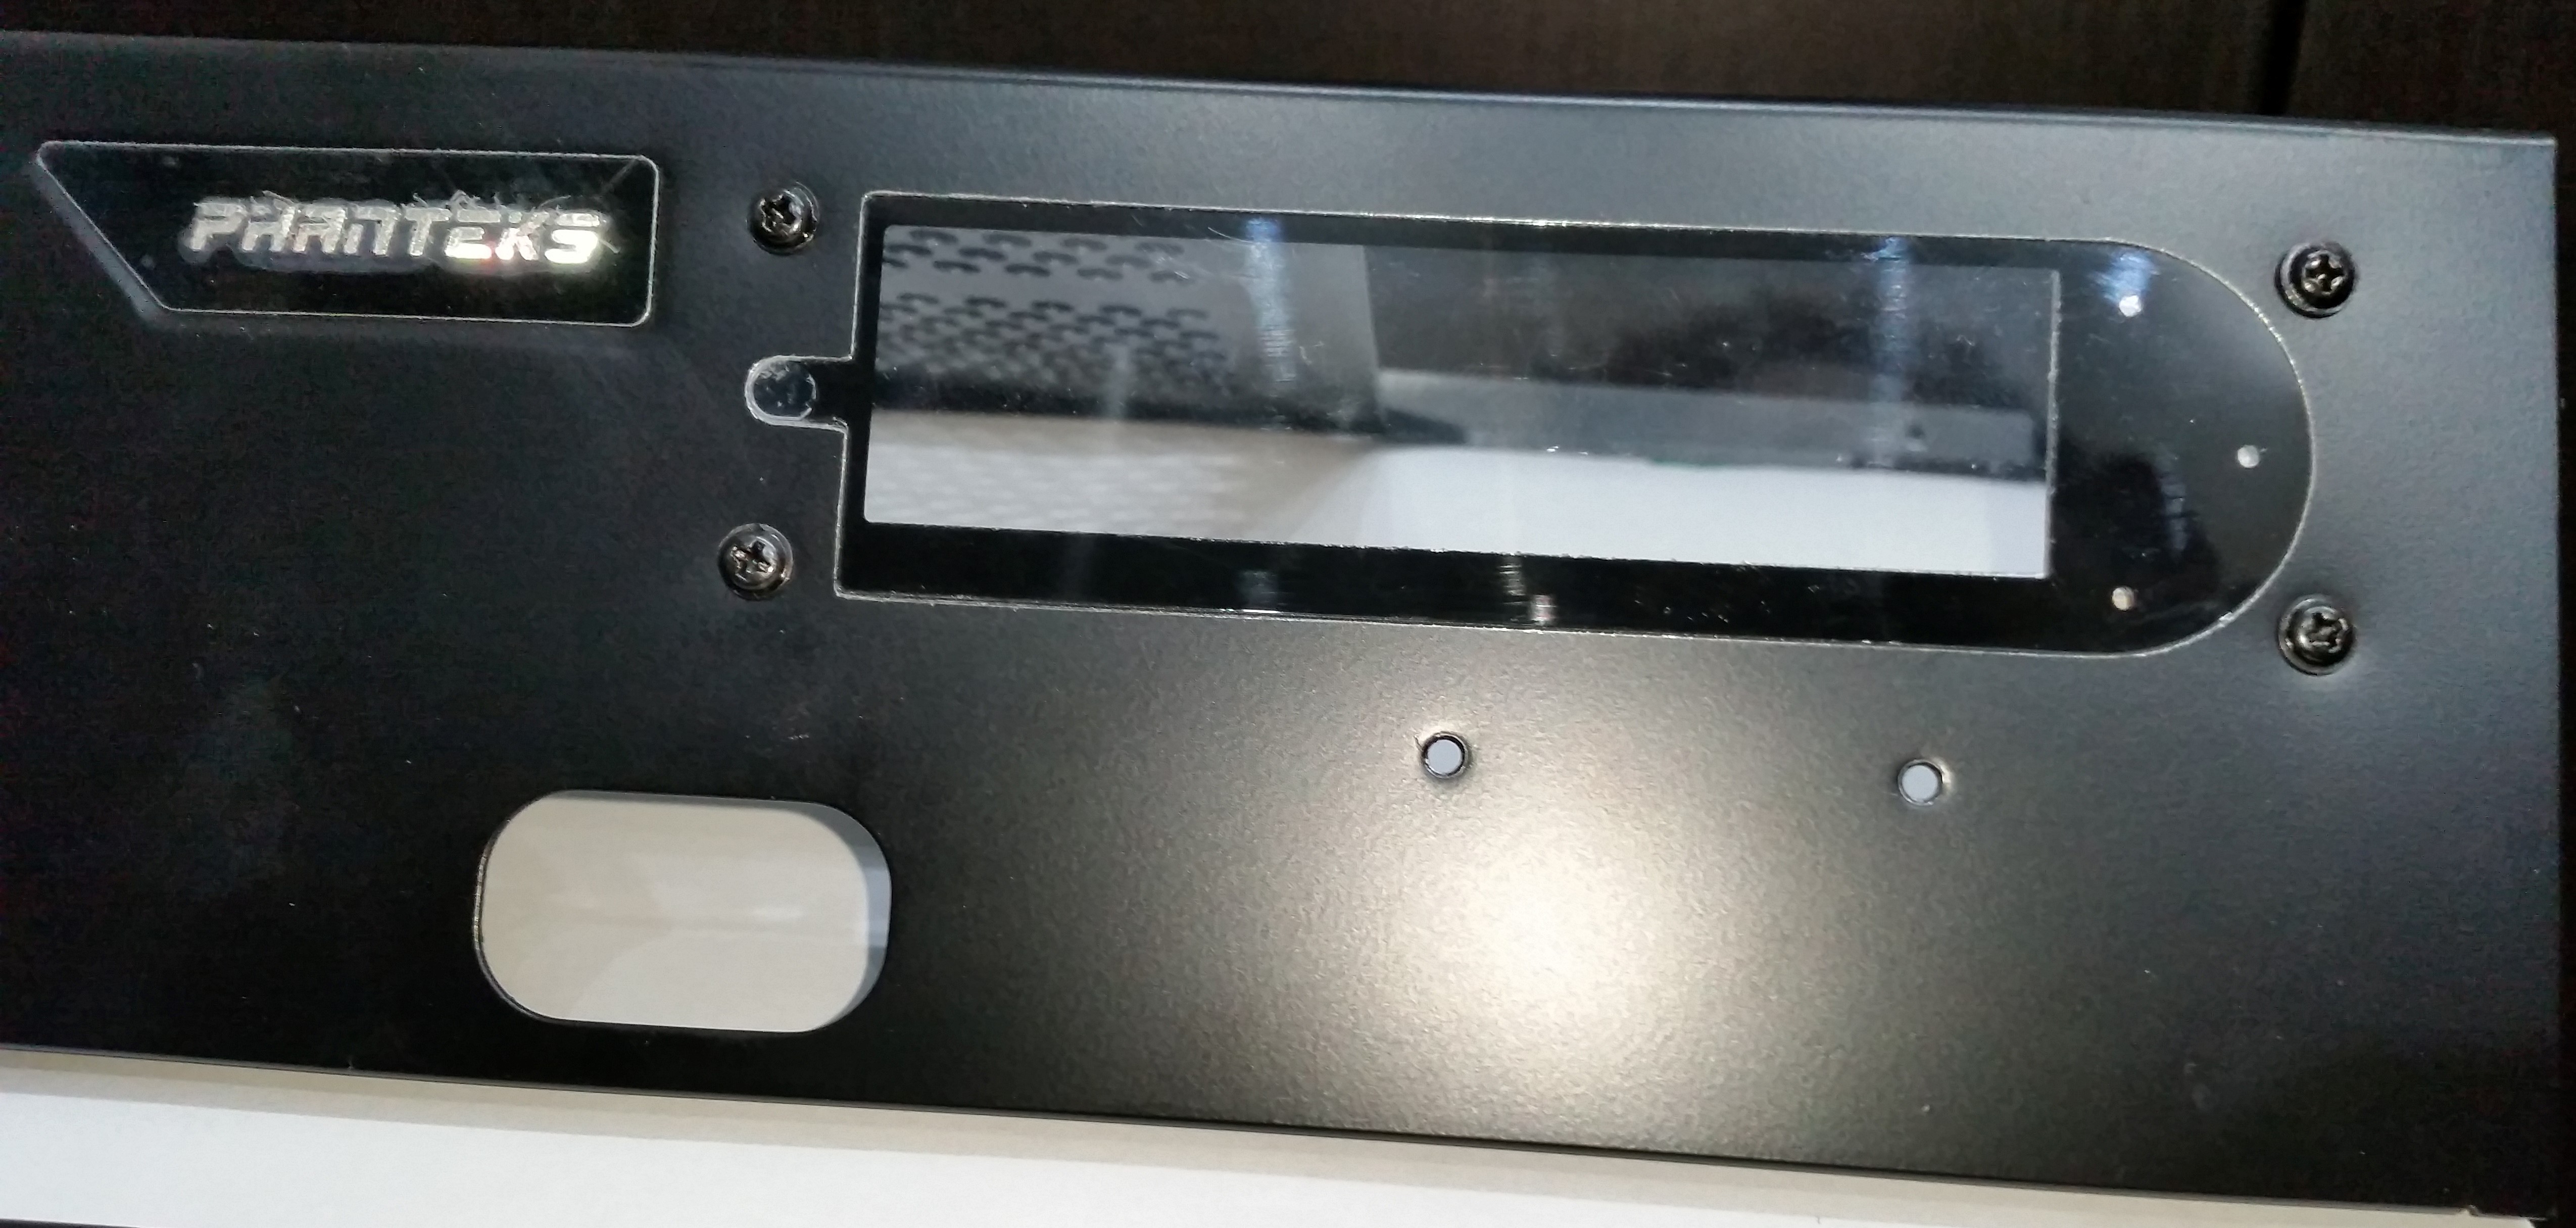
Actually, not as bad as I'd feared....just don't tell anyone that! It really helped being able to use the Aquaero bezel as a template. I centre punched and drilled the four corner holes and then tapped them with an M3 thread so the countersunk Aquaero screws would hold it in place. I'm going to use black flange-head screws in the end as I don't have enough depth of metal to countersink but for the template, the countersink conveniently holds the template exactly in place and, importantly, repeatably in the same place. I can just drill out the thread when I'm ready to mount the rest of the unit behind the glass.

Piece of wood behind the metal to stop it bending - it's only 0.7mm thick! An offcut of skirting board just happens to be a perfect fit
Dremel diamond cutting wheel for the straights and I drilled the curves. Diamond wheel was also pretty good for nibbling away at the round edges so that I could minimise the amount of filing required.
I did buy a set of diamond needle files but I wasn't all that impressed with them. The set of 16 Draper redline files was much better. I will confess to being slightly amused when I discovered that a course file is called a ******* file...leading to the term 'half round *******'.
I originally intended to take the Aquaero bezel off once I'd marked it but as it was held in place so well, I could use it as a guide. Helpfully, being 1mm thick stainless steel, it was also tougher than the mild steel of the case so I could (carefully) file all the way up to it. Then it was just a case of offering up the glass and filing back the bits where it didn't quite fit.
Next job is mounting the rad on the side panel. Just got to work out how to precisely mark the location so I can drill in the right place and have it hang at the right height.
Piece of wood behind the metal to stop it bending - it's only 0.7mm thick! An offcut of skirting board just happens to be a perfect fit
Dremel diamond cutting wheel for the straights and I drilled the curves. Diamond wheel was also pretty good for nibbling away at the round edges so that I could minimise the amount of filing required.

I did buy a set of diamond needle files but I wasn't all that impressed with them. The set of 16 Draper redline files was much better. I will confess to being slightly amused when I discovered that a course file is called a ******* file...leading to the term 'half round *******'.
I originally intended to take the Aquaero bezel off once I'd marked it but as it was held in place so well, I could use it as a guide. Helpfully, being 1mm thick stainless steel, it was also tougher than the mild steel of the case so I could (carefully) file all the way up to it. Then it was just a case of offering up the glass and filing back the bits where it didn't quite fit.
Next job is mounting the rad on the side panel. Just got to work out how to precisely mark the location so I can drill in the right place and have it hang at the right height.
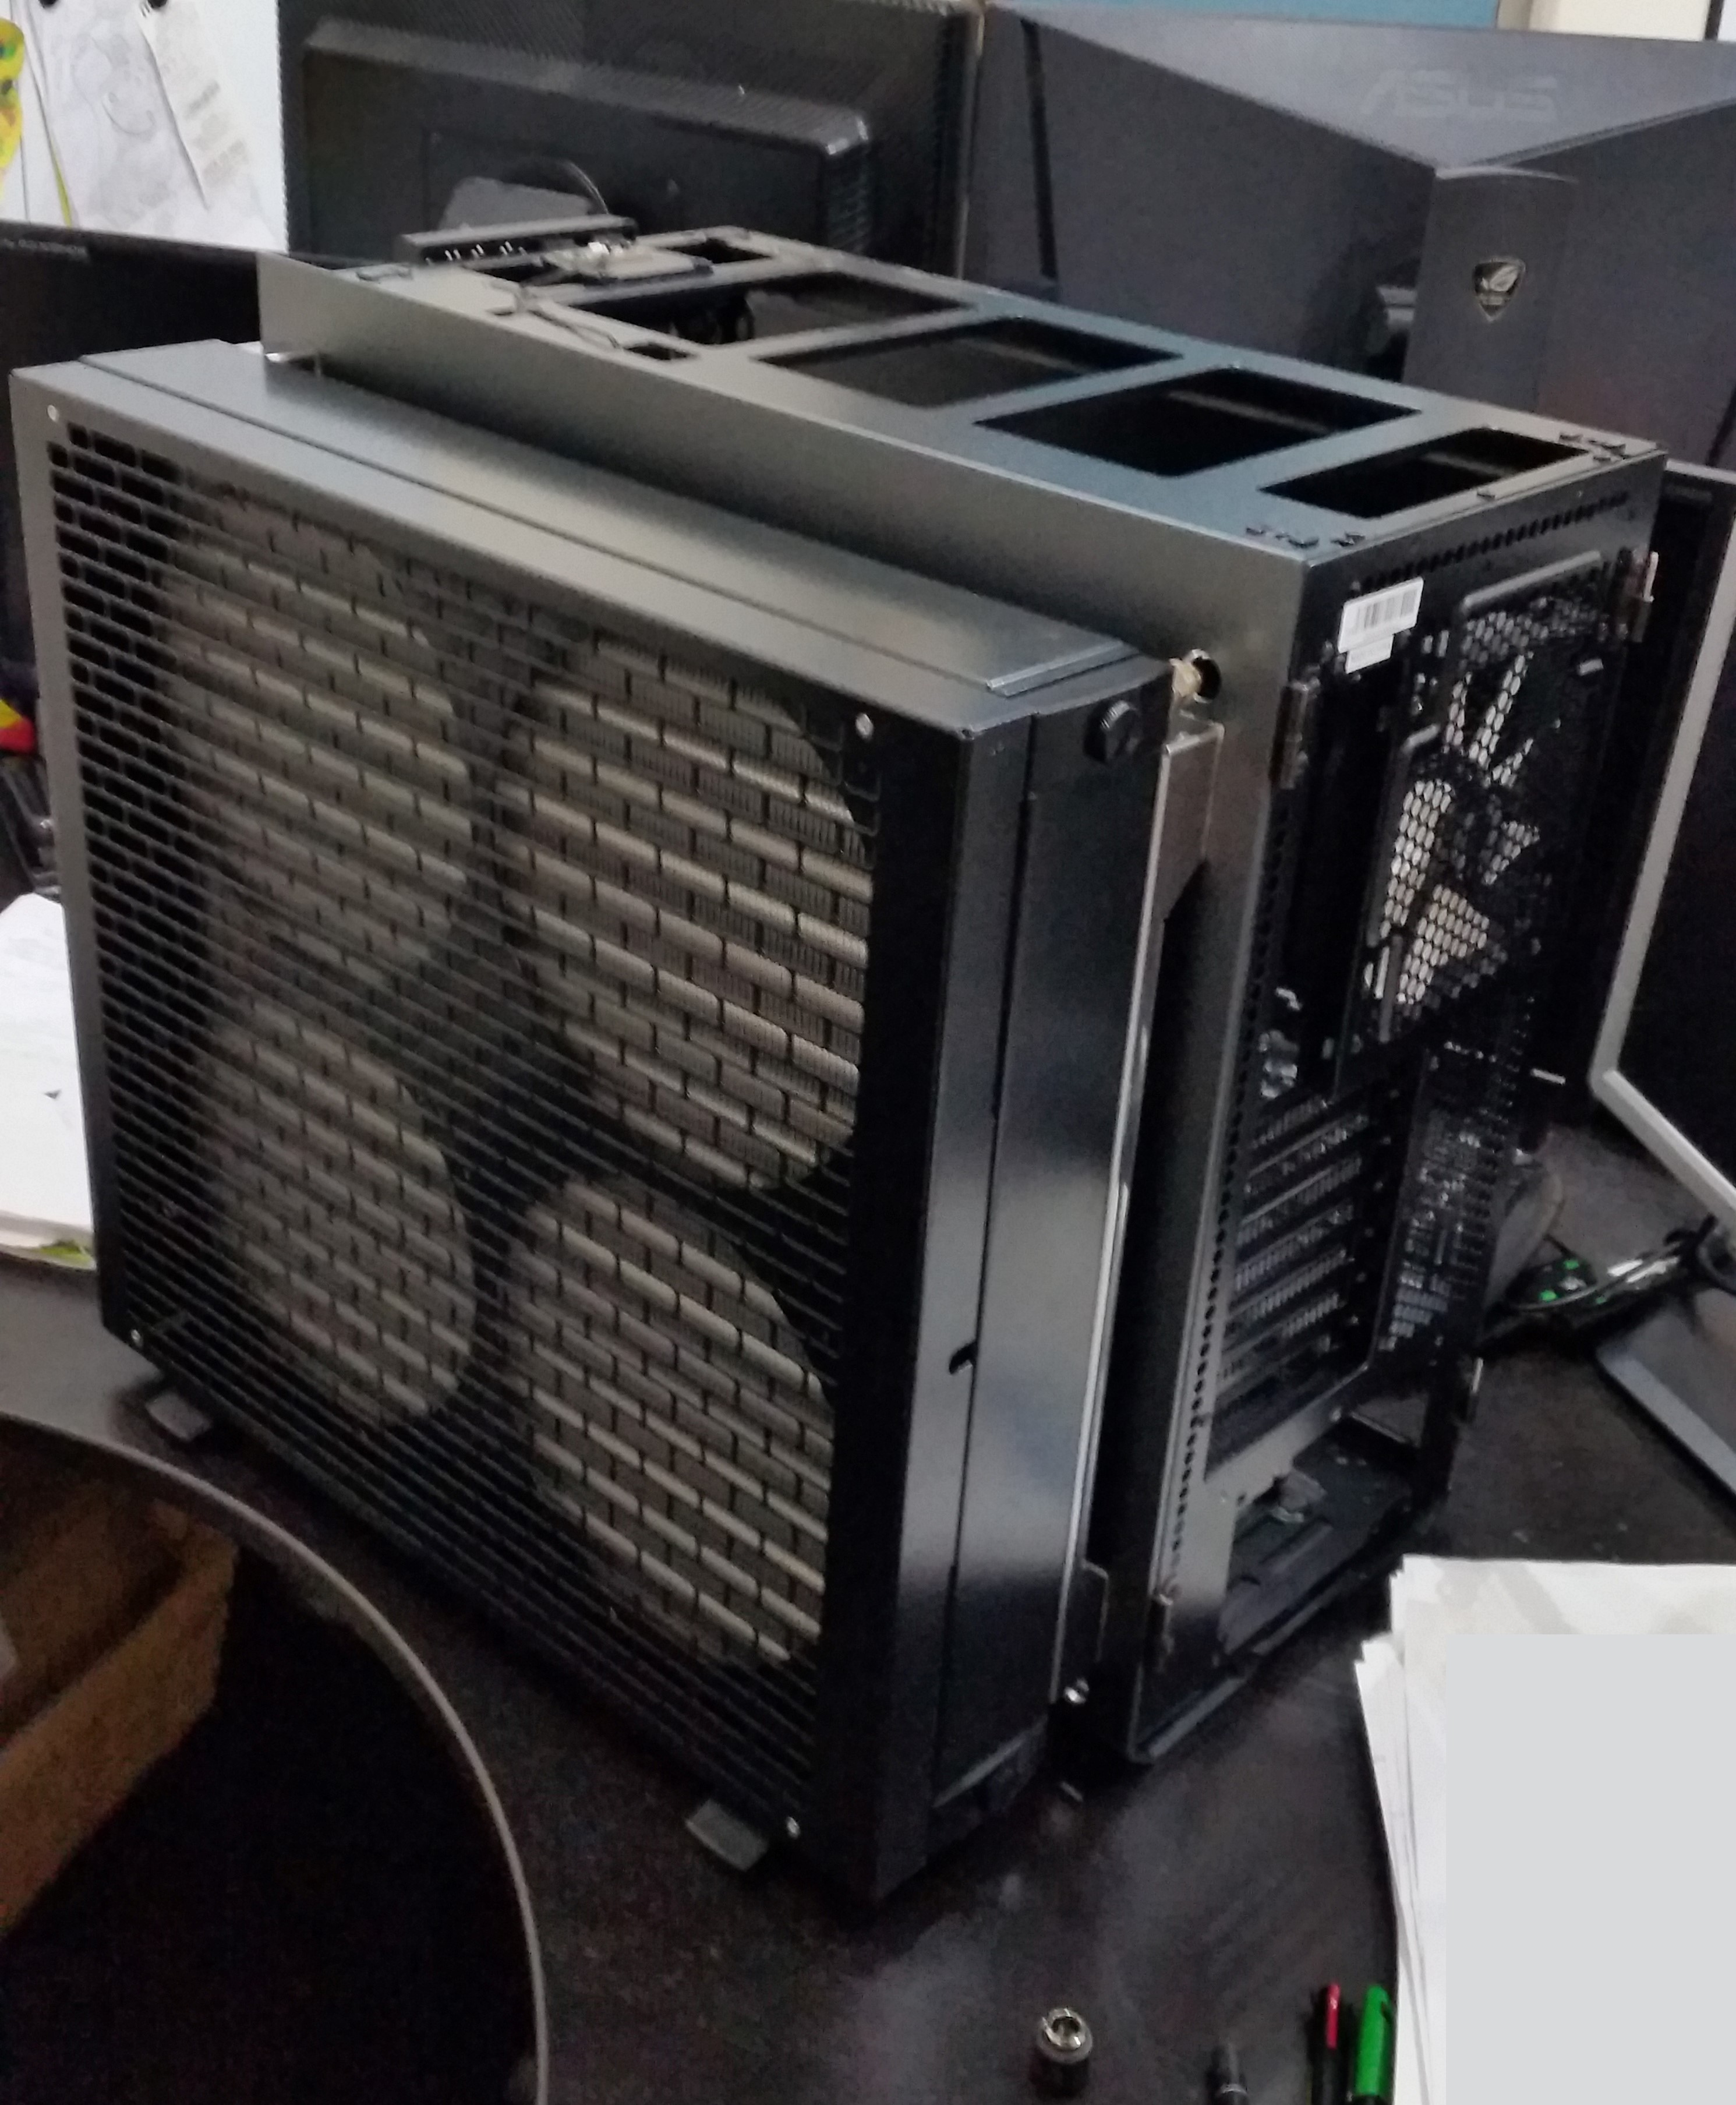
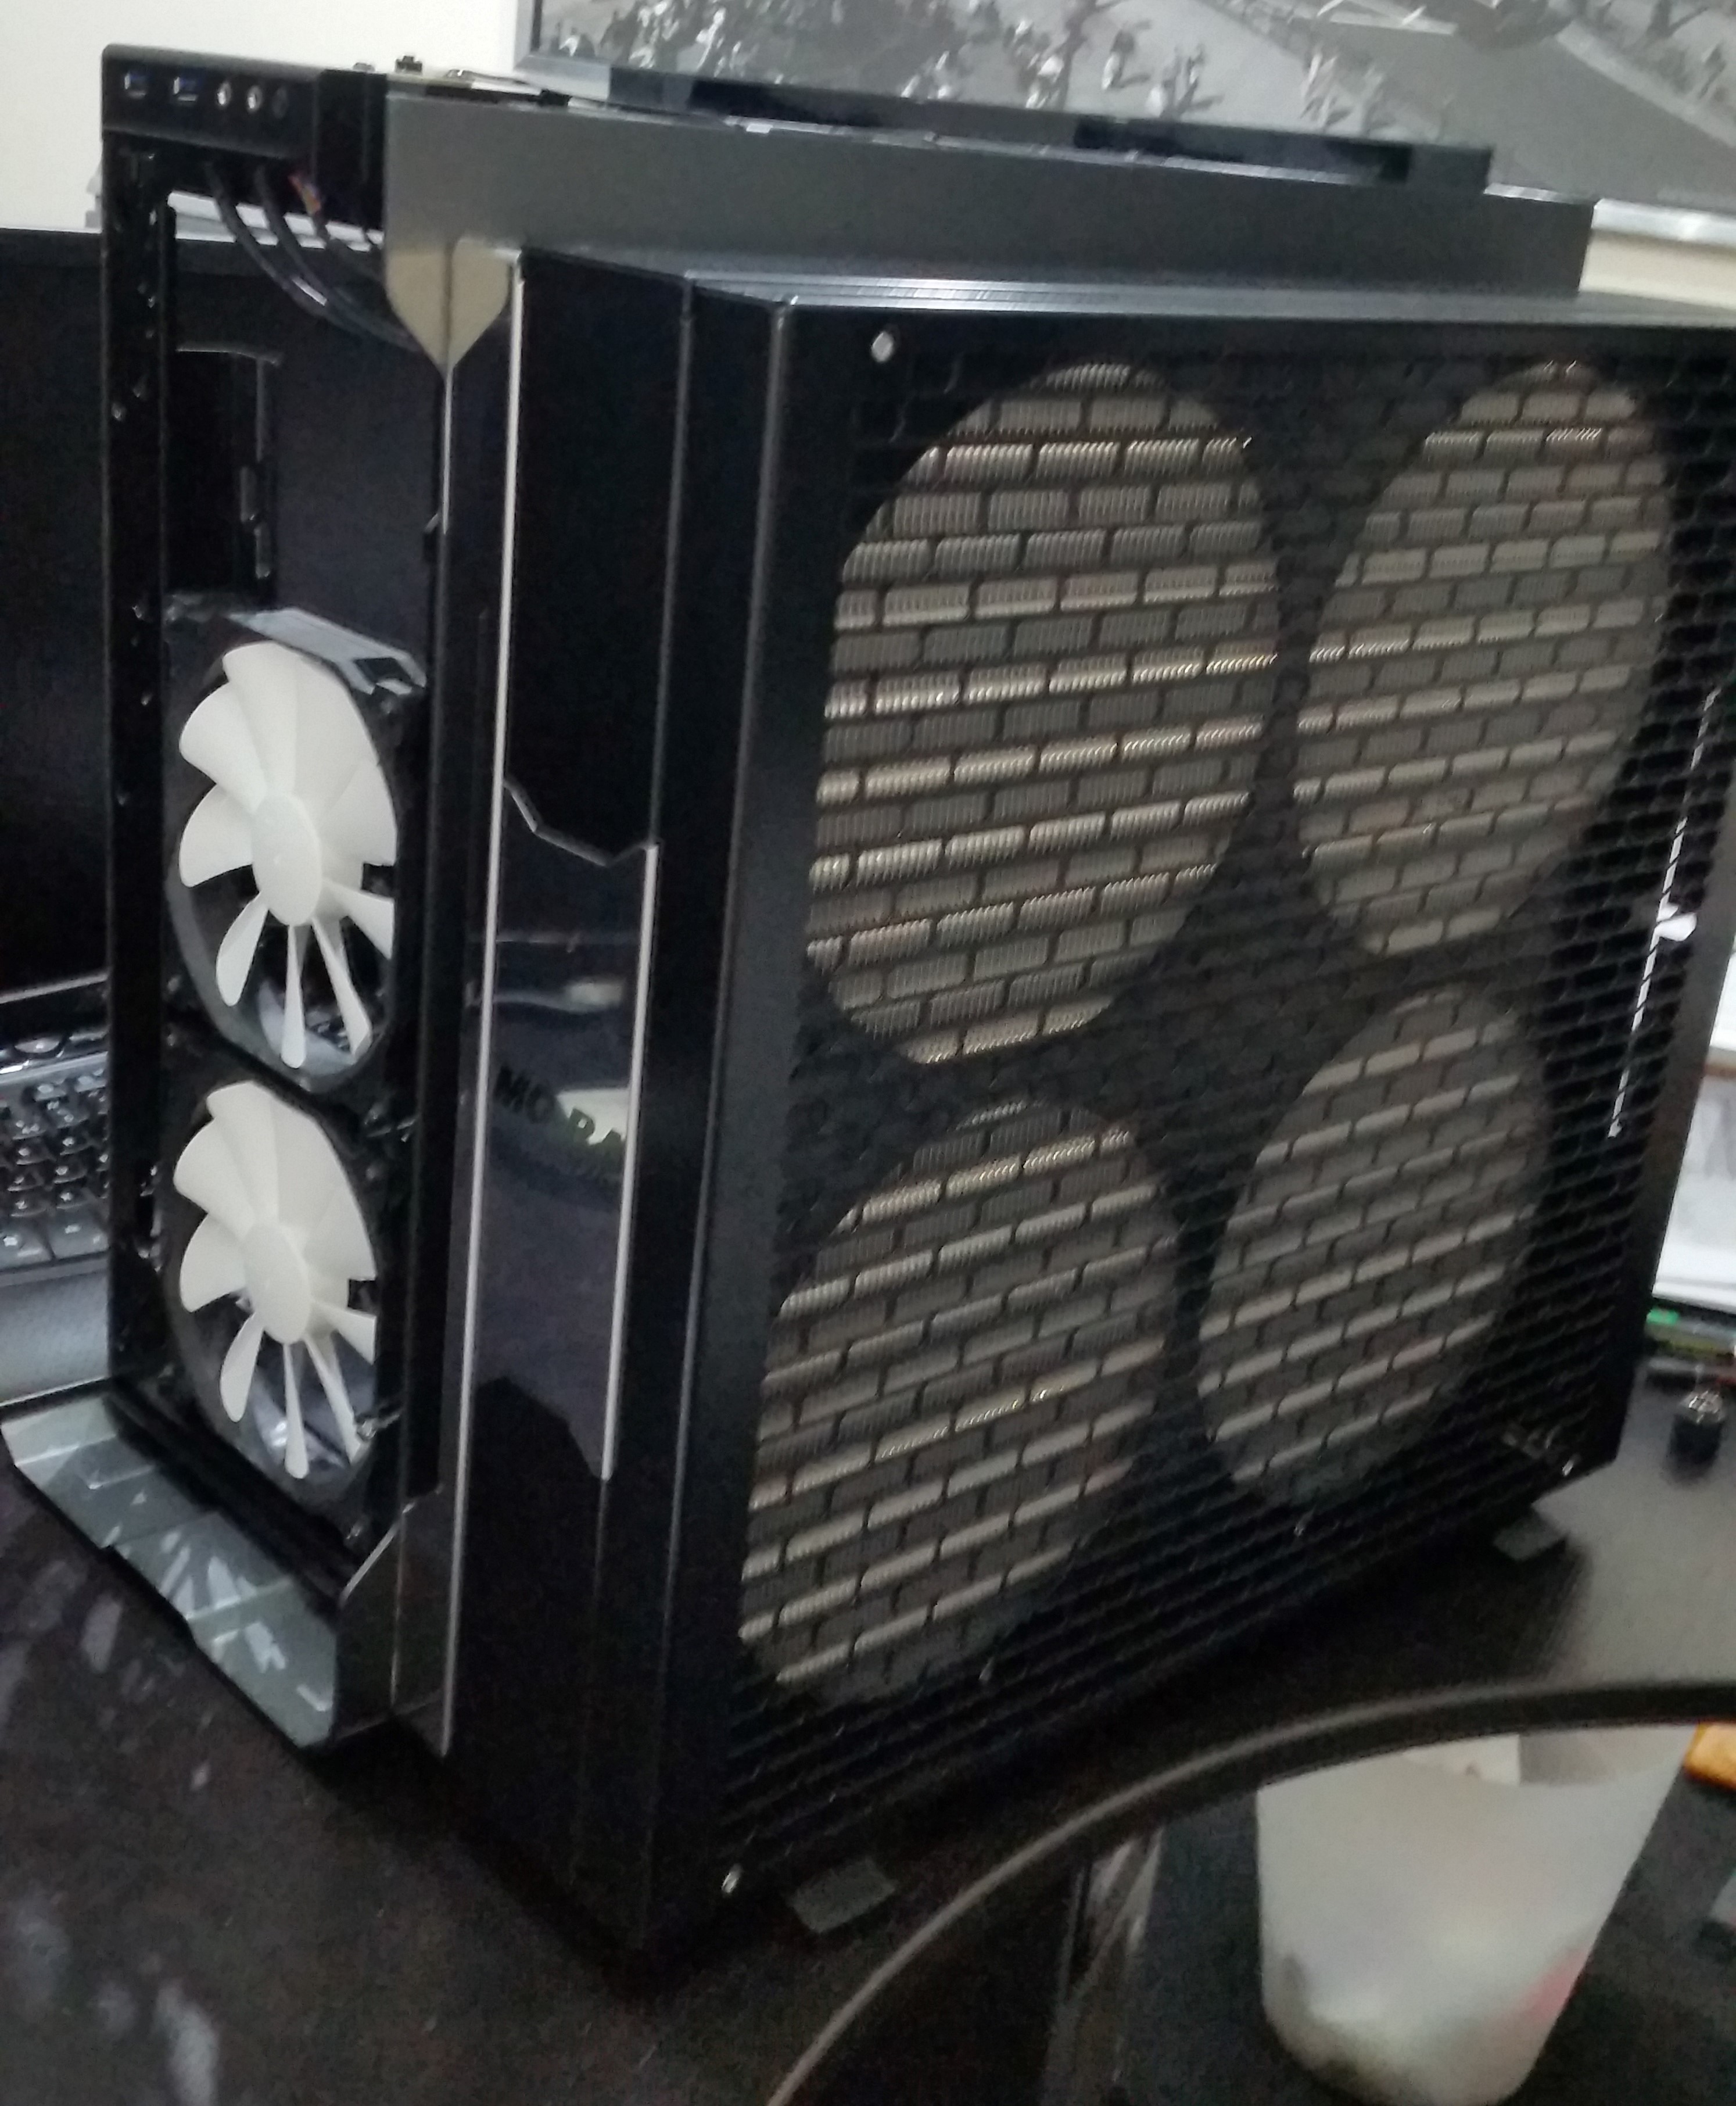
Another update! ....I so need to do some actual work - you know, the paid stuff!
Got the rad mounted today. Masked off the whole panel so I didn't damage the finish. Mainly the rad standoffs have sharp edges that started to scratch the panel.
Had to Dremel down the rad feet so they would fit under the case's feet where they overlapped. Tungsten Carbide bit seems to work nicely on Delrin.
Lined the rad up with the front edge of the panel and drew around the standoffs with a nice green marker. Then took the standoff off the rad and traced the mounting holes.
Centre punch, 3.2mm drill and tap to M4x0.7 ready for the supplied hex screws:
Tested the weight of the rad on the door.....and.....nope. When you start swinging the door open, the whole chassis starts to twist. Now to be fair, I've got the front, top, one side and the mid-plate but with the exception of the mid-plate (PSU shroud), none of those are structural. This is without coolant in. Not a massive problem though as I've conveniently assumed the worst in advance (you get cynical withage experience!) and mounted it so the (optional extra) feet are touching the ground and taking the weight.
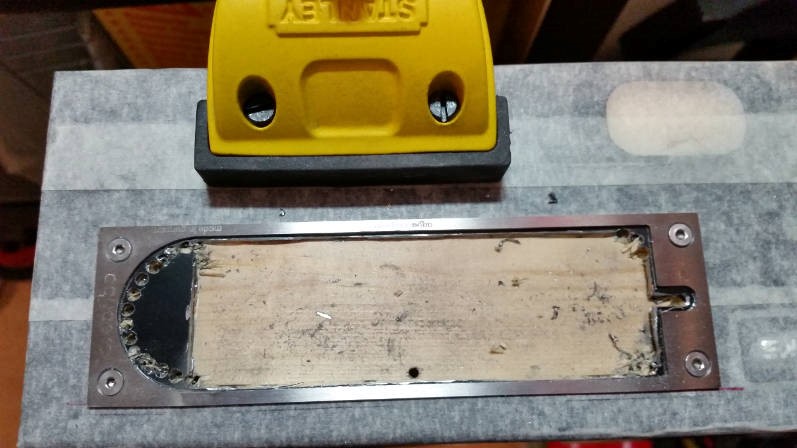
THIS is how you measure the position to drill the holes through for the coolant lines!
One step-drilling later and we have a mounted rad with holes ready for coolant. Currently they're 14mm (12mm didn't fit the 12mm acrylic and there wasn't a 13mm step on the drill) but I may widen that to put grommets in later. Fitting is just an old 10/8 I had lying about.
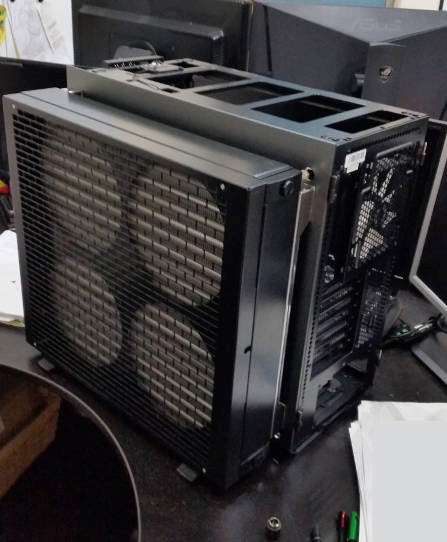

Starting to take shape!
Got the rad mounted today. Masked off the whole panel so I didn't damage the finish. Mainly the rad standoffs have sharp edges that started to scratch the panel.
Had to Dremel down the rad feet so they would fit under the case's feet where they overlapped. Tungsten Carbide bit seems to work nicely on Delrin.
Lined the rad up with the front edge of the panel and drew around the standoffs with a nice green marker. Then took the standoff off the rad and traced the mounting holes.
Centre punch, 3.2mm drill and tap to M4x0.7 ready for the supplied hex screws:
Tested the weight of the rad on the door.....and.....nope. When you start swinging the door open, the whole chassis starts to twist. Now to be fair, I've got the front, top, one side and the mid-plate but with the exception of the mid-plate (PSU shroud), none of those are structural. This is without coolant in. Not a massive problem though as I've conveniently assumed the worst in advance (you get cynical with
THIS is how you measure the position to drill the holes through for the coolant lines!
One step-drilling later and we have a mounted rad with holes ready for coolant. Currently they're 14mm (12mm didn't fit the 12mm acrylic and there wasn't a 13mm step on the drill) but I may widen that to put grommets in later. Fitting is just an old 10/8 I had lying about.
Starting to take shape!
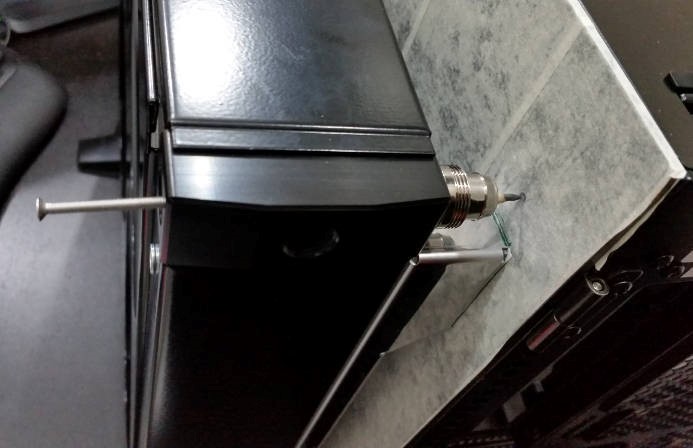
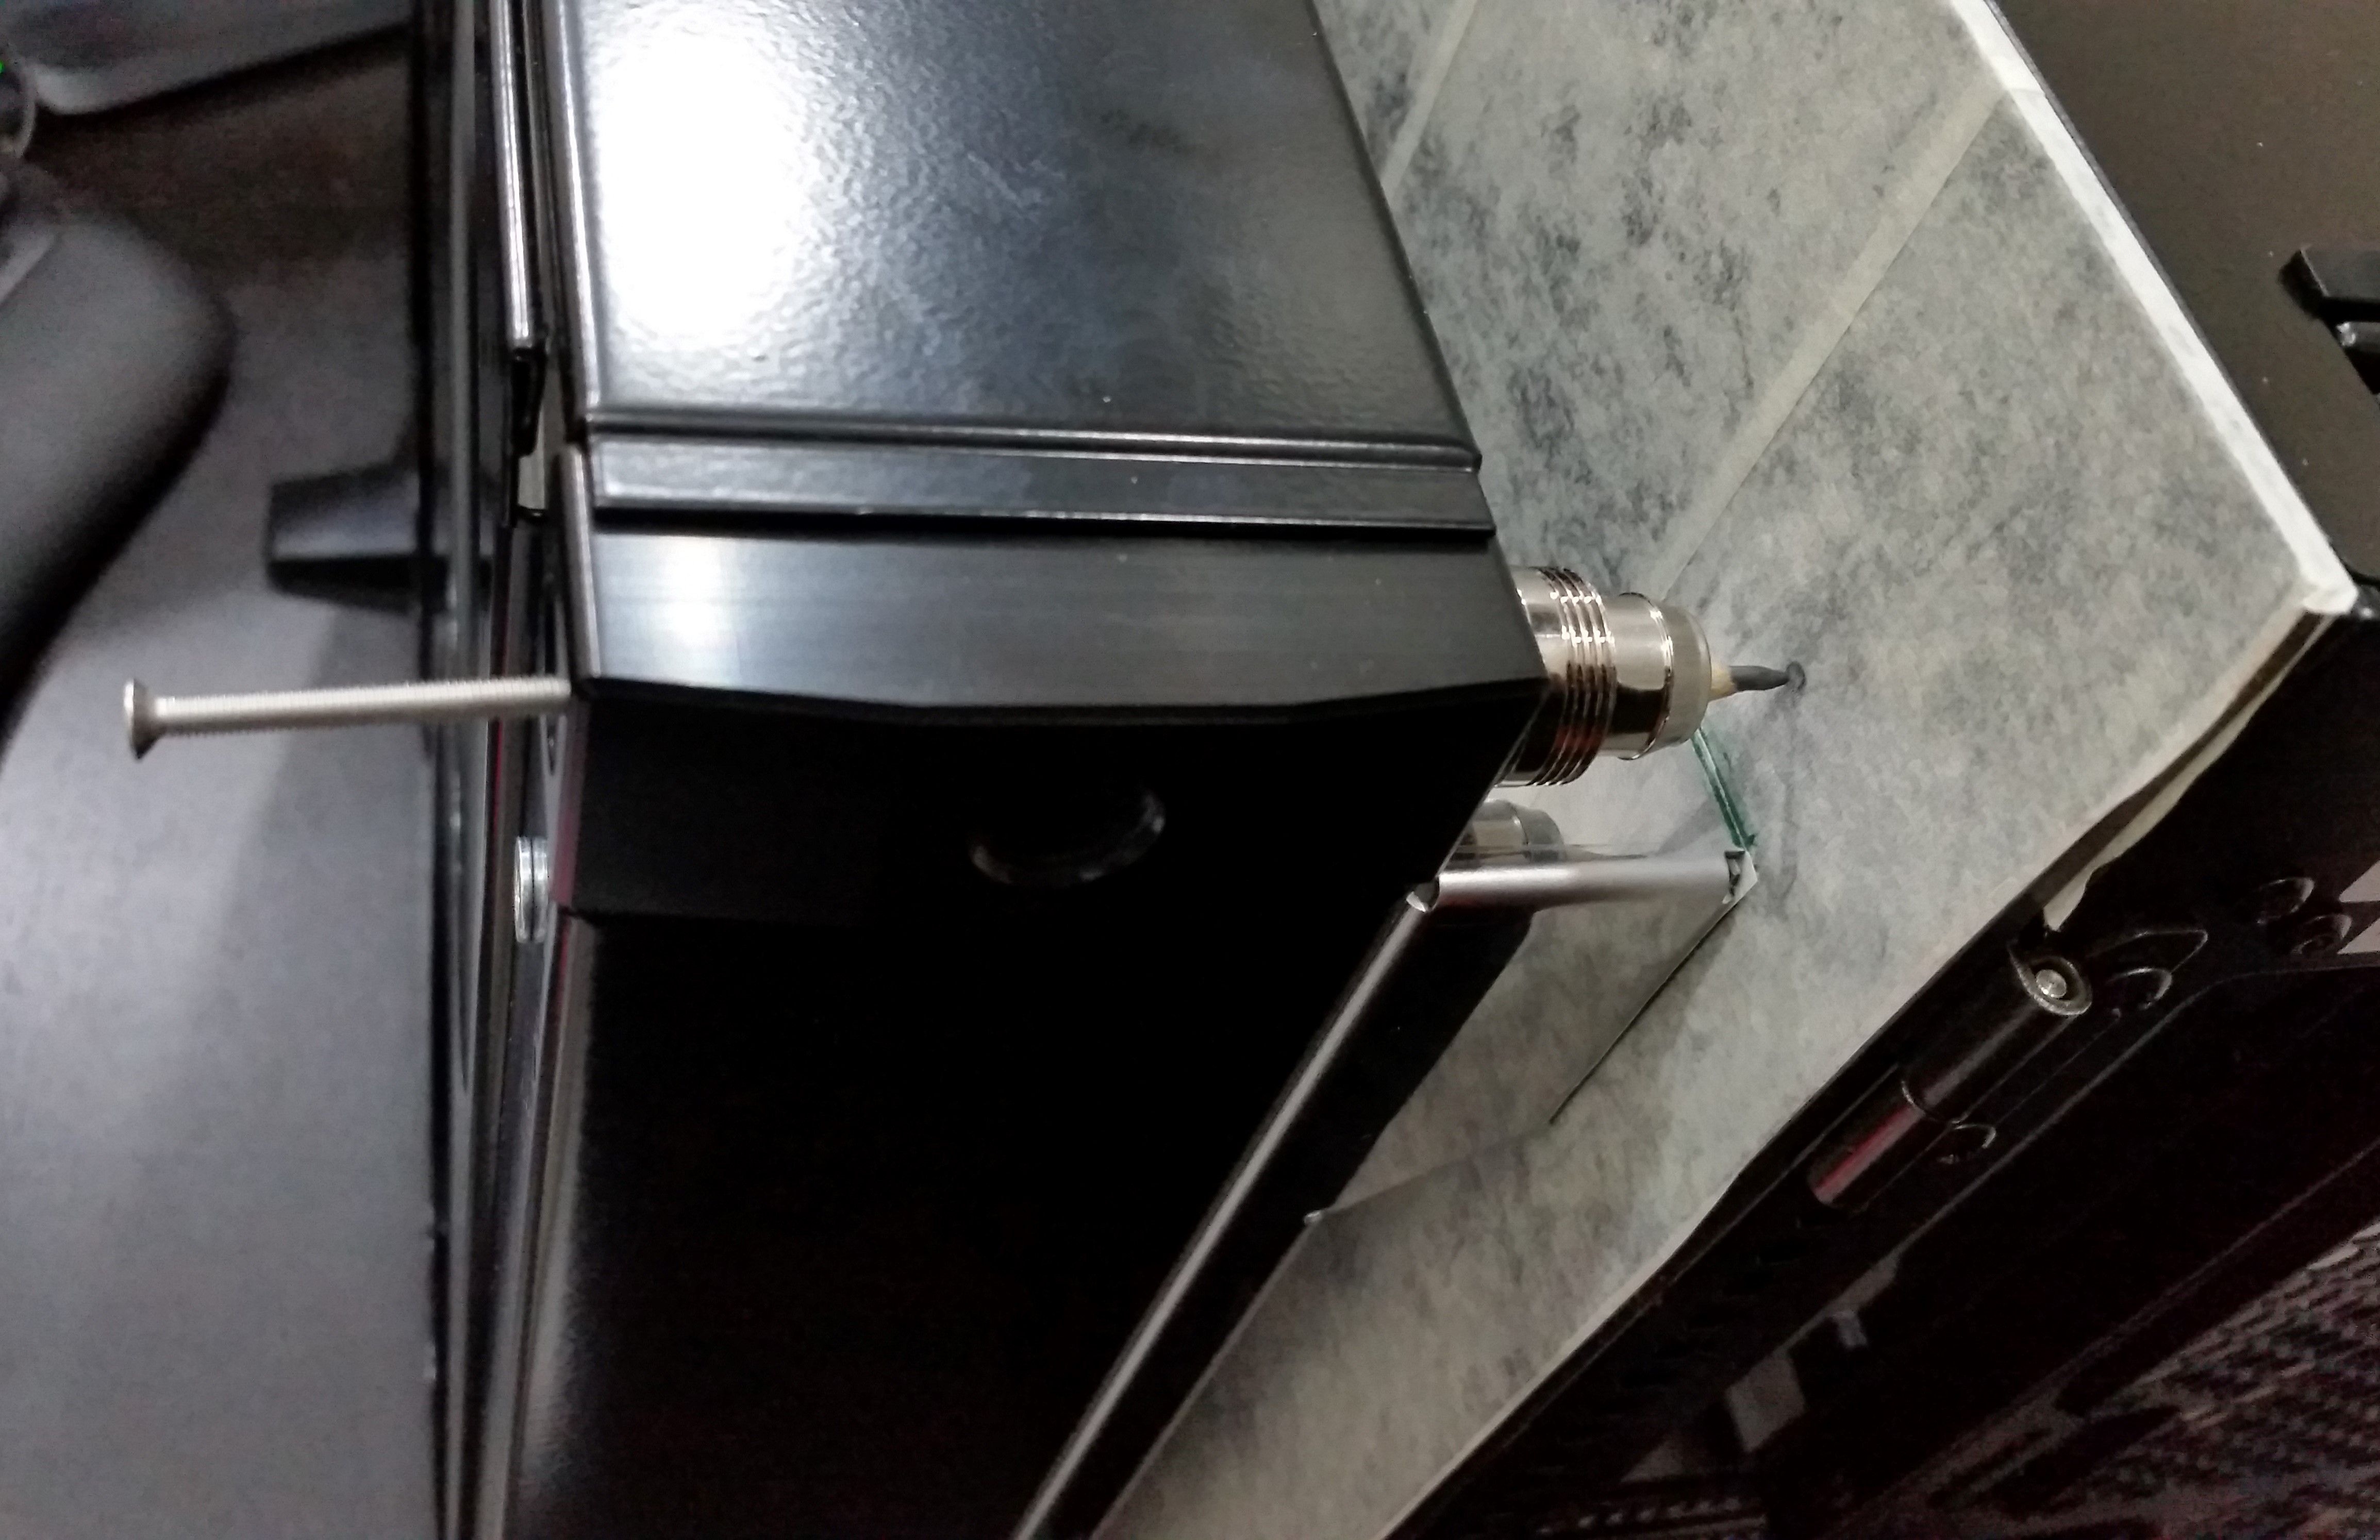
Well, I might have cracked it. The problem is how to get the tubing from the rad, in through the side panel and immediately 90° within just 20mm of space between the side panel and the motherboard tray. This has been keeping me awake at night as possible solutions come to mind and get shot down:
Bulkhead passthrough: Just don't have the room.
Bent acrylic: The bend may be too sharp (can't be sure until heat gun arrives) and I can't get a grommet that's a good fit because the panel is too thick.
Bitspower L-fitting cube: could be perfect but it's 24mm and I just don't have that sort of space.
Standard 90° bend and bury the shaft of it through the side panel: messy and then I've got to get it connected to the rad in under 30mm. Can't find good dimensions on most fittings either.
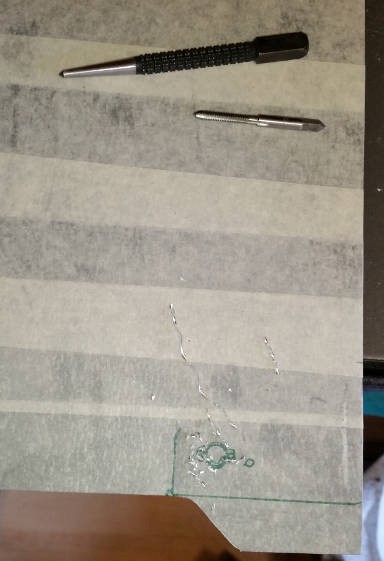
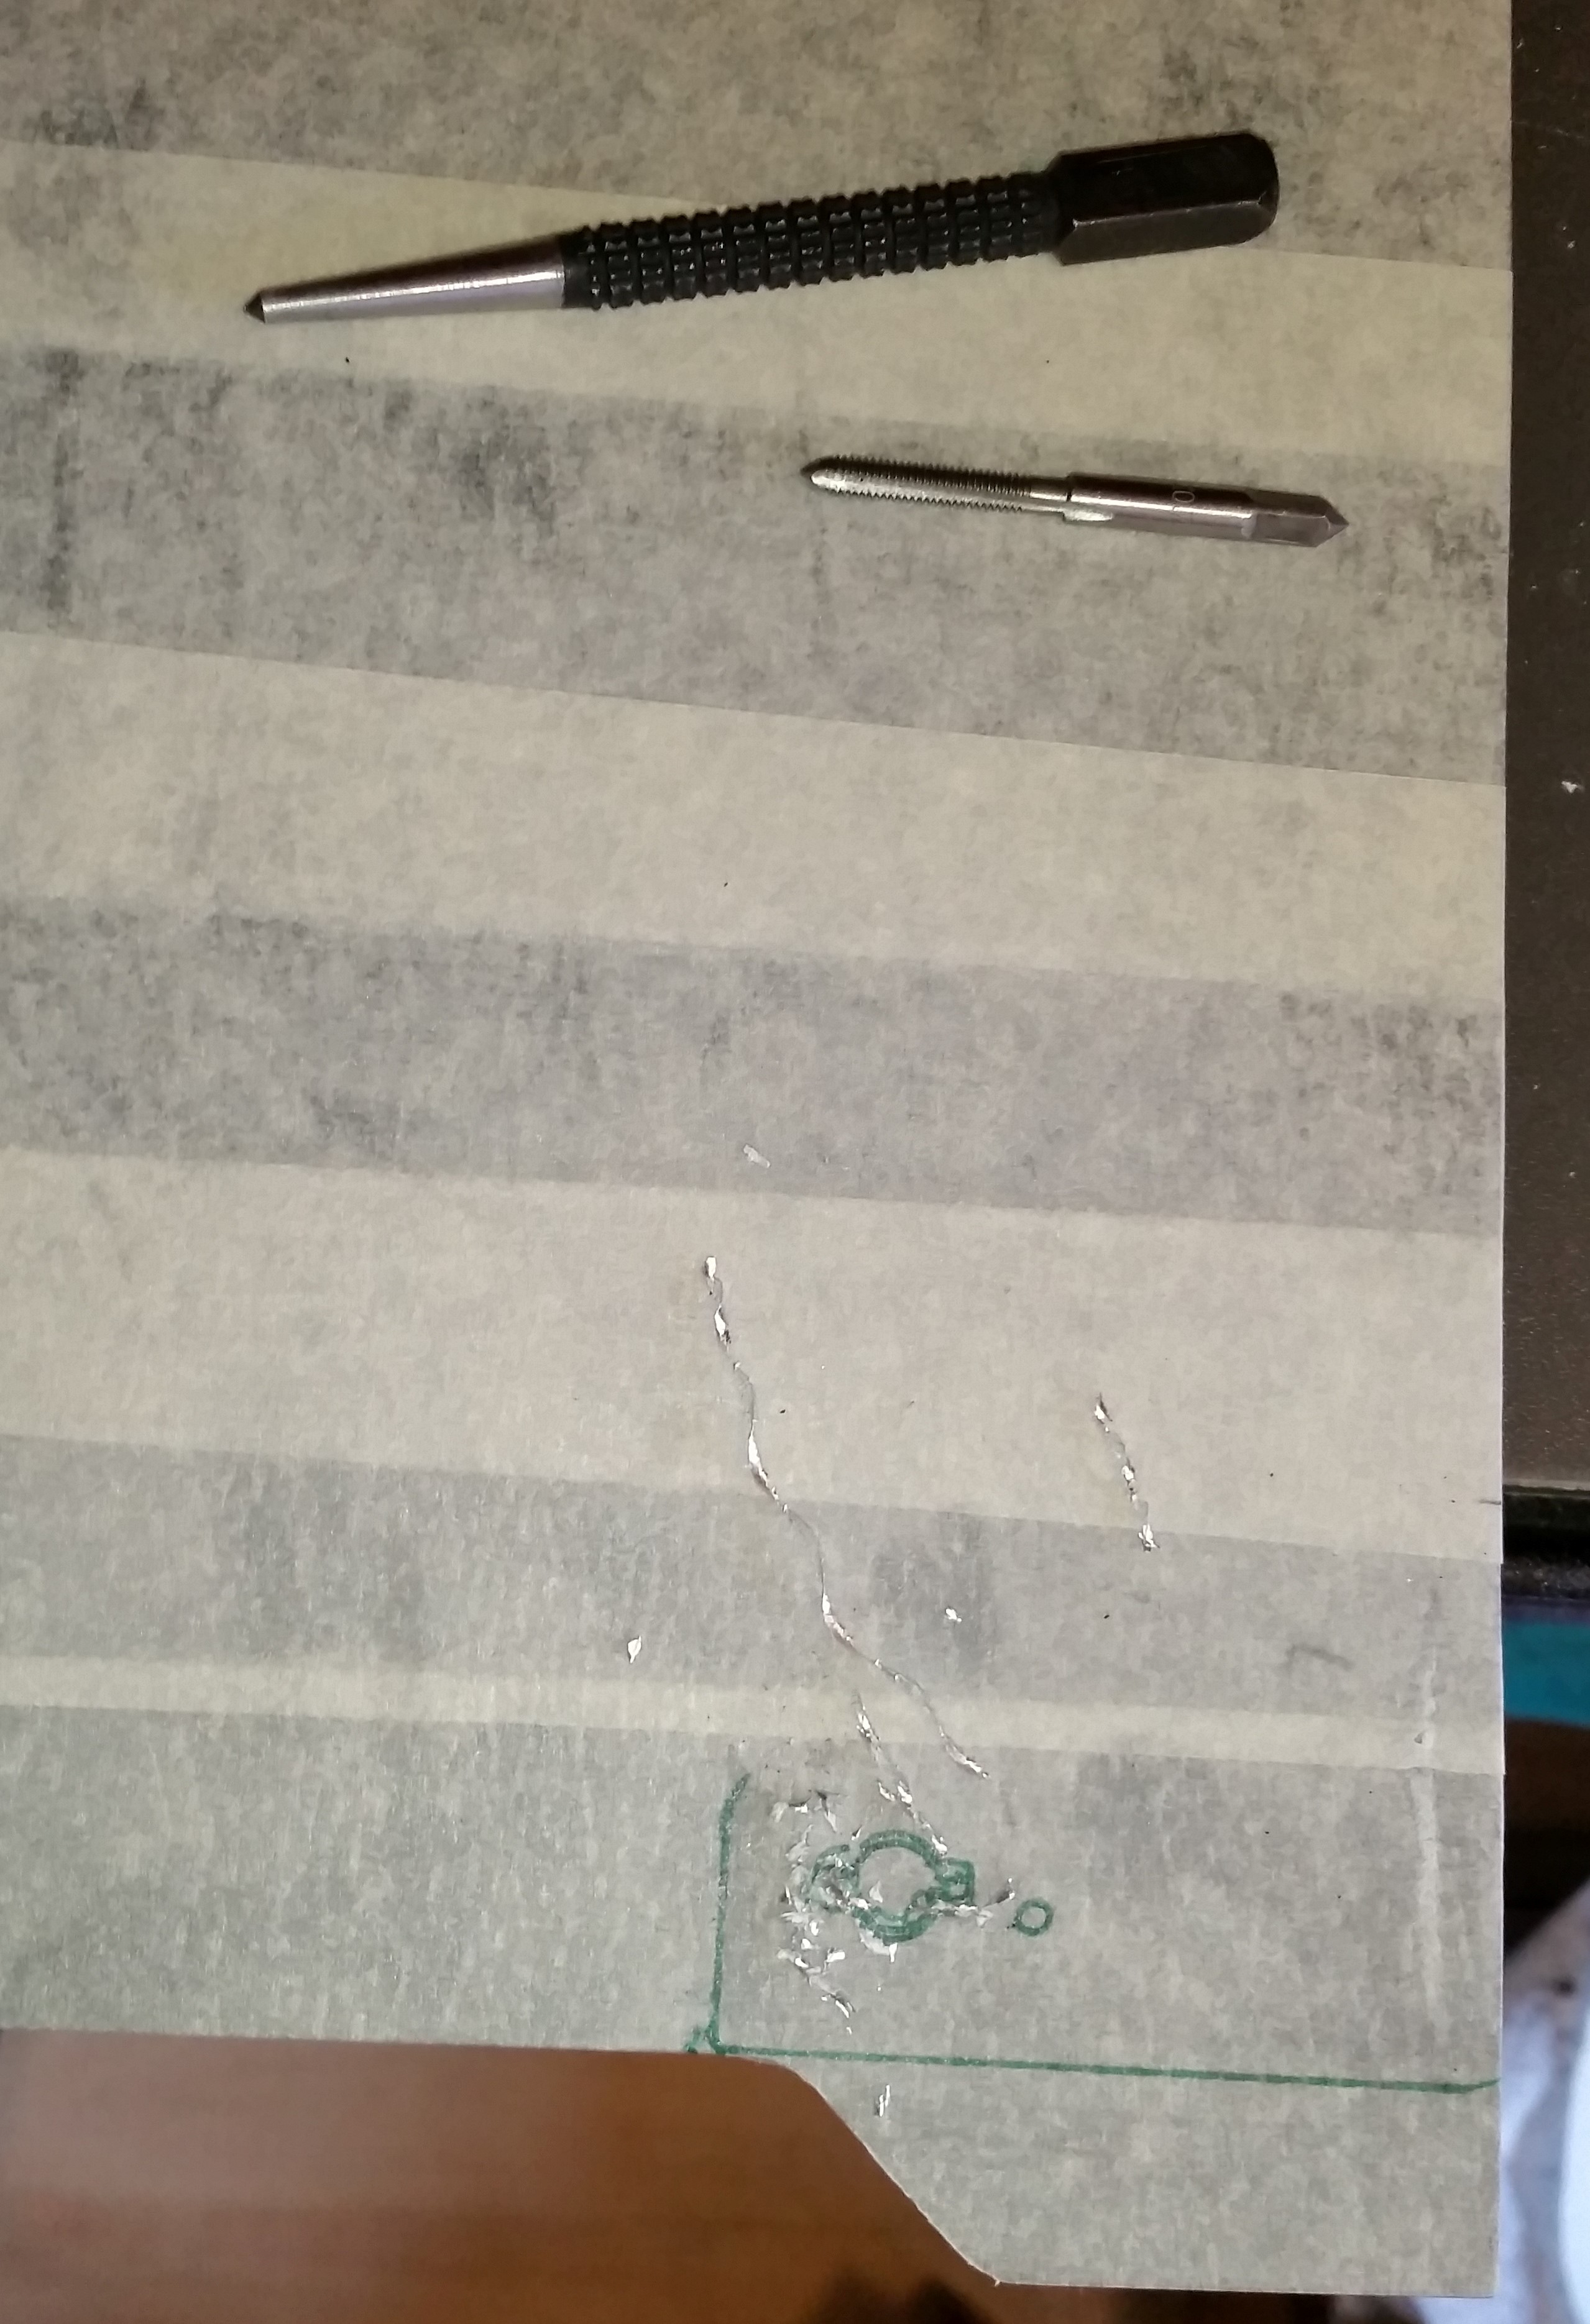
So how then? Well, I found some Barrow 90° bends that aren't rotary and they turn out to be 19mm. Tested and they fit the gap! Now, to connect them. I can't easily seal against the panel as I've already drilled at 14mm hole through the panel to run the acrylic through and the one at the top didn't go perfectly - it's a little wider and wonky where I think the step drill went to far and started boring the next size up. I say that like it was entirely the step drill's fault somehow. So my connection needs to pass through the panel and seal independently of it. Modern fittings have less than 5mm of thread so that's useless by the time it's gone through 3mm of panel. I looked at older fittings which would have to be sealed with PTFE tape and all sorts of combinations. Nothing worked particularly well. Suddenly it dawned on me that if the acrylic tube was the right diameter, you might be able to thread it and if it was a female thread, an o-ring would seal against the end negating the need for the PTFE tape that might crack the acrylic (presumably the pressure on the inside of the thread needed to seal it). So the question is, would acrylic tubing take a female G1/4 thread? Answer turns out to be yes and is nicely demonstrated by the ModZoo on YouTube here.
Better than that, it turns out that Barrow do a selection of G1/4" Acrylic Dual Female Extenders available in 15mm length and increments of 10mm from 20mm to 120mm. So one of these through an enlarged hole in the panel - should be 16mm - should connect nicely onto my 90° bend. A male to male rotary then connects the other end to the rad. So the dimensions just happen to be exactly correct? Well, no...that would be tooo easy! Best I can get is a 15mm barrow male to male rotary and then a 20mm tube. This is 2.7mm too long but I figure I can sand about that much off the end and just extend the thread a little if necessary. All I need now is the G1/4 tap I ordered - rather than the R1/4 tap I received. Never easy but I think that progress is going to be possible and hopefully sleep attainable...once this flu has stopped trying to kill me!
Incidentally, it should be possible to do this on 16/12 acrylic of any length. It's just that I only need a small section and the Barrow ones have one thread perfectly done already and the next one started for me. Should be harder to screw it up! ....I hope!
Currently waiting for delivery of:
So stuff should start happening soon....although it could be me being taken away by the nice men in white coats!
Still have to mount the pump but I'm going to wait until I've got the filter so I can arrange them. Also have to respray the PSU shroud after I lifted the case with the pump just resting in location with thanks to Davido Labido for the advice on paint. I've got some M4 threaded rod and some 6mm ali tubing that fits over it. Going to use them to make some stilts for the pump so that the acrylic top sticks up through the PSU shroud....or at least that's the plan
Bulkhead passthrough: Just don't have the room.
Bent acrylic: The bend may be too sharp (can't be sure until heat gun arrives) and I can't get a grommet that's a good fit because the panel is too thick.
Bitspower L-fitting cube: could be perfect but it's 24mm and I just don't have that sort of space.
Standard 90° bend and bury the shaft of it through the side panel: messy and then I've got to get it connected to the rad in under 30mm. Can't find good dimensions on most fittings either.
So how then? Well, I found some Barrow 90° bends that aren't rotary and they turn out to be 19mm. Tested and they fit the gap!
Now, to connect them. I can't easily seal against the panel as I've already drilled at 14mm hole through the panel to run the acrylic through and the one at the top didn't go perfectly - it's a little wider and wonky where I think the step drill went to far and started boring the next size up. I say that like it was entirely the step drill's fault somehow. So my connection needs to pass through the panel and seal independently of it. Modern fittings have less than 5mm of thread so that's useless by the time it's gone through 3mm of panel. I looked at older fittings which would have to be sealed with PTFE tape and all sorts of combinations. Nothing worked particularly well. Suddenly it dawned on me that if the acrylic tube was the right diameter, you might be able to thread it and if it was a female thread, an o-ring would seal against the end negating the need for the PTFE tape that might crack the acrylic (presumably the pressure on the inside of the thread needed to seal it). So the question is, would acrylic tubing take a female G1/4 thread? Answer turns out to be yes and is nicely demonstrated by the ModZoo on YouTube here.Better than that, it turns out that Barrow do a selection of G1/4" Acrylic Dual Female Extenders available in 15mm length and increments of 10mm from 20mm to 120mm. So one of these through an enlarged hole in the panel - should be 16mm - should connect nicely onto my 90° bend. A male to male rotary then connects the other end to the rad. So the dimensions just happen to be exactly correct? Well, no...that would be tooo easy! Best I can get is a 15mm barrow male to male rotary and then a 20mm tube. This is 2.7mm too long but I figure I can sand about that much off the end and just extend the thread a little if necessary. All I need now is the G1/4 tap I ordered - rather than the R1/4 tap I received. Never easy but I think that progress is going to be possible and hopefully sleep attainable...once this flu has stopped trying to kill me!
Incidentally, it should be possible to do this on 16/12 acrylic of any length. It's just that I only need a small section and the Barrow ones have one thread perfectly done already and the next one started for me. Should be harder to screw it up! ....I hope!
Currently waiting for delivery of:
- 4x Bitfenix 200x200x20 fans for the rad
- Coolant (EC6 clear)
- Bunch of EK 12/10 acrylic fittings
- AquaComputer filter - I figure it's probably a good thing and if I can source a G1/8 lighting module it's look cool set into the top surface of the PSU shroud
- Alphacool 90° dual rotary connectors for the hose hinges
- EK 20mm extensions for the hose hinges
- spring clips to hold soft tube onto acrylic - 13/10 Tygon fits nice and tight over 12/10 acrylic but best make sure!
- Ribbon cable to extend the Aquaero - I think it's on the slow boat from China!
- Heat gun (any time this year Monsoon!)
So stuff should start happening soon....although it could be me being taken away by the nice men in white coats!
Still have to mount the pump but I'm going to wait until I've got the filter so I can arrange them. Also have to respray the PSU shroud after I lifted the case with the pump just resting in location
with thanks to Davido Labido for the advice on paint. I've got some M4 threaded rod and some 6mm ali tubing that fits over it. Going to use them to make some stilts for the pump so that the acrylic top sticks up through the PSU shroud....or at least that's the plan Well if stuff would turn up and be correct, my sanity would be much higher! Fans arrived but they're awful. Push a fair amount of air but the noise is really odd and if you put the fan grill on they whine horribly. They also sound like they're on a lopsided bearing as you slow them down so not happy when silence is the aim. I'm not sure whether to try Aerocool Dark Force's or try 200x200x30mm fans which will mean the fan grill won't fit without somehow padding it out. I suppose the alternative is to ditch the adaptor plate and use 9 x 140mm Noctuas (or equivalent). Expensive though. Anyone got any experience or recommendations here?
Ribbon cable turned up and it's not 1mm pitch as described so it doesn't fit. I'm reasonably convinced that some sort of Ultra 2 SCSI cable might be correct but I've cleared out the stuff I was never going to use. Will have to check my mum's basement to see whether there's any left there. That's where I used to be lurking back in the days when 9GB 10k spin SCSI disks were blazingly fast and more storage than you could hope to fill in a lifetime
G1/4 taps turned up...and are R1/4. Seller has found some G1/4 taps and was really helpful once I'd explained the problem. These should let me extend the thread in the acrylic tubes once they turn up.
Alphacool 90 degree fittings have turned up but I seem to have got confused between my cunning hinge plan and my realistic hinge plan....or in other words I ordered the wrong thing and only have enough to build most of one hinge. Why are EK fittings in such short supply lately?!
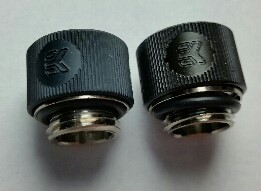
Got the EK acrylic fittings in black. There is a difference between black and the Elox black the OCUK are currently selling as "black". It's quite subtle but the Elox is slightly greyer. I'll see if I can get a picture that shows the difference.
Next up is to pull the PSU shroud out again and cut out the filter hole. Going to mount it in the same way as the Aquaero but on the top surface. Hopefully back light it but have to source a G1/8 acrylic LED module which seem to be next to non-existent in this country.
Ribbon cable turned up and it's not 1mm pitch as described so it doesn't fit. I'm reasonably convinced that some sort of Ultra 2 SCSI cable might be correct but I've cleared out the stuff I was never going to use. Will have to check my mum's basement to see whether there's any left there. That's where I used to be lurking back in the days when 9GB 10k spin SCSI disks were blazingly fast and more storage than you could hope to fill in a lifetime
G1/4 taps turned up...and are R1/4. Seller has found some G1/4 taps and was really helpful once I'd explained the problem. These should let me extend the thread in the acrylic tubes once they turn up.
Alphacool 90 degree fittings have turned up but I seem to have got confused between my cunning hinge plan and my realistic hinge plan....or in other words I ordered the wrong thing and only have enough to build most of one hinge. Why are EK fittings in such short supply lately?!
Got the EK acrylic fittings in black. There is a difference between black and the Elox black the OCUK are currently selling as "black". It's quite subtle but the Elox is slightly greyer. I'll see if I can get a picture that shows the difference.
Next up is to pull the PSU shroud out again and cut out the filter hole. Going to mount it in the same way as the Aquaero but on the top surface. Hopefully back light it but have to source a G1/8 acrylic LED module which seem to be next to non-existent in this country.
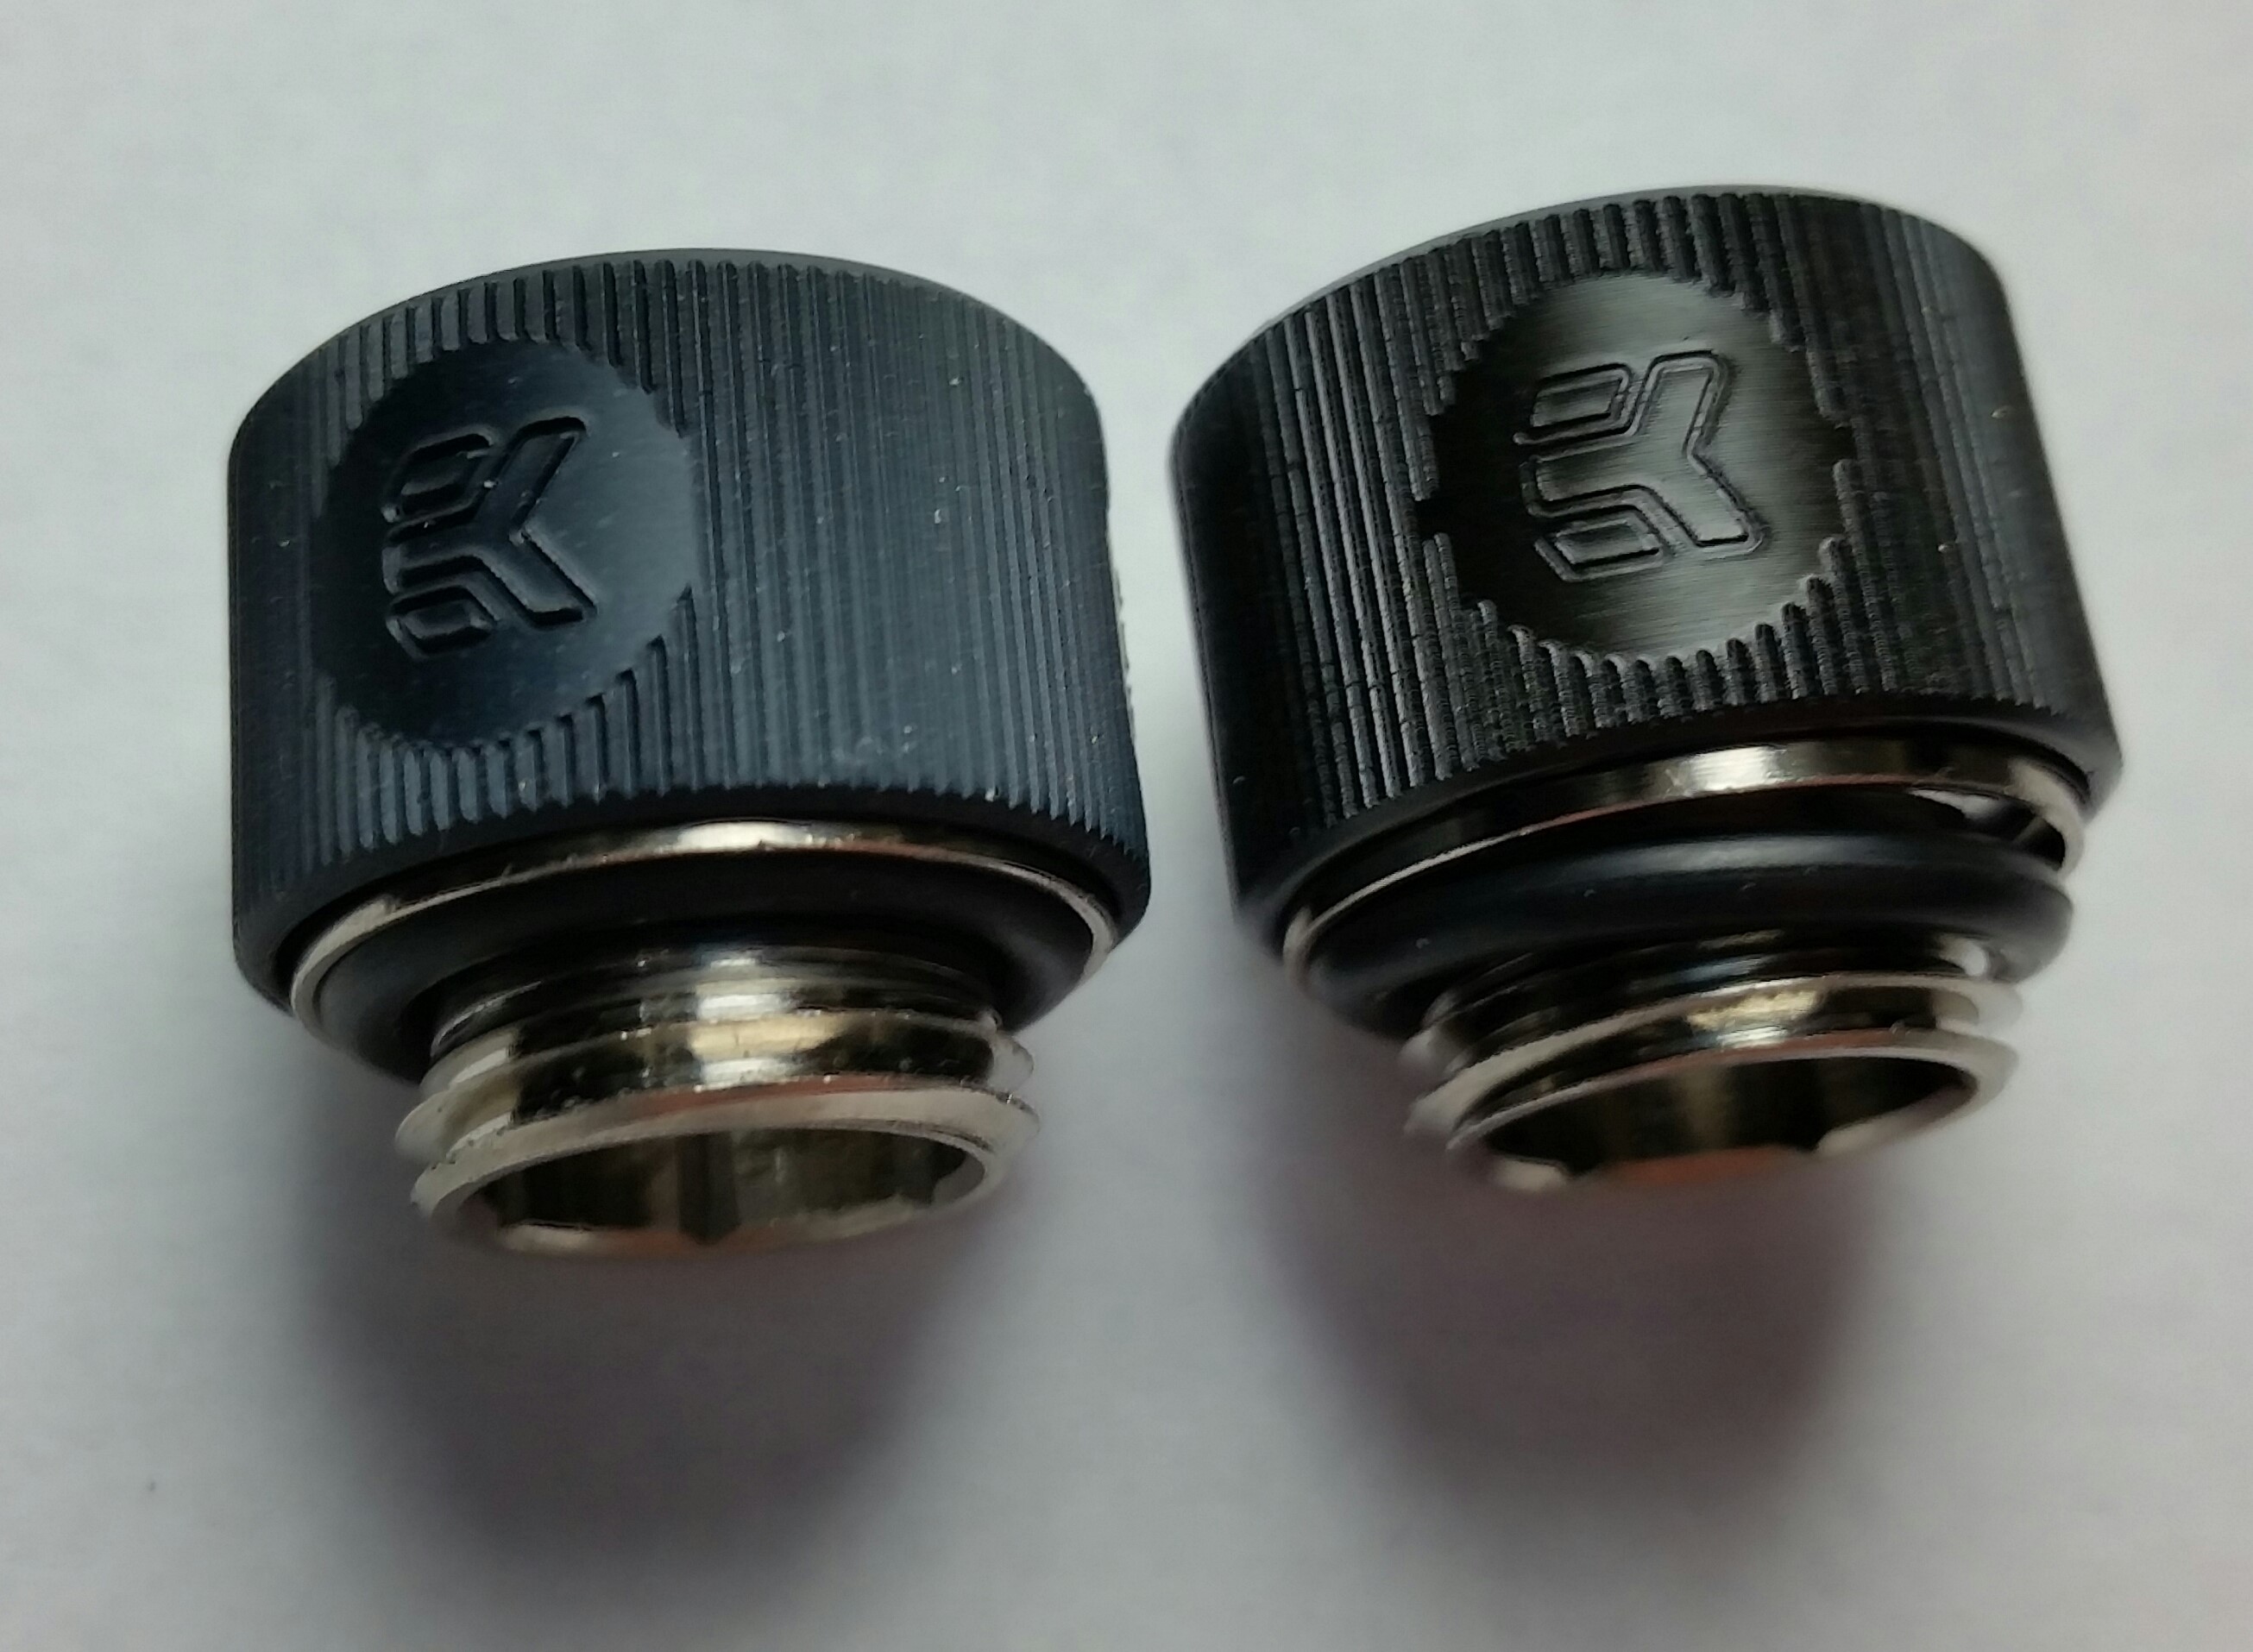
Pic as promised. Elox is on the left, black on the right. Elox is slightly more matt and greyer. Click for larger version.
So what's worse than flushing a rad? Flushing a MONSTER rad! I foolishly assumed the design was like most with atria at each end. Found out the hard way when I poured water in one top port with another top port open to let the air out. Turns out they're directly connected Actual design seems to be 3 or 4 tubes going from top ports to the right, then 3 or 4 tubes back and zig-zagging all the way down. It makes it a real pain to fill with a funnel in order to flush it out and I was fearful that flow would be naff.
A while ago someone posted the genius idea of siphoning water through the rad to flush it. I gave this a go for the last rad and was dead smug with myself but the results were disappointing when I gave it a final shake with some DI and flakes came out. In the spirit of Overkill, I took it to the next level. I present to you the Dual DDC PowerFlush! Fun for all the family...clearly.

I was careful to keep water and mains (and son!) separated
Looks like I need not have worried about flow rate! It does seem to increase with the 2nd pump running - at least the jet goes further - but I won't have figures until I get everything finished and have the Aquaero and flow meter in the loop. So with massive flow gushing through the rad, it's all clean now and my laziness has been rewarded, right? Nope. A shake with tap water still has it coming out cloudy - like difficult to see through white cloudiness. Seems like there isn't really a good shortcut to this. Very disappointed.
Actual design seems to be 3 or 4 tubes going from top ports to the right, then 3 or 4 tubes back and zig-zagging all the way down. It makes it a real pain to fill with a funnel in order to flush it out and I was fearful that flow would be naff.A while ago someone posted the genius idea of siphoning water through the rad to flush it. I gave this a go for the last rad and was dead smug with myself but the results were disappointing when I gave it a final shake with some DI and flakes came out. In the spirit of Overkill, I took it to the next level. I present to you the Dual DDC PowerFlush! Fun for all the family...clearly.
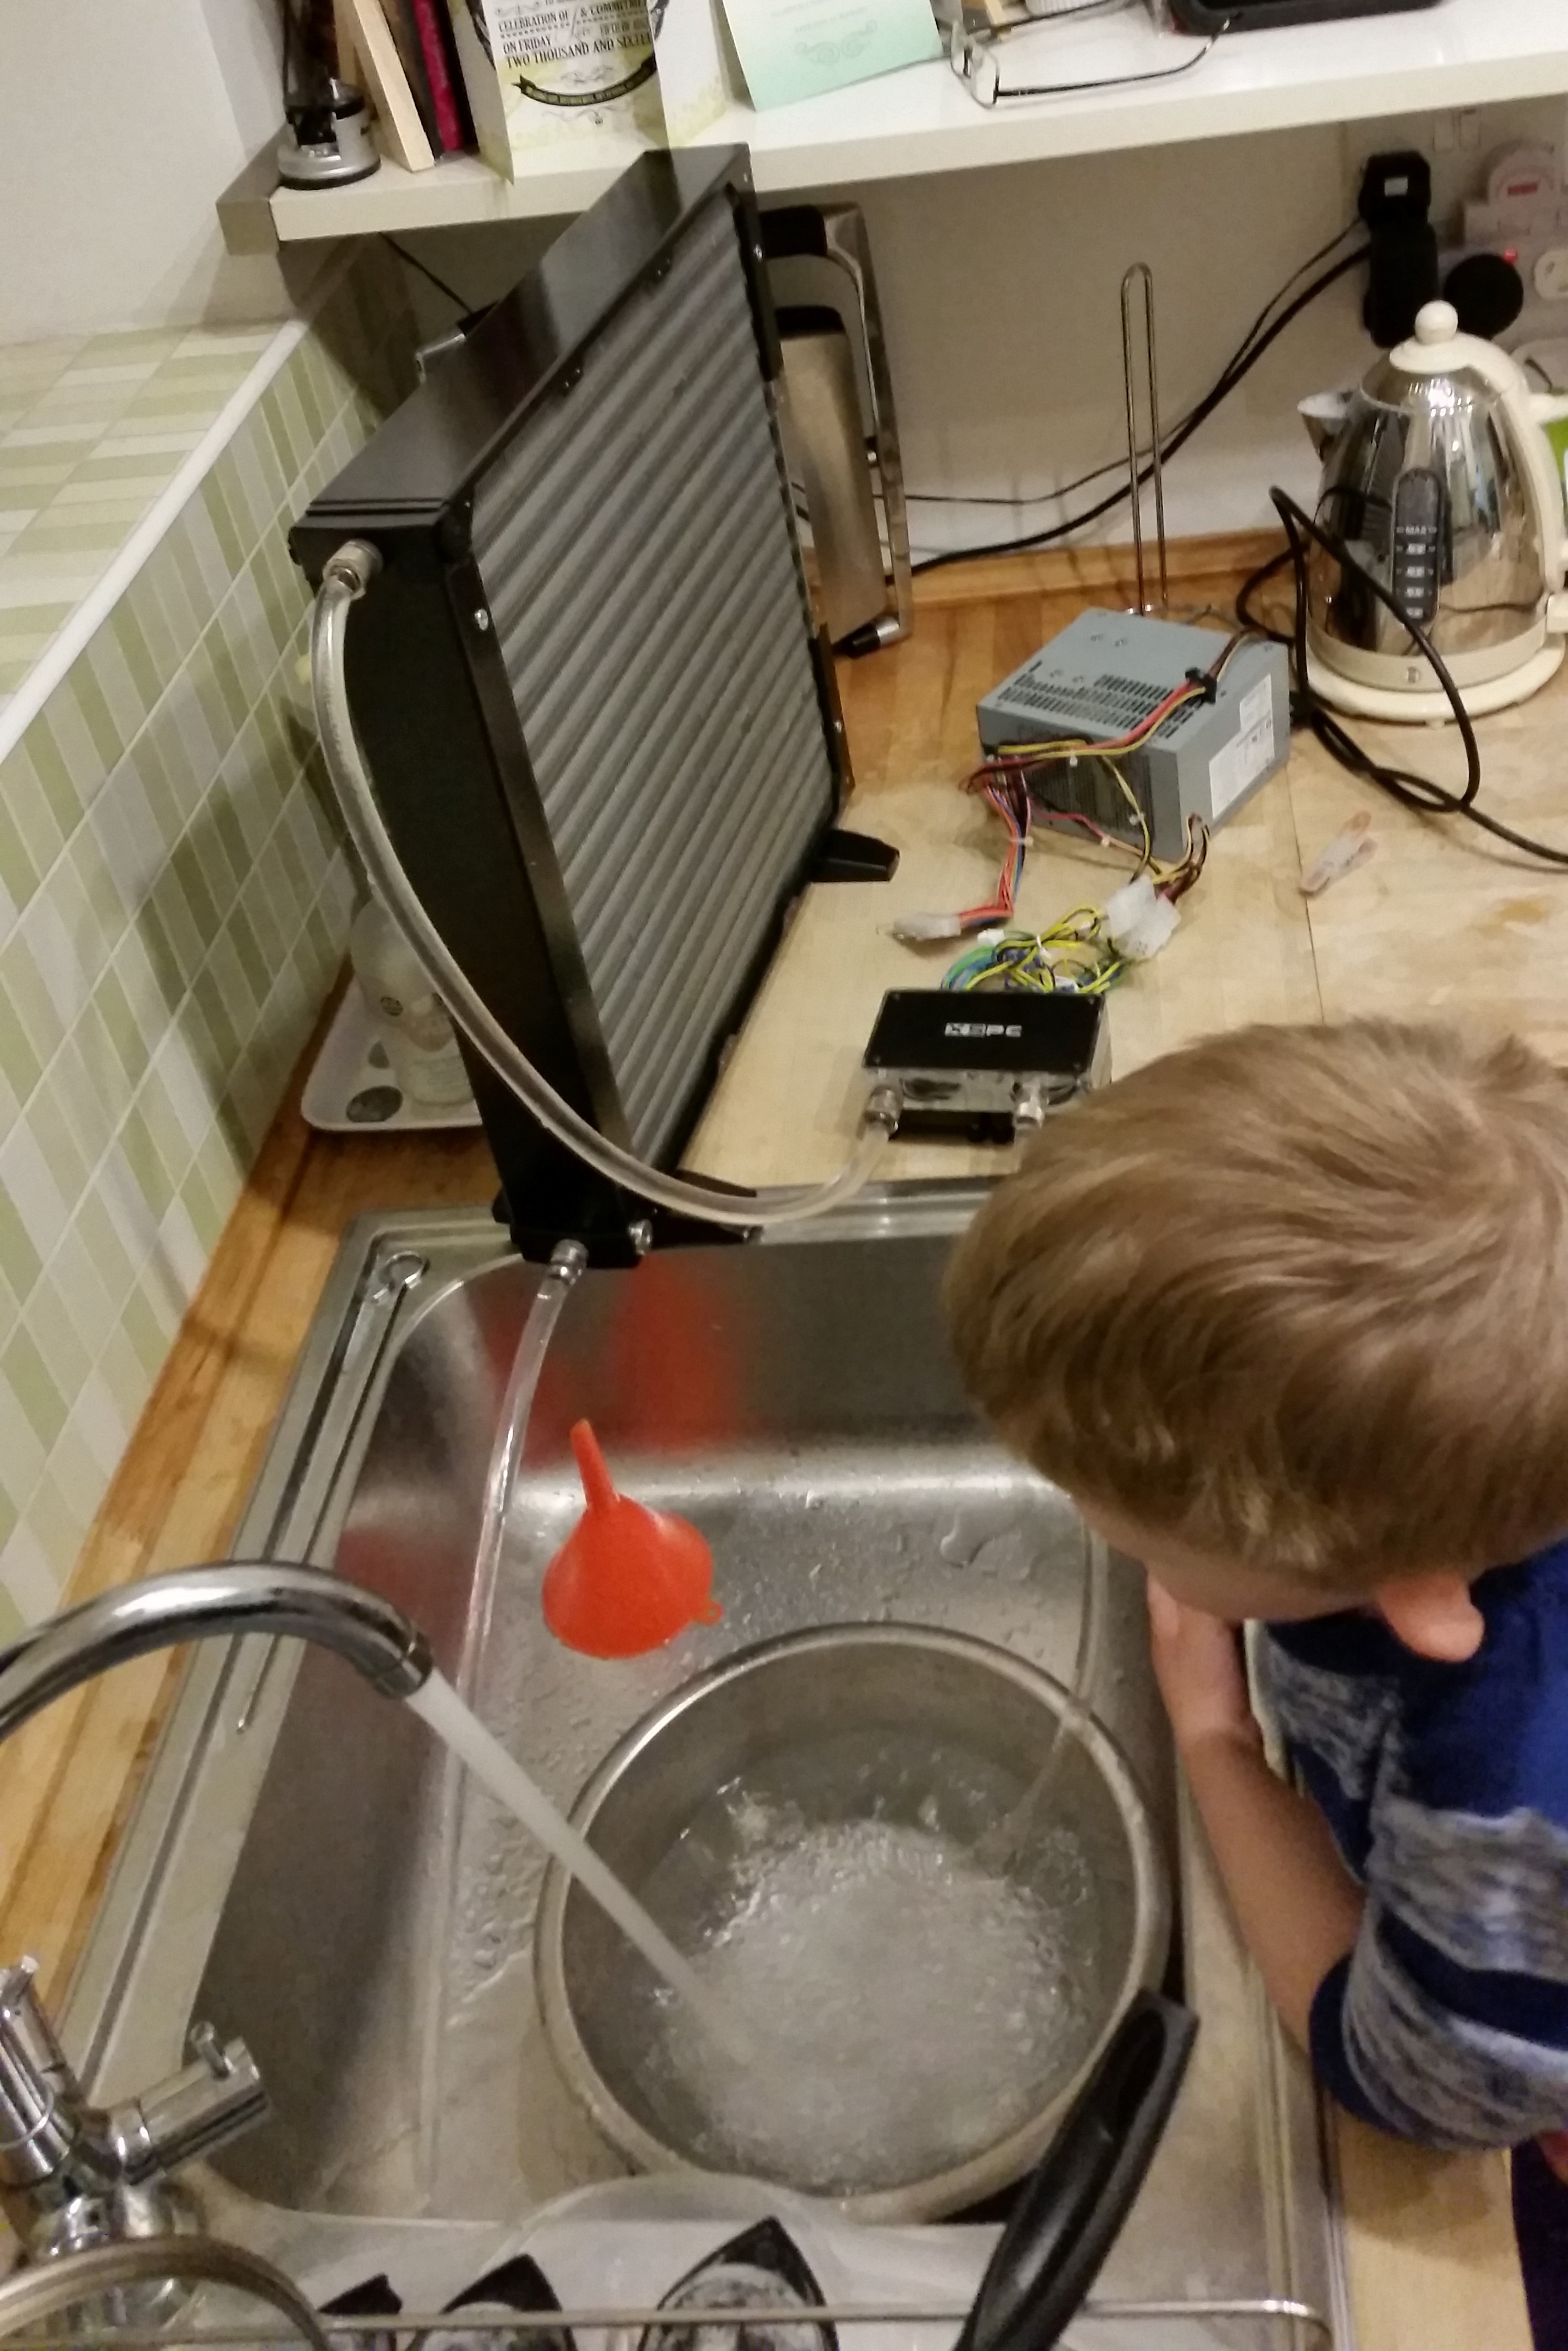
I was careful to keep water and mains (and son!) separated
Looks like I need not have worried about flow rate! It does seem to increase with the 2nd pump running - at least the jet goes further - but I won't have figures until I get everything finished and have the Aquaero and flow meter in the loop. So with massive flow gushing through the rad, it's all clean now and my laziness has been rewarded, right? Nope. A shake with tap water still has it coming out cloudy - like difficult to see through white cloudiness. Seems like there isn't really a good shortcut to this. Very disappointed.
Last edited: