

Over volting a Titan a 780Ti and 780's is now easy. This guide includes BIOS's for a Reference 780/Gigabyte Ghz/Wf/ACX/DCII/EVGA SC/TFIV/HoF/Jetstream and for the 780Ti Reference/ACX/Asus/EVGA SC ACX/Gainward/Gigabyte/Inno3D/JetStream/MSI/Palit/Zotac
A massive thanks to Skyn3t and Zawarudo from OCN.net for the voltage tools and without your support, this guide wouldn't be possible. Also thanks to Unwinder for his afterburner skills. Top guys")
So you have a Titan or a 780 or a 780Ti and you want to unlock its potential and grab some extra Mhz for benching or gaming? Then this thread is for you. I will run through this as basic as possible and if anyone wants to add anything or correct me, please feel free to do so.
"Just shut up and get on with it" I hear you shout...But before I do that, I want to say that this can be dangerous and can possibly void your warranty/damage your GPU and I take no responsibility. Many users have had no issues but that's not to say you wont, so please be warned. YOU DO THIS AT YOUR OWN RISK AND I TAKE NO REPONSIBILITY.
Ok on we go.
First things first, download the tools you will need from here:
BIOS's now included are:
(780) EVGA ACX - All reference cards - Gigabyte WFx3 - Gigabyte Ghz Ed - Twin Frozr 4 - EVGA SC Reference - Palit Jetstream - Palit Hall of Fame - Asus DCII
(780Ti) All reference cards - EVGA ACX - Asus - EVGA ACX SC - Gainward - Gigabyte - Inno3D - MSI - Palit - Zotac - Palit Jetstream
For the Titan, click me
For the 780, click me
For the 780Ti, click me
GTX 780, 780 TI, 770, 680 Classified Software Overvoltage tool click me
EVGA Classified 780 BIOS click me
EVGA Classified 780Ti BIOS click me
I have added the Classy 780 and 780Ti BIOS's and also the voltage tuner that is used with a Classy. It allows 1.35V on the 780 and 1.5V on the 780Ti.
It has been pointed out to me that some newer cards require a newer version of NVFlash, so I have included this in each of the tool sets for your card.
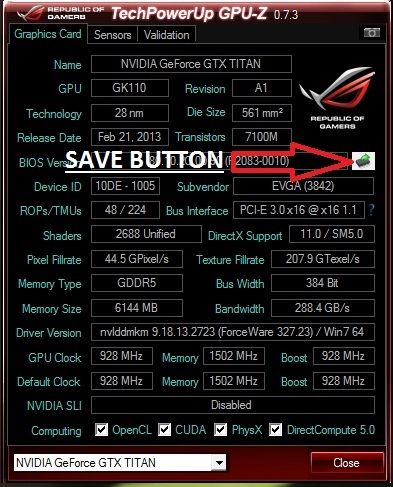
First run GPU-Z and back up your BIOS by clicking the micro chip on GPU-Z: (Make sure you do this, incase you ever need to flash back or RMA your card)
You will need to place the nvflash files alongside the .rom file in the same folder. So for example you should have your folder with these files in:
And now you are ready to go with flashing your card/cards.
Press and hold shift and right mouse click the nvflash folder and select 'open command window here'
If using a 780/780Ti:
next type nvflash -4 -5 -6 skynet-3A-SC-rev3-941.rom and hit enter (Or any of the corresponding names that fit your card)
If using a Titan
next type nvflash -4 -5 -6 x.rom and hit enter
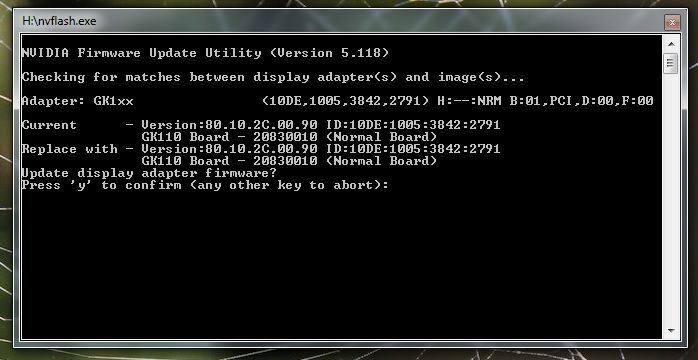
(note: I renamed the Titan bios to x.rom for easier memory and for the 780/780Ti, feel free to do the same)
It will and ask if you want to overwrite. Press Y and it will give a beep and off it goes. Don't do anything whilst it is doing this, as you could brick your GPU. When it has finished, the CMD window that was working will disappear or if you have SLI running, it will ask if you want to flash the second GPU. This is your choice if you do or dont.
Once that is done, restart the computer and reinstall your drivers (recommended). That is the scary part done and you are now sitting with a non boosting BIOS and a BIOS that will just downclock when not in use to ~300Mhz. You also have a BIOS that has 1.212V as standard and the ability to have 100% fan I believe (I am watercooled, so unverified from me) and a higher power target.
--------------------------------------------------------------------------
Now onto enabling the 1.3V Afterburner hack.
Before we begin this, uninstall any versions of Afterburner you may have and after uninstallation, make sure you delete the MSIAfterburner folder if it is still there from your programs (x86) or wherever you installed it.
Next, install the MSI afterburner that came in the tools package. Open up Afterburner and move any slider (Add +100 to the memory clock), click apply and then close down Afterburner. Make sure afterburner is not running and find the MSI afterburner folder that just installed.
Go into that folder and open the 'profiles' folder and you should see 2 files. One looks like this 'VEN_10DE&DEV_1005&SUBSYS_27913842&REV_A1&BUS_1&DEV_0&FN_0.cfg' Open that with notepad and add to the bottom:
[Settings]
VDDC_Generic_Detection=0
VDDC_NCP4206_Detection=4:20h
Now click save. If you get access denied, right click the ven_10DE file in the folder and click properties - security Tab - Edit button - users - tick full control - apply.
(Note: for me, this didn't work and I had to change the 4:20h to 3:20h, as I am on the ri3 GPU. Sorry if this is confusing but it will make sense if you read on)
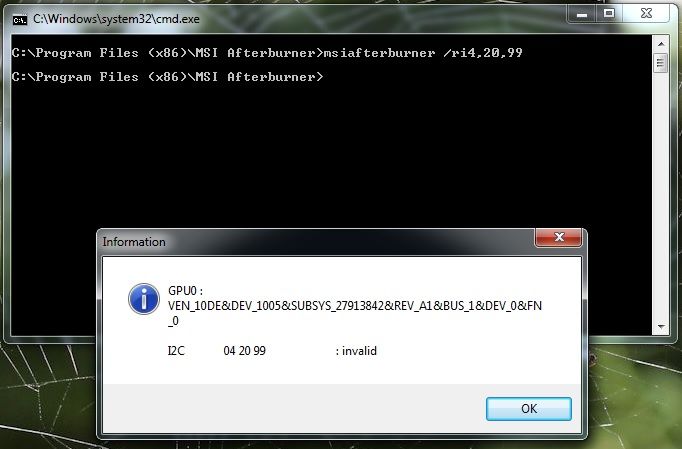
Now let's see what command you need to add for Afterburner. To find out, we press and hold shift and right click on the msiafterburner folder and choose 'open command window here'
Type: msiafterburner /ri4,20,99
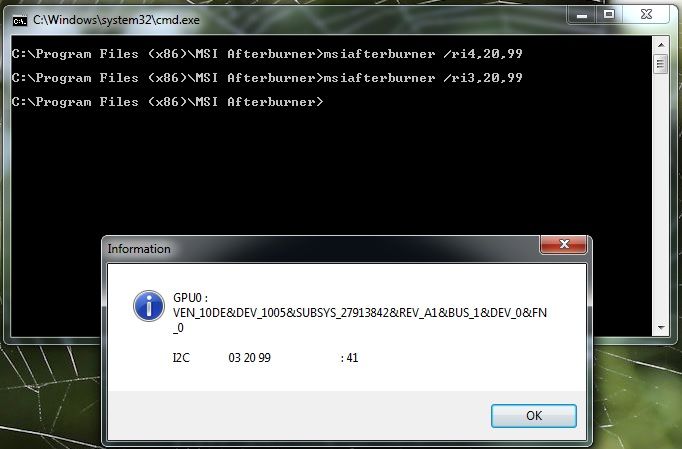
If it returns invalid, then your GPU will require the ri3 command. Go back to the last step where you added the [settings] to profiles and change the 4:20h to 3:20h (like I had to)
Type: msiafterburner /ri3,20,99
This will give the 41 screen (what we want to see)
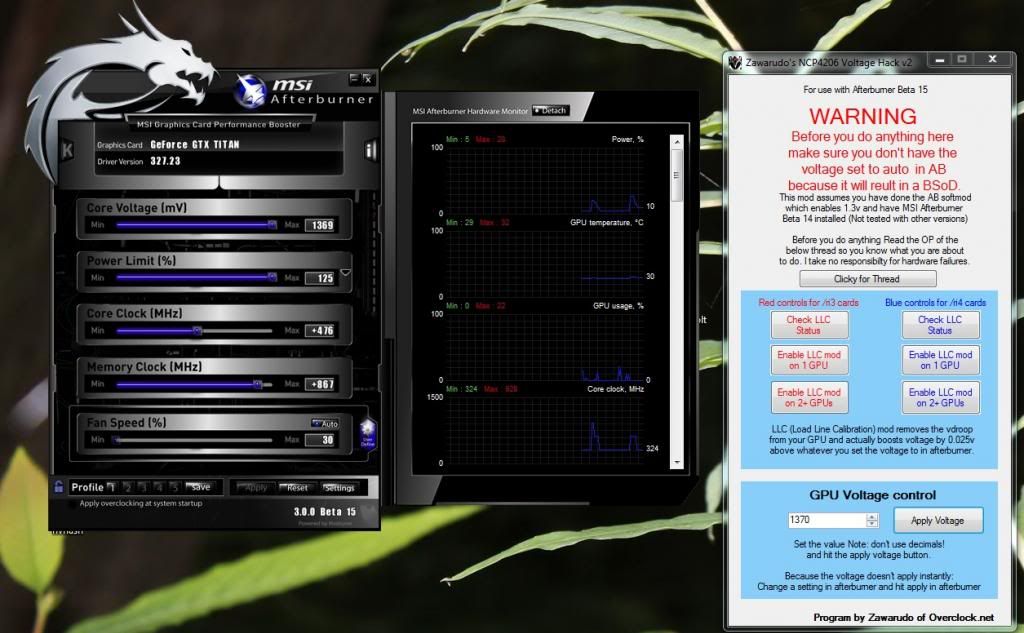
Now when we open Afterburner, it should ask us to restart to apply the settings (if it all went well) click ok and when your computer restarts, you will now have 1.3V (1.325V effective) to play with.
It should now look like this.
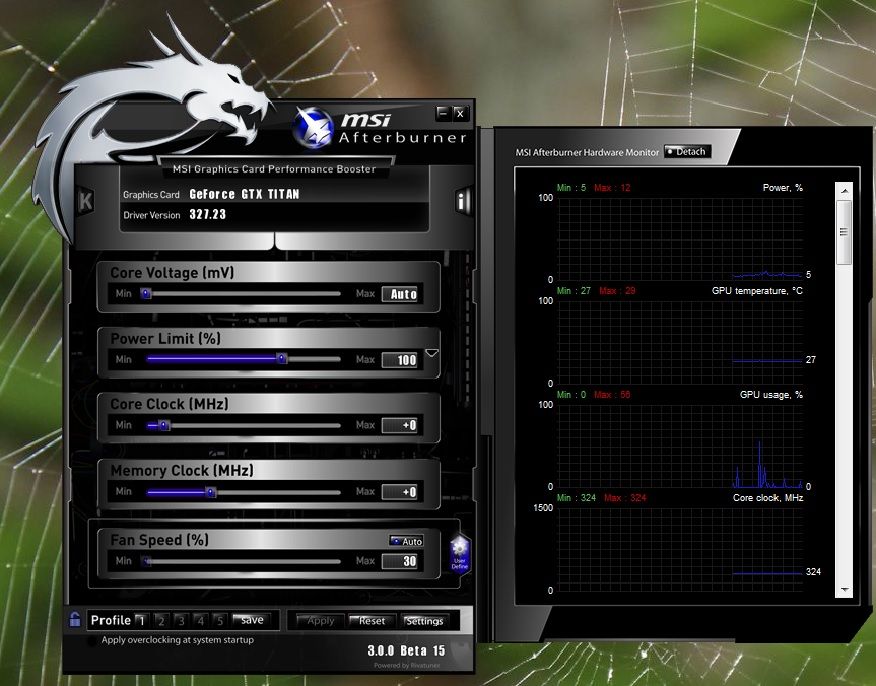
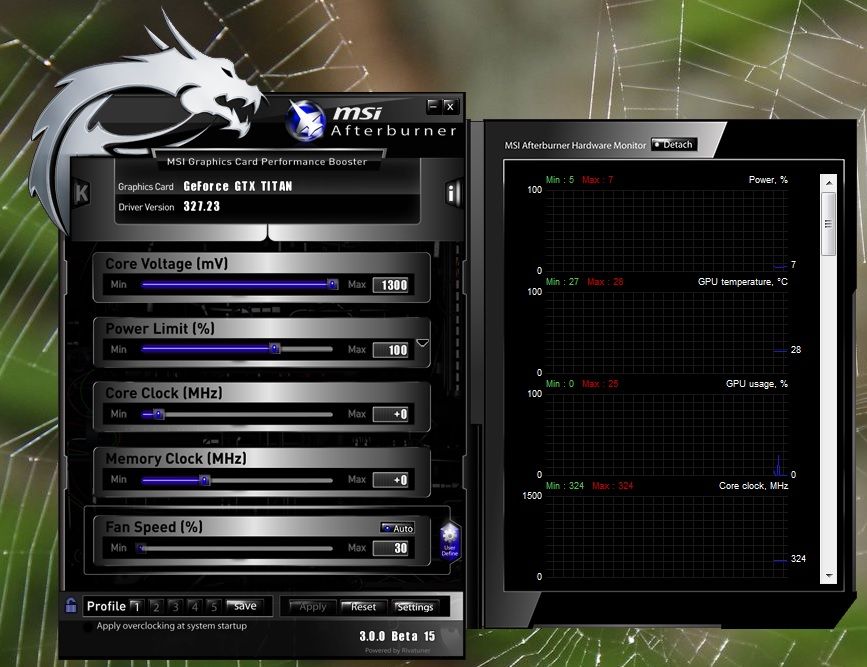
As you can see, it opens with the volts set to auto and the slider maxing at 1300mV (1.3V) With the Skynet bios we are using, this makes for an effective voltage of 1.325V.
-----------------------------------------------------------------------------------------------------------
Now to sort out vdroop (clocks dropping)
make your way to your afterburner folder again (with AB closed) and press and hold shift whilst right clicking the Afterburner folder and again choose 'open command window here'
Type msiafterburner /ri3,20,de (if you used the 3:20h earlier) and you should see this (if you used the 4:20h earlier, type msiafterburner /ri4,20,de)
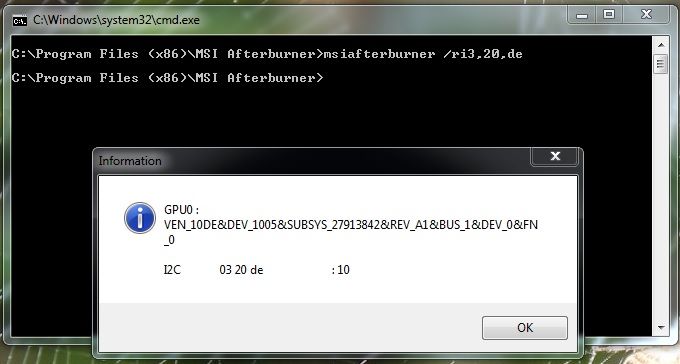
Now we want to make the last :10 into :00 and to do this we type
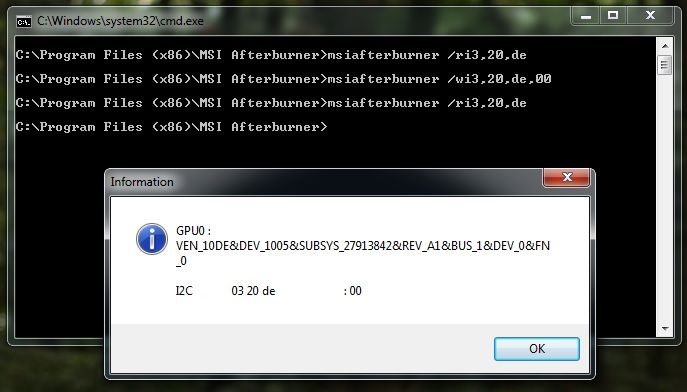
msiafterburner /wi3,20,de,00 (if you used the 3:20h earlier) or msiafterburner /wi4,20,de,00 (if you used the 4:20h earlier)
Now when we type: msiafterburner /ri3,20,de we should see this (or msiafterburner /ri4,20,de)
Note: I have included the Zawarudo tool which makes doing the vdroop simpler
Now you should have a constant clock and 1.325V at your disposal. I will get onto the higher voltages soon but for now, that will get you going
--------------------------------------------------------------------------------------------------
Onto Zawarudo's excellent tool for over volting even further....
As you can see from this image, the layout is very intuitive and not overly complicated. I will warn people to please be careful and say that the highest I have been is 1.395v (1.37v set in this tool) and this is using an EK-FC full cover waterblock which has vrm water cooling. Not many of the blocks have this, so check before you go to far. As there is no VRM temp monitoring on a Titan, going from guys in the know, they generally say that you VRM temps are what your GPU core is + ambient temps. So if your GPU was at 50c and ambient (room temps) were 24c, that would give VRM temps of ~74c. Nothing set in stone on this and pure speculation (albeit from guys who use LN2 and bench often).
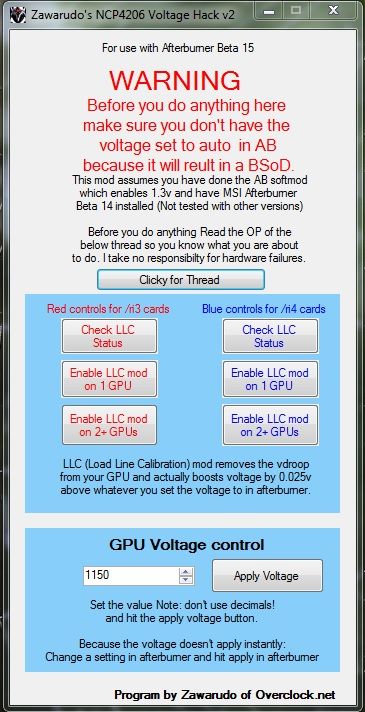
Anyways, on with the tool.
First open Afterburner and move the voltage slider to anything, so long as it isn't Auto (it could BSOD if left on Auto)
Next run the Zawarudo tool as Admin
Under GPU voltage control, set the desired volts
click Apply Voltage
Go and set your clocks in AB and click apply in the afterburner window.
You will see the voltage go to what you just set but remember that 0.025V is going on top of what you set...So 1.3V will be 1.325V effective.
There is also an easier way of fixing the vdroop with this tool and that is to choose the left or the right side (ri3 or ri4) If you use the ri3 commands, use the left side and if you use the ri4 commands, use the right side...Simples. You can also set SLI with this mod as well and again choose what side is for your commands.
And that is that in a nutshell. Please be careful and don't go mad. I will add this thread to the bottom of my sig for easy finding. Please feel free to pop onto OCN.net to give Zawarudo and Skyn3t a thanks for these great tools/mods and a little rep never hurts
A massive thanks to Skyn3t and Zawarudo from OCN.net for the voltage tools and without your support, this guide wouldn't be possible. Also thanks to Unwinder for his afterburner skills. Top guys
So you have a Titan or a 780 or a 780Ti and you want to unlock its potential and grab some extra Mhz for benching or gaming? Then this thread is for you. I will run through this as basic as possible and if anyone wants to add anything or correct me, please feel free to do so.
"Just shut up and get on with it" I hear you shout...But before I do that, I want to say that this can be dangerous and can possibly void your warranty/damage your GPU and I take no responsibility. Many users have had no issues but that's not to say you wont, so please be warned. YOU DO THIS AT YOUR OWN RISK AND I TAKE NO REPONSIBILITY.
Ok on we go.
First things first, download the tools you will need from here:
BIOS's now included are:
(780) EVGA ACX - All reference cards - Gigabyte WFx3 - Gigabyte Ghz Ed - Twin Frozr 4 - EVGA SC Reference - Palit Jetstream - Palit Hall of Fame - Asus DCII
(780Ti) All reference cards - EVGA ACX - Asus - EVGA ACX SC - Gainward - Gigabyte - Inno3D - MSI - Palit - Zotac - Palit Jetstream
For the Titan, click me
For the 780, click me
For the 780Ti, click me
GTX 780, 780 TI, 770, 680 Classified Software Overvoltage tool click me
EVGA Classified 780 BIOS click me
EVGA Classified 780Ti BIOS click me
I have added the Classy 780 and 780Ti BIOS's and also the voltage tuner that is used with a Classy. It allows 1.35V on the 780 and 1.5V on the 780Ti.
It has been pointed out to me that some newer cards require a newer version of NVFlash, so I have included this in each of the tool sets for your card.
First run GPU-Z and back up your BIOS by clicking the micro chip on GPU-Z: (Make sure you do this, incase you ever need to flash back or RMA your card)
You will need to place the nvflash files alongside the .rom file in the same folder. So for example you should have your folder with these files in:
- nvflash.exe
- nvflash32.sys
- nvflash64.sys
- skynet-3A-SC-rev3-941.rom
And now you are ready to go with flashing your card/cards.
Press and hold shift and right mouse click the nvflash folder and select 'open command window here'
If using a 780/780Ti:
next type nvflash -4 -5 -6 skynet-3A-SC-rev3-941.rom and hit enter (Or any of the corresponding names that fit your card)
If using a Titan
next type nvflash -4 -5 -6 x.rom and hit enter
(note: I renamed the Titan bios to x.rom for easier memory and for the 780/780Ti, feel free to do the same)
It will and ask if you want to overwrite. Press Y and it will give a beep and off it goes. Don't do anything whilst it is doing this, as you could brick your GPU. When it has finished, the CMD window that was working will disappear or if you have SLI running, it will ask if you want to flash the second GPU. This is your choice if you do or dont.
Once that is done, restart the computer and reinstall your drivers (recommended). That is the scary part done and you are now sitting with a non boosting BIOS and a BIOS that will just downclock when not in use to ~300Mhz. You also have a BIOS that has 1.212V as standard and the ability to have 100% fan I believe (I am watercooled, so unverified from me) and a higher power target.
--------------------------------------------------------------------------
Now onto enabling the 1.3V Afterburner hack.
Before we begin this, uninstall any versions of Afterburner you may have and after uninstallation, make sure you delete the MSIAfterburner folder if it is still there from your programs (x86) or wherever you installed it.
Next, install the MSI afterburner that came in the tools package. Open up Afterburner and move any slider (Add +100 to the memory clock), click apply and then close down Afterburner. Make sure afterburner is not running and find the MSI afterburner folder that just installed.
Go into that folder and open the 'profiles' folder and you should see 2 files. One looks like this 'VEN_10DE&DEV_1005&SUBSYS_27913842&REV_A1&BUS_1&DEV_0&FN_0.cfg' Open that with notepad and add to the bottom:
[Settings]
VDDC_Generic_Detection=0
VDDC_NCP4206_Detection=4:20h
Now click save. If you get access denied, right click the ven_10DE file in the folder and click properties - security Tab - Edit button - users - tick full control - apply.
(Note: for me, this didn't work and I had to change the 4:20h to 3:20h, as I am on the ri3 GPU. Sorry if this is confusing but it will make sense if you read on)
Now let's see what command you need to add for Afterburner. To find out, we press and hold shift and right click on the msiafterburner folder and choose 'open command window here'
Type: msiafterburner /ri4,20,99
If it returns invalid, then your GPU will require the ri3 command. Go back to the last step where you added the [settings] to profiles and change the 4:20h to 3:20h (like I had to)
Type: msiafterburner /ri3,20,99
This will give the 41 screen (what we want to see)
Now when we open Afterburner, it should ask us to restart to apply the settings (if it all went well) click ok and when your computer restarts, you will now have 1.3V (1.325V effective) to play with.
It should now look like this.
As you can see, it opens with the volts set to auto and the slider maxing at 1300mV (1.3V) With the Skynet bios we are using, this makes for an effective voltage of 1.325V.
-----------------------------------------------------------------------------------------------------------
Now to sort out vdroop (clocks dropping)
make your way to your afterburner folder again (with AB closed) and press and hold shift whilst right clicking the Afterburner folder and again choose 'open command window here'
Type msiafterburner /ri3,20,de (if you used the 3:20h earlier) and you should see this (if you used the 4:20h earlier, type msiafterburner /ri4,20,de)
Now we want to make the last :10 into :00 and to do this we type
msiafterburner /wi3,20,de,00 (if you used the 3:20h earlier) or msiafterburner /wi4,20,de,00 (if you used the 4:20h earlier)
Now when we type: msiafterburner /ri3,20,de we should see this (or msiafterburner /ri4,20,de)
Note: I have included the Zawarudo tool which makes doing the vdroop simpler
Now you should have a constant clock and 1.325V at your disposal. I will get onto the higher voltages soon but for now, that will get you going
--------------------------------------------------------------------------------------------------
Onto Zawarudo's excellent tool for over volting even further....
As you can see from this image, the layout is very intuitive and not overly complicated. I will warn people to please be careful and say that the highest I have been is 1.395v (1.37v set in this tool) and this is using an EK-FC full cover waterblock which has vrm water cooling. Not many of the blocks have this, so check before you go to far. As there is no VRM temp monitoring on a Titan, going from guys in the know, they generally say that you VRM temps are what your GPU core is + ambient temps. So if your GPU was at 50c and ambient (room temps) were 24c, that would give VRM temps of ~74c. Nothing set in stone on this and pure speculation (albeit from guys who use LN2 and bench often).
Anyways, on with the tool.
First open Afterburner and move the voltage slider to anything, so long as it isn't Auto (it could BSOD if left on Auto)
Next run the Zawarudo tool as Admin
Under GPU voltage control, set the desired volts
click Apply Voltage
Go and set your clocks in AB and click apply in the afterburner window.
You will see the voltage go to what you just set but remember that 0.025V is going on top of what you set...So 1.3V will be 1.325V effective.
There is also an easier way of fixing the vdroop with this tool and that is to choose the left or the right side (ri3 or ri4) If you use the ri3 commands, use the left side and if you use the ri4 commands, use the right side...Simples. You can also set SLI with this mod as well and again choose what side is for your commands.
And that is that in a nutshell. Please be careful and don't go mad. I will add this thread to the bottom of my sig for easy finding. Please feel free to pop onto OCN.net to give Zawarudo and Skyn3t a thanks for these great tools/mods and a little rep never hurts
Last edited:


