1930s Semi Refurb - Part 11 of ... (Summer House)

Reckon this is good for line and pins @dlockers ? Or just go the cheaper steel rebar way

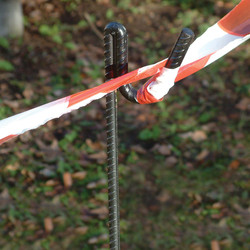
I used the steel rebar'y things. If the kit above is more expensive I'd stick to tried and true. Just make sure you go a foot or two past your structure, don't be tempted to "peg" the corner.

I saw he was suggesting polyurethane glue e.g. Below. I thought d4 caberdeck glue or similar would be preferred?


Ps which joist hangers did you use for the upside down ones for the roof... (not wanting to open that debate again!) the build pack references a toolstation part which has multiple sizes
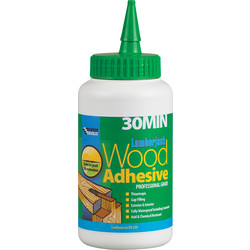
Yeah I use poly glue. I don't know the caberdeck but get what you mean RE: D4. This stuff foams up unlike any other glue I've used though.

On joist hangers I am pretty sure it is the 47x272. Wickes actually do a box of 50 which may work out cheaper.
 
P.S. Joist hangers are MISERABLE lol. You may want to rent a PPN....seriously. I am a right knuckledragger and can power through most things, but I really hated joist hangers.

A tip, because the hangers are bigger than the wood, is to use an angle grinder to cut the sides (Liam just bashes them down but he using like a 30 oz framing hammer lol). Your hands will thank you and it'll be a lot neater!
 
Ah where did you get the rebar from?.. Joist hangers for mine it says you want 112 hangers which seems like a lot...
2 per joist at 400 centres across 7meters - I think I ordered 98 or so. They soon get eaten up!

The rebar I got from my brother - but toolstation do sell them:
 
Does this price list seem reasonable to you @dlockers

I realise Im only going to PIR the floor so I think i can do half the units OF 100mm PIR

ALKnru5.jpeg
Will take a proper look in early AM but did you sign up as trade on materials market? You literally click trade and it asks for nothing.
 
Is that the 30mm twist nails? I got these on a toolstation order but 8 packs seems a lot... Are 30mm nails ok for joist hangers etc seems quite short?

Not sure what you're meant to do without a nail gun for the underside frame. I've decided against buying a nail gun as my dog hates the noise :D

Ah no I meant the nails for the nail gun. If you are screwing ignore.

Buy double the sheradized nails, they were way under stated in the build pack. You use about a pack for each splice plate pair and a load on the joist hangers.

They are fine for the roof straps
 
Does it tell you anywhere what size to screw for the floor plates? Normally I'd expect to have some nails in the floor also as screws have poor shear strength.

Maybe I'm missing it in the build pack instructions...
He doesn't use structural screws or anything, I don't think they are under that kind of load? I'd whack a bunch of 100mm's in.
 
Would 100mm not blow thru the 100mm timbers so really 60 is a better bet?

I was gonna part screw and part hand nail it. I'm an engineer by trade so tend to overdesign stuff..
The floor plate will be on the bearers which are 100, and you have 22mm of chipboard to clear, and the 2" part of the 4x2. Definitely 100 IMO, maybe 120 is pushing it.
 
Oh sorry, I'm talking about the side to side fixings on the base of the frame thru the timber joist hangers which I wasn't sure about, thus a shear load.

For the flooring I was gonna use a load of 60mm flooring screws and some 100s for the main body of the stud walls. They will all be in compression /tension with uplifting which I'm not too concerned about.
Sorry I am being a tard and still don't know what you mean!

Floor wise I used my favourite Spax screws but any normal 60mm will work.

Got a couple problems on mine....

For the 4x3 my build would needs 8 lengths and materials market said the minimum order is 20 lengths

Was it this foil type tape you said to use under the caberdeck? Then I wouldn't need additional layer of anything?
URN: 3008006

This membrane look OK? But cheaper than toolstation
I just heard they are playing games on the 4x3. Can you get them somewhere else?

Tape wise - yes but I normally but it from TS. I wouldn't bother putting anything else if you tape.
 
Day 12 -

Just isn't enough hours in the day! Managed to get the doors in - I now know heal and toe, lol. I'm not sure they are perfect but seem OK. I still need to put the gasket on the inside so fingers crossed we don't get some crazy gale force wind.

I also, finally, thank god, glued the roof and got the final roof trimmers on. It looks mighty fine. Just need to patch that final bit of OSB and then get the slate battens on. I think because of the height of the door, decking is a no brainer.

xfmzBif.jpg

for scale, the doors are 3M bi-folds by 2M high.

SU3gWAE.jpg


7hCZfzN.jpg
 
Looks good. Is it a low threshold door? What's the gap to the bottom of the frame? I'm gonna probably put some decking infront of mine also. Bought loads of spare 3x4 due to minimum quantities and a couple extra rods.

Did you order doors before finishing the studwork etc?
Yeah the door itself is pretty low, I guess it's obvious when you think about it, but it's sitting on the beam and the 22mm chipboard, plus whatever ground you had to clear with the rods. So to "floor" level it's like 8 inches I guess! The internal threshold is like 25mm or maybe? I'll take a pic as I'm working from memory.

Definitely a decking job to avoid a giant step up. Which is good as I was anticipating major ground works to lower the level lol. Seems obvious now that the deck will be door cill height.
 
Also took this pic for you, as I had a few wobbles trying to understand it. If you go rubber4roofs you get the sure edge drip trim, which isn't really discussed in the videos I could find. There is a manual kicking about somewhere and someone gave some vague advice, but this seems to have worked really well -

Basically get soffits and fascias on, trim them down with multi tool
Then attach a slate batten to gutter side
The the r4r kit includes a plastic trim that nails to this
And then the roof flops over it.

It means you can tuck the guttering right under and you'll have no chance of water missing it or splashing over it.

EkXySbm.jpeg

You'll have to zoom in!!
 
Is that an actual allotment in the image or just a neighbour's garden? Also, is that a gate from your garden into it (just behind the water but thing)
Yep - super lucky to back onto allotments (the high snobiety type). The gate is onto the allotments. The plan was my girl would go to the school just through; but annoyingly we preferred the school up the busy road :cry:

pet/peter rabbit could have fun.


you glued the membrane across the full roof surface - spent some time gluing down roofing felt yesterday glue was horribly runny
guess the roof edge is like this ? https://ukflatroofing.com/classicbond-trims/sure-edge-gutter-drip-trim-anthracite-grey
Yeah exactly that- I probably paid over the odds but got it all from Rubber4roofs. It is exactly that, and that diagram is perfect to describe the slate batten approach. Makes a big difference. Guttering will be brilliant.

And yes we play find mr mcgregor all the time on the allotment :D
 
Last edited:
Did you use D4 glue to the joists when putting your floor down, or for the roof OSB? I've seen videos of 30min glue and bought some but figure it's good to put to joists to stop creaking?
No point on the floor as you'll have a vapour barrier/silver tape down (you'll be D4ing it to tape). For the roof, I glued the OSB3 to joists.

I'm in deep trouble if those don't work as I am probably ~£200 in -
I use them every instance I take up floorboards. Touch wood, not a single creak...yet...
 
Yeah exactly -- I accidently bought 2.4x1.2 OSB3 but still whacked in loads of D4 between joints and the joists. Was walking all over it Saturday and it is solid.

Make sure you crown your roof timbers tho, I forgot, and have been pretty lucky; but if you end up using 2.4x1.2 non-T&G boards, any variance even minor will show through (as you'll be trimming to land on roof joists).

If I had my time again - assuming I got a nice square building to start from, I'd cut them to perfect length*, crown, clamp and bolt to each other (so they're perfectly flat), then toe nail/strap.

*and I'd really think about overhang, as 30cm is OK but doesn't really give you anything other than an aesthetic/place to put lights). I think next time I'd go at least 60 at the front so it's almost like a porch cover.
 
Back
Top Bottom