

You are using an out of date browser. It may not display this or other websites correctly.
You should upgrade or use an alternative browser.
You should upgrade or use an alternative browser.
1973 - MGB - Long term project :)
- Thread starter Malt_Vinegar
- Start date
More options
Thread starter's posts- Joined
- 20 Oct 2002
- Posts
- 17,254
- Location
- In a house
I did think they might cause some discussion. The colour of the seats is actually much darker than the pictures show, i think its the lighter colour thread in the weave, getting picked out by the flash in the dark environment.
Its interesting how different people view the seats. The change was far more about altering the use-ability of the car. The original seats are very poor at supporting you, and make driving enthusiastically a bit difficult. They were also very tired and in need of a serious amount of work.
The good news for purists out there, is that original seats can be dropped straight back in! Nothing structurally has been changed from the original mounting points. The seating options for the MGB are somewhat limited, as the seat area is very narrow. So you really are limited to very narrow buckets (which are really not practical), MX5, or refurbished originals. The rest of the interior is just changing colour, which was an option on the MG anyway! The carpets were very poor condition, and the interior trim panels were really showing their age.
Other benefits are that the seats now sit lower, so headroom is greater and it's much easier getting in an out I also wanted to ensure I was ready for any brake/engine/suspension upgrades later on.
Its interesting how different people view the seats. The change was far more about altering the use-ability of the car. The original seats are very poor at supporting you, and make driving enthusiastically a bit difficult. They were also very tired and in need of a serious amount of work.
The good news for purists out there, is that original seats can be dropped straight back in! Nothing structurally has been changed from the original mounting points. The seating options for the MGB are somewhat limited, as the seat area is very narrow. So you really are limited to very narrow buckets (which are really not practical), MX5, or refurbished originals. The rest of the interior is just changing colour, which was an option on the MG anyway! The carpets were very poor condition, and the interior trim panels were really showing their age.
Other benefits are that the seats now sit lower, so headroom is greater and it's much easier getting in an out
I also wanted to ensure I was ready for any brake/engine/suspension upgrades later on.- Joined
- 20 Oct 2002
- Posts
- 17,254
- Location
- In a house
Problem is the stock MX-5 seats are also rubbish at holding you in
Compared to a 40+ year old foam seat made in the midlands?
 I think the only people I have heard or seen complaining about the MX5 seats are the slightly larger variety. Not really an issue for myself and the Mrs
 ")
Soldato
- Joined
- 10 Mar 2006
- Posts
- 3,975
Nice car, seat swap is a shame though.
Agreed, the seats really don't suit it.
+1. You've changed most of the interior with changing those seats.
Associate
- Joined
- 23 Mar 2009
- Posts
- 2,014
- Location
- Peterborough
Ahhh someone else putting mx5 seats in an MGB. My step dad's just had some re-trimmed and put in his GT. He still has the originals but he's fed up of sitting in them. He's got the mx5 seats with the speakers in them however.
- Joined
- 20 Oct 2002
- Posts
- 17,254
- Location
- In a house
Ahhh someone else putting mx5 seats in an MGB. My step dad's just had some re-trimmed and put in his GT. He still has the originals but he's fed up of sitting in them. He's got the mx5 seats with the speakers in them however.
Mine also have speakers, another great plus in the MG
People tend to resort to cutting the door cards, or other interior trim to fit aftermarket speakers.So I guess the seats really are an aquired taste!! However, when I am sat in them, I really don't regret fitting them. So much more comfy and compact. The driving position is really nice, the seat rails work better, they dont creak, and most of all are not brown!
Have any of you actually sat in original MGB seats for any length of time?
There is a reason it's quite a common choice
Yeah, four hours on the original leather seats in a 1969 MGB from London to Paignton. Didn't find them that bad. I don't find the original MX-5 seats any better.
Sorry to say it but they're a common swap because people are too cheap to go for the better seats that are available. In my opinion they suit the car and I don't think they are sympathetic for the era of car they are going in.
Personally I would opt for a pair of period bucket seats, like in the MGB LE50. But this is all my opinion, and it is your car, so feel free to tell me to STFU")
Sorry to say it but they're a common swap because people are too cheap to go for the better seats that are available. In my opinion they suit the car and I don't think they are sympathetic for the era of car they are going in.
Personally I would opt for a pair of period bucket seats, like in the MGB LE50. But this is all my opinion, and it is your car, so feel free to tell me to STFU
Last edited:
- Joined
- 20 Oct 2002
- Posts
- 17,254
- Location
- In a house
Yeah, four hours on the original leather seats in a 1969 MGB from London to Paignton. Didn't find them that bad. I don't find the original MX-5 seats any better.
Sorry to say it but they're a common swap because people are too cheap to go for the better seats that are available. In my opinion they suit the car and I don't think they are sympathetic for the era of car they are going in.
Personally I would opt for a paid of period bucket seats, like in the MGB LE50. But this is all my opinion, and it is your car, so feel free to tell me to STFU
Haha, yer STFU
I did look at the period buckets, but they do not recline and have no head-rests
 So not really a viable option for me!
Will see how I get on with these once I have had a good drive in them. If I stuggle, will just flog them with the adaptor plates to find some alternatives that have recline, have speakers built in, and headrests
Soldato
- Joined
- 22 Aug 2004
- Posts
- 7,607
Mine has the normal MGB seats but they have been upgraded to leather with a headrest by a previous owner. Usually it would have had no headrest and silver coloured deck chair striped cloth.
Shame you took out the brown interior, I always thought brown and white went well together, old skool combo.
Shame you took out the brown interior, I always thought brown and white went well together, old skool combo.
Soldato
- Joined
- 18 Oct 2002
- Posts
- 8,968
- Location
- UK
Mine also have speakers, another great plus in the MG
What size though? can't imagine a 2" driver an inch from your ear would sound nice?
- Joined
- 20 Oct 2002
- Posts
- 17,254
- Location
- In a house
What size though? can't imagine a 2" driver an inch from your ear would sound nice?
I think they are little co-axials
I believe there is a nice JVC upgrade out on the MX5 parts website, not sure if i will need them to be honest. Moving from no speakers to some feels like a luxury anyway!
Last edited:
- Joined
- 20 Oct 2002
- Posts
- 17,254
- Location
- In a house
Finally got around to wiring up the seat speakers today.
I decided to split the front channel from the head unit over the two seats (as they have 2 speakers each) which means I maintain stereo in each seat. This means I can leave a second channel for some other speakers I might fit later depending on wether I want to cut the rear trim panels.
So, I trimmed the speaker leads from the iso connector, worked out which was front/rear/left/right.

Snip off the mazda plugs from the seats.

Then work out/label which cable set is which:

I then spliced the relevant channels from the seats, and ran the two wires under the centre console from the head unit, and tidied away the seat cables, and tucked it all under the console.
Done, stereo in each seat and one one channel
I decided to split the front channel from the head unit over the two seats (as they have 2 speakers each) which means I maintain stereo in each seat. This means I can leave a second channel for some other speakers I might fit later depending on wether I want to cut the rear trim panels.
So, I trimmed the speaker leads from the iso connector, worked out which was front/rear/left/right.
Snip off the mazda plugs from the seats.
Then work out/label which cable set is which:
I then spliced the relevant channels from the seats, and ran the two wires under the centre console from the head unit, and tidied away the seat cables, and tucked it all under the console.
Done, stereo in each seat and one one channel
- Joined
- 20 Oct 2002
- Posts
- 17,254
- Location
- In a house
Whilst doing the work on the speakers, i decided to fix a problem that had been bugging me a lot. The centre console was quite rattly, and it was due to the catch being broken. It had been replaced with a chunky bit of wood at some point over the last 40 years, but this was not working well any more.
Here is the hole:

and the wooden block that "fitted" in:

I had bought a replacement part some time ago, but could not fit it due to the big hole. So something had to be done. So, I cut up the nearest bit of thick black plastic I could find!:
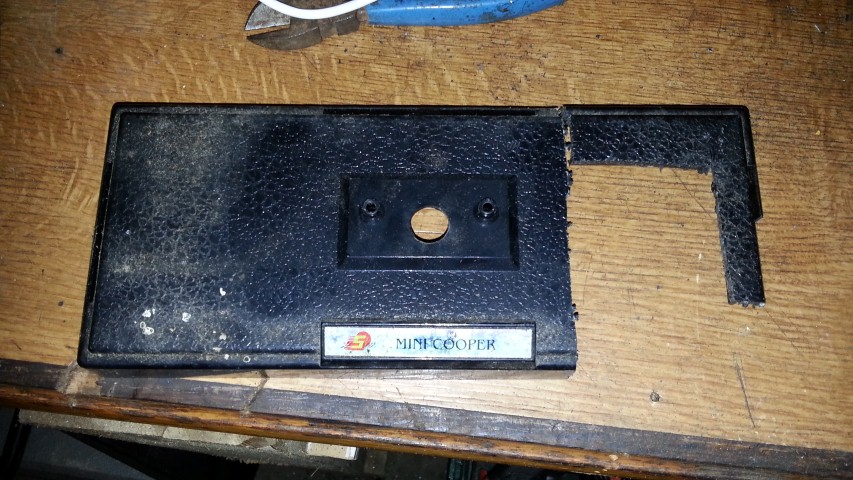
made a small hole in it, and fitted the catch, I added some screw later as it seemed glue was not cutting it:

So I removed this bit of wood, and could fit the correct bit:

Then drilled the pilot holes to fit the new catch:

Then it was all done, wanted to make it a bit smaller, but the hole was so big, and I wanted some extra plastic to drill into to stop it splitting:


Just need to file down the back edge a bit, and perhaps trim a snippet off the front edge to hide it totally. However, it cant be seen unless you get down into the footwell practically
Here is the hole:
and the wooden block that "fitted" in:
I had bought a replacement part some time ago, but could not fit it due to the big hole. So something had to be done. So, I cut up the nearest bit of thick black plastic I could find!:
made a small hole in it, and fitted the catch, I added some screw later as it seemed glue was not cutting it:
So I removed this bit of wood, and could fit the correct bit:
Then drilled the pilot holes to fit the new catch:
Then it was all done, wanted to make it a bit smaller, but the hole was so big, and I wanted some extra plastic to drill into to stop it splitting:
Just need to file down the back edge a bit, and perhaps trim a snippet off the front edge to hide it totally. However, it cant be seen unless you get down into the footwell practically
Soldato
- Joined
- 22 Aug 2004
- Posts
- 7,607
Good work, you buy the repair kits for that bit with a little metal plate. Mine has broken in the same place.
- Joined
- 20 Oct 2002
- Posts
- 17,254
- Location
- In a house
Quick update...
The car failed its MOT on the 28th of October. I knew it would but just wanted a checklist of things I needed to fix for the summer.
Brake imbalance over an axel
Battery insecure
ns headlight not working on dipped beam
main beams not working
Off side front headlight aimed too high
indicators flashing too slowly
The brake imbalance is the main issue. I have a full set of brand new front calipers, pads, discs and brake lines that arrived yesterday. I also have a rear brake refurbishment kit arriving shortly. So that will hopefully solve that issue.
I have replaced all interior and dash lights with led bulbs. Much nicer looking and brighter.
Replaced the flasher unit
Changed the headlight bulbs to newer brighter versions, then readjusted. I fixed the dipped light not working by finding a disconneted wire and rejoining it up.
Should be able to crack on with the brakes next week. Then its MOT time!
Soldato
- Joined
- 22 Aug 2004
- Posts
- 7,607
You can join my MGB LED gang now The reversing lights are good ones to change, saves a fair bit of load on the wiring. One of the nice things about MGBs is the cost of parts. It's probably cheaper to buy new calipers than faff about with the old ones
I had a bit of trouble with my front lights so I just snipped the old bullets off and wired it together. Usually it's down to getting a poor earth.
The reversing lights are good ones to change, saves a fair bit of load on the wiring. One of the nice things about MGBs is the cost of parts. It's probably cheaper to buy new calipers than faff about with the old ones I had a bit of trouble with my front lights so I just snipped the old bullets off and wired it together. Usually it's down to getting a poor earth.
- Joined
- 20 Oct 2002
- Posts
- 17,254
- Location
- In a house
I wanted to do the sidelights, and other bulbs too. But wanted to check that I had solved the wiring issues before I started to fiddle too much with the lighting.
I was very worried about the headlights doing odd things, but after pulling them out, and tracing the wires (helped by the bentley manual I received as a secret santa) I figured out I had accidentally snipped a wire for the NS dipped beam when I ripped out the add-on spot lights that were badly wired in.
I though I had blown something when I was fitting the led gauge bulbs, as they all went off when fitting the final one. Turns out I had turned down the brightness rheostat by accident whilst I was scrabbling around in the footwell.. Left me scratching my head for a while. Not helped by the fact I had also managed to install the LED interior bulbs backwards, forgetting they were polarity dependant, unlike the original bulbs... I thought I had created a major electrical problem somewhere along the line, but was even more worried as all the fuses were fine?!
Still, got there in the end.
The modern H4 bulbs make a huge different to the headlight colour and really seems to throw a lot more light on the wall in the garage. This might just be down to the higher kelvin value, but I like the look. Just need to get the side-lights done now, as they look very yellow in comparison.
I am going to replace a lot of the old wiring where I can. You are right, a lot of the problems are just down to the ageing connections
Soldato
- Joined
- 22 Aug 2004
- Posts
- 7,607
One time I popped to petrol station at night and when I came to turn my lights back on the front ones had stopped working and both indicators were on solid
I replaced all my interior lights apart from the alternator one which is part of the circuit and so far externally, my number plate lights and both reversing lights. I think it's probably saved around 6 amps of load, which is a good amount on tired old wiring.
When I did my rocker switches I had to swap the lighting spade terminals round to account for the polarity too. The dials were all ok.
I had a wire burn out on the fuel pump due to a poor earth so I've got some earths connected to the rear boot catch.