Corsair Carbide Air 540 Builds

Hmmm don't see how you could have done that? Need more pictures :D

Oh and what did you do with the left over cable?

Hello again. I started from the right bottom and went left all away around the case and was back where I started and had 30 or so cm left and put that in where I started on the bottom right side in the front area. I can't see it,but does light up well. Have you tried to take off fan then put light's up. Put fan back and see if it fits?
 
Last edited:
I've got 3 monitors too. Not that pleased with them though as they don't have display ports, which means I need dual link DVI cables. AMD however don't like DVI cables and seem to assume that everyone has DisplayPort monitors. So it'd cost me £150+ in adaptors if I went with AMD cards (which I'd sort of like to do). My monitors only cost £150-ish!
They also don't really do 3D with Nvidia cards.

That's the other thing with this case though, I've got mine tucked away under the desk, but if you had it on the desk you'd need to have a big desk to fit 3 monitors too. The 540 has a bigger than normal footprint, although I'd be surprised if the extra width was the deciding factor when deciding on 3 monitors.

Also, I found I don't like gaming on 3 monitors, everything is too stretched.

My desk is big and can fit 2 monitors,but I'm not going to do that. My case and monitor fit great on top of desk.
 
Hello again. I started from the right bottom and went left all away around the case and was back where I started and had 30 or so cm left and put that in where I started on the bottom right side in the front area. I can't see it,but does light up well. Have you tried to take off fan then put light's up. Put fan back and see if it fits?

The led cable goes over the screw holes so impossible. :(
 
Done it. Just had to take fan and put it behind. Not ideal but only way. Chuffed with the rear. The controller fits in great in the bays!

BFB514D9-F085-49A7-9698-ECAB27AA0CBC-14509-000003BE46854041_zps8d33260c.jpg
 
Try have to have more intake than exhaust to get static pressure; will help with temps and keeping dust out... but you probably already knew that right ;)

That case has got some serious room in there! Hurry and fill it with gpus! :D
 
And how quiet is it with that setup ?


it was not quiet, but i have scrapped push/pull for now, i have my 2 H100i fans plugged into the MB directly.
the H100i only plugged into Sata for power.

Using "Asus Fan xpert 2" to control all my fans.
at idle / none gaming its very quiet.
I have not overclocked yet but i plan to do so over the next week.
 
Why did Corsair go with a removable rear 120mm fan grill? This makes it difficult to use rubber fan mounts.

i found it was the corner of the case which got in the way when installing an af140.

and i would guess that the fan guard like that, has a lot less resistance than the normal honeycomb stuff.
 
Well on Sunday finally gathered the willpower to try and get the build somewhat done after realizing on Thursday that it wasn't quite going to be the plug and play effort I was hoping for.
Installed are a 280 SR1 and an old 240 Black ice GT Stealth, Swiftech XT rev.1 and a 10w and 18w ddc in the back.


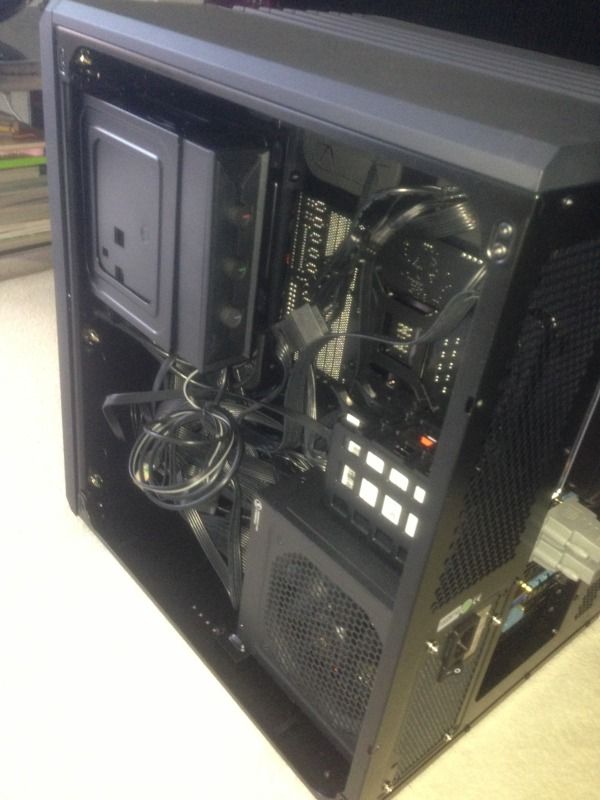
Easing you in with a pic of the snake nest in the back. I made a cursory attempt at some cable management. Current hideous fan controller in the back for now to keep a cleaner outside.
T1Em5bKl.jpg

To give some idea of the clearance tolerances, and why I really wish that they had put an extra inch in every direction. Imagine the endless possibilities!
3tVAX3bl.jpg

This was a tight fit, the fan and vga jack are for all intent and purposes touching. I installed the board with the fan in place -had to have the protector panel sitting on the board as I slid it in rather than clipped in place ready- so couldn't access the screws and am too lazy to anything about that atm.
z4YXsNfl.jpg

Semi finalized build but up and running for now. Slipped another 120 fan in the front for some extra fresh air feed. There is space for a push/pull on the front rad but for now just installed some fan grills to help protect the rad fins. May ecen move the fans to the other side to see what the affect on fan noise is. (My experience of pulling fans is that in some scenarios the sound can be awfull).Not sure what I'm doing with the rear fan mount, may have it as intake.
qZ690cel.jpg

And with the acrylic window.
WLDQ55ml.jpg

5lQJBfLl.jpg

EM1iGOIl.jpg
I am so close to ordering the new xspc photon res which would add a touch of light and colour and would beautify things a little.

This is how it is for now (awaiting res and may re-add vga block). I did have the gpu watercooled in my old case but am unsure if I will keep or sell the card for now.
My old acrylic res is also a bit on the battered side and I intend to replace it soon. The res would be placed where the black 90deg fitting currently sits in the bottom left and would incorporate the drain port. Incidentally I got to relive my hate for T lines in this build.
Got a few more pics so may create a mini buildlog later when I get around to it (loads of photos but going through them quickly not actually the ones I wanted!)


Overall as I mentioned in my previous post quite pleased with the case. There are a few changes that could be made to really make this a more configurable watercooling case, but happy with the look, the build quality is good (for high and low reference my two previous cases have been a Lianli A70 and a Xigmatec Elysium).
 
This is how it is for now (awaiting res and may re-add vga block). I did have the gpu watercooled in my old case but am unsure if I will keep or sell the card for now.
My old acrylic res is also a bit on the battered side and I intend to replace it soon. The res would be placed where the black 90deg fitting currently sits in the bottom left and would incorporate the drain port. Incidentally I got to relive my hate for T lines in this build.
Got a few more pics so may create a mini buildlog later when I get around to it (loads of photos but going through them quickly not actually the ones I wanted!)
 
Back
Top Bottom